1
www.AromaCo.com
ARC-856
Arrocera y vaporera
Sensor Logic™
de 6 Tazas
Manual de instrucciones
Instruction Manual
6-Cup Sensor Logic™
Rice Cooker and Food
Steamer
www.AromaCo.com
ARC-856
6-Cup Digital Rice Cooker
Aroma Housewares Co.
6469 Flanders Drive
San Diego, CA 92121
U.S.A.
1-800-276-6286
www.aromaco.com
Aroma has master the art of cooking perfect, fluffy rice, so you don’t have to.
Just add rice, water and turn the rice cooker on. The machine will automatically
switch to warming mode when the rice is done. It also comes equipped with
pre-programmed functions to prepare soup, porridge and slow cooked meals in
addition to functions for white, sushi and brown rice.
© 2007 Aroma Housewares Company. Todos los derechos reservados.
Congratulations on your purchase of the
and Food Steamer.
The specialized brown rice function easily prepares tough-to-cook brown rice at
the touch of a button. Now you can enjoy the great taste and nutritional
benefits of brown rice, without the hassles of traditional preparation methods.
This rice cooker also comes equipped with a steam tray. Ideal for preparing
nutritious, well-balanced meals, steaming locks in food’s natural flavor, moisture
and nutrients without the use of added oils or fats. Included in this instruction
manual is a handy steaming reference to guide you through the preparation of
nearly all your favorite vegetables and meats. Steam vegetables or meat while
simultaneously cooking rice to make a complete, healthy meal with ease in your
rice cooker!
Publicado Por:
This manual contains instructions for the use of your new rice cooker as well as
some additional information about rice. For recipe suggestions or more kitchen
solution ideas, please visit us online at www.AromaCo.com.
Please read all the instructions before first use.
Aquí en Aroma hemos dominado el arte de cocinar arroz esponjoso y perfecto
con solo un botón para que usted no haga el trabajo. Con la arrocera de
Aroma, cocinar termina automáticamente y cambia al modo de "keep warm,"
para que no tenga que mirar al reloj o preocuparse por sobrecocinar su arroz.
Este aparato versátil también vapora verduras, carne y pescado y aún cocina
sopas y caldos. Tiene funciones programadas para arroz blanco, arroz para
sushi y arroz integral! El programa para arroz integral hace fácil su cocimiento, lo
cual usualmente sea muy duro.
¡Felicitaciones en su compra de
Arrocera y Vaporera de 6 tazas!
© 2007 Aroma Housewares Company All rights reserved.
Se incluye también una charola para cocinar al vapor. Ideal para preparar
comida nutritiva y equilibrada, el método de vaporar mantiene el sabor, la
frescura y los nutrientes de su comida sin el uso de grasa o aceite.
Aroma Housewares Co.
6469 Flanders Drive
San Diego, CA 92121
U.S.A.
1-800-276-6286
www.aromaco.com
Este manual contiene instrucciones sobre como usar su nueva arrocera y alguna
información adicional sobre el arroz. Para consejos sobre recetas o ideas para
nuevos aparatos para su hogar, por favor visítanos en línea en
www.AromaCo.com.
Published By:
1
SAVE THESE INSTRUCTIONS
13. Extreme caution must be used when
moving the appliance containing
hot water or other liquids.
14. Do not touch, cover or obstruct the
steam valve on the top of the rice
cooker as it is extremely hot and
may cause scalding.
15. Use only with a 120V AC power
outlet.
16. Always unplug from the base of the
wall outlet. Never pull on the cord.
17. The rice cooker should be operated
on a separate electrical circuit from
other operating appliances. If the
electrical circuit is overloaded with
other appliances, the appliance
may not operate properly.
18. Always make sure the outside of the
inner cooking pot is dry prior to use.
If cooking pot is returned to cooker
when wet, it may damage or cause
the product to malfunction.
19. Use extreme caution when opening
the lid during or after cooking. Hot
steam will escape and may cause
burns.
20. Rice should not be left in the rice pot
with the keep warm function on for
more than 12 hours.
21. To prevent damage or deformation,
do not use the inner pot on a
stovetop or burner.
22. To disconnect, turn any control to
“OFF”, then remove plug from wall
outlet.
23. To reduce the risk of electrical shock,
cook only in the provided
removable container.
Important: Read all instructions
carefully before first use.
2. Do not touch hot surfaces. Use the
handles or knobs.
3. Use only on a level, dry and heatresistant surface.
4. To protect against electrical shock,
do not immerse cord, plug or the
appliance in water or any other
liquid.
5. Close supervision is necessary when
the appliance is used by or near
children.
6. Unplug from outlet when not in use
and before cleaning. Allow unit to
cool before putting on or taking off
parts, and before cleaning the
appliance.
7. Do not operate any appliance with
a damaged cord or plug or after
the appliance malfunctions or has
been damaged in any manner.
Return the appliance to the nearest
authorized service facility for
examination, repair or adjustment.
8. The use of accessory attachments
not recommended by the
appliance manufacturer may result
in fire, electrical shock or injury.
9. Do not use outdoors.
10. Do not let cord touch hot surfaces
or hang over the edge of a counter
or table.
11. Do not place on or near a hot
burner or in a heated oven.
12. Do not use the appliance for other
that its intended use.
1.
Basic safety precautions should always be followed when using electrical
appliances, including the following:
IMPORTANT SAFEGUARDS
MEDIDAS IMPORTANTES DE SEGURIDAD
Cuando se usen aparatos electricos, siempre deberán observarse las
precauciones básicas de seguridad, incluyendo las siguientes:
1. Importante: Lea cuidadosamente
14. Durante la etapa de cocimiento,
todas las instrucciones de
podrá observar vapor saliendo de
seguridad antes de comenzar a
las ventanillas sobre las tapas. Esto
usar el aparato por primera vez.
es normal. No cubra, toque ni
2. No toque las superficies calientes.
obstruya la ventanilla de vapor.
Utilice para ello los mangos o las
15. Úsese únicamente con una
perillas.
tomacorriente AC de 120V.
3. Use el aparato sobre una
16. Siempre desconecte desde la base
superficie nivelada, seca y
de la tomacorriente de la pared.
resistente al calor.
Nunca jale del cordón.
4. Para protegerse y evitar un
17. La olla arrocera deberá operarse
choque eléctrico, no sumerja en
en un circuito eléctrico separado
agua o en cualquier otro líquido
de otros aparatos que estén
el cordón, la clavija o el aparato
funcionando. Si el circuito
mismo.
eléctrico se sobrecarga con otros
5. Mantenga el aparato fuera del
aparatos, puede ser que esta
alcance de los niños para evitar
unidad no funcione
accidentes.
adecuadamente.
6. Asegúrese de que el aparato esté
18. Asegúrese siempre de que la
apagado OFF, cuando no se esté
cacerola para cocinar interna
usando, antes de ponerle o
esté seca por la parte de afuera
quitarle partes y antes de
antes de usarla. Si la cacerola
limpiarlo.
para cocinar se mete húmeda en
7. No ponga a funcionar ningún
la olla arrocera, esto dañará al
aparato si el cordón eléctrico o la
producto, ocasionando que no
clavija de enchufe están dañados o
funcione bien.
si la unidad no funciona bien o si se
19. Recomendamos que se tomen
ha dañado de alguna manera.
precauciones extremas al abrir la
Regrese el aparato a la agencia de
tapa durante el tiempo que
servicio autorizada más cercana,
cocine o después de haber
para revisión, reparación o ajuste.
cocinado, ya que el vapor
8. No utilice aditamentos o
caliente escapará de la olla y
accesorios que no sean surtidos o
esto podría ocasionar
recomendados por el fabricante.
quemaduras.
Las partes incompatibles crean un
20. El arroz no debe permanecer
peligro.
dentro de la olla de arroz con la
9. No se use en exteriores.
función de "mantener caliente"
10. No deje que el cordón cuelgue
por más de 12 horas.
sobre la orilla de la mesa o del
21. Para evitar daños o
mostrador ni toque las superficies
deformaciones, no use la olla
calientes.
interna sobre una estufa o
11. No coloque el aparato sobre o
quemador.
cerca de una rejilla de gas o
22. Antes de retirar el enchufe de la
eléctrica encendidas ni dentro de
toma de corriente eléctrica de la
un horno caliente.
pared, asegúrese de que el
12. No utilice el aparato para otro uso
aparato haya sido apagado.
que no sea el indicado.
23. Para reducir el riesgo de incendio
13. Se deberán tomar precauciones
o choque eléctrico, cocina
extremas al mover el aparato
recipiente interior.
cuando contenga arroz u otros
líquidos calientes.
GUARDE ESTAS INSTRUCCIONES
1
INSTRUCCIONES DE CABLE CORTO
1. Se proporciona un cable eléctrico corto con el propósito de reducir el
riesgo de tropezarse o enredarse con un cable más largo.
2. Hay cables de extensión más largos disponibles y deben ser usados con
sumo cuidado.
3. Si se usa un cable de extensión más largo:
a. La clasificación eléctrica marcada en el cable de extensión debe ser
por lo menos igual que la clasificación eléctrica del aparato.
b. El cable más largo debe ser colocado de manera que no cuelguepor
el borde del mostrador o mesa en donde pudiera ser jalado por un
niño o alguien pudiera tropezarse con el cable sin querer.
¡NO DEJE QUE EL CABLE
CUELGUE!
2
This appliance is for household use only.
If the supply cord is damaged, it must be replaced by the manufacturer, its
service agent or a similarly qualified person in order to avoid a hazard.
To reduce the risk of electric shock, this plug is intended to fit into a polarized
outlet only one way. If the plug does not fit fully into the outlet, reverse the
plug. If it still does not fit, contact a qualified electrician. Do not attempt to
modify the plug in any way.
This appliance has a polarized plug (one blade is wider than the other); follow
the instructions below:
POLARIZED PLUG
KEEP AWAY
FROM CHILDREN!
¡MANTÉNGALO
LEJOS DE LOS
NIÑOS!
PLOYA POLARIZADA
Si este aparato tiene ploya polarizada:
Para reducir el riesgo de descarga eléctrica, este ploya intencionalmente solo
debe de enchufar un lado en enchufes de luz de ploya polarisada. Si la clavija
no entra completamente, da vuelta a la clavija. Si aun la clavija no puede
entrar, llame a un electricista calificada. No intente de modificar la clavija, es
muy peligroso.
Si esté estropeado el cordón eléctrico, hay que ser reemplazado por el
fabricante o su agencia de servicio u otra persona calificada para hacer que se
evita cualquier peligro.
ESTE APARATO ES PARA USO DOMÉSTICO.
2
DO NOT DRAPE CORD!
1. A short power-supply cord is provided to reduce the risks resulting from
becoming entangled in or tripping over a longer cord.
2. Longer extension cords are available and may be used if care is exercised in
their use.
3. If a longer extension cord is used:
a. The marked electrical rating of the extension cord should be at least as
great as the electrical rating of the appliance.
b. The longer cord should be arranged so that it will not drape over the
counter top or tabletop where it can be pulled by children or tripped over
unintentionally.
SHORT CORD INSTRUCTIONS
3
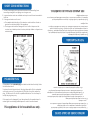
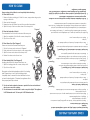
Measuring Cup
Steam Tray
IDENTIFICACION DE LAS PARTES
Botón para Abrir
Spoon Holder Diagram
Inner Pot
Spoon
"Delay Timer"
button
Timer (hrs)
Panel de
Control
"Delay Timer"
indicator
Soup Ladle
Spoon Shelf
Accessories
"Warm/Off"
button
Warm
Off
Abertura
removible
Tapa
Caja
Exterior
Soporte
para
Utensilios
Delay
Timer
"Menu"
button
"Warm/Off"
indicator
White Brown Sushi
Rice Rice
Menu
"Start"
button
Base
steam/cook
MIN
HR
1 hour
porridge/soup
2 hour
slow cook
Start
"Start" indicator
LCD display
Pantalla
LCD
1 hour
porridge/soup
2 hour
slow cook
Tecla
del
"Menú"
Base
Spoon Shelf
Control Panel
Cooker Body
Cover Button
MIN
HR
Start
steam/cook
White Brown Sushi
Rice Rice
Menu
Luz
Indicadora
para
“Demorar
Tiempo”
Warm
Off
Delay
Timer
Tecla de “Demorar
Tiempo”
Diagrama de
instalación para el
sostén del cucharón
Cover
Tiempo
Recipiente Interior
Paleta para
Arroz
Luz Indicadora
para “Inicio”
Tecla de
“Inicio”
Luz Indicadora para
“Calentar/Apagar”
Tecla para
“Calentar/Apagar”
Accessorios
Cucharón
para Sopa
Taza para Medir
Steam Valve
PARTS IDENTIFICATION
Soporte para
Utensilios
Vaporera
3
COMO USAR EL APARATO
Antes de usarla por primera vez:
1.
2.
3.
4.
5.
6.
7.
Lea todas las instrucciones y medidas importantes de seguridad.
Retire todos los materiales de empaque y asegúrese de que los artículos se reciban en
buenas condiciones.
Rompa todas las bolsas de plástico, ya que pueden representar un riesgo para los niños.
Lave los accesorios y la tapadera de vidrio con agua tibia y jabón. Enjuáguelos y séquelos
completamente.
Saque la olla interior de la olla arrocera y lávela con agua tibia y jabón. Enjuáguela y
séquela totalmente antes de volverla a poner dentro de la olla.
Limpie el cuerpo de la olla con una toalla húmeda.
Limpie la válvula de vapor. Vea la página 12 para instrucciones detalladas.
• No utilice limpiadores abrasivos ni fibras para tallar.
• En ningún momento sumerja en agua o algún otro líquido, la base de la olla arrocera o el
cordón ni la clavija.
Para cocinar arroz:
1. Usando la taza de medir proporcionada, mida la cantidad deseada de arroz. Una taza
equivale a una taza completa marcada en el nivel. La taza de medir incluida es de 180
mL y no iguala a una taza estándar (U.S. cup).
2. Enjuague el arroz en un colador u otro contenedor separado (no enjuague el arroz en la
olla interna) hasta que el agua se convierta relativamente clara. Ponga el arroz enjuagado
en la olla interna.
3. Usando la taza para medir incluida o las líneas de para medir dentro de la olla interna,
agregue la cantidad apropiada de agua en la olla interna. Una guía muy útil para medir
agua y arroz está incluida en la página 8. Nivele la superficie de arroz en la olla con la
espátula para que así pueda tener una cocción uniforme.
Consejo: Para obtener un arroz mas blando remoje el arroz por 10-20 minutos antes de iniciar el
ciclo de cocción.
4. Ponga la olla interna en la arrocera. Ponga la tapadera, asegurándose que esté en su
lugar, y enchufe el cable a la toma de corriente en la pared.
5. Presione el botón de Menu hasta que su selección aparece en la pantalla digital. Escoge
entre arroz blanco (White rice), arroz de sushi (sushi) o arroz integral (brown rice).
Oprima el botón de inicio (Start). El foco indicador se encenderá.
6.
7.
Cuando el ciclo de cocción acerca a la terminación, una cuenta descendiente
aparecerá en el indicador digital para contar abajo de los últimos 12 minutos. Una vez
que la cuenta descendiente alcance 0, el ciclo se ha acabado.
8. Una vez terminado el cocimiento, la arrocera cambiará al modo de calentamiento y el foco
indicador “warm” se encenderá. Deje reposar el arroz de 5 a 10 minutos, sin destapar. Esto
asegurará que el arroz quede bien cocido.
9. La arrocera se quedará en el modo de calentamiento hasta que se desconecte el
enchufe de la tomacorriente y la pantalla digital mostrará cuantas horas la comida ha
sido calentando. Desconecte la olla arrocera una vez que termine el cocimiento.
* Es muy importante que la olla interior esté completamente limpia y seca antes de que
se coloque en el cuerpo de la arrocera. La presencia de agua u otras sustancias en la
superficie exterior de la olla puede causar que este aparato malfuncione.
4
* It is important that the outside surface of the inner pot is completely clean and dry
before it is placed into the rice cooker. Water, food, or other substances on the pot will
come into contact with the heating element and may cause damage to the product.
Using the measuring cup provided, measure out the desired amount of rice. One
cup refers to one full, level cup. The measuring cup provided adheres to rice
industry standards (180mL) and is not equal to one U.S. cup.
2. Rinse rice in a mesh strainer or other separate container (do not rinse rice in the
inner pot) until the water becomes relatively clear. Drain; then place rinsed rice
into the inner pot.
3. Using the measuring cup provided or the measurement lines inside the inner
pot, add the appropriate amount of water to the inner pot. A helpful rice/water
measurement guide is included on page 8. Smooth over the top of the rice with
the rice paddle so that rice surface is level to ensure even cooking.
TIP: For softer rice, allow the rice to soak for 10-20 minutes prior to beginning the
cooking cycle.
4. Place the inner pot in the rice cooker. Close the lid, making sure that it locks into
place, and plug power cord into a wall outlet. The ‘START’ light will flash.
5. Press the “MENU” button until the arrow is pointing to the desired setting.
Choose from white rice, brown rice, or sushi rice.
6. Press “START” button. The indicator light will illuminate.
7. As the cook cycle nears completion, a countdown will appear on the digital
display to count down the last 12 minutes. Once the countdown reaches 0,
the rice is finished cooking.
8. After cooking, the rice cooker will automatically switch to keep-warm mode and
the WARM indicator light will illuminate. Allow rice to stand on keep-warm mode
for 5-10 minutes without removing the lid. This will ensure that the rice is cooked
thoroughly.
9. The rice cooker will remain in warm mode until it is unplugged and the digital
display will indicate the number of hours rice has been warming. Unplug the cord
from the wall outlet when not in use.
1.
To Cook Rice:
1. Read all instructions and important safeguards.
2. Remove all packaging materials and make sure items are received in good
condition.
3. Tear up all plastic bags as they can pose a risk to children.
4. Wash lid and accessories in warm, soapy water. Rinse and dry thoroughly.
5. Remove inner pot from rice cooker and clean with warm, soapy water. Rinse and
dry thoroughly before returning to cooker.
6. Wipe body clean with a damp cloth.
7. Wash the steam vent. See page 12 for detailed instructions.
• Do not use abrasive cleaners or scouring pads.
• Do not immerse the rice cooker base, cord or plug in water at any time.
Before First Use:
USING YOUR RICE COOKER
5
COMO USAR SU APARATO
Programas especializadas para el arroz:
Programa para arroz blanco es el método típico para cocinar el arroz, puesto
que el arroz blanco es la variedad más común. El arroz será cocinado hasta
que se absorbe toda la agua y todo el se deja que es el arroz delicioso y
mullido.
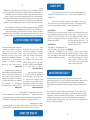
NOTE
When the delay timer function is not active, the digital display will show
two dashes (see illustration below). It does not countdown for any other
function.
1. Press “MENU” to select ‘White Rice’, ‘Brown Rice’ or ‘Sushi’. For health and
safety reasons, the delay timer will only work with these three functions.
2. Press “DELAY TIMER.” Select the number of hours within which you would like
your cooking to finish by pressing the “+” button to add one hour or “-” button
to subtract one hour (1 to 15 hours).
3. Press the “START” button.
4. In the last few minutes of the cooking cycle, the digital display will show a
countdown to advise you approximately how many minutes are left until the
rice will be finished.
5. Rice cooker will automatically switch to warm mode when complete. The
digital display will indicate the number of hours rice has been warming.
6. Press “WARM/OFF” to turn off the rice cooker after using. Always unplug the
unit when not in use.
To Use the Delay Timer:
Sushi Rice Function is a shorter cooking cycle which gives the rice a firmer
texture. The best variety of rice to use is Pearl Rice (see About Rice on page 13).
Once cooked, sushi rice needs to be mixed with a rice vinegar mixture which
makes it ‘sticky’ enough to hold together a sushi roll.
Brown Rice Function is ideal for tough to cook, yet extremely nutritious brown
rice. The brown rice is soaked for 20-30 minutes prior to cooking to allow the
water to soak through its extra bran layers. The rice then cooks at a lower heat
for a longer time, which ensures that it turns out light, moist and tender.
Programa para arroz integral es ideal para el arroz integral, lo cual es más difícil
cocinar pero mucho más nutritivo también. El arroz integral se empapa por 20-30
minutos antes de cocinar para permitir que el agua empape con sus capas
adicionales del salvado. Entonces, el arroz cocina en un calor más bajo por una
época más larga, que se asegura de que un resultado húmedo y suave.
Programa para arroz ‘sushi’ es un ciclo de cocinar más corto que da al arroz una
Acerca del arroz en la página 13). Una vez que esté cocinado, el arroz ‘sushi’
necesite ser mezclado con una mezcla del vinagre del arroz que lo hace
bastante viscoso para hacer un rollo de sushi.
Para usar el temporizador programado:
1. Oprima el botón “MENU” hasta que la flecha indica a arroz blanco (White rice),
arroz integral (Brown rice), o arroz de sushi (Sushi). Para razones de salud el
temporizador programado solo funciona con estas tres funciones.
2. Oprima el botón del temporizador programado (DELAY TIMER). Seleccione el
número de horas en lo cual desee que el cocimiento sea terminado (1 to 15
horas).
3. Oprima el botón de inicio (START).
4. En los últimos minutos del ciclo de cocimiento, la pantalla digital se muestra
aproximadamente cuantos minutos se quedan en el ciclo.
5. Una vez terminado el cocimiento, la arrocera cambiará al modo de
calentamiento y el foco indicador ‘warm’ se encenderá. La pantalla digital
mostrará cuantas horas el arroz ha sido calentando.
6. Oprima el botón “WARM/OFF” para apagar la arrocera. Siempre desenchufe
la arrocera cuando no la está usando.
NOTA
Cuando no se use el temporizador programado, la pantalla digital se
mostrará dos líneas (vea el dibujo de abajo). No cuenta atrás para ninguna
otra función.
White Rice Function is the typical method for cooking rice, since white rice is the
most common variety. Rice will be cooked until all water is absorbed and all that
is left is delicious, fluffy rice.
Rice Functions:
USING YOUR RICE COOKER
5
GUIAS DE COCCION
Para cocer alimentos al vapor:
1. Para cocinar al vapor sin cocer arroz, agregue la cantidad de agua deseada a
la olla interior. En las páginas 10 (vegetales) y 11 (carnes) aparece unas guías
útiles para cocer al vapor.
2. Coloque los alimentos en la charola, si es que caben allí, o póngalos en un
tazón a prueba de calor y luego coloque el tazón en la charola dentro de la
olla arrocera.
3. Asegúrese de que la superficie exterior de la olla está completamente seca y
limpia. Coloque la olla interior con la charola de vapor en el cuerpo de la
arrocera. Cierre la tapa y conecte el enchufe a la tomacorriente.
4. Presione el botón de “MENU” hasta que la flecha indique al modo de cocinar
al vapor (Steam/Cook). Oprima el botón de inicio (Start).
5. Cuando haya terminado el cocimiento al vapor, la arrocera cambiará
automáticamente al modo de calentamiento ("warm"). Se recomienda que no
deje los alimentos en el modo de calentamiento más de 5 a 10 minutos para
evitar que se sobrecuezan. La pantalla digital mostrará cuantas horas la
comida ha estado en el modo de calentamiento.
6. La arrocera permanecerá al modo de calentamiento hasta que el enchufe sea
desconectado de la tomacorriente. Siempre desenchufe la arrocera después
de usarla.
Para instrucciones de cocinar arroz y vaporar simultáneamente, vea a la pógina 7.
¿Tengas prisa?
La función de “steam/cook” puede ser utilizado como modo rápido de cocción
para el arroz. Esto renunciará el ciclo de remojo, ahorrando una cantidad de
tiempo significativa. Sin embargo, recomendamos solamente usarlo si el tiempo
está de la esencia. El arroz producido por cocinar rápido no estará casi como
bueno como si el ciclo completo fuera utilizado.
Para cocinar sopas y caldos:
1. Agregue los ingredientes a la olla interior y colóquela en el cuerpo.
2. Oprima el botón “MENU” hasta que la flecha indique a cocinar sopas (1-hour
porridge/soup). Oprima el botón de inicio (Start).
3. El calor se levantará para traer los ingredientes a ebullición, después reduce
rápidamente el calor al punto bajo. El calor será mantenido por 1 hora.
4. Una vez termidao el cocimiento, la arrocera cambiará al modo de
calentamiento y el foco indicador ‘warm’ se encenderá.
5. Oprima el botón “WARM/OFF” para apagar la arrocera. Siempre desenchufe
la arrocera cuando no la está usando.
Para cocción lenta:
1. Agregue los ingredientes a la olla interior y colóquela en el cuerpo.
2. Oprima el botón “MENU” hasta que la flecha indique a cocción lenta (2-hour
slow cook). Oprima el botón de inicio (Start).
3. El calor se levantará para traer los ingredientes a ebullición, después reduce
rápidamente el calor al punto bajo. El calor será mantenido por 2 horas.
Short on time?
6
6
3. Heat will rapidly rise to bring ingredients to a boil, then reduce to low. Heat will be
maintained for 2 hours. Continued on next page.
1. Add ingredients to inner pot, and place pot in rice cooker. Close the lid.
2. Press the “MENU” button until the arrow is pointing to 2-hour slow cook. Press
the “START” button.
To Slow Cook:
1. Add ingredients to inner pot, and place pot in rice cooker. Close the lid.
2. Press the “MENU” button until the arrow is pointing to 1-hour porridge/soup.
Press the “START” button.
3. Heat will rapidly rise to bring ingredients to a boil, then reduce to low. Heat
will be maintained for 1 hour.
4. Cooker will automatically switch to keep warm mode when complete. The
digital display will indicate the number of hours food has been warming.
5. Press “WARM/OFF” to turn the rice cooker off. Always unplug the rice cooker
when not in use.
To Cook Porridge, Soups and Stews:
The steam/cook function can be used as a quick cook mode for your rice. This
will forego the soaking cycle, saving a significant amount of time. However, we
only recommend doing this if time is of the essence. The rice produced by quick
cooking will not be nearly as good as if the full, proper rice cycle was used.
1. When steaming only, add the appropriate amount of water to the inner pot
according to the food to be cooked. A convenient steaming guide has been
provided on page 10 for vegetables and page 11 for meats.
2. Place food into the steam tray. Smaller foods may be placed in a heat-proof
dish and then placed into the steam tray.
3. Set the inner pot into the body of the rice cooker, making sure that the exterior
is clean and completely dry, then place the steam tray into the inner pot.
Close the lid and plug the power cord into a wall outlet.
4. Press the “MENU” button until the arrow points to the “STEAM/COOK” setting.
Press the “START” button.
5. When food has steamed for the appropriate time, press the “OFF” button.
When the water in the inner pot has boiled off, the rice cooker will
automatically switch to “WARM” mode. Exercise caution when opening the
lid and removing the steam tray and wear protective kitchen mitts to avoid
burns. The digital display will indicate the number of hours food has warmed.
6. The rice cooker will remain on “WARM” mode until it is unplugged. Always
unplug the rice cooker when not in use.
FOR INSTRUCTIONS ON COOKING RICE AND
STEAMING SIMULTANEOUSLY, REFER TO PAGE 7.
To Steam Food:
USING YOUR RICE COOKER
7
NOTE
It is possible to steam at any point during the rice cooking cycle. However, it is
recommended that you steam during the end of the cycle so that steamed food
does not become cold or soggy before the rice is ready.
1. Begin cooking the desired amount of rice. See “To Cook Rice” on page 4 for
detailed instructions. Do not attempt to cook more than 4 cups (uncooked) of rice
if trying to use the steam tray simultaneously, or the steam tray will not fit.
2. Place the inner pot into the unit, close the lid and press “START”.
3. Refer to the steaming guides for vegetables (page 10) or meat (page 11) for
hints and approximate steaming times. It is best to insert the food to be steamed
toward the end of the rice cooking cycle so that your meal is fresh and warm all at
once.
4. Place your choice of vegetables or meat into the steam tray. Open the lid,
using caution as steam escaping will be extremely hot, and place steam tray into
the rice cooker.
5. Close the lid and allow the cooker to resume cooking.
6. Once food has been steamed for the appropriate time, open the lid. Use
caution when opening lid as steam escaping will be extremely hot. Remove
the steam tray and check food to be sure it has been thoroughly cooked.
Exercise caution when removing the steam tray as well; it will be hot.
7. Close the lid of the rice cooker and allow rice to continue to cook until finished.
The unit will chime when rice is ready and switch to keep warm mode. The digital
display will indicate the number of hours food has been warming.
8. Press “WARM/OFF” to turn off the rice cooker. Always unplug the rice cooker when
not in use.
CAUTION:
• Use caution when opening lid as steam escaping will be extremely hot.
• If cooking pot is returned to cooker when wet it will damage this product, causing it
to malfunction.
One of the most convenient features of this rice cooker is the ability to both cook rice
and steam food simultaneously, ideal for creating delicious all-in-one meals.
To Steam Food And Cook Rice Simultaneously
Although the rice cooker automatically switches to warm mode after cooking finishes,
you may also use this function independently to keep a meal warm for serving.
1. Add food to be warmed to inner pot and place in the rice cooker. Close the lid.
2. Press “WARM/OFF” button until the indicator light illuminates.
3. The digital display will indicate the number of hours food has been warming.
4. Press “WARM/OFF” button until the light turns off when finished warming.
5. Unplug the rice cooker when not in use.
To Use Warm Mode:
4. Cooker will automatically switch to keep warm mode when complete. The digital
display will indicate the number of hours food has been warming.
5. Press “WARM/OFF” to turn the rice cooker off. Always unplug the rice cooker
when not in use.
To Slow Cook:
USING YOUR RICE COOKER
GUIAS DE COCCION
Para cocción lenta:
4. Una vez termidao el cocimiento, la arrocera cambiará al modo de
calentamiento y el foco indicador ‘warm’ se encenderá.
5. Oprima el botón “WARM/OFF” para apagar la arrocera. Siempre desenchufe
la arrocera cuando no la está usando.
Para calentar:
Aunque la arrocera cambia automáticamente al modo de calentamiento “WARM” una
vez haya terminado el cocimiento, también se puede usar esta función para calentar la
comida antes de servirla.
1. Agregue la comida a la olla interior y coloque la olla en el cuerpo.
2. Presione el botón “WARM/OFF” hasta que ilumine la luz indicadora.
3. La pantalla digital mostrará cuantas horas la comida ha sido calentando.
4. Press “WARM/OFF” button when finished warming.
5. Siempre desconecte la unidad después del uso.
Para cocinar arroz y vaporar simultáneamente:
Una de las funciones más convenientes de este arrocera es la abilidad de cocer arroz y
vaporar alimentos simultáneamente. Es ideal para cocinar comidas completos deliciosos
en una sola olla.
1. Empiece a cocinar la cantidad deseada de arroz. Vea a la seccion titulada ‘Para
cocinar arroz’ en la página 4 para instrucciones detalladas. No intentar cocer más que
4 tazas de arroz (crudo) se se desee cocinar al vapor a la vez. La bandeja para
vaporar no caberá.
2. Coloque la olla interior en la base de la arrocera y oprima ‘Start.’
3. Use las tablas de referencia para vegetales (página 10) y para carne (página 11) para
sugerencias y tiempos de cocimiento aproximados. Se recomienda agregar la bandeja
de vaporar cerca del fin del ciclo de cocimiento para evitar que la comida se enfríe
antes de que esté listo el arroz.
4. Ponga la carne y/o las vegetales en la bandeja para vaporar. Abre la tapa con mucho
cuidado porque vapor caliente se escapará. Coloque la bandeja para vaporar en la
olla interior.
5. Cierra la tapa y permite que el aparato continue cocinando.
6. Una vez que los alimentos han cocidos por el tiempo necesario, abre la tapa con
mucho cuidado. El vapor caliente se escapará. Remueva la bandeja para vaporar,
con cuidado por que estará caliente, y asegúrese de que los alimentos estén listos.
7. Cierra la tapa y permite que el arroz cocine hasta que esté terminado. La arrocera
soñará y cambiará automáticamente al modo de ‘WARM’ (calentar). La pantalla digital
mostrará cuantas horas el arroz ha sido calentando.
8. Oprima el botón de calentar/apagar (“WARM/OFF”) para apagar la unidad. Siempre
desconecte la unidad de la tomacorriente después de usar.
PRECAUCIÓN:
• Use caution when opening lid as steam escaping will be extremely hot.
• Si la olla para cocer está mojada y se coloca nuevamente en la olla interior, causará
daños y fallas al producto.
NOTA:
Se puede vaporar la comida durante cualquier parte del ciclo de cocimiento. Se
recomienda vaporar al fin del ciclo para evitar que los alimentos se enfríen antes
de que el arroz esté listo.
7
COOKING GUIDE
8
ARROZ CRUDO
3-1/2 Tazas
2-1/2 Tazas
ARROZ BLANCO
AGUA CON
LA MEDIDA
Línea 3
Línea 2
ARROZ BLANCO
LÍNEA
ADENTRO
DE LA OLLA
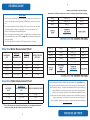
Tabla de medidas de arroz blanco:
6 Tazas
4 Tazas
ARROZ
COCIDO
CONSEJOS ÚTILES
1. Enjuague el arroz para quitarle el exceso de salvado y almidón. Esto
evitará que el arroz se queme o se pegue en el fondo de la olla.
2. Si se le está pegando el arroz debido al tipo de arroz que está usando,
intente agregar una ligera capa de aceite vegetal o rocío (spray)
antiadherente al fondo de la olla interior antes de agregar el arroz.
3. La tabla es sólo una guía general de medición. Puesto que existe una
gran variedad de clases de arroz en el mercado (véase Acerca del Arroz
en la página 13), las medidas de arroz/agua pueden variar ligeramente.
GUIAS DE COCCION
8
2 Tazas
of brown rice that may be cooked at one time is 4 cups.
3 Tazas
* Due to the extra water needed to cook brown rice, the maximum amount
8 Tazas
8 Cups
6 Cups
Línea 4
5-1/2 Cups
4-1/4 Cups
4-1/2 Tazas
4 Cups
4 Cups
4 Tazas
3 Cups
3 Cups
10 Tazas
2 Cups
BROWN RICE
WATER WITH MEASURING APPROX COOKED RICE YIELD
CUP
Línea 5
UNCOOKED
RICE
5-1/2 Tazas
Brown Rice/Water Measurement Chart:
5 Tazas
12 Tazas
12 Cups
Línea 6
Line 6
6-1/2 Tazas
6-1/2 Cups
8 Cups
10 Cups
6 Tazas
Line 5
Tabla de medidas de arroz integral:
Line 4
5-1/2 Cups
ARROZ
COCIDO
6 Cups
4-1/2 Cups
ARROZ INTEGRAL
AGUA CON
LA MEDIDA
5 Cups
ARROZ CRUDO
6 Cups
4 Cups
4 Tazas
Line 3
4 Cups
3 Tazas
3-1/2 Cups
Line 2
2 Tazas
3 Cups
2-1/2 Cups
6 Tazas
APPROX COOKED
RICE YIELD
4-1/4 Tazas
WHITE RICE
WATERLINE
INSIDE POT
3 Tazas
WHITE RICE
WATER WITH
MEASURING CUP
2 Cups
8 Tazas
UNCOOKED
RICE
5-1/2 Tazas
White Rice/Water Measurement Chart:
4 Tazas
1. Rinse rice before placing it into the inner pot to remove excess bran and
starch. This will help reduce browning and sticking to the bottom of the
pot.
2. If you have experienced any sticking with the type of rice you are using,
try adding a light coating of vegetable oil or non-stick spray to the
bottom of the inner pot before adding rice.
3. This is only a general measuring guide. As there are many different kinds
of rice available (see About Rice on page 13), rice/water measurements
may vary slightly.
4. For softer rice, allow it to soak for 10-20 minutes prior to cooking.
* Debido a la agua adicional que se require con el arroz integral, la capacidad
máxima para arroz integral es de 4 tazas.
HELPFUL HINTS
9
• Variations in the type of rice being cooked
• Variations in the amount of rice and/or water in the inner pot
• If you are making a second batch of rice shortly after the first batch, cooking
times may be reduced because the heating element will already be warm.
• Opening the lid during the cycle causes a loss of heat and steam. Cooking
time may be prolonged if the lid is opened before the rice is finished.
Cooking times are approximate. This table is for reference only. Possible
variations in cooking times may be caused by one or more of the following
factors:
6 Cups
5 Cups
40-45 Min
-
38-43 Min
-
-
GUIAS DE COCCION
INSTRUCCIONES ESPECIALES
• El arroz integral, salvaje y otros tipos de arroz varían en sus contenidos.
Algunos tipos de arroz podrán requerir un tiempo más largo para cocinar
y/o agua adicional. Consulte con las instrucciones del paquete para
sugerencias de como cocinarlo.
• La taza para medir incluida no es igual a una taza estándar. La tabla se
refiere a tazas de arroz/agua según la taza para medir incluida.
• La capacidad máxima de la arrocera es 6 tazas de arroz crudo (4 tazas
arroz integral) que se equivale a 12 tazas de arroz cocido (8 tazas si ese
arroz integral) . No ponga más que 6 tazas de arroz crudo (4 tazas si es
arroz integral) en la olla interior.
TIEMPOS DE COCIMIENTO:
ARROZ BLANCO NO
COCIDO
WHITE RICE
UNCOOKED CUPS
COOKING TIME
BROWN RICE
UNCOOKED CUPS
COOKING TIME
4 Tazas
2 Cups
3 Cups
30-35 Min
1:40-45 Min
2 Tazas
4 Cups
32-37 Min
2 Cups
34-39 Min
4 Cups
1:50-55 Min
3 Cups
1:42-47 Min
APPROXIMATE COOKING TIMES:
• Brown rice, wild rice and rice mixes vary in their make-up. Some variations
may require longer cooking times and/or additional water in order to
achieve optimum results. Refer to the individual package instructions for
cooking suggestions.
• The measuring cup included adheres to rice industry standards (180mL)
and is not equal to one U.S. cup. The chart above refers to cups of
rice/water according to the measuring cup provided.
• Do not place more than 6 cups of uncooked rice (4 cups if brown rice) into
this appliance at one time. The maximum capacity of this unit is 6 cups
raw rice (4 cups if brown rice) which yields 12 cups of cooked rice (8 cups
brown rice).
SPECIAL INSTRUCTIONS
3 Tazas
5 Tazas
6 Tazas
DURACION DE
COCCION
ARROZ INTEGRAL
NO COCIDO
30-35 Min
2 Tazas
32-37 Min
3 Tazas
34-39 Min
4 Tazas
38-43 Min
-
40-45 Min
-
DURACION DE
COCCION
1:40-45 Min
1:42-47 Min
1:50-55 Min
-
Los tiempos de cocción son aproximados. Esta tabla es para referencia
únicamente. Posibles variaciones en tiempos de cocción podrían ser causados
por uno o más de los siguientes factores:
• Variaciones en el tipo de arroz cocinado
• Variaciones en la cantidad de arroz y/o agua en la olla interna
• Si usted prepara una segunda tanda de arroz enseguida de la primera, los
tiempos de cocción podrían ser menos debido a que los componentes del
electrodoméstico de aun estén calientes.
• Abrir la tapadera durante el ciclo de cocción podrían causar perdida de calor
y vapor. El tiempo de cocción podría ser prolongado si la tapadera es abierta
antes de que el arroz esté listo.
*El arroz integral requiere 1/4 de taza de agua adicional por cada taza de
arroz.
COOKING GUIDE
9
Tabla
GUIAS DE COCCION
para cocer al vapor los vegetales:
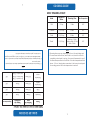
VEGETAL
Espárragos
CANTIDAD DE AGUA
1/2 Taza
1 Taza
Zanahoria
1/4 Taza
Brocoli
Col
1 Taza
1/2 Taza
Chicharos
1-1/4 Tazas
Berenjena
1 Taza
Coliflor
Maiz
Ejotes
1 Taza
1 Taza
1/2 Taza
Espinaca
1/2 Taza
TIEMPO DE
COCIMIENTO
10 Minutos
5 Minutos
15 Minutos
15 Minutos
15 Minutos
15 Minutos
20 Minutos
15 Minutos
10 Minutos
10 Minutos
10 Minutos
10 Minutes
10 Minutes
10 Minutes
Calabaza
1/2 Cup
1/2 Cup
5 Minutes
10 Minutes
10 Minutos
Squash
Spinach
10 Minutes
15 Minutes
15 Minutes
15 Minutes
1/4 Cup
1/2 Cup
1/2 Taza
1/2 Cup
1 Cup
1 Cup
1 Cup
Broccoli
Asparagus
Calabacín
Peas
Green Beans
20 Minutes
15 Minutes
15 Minutes
STEAMING TIME
SUGERENCIAS ÚTILES
HELPFUL HINTS
1/2 Cup
1-1/4 Cup
1 Cup
1 Cup
AMOUNT OF WATER
1. La mayoría de los vegetales absorben unicamente una pequeña parte
de agua cuando se están cocinando al vapor, no es necesario
cambiar la cantidad de agua para cocinar al vapor diferentes
alimentos.
2. Para vaporar y cocer arroz simultáneamente, sigue las instrucciones de
cocinar arroz de las página 7.
3. Cuando sea posible, mantenga la tapa siempre cerrada durante todo
el proceso de cocer al vapor. El abrir la tapa causará una pérdida de
calor y vapor, resultando en un tiempo de cocción más lento. Si es
necesario abrir la tapa, tal vez desee agregar una pequeña cantidad
de agua a la olla para ayudar a reponer el tiempo de cocción.
4. La altura, la humedad y la temperatura exterior afectarán los tiempos
de cocción.
5. La tabla de cocción al vapor es sólo para propósitos de consulta. El
tiempo real de cocción puede variar.
10
1. Since most vegetables only absorb a small amount of water, there is no
need to increase the amount of water with a larger serving of
vegetables.
2. When steaming and cooking rice simultaneously, follow the instructions
on page 7.
3. When possible, always keep the lid closed during the entire steaming
process. Opening the lid causes a loss of heat and steam, resulting in a
slower cooking time. If you find it necessary to open the lid, you may
want to add a small amount of water to help restore the cooking time.
4. Altitude, humidity and outside temperature will affect cooking times.
5. This steaming chart is for reference only. Actual cooking time may vary.
Zucchini
Eggplant
Corn
Cauliflower
Carrots
Cabbage
VEGETABLE
VEGETABLE STEAMING CHART:
COOKING GUIDE
10
COOKING GUIDE
11
MEAT STEAMING CHART:
Amount of
Water
Steaming Time
Safe Temperature
2 Cups
15 Min.
140º
Chicken
2-1/2 Cups
20 Min.
165º
Beef
2-1/2 Cups
Medium = 15 Min.
Medium-Well = 20 Min.
Well = 23 Min.
160º
Meat
Fish
Pork
2-1/2 Cups
20 Min.
160º
NOTE
1. Steaming times may vary depending on the cut of meat being used.
2. To ensure meat tastes its best, and is safe to eat, check that meat is
completely cooked prior to serving. Use a meat thermometer to see if
the internal temperature is at least that of the safe termperatures listed
above. If it is not, simply place more water in the inner pot and repeat
the cooking process until a safe temperature is reached.
la olla interior y repite el proceso hasta que esté lista.
adecuadamente antes de servir. Si está poco hecho, agregue más agua a
2. Para protegerse de la enfermedad, asegúrese de que la carne esté cocido
carne que se usa.
1. El tiempo de cocimiento puede variar depende del ancho de la pieza de
NOTA
Carne de
vaca
Carne de
cerdo
Pollo
Pescado
Carne
11
En su punto = 15 Min.
Bien hecho = 20 Min.
Muy hecho = 23 Min.
2-1/2 Tazas
20 Min.
2-1/2 Tazas
2-1/2 Tazas
20 Min.
15 Min.
2 Tazas
Tiempo de
cocimiento
Cantidad de
agua
Tabla para cocer al vapor las carnes:
GUIAS DE COCCION
160º
160º
165º
140º
Temperatura sana
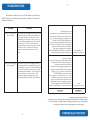
COMO LIMPIAR EL APARATO
Desconecte siempre la unidad y deje que se enfríe completamente antes de
limpiarla.
Para limpiar la olla interna de arroz
1. Saque la cacerola interna. Lávela con agua tibia y jabón, usando una
esponja o toalla para platos.
2. Enjuague y seque perfectamente.
3. Repita este proceso con la charola para vapor y con los otros accesorios
que se proporcionan.
4. Limpie el cuerpo de la olla arrocera con una toalla húmeda.
Diagrama 1
Diagram 2
Para limpiar el fondo de la tapa:
La parte inferior de la tapa se debe limpiar después de
cada uso.
1. Pase un trapo caliente y húmedo por la parte inferior
de la tapa.
2. Seque con un trapo suave y seco.
To Clean Heating Plate: (See Diagram 2)
Heating plate should be cleaned after every use.
1. Wipe the heating plate with a warm, damp cloth.
2. Dry with a soft dry cloth.
Para limpiar la lámina de calentamiento: (Ver el Diagrama 2)
La lámina de calentamiento se debe limpiar después de cada
uso.
1. Pase un trapo caliente y húmedo por la parte inferior de
la tapa.
2. Seque con un trapo suave y seco.
Es posible que los granos de arroz y otros materiales secos se peguen a la
lámina de calentamiento. Repita los pasos 1 y 2 hasta que la lámina de
calentamiento esté completamente limpia para asegurar el contacto
completo entre la olla interna y la lámina de calentamiento. De otro modo,
el aparato no cerrará correctamente y podría sobrecalentarse.
Ø No utilice limpiadores abrasivos ásperos o productos que no se consideren
seguros para usarse en recubrimientos no adherentes.
Ø No sumerja la base del cocedor de arroz en agua ni en ningún otro líquido.
Este aparato NO está diseñado para el lavavajillas. La olla interna NO está
diseñado para el lavavajillas.
To Clean Steam Vent: (See Diagram 1)
Steam vent should be cleaned after every use.
1. Pull out the steam valve as shown in Diagram 1.
2. Empty and wash the steam valve in warm, soapy water.
3. Wipe the steam valve clean with a damp cloth.
4. Reinsert the steam valve for next use.
Diagrama 2
Diagram 1
Para limpiar la válvula de vapor: (Ver el Diagrama 1)
La válvula de vapor se debe limpiar después de cada uso.
1. Saque la válvula de vapor como se demuestra en
el Diagrama 1.
2. Vacíe y lave la válvula de vapor en agua jabonosa caliente.
3. Limpie la válvula de vapor con un trapo húmedo limpio.
4. Reinserte la válvula de vapor para el siguiente uso.
12
Ø Do not use harsh or abrasive cleaners or products that are not considered
safe to use on non-stick coatings.
Ø Do not immerse rice cooker base in water or any other liquid. This appliance
is NOT dishwasher safe. The inner pot is NOT dishwasher safe.
Rice grains or other dried materials may stick to the heating
plate. Repeat steps 1 and 2 until the heating plate is
completely clean to ensure full contact between the inner
pot and the heating plate. Otherwise, the appliance will not
close properly and may overheat.
To Clean the Underside of the Lid:
The underside of the lid should be cleaned after every use.
1. Wipe the underside of the lid with a warm, damp cloth.
2. Dry with a soft dry cloth
Always unplug unit and allow to cool completely before cleaning.
To Clean Inner Rice Pot:
1. Remove the inner cooking pot. Wash it in warm, soapy water using a nylon
sponge or dishcloth.
2. Rinse and dry thoroughly.
3. Repeat process with steam tray and other provided accessories.
4. Wipe the body of the rice cooker clean with a damp cloth.
HOW TO CLEAN
12
13
Sensor Logic™ rice cookers are for true rice enthusiasts. This rice cooker uses a
micro computer chip that controls heating in a way that optimizes the cooking
temperature of the rice to enhance flavor and texture. The sensor monitors the
boiling rate of the water in the pot and controls temperature accordingly to
provide the perfect pot of rice, every time. It also functions for cooking sushi rice,
brown rice, soup and porridge.
Traditional electric rice cookers heat only from the bottom at one set
temperature and turn off once all the water has been absorbed. Aroma’s 6-Cup
Sensor Logic™ Rice Cooker uses advanced technology and an all around
heating system that maintains the optimal cooking environment for the perfect
rice.
ABOUT SENSOR LOGIC™
Short Grain Rice
Short grain is characteristically soft,
sticky and chewy. This is the rice used
to make sushi. "California Rice" is soft;
"Sweet Rice", often called "pearl" rice
for its round shape, is extra sticky and is
excellent for making rice pudding.
Long Grain Rice
Typically this rice is not starchy and has
loose, individual grains after cooking.
"Carolina" is firm and "Jasmine" is the
firmest of the long grain variety and is
flavorful and aromatic.
Wild Rice
Wild Rice comes in many delicious
varieties and mixes. Often it is mixed
with long grain rice for its firmer texture
and rich brown to black color. Wild rice
makes wonderful stuffing for poultry
when cooked with broth and mixed
with your favorite dried fruits.
Brown Rice
Brown rice is often considered the most
healthy variety. It has bran layers on
the rice grains and contains more Bcomplex vitamins, iron, calcium, and
fiber than polished (white) rice. The
most popular brown rice is long grain
and has a chewy texture.
There are many different varieties of rice available. Your Aroma
Rice Cooker can cook any type perfectly every time. The following are the
most commonly available varieties of rice and their characteristics:
Rice is a valuable source of low fat, complex carbohydrates and is
abundant in thiamin, niacin and iron. It is an essential ingredient for a
healthy diet.
ABOUT RICE
ACERCA DEL ARROZ
El arroz es una fuente importante de carbohidratos complejos bajos en
grasa y es abundante en tiamina, niacina y hierro. Es un ingrediente esencial
para una dieta saludable.
Hay muchas diferentes variedades de arroz disponibles en el mercado.
Su Olla para Cocinar Arroz de Aroma puede cada vez cocinar cualquier tipo de
arroz perfectamente. A continuación encontrará las variedades de arroz
comúnmente disponibles y sus características:
Arroz de grano largo
Típicamente este arroz no tiene mucho
almidón y presenta granos individuales
y sueltos después de su cocimiento. El
arroz "Carolina" es un poco firme, y el
arroz "Jazmín" es el más firme de las
variedades de granos largos y es
aromático y de mucho sabor.
Arroz de grano corto
El arroz de grano corto es de
naturaleza suave, pegajoso y firme al
diente. Este es el arroz que se usa para
hacer sushi. El "Arroz California " es
suave;
el
"Arroz
Dulce
",
frecuentemente llamado arroz "perla"
debido a su forma redonda, es extra
pegajosa y es excelente para recetas
como el arroz con leche o budín de
arroz.
Arroz integral
El arroz integral es frecuentemente
considerado
la
variedad
más
saludable. Tiene capas de salvado en
cada grano y contiene más vitaminas
del complejo B, hierro, calcio y fibra
que el arroz pulido (blanco). El arroz
integral más popular es de grano largo
y tiene una textura firme al diente.
Arroz silvestre
El arroz silvestre viene en muchas
diferentes variedades y mezclas.
Frecuentemente es mezclado con
arroz de grano largo por su textura más
firme y color en tonos de café hasta
negro. El arroz silvestre es ideal para
rellenar aves como pollo y pavo
cuando es cocinado con consomé y
mezclado con sus frutas secas favoritas.
ACERCA DEL SENSOR LOGIC™
Los aparatos eléctricos tradicionales para cocer arroz sólo calientan desde el
fondo a una temperatura preestablecida y se apagan cuando se ha absorbido
el agua. El cocedor de arroz con Sensor Logic de 6 tazas de Aroma utiliza
tecnología de punta y un sistema de calentamiento todo alrededor de la olla
para mantener las condiciones óptimas de cocimiento para lograr un arroz
perfecto.
Los cocedores de arroz con Sensor Logic están diseñados para los verdaderos
aficionados al arroz. Este tipo de cocedor de arroz utiliza un microchip de
computadora que controla el calentamiento de tal manera que se optimiza la
temperatura de cocción del arroz para mejorar su sabor y textura. El sensor
controla la tasa de ebullición del agua en la olla y controla la temperatura
correspondientemente para producir la olla perfecta de arroz cada vez que se
prepara. También cuenta con funciones para cocer arroz sushi, arroz integral y
avena.
13
SOLUCION DE PROBLEMAS
14
Dado que las variedades de arroz pueden variar en su
composición, los resultados también pueden diferir. A continuación se
incluyen algunos consejos para solucionar problemas, a fin de ayudarle
a lograr la consistencia deseada.
.
PROBLEMA
SOLUCION
El arroz está seco y/o
duro.
If your rice is still too wet or soggy when the
rice cooker switches to warm mode, use the
rice paddle to stir the rice. This will redistribute
the bottom (moistest) part of the rice as well
as release excess moisture. Close the lid and
allow to remain on warm mode for 10-30
minutes as needed, opening the lid and
stirring periodically to release excess moisture.
Si el arroz está seco o duro/gomoso cuando
la cacerola para arroz cambia a modo
WARM (CALENTAR), el arroz se ablandará
con más agua y más tiempo de cocción.
Según cuán seco esté el arroz, agregue
entre ½ y 1 taza de agua, y revuelva. Cierre
la tapa y presione el interruptor de
encendido en modo COOK (COCINAR).
Cuando la cacerola para arroz cambia a
modo WARM (CALENTAR), abra la tapa y
revuelva el arroz para controlar su
consistencia. Repita este procedimiento
según sea necesario hasta que el arroz esté
blando y húmedo.
Rice is too moist/soggy
after cooking.
El arroz está caldoso
y/o aguachento
If your rice is dry or hard/chewy when the rice
cooker switches to WARM mode, additional
water and cooking time will soften the rice.
Depending on how dry your rice is, add ½ to
1 cup of water and stir through. Close the lid
and press the “COOK” button. When rice
cooker switches to warm mode, open the lid
and stir the rice to check the consistency.
Repeat as necessary until rice is soft and
moist.
SOLUTION
Si el arroz aún está demasiado caldoso o
aguachento cuando la cacerola para arroz
cambia a modo WARM (CALENTAR),
revuelva con la paleta para arroz. Esto
redistribuirá el arroz que está en el fondo (el
más húmedo) y también liberará el exceso
de humedad. Cierre la tapa y deje en
modo WARM (CALENTAR) durante 10 a 30
minutos según sea necesario; abra la tapa y
revuelva periódicamente a fin de liberar el
exceso de humedad.
Rice is too dry/hard
after cooking.
PROBLEM
Because rice varieties may vary in their make-up, results may
differ. Below are some troubleshooting tips to help you achieve the
desired consistency.
TROUBLESHOOTING
14
15
GARANTÍA LIMITADA
Aroma Housewares Company garantiza que este producto no
tenga defectos en sus materiales y fabricación durante un período
de un año a partir de la fecha comprobada de compra dentro de
la parte continental de los Estados Unidos.
AROMA HOUSEWARES COMPANY
6469 Flanders Drive
San Diego, California 92121
1-800-276-6286
M-F, 8:30 AM - 5:00 PM, Pacific Time
Website: www.aromaco.com
This warranty gives you specific legal rights and which may vary from
state to state and does not cover areas outside the United States.
This warranty does not cover improper installation, misuse, abuse or
neglect on the part of the owner. Warranty is also invalid in any case
that the product is taken apart or serviced by an unauthorized service
station.
Within this warranty period, Aroma Housewares Company will repair or
replace, at its option, defective parts at no charge, provided the
product is returned, freight prepaid with proof of purchase and U.S.
$13.00 for shipping and handling charges payable to Aroma Housewares
Company. Before returning an item, please call the toll free number
below for a return authorization number. Allow 2-4 weeks for return
shipping.
Dentro de este período de garantía, Aroma Housewares Company
reparará o reemplazará, a su opción, las partes defectuosas sin
ningún costo, siempre y cuando el producto sea devuelto, con el
flete prepagado, con comprobación de compra y $13.00 dólares
para cargos de envío y manejo a favor de Aroma Housewares
Company. Antes de devolver un producto, sírvase llamar al número
telefónico gratuito que está más abajo para obtener un número de
autorización de devolución. Espere entre 2-4 semanas para recibir el
aparato nuevamente.
Esta garantía no cubre la instalación incorrecta, el uso indebido,
maltrato o negligencia por parte del usuario. La garantía también
es inválida en caso de que el aparato sea desarmado o se le dé
mantenimiento en un centro de servicio no autorizado.
Esta garantía le da derechos legales específicos los cuales podrán
variar de un estado a otro y no cubre áreas fuera de los Estados
Unidos.
AROMA HOUSEWARES COMPANY
6469 Flanders Drive
San Diego, California 92121
1-800-276-6286
L-V, 8:30 AM - 5:00 PM, Tiempo del Pacífico
Sitio Web: www.aromaco.com
Aroma Housewares Company warrants this product free from defects in
material and workmanship for one year from provable date of purchase
in the continental United States.
LIMITED WARRANTY
15