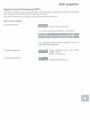
1
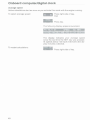
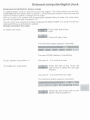
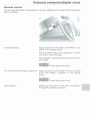
Before you proceed to read this Owner's Manual, please note
the following important information:
Some of the equipment and descriptions contained in this
manual are identified by an asterisk. This indicates that the
equipment and accessories described in the subsequent passages are not standard in all national markets, that they are
installed on specific model versions only, or that they are available as factory or dealer-installed options.
For information on optional accessories not covered in this
manual, please consult the Owner's Manual supplied with
your car, the Supplementary Owner's ~ a n u a(if
i applicable) or the installation and operating instructions provided
with the equipment. Your aGthorize3 BMW ~ e a l e rwill be
happy to assist you with any questions that may arise.
To ensure that our accessories continue to embody a synthesis of superb quality combined with technological excellence,
we at BMW pursue a policy of continuous, ongoing development embracing all aspects of their design. It is therefore possible that some of your own vehicle's systems may vary from
those described in this manual. For the same reason. it is also
impossible to guarantee that all descriptions and illustrations
will be completely accurate in all respects. We must therefore
request your understanding for the fact that we are unable to
recognize legal claims based on discrepancies between the
data, illustrations and descriptions in this manual and your
own vehicle's equipment.
This Owner's Manual is available in the following languages:
US Englisch Order No. 01 41 9 789 777
CDN French Order No. 01 42 9 789 778
@ 1996 BMW AG
Munich, Federal Republic of Germany
Reproduction and duplication, in whole or part,
only with the express written permission of BMW AG, Munich.
Order No. 01 41 9 789 777 US 111196
Printed in Germany
Printed on environment-friendlypaper
(chlorine-free, recyclable).
This Owner's Manual is designed to serve as your comprehensive guide to the wide range of functions and features provided by your BMW Radio and Information System. Thorough
familiarity with this manual's contents will assist you in becoming acquainted with the system's extended array of special
technical features.
This Owner's Manual contains descriptions of the following
systems:
BMW Car radio
Onboard computer
DSP - Digital Sound Processing*
Cellular phone*
You will find a summary of standard radio functions and operating instructions on pages 5 and 6.
The control options for using the Multi-Information Display
(MID) are listed on pages 3 and 4.
These summaries are followed by more detailed information
on selected controls and features. The Owner's Manual is arranged with the features listed on the left of the page with the
corresponding control procedures and displays on the right.
The explanations focus on the basics. Owing to the various
user options, the range of potential displays for some systems
extends beyond those described in this manual, which also
dispenses with detailed descriptions of universally familiar
procedures and operations.
This manual has been specially designed to provide you with
a quick and convenient information source. The fastest way to
find information on any particular subject is to consult the index at the back.
We wish you many miles of driving pleasure
BMW AG
Multi-Information-Display (MID)
.
--
-~
-
Multi-Information Display (MID)
The MID serves as the central display and control unit for a variety of vehicle systems.
Various versions are available; the specific control layout on your own MID will be determined by the accessories installed in the vehicle. Displays are provided for the following onboard systems:
- sound systems (radio, cassette player, CD)
-digital clock (time and date)
- onboard computer (fuel consumption, cruising range, etc.)
- DSP Digital Sound Processing
-cellular phone (e.g., dialing)
1
2
3
4
Controls and displays
1 Combined power switch and volume knob (for sound system and phone in
hands-off mode)
2 Scan key
3 Displays for various onboard systems
4 Sound systemlDSP key
5 Cellular phone indicator lamp
-red, no phone communications possible; flashing lamp indicates that only
emergency calls can be processed
- green, line open
-yellow, continuous or flashing, indicates that the phone is establishing
communications using an outside network.
6 Indicator lamp for parked-car ventilation
-comes on when unit is activated at programmed time
- flashes during active operation
7 Control key for onboard computer/digital clock
8 Control key for cellular phone
9 Control keys for menu
10 Display for entry and data request keys
5
Essential features
To select digital clock:
W Press cbck sym,ol.
The following display appears (example):
To reset time and date, refer to pages 28/29.
To select sound source:
Press AUDIO key.
The following display appears (example):
You can now press the right side of the
key to select the cassette
PBplayer. For additional information refer
to pages 9 through 24.
To select cellular phone:
Press TEL key.
The following display appears (example):
To select onboard computer:
The following display appears (example):
For additional information refer to pages 33 through 43.
To select DSP:
Press DSP key.
The following display appears (example):
For addiiional information refer to pages 45 through 48.
BMW Car Radio
-
-
--- --
2
I
Controls and displays
1 Volume control knob:
- Press to switch radio on and off
- Rotate knob to adjust volume in radio, cassette and CD modes
2 Cassette slot
3 Display: (waveband, frequency, cassette and CD modes, tone and speaker
settings, time and date)
4 Key function display (menu)
Time and date
To display the time:
(ignition key at position 0)
To reset time:
(ignition key in position 112)
Press clock key.
Press right side of key. The dots in the
display panel start to flash. Use the HRS+ and -MIN+ keys to enter the
time.
Press right side of key to confirm your
I
entry.
To reset date:
(ignition key in position 112)
Select menu:
Press clock key.
mm@a
mPress key.
Press right side of key, the word DATE
starts to flash beside the dots in the display.
You can now use the
-DAY+, - MONTH+ and -YEAR+ kevs
to enter the correct date.
Press right side of key to confirm entry.
Tone and speaker settings
The system allows you to select individual settings for BASS, TREBLE, FADER and
BALANCE.
To select tone adjustment mode:
To adjust tone:
Standard setting:
rn
rn
m
Press key to select bass (example).
Press left or right side of key for desired
bass setting.
Maintain pressure on the key until FLAT
appears in the display.
Essential features
Search:
Manual search:
SCAN search:
To select sound source:
To change broadcast band:
With radio, cassette or CD*
Left = reverse scanllower frequency
Right = forward scanlhigher frequency
With radio, cassette or CD*
Press m, then press the desired side of
the kev
Left = ieverse scanllower
frequency
Right = forward scanlhigher frequency
%Press left side of key to start automatic
search sequence during radio or CD
operation. The system pauses at each
station (or title in CD mode) for several
seconds before continuing.
Press AUDIO, then use the FMIAM,
TAPE or CD key to select radio, cassette or compact disc*.
Radio progresses one step through its
6range sequence each time you press
the key:
Press AM to select AM or AMA
Press FM to select FM (1...6), FM
(7...12) and FMA.
Press right side of key. The radio automatically tunes to the weather station
currently providing the best reception.
To select Weather Band:
Station keys:
mYou can program six stations for each
of the following ranges: FM 1...6, FM
7...12, FMA, AM, AMA.
Also used to select CDs.
To eject cassette:
B# PESS key.
To change cassette side:
Noise suppression mode:
m
Press key.
TAPE A is Side 1, TAPE B is Side 2.
Press key.
Each time you press the key the unit
progresses one step in the following sequence: Dolby off, Dolby B, Dolby C.
Station selection
Start by selecting the waveband:
To select:
Press key again to continue through control
sequence:
AM - alternates between AM and AMA
FM - the three-range sequence includes FM
(1...6), FM (7...12) and FMA
The following display appears (example):
You can select stations using any of the following options:
Station selection with automatic search
To start search:
Press left or right side of key. The
unit responds by automatically
tuning to the next station.
Left side: Lower frequency.
Right side: Higher frequency.
Station selection
Station selection with manual search
Start by selecting manual mode:
The following display appears (example):
To start search:
Press left or right side of key.
Maintain pressure to continue
scanning.
Left side: Lower frequency.
Right side: Higher frequency.
This key allows you to fine-tune to precisely
the desired frequency.
Station selection with SCAN search
-
SCAN is an automatic forward search mode. The radio pauses at each station for several seconds before continuing.
To select SCAN search:
mPress left side of key.
The following display appears (example):
To cancel SCAN mode:
Press left side of key or select
another function.
Weather Band
Weather radio is a service of the National Oceanic and Atmospheric Administation
(NOAA) of the U.S. Department of Commerce. Taped weather messages are repeated
every four to six minutes and are routinely revised every one to three hours, or more
frequently if needed. Most of the stations operate 24 hours daily. During severe
weather, National Weather Service forcasters can interrupt the routine weather broadcasts and substitute special warning messages. If you have a question concerning
NOAA Weather Radio, please contact your nearest National Weather Service Office,
or write to National Weather Service (Attn: WIOMll), National Oceanic and Atmospheric Administration, 1325 East-West Highway Siver Spring, MD. 20910.
To select/exit Weather Band:
-
Press right side of key.
The following display appears (example):
In this mode the radio automatically selects the
weather station currently providing the best reception.
If no weather stations are currently available,
the following display appears:
To start search:
Press IeWr~ghtside of key; maintain pressure to continue search.
To start manual search:
Press leniright side of key.
To exit Weather Band:
P4 Press right side of key or select
manother function.
Station programming
You can store a total of 18 FM (2 FM ranges plus FMA) and 12 AM (AM and AMA)
stations.
Start by selecting the waveband
To select:
UPress left/nght side of key to select
mwaveband and range.
Each time you press the key the unit progresses one step in the control sequence:
AM - alternates between AM and AMA
FM - the three-range sequence includes FM
(1...6), FM (7...12) and FMA
Start search mode:
To store station:
Press lefffright side of key; maintain pressure to continue search.
mPress the desired station key (FM
L1-12, AM 1-6, FMA
1-6 or AMA
1-6). Maintain pressure on the key
until the station returns after a brief
~nterruptlon.
The key number IS identified by an asterisk in
the display.
Autostore
This feature automatically stores the six FM stations with the best reception (FMA).
To select Autostore:
Maintain pressure on the left side
mof the key until AUTOSTORE appears in the display panel.
To cancel AUTOSTORE:
Press any radio key.
Programmed station selection
Start by selecting waveband:
U
Press left/right side of key to select
desired waveband and range.
Select stored station:
Press the appropriate program
key.
Cassette listening
To select cassette mode
Slide the cassette all the way into the slot (detent mechanism engages), taking care to
ensure that the exposed tape in the cassette is on the right. The sound system automatically switches to the cassette mode.
The following display appears (example):
If a cassette has already been
inserted:
mmEa
Press right side of key.
The unit recognizes the tape material and selects the correct bias setting automatically.
To change sides:
To cancel casette mode
mNEm
Press key.
Select another listening mode (such as radio
or CD player).
or
e
press key.
The unrt ejects the cassette for removal.
or
Switch off the radio.
The cassette remalns in the slot, and the
sound system automatically resumescassette
reproduction when you switch the power back
on.
Cassette player
--
Fast forwardlrewind
To select:
Start by pressing m, then press
left or right side of key.
or
Briefly press left or right side of
key twice in succession.
b b or
44
R
appears in the display panel.
As soon as one side of the cassette is finished,
the unit switches to the other side automatically. When you use the fast rewind mode to
return to the beginning of the current side, this
is the point at which cassette reproduction will
start once the rewind process has been completed.
To stop fast forwardlrewind:
Press any section of the key, or
select another function.
-
Music search Forward and reverse
Provided that a pause of at least four seconds is present between selections, you can
use this function to wind the tape to the start of the next title on the cassette.
Press left/right side of key to return
to the beginning of the current
selection or fast forward to the
start of the next title.
To select music search:
)
or
4R
appears in the display panel.
Forward:
The tape briefly switches to the fast forward
mode before reverting to music reproduction
upon reaching the beginning of the next title.
If you are currently listening to the last selection on one side, the unit automatically
switches to the other side of the tape.
Reverse:
The tape rewinds to the beginning of the current selection and then automatically returns to
normal sound reproduction.
The tape also reverts to normal play when it
reaches the beginning of the current side.
To cancel forward/reverse search:
Press any section of the key, or
select another function.
Cassette player
General information
The unit is suitable for use with pure ferrous (metal), ferric oxide, chromium dioxide and
ferrochrome cassettes.
We recommend that you use heavy-duty cassettes specifically designed for automotive applications. Extended-play cassettes use thinner tape, and are thus more prone
to failure. We therefore advise against the use of cassettes with a playing time in excess of 90 minutes.
To help prevent tape jams, you should always store your cassettes in the cassette
holder with detent when they are not in use.
To prevent malfunctions arising from distortions in the cassette's housing, always remove your cassettes from the car after parking if you anticipate that they will be exposed to extreme temperatures (less than -1 O°C/l 5OF or above +40°C/105OF).
Cleaning the cassette player's mechanism
Over extended periods dust and contamination will accumulate on the cassette player's head, leading to a gradual reduction in the quality of sound reproduction. Dirt also
tends to collect in the unit's winding mechanism. You should therefore remember to
clean the cassette player at regular intervals.
Error warning
Distorted sound reproduction is usually traceable to stiction and resistance in the cassette's winding mechanism.
When a cassette locks up, the following display appears in the panel:
To exit cassette mode:
e
Press key and remove the cassette from its slot immediately.
If you notice that the tape in the cassette is loose, you can retighten it by rewinding it at
one of the capstans using a pen or pencil.
Reinsert the cassette in the unit and take up any remaining slack by winding to the end
of the tape in both directions (fast forward and rewind).
You should refrain from any further attempts to use the tape if TAPE ERROR reappears in the display.
CD Player
CD Player*
The following supplementary controls are available on sound systems equipped with
an optional CD changer.
To select the CD mode
mPress left side of key.
The following display appears (example):
-
The CD resumes play, starting at the point at
which it was last interrupted.
To select a CD:
$g Press the number of the desired
CD (1...6).
The CD's magazine number appears in the
display. The changer loads and starts to play
the CD from the first title. Once the last title on
a CD has been completed, the unit automatically loads and starts to play the next disc.
For information on the following displays:
CD CHECK, NO MAGAZINE, NO DISCS or
HIGH TEMP, refer to explanations of CD display codes found on page 57.
To select track:
To cancel CD mode
Press IeWright side of key; maintain pressure to continue search.
Select another function (radio, cassette).
CD Player
Fast forwardreverse scan
To start forwardlreverse scan:
Start by pressing m, then press
the leftfright side of the key. Release the key to terminate the
scanning process.
bb
or
44
R
appears on the display.
The unit automatically starts playing the initial
track whenever you reach the beginning or end
of the CD.
Title search forwardreverse
To start title search (fonvardlreverse):
Maintain pressure on leftlright side
of key until the unit arrives at the
desired selection.
-
SCAN sampling mode
The unit samples all of the tracks on the selected CD, playing each for several seconds
before progressing to the next.
To select SCAN sampling mode:
Press left side of key.
The following display appears (example):
Once you reach the end of the CD the player
goes back to the first title.
To cancel sampling mode:
Press left side of key or select
manother function.
CD Changer
General information
The BMW 6 CD CHANGER A*
zine capacity is 6 CD's.
is installed in the luggage compartment. The maga-
General information on using the CD changer
You may experience brief interruptions in music reproduction andlor skipping when you
use the CD player while driving on rough or uneven road surfaces, especially if your
car is equipped with Sports suspension.
This CD changer is designed to provide trouble-free operation within a temperature
range extending from 0 OC132 OF to + 60 OC/140 OF.
To avoid malfunctions, we therefore recommend that you ensure that the in-car temperature is within this range before using the CD changer.
Precautions for handling laser devices
The BMW 6 CD CHANGER A is a Class 1 laser product.
Should the cover be removed, defective or damaged, the unit could emit invisible laser
radiation.
Caution:
Never remove the cover from the housing.
To ensure safety, always refer any required service or maintenance work to qualified
professionals.
To remove the CD magazine
To open:
~
BMW
.
...i,
Slide the cover to the right.
Press button (arrow):
The unit ejects the magazine for removal.
CD Changer
Loading and removing CD's
The numbers on the CD trays correspond to the CD numbers that appear in the display
panel.
Fill the magazine by inserting the CD's in the
trays with the printed side upward.
To remove the CD, proceed according to the illustration. Pull the tray halfway out and remove
the CD.
We do not recommend using an adapter to play single-format CD's, as there is an increased risk that the CD or the adapter could jam.
Suitable magazines for single-format CD's are commercially available.
To install the CD magazine
Slide the cover to the right.
Ensure that the arrow is pointed toward the CD
player, then slide the magazine all the way into
the housing.
Slide the cover back into its closed position.
Tilt adjustment
Use to adjust the changer's installation position as required.
Use a ball-point pen to move the adjuster.
Press the button to release the detent and
move the adjuster to the appropriate setting.
V = Vertical installation
H = Horizontal installation
Multi-Function Steering Wheel (MFL)
Sound system controls on the multi-function steering wheel*
The optional Multi-FunctionSteering Wheel provides you with convenient fingertip control of the following sound system functions:
Audio control
- Station keys and forward/reverse scan in radio mode
- Music search and fast forwardlrewind in cassette mode;
track selection in CD* mode
- Volume control.
Station key search/
activate search mode:
Apply brief pressure to the key to select
the next stored station (forward sequence).
Maintain pressure to initiate the forward
station search (ascending frequency
sequence).
1
Apply brief pressure to the key to select
the next stored station (reverse sequence).
Maintain pressure to initiate the reverse
station search (descending frequency
sequence).
With High Onboard Computer Combination only:
When you use the Multi-Function Steering Wheel or one of the radio keys to select a
frequency or title your choice appears in the instrument cluster for several seconds.
To adjust volume:
+ Higher
- Lower
Multi-Function Steering Wheel (FML)
-.-
-
- --
Cellular phone
We recommend that you refrain from dialing the phone or using any of the other controls on the multi-function steering wheel or MID while the vehicle is in motion.
Before you can use the Mutli-Function Steering Wheel for dialing, the names and numbers must first be programmed into the system.
You can use the keys to control the following:
Forward search in telephone index.
Adjust volume in hands-off mode (available during active operation only).
1
Reverse search in telephone index.
Radio/cellular phone selection switch.
Answer phone.
select phone number,
terminate conversation.
Note:
The FUT and receiver keys are only installed
on vehicles equipped with a cellular phone.
Digital clock
You can use the digital clock to activate and control the following equipment and systems:
- request time and date
-program an hourly reminder signal (memo), for instance, to remind you of news
broadcasts
- stopwatch mode, and
- parked-car ventilation.
To request time and date
Activate clock mode:
EPress the clock key.
The following display appears (example):
If the ignition key is at position 0 or has been
removed the current time will remain in the display for eight seconds; it remains indefintitely
with the ignition key in position 1 or 2.
Display options include a 12 or 24-hour scale as well as European or American date
sequence.
To change display scale:
BiEmaa
mPress left side key.
When you select the 12-hour mode, AM or PM
will also appear on the right side of the display
panel.
Onboard computerldigital clock
-
-
--
To reset clock
Select reset function:
Press the clock key twice.
The following display appears (example):
EI3sm
mPress right side of key.
The dots in the display start to flash.
To reset time:
-
Press IeWright side of key
I
to enter the hours.
Press IeWright side of key
mto enter the minute.
To store time:
mPress key.
Note:
Follow the above sequence to reset the
clock if the time is lost due to a temporary
interruption in the supply of electrical current to the unit.
.
Onboard computerldigital clock
To reset date
Select reset function:
%Press the clock key twice.
The following display appears (example):
Press right side of key.
The word DATE appears and the dots in the
display start to flash.
To reset date:
Press left/right side of key
3to enter the month.
-
Press left/right side of key
to enter day.
Press left/right side of key
to enter year.
To store date:
Press key.
No special adjustments are required for leap
years, as these have already been programmed into the system.
Note:
After any temporary interruption in the
power supply to the unit, follow the above
sequence to reset the date.
Onboard computerldigital clock
---
-
Stopwatch
The stopwatch can record elapsed times of up to 99 hours and 59 minutes. The current
elapsed time is shown continuously in the display, initially in seconds and tenths of a
second, then in minutes and seconds after one minute. After the first hour the unit reverts to a display of hours and minutes.
To select stopwatch mode:
a
press the key twice.
The following display appears (example):
To start stopwatch:
lmm@iB
Press right side of key.
The clock symbol on the right lights up and the
elapsed time starts to run in the display.
To stop timing:
With the elapsed time appearing in the display:
lmm@iB
Press right side of key.
With other information appearing
in the display:
Select clock mode, then
E!samm
For current elapsed time:
press key,
Select clock mode, then
The clock symbol starts to flash and the instantaneous elapsed time appears in the display.
Meanwhile the stopwatch continues to record
the overall elapsed time.
To request time display:
The stopwatch stops running when you turn
the ignition key to position 0. It resumes active
operation when you return the key to position 1.
Onboard computerldig'tal clock
Auxiliary heater
To enter activation times
You can preselect two different activation times for the auxiliary heater. The timer
switches off the heater automatically after an operating time of 30 minutes.
Please consult the standard Owner's Manual for additional important information on using the auxiliary heater.
To program activation time 1
Program data can only be entered with the digital clock in operation and the ignition key
at position 1.
To program timer:
nmmlaia
Press lefi side key.
The following display appears (example):
-
Press right side of key.
mTIMER 1 flashes in the display.
Enter the activation time:
Press left/right side of key
to enter the hour.
Press lefttright side of key
mto enter the minute.
Press right side of key to confirm
I
your entry.
To Droaram activation time 2
US; the procedure described for activation time 1, but press the right side of the key
(TIMER 2) at step 2.
Onboard com_puter/digital clock
-
-
.
--
.-
To change a programmed activation time:
Use the standard entry sequence described for activation times 1 and 2 to program the
new time.
The LED in the MID comes on to remind you that an activation time has been programmed.
The LED also flashes while the blower is operating. It goes out when the system is
deactivated.
To request display of activation time
-You can view the first activation time using the key sequence described on the previous page.
-To view the second activation time, use the same sequence, but select TIMER 2.
The sytem activates (blower starts at selected time - LED comes on) and deactivates
(LED off) the heater at the programmed times.
After selecting the desired activation time press 1 TIMER 2.
Programmedtimes remain stored in the system's memory until new times are entered.
Note:
Provided that the outside temperature is above 16" C/60° F, the parked-car ventilation
will come on automatically at the preselected time.
Manual control
Available only with the ignition key in position 1!
Select mode:
m
Press left side of key twice in succession.
To switch blower onloff:
ImmHa
Press key.
Onboard com~uterldiaitalclock
Onboard computer
The onboard computer serves as your source of current information on average
speed, average fuel mileage, cruising range, distance remaining to destination
and speed limit threshold. The computer is also used to control the enhanced vehicle immobilization system.
In the interests of driving safety, you should always enter data into the computer before
you start off, with the vehicle stationary. The onboard computer then starts active calculations as soon as you set the car in motion.
You can use the remote control feature (refer to page 43) to display computer data in
the instrument cluster while underway.
No user entries are required for average fuel consumption 1CONSUM2, estimated
cruising range RANGE and average speed SPEED.
The speed limit threshold LIMIT, distance to destination DlST ARR and enhanced vehicle immobilizationCODE are available only when you enter the required data beforehand.
To activate onboard computer controls
The onboard computer is available for ~nteractiveoperation with the ignition key in positions 1 and 2.
To select function:
EPress right side of key.
To select scale:
(only possible with vehicle underway)
m
mPress left side of key.
The scale changes each time you press the
key, alternating between metric and US units.
The following display appears (example):
Onboard computerldigital clock
--
-
Speed limit threshold
This feature alerts you when you exceed the programmed maximum speed (for
instance, posted speed limit). An acoustic signal sounds and the word LIMIT flashes on
the right side of the display panel. The programmed limit also appears in the instrument
cluster's Check Control panel for 8 seconds.
Vehicle speed must drop back to at least 3 mph (5 kmlh) below the programmed speed
to reset the system for repeat warnings.
To enter the speed warning threshold
To select limit mode:
To enter limit speed:
Press right side of key,
Pthen
mlmm
mPress key.
tmimail
mPress right side of key.
The following display appears (example):
m
mmlrmm
Use keys 0 - 9 to enter the desired speed.
mEm
To change speed entry:
mEm
Press right side of key.
Press left side of key.
Press left side of key once to delete the last
digit entered.
Onboard com~uterldiaitalclock
To adopt current speed as limit
Select LlMlT mode:
Press right side of key,
then
To adopt limit:
Press right side of key twice in
succession.
To cancel speed warning
Select mode:
To cancel warning:
Press right side of key,
then
Rmm
Press key.
The word LlMlT disappears fron the display.
The speed remains stored in the unit's
memory. This speed is adopted if you reactivate this function by again pressing the LlMlT
key.
Onboard computer/digital clock
Distance remaining to destination
Displays the remaining distance to your destination. Available only if you entered the
total trip distance before starting off.
To select this mode:
Press right side of key,
then
The following display appears (example):
To enter the distance:
mlEmm
mPress right side of key.
The following display now appears (example):
Use keys 0 - 9 to enter the distance.
Press right side of key
I
to confirm your entry.
To correct your entry:
Press this side of the key to delete the last digit
entered.
To request distance display:
Press right side of key,
then
mimm
mPress left side of key
Any additional mileage extending beyond the
trip distance defined in your initial entry is indicated by a minus sign.
Estimated time of arrival
The computer calculates your estimated time of arrival based on current operating
cond~tions.
Available only when you enter the distance (DIST) prior to starting your journey. The
clock must also be correctly set.
To select ETA mode:
Press right side of key.
To request display:
The following display appears (example):
Onboard computerldigital clock
Estimated cruising range
The computer calculates your estimated cruising range based on current operating
conditions (using your aveiage fuel consumption rate d;ring the preceding 18 miles136
kilometers) and the amount of fuel remaining in the tank.
Note:
To avoid serious damage to the engine andlor catalytic converter, please refuel
immediately whenever you note that your cruising range has dropped to below
50 kilometers.
When you refuel the onboard computer will register the additional fuel only
when more than 1.4 gallons16 litres are added with the engine off.
To select this mode:
Press right side of key,
To request display:
Press key.
The following display appears (example):
A brief warning also appears in the instrument
cluster when the cruising range drops to below
31 miles (50 kilometers).
Average fuel consumption
The computer can calculate the average fuel consumption rates for two different distances at the same time (for instance, providing s~multaneousmileage data for an entire trip and for a single leg of the journey).
To start calculations for distance 112
Active calculations start as soon as you activate this mode with the engine running.
To select mileage mode:
To request display:
-
Press left side of key to view consumption rate 1, right side for rate 2.
The following display appears (example):
To restart calculations:
flPress left or right side of key, then
Press right side of key.
The computer recalculates the first or second
consumption rate, which then appears in the
display.
Onboard computerldigital clock
Average speed
Active calculations start as soon as you activate this mode with the engine running.
To select average speed:
Press right side of key,
then
mmmm
mPress key.
The following display appears (example):
The display indicates your average speed
since the last time the SET key was pressed.
At speeds below 100 mph (100 kmlh) the display includes a decimal.
To restart calculations:
mimiail
mPress right side of key.
Onboard computer/digital clock
Enhanced immobilization feature (code)
A supplementary code IS required to start the engine. The code system can be activated only with the lgnlt~onkey in position 1. Once the code IS active, only the scan and
volume functions remain available for the radio.
After you return, the system will automatically request that you enter the code when
you turn the ignit~onkey to position 112.
You can enter any sequence of digits ranging from 0000 to 9999. You must re-enter the
code each time you activate the system.
Always remember the code!
Press right side of key,
then
To select this mode:
mPress left side of key.
The following display appears (example):
The word CODE flashes in the display.
To set, ignition key position 1:
Use keys 0 - 9 to enter the code.
To modify your code entry:
mside of key to delete the last digit
Press left side of key. Press left
entered.
Use keys 0 - 9 to enter the new code.
The following display appears (example):
C
I ignition key to position 0.
Onboard com~uterldiaitalclock
To disarm system, with ignition key in position 1 or 2:
If you entered a code when leaving the vehicle, the system automatically requests that
you re-enter this same code when you turn the ignition key to position 1 or 2 upon your
return.
The following display appears (example):
The display is accompanied by a gong.
To disarm system:
Use keys 0 - 9 to enter the code.
Press right side of key to confirm
myour entry.
The system responds to attempts to start the
engine using an incorrectlno code by sounding
a gong and preventing the engine from starting. The current time automatically reappears
in the display panel once you enter the correct
code and then confirm your entry by pressing
SET.
If the vehicle is equipped with an alarm system. the enhanced vehicle immobilizer will
respond to three consecutive false entries
or three starting attempts by activating the
alarm for a period of 30 seconds.
Onboard computerldigital clock
Remote control
You can use the button incorporated in the turn signal lever to select stored computer
data for display.
To store displays:
Apply pressure to the button until PROG 1 appears in the display panel.
Press the MID keys in the sequence in which
you wish to view the data.
The program number advances each time you
store data.
miT@mm
Press right side of key.
For comprehensive display sequence: Apply pressure to the button in the turn signal
lever until PROG 1 appears in the display
panel.
UimmEa
Data request:
Press right side of key.
Briefly tap the button in the lever to progress
through the display sequence.
DSP amplifier
Digital Sound Processing (DSP)
The DSP amplifier system incorporates such features as spatial simulation and equalizer functions to furnish optimal listening pleasure.
The DSP controls are activated when you switch the radio on.
DSP control switch
To activate DSP:
Press right side of key
The following display appears (example):
The includes shows three standard and two
user-defined programs.
To select program:
To deactivate DSP:
Press selection key (e.g. CONCERT HALL).
DSP is now active.
Press W side of key.
Program selection
You can select from among three standard -CONCERT HALL, JAZZ CLUB, CATHEDRAL -and two user-defined programs (Memory 1 and 2).
To select standard programs
Activate DSP:
Press right side of key.
The following display appears (example):
To select stored program:
Press desired key (e.g. CONCERT HALL).
The following display appears:
Separate selection of frequency, spatial simulation (room size) and reverberation (echo) levels is not available when the permanent
memory program is active.
DSP am~lifier
To program user-defined memory
You can enter and store your own preferred settings for equalizer (80 Hz, 200 Hz, 500
Hz, 1 KHz, 2 KHz, 5 KHz, 12 KHz), room size and echo level.
Note:
When you set the room size or echo level 0, the other automatically reverts to 0
as well. When you subsequently return the first controller to 1, the second automatically reverts to its initial setting. If you store a 0 setting for one of these controllers by switching to another mode, the stored setting for the other (unaltered)
controller will be deleted.
To select:
Press right side of key.
Press selection key (MEMORY 1
min the example).
-
The following display appears (example):
mPress right side of key.
The following display appears (example):
To select equalizer setting:
Press left side of key.
The following display appears (example):
To select frequency:
Example: Press left side of key to
select 500 Hz.
Press left or right side of key to ad-
Ljust frequency to desired level.
DSP am~lifier
To adjust reverberation (echo level):
Press right side of key.
Press desired program memory
mkey (MEMORY 1 in the example).
The following display appears (example):
Press right side of key.
The following display appears (example):
mPress left or right side of key to seLlect desired echo level.
To change spatial simulation
(room size)
Press key.
The following display appears (example):
mPress correspondingside of key to
select desired room size setting.
-
As you change these settings, the sound system instantly adapts to reflect your entries in its
music reproduction while simultaneously storing the new settings.
Return to previous
setting:
Press right side of key.
Phone control using MID
We recommend that you refrain from dialing the phone or using any of the other controls on the multi-function steering wheel or the Multi-Information Display (MID) while
the vehicle is in motion.
The MID allows fast and convenient control of phoning operations by providing direct
access to the following:
-TOP 8 dialing
- Name dialing
- Fast-dial codes
-Manual dialing with numeric entry
- Notebook function
You can also select information on reception level and the duration of your conversation for display.
Some phone functions will operate only if the corresponding programming operations
have been carried out (index) or when specifically activated.
You can use the MID to control the phone with the ignition key in position 1 or 2.
Please observe the information and instructions contained in the manual provided with
your cellular phone.
To activate phone
Select phone mode:
Press right side of key.
The following display appears:
If you have already made previous calls, the
display appears as follows (example):
Cellular phone
BMW Help
To select HELP:
Press key.
The following display appears (example):
To initiate emergency call:
Press left side of key.
To terminate emergency call:
Press left side of key.
Cellular ÿ hone
TOP 8 dialing
You can use this function to store and dial the eight most frequently used telephone
numbers. This function is available for previously dialed numbers; to use this function
you must first store the names with the corresponding numbers.
To dial:
The following display appears (example):
The names appear in alphabetical order. You
can select additional names (to a maximum of
four)
To delete name (Julia in the example):
To select other functions:
-
Maintain pressure on the key for at
least three seconds.
mPress left/right side of key.
Names used only rarely are automatically deleted from the TOP 8 list; access is then
via the name dialing function.
Cellular phone
Name dialing
To dial:
Press right side of key.
The following display appears (example):
Access is restricted to names and telephone
numbers that have been entered and stored
previously (refer to manual supplied with cellular phone).
To select name:
mmm
Press key.
The following display appears (example):
The names appear in the display, and are replaced by the corresponding telephone numbers once three seconds have elapsed.
To call (for instance, Julia):
Press key,
then
Press left side of key.
To view additional names:
The names appear in alphabetical order. You
can view additional names by pressing
the IefVright side of the key.
Cellular phone
Fast dial
To activate:
Press right side of key.
Provided that you have already called the party
using name or telephone number, the following
display appears (example):
-
Press right side of key.
The following display appears:
This function is available only if 'you have previously entered and stored the name or number under a fast-dial code (refer to manual supplied with cellular phone).
To enter fast dial number:
m@mm
mPress key
The follow~ngdisplay appears:
Use keys 0 - 9 to enter the stored fast-dial
code for the desired number.
To change entry:
To select desired fast-dial code
number using scan mode:
Press left or right side of key to
continue through sequence or
overwrite number.
b d
Press leftlnght side of key.
If no data are available for the selected fastdial code number, the following display appears:
mmmmsrlp;lY
Cellular phone
Manual dialing
To select:
Press right side of key.
The following display appears:
A. To dial an unstored
number:
The following display appears:
Use keys 0 - 9 to enter the desired telephone
number.
To correct your entry:
Briefly press the left side of the key
mto delete the digits one at a time.
y
Maintain pressure on the left side
delete the complete
number.
Lof the key to
B. To select a specific number
using the scan mode:
Press IetVright side of key.
You can use the scan key to display and then
dial the last ten numbers called.
Cellular phone
Notebook function
You can enter new numbers in the notebook memory while phoning.
To select Notebook function:
Press right side of key.
The following display appears:
Press key.
The following display appears:
Use keys 0 - 9 to enter the telephone number.
To correct your entry:
Briefly press the left side of the key
to delete the digits one at a time.
Maintain pressure on the left side
of the key to delete the complete
number.
To store a number:
To select number directly
from notebook memory:
Press right side of key.
Press this key,
mthen
Press left side of key.
Cellular phone
Auxiliary functions
A display of reception signal strength and call duration is available when any phone
function is active.
To select display:
Press right side of key.
The following display appears:
Select display:
w>."7.*.
Press left side of key.
The following display appears:
The signal strength always appears immediately after a connection is made.
To request call duration d~splay:
..sq..r:-r..
7
Press key
The running time for the current call appears in
the display. Press the signal level key for a display of the reception signal level.
To return to initial function:
,+Ti, .T?.
i
1 Press right side of key.
-
Acronyms/Displays/Status reports
-
-
Acronyms/Displays/Status reports
Display code
Description
AM
Waveband
AMA
Waveband (Autostore)
AUTOSTORE
AUTOSTORE - Automatically stores the six frequencies
providing the best reception in the FM band.
BAL
BALANCE - Left to right speaker volume adjustment.
BASS
BASS - Low sound frequency adjustment.
CD CHECK
Appears while the unit registers the contents of the CD
magazine.
Dolby and the double D symbol are registered trademarks
of the Dolby Laboratories Licensing Corporation. Dolby
noise suppression systems are manufactured under a licensing agreement with the Dolby Laboratories Licensing
Corporation.
FADER
FADER - Front to rear volume adjustment.
FLAT
Center (default) position for all sound adjustments.
FM
Broadcast band.
FMA
Broadcast band (Autostore).
HIGH TEMP
Unit overheated.
Sound reproduction resumes automatically once the unit
has cooled back down to its normal operating temperature.
LOUDNESS - Amplifies the bass tones at low listening
volumes.
NO DISCS
No compact discs in the changer's magazine
NO MAGAZINE
No magazine inserted in CD changer.
NO STATION
Appears when no Weather Band stations are available.
NO TAPE
No cassette in player.
SC
Appears during scanning.
ST
Indicates stereo reception
TAPE AIB
Cassette side AIB
TAPE ERROR
Defective cassette.
TREB
TREBLE adjustment.
Abbreviations 57
Acronyms 57
Activation times
Parked-car ventilation 31
Arrival time 37
Autostore 13
Average fuel consumption 39
Average speed 40
Call duration 56
Cassette mechanism, cleaning 18
Cassette player
Error codes 18
Fast forward/rewind 16
General information 18
Music search 17
Starting 15
Stopping 15
Cassette side selection 6
CD changer 23
General information 23
Installation position 24
Magazine installation 24
Maaazine removal 23
~agazine,loading and removing
CDs 24
CD listening
Track selection 19
CD selection 19
Fast forward/reverse 22
Random play 22
Starting 19
Terminating 19
Track search, forwardlreverse 20
Cellular phone 49
Activation 49
Auxiliary functions 56
BMW Help 50
Fast dial 53
Manual dialing 54
Name dialing 52
Notebook function 55
TOP 8 51
Center position (tone adjustment) 6
Code 41
Deactivating 42
Activating 41
Controls
MID 3,4
Radio 5,6
Cruising range 38
Date 4
Reset 29
Display request 27
Digital clock 27
Digital Sound Processing, see DSP
Displays 57
Distance to destination 36
Dolby 6, 57
DSP
Activation 45
Standard programs 46
Program selection 46
User-defined memory 47
Emergency deactivation 42
ERROR 57
Error reports 18
Essential functions
Radio 5, 6
MID 3,4
Estimated time of arrival (ETA) 37
Estimated cruising range 38
Fast-dial feature 51
FLAT 57
Activation 6
Fuel consumption 39
General information
Cassette player 18
Limit 32
Manual search 6,10
Multi-function steering wheel
Sound system controls 23
Telephone controls 24
Music search 17
NO DISCS 57
NO MAGAZINE 57
NO STATION 57
NO TAPE 57
Noise suppression 6
Notebook 55
Onboard computer 33
Activating 33
General 33
Remote operation 43
Parked-car heatinglventilation 31
Manual control 32
Activation times 31
Programming stations 13
Index
-.
Radio 5. 6
Essential functions
Random play 22
SCAN search 10,20
Speed limit 34
Station selection 9
Auto, search 9
Manual search 10
SCAN search 10
Station keys 6
Status reports 55
Stopwatch mode 30
Storing stations 13
Summaries
MID Multi-Information Display 3,4
Radio 5, 6
Supplementary functions
Cellular phone 56
Time 4
Reset 28
Time and date request 27
Tone adjustment 6
TOP 8 51
Vehicle immobilzation, enhanced
(code) 41
Waveband 9, 13
Selection 6
Best. Nr. 01 41 9 789 777
US-englisch bo