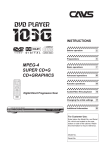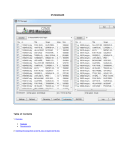
1
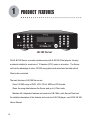
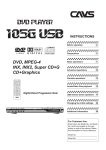
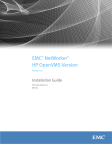
CAVS JB-199
SERVER
Digital Karaoke Jukebox Player
USER’S MANUAL
Be sure to read this manual before starting the operation of the unit.
Also refer to JB-199 User’s Manual for full features and controls of
JB-199 Server player.
POWER
MIC.1
JB/CD
MIC. 2
TEMPO UP
BGV
KEY b
LIST
MENU
TEMPO DOWN
VOCAL
MIC.1
MIC. 2
ECHO
KEY #
R
JB-199
JB-199
Client 1
POWER
MIC.1
JB/CD
MIC. 2
POWER
BGV
TEMPO UP
KEY b
LIST
MENU
TEMPO DOWN
VOCAL
MIC.1
MIC. 2
ECHO
JB/CD
KEY #
MIC.1
R
MIC. 2
TEMPO UP
BGV
KEY b
LIST
MENU
TEMPO DOWN
VOCAL
MIC.1
MIC. 2
ECHO
KEY #
R
JB-199
JB-199
JB-199
JB-199
Client 9
Client 2
JB-199 Server
POWER
BGV
TEMPO UP
KEY b
LIST
MENU
TEMPO DOWN
VOCAL
MIC.1
MIC. 2
ECHO
JB/CD
BGV
TEMPO UP
POWER
JB/CD
KEY #
R
KEY b
LIST
KEY #
MENU
TEMPO DOWN
VOCAL
..
.MIC.1
MIC. 2
ECHO
MIC.1
MIC. 2
TEMPO UP
BGV
KEY b
LIST
MENU
TEMPO DOWN
VOCAL
MIC.1
MIC. 2
ECHO
KEY #
R
JB-199
JB-199
JB-199
JB-199
R
JB-199
JB-199
...
...
...
...
...
Client 8
...
...
MIC. 2
...
MIC.1
. .
JB/CD
MIC. 2
. .
MIC.1
. .
POWER
Client 3
Router / Switch
POWER
MIC.1
JB/CD
MIC. 2
TEMPO UP
POWER
BGV
KEY b
LIST
KEY #
MENU
TEMPO DOWN
VOCAL
MIC.1
MIC. 2
ECHO
MIC.1
R
JB/CD
MIC. 2
TEMPO UP
BGV
KEY b
LIST
MENU
TEMPO DOWN
VOCAL
MIC.1
MIC. 2
ECHO
KEY #
R
JB-199
JB-199
JB-199
JB-199
Client 7
Client 4
POWER
MIC.1
JB/CD
MIC. 2
TEMPO UP
POWER
BGV
KEY b
LIST
MENU
TEMPO DOWN
VOCAL
MIC.1
MIC. 2
ECHO
JB/CD
KEY #
R
JB-199
JB-199
Client 6
MIC.1
MIC. 2
TEMPO UP
BGV
KEY b
LIST
MENU
TEMPO DOWN
VOCAL
MIC.1
MIC. 2
ECHO
KEY #
R
JB-199
JB-199
Client 5
CAVS JB-199
SERVER
Digital Karaoke Jukebox Player
Contents
1. Product features
2
2. How to connect
3
3. HOW TO SETUP JB-199 SERVER
4
4. HOW TO SETUP JB-199 CLIENT
4
5. HOW TO CONVERT JB-199 TO JB-199 CLIENT
7
6. HOW TO LOAD SONGS ONTO JB-199 SERVER
10
1. Loading from JB-199 (Client/Standard)
2. Loading from a single JB-199 (Client/Standard)
3. Load Songs from other media
(CD+G disc, CDG or MCG file, SCDG disc)
10
11
12
1
PRODUCT FEATURES
BGV
LIST
KEY #
MENU
TEMPO DOWN
VOCAL
MIC.1
MIC. 2
ECHO
R
JB-199
JB-199
...
...
...
...
...
...
...
...
...
MIC. 2
TEMPO UP
KEY b
. .
MIC.1
JB/CD
. .
POWER
. .
JB-199 Server
CAVS JB-199 Server connects simultaneously with 9 JB-199 Client players, forming
a network suitable for maximum of 10 karaoke (KTV) rooms in a location. The Server
unit has the advantage to store 100,000 song data inside and share the data with all
Client units connected.
The main features of JB-199 Server are:
Store 100,000 songs of DVD, VCD, CD+G, MIDI and CD formats.
Share the song data between the Server and up to 9 Client units.
Maintain full indepedent features and controls of JB-199 in each Server/Client unit.
For detailed description of the features and controls of JB-199 player, see CAVS JB-199
User’s Manual.
2
2
HOW TO CONNECT
Up to 9 JB-199 Client players may be connected to a single JB-199 Server.
The connection of JB-199 Server and Clients is illustrated below.
It requires a Router/Switch* to connect JB-199 Server to JB-199 Clients.
The Router/Switch should be 100Mbps compatible and have the number of ports
equal to the number of JB-199 Clients plus 1.
*Router / Switch is not included in accessory.
CAUTION
RISK OF ELECTRIC SHOCK
DO NOT OPEN
WARNING: TO REDUCE
CAUTION: TO REDUCE THE RISK OF ELECTRIC
THE RISK OF FIRE OR
SHOCK, DO NOT REMOVE COVER, NO
ELECTRIC SHOCK, DO NOT
USER-SERVICEABLE PARTS INSIDE. REFER
EXPOSE THIS APPLIANCE TO SERVICING TO QUALIFIED SERVICE PERSONNEL.
VIDEO OUT
VIDEO IN
RAIN OR MOISTURE.
MOUSE
S-VIDEO
USB
KEYBOARD
INPUT
LAN
BILL / COIN
VGA
AUDIO OUT
AUDIO IN
RESET
CONTROL
OUTPUT
Router / Switch
POWER
MIC.1
JB/CD
MIC. 2
TEMPO UP
POWER
BGV
KEY b
LIST
MENU
TEMPO DOWN
VOCAL
MIC.1
MIC. 2
ECHO
JB/CD
KEY #
R
JB-199
JB-199
Client 1
MIC.1
MIC. 2
TEMPO UP
POWER
BGV
KEY b
LIST
MENU
TEMPO DOWN
VOCAL
MIC.1
MIC. 2
ECHO
JB/CD
KEY #
R
JB-199
JB-199
Client 2
MIC.1
MIC. 2
TEMPO UP
POWER
BGV
KEY b
LIST
MENU
TEMPO DOWN
VOCAL
MIC.1
MIC. 2
ECHO
JB/CD
KEY #
MIC.1
R
JB-199
JB-199
Client 3
...
MIC. 2
TEMPO UP
BGV
KEY b
LIST
MENU
TEMPO DOWN
VOCAL
MIC.1
MIC. 2
ECHO
KEY #
R
JB-199
JB-199
Client 9
3
3
HOW TO SETUP JB-199 SERVER
JB-199 Server will come with a golden sticker in the front panel indicating that it is a
factory-configured server.
Connect JB-199 Server to a power outlet using the power cord. Be sure to select a correct setting
for the POWER Selector (for example, 110V).
Connect JB-199 Server to an Audio Video system (for example, TV) using the AV cable.
Connect JB-199 Server to a Router/Switch using the LAN cable. The Router/Switch should be
100Mbps compatible with the number of ports equal to the number of JB-199 Clients (up to 9) you
wish to connect plus 1.
Power on JB-199 Server by pressing the Power button on the front panel. JB-199 Server will boot
up to the welcome message.
4
HOW TO SETUP JB-199 CLIENT
The following directions are only for JB-199 Client unit that is pre-configured to be a client.
For directions in converting your standatd JB-199 to JB-199 Client, refer to the Section:
How to Convert JB-199 to JB-199 Client.
Be sure to have JB-199 Server connected as shown in the Section 3: How to Setup JB-199 Server.
Requirements:
Router/Switch with the number of ports equal (or more) to the number of JB-199 Server
and Client(s).
PC monitors, mouses and keyboards (two sets or more)
4
HOW TO SETUP JB-199 CLIENT
1. Connect the PC monitor, mouse, and keyboard to JB-199 Server and JB-199 Client(s).
2. Connect JB-199 Server and all other JB-199 Clients to the same Router/Switch.
3. Turn on JB-199 Server first and then the JB-199 Client(s).
4. Set Computer Name and Workgroup name.
From JB-199 Server, press ALT-F4 on the keyboard to exit to Windows Desktop.
Then right click on My Computer, and select Properties and Computer Name.
Check for the workgroup name (for example, CAVS) of JB-199 Server.
From JB-199 Client, press ALT-F4 to exit to Windows Desktop.
Then right click on My Computer, and select Properties and Computer Name.
Press Change and type Computer name to be “Client-#” (# represents the client number.
For example, if it is 3rd client, the Computer name should be “Client-3”)
Type in the Workgroup name to be same as JB-199 Server.
Press Apply and restart JB-199 Client.
5. Edit JBConfig.txt
From JB-199 Server, double click on JB-199Startup.exe icon to restart the JB-199 program.
Using the remote control, press Menu and select 1. Jukebox.
Check for the IP address of JB-199 Server and write it down.
WARNING: If IP address is shown as 127.0.0.1, then restart the Router/Switch and the
JB-199 Server. Check for the IP address of JB-199 Server once again.
From JB-199 Client, press ALT-F4 to exit to Windows Desktop. Double click on
My Computer - Disk C: - NJB99 - Config, and finally double click on JBConfig.txt.
NOTE: If no such file exists, look for Config.txt.
5
HOW TO SETUP JB-199 CLIENT
Notepad program will open with JBConfig.txt file ready for editing.
In the text of JBConfig.txt, look for [System] section.
Within the section, there will be a line:
ip=192.168.1.102; Server IP address
Substitute the IP address in the line with the IP address of JB-199 Server obtained before.
For example, if JB-199 Server IP address was 192.168.0.105, modify the line to:
ip=192.168.0.105; Server IP address
After the change has been made, press File button of Notepad program and select Save, and
close the file.
6. Restart JB-199 Client.
7. Repeat above steps (1-6) for each JB-199 Client.
WARNING: For steps 2 thru 6, JB-199 Server must be turned on and connected to the
Router/Switch at all time.
6
5
HOW TO CONVERT JB-199 TO JB-199 CLIENT
The following directions are only for those who wishes to convert a JB-199 Standard to JB-199 CLIENT.
To convert JB-199 Dual Screen or Premier, please contact CAVS at [email protected].
Be sure to have JB-199 Server connected as shown in the Section 2: How to Setup JB-199 Server.
Requirements:
Router/Switch with number of ports equal (or more) to the number of JB-199
Server and Client(s)
PC monitors, mouses and keyboards (two sets or more)
JB-199 Client Program downloaded from www.cavsusa.com
1. Connect the PC monitor, mouse, and keyboard to JB-199 Server and JB-199.
2. Connect JB-199 Server and JB-199 to the same Router/Switch.
3. Turn on JB-199 Server first and then JB-199.
4. Set Computer Name and Workgroup name.
From JB-199 Server, press ALT-F4 on the keyboard to exit to Windows Desktop.
Then right click on My Computer, and select Properties and Computer Name.
Check for the workgroup name (for example, CAVS) of JB-199 Server.
From JB-199, press ALT-F4 to exit to Windows Desktop.
Then right click on My Computer, and select Properties and Computer Name.
Press Change and type Computer name to be “Client-#” (# represents the client number.
For example, if it is 3rd client, the Computer name should be “Client-3”)
Type in the Workgroup name to be same as JB-199 Server.
Press Apply and restart JB-199.
5. Download the JB-199 Client Program from www.cavsusa.com and save it in a PC. Unzip the
downloaded program into 4 files. Next transfer the files into JB-199 as follows:
From JB-199, press ALT-F4 to exit to Windows Desktop.
Transfer the 4 files into JB-199 using, for example, a USB memory device. If you have an
external CD/DVD disc drive, the files can be transferred using a disc also.
Copy Startup-n.bat to C:\NJB99\Prog folder of JB-199.
Copy JB99New.exe and JB99FTP.exe to C:\NJB99\Prog\Upgrade folder of JB-199
Double click to run JB199_Server.reg in JB-199 to update the registry.
7
HOW TO CONVERT JB-199 TO JB-199 CLIENT
6. Edit JBConfig.txt.
From JB-199 Server, double click on JB-199Startup.exe icon to restart the JB-199 program.
Using the remote control, press Menu and select 1. Jukebox.
Check for the IP address of JB-199 Server and write it down.
WARNING: If IP address in JB-199 Server is shown as 127.0.0.1, then restart the
Router/Switch and JB-199 Server. Check for the IP address of JB-199 Server once again.
In JB-199, double click on My Computer - Disk C: - NJB99 - Config, and finally double click on
JBConfig.txt.
NOTE: If no such file exists, look for Config.txt.
Notepad program will open with JBConfig.txt file ready for editing.
In the text of JBConfig.txt, look for [System] section.
In [System] section, append following 2 lines:
network=1 ; 0:off, 1:on(client only)
ip=192.168.1.102 ; Server IP address
Substitute the IP address in the line with the IP address of JB-199 Server obtained before.
For example, if JB-199 Server IP address was 192.168.0.105, modify the second line to:
ip=192.168.0.105; Server IP address
After 2 lines are appended and new IP address is entered, JBConfig.txt should look as follows
(contents and values may vary slightly):
[display]
window=0
; 0:full, 1:window mode
videotype=0
; 0:full, 1:auto size
screen=800,600,32
; defualt=800,600,32
FrameRate=75
; 75 frame/sec
program=0
; 0:normal, 1:RG mode (support)
;
[system]
comm=1,115200,n,8,1
; default : comm
comm2=2,115200,n,8,1
; serial remocon
network=1 ; 0:off, 1:on(client only)
ip=192.168.1.102 ; Server IP address*
;
[screen]
...
8
Press File button of Notepad program and select Save, and close the file.
HOW TO CONVERT JB-199 TO JB-199 CLIENT
7. Set Map Network Drive
From JB-199, go to Windows Desktop and then right click on My Network Places.
Select Map Network Drive and choose Browse.
Select Entire Network, Microsoft Windows Network, and CAVS.
Select JB199 Server, and right click on Songs folder.
Choose Map Network Drive.
Set drive letter as N:
Check Reconnect at logon and press Finish.
8. Restart JB-199. The unit is now ready as JB-199 CLIENT.
9. Repeat above steps (1-6) for each JB-199(s).
WARNING: For steps 2 thru 6, JB-199 Server must be turned on and connected to the
Router/Switch at all time.
9
6
1
HOW TO LOAD SONGS ONTO JB-199 SERVER
Loading from JB-199 (Client/Standard)
Connect PC Monitor, keyboard, and mouse to JB-199 (Client/Standard).
Connect both JB-199 Server and JB-199 (Client/Standard) to a Router/Switch.
Power on the Router/Switch, JB-199 Server, and then JB-199 (Client/Standard) in order.
In JB-199 Server, using the remote control, select Menu and 1. Jukebox. Obtain the IP address.
In JB-199 (Client/Standard), press ALT-F4 to go to Windows Desktop.
Double click on CAVS JB-199 Manager icon. Select JB199 Manager among 4 options.
Press the LOG IN button and type in the IP Address obtained above from JB-199 Server. Type in
the User ID and Password. The default values are
User ID: cavsadmin
Password: jb199admin
Press the FOLDER button on the left window. Select the Songs folder in JB-199 (Client/Standard).
For dual partitioned hard drive, Songs folder is located at D:\Songs
For single partitioned hard drive, Songs folder is located at C:\NJB99\Songs
Next select a subfolder, for example, JB001000, in the Songs folder. It is strongly recommended
to select the subfolders in sequence to transfer the songs in original order.
Place a check mark (by a single click) on the box at the top of the left window. Check mark will be
placed on all the songs of the subfolder.
Press Auto Numering button and assign a starting song number. JB-199 Manager will
automatically assign the very last number available in JB-199 Server. You can also manually type
in a number to customize the song numbers.
WARNING: When typing in a starting number manually, be careful not to overwrite any existing
songs in JB-199 Server.
10
HOW TO LOAD SONGS ONTO JB-199 SERVER
Press Save List and press the Right Arrow (in the center of the program) to begin the transfer of
the song files to JB-199 Server.
Repeat above steps for each subfolders inside Songs folder to transfer the entire song library of
JB-199 (Client/Standard).
2
Loading from a single JB-199 (Client/Standard)
This section describes a more convenient way to transfer song data from JB-199 (Clinet/Standard)
to JB-199 Server. This method however is only valid when there is only one JB-199
(Client/Standard) unit to transfer the song data from. If there are more, you must then transfer the
song data starting from the second JB-199 (Client/Standard) using the method described in
Subsection 1: Loading from a JB-199 (Client/Standard).
A. Loading through LAN connection
1. Connect PC Monitor, keyboard, and mouse to both JB-199 Server and JB-199 (Client/Standard).
2. Connect both JB-199 Server and JB-199 (Client/Standard) to a same Router/Switch.
3. Power on the Router/Switch, JB-199 Server, and then JB-199 (Client/Standard) in order.
4. In JB-199 (Client/Standard), press ALT-F4 to go to Windows Desktop.
5. Double click on My Computer. Double click on Data D: and locate Songs folder
(if Data D: is not available, double click on C: and NJB99 to locate Songs folder).
6. Right click on Songs folder and select Sharing and Security.
7. Click on “If you understand the security risks but want to share files ...
8. Select “Just enable file sharing” and press OK.
9. Click on “Share this folder on the network” and press Apply, and move back to Windows Desktop.
10. Right click on My Computer, select Properties, and select Computer Name.
11. Make note of the Computer name and Workgroup name.
12. In JB-199 Server, press ALT-F4 to go to Windows Desktop.
13. Double click on My Network Places, Entire Network, and Microsoft Windows Network.
14. Double click on Workgroup name of JB-199 (Client/Standard) which we noted above.
15. Double click on Computer name of JB-199 (Client/Standard) which we noted above.
16. Right click on Songs folder and select Copy.
11
HOW TO LOAD SONGS ONTO JB-199 SERVER
17. Move to Windows Desktop. Double click on My Computer and Data D:
Right click on Songs folder and and select Paste.
B. Loading through an external USB hard drive
1. Connect PC Monitor, keyboard, and mouse to both JB-199 Server and JB-199 (Client/Standard).
2. Connect both JB-199 Server and JB-199 (Client/Standard) to a same Router/Switch.
3. Power on the Router/Switch, JB-199 Server, and then JB-199 (Client/Standard) in order.
4. In JB-199 (Client/Standard), press ALT-F4 to go to Windows Desktop.
5. Double click on My Computer. Double click on Data D: and locate Songs folder
(if Data D: is not available, double click on C: and NJB99 to locate Songs folder).
6. Right click on Songs folder and select Copy.
7. Connect the external USB hard drive to JB-199 (Client/Standard) and turn it on.
8. Open the external USB hard drive from My Computer and right click to paste Songs folder.
9. Once the copying of the folder is completed, disconnect the external USB hard drive and
connect it to JB-199 Server.
10. In JB-199 Server, press ALT-F4 to go to Windows Desktop.
11. From My Computer, open the external USB storage device and right click on the Songs folder.
Select Copy.
12. From My Computer, double click on Data D: and right click on the Songs folder. Select Paste.
NOTE: It is important to verify if there is enough space available on the external USB hard drive
to hold the entire Songs folder. If not, double click on the Songs folder and copy a group of subfolders
at a time to complete the copying of the entire folder.
3
Load Songs from other media
(CD+G disc, CDG or MCG file, SCDG disc)
Refer to Disc Capture (page 31), Download (page 33), and JB-199 Manager Program (page 38)
of JB-199 User’s Manual for information.
12
CAVS USA INC.