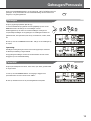
1
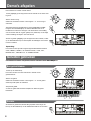
ELEKTRONISCH
KEYBOARD
Medeli
MC37A / MC49A
Gebruiksaanwijzing
De gebruikte afbeeldingen zijn van de MC37A. Bediening en functies,
alsmede de benaming op de MC49A zijn identiek, afgezien van ontbrekende
functies. Deze functies zijn in deze handleiding als zodanig gemarkeerd.
VEILIGHEIDSINFORMATIE
WAARSCHUWING
FCC-VOORSCHRIFTEN
(VOOR (for
DE VS)
THE FCC REGULATION
WARNING
USA)
Deze
apparatuurhas
is getest
bevonden
te voldoen
aanwith
de
This equipment
been en
tested
and found
to comply
beperkingen
van
een
Class
B
digitaal
apparaat,
volgens
the limits for a Class B digital device, pursuant to Part 15Part
of
15
deRules.
FCC-reglementen.
thevan
FCC
De
beperkingen
ontwikkeld
om een
redelijke bescherming
These
limits arezijn
designed
to provide
reasonable
protection
te
bieden
tegen
schadelijke
storingen
bij
huishoudelijk
against harmful interference in a residential
installation. This
gebruik. Deze apparatuur genereert en gebruikt
equipment generates, uses, and can radiate radio frequency
radiofrequenties en kan, indien niet geïnstalleerd en gebruikt
energy and, if not installed and used in accordance with the
volgens de aanwijzingen, schadelijk interfereren met
instructions, may cause
interference
radio
radiocommunicatie.
Er is harmful
echter geen
garantietodat
er zich in
communications.
However,
there
is
no
guarantee
bepaalde situaties geen interferenties voordoen. that
interference
willapparatuur
not occur schadelijke
in a particular
installation.
Wanneer
deze
storingen
bij tv- en
If this equipmentveroorzaakt,
does causewat
harmful
interference
to radiodoor
or
radio-ontvangst
kan worden
vastgesteld
television
reception,
which
can be determined
by turning
het
apparaat
uit en aan
te schakelen,
is het raadzaam
omthe
de
equipment
and on,
the
is encouraged
to trytetonemen:
storing
op teoff
heffen
door
deuser
volgende
maatregelen
correct the interference by one or more of the following
•measures:
Roteer of verplaats de ontvangende antenne
• Vergroot de afstand tussen het apparaat en de ontvanger
Reorient
or relocate
the
antenna.
• Sluit
de apparatuur
aan
opreceiving
een andere
wandcontactdoos
Increase
between
thevan
equipment
and
die
zich nietthe
in separation
dezelfde groep
als die
de ontvanger
receiver.
bevindt
Connect
equipment into
an outlet
onradioa circuit
• Vraag
een the
wederverkoper
of een
ervaren
of tvdifferent from that to which the receiver is connected.
technicus om hulp.
Consult the dealer or an experienced radio/TV technician
for help.
Ongeoorloofde veranderingen of modificaties aan de
apparatuur
kunnen
leiden
het vervallen
vansystem
het recht
Unauthorized
changes
or tot
modification
to this
canop
het
gebruik
van
de
apparatuur.
void the user's authority to operate this equipment.
Voorzichtig!
CAUTION
Sterke
magnetische
kunnen het
The normal
functionvelden
of the product
maynormaal
be disturbed by
functioneren
vanMagnetic
het apparaat
verhinderen.
dan
de
Strong Electro
Interference.
If so,Volg
simply
reset
resetprocedure
zoals
beschreven
in
de
handleiding.
Als
the product to resume normal operation by following the
dat niet helpt, gebruik het apparaat dan op een andere
owner's manual. In case the function could not resume,
locatie.
please use the product in other location.
VOORZORGSMAATREGELEN
PRECAUTIONS
LEES
AANDACHTIG
ALVORENS
VERDER
TE GAAN
PLEASE
READ CAREFULLY
BEFORE
PROCEEDING
Voeding
Bewaar
deze this
handleiding
opaeen
als reference.
naslag bij
Please keep
manual in
safeveilige
place plaats
for future
toekomstig
gebruik. lichtnetadapter aan op een stopcontact
Sluit
de bijbehorende
Power
met
het Supply
juiste voltage.
Please connect the designated AC adaptor to an AC outlet
Sluit het niet aan op een stopcontact met een ander voltage
of the correct voltage.
dan waarvoor het apparaat bedoeld is.
Do not connect
it to an AC outlet
of voltage
other than
that
Ontkoppel
de lichtnetadapter
wanneer
het apparaat
niet
in
for which
is intended.
gebruik
is your
of in instrument
het geval zich
onweer voordoet.
Unplug the AC power adaptor when not using the
Aansluitingen
instrument, or during electrical storms.
Alvorens het instrument op andere apparatuur aan te sluiten,
Connections
schakel
alle betreffende apparaten eerst uit.
Before connecting the instrument to other devices, turn off
the power to all units. This will help prevent malfunction and
Plaatsing
/ or damage to other devices.
Stel het apparaat niet bloot aan omstandigheden die
vervorming,
Location verkleuring of nog ernstiger schade veroorzaken:
Do not expose the instrument to the following conditions to
avoid deformation, discoloration, or more serious damage:
• Direct zonlicht
• Extreme temperaturen of vochtigheid
Direct sunlight
• Overmatig
stof en vuil or humidity
Extreme temperature
• Sterke
trillingen
of schokken
Excessive dusty
or dirty location
• InStrong
de nabijheid
van
magnetische
velden
vibrations or
shocks
Close to magnetic fields
Storingen
opwith
andere
elektrische
Interference
other
electricalapparaten
devices
Radioʼs
en tvʼs
die dichtplaced
bij het nearby
apparaat
staan
kunnen
Radios and
televisions
may
experience
storende
signalen
ontvangen.
Gebruik
het
apparaat
reception interference. Operate this unit at a suitableop een
geschikte
afstand
vanand
radioʼs
en tvʼs.
distance from
radios
televisions.
Cleaning
Clean only with a soft, dry cloth.
Reiniging
Reinig
met een zachte,
doek.
Do notuitsluitend
use paint thinners,
solvents,droge
cleaning
fluids, or
Gebruik
geen verfverdunner,
chemical-impregnated
wipingoplosmiddelen,
cloths.
schoonmaakmiddelen of met chemische middelen
Handling
geïmpregneerde
schoonmaakdoekjes.
Do not apply excessive
force to the switches or controls.
Do not let paper, metallic, or other objects into the
Behandeling
instrument. If this happens, unplug the AC adaptor from the
Gebruik geen overmatige kracht bij de bediening van
wall outlet. Then have the instrument inspected by qualified
schakelaars en knoppen.
service personnel.
Zorg dat er geen papieren, metalen of andersoortige
voorwerpen
in het
apparaat
Ontkoppel de
Disconnect all
cables
beforeterechtkomen.
moving the instrument.
lichtnetadapter als dit toch gebeurt. Laat vervolgens het
apparaat inspecteren door geschoold servicepersoneel.
Ontkoppel alle kabels alvorens het apparaat te verplaatsen.
2
Inhoudsopgave
Beschrijving bedieningspaneel en –venster
Beschrijving bedieningspaneel en –venster
Panel & Display Description
Frontpaneel
4
MC37A
Front Panel...................................................4 5
Achterpaneel
Frontpaneel
Rear Panel....................................................4 25
LCD-venster
Achterpaneel
3
Display..........................................................5
LCD-venster
Voorbereiding
Setup
Voeding
MC49A
3
6
Power Supply................................................6 4
Frontpaneel
Aansluitingen
Achterpaneel
5
Een
hoofdtelefoon aansluiten
7
Connections
LCD-venster
5
Een
versterker aansluiten
Connecting
a pair of Headphones................7 7
Een microfoon aansluiten
7
Connecting
an Amplifier ................................7 7
Voorbereiding
Een
computer
aansluiten
Voeding
6
Connecting a Microphone.............................7
Connecting
a Computer ................................7 8
Demoʼs
afspelen
Aansluitingen
Een hoofdtelefoon aansluiten
7
Geluiden
gebruiken
Playing
the
Demos......................................8 7
Een
versterker
aansluiten
Een microfoon
geluid kiezen
8
Een
aansluiten
7
Sustain
8
Playing
the
Voices
Een
computer
aansluiten
7
Modulatie
Selecting a Voice..........................................8 9
DSP-effect
9
Demoʼs
afspelen
Sustain
..........................................................8 89
Transponeren
Modulation....................................................9 9
Piano
Geluiden
gebruiken
DSP Effect
.....................................................9
Een geluid kiezen
8
Transpose
98
.....................................................
Styles
gebruiken
Sustain
Piano
9109
.............................................................
Een
Style
kiezen
Modulatie
Een
Fill
afspelen
10
DSP-effect
9
Sync
10
Playing the Styles
Transponeren
9
Begeleidingsvolume
Selecting a Style.........................................10109
Piano
Tempo
Playing a Fill................................................1011
Akkoordvingerzetting
11
Styles
Syncgebruiken
............................................................1012
Eenknops-instellingen
Een
Style kiezen
Accompaniment
Volume.............................1010
Een Fill afspelen
Tempo.........................................................1110
Sync
10
Chord Fingering..........................................1110
Begeleidingsvolume
One Touch Setting......................................1211
Tempo
Akkoordvingerzetting
11
Eenknops-instellingen
12
Geheugen/Percussie
Memory/Percussion
Geheugen
13
Memory.......................................................13
Percussie
13
Percussion..................................................13
Akkoordenboek
14
Chord Dictionary......................................14
Metronoom
Metronome
Metronoom
inschakelen
14
Turning kiezen
on the Metronome.........................14
Maatsoort
14
Selecting the Beat......................................14
Songs afspelen
Playing
the Songs
Songs
beluisteren
15
Listening to the Songs................................15
Les-modus
15
Lesson Mode..............................................15
Opname en weergave
16
Recording and Playback..........................16
MIDI-functies
Wat
is MIDI?
17
MIDI
Functions
MIDI-aansluitingen
17
What’s MIDI?..............................................17
MIDI Terminals............................................17
Probleemoplossing
18
Specificaties
Trouble Shooting......................................1818
Appendices
Specifications...........................................18
Geluidenlijst
19
Style-lijst
20
Appendices
Songlijst
21
Voice List....................................................19
Akkoordenlijst
22
Style List.....................................................2320
Midi-implementatiekaart
Song List.....................................................21
Chord List...................................................22
MIDI Implementation Chart.........................23
De gebruikte afbeeldingen zijn van de MC37A. Bediening en functies,
alsmede de benaming op de MC49A zijn identiek, afgezien van ontbrekende
functies. Deze functies zijn in deze handleiding als zodanig gemarkeerd.
3
Beschrijving bedieningspaneel en -venster
Frontpaneel
Front Panel
MC37A
13
7
8
11
9
12
10
1
14
15
2
5
3
4
6
1. POWER
ON/OFF
Aan/uit-schakelaar
Turn thehet
power
on and
offof
. uit.
Schakelt
apparaat
aan
2. A.B.C
A.B.C..
Turn
Chord Mode on
and
.
Zet
de the
Akkorden-modus
aan
enoff
uit.
Start/Stop
3. START/STOP
Start
stop playing
the songvan
in een
Start
ofor
beëindigt
het afspelen
Song
Mode
.
song
in de
Song-modus.
Start
stop playing
the stylevan
in Style
Start
of or
beëindigt
het afspelen
een
Mode
. Style-modus.
style
in de
4. SYNC/FILL
Sync/Fill
Turn the
SYNC
START
off.een
Schakelt
Sync
Start
aan ofon
uit.and
Start
Play the FILL
Fill.
5.
5. Recording
RECORDING
RECORD:
totRecord
de
RECORDToegang
: Enter the
Mode.
opnamemodus.
PLAY: Play back the recorded
PLAY:
Een opgenomen
uitvoering
performance
.
afspelen.
10. Store
STORE
Instellingen
in het geheugen
Registeropslaan
the memory.
6. M1-M5/PAD1-PAD5
6. M1-M5/PAD1-PAD5
Recall the memory settings.
Roept geheugeninstellingen op.
Play the
percussion sound.
Bespeel
percussiegeluiden.
12. Function
FUNCTION
Verander
de the
gekozen
functie.
Change
adjusted
function.
11. Style
STYLE
Geeft
toegang
tot de
Style-modus.
Enter
the Style
Mode.
13.
13. Voice
VOICE
Geeft
toegang
tot deMode.
Geluiden-modus.
Enter
the Voice
7. Master
MASTER
7.
VolVOL
Adjust the
volume.
Instelling
vanmaster
het mastervolume
14.
14. Song
SONG
Geeft
toegang
tot deMode.
Song-modus.
Enter
the Song
8. Acc.
ACC.VOL
8.
Vol
Adjust
volume.
Instellingthe
vanaccompaniment
het begeleidingsvolume
15.
15. O.T.S.
O.T.S.
Toegang
Eenknops-modus.
Entertot
thede
One
Touch Setting Mode.
9. Tempo
TEMPO
9.
Adjust the
tempo.
Instelling
vancurrent
het tempo
Achterpaneel
Rear Panel
24.
24. DC
DC 9V
9V
Aansluiting
van 9V).
Connectvoor
DV netvoedingsadapter
9V power adaptor (optional
gelijkstroom (optioneel).
25. PHONES/OUTPUT
25. Phones/Output
Connect a pair of headphones.
Aansluiting
hoofdtelefoon
Connectvoor
the een
audio
equipment. of externe
versterkingsapparatuur.
26. USB
26. USB
Connect to a computer
Aansluiting voor een computer.
27. MIC IN
27. Mic
In a microphone.
Connect
Aansluiting voor een microfoon.
24
27
26
25
24
Beschrijving bedieningspaneel en -venster
MC37A
23
18
22
17
21
16
19
20
16.
16.Memory/Perc.
MEMORY/PERC.
Switch
the M1-M5/PAD1-PAD5
's
Schakel
tussen
M1-M5- en PAD1-PAD5function
between
anden
functies,
wissel
tussenmemory
geheugen
percussion.
percussie.
17.Modulation
MODULATION
17.
Turnmodulatie-effect
the Modulation aan
effect
Zet het
enon
uit.and off.
18.
Dict.DICT.
18.Lesson/Chord
LESSON/CHORD
Verander
de Les-modus.
Change
the Lesson mode.
Toegang
hetChord
Akkoordenboek
Entertotthe
Dictionary.
21.
21.Sustain
SUSTAIN
Zet het
Sustain-effect
aan ofon
uit.and off.
Turn
the Sustain effect
22.
22.Metro
METRO
Zet de
metronoom
aan of on
uit.and off.
Turn
the metronome
19.
toetsen
19.Numerieke
NUMBER KEYS
GeefSelect
een getal
of stelor
parameters
the in
number
adjust the
bij. parameters.
23.
23.Piano
PIANO
Toegang
dePiano
Piano-modus.
Entertot
the
Mode.
20.
20.DSP
DSP
Turn
the DSP effect
Zet het
DSP-effect
aan ofon
uit.and off.
Display
1.
DSP
1.DSP
10.
Tempo/Tellen
10.TEMPO/COUNT
2.
Les 1
2.LESSON
1
11.
Begeleidingsvolume/
11.ACCOMP
VOLUME/
Mastervolume
MASTER
VOLUME
3.
Les 2
3.LESSON
2
4. Les 3
4.LESSON 3
5. Akkoord
5.CHORD DIRECT
6. Auto Basakkoord
6. AUTO BASS CHORD
7. G-sleutel
7.TREBLE CLEF
8. F-sleutel
8.BASS CLEF
9. Maataanduiding
9.BEAT
12.
Metronoom
12.METRO
13. Geheugen/Percussie
13.MEMORY/PERCUSSION
5
6
1
2
3
4
13
14
DSP
Lesson 1
Lesson 2
Lesson 3
7
8
10
15
11
9
12
16
17
14. Opname/weergave
14.RECORD/PLAY
15. Eenknops-instelling
15.ONE TOUCH SETTING
16. Sustain
16.SUSTAIN
17. Klavier
17.KEYBOARD
35
Beschrijving bedieningspaneel en -venster
Frontpaneel
Front Panel
MC49A
o
o
4
3
2
1
5
6
7
8
9
10
11
6. Sync/Fill
Schakelt
Sync Start aan of uit. Start een
6. SYNC/FILL-IN
Fill.Turn the SYNC START on and off.
Play the FILL-IN
7. A.B.C.
7. A.B.C.
Zet
de Akkorden-modus aan en uit.
Turn the Chord Mode on and off.
8. Record
8. RECORD
Toegang
tot de opnamemodus.
Enter the Record Mode.
4. Tempo
4. TEMPO
9. Tempo
Instelling van het tempo
Adjust the current tempo.
9. PLAY van het tempo
Instelling
Play back the recorded performance.
5. START/STOP
Start/Stop
5.
10. Function
Start
of or
beëindigt
het afspelen
een song
in Verander
Start
stop playing
the songvan
in Song
Mode.
10. FUNCTION
de gekozen functie.
deStart
Song-modus.
or stop playing the style in Style Mode.
Change the adjusted function.
Start of beëindigt het afspelen van een style in
de Style-modus.
1. Aan/uit-schakelaar
1.
POWER
Schakelt
hetON/OFF
apparaat aan of uit.
Turn the power on and off.
2. Master Vol
2.
MASTER
Instelling
vanVOLUME
het mastervolume
Adjust the master volume.
3. Acc. Vol
3.
ACC.VOL
Instelling
van het begeleidingsvolume
Adjust the accompaniment volume.
12
13
14
11. Song
Geeft
toegang tot de Song-modus.
11. SONG
Enter the Song Mode.
12. Style
Geeft
toegang tot de Style-modus.
12. STYLE
Enter the Style Mode.
13. Voice
Geeft
toegang tot de Geluiden-modus.
13. VOICE
Enter the Voice Mode.
14.
14. O.T.S.
O.T.S.
Toegang
Eenknops-modus.
Entertot
thedeOne
Touch Setting Mode.
Achterpaneel
Rear Panel
23. DC 9V
23.
DC 9V voor netvoedingsadapter van 9V
Aansluiting
Connect DC
9V power adaptor (optional).
gelijkstroom
(optioneel).
24.
24. PHONES/OUTPUT
Phones/Output
Connectvoor
a pair
of hoofdtelefoon
headphones. of externe
Aansluiting
een
Connect the audio equipment.
versterkingsapparatuur.
25.
25. USB
USB
Connectvoor
to a een
computer.
Aansluiting
computer.
4
23
24
25
Beschrijving bedieningspaneel en -venster
MC49A
16
15
18
19
17
20
21
22
15. DSP
DSP
15.
Zet Turn
het DSP-effect
aan of
the DSP effect
onuit.
and off.
17.
17. Modulatie
MODULATION
Zet het
enon
uit.and off.
Turnmodulatie-effect
the Modulation aan
effect
16. CHORD
DICT./LESSON
Chord Dict./Lesson
Enter or
the Lesson mode.
Verander
dechange
Les-modus.
Enter tot
thehet
Chord
Dictionary.
Toegang
Akkoordenboek
18. Sustain
SUSTAIN
18.
TurnSustain-effect
the Sustain effect
and off.
Zet het
aan ofonuit.
20.
+,+,
-, -,
Numerieke
20.
NUMBER toetsen
KEYS
Geef een
getal
of stel parameters
Select
theinnumber
or adjust the
bij.. parameters.
21.
STORE
21.
Store
Register
the memory.
Instellingen
opslaan
in het geheugen.
19. Metronome
METRONOME
19.
Turn the metronome on and off.
Zet de metronoom aan of uit.
22. M1-M4
22. M1-M4
Recall the memory settings.
Roept geheugeninstellingen op.
Display
1. DSP
1.DSP
10. Tempo/Tellen
10.TEMPO/COUNT
2. Les 1
2.LESSON 1
11. Begeleidingsvolume/
11.ACCOMP VOLUME/
Mastervolume
MASTER VOLUME
3. Les 2
3.LESSON 2
4. Les 3
4.LESSON 3
5.
5.Akkoord
CHORD DIRECT
6.
Basakkoord
6.Auto
AUTO
BASS CHORD
7.
G-sleutelCLEF
7.TREBLE
12.
12Metronoom
.METRONOME
13.
13Geheugen/Percussie
.MEMORY/PERCUSSION
5
6
1
2
3
4
13
14
DSP
Lesson 1
Lesson 2
Lesson 3
7
8
10
15
11
9
12
16
17
14.
14Opname/weergave
.RECORD/PLAY
15.
15Eenknopsinstelling
.ONE TOUCH SETTING
16.
16Sustain
.SUSTAIN
8.
F-sleutel
8.BASS
CLEF
17.
17Klavier
.KEYBOARD
9.
Maataanduiding
9.BEAT
5
Voorbereiding
Deze
sectie behandelt
het opzetten
van het
instrument
de voorbereidingen
alvorens
gaan spelen.
Leesthis
deze
This section
contains information
about
setting
up your en
instrument
and preparing
to play.tePlease
go through
section carefully
sectie aandachtig door voordat het apparaat wordt ingeschakeld.
before turning the power on.
Power Supply
Voeding
You
canhet
power
thevoeden
unit either
batteries
by power
adaptor.
Follow
Je
kunt
toestel
doorbymiddel
vanor
zowel
batterijen
als een
the
instructions
described
below.
netvoedingsadapter. Volgen de navolgende instructies:
Using Batteries
6 pieces ofgebruiken
C size (SUM-2 or R-14) or equivalent alkaline batteries
Batterijen
must first be installed into the battery compartment.
Er moeten eerst 6 C-batterijen (SUM-2 of R-14) of gelijkwaardige alkalinebatterijen
1. Open the battery compartment cover located on the bottom cabinet
in het
worden geplaatst.
of batterijencompartiment
the unit.
1. Open het batterijencompartiment aan de onderzijde van het keyboard.
Insert de
thebatterijen
batteries,en
carefully
followde
themarkering
polarity markings
on the als
2.2.Plaats
volg daarbij
van de polaritiet
cabinet.
aangegeven in het compartiment.
3. Plaats de deksel terug en zorg ervoor dat hij het compartiment goed afsluit.
3. Replace the compartment cover, making sure that it locks firmly in
place.
Opmerking:
Note: nooit oude en nieuwe batterijen.
Combineer
Do not mix old and new batteries.
Gebruik altijd hetzelfde type batterijen.
Always use same types of batteries.
Verwijder
de batterijen
uit het toestel
hetit voor
tijd niet
Always remove
the batteries
from thewanneer
unit when
is notlangere
being used
for wordt
an extended period of time.
gebruikt.
Using
Power Adapter gebruiken
De
netvoedingsadapter
1.
First, please make sure that POWER ON/OFF switch of the
1. Zorg ervoor dat de aan/uit-schakelaar van het instrument op OFF
instrument is set to OFF.
staat. Zet de Master Volume-knop op het minimum niveau.
2. Connect the AC adaptor to the power supply jack.
2. Verbind de netvoedingsadapter met de voedingsingang.
3. Plug the AC adaptor into an AC outlet. And when turning the power
OFF, simply reverse the procedure please. This will automatically
cut off the battery power supply.
3. Sluit de netvoedingsadapter aan op een stopcontact. Volg de
omgekeerde
procedure
4. Turn the power
ON. wanneer het toestel moet worden
uitgeschakeld.
Note:
When the keyboard is not in use or in the time of thunderstorm, please
4.disconnect
Schakel het
thetoestel
powerin.
for safety purpose.
A prompt voice sounds every two minutes if there is no operation.
Opmerking:
Wanneer het toestel niet wordt gebruikt of ten tijde van een onweer,
verwijder de netvoeding ten behoeve van de veiligheid.
Er klinkt een aandachtssein elke twee minuten dat het apparaat niet
wordt gebruikt.
6
Aansluitingen
Connecting
a pair of
Headphones
Een
hoofdtelefoon
aansluiten
Een
standaard
kan worden
behoeve van
A standard
pairhoofdtelefoon
of stereo headphones
can aangesloten
be connectedten
to the
PHONES
jack
for
private
practice
or
late
night
playing
.
The
internal
bijvoorbeeld oefenen zonder anderen te storen en gebruik in de late uurtjes.
stereo speaker system is automatically shut off when a pair of head
Het
interne
luidsprekersysteem
phones
is plugged
into this jack. wordt automatisch uitgeschakeld wanneer
een hoofdtelefoon wordt aangesloten op de Phones-uitgang.
Note:
Opmerking:
Do not listen with the headphones at high volume for long periods of
time. Doing
so hoofdtelefoon
may cause hearing
loss.
Luister
met de
niet gedurende
langere tijd op een hoog
geluidsniveau. Dit kan gehoorverlies veroorzaken.
Connecting
an aansluiten
Amplifier
Een
versterker
Verbind
audiokabel
de Output-uitgang.
Plug aneen
audio
cord into met
the OUTPUT
jack.
Then
plug
the
other
end
of
the
cord into LINE
IN or AUX
IN of the
Steek het andere einde van de audiokabel
in Line-Inof Aux-In-ingang
van
amplifier.
de versterker.
Note:
Opmerking:
To avoid damaging the speakers, please ensure that the volume has
been
to the minimum
level before worden
connecting
the powerzorg
andervoor
other dat
Om
te set
voorkomen
dat de luidsprekers
beschadigd,
devices.
het volume is ingesteld op het minimum niveau alvorens de netvoeding en
andere apparaten aan te sluiten.
Connecting
a Microphone
Een
microfoon
aansluiten
Alleen MC37A
You
caneen
connect
an microfoon
external microphone
IN jack.
Je
kunt
externe
aansluiten to
opMIC
de Mic
In-ingang.
Connecting
a Computer
Een
computer
aansluiten
Theinstrument
instrumentontvangt
receives en
and
transmits
MIDI messages via
themiddel
USB van
Het
verzendt
MIDI-commandoʼs
door
connector.
de
USB-connector.
7
Demo's afspelen
Het instrument is voorzien van 80 demoʼs.
The instrument features 80 demo songs.
1. Druk gelijktijdig op de knoppen STYLE en VOICE om de demo weer
te
1.geven.
Press the [STYLE] and [VOICE] buttons simultaneously to start
playing the demo.
2. Kies de demo-song.
Gebruik
of de knoppen + of - om de song te
2. Selectdeanumerieke
demo songtoetsen
.
Use the number keys, the [+] button or the [-] button to select the
selecteren.
desired demo song.
3. Stel het gewenste geluidsniveau in met de MASTER VOLUME3. Adjust Druk
the volume
with theop[MASTER
VOLUME
] buttons
. of
knoppen.
herhaaldelijk
de toetsen
MASTER
VOL UP
Repeatedly
press
MASTER
VOL
up
or
down
to
increase
or
[
]
DOWN om het volume te verhogen of te verminderen. Het instelling
decrease the volume. The volume ranges from 0 (no sound) to 9
van het volume reikt van 0 (geen geluid) tot 9 (maximum) en de hidige
(Maximum) and the current volume level appears on the display.
volume-instelling verschijnt in het LCD-venster.
4. Press the [STYLE] and [VOICE] buttons simultaneously again or
4. Druk
nogmaals
gelijktijdig op
de knoppen
STYLE and
en VOICE,
druk
press
the [START/STOP]
button
to stop playing
exit the of
demo
mode.
op de
START/STOP-knop om het afspelen te beëindigen en de Demomodus te verlaten.
Note:
In the DEMO mode, all buttons except START/STOP, TEMPO+,
Opmerking:
TEMPO-, Number Keys, +/YES, -/NO, MASTER VOL+, MASTER
In de Demo-modus zijn alle knoppen uitgeschakeld behalve START/
VOL-, POWER ON/OFF will not be available.
STOP, TEMPO+, TEMPO-, de numerieke toetsen, +/YES, -/NO,
MASTER VOL+, MASTER VOL - en POWER ON/OFF.
Geluiden gebruiken
Playing
Voices
Theinstrument
instrumentisfeatures
, including
4 drum
kits. Please
to Voice List.
Het
voorzien132
132voices
geluiden,
inclusief
4 drumkits.
Zie derefer
Geluidenlijst.
Selecting
Voice
Een
geluidakiezen
1.Druk
Press
button.
1.
opthe
de [VOICE]
VOICE-knop.
Enter
the
VOICE
mode
. LCD
shows “VOICE
” en
andhet
the voice
In de Voice-modus toont het
LCD-venster
“VOICE”
number.
geluidsnummer.
2. Select a voice.
2. Kies
Useeen
the geluid.
number keys, the [+] button, the [-] button to select the
voice
you
want to play
.
Gebruik de numerieke
toetsen
of de knoppen + of - om het geluid
waarmee je wilt spelen te selecteren.
3. Play the voice.
You can play the keyboard and listen to the selected voice.
3. Speel het geluid.
Je kunt het geluid met het klavier bespelen en aldus het geluid
beluisteren.
Sustain
When
the Sustain
featuresklinken
in ON, alle
all notes
playednoten
on the
keyboard
Als
Sustain
is geactiveerd,
gespeelde
langer
uit.
would have a longer sustain. Press the [SUSTAIN] button to turn the
Druk
op
de
SUSTAIN-knop
om
dit
uitklankeffect
AAN
of
UIT
te
zetten.
SUSTAIN effect ON or OFF.
8
From 0-9
Geluiden gebruiken
Modulation
Modulatie
TheModulatie-functie
Modulation function
applies
a vibratotonen
effectvan
to notes
played
De
voorziet
gespeelde
vibrato.
Druk on
op the
de
keyboard. Press the [MODULATION] button while playing the keyboard
MODULATION-knop terwijl je noten speelt om het vibrato-effect te
then you will hear the vibrato effect.
horen.
DSP Effect
DSP-effect
This function
allows
to perform
the overall sound
in ameer
more
Deze
functie stelt
je inyou
staat
om het totaalgeluid
met een
.
realistic
effect
realistisch ruimtelijk effect te bespelen.
The DSP effect is set to ON when keyboard power on.
Het
DSP-effect
al aan
op het
moment
dateffect
het toestel
wordt
Press
the [DSPstaat
] button
to turn
on/off
the DSP
.
ingeschakeld. Door op de DSP-knop te drukken, kun je het DSP-
DSP
effect aan of uit zetten.
Transpose
Transponeren
De
transponeerfunctie
steltthe
je in
staat pitch
de complete
toonhoogte
van het
Transpose
function allows
overall
of the instrument
to be
transposed up or down by a maximum of one octave in semitone
instrument
. stappen van een halve toon binnen een bereik van
incrementsin
1. Press the
button until “
” displays.
maximaal
een[FUNCTION]
octaaf te transponeren.
1. Druk op de FUNCTION-toets totdat het LCD-venster "TPS O"
2. Press the [+] or [-] button to adjust the pitch of the instrument within
6 semitone.
aangeeft.
2.
opthe
de [+]
toetsen
+ buttons
of - om de
toonhoogte van
het instrument
3.Druk
Press
and [-]
simultaneously
to reset
the transpose
to 0. 6 halve tonen hoger of lager in te stellen.
maximaal
3. Gelijktijdig indrukken van de toetsen + en - resulteert in het
terugzetten van de standaardwaarde van de transpositie.
Piano
Alleen MC37A
No matter
what setting
from the panel,
yougemaakt,
can instantly
Welke
instellingen
je ookyou
op've
hetmade
bedieningspaneel
hebt
je
call up
theonmiddellijk,
piano setting
by één
a single
press.de piano-instellingen
kunt
altijd
met
druk button
op de knop
oproepen.
1. Press [PIANO] button to enter piano and exit piano mode.
1. Druk op de PIANO-knop om de Piano-modus te activeren of te
verlaten.
2. In the PIANO mode, you can start a style. Press the [START/STOP]
button to play.
2. In de Piano-modus kun je een Style starten. Druk op de START/
STOP-toets om deze af tespelen.
9
Styles gebruiken
Het instrument is voorzien van 100 styles in verschillende muziekgenres. Zoek er ʼs een paar uit (zie Style-lijst) en
The instrument
features
100 styles
in a variety of different musical genres. Try selecting some of the different styles (Refer to
speel
mee met de
automatische
begeleiding.
Style List) and play with the auto accompaniment.
Opmerking:
Note:91-99 en 00 zijn soecifieke piano-styles. Als je A.B.C. niet activeert en vervolgens een akkoord speelt, zal de
Styles
The styles (91-99 and 00) are the piano styles. If you don't turn on A.B.C. and play a chord, the auto accompaniment does
automatische
begeleiding niet werken.
not work.
Selecting
a Style
Een
Style kiezen
1.Druk
Press
button.
1.
opthe
de [STYLE]
STYLE-toets.
Enter the STYLE mode. LCD shows “STYLE” and the style
Activeer de Style-modus. Het LCD-venster toont “STYLE” en het stylenumber.
nummer.
2. Use the number keys, the [+] button, the [-] button to select the style
you want to play.
2. Gebruik de numerieke toetsen of de knoppen + en - om de style die
je
gebruiken
te kiezen. button to start the rhythm tracks of the
3.wilt
Press
the [START/STOP]
auto accompaniment.
3. Druk op de START/STOP-toets om de drumpartij van de
begeleidingsautomaat te starten.
Playing
a Fill
Een
Fill afspelen
Terwijl de begeleiding speelt kun je een fill laten afspelen door de
Simply press the [FILL] button, while the style is playing.
FILL-toets
in teinserts
drukken.
Het toestel
voegt
een variatie
vervolgens
The keyboard
a variation,
then
the original
stylein,
automatically
resumes
at
the
end
of
the
current
measure.
wordt de oorspronkelijke style hervat aan het einde van de huidige
maat.
Note:
For inserting a longer variation, hold down the [FILL] button, The
keyboard play the variation until you release the [FILL] button。
Opmerking:
Houd om een langere variatie in te voegen de FILL-toets ingedrukt.
Het instrument speelt de betreffende variatie totdat de FILL-toets
wordt losgelaten.
Sync
Terwijl
de begeleiding
niet wordt
afgespeeld,
druk
op de
SYNC-toets.
While the
style is not playing
the [SYNC
black dots
, press
] button
. The
below
the tempo
the het
metronome
indicating the
standby
De
zwarte
stippenand
onder
tempo enflash,
de metronoom
knipperen,
mode of the
keyboard.
daarmee
aangevend
dat het keyboard standby is.
1. If the A.B.C. is OFF, pressing any key will automatically begins to
1. Als A.B.C. uit staat, zorgt het indrukken van elke toets voor het
play the style (rhythm track).
starten van de style (ritmepartij).
2. If the A.B.C. is ON, pressing any key in the left-hand range of the
2. Als
A.B.C. is
hettoindrukken
van toetsen
in).
keyboard
willingeschakeld,
automaticallyzorgt
begins
play the style
(all tracks
linkerhandzone ervoor dat het keyboard de style automatisch start
(alle partijen).
Accompaniment Volume
Begeleidingsvolume
Stel
hetthe
volume
vanofde
in metwith
de ACC.VOL-toetsen
Druk.
Adjust
volume
thebegeleiding
accompaniment
the [ACC.VOL] buttons
herhaaldelijk
op de[ACC
toetsen
ACC.VOL.
⋀ ofto⋁increase
om het volume
te the
Repeatedly press
.VOL
] up or down
or decrease
volume. The
ranges
0 (no
to 9 (loopt
Maximum
the
verhogen
of tevolume
verlagen.
Het from
bereik
van sound)
het volume
van 0) and
(geen
current
accompaniment
volume
level
appears
on
the
display.
geluid) tot 9 (maximum) en het huidige begeleidingsvolume wordt in
het LCD-venster getoond.
From 0-9
10
Styles gebruiken
Tempo
Elk van de Styles is geprogrammeerd met een eigen basistempo; dit
Each style of the instrument has been programmed with a default
kan
worden
aangepast
met
knoppen
tempo
; however
, this can
bede
changed
byTEMPO+/TEMPO-.
using the [TEMPO+] or
1.
Verander
het
tempo.
[TEMPO-] buttons.
Gebruik de knoppen TEMPO+ of TEMPO- om het tempo aan te
passen
een bereik
van 40 tot button
240. to change the tempo. The
the [TEMPO+]
or [TEMPO-]
1. Use binnen
value ranges from 40 to 240.
2. Houd de TEMPO-toetsen ingedrukt om het tempo heel snel aan te
2. Hold down the [tempo] buttons can change the tempo quickly.
passen.
3.Om
Press
[TEMPO
[TEMPO
-] buttons
simultaneously druk
to
3.
hetthe
tempo
terug+]
teand
zetten
naar de
standaardinstellingen,
restore the default tempo setting.
gelijktijdig op de knoppen TEMPO+ en TEMPO-.
Chord Fingering
Akkoordvingerzetting
1. Druk 0p de A.B.C.-toets, "A.B.C." verschijnt links in de LCD-venster.
Op
dat moment
is hetbutton,
klavier “
in A.B.C
twee zones
verdeeld.
Deleft
19side
toetsen
aan
1. Press
the [A.B.C]
on the
of the
” appears
de linkerkant
van the
het keyboard
klavier worden
de begeleidingstoetsen
genoemd.
display. Now,
is divided
two parts. The 19 keys
on the
left of the keyboard are
accompaniment
keys.
De begeleidingstoetsen
diecalled
je aanslaat
bepalen het
typeThe
akkoorden dat
accompaniment keys you pressed determine the type of chords that
je speelt.
you played.
2.
de the
begeleidingstoetsen
aan,, the
de overeenkomstige
akkoorden
2. Sla
Press
accompaniment keys
corresponding chord
will display
worden
in
het
LCD-venster
getoond.
on LCD.
Enkele-vinger-akkoorden
SINGLE
FINGERING
De
enkele-vinger-begeleiding
maakt het kinderlijk eenvoudig om
Single-finger
accompaniment
makes it te
simple
to produce
prachtig georkestreerde
begeleidingen
produceren
met beautifully
gebruik van
orchestrated accompaniment using major, seventh, minor and minormajeur-, septiem-, mineur- en mineur-septiem-akkoorden door het
seventh chord by pressing a minimun number of keys on the AUTO
indrukken
van een minimum
aan
binnen de begeleidingszone
ACCOMPANIMENT
section of
thetoetsen,
keyboard.
van het klavier.
Om een majeur-akkoord te spelen
Speel de grondtoon van het akkoord.
Om een mineur-akkoord te spelen
Speel de grondtoon samen met de
dichtstbijzijnde zwarte toets links.
Om een septiem-akkoord te spelen
Speel de grondtoon samen met de
dichtstbijzijnde witte toets links.
Om een mineur-septiem-akkoord te spelen
Speel de grondtoon samen met de
dichtstbijzijne witte én zwarte toets links (drie
toetsen totaal).
Meerdere-vingers-akkoorden
MULTI FINGERING
Deze
moduslets
stelt
je to
in play
staatchords
akkoorden
te accompaniment
spelen op de keys using
This mode
you
on the
chord formations of three
or more notes.akkoordformaties van drie of
begeleidingstoetsen
met gebruikmaking
The chord
appears on theverschijnen
display. The
of keys you
meer
noten.name
De akkoordnamen
in number
het LCD-venster.
Het
pressed
determines
typebepaalt
of chords
playing. dat je speelt.
aantal
toetsen
dat je the
indrukt
hetyou
typeare
akkoorden
Noten aangegeven tussen ronde haken
(•) zijn optioneel; zonder deze wordt het
akkoord herkend.
11
Styles gebruiken
One Touch Setting
Eenknops-instellingen
One
Touch Setting is a convenient
function
thatdie
allows
De
eenknops-bediening
is een handige
functie
je in you
staattostelt om
automatically play a preset voice to match a selected style you have
automatisch
changed. een geluid te kiezen dat past bij de style die je hebt gekozen.
Ga als volgt te werk om de Eenknops-instellingen te activeren.
Follow these steps to activate One-Touch Setting.
1.Druk
Press
button
tode
turn
on the One Touch Setting
1.
opthe
de[O.T.S.]
O.T.S.-knop
om
eenknops-bediening
voor defor
huidige
” appears
.
style. “O.T.S.
stylecurrent
in te schakelen.
"O.T.S."
verschijnt.
2. Press one of the ONE TOUCH SETTING buttons [M1]-[M4]. Voice
match
selected
can be instantly
withbijpassende
just a singlegeluid
2. Druk
opthe
een
van de style
O.T.S.-knoppen
M1 - recalled
M5 (4). Het
button
wordt
metpress.
één druk op de knop bij de gekozen style opgeroepen.
3. Press the [O.T.S.] button again to quit One Touch Setting mode,
“O.T.S.
” disappears
3. Druk
nogmaals
op de .O.T.S.-knop om de Eenknops-bediening te
verlaten. "O.T.S." verdwijnt.
Note:
A.B.C. is automatically turned on in O.T.S. mode.
Opmerking:
When the
style
is changed,
the matched
voice
will be changed
A.B.C.
wordt
in de
O.T.S-modus
automatisch
ingeschakeld.
automatically in O.T.S. mode.
Waneer in de O.T.S.-modus een andere style wordt gekozen wordt het
bijpassende geluid automatisch aangepast.
12
Geheugen/Percussie
Druk
de[MEMORY/PERC.]
toets MEMORY/PERC.
toetsen
M1 - M5[M
te1]schakelen
Pressopthe
buttonom
to de
switch
the buttons
- [M5] tussen de
geheugen- en de percussiefunctie. De standaardinstelling, als het toestel wordt
function between memory function to percussion function. The default
aangezet, is de geheugenfunctie.
function is memory when power is turned on.
Memory
Geheugen
Er zijn 5 (4) geheugenplaatsen (M1-M5 (4)).
There are 5 memories (M1-M5).
1.
STORE-knop
ingedrukt
en press
druk tegelijkertijd
op een van de
Whilede
holding
the [STORE]
button,
one of the MEMORY
1.Houd
buttons: [M1] - [M5]
to register
panel settings
. The
MEMORY-toetsen:
M1–M5
(4) om the
de instellingen
van
het new settings
will replace the previous memory data. The settings include the
bedieningspaneel op te slaan. De nieuwe instellingen vervangen de
number of voice, the number of style, tempo, beat value, sustain
oorspronkelijk
effect, etc. instellingen in het geheugen. De instellingen bevatten het
geluidsnummer, het sylenummer, het tempo, de maatsoort, sustain, effect,
2. Press one of the MEMORY buttons: [M1] - [M5] to recall the panel
etc.
settings.
2. Druk op een van de MEMORY-toetsen M1 - M5 (4) om de instellingen op
Note:
te
roepen.
The
stored settings can not be recalled when the One Touch Setting
function is on.
The stored settings will be returned to the default settings after you
Opmerking:
turned off the power.
Instellingen uit het geheugen kunnen niet worden opgeroepen waanneer
de Eenknops-bediening is ingeschakeld.
De opgeslagen instellingen worden na het uitschakelen van het toestel
teruggezet op hun standaardinstelling.
Percussion
Percussie
Alleen MC37A
Er
zijn are
5 percussiepads:
bass:drum,
5 percussion pads
There
Bass snare
drum, drum,
snare open
drum,hihat,
hi-hatgesloten
open, hi-hihat
hat
close,
and
high
tom-tom.
en hoge tomtom.
1. Press the [MEMORY/PERC.] button to enter the percussion
function.
LCD
will display PERC.
1. Druk
op deThe
toets
MEMORY/PERC.
om toegang te krijgen tot de
percussiefunctie. Het LCD-venster toont "PERC"
2. Press the [PAD] buttons to play the percussion sounds.
2. druk op de PAD-toetsen om de percussiegeluiden te bespelen.
13
Akkoordenboek
Chord
feite een a“akkoordenboek”
dat helpt
bij help
het you to
Chord Dictionary
dictionary is
is in
essentially
built-in “chord book
” that
vaststellen
van denotes
individuele
noten van een akkoord.
check the Chord
.
Press
] button
enter this
, the
1.Druk
1.
opthe
de[CHORD
CHORD DICT.
DICT-toets
omtotoegang
temode
krijgen
totLCD
de
”, the Chord Type and Chord Notes.
displays “
akkoordenboek-modus, het LCD-venster toont "dICT", het akkoordtype
en
noeten
in, het
2. de
In this
mode
the akkoord.
key above #G3 are used to assign the Chord Type,
the keys above C5 are used to assign the Chord Root. When the
Chord Type and Chord Root are confirmed, the LCD will display the
2. InChord
de Dict
1-modus
worden
de toetsen van het klavier hoger dan G#3
and
its keyboard
position.
gebruikt om het Akkoordtype te bepalen en de toetsen boven C5 voor de
3. Play the chords
on het
theAkkoordtype
keyboard according
to the display.
If you
Grondtoon.
Wanneer
en de Grondtoon
zijn vastgesteld,
press the correct notes, you will hear a prompt applause sound.
toont het LCD-venster het akkoord en zijn positie op het klavier.
3. Speel de akkoorden zoals aangegeven in het LCD-venster. Er klinkt
een applausgeluid als het akkoord correct wordt gespeeld.
Metronome
Metronoom
Turning on inschakelen
the Metronome
Metronoom
1. Druk op de METRO-toets om de metronoom aan te zetten.
1. Press the [METRO] button to turn on the metronome.
2.2.Druk
nogmaals
op de button
METRO-knop
uit te zetten.
Press
the [METRO]
again toom
turndeoffmetronoom
the metronome.
Press
[TEMPO+]
/ [TEMPO-]
button om
to change
the van
tempo
3.3.Druk
opthe
de toetsen
TEMPO+
of TEMPOhet tempo
de of the
metronome.
metronoom aan te passen.
Selecting the
Beat
Maatsoort
kiezen
1.
opthe
de [FUNCTION]
FUNCTION-toets
totdat
1.Druk
Press
button
until "bET
“ 4" verschijnt.
” displays.
2.Gebruik
Press the
or [-] button
to change
the beat
2.
de [+]
toetsen
+ en - om
de maatsoort
te value:
kiezen: 0 2 3 4 5 6 7
0 2 3 4 5 6 7 8 9. The default value is 4.
8 9. De standaardwaarde is 4.
14
Songs afspelen
Theinstrument
instrumentisfeatures
songs
(Refer(zie
to Song
List). Each
song
cankan
be worden
practiced
in LESSON
Het
voorzien80van
80 songs
de Songlijst).
Elke
song
geoefend
in demode.
Les-modus.
Listening
to the Songs
Songs
beluisteren
1. Druk op de SONG-toets om toegang te krijgen tot de Song-modus.
1. Press the [SONG] button to enter the song mode. It will play all
Allesongs
songscircularly.
worden in
een
lus afgespeeld.
LCD-venster
toont of
The
display
indicates "Het
SONG
" and the number
"SONG"
en hetsong.
nummer
van
huidigebutton
song. again
Druk ,nogmaals
the current
Press
thede[SONG]
it will stop op
thede
song and exit
the song
mode
SONG-toets
om het
afspelen
te. beëindigen en de Song-modus te
verlaten.
2. In song mode, use the number keys, [+] or [-] button to select a
song.
2. Druk op de toetsen + of - om de song die je wilt afspelen te kiezen.
From 01-80
3. Once you start playing a song by pressing [START/STOP] button, it
will play
current
song
repeatedly.
Pressvan
thede
[START
/STOP] button
3. Zodra
een
song is
gestart
door middel
START/STOP-toets,
again
stop the
currentDoor
songnogmaals
but not exit
mode.
, it will
wordt
deze
alsmaar
herhaald.
opthe
desong
START/STOP-
toets te drukken, wordt de huidige song beëindigd, maar de Song-
4.
Use wordt
the [TEMPO+]
or [TEMPO-] button to change the tempo of the
modus
niet verlaten.
current song.
5.
When the
is stopped,
press
[STYLE],om
to exit
[VOICE
], [DEMO
4. Gebruik
desong
toetsen
TEMPO+
en TEMPOhet tempo
van ]de
huidige
songmode
aan .te passen.
the song
5. Na het beëindigen van song, druk op de knoppen STYLE, VOICE
of DEMO om de Song-modus te verlaten.
Lesson Mode
Les-modus
In het instrument zijn er drie manieren om met de songs te oefenen:
In the instrument, there are 3 different ways to practice the songs: time
timingsoefeningen, trefzekerheidsoefeningen en met uigeschakelde
value training, note correction training, melody off. And the keyboard has
melodie. Het keyboard heeft een beoordelingssysteem om je te
a grading
to help
you to know
well about your progress.
helpen
de system
geboekte
vooruitgang
in te bepalen.
Song
mode, press
theop
[LESSON]
button to enter
the lesson
1. InIn de
1.
Song-modus,
druk
de LESSON-toets
om toegang
te
mode
the lesson
mode
.
krijgen
totordeswitch
Les-modus
of om
te wisselen
tussen de drie
lesmanieren.
2. Druk
Pressopthe
to te
start
learningmet
will
] button
. The
2.
de[START/STOP
toets START/STOP
om
beginnen
deLCD
oefening.
display
the
note
need
to
be
played
.
Het LCD-venster toont de noot die moet worden gespeeld.
3.
op de toets
START/STOP
om de
oefening
3. Druk
Pressnogmaals
the [START/STOP
again to stop
learning
] button
. te
beëindigen.
4. Er
There
lesson modes
grading system.
4.
zijn are
drie3lesmanieren
en and
een abeoordelingssysteem.
Lesson 1
Lesson 2
Les
1: 1: the In
de Les 1-modus
beoordeelt
keyboard
alleen de
Lesson
keyboard
only grades
the time het
value
of the playing,
don't
timing/ritmiek van de gespeelde noot en negeert de
caredaadwerkelijke
the correction juistheid
of the note.
van de noot.
Lesson
keyboard
only grades
your practice
by the note
Les
2: 2: the In
de Les 2-modus
beoordeelt
het keyboard
de ; don't
caretrefzekerheid
about the correctness
of the
timing
Only when
van de juiste
noten
en. negeert
de you
vannote,
de ritmiek/timing.
alsto
jethe
de next
juistenote.
playjuistheid
the correct
the song will Alleen
continue
speelt,
de your
songpractice
verder naar
decorrection
volgende of the
Lesson 3: the noot
keyboard
willgaat
score
by the
timenoot.
value and note.
Les 3:
In de Les 3-modus beoordeelt het keyboard zowel op
Grade:
In lesson
mode, when
finished learning thevan
current
ritmiek/timing
als opyou
juistheid/trefzekerheid
de the
song,
the
keyboard
will
play
the
prompt
sound
to
tell
you the
noten.
level
get.
Beoordeling:
Inyou
de Les-modus,
nadat je het oefenen van de song
hebt beëindigd, geeft het keyboard een aandachtssein
Level 1: Ok om aan te geven welk niveau je hebt bereikt.
Level 2: Good
Level 3:1:Very Good
Niveau
Oké
Niveau
Goed
Level 4:2:Excellent
Niveau
3:
Heel
goed
After grading,
the
song
will be playing again, you can learn it again.
Niveau 4:
Uitmuntend
Na de beoordeling wordt de song opnieuw afgespeeld, zodat je
nogmaals kunt oefenen.
Lesson 3
15
Opname en weergave
Je kunt je eigen uitvoering opnemen, tot maximaal 200 noten, inclusief
You can record your performance (up to 200 notes), and the
een
begeleidingspartij.
accompaniment
.
1. Press the [REC] button, the "REC " appears, the beat flashes.
1. Druk op de REC-knop, "REC" wordt getoond en de maataanduiding
2. Play the notes you want to record or press the [START/STOP]
knippert.
button to start recording. If you want to record your performance
accompanied with the style, please turn on the A.B.C, and play the
2. Druk op de START/STOP-toets of bespeel het klavier om de
chords on the left of the keyboard.
opname te starten. Als je je uitvoering wilt combineren met een
begeleidingspartij
een style,
A.B.C. in. en
de
3. Press the [RECvan
] button
again schakel
to stop recording
Thespeel
"REC
"
akkoorden
op de linkerhelft van het klavier.
disappears.
4.Druk
Pressnogmaals
the [PLAY
to play the
you recorded.
The De
3.
op] button
de REC-toets
omnotes
de opname
te beëindigen.
“PLAY”
"REC"-indicatie
verdwijnt.
appears.
4.
de[PLAY
PLAY-toets
om
de noeten
je hebt
opgenomen
af te
5.Druk
Pressopthe
] button
again
to stopdie
it. The
“PLAY
” disappears.
spelen. "PLAY" wordt getoond.
Note:
If you turned off the keyboard, the data you have recorded will be lost.
5. Druk nogmaals op de PLAY-toets om de weergave te beëindigen.
De "PLAY"-indicatie verdwijnt.
Opmerking:
Als je het keyboard uit zet, gaan alle opgenomen data verloren.
Song
16
MIDI-functies
Door
middel
MIDI-functies
kunnen
je je
muzikale
mogelijkheden
sterksection
uitbreiden.
Dit hoofdstuk
watit can do, as
By using
thevan
MIDIdefunctions
you can
expand
your
musical
possibilities. This
explains
what MIDIbehandelt
is, and what
well as
you can
MIDIjeon
yourmet
instrument.
MIDI
is, how
wat MIDI
kanuse
en hoe
MIDI
je instrument kunt gebruiken.
What's
MIDI?
Wat
is MIDI?
MIDI
afkortingthat
voorstands
“Musical
Instrument
Digital Interface”
en maakt het voor
MIDI is
is een
an acronym
for Musical
Instrument
Digital Interface,
which allows electronic
musical instruments
to communicate
each
elektronische
muziekinstrumenten
mogelijk om
met elkaar te with
communiceren
in de
other,van
by sending
andenreceiving
compatible
Note, Control
Change,
vorm
verzenden
ontvangen
van MIDI-notes
(noten),
Control Changes
Program Change
andChanges
various other
typesvan
of MIDI
data
messages. andere
(besturing),
Program
(wisselen
geluid)
en, or
verschillende
The instrument can control a MIDI device by transmitting note related
vormen van MIDI-data en –commandoʼs.
data and various types of controller data. The instrument can be
Het
instrument
kan
MIDI-apparaten
besturen
doorautomatically
nootgerelateerde data en
controlled
by the
incoming
MIDI messages
which
besturingsdata
te
versturen.
Het
instrument
kan
worden
bestuurd
determine tone generator mode, select MIDI channels, voices
anddoor inkomende
MIDI-boodschappen
die
automatisch
de
toongenerator-modus
effects, change parameter values and of course play the voicesvaststellen, MIDIspecifiedkiezen,
for thegeluiden
various parts.
kanalen
en effecten, parameterinstellingen veranderen en –
MIDI messages
can be
divided
groupsvoor
: Channel
messages and
natuurlijk
– geluiden
spelen
die into
zijn two
ingesteld
de verschillende
onderdelen.
System messages. kunnen in twee categorieën worden ingedeeld:
MIDI-boodschappen
Kanaalboodschappen en Systeemboodschappen.
MIDI Terminals
MIDI-aansluitingen
MIDI-aansluiting
MIDI Connection
Het
keyboard
is voorzien
van
een standaard
USB-interface
The elektronische
electronic keyboard
is equipped
with
a standard
USB interface
instead
conventionalMIDI-inMIDI INen
and
MIDI out connectors.
USB
i.p.v.
de of
conventionele
MIDI-uit-connectors.
DeThe
USBinterface allows the keyboard to be connected to a computer without
interface maakt het mogelijk het keyboard op een computer aan te
the need to separately purchase a MIDI interface for the computer.
sluiten
zonder tussenkomst
van een
apart voor
computerasaan
te
Most computers
will automatically
recognize
thejekeyboard
a MIDI
interface,MIDI-interface.
allowing MIDI messages to be received from, or sent to,
schaffen
music
programs
running
on the computer.
De
meeste
computers
herkennen
het keyboard als MIDI-interface,
waardoor
is MIDI-commando's
muzieksoftware
te
To connecthet
themogelijk
keyboard
to a computer you vanuit
will need
a standard USB
verzenden
en
te
ontvangen
A-B cable (not supplied) and suitable software such a music
sequencing
program
supplied).te verbinden heb je een standaard
Om
het keyboard
met(not
de computer
USB-A-B-kabel (niet meegeleverd) nodig en passende software voor de
Note:
computer
(niet
meegeleverd).
Activate the
computer
from a sleep/suspended/standby mode before
connecting the USB cable.
Connect the USB cable to the instrument and a computer before
Opmerking:
turning the power of the instrument on.
Haal je computer uit de slaap/stand-by-modus voordat je de USB-kabel
aansluit.
Sluit de USB-kabel tussen het instrument en de computer aan alvorens
het instrument in te schakelen.
17
Probleemoplossing
Probleem
Problem
The speakers produce a “pop” sound
De luidsprekers
een
tikgeluid
als
whenever produceren
the power is
turned
ONtelkens
or OFF.
Mogelijke oorzaak en oplossing
Possible Cause and Solution
This is normal and is no cause for alarm.
Dit is normaal en het kan geen kwaad.
het apparaat wordt in- of uitgeschakeld.
sound
results
when
thebespeeld.
keyboard is
GeenNo
geluid
als het
klavier
wordt
played.
Make
sure the master volume
set at
levels. Zorg
De Volume-instellingen
(Mixer)isstaan
opappropriate
een te laag niveau.
ervoor dat de volumes van de geluiden op het juiste niveau staan.
Er wordt
geruis/gekraak
geproduceerd
bij hetisgebruik Using
Het agebruik
een mobiele
in de
van de
When
using a mobile
phone, noise
mobilevan
phone
in closetelefoon
proximity
tonabijheid
the instrument
produced.
may
producekan
interference.
To prevent
this, turn
off the uit
mobile
van een
mobiele telefoon.
PortaTone
storing veroorzaken.
Schakel
de telefoon
of gebruik
phone
or
use
it
further
away
from
the
instrument.
hem verder van de PortaTone verwijderd om dit te voorkomen.
The auto accompaniment does not play
De begeleidingsautomaat speelt niets af, zelfs als
back even Sync is in standby condition and
Syncaiskey
geactiveerd
en er wordt een toets bespeeld.
is pressed.
You may be trying to start accompaniment by playing a key
Hetright-hand
kan zijn datrange
je probeert
dekeyboard.
begeleidingsautomaat
in the
of the
To start thete starten door
een noot in het with
rechterhandbereik
van het
keyboard
accompaniment
Sync Start, make
sure
to playteaspelen.
key in Speel
noot in range
de linkerhandzone
om de begeleidingsautomaat d.m.v.
theeen
left-hand
of the keyboard.
Sync Start te starten.
Specifications
Specificaties
Keyboard
49
Display
Multi-functional LCD
Polyphony
32
Voice
132, including 4 drum kits
Style
100
Song
80
Demo
80
Tempo
40-240
Registration Memory
5 (MC49A: 4)
Control button
Power on/off switch, Master Volume+/-, ACC.
Volume+/-, Tempo+/-, A.B.C, Function, Style, Voice,
Song, Lesson, Store, M1-M5, O.T.S., Modulation,
Memory/Perc., +/-, Piano, Metro, Sustain, DSP.
Accompaniment Control
Start/Stop, Sync/Fill.
Record Function
Record, Play.
Connectors
DC IN, Headphones / Output, USB, MIC IN.
Power Supply
DC 9V
Speaker
2W + 2W (MC49A: 3W + 3W)
Dimensions
667 (W)X245 (D)X82 (H) mm (MC49A: 795x315x120mm)
Weight
2.2KG(without batteries)(MC49A: 3.6KG)
Specificaties are
en uitvoeringen
onderwithout
voorbehoud.
* All specifications and*appearances
subject to change
notice.
18
Geluidenlijst
51
Synth Strings 1
Synth Strs 1
103
FX 7 (Echoes)
Echoes
52
Synth Strings 2
Synth Strs 2
104
FX 8 (Sci-Fi)
Sci-Fi
Grand Pno
53
Choir Aahs
Choir Aahs
Bright Acoustic Piano
Bright Pno
54
Voice Oohs
Voice Oohs
ETHNIC
105 Sitar
Electric Grand Piano
E.Grand Pno
55
Synth Voice
Synth Voice
106
Banjo
Banjo
4
Honky-Tonk Piano
Honky-Tonk
56
Orchestra Hit
Orchestra Hit
107
Shamisen
Shamisen
5
Rhodes Piano
Rhodes Pno
108
Koto
Koto
6
Chorus Piano
Chorus Pno
BRASS
57 Trumpet
Trumpet
109
Kalimba
Kalimba
7
Harpsichord
Harpsichord
58
Trombone
Trombone
110
Bagpipe
Bagpipe
8
Clavichord
Clavi
59
Tuba
Tuba
111
Fiddle
Fiddle
60
Muted Trumpet
Muted Trumpet
112
Shanai
Shanai
Celesta
61
French Horn
French Horn
10 Glockenspiel
Glockenspiel
62
Brass Section
Brass Section
PERCUSSIVE
113 Tinkle Bell
11 Music Box
Music Box
63
Synth Brass 1
Synth Brass 1
114
Agogo
Agogo
12 Vibraphone
Vibraphone
64
Synth Brass 2
Synth Brass 2
115
Steel Drums
Steel Drums
13 Marimba
Marimba
REED
116
Woodblock
Woodblock
14 Xylophone
Xylophone
65
Soprano Sax
Soprano Sax
117
Taiko Drum
Taiko Drum
15 Tubular Bells
Tubular Bells
66
Alto Sax
Alto Sax
118
Melodic Tom
Melodic Tom
16 Dulcimer
ORGAN
Dulcimer
67
Tenor Sax
Tenor Sax
68
Baritone Sax
Baritone Sax
119 Synth Drum
EFFECTS
17 Hammond Organ
Hammond Org
69
Oboe
Oboe
120
Effects 1
Effects 1
18 Percussive Organ
Perc Org
70
English Horn
English Horn
121
Effects 2
Effects 2
19 Rock Organ
Rock Org
71
Bassoon
Bassoon
122
Effects 3
Effects 3
20 Church Organ
Church Org
Clarinet
123
Effects 4
Effects 4
21 Reed Organ
Reed Org
72 Clarinet
PIPE
124
Effects 5
Effects 5
22 Accordion
Accordion
73
Piccolo
Piccolo
125
Effects 6
Effects 6
23 Harmonica
Harmonica
74
Flute
Flute
126
Effects 7
Effects 7
24 Tango Accordion
Tango Acd
75
Recorder
Recorder
127
Effects 8
Effects 8
GUITAR&BASS
76
Pan Flute
Pan Flute
Effects 9
25 Acoustic Guitar (Nylon) Nylon Gtr
77
Bottle Blow
Bottle Blow
128 Effects 9
DRUM
26 Acoustic Guitar (Steel) Steel Gtr
78
Shakuhachi
Shakuhachi
129
Standard Kit
Standard
Jazz Gtr
79
Whistle
Whistle
130
Room Kit
Room
Ocarina
131
Power Kit
Power
132
Electronic Kit
Electronic
No. Name
PIANO
1 Acoustic Grand Piano
2
3
abbr.
MALLET
9
Celesta
27 Electric Guitar (Jazz)
28 Electric Guitar (Clean) Clean Gtr
29 Electric Guitar (Muted) Muted Gtr
80 Ocarina
LEAD & PAD
30 Overdriven Guitar
Overdriven
81
Lead 1 (Square)
Square
31 Distortion Guitar
Distortion
82
Lead 2 (Sawtooth)
Sawtooth
32 Guitar Harmonics
Harmonics
83
Lead 3 (Calliope lead) Calliope
33 Acoustic Bass
Acoustic Bass
84
Lead 4 (Chiff lead)
Chiff
34 Electric Bass(Finger)
Finger Bass
85
Lead 5 (Charang)
Charang
35 Electric Bass (Pick)
Pick Bass
86
Lead 6 (Voice)
Voice
36 Fretless Bass
Fretless Bass
87
Lead 7 (Fifths)
Fifths
37 Slap Bass 1
Slap Bass 1
88
Lead 8 (Bass&Lead)
Bass&Lead
38 Slap Bass 2
Slap Bass 2
89
Pad 1 (New Age)
New Age
39 Synth Bass 1
Synth Bass 1
90
Pad 2 (Warm)
Warm
40 Synth Bass 2
STRINGS
Synth Bass 2
91
Pad 3 (Polysynth)
Polysynth
92
Pad 4 (Choir)
Choir
41 Violin
Violin
93
Pad 5 (Bowed)
Bowed
42 Viola
Viola
94
Pad 6 (Metallic)
Metallic
43 Cello
Cello
95
Pad 7 (Halo)
Halo
44 Contrabass
Contrabass
45 Tremolo Strings
Tremolo Strs
96 Pad 8 (Sweep)
SYNTH SFX
46 Pizzicato Strings
Pizzicato Strs
97
FX 1 (Rain)
Rain
47 Orchestra Harp
Orchestra Harp
98
FX 2 (Soundtrack)
Soundtrack
48 Timpani
ENSEMBLE
Timpani
99
FX 3 (Crystal)
Crystal
49 Strings Ensemble 1
50 Strings Ensemble 2
Sitar
Tinkle Bell
Synth Drum
Sweep
100 FX 4 (Atmosphere)
Atmosphere
Strings Ens 1
101 FX 5 (Brightness)
Brightness
Strings Ens 2
102 FX 6 (Goblins)
Goblins
19
Style-lijst
52 Swing Fox
Swing Fox
53 Big Band
Big Band
8 Beat 1
54 Big Band Medium
Big Band Medium
8 Beat 2
8 Beat 2
55 Jazz Waltz 1
Jazz Waltz 1
3
8 Beat 3
8 Beat 3
56 Ragtime
Ragtime
4
8 Beat 4
8 Beat 4
57 Dixeland
Dixeland
5
60’s 8 Beat
60’s 8 Beat
58 Quick Step
Quick Step
6
8 Beat Ballad
8 Beat Ballad
COUNTRY
7
8 Beat Rock
8 Beat Rock
59 Country 1
Country 1
8
16 Beat 1
16 Beat 1
60 Country 2
Country 2
9
16 Beat 2
16 Beat 2
61 Pop Country
Pop Country
10 16 Beat Pop
16 Beat Pop
62 Country Rock
Country Rock
11 16 Beat Shuffle
16 Beat Shuffle
63 Country Folk
Country Folk
12 Ballad 1
Ballad 1
64 3/4 Country
3/4 Country
13 Slow Ballad
Slow Ballad
65 Country Waltz
Country Waltz
14 16 Beat Ballad
16 Beat Ballad
66 Country Shuffle
Country Shuffle
15 Unplugged
ROCK
Unplugged
67 Country Boogie
Country Boogie
68 Country Blues
Country Blues
16 Rock
Rock
69 Country Quick Step Country Quick Step
17 Pop Rock
Pop Rock
Bluegrass
18 Fast Rock
Fast Rock
70 Bluegrass
LATIN
19 Slow Rock 1
Slow Rock 1
71 Bossa Nova 1
Bossa Nova 1
20 Slow Rock 2
Slow Rock 2
72 Bossa Nova 2
Bossa Nova 2
21 Rock & Roll
Rock & Roll
73 Rhumba
Rhumba
22 Heavy Metal
Heavy Metal
74 Pop Rhumba
Pop Rhumba
23 Blues Boogie
Blues Boogie
75 Cha Cha
Cha Cha
24 Blues
Blues
76 Pop Cha Cha
Pop Cha Cha
25 Shuffle
Shuffle
77 Tango
Tango
26 Blues Shuffle
Blues Shuffle
78 Jazz Samba
Jazz Samba
27 Rock Shuffle
Rock Shuffle
79 Reggae
Reggae
28 Charleston
DANCE
Charleston
80 Pop Reggae
TRADITIONAL
Pop Reggae
29 Disco 1
Disco 1
81 March 1
March 1
30 Disco 2
Disco 2
82 March 2
March 2
31 Disco Funk
Disco Funk
83 German March
German March
32 Dance
Dance
84 6/8 March 1
6/8 March 1
33 House 1
House 1
85 Polka
Polka
34 House 2
House 2
86 Pop Polka
Pop Polka
35 Rap
Rap
87 Waltz 1
Waltz 1
36 Euro Beat
Euro Beat
88 Slow Waltz
Slow Waltz
37 Hip Hop
Hip Hop
89 Vienna Waltz
Vienna Waltz
38 Techno
SOUL & FUNK
Techno
Musette
39 Funky Pop
Funky Pop
90 Musette
PIANO
91 8 Beat
40 Jazz Funk
Jazz Funk
Ballad 2
41 Cool Funky
Cool Funky
92 Ballad 2
93 Boogie
42 Soul 1
Soul 1
Jazz
43 Soul 2
Soul 2
94 Jazz
95 Swing 2
44 Soul Shuffle
Soul Shuffle
Jazz Waltz 2
45 Soul Blues
Soul Blues
96 Jazz Waltz 2
97 Twist
46 R & B
R&B
March
47 6/8 Gospel
6/8 Gospel
98 March
99 6/8 March 2
48 Pop Groove
JAZZ
Pop Groove
00 Waltz 2
Waltz 2
49 Swing 1
Swing 1
50 Cool Jazz
Cool Jazz
51 Pop Swing
Pop Swing
No. Name
20
BEAT & POP
1 8 Beat 1
2
abbr.
8 Beat
Boogie
Swing 2
Twist
6/8 March 2
Songlijst
No.
Name
FAVORITE
1
The Old Gray Mare
JAZZ & FUSION
June Samba
43
44
Guitar&Saxphone
2
In The Rain
45
The Hip Hop’s Night
3
Jeanie With The Light Brown Hair
46
Blue Lunch
4
American Patrol
47
Cobweb
5
Heipenposlein
48
Wine
6
Summer Palace
49
Jazz Old Man
7
Rondo
50
Carlos
8
El Bimbo
9
It’s Been A Long,Long Time
CHRISTMAS
Ave Maria
51
10
Chant sans paroles
52
Joy To The World
11
Water Music
53
Santa Claus Is Coming To Town
12
The Entertainer
54
Silent Night
13
The Light
55
Amazing Grace
14
Five Hundred Miles
56
Susanna
15
Old Folks At Home
57
Battle Hymne Of The Republic
16
O Sole Mio
58
Carry Me Back To Old Virginny
17
Sonata
59
Turkey In The Straw
18
Allegro In bB
60
Dark Eyes
19
The Red Sarafan
20
Dance De Mirlitons
PIANO
Fur Elise
61
21
Nocturne
62
Bagatelle No.3
22
Air On The G-String
63
Moseta Dance
23
Canon
64
Prelude in G
Lover’s Concerto
25
Beautiful Dreamer
FOLK & COUNTRY
65
Turkish Rondo
66
Four Swan
67
Did You Ever See a Lassie
26
Spring
24
Danny Boy
68
27
My Bonnie
69
Impromptu
28
Skip To My Side
70
Gavotte
29
Katyusha
71
Nocturne
30
Red River Valley
72
Pizzicato Polka
31
The Sideway
73
Musical Moments
32
Dance Of Russia
74
Reggae
33
House Of Rising Sun
75
All Kind Of My Everything
34
Waltz Of Starlight
76
Valse No.6 “Petit Chien”
35
Home On The Range
77
Rondeau
36
The Blue-Bells Of Scotland
78
Chrysanf
37
Annie Laurie
79
Invention a 2 Voix
38
Trumpet
80
Jesus,Saviour Pilot me
39
Country
40
Jambalaya
41
Bridge
42
Sippin Cider Through A Straw
21
Akkoordenlijst
22
No. Chord Name/[Abbreviation]
Normal Voicing
Chord (C)
Display
0
Major [M]
1-3-5
C
C
1
Major sixth [6]
1-(3)-5-6
C6
C6
2
Major seventh [M7]
1-3-(5)-7
CM7
CM7
3
Major add ninth [Madd9]
1-2-3-5
Cmadd9
CM9
4
Augmented [aug]
1-3-#5
Caug
Caug
5
Minor [m]
1-b3-5
Cm
Cm
6
Minor sixth [m6]
1-b3-5-6
Cm6
Cm6
7
Minor seventh [m7]
1-b3-(5)-b7
Cm7
Cm7
8
Minor major ninth [mM7]
1-b3-(5)-7
CmM7
CmM7
9
Diminished [dim]
1-b3-b5
Cdim
Cdim
10
Diminished seventh [dim7]
1-b3-b5-6
Cdim7
Cdim7
11
Seventh [7]
1-3-(5)-b7
C7
C7
12
Seventh suspended fourth [7sus4]
1-4-5-b7
C7sus4
C7sus4
13
Suspended fourth [sus4]
1-4-5
Csus4
Csus4
MIDI-implementatiekaart
Function
Basic
Channel
Transmitted
Default
1ch
Changed
×
Default
×
Mode
Messages
×
Altered
***********
Note
0—127
Number
True voice
***********
Velocity
Note on
〇 9nH,V=64
Note off
×(9nH,V=0)
After Touch Keys
×
Chs
×
Pitch Bend
×
Control
0
×
Change
1
×
5
×
6
×
7
×
10
×
11
×
64
×
65
×
66
×
67
×
80
×
81
×
91
×
93
×
120
×
121
×
123
×
○
Program
***********
Change
:true
×
System
Exclusive
System
:Song Position ×
×
Common :Song Select
×
:Tune
×
System
:Clock
×
Real Time :Commands
Aux
:Local ON/OFF ×
×
:All Notes Off
×
Messages :Active Sense
×
:Reset
Note:
Recognized
1-16ch
×
3
3
×
0—127
0—127
〇 9nH,V=1-127
×(9nH,V=0; 8nH,V=0-127)
×
×
○
○
○
○
○
○
○
○
○
○
○
○
○
○
○
○
○
○
○
0—127
×
×
×
×
×
×
×
○
○
○
Remarks
Bank Select
Modulation
Portamento Time
Data Entry
Volume
Pan
Expression
Sustain Pedal
Portamento ON/OFF
Sostenuto Pedal
Soft Pedal
Reverb Program
Chorus Program
Reverb Level
Chorus Level
All Sound Off
Reset All Controllers
All Notes Off
23
MC37A_G07