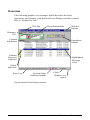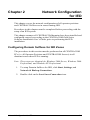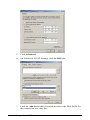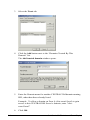
1
CENTRACOM Gold Series™ Elite
Inbound Event Display (IED)
© 2004-2009 Motorola, Inc.
All Rights Reserved
Printed in U.S.A.
6880801D90-D
This page intentionally left blank.
Foreword
Computer Software Copyrights
The Motorola products described in this user’s guide include a
copyrighted Motorola computer program. Laws in the United States and
other countries, as well as International Treaties, preserve for Motorola
the exclusive rights for Motorola’s copyrighted computer programs,
including the exclusive right to copy, reproduce, distribute, or otherwise
transfer said computer program(s). Accordingly, the copyrighted
Motorola computer programs contained in this user’s guide may not be
copied, decompiled, reverse engineered, disseminated, distributed,
disassembled, modified, adapted, used to prepare derivative works, or
reproduced in any manner, on or within any media without the express
written permission of Motorola. Furthermore, the purchase of Motorola
products shall not be deemed to grant either directly or by implication,
estoppel, or otherwise, any license under the copyrights, patents, or patent
applications of Motorola, except for the normal non-exclusive, royaltyfree license that arises by operation of law in the sale of a product.
Motorola Limited Hardware Warranty
This warranty for CENTRACOM Gold Series products is provided in lieu
of the Commercial Warranty (Standard) for certain Motorola
manufactured products, as set forth in General Information,
CENTRACOM Warranty of the Motorola Electronic Catalog (Domestic
User Price Book). This warranty is extended by Motorola, Inc., 1301 E.
Algonquin Road, Schaumburg, Illinois 60196 to the original end user
purchaser when purchasing for commercial, agricultural or governmental
use. This warranty is not assignable or transferable to any other party and
applies only within the 50 United States.
This plan extends the coverage of the Commercial Warranty (Standard)
from one year parts and 120 days labor to one year parts and one year
labor for CENTRACOM Gold Series products, with the first 120 days
labor to be provided on-site, and labor for the remainder of the year to be
provided at the designated depot service center. ALL REFERENCES TO
THE WARRANTY PERIOD BEGIN AT TIME OF ORIGINAL
SHIPMENT.
Foreword and Table of Contents
6880801D90-D
i
I. GENERAL PROVISIONS
This warranty sets forth the full extent of MOTOROLA'S responsibilities
regarding the Product. Motorola's total liability and the purchaser's sole
remedy for any breach of this Warranty will be limited to, at Motorola's
option, repair, replacement, or refund of the purchase price of the
product(s). MOTOROLA DISCLAIMS ALL OTHER WARRANTIES,
EXPRESS OR IMPLIED, INCLUDING WITHOUT LIMITATION THE
IMPLIED WARRANTIES OF MERCHANTABILITY AND FITNESS
FOR A PARTICULAR PURPOSE. IN NO EVENT SHALL
MOTOROLA BE LIABLE FOR INCIDENTAL OR
CONSEQUENTIAL DAMAGES TO THE FULL EXTENT SUCH
MAY BE DISCLAIMED BY LAW.
II. WHAT THIS WARRANTY COVERS
Parts:
All CENTRACOM Gold Series product parts are warranted to be free
from defects in material and workmanship for a period of ONE (1) YEAR
from the date of shipment. Motorola will furnish free of charge parts that
Motorola finds defective within the full warranty period.
Labor:
Labor to repair or replace defective parts within the original shipped
products will be provided for one (1) year from the date of purchase.
Motorola will pay for on-site labor to repair or replace any defective parts
for one hundred twenty (120) days from the date of shipment. For the
remainder of the one (1) year period from the date of shipment, defective
parts must be returned for depot repair.
THIS PLAN DOES NOT COVER defects, malfunctions, performance
failures or damages to the parts resulting from:
Use in other than its normal and customary manner
Misuse, vandalism, accident or neglect or
Improper disassembly, testing, operation, maintenance, installation,
modification, adjustment, alteration, or repair.
ii
6880801D90-D
Gold Series™ Elite Inbound Event Display
How to Receive Depot Warranty Service
All CENTRACOM Gold Series parts covered by the Warranty for
CENTRACOM Gold Series Products that require depot service must be
sent or taken to the following depot:
Motorola System Support Center
1311 East Algonquin Road
Schaumburg, IL 60196
Phone: 800-323-9949
Motorola Limited Software Warranty
For the first one hundred twenty (120) days following its initial shipment,
Motorola warrants that, when properly used, its software will be free
from reproducible defects that cause a material variance from its
published specification. However, Motorola does not warrant that
program operation will be uninterrupted or error-free, that each defect
will be corrected, or that any program will meet Licensee's particular
requirements.
Motorola's total liability and Licensee's sole remedy for any warranted
software shall be limited to, at Motorola's option, repair or replacement of
Motorola software or the payment of Licensee's actual damages, not to
exceed the total licensed charge paid by Licensee to Motorola for the item
of software that caused the damage.
IN NO EVENT SHALL MOTOROLA BE LIABLE FOR SPECIAL,
INCIDENTAL OR CONSEQUENTIAL DAMAGES (INCLUDING
WITHOUT LIMITATION LOSS OF USE, TIME OR DATA,
INCONVENIENCE, COMMERCIAL LOSS, LOST PROFITS OR
SAVINGS) TO THE FULL EXTENT SUCH MAY BE DISCLAIMED
BY LAW EVEN IF MOTOROLA HAS BEEN ADVISED OF THE
POSSIBILITY OF SUCH DAMAGES OR FOR ANY CLAIM
AGAINST LICENSEE BY ANY OTHER PARTY.
MOTOROLA IS NOT RESPONSIBLE AND SPECIFICALLY
DISCLAIMS ANY AND ALL LIABILITY FOR: (1) ANY
HARDWARE, FIRMWARE, OR SOFTWARE PROBLEMS CAUSED
BY CHANGES IN THE OPERATING CHARACTERISTICS OF
COMPUTER HARDWARE OR COMPUTER OPERATING SYSTEMS
WHICH MAY BE MADE TO THE HOST COMPUTER, WHICH
CHANGES ARE MADE AFTER THE RELEASE OF THE
SOFTWARE PRODUCT AND ITS INSTALLATION ON THE HOST
COMPUTER; (2) ANY HARDWARE, FIRMWARE, OR SOFTWARE
PROBLEMS WHICH ARE CAUSED, DIRECTLY OR INDIRECTLY,
BY THE INTERACTION OF THE SOFTWARE PRODUCT WITH
Foreword and Table of Contents (U.P.)
6880801D90-D
iii
NON-MOTOROLA CENTRACOM GOLD SERIESTM SOFTWARE
PRODUCTS; AND (3) ANY HARDWARE, FIRMWARE OR
SOFTWARE PERFORMANCE PROBLEMS WHICH ARE CAUSED,
DIRECTLY OR INDIRECTLY, BY USING NON-MOTOROLA
CENTRACOM GOLD SERIESTM SOFTWARE ON THE SAME HOST
COMPUTER WITH THE SOFTWARE PRODUCT.
This warranty extends only to the first licensee; subsequent transferees
accept these programs “as is” and without warranties of any kind. THIS
WARRANTY IS GIVEN IN LIEU OF ALL OTHER
WARRANTIES, EXPRESS OR IMPLIED, INCLUDING,
WITHOUT LIMITATION, THE WARRANTIES OF
MERCHANTABILITY AND FITNESS FOR A PARTICULAR
PURPOSE.
The classification of defects in Motorola supplied software shall be the
responsibility of Motorola. Remedy of defects is at the sole discretion of
Motorola. If Motorola agrees to remedy a software defect, the new
software will be warranted until the end of the original warranty period.
Replacement of any software defect shall constitute Motorola supplying
the customer with the appropriate software media and authorization key.
Field installation and configuration are not included.
All warranty service will be performed at service locations designated by
Motorola. Travel and associated expenses of the Licensee or such
expenses incurred by Motorola for visits to Licensee's location by
Motorola personnel are not covered by this warranty. This warranty does
not cover an item of Software (i) used in other than its normal and
customary manner; (ii) subjected to misuse; (iii) subjected to
modifications by Licensee or by any party other than Motorola without
the prior written consent of Motorola.
For the first 120 days following its initial shipment, Motorola warrants
that the media carrying the software will be free from defects which
damage the performance of the software. Motorola will replace any
damaged media free of charge during the warranty period. Warranted
media is limited to that which is used to transport the software (e.g.
floppy disks and authorization key). PROMs, which may store the
software in equipment are covered in the hardware warranty.
Field software updates/upgrades and new enhancement option software
will be warranted for one hundred twenty (120) days from the date of
initial shipment.
All special software (“SP”) provided to customers by Motorola will be
warranted as set forth herein.
iv
6880801D90-D
Gold Series™ Elite Inbound Event Display
Documentation Copyrights
No duplication or distribution of this document or any portion thereof
shall take place without the express written permission of Motorola. No
part of this manual may be reproduced, distributed, or transmitted in any
form or by any means, electronic or mechanical, for any purpose without
the express written permission of Motorola. To order additional copies
contact your Motorola sales representative.
©2004, Motorola, Inc. All rights reserved. Printed in U.S.A.
Disclaimer
The information in this document is carefully examined, and is believed
to be entirely reliable. However, no responsibility is assumed for
inaccuracies. Furthermore, Motorola reserves the right to make changes
to any products herein to improve readability, function, or design.
Motorola does not assume any liability arising out of the applications or
use of any product or circuit described herein; nor does it cover any
license under its patent rights nor the rights of others.
Trademark Information
Motorola and the Motorola logo, are registered trademarks of Motorola,
Inc. CENTRACOM™, CENTRACOM Elite™, CENTRACOM Gold
Series™, iDEN™, Digital Voice Privacy™, DVP™, and SmartZone™
are common law trademarks.
Windows NT® Windows 2000® and Windows XP®are trademarks of
Microsoft Corporation.
Any other brands or product names are trademarks or registered
trademarks of their respective holders.
Foreword and Table of Contents (U.P.)
6880801D90-D
v
FCC Interference Warning
The FCC requires that manuals pertaining to Class A computing devices
must contain a warning about possible interference with local residential
radio and TV reception. This warning reads as follows:
This equipment generates, uses, and can radiate radio frequency energy
and if not installed and used in accordance with the instruction manual,
may cause interference to radio communication. This equipment has
been tested and found to comply with the limits for a Class A computing
device pursuant to Subpart J of Part 15 of FCC Rules, which are designed
to provide reasonable protection against such interference when operated
in a commercial environment. Operation of this equipment in a
residential area is likely to cause interference. In this case, users are
required at their own expense to correct the interference.
Regional Languages
The CENTRACOM Gold Series Elite and Elite Admin applications
support regional languages. To configure the application to support a
regional language, refer to the Motorola Console Regional Language
Support User's manual which is located on the CENTRACOM Gold
Series CD-ROM.
vi
6880801D90-D
Gold Series™ Elite Inbound Event Display
Getting Help
Please read this manual before performing any installation or operations.
When a program is activated, select the Help menu at the top of the
screen for the Help file to be displayed.
If there is a problem loading or operating software, or if the console does
not appear to be working properly, refer to "Troubleshooting" or contact
the supervisor for help.
To request technical assistance call the Motorola System Support Center:
•
Motorola and MMS - (800) 221-7144
•
End Users or Customer - (800) 323-9949
Please have the following information ready before calling:
•
The Customer name and phone number
•
The Service Shop or Provider name and phone number
•
A description of the problem
•
Any remote dial-up numbers (if applicable)
•
Serial number of equipment
•
Gold CD-ROMs, and CDM/ADM/Elite software version numbers
•
COIM Firmware version
•
If upgraded, the Factory order number of the upgrade
•
Proof of coverage under warranty, maintenance agreement, or a valid
P.O. number for flat rate charge
Foreword and Table of Contents (U.P.)
6880801D90-D
vii
This page intentionally left blank.
viii
6880801D90-D
Gold Series™ Elite Inbound Event Display
Contents
FOREWORD .................................................................................................. I
Computer Software Copyrights.................................................................. i
Motorola Limited Hardware Warranty...................................................... i
How to Receive Depot Warranty Service ................................................. iii
Motorola Limited Software Warranty ...................................................... iii
Documentation Copyrights ........................................................................v
Disclaimer..................................................................................................v
Trademark Information ..............................................................................v
FCC Interference Warning........................................................................vi
Regional Languages..................................................................................vi
Getting Help............................................................................................ vii
CHAPTER 1 INTRODUCTION ......................................................................... 1-1
Overview ................................................................................................ 1-2
CHAPTER 2 NETWORK CONFIGURATION FOR IED.................................... 2-1
Configuring Domain Suffixes for IED Zones ......................................... 2-1
Configuring Domain Trusts in Windows 2000 Server............................ 2-5
Configuring Domain Trusts in Windows Server 2003............................ 2-9
CHAPTER 3 INSTALL BROADCAST MESSAGE ROUTER .............................. 3-1
Subnets and Broadcast Message Router (BMR) .................................... 3-1
Install Broadcast Message Router (BMR).............................................. 3-2
Setting up a Broadcast Message Router Service .................................... 3-5
Verify or Stop an operating BMR......................................................... 3-10
CHAPTER 4 BMRC AND CDM/ADM CONFIGURATION ............................. 4-1
Broadcast Message Router Configuration (BMRC)............................... 4-1
System Port Numbers ............................................................................. 4-3
Install Inbound Event Display................................................................ 4-3
Configure Console Database Manager (CDM) for Inbound
Event Display ......................................................................................... 4-3
Configure Alias Database Manager (ADM) for Inbound Event
Display ................................................................................................... 4-4
CHAPTER 5 ELITE ADMIN CONFIGURATION ............................................... 5-1
Elite Admin Toolbar and Menu.............................................................. 5-2
Creating an Inbound Event Display....................................................... 5-3
Using the Wizard .................................................................................... 5-4
Specifying a Name for an Inbound Event Display.................................. 5-4
Specifying Message and Status Codes .................................................... 5-5
Specifying Sorting Criteria ..................................................................... 5-6
Configuration Summary from the Wizard............................................... 5-8
Customization......................................................................................... 5-9
Preferences dialog................................................................................. 5-10
Foreword and Table of Contents (U.P.)
6880801D90-D
ix
Resource Display Filter......................................................................... 5-12
Message Code Display Filter dialog ..................................................... 5-13
Operating Filter Dialog Controls .......................................................... 5-14
Status Code Display Filter dialog ......................................................... 5-15
Sorting dialog........................................................................................ 5-16
Sorting Scenarios ................................................................................. 5-17
1
2
3
4
Initial displayed content .................................................................... 5-17
Sort by Received Time Order then Primary/non-Primary ................. 5-18
Event State placed first in the Order of Classifications..................... 5-19
Monitor Message and Status Codes .................................................. 5-20
Operations dialog................................................................................. 5-21
CHAPTER 6 DISPATCH OPERATION WITH INBOUND EVENT DISPLAY........ 6-1
Dropdown Menus and Handling Events ................................................ 6-2
Responding to Events ............................................................................. 6-3
Menu Operations and Buttons................................................................. 6-4
Event Status Indicators ........................................................................... 6-5
Handling Events in the Queue ................................................................ 6-6
Modify Inbound Event Display Preferences........................................... 6-8
APPENDIX A ............................................................................................. A-1
Registry Settings.....................................................................................A-1
GLOSSARY
INDEX
x
6880801D90-D
Gold Series™ Elite Inbound Event Display
Chapter 1
Introduction
This manual describes the Inbound Event Display (IED) operator
organizational feature, available as a software add-on for CENTRACOM
Gold Series™ Elite console operator positions.
IED software enhances an Elite console to perform similar to a call-based
console, as opposed to channel based console. On the Elite Dispatch
operator interface, IED is displayed as a movable call queue window for
radio messages and radio statuses.
This interface is available to operator positions that have the capability
assigned in the Console Database Manager (CDM) application.
The display itself has initial similarity to the Dispatch application's
Activity Log but allows a variety of configurations for how events are
displayed and handled by operators.
This manual covers network and message router installation and
configuration, capability assignment in the Elite Console Database
Manager (CDM), configuring the display using Elite Admin and the
operation of Inbound Event Display in Elite Dispatch.
Introduction
6880801D90-D
1-1
Overview
The following graphic is an example, which describes the basic
appearance and features of an Inbound Event Display interface, named
here as “Request to Talk."
Title Bar
Drop down menus
Window
buttons
Resource
Tile
Column
title button
Operations
buttons
Primary
Resource
Indicator
Highlighted
Message
event
Status
Indicator
Error Log
System Status
Indicator buttons
Clock
Window size
control
Typical Inbound Event Display Interface
1-2
6880801D90-D
Gold Series™ Elite Inbound Event Display
Chapter 2
Network Configuration
for IED
This chapter covers the network configuration of all operator positions
and CENTRACOM Servers in zones running IED.
Procedures in this chapter must be completed before proceeding with the
setup of an IED system.
This chapter assumes all CENTRACOM domains have been installed and
configured correctly according to the CENTRACOM Gold Series
Software Installation User’s Guide, prior to performing the IED
installation.
Configuring Domain Suffixes for IED Zones
The procedures in this section must be performed on all CENTRACOM
PCs (i.e. all Operator Positions and CENTRACOM Servers) in all
domains/zones where IED is running.
Note: These steps are identical for Windows 2000 Server, Windows 2000
Professional, and Windows XP Professional.
1.
To setup Domain Suffixes for IED, click Start, Settings, and
Network & Dial-up Connections.
2.
Double-click on the Local Area Connection icon.
Network Configuration for IED
6880801D90-D
2-1
2-2
3.
Click Properties.
4.
Select Internet Protocol (TCP/IP) and click Properties again.
6880801D90-D
Gold Series™ Elite Inbound Event Display
5.
Click Advanced.
6.
On Advanced TCP/IP Settings click the DNS tab.
7.
Click the Add button that is located just above the DNS Suffix for
this connection text entry box.
Network Configuration for IED
6880801D90-D
2-3
8.
Type the DNS suffix for another CENTRACOM domain running
IED, other than those already listed.
9.
Click Add to insert the newly created DNS suffix to list.
10. Repeat steps 7 through 9 for all remaining CENTRACOM
domains running IED.
11. Click OK to accept the changes.
2-4
6880801D90-D
Gold Series™ Elite Inbound Event Display
Configuring Domain Trusts in Windows 2000
Server
A Domain "Trust" must be created between different CENTRACOM
domains to enable read access to the CENTRACOM share across
domains.
The name of the share created by the installation must not be changed
from "CENTRACOM". A Domain Trust is not completed until both
sides of the trust have run these procedures.
The procedures in this section must be performed on all CENTRACOM
Servers in all domains/zones where IED is running.
1.
To setup Domain Trusts, click Start, Programs, Administrative
Tools, Active Directory, then Domains and Trusts.
The Domains and Trusts window opens.
2.
Right click on the Zone Icon and select Properties.
The properties window opens.
Network Configuration for IED
6880801D90-D
2-5
3.
Select the Trust tab.
4.
Click the Add button next to the “Domains Trusted By This
Domain” list.
The Add trusted domain window opens.
5.
Enter the Domain name for another CENTRACOM domain running
IED, other than those already listed.
Example: To allow a domain on Zone 4 (elite-zone4.local) to gain
access to this CENTRACOM Server’s domain, enter "elitezone4.local."
6.
2-6
Click OK.
6880801D90-D
Gold Series™ Elite Inbound Event Display
7.
If the Windows prompts that it cannot verify the trust, click OK,
otherwise proceed to Step 8.
8.
Click the Add button next to the “Domains That Trust This Domain”
list.
The Add Trusting Domain window opens.
9.
Enter the same Domain name that was entered in Step 5.
Example:
In order for this CENTRACOM Server to gain access to the domain
on Zone 4, enter "elite-zone4.local."
10. Click OK.
11. Click YES when asked to verify the trust.
Network Configuration for IED
6880801D90-D
2-7
12. Enter the user name and password of the CENTRACOM Server you
are attempting to gain a trust with.
Example: In these procedures we are granting and gaining access to
the Domain in Zone 4, so enter the user name and password for the
CENTRACOM Server in Zone 4.
13. If you have completed this procedure on one half of the trust you are
attempting to create, for example, if you are at the CENTRACOM
server at Zone 3 and have not followed the same procedures for the
CENTRACOM Server for Zone 4, the following window appears.
Click OK, and proceed to run these steps on the CENTRACOM
Server in Zone 3.
Otherwise, the following Verified window appears. Click OK.
14. Click OK on the Zone Properties window.
2-8
6880801D90-D
Gold Series™ Elite Inbound Event Display
Configuring Domain Trusts in Windows Server
2003
A Domain "Trust" must be created between different CENTRACOM
domains to enable read access to the CENTRACOM share across
domains.
The name of the share created by the installation must not be changed
from "CENTRACOM". A Domain Trust is not completed until both
sides of the trust have run these procedures.
The procedures in this section must be performed on all CENTRACOM
Servers in all domains/zones where IED is running.
1.
To setup Domain Trusts, click Start, All Programs, Administrative
Tools, Active Directory Domains and Trusts.
The Domains and Trusts window opens.
2.
Right click on the Zone Icon and select Properties.
The properties window opens.
Network Configuration for IED
6880801D90-D
2-9
3.
Select the Trust tab.
4.
Click the New Trust… button.
The New Trust Wizard window opens.
5.
2-10
Click Next.
6880801D90-D
Gold Series™ Elite Inbound Event Display
6.
Enter the Domain name for another CENTRACOM domain
running IED, other than those already listed and click Next.
Example: To allow a domain on Zone 4 (elite-zone4.local) to gain
access to this CENTRACOM Server’s domain, enter "elite-zone4.
local."
7.
If Windows prompts that it cannot verify the trust, select the Trust
with a Windows domain option and verify the domain name,
otherwise proceed to Step 8.
Network Configuration for IED
6880801D90-D
2-11
2-12
8.
Select the Two-way and click Next.
9.
Select Both this domain and the specified domain and click
Next.
6880801D90-D
Gold Series™ Elite Inbound Event Display
Note: Make sure the user has not setup a trust on the other server. If
they have setup the trust, remove it for this process to complete.
10.
Enter the trust password and click Next.
11.
The Trust Selections Complete window shows the selections you
have made, click Next.
Network Configuration for IED
6880801D90-D
2-13
2-14
12.
Select Yes, confirm the outgoing trust, and click Next.
13.
Select Yes, confirm the incoming trust, and click Next.
6880801D90-D
Gold Series™ Elite Inbound Event Display
14.
The Completing the New Trust Wizard window appears. Click
Finish to add the trust.
Note: The procedure above should be performed only in one of the
servers where the two-way trusts are being setup. It will take care
of the trust setup for the other machine as well, so the user does
not need to create a new trust in the other server, or modified it.
Network Configuration for IED
6880801D90-D
2-15
This page intentionally left blank.
2-16
6880801D90-D
Gold Series™ Elite Inbound Event Display
Chapter 3
Install
Broadcast Message Router
Subnets and Broadcast Message Router (BMR)
The BMR enables Inbound Event Display messages to be relayed
between subnets. The following applies only if a network has greater
than one subnet. For networks of only one subnet, skip to “Install
Inbound Event Display” on page 4-3
The following list outlines steps required to establish Inbound Event
Display on a Local Area Network:
•
Ensure PC server names are unique
•
Set up accounts for Broadcast Message Router (BMR)
•
Identify BMR computers
OP
OP
Subnet
“Zone 1”
OP
OP
OP
Subnet
“Zone 2”
Message
Router Host
OP
Message
Router Host
OP
Subnet
“Zone 3”
OP
OP
Message
Router Host
Subnets showing Operator Positions (OPs). Each subnet contains a Message
Router host.
Install Broadcast Message Router
6880801D90-D
3-1
Install Broadcast Message Router (BMR)
This manual assumes that each subnet is set up as specified in the
CENTRACOM PC Software Installation User’s Guide.
The BMR allows messages to be relayed between subnets. In the CDM,
the Broadcast Message Router Configuration (BMRC) allows system
administrators to designate machines on their network.
Observe these installation and configuring notes before installing the
BMR:
•
The BMR is recommended to be installed on the same local LAN as
the Inbound Event Display operator positions.
Warning: Running more than one BMR within a subnet will slow or
crash that subnet.
3-2
•
If there is more than one subnet, then exactly one BMR must be
installed on each subnet. Installers must determine how many
subnets are in the system and must identify an appropriate machine
on each subnet for the BMR. However, loading the BMR onto the
same machine as the CDM may slow the performance on that
machine. In addition, a busy BMR on an Elite workstation may
influence the performance. If a Dispatch User Interface is to be run
on a BMR PC, the login on that PC must be the same as the account
that PC's BMR is configured.
•
Host names or IP addresses can be used but IP addresses are strongly
recommended.
•
BMR IP addresses or host names must be entered into all CDMs if
more than one CDM is present for multi-zone systems. So, keep a list
of all assigned BMR IP addresses or host names for later input into
the CDM BMRC screen.
6880801D90-D
Gold Series™ Elite Inbound Event Display
In the CENTRACOM Elite software setup, note the following steps to
add BMR to the system:
1.
When choosing what components to install, choose Custom.
2.
Choose Broadcast Message Router.
3.
If the BMR is not already installed, during the Custom Install the
user is presented with a reminder to give the service a proper
domain username and password:
Install Broadcast Message Router
6880801D90-D
3-3
•
3-4
The following dialog is presented if a user deselects the box
(to uninstall BMR):
4.
Continue with installation as discussed in the Software Install
User's Guide.
5.
After CENTRACOM Elite install is completed, reboot the PC.
6880801D90-D
Gold Series™ Elite Inbound Event Display
Setting up a Broadcast Message Router Service
Use the following procedure to configure the Broadcast Message Router
Service:
1.
Navigate to and open the Windows Control Panel.
2.
3.
Double-click the applet icon for Administrative Tools.
The Administrative Tools window is displayed.
Double-click the Services icon.
The Services window is displayed.
4.
Right-click the Broadcast Message Router to be administered and
select Properties.
5.
From the General tab, select the Startup Type to be Automatic.
Install Broadcast Message Router
6880801D90-D
3-5
6.
Select the Log On tab.
7.
Select This Account.
Note: The Broadcast Message Router needs to run with a domain
account that is valid in all domains, otherwise the operatorto-operator functionality will not work across all zones.
The login should be in the format:
ELITE-ZONE1.local\Administrator
8.
9.
3-6
Select Browse.
The Select user dialog window is displayed.
Click Advanced.
6880801D90-D
Gold Series™ Elite Inbound Event Display
10.
Click Find Now.
11.
Select an Administrator User from the list and click OK.
Install Broadcast Message Router
6880801D90-D
3-7
Note: The Broadcast Message Router needs to run with a domain
account that is valid in all domains, else the operator
functionality will not work across all zones.
3-8
12.
Click OK.
13.
Enter the password for the selected user, and then confirm it.
6880801D90-D
Gold Series™ Elite Inbound Event Display
Warning:
If there is no password created for this user account
– make sure to delete the ‘*****” in the Password
fields. Failure to do this will prevent the service
from running correctly.
14.
Click OK to return to the Services window.
15.
With the BMR selected, right-click and select Start.
16.
Close the Services and Administrative tools windows.
Install Broadcast Message Router
6880801D90-D
3-9
Verify or Stop an operating BMR
Users can verify if a BMR is running by viewing the "Services" dialog
and viewing the Status column for the BMR in the list.
To stop a BMR from running, a user must be logged in as an
Administrator.
1.
Navigate to Windows Control Panel and double-click the
Administrative Tools icon.
The Administrative Tools window is displayed.
2.
Double-click Services.
The Services window is displayed.
3.
Right click the Broadcast Message Router from the list and select
Stop.
3-10
6880801D90-D
Gold Series™ Elite Inbound Event Display
Chapter 4
BMRC and CDM/ADM
Configuration
Broadcast Message Router Configuration (BMRC)
In this section, administrators will use the Broadcast Message Router
Configuration (BMRC), which involves adding/deleting of Broadcast
Message Router Service information for systems of multiple Console
subnets.
To open the Broadcast Message Router Configuration, in the main CDM
screen:
1.
Select Edit then Message Router Configuration…
The Broadcast Message Router Configuration screen appears.
Install Broadcast Message Router
6880801D90-D
4-1
Broadcast Message Router Configuration screen
The two main regions for data entry are Host Settings and System
Port Number.
2.
Type the IP address of all the BMRs in the system, including this
machine if it is a BMR, and then click Add.
Note: In multi-zone systems, all CDMs need the same host list.
Note: When the Host List and/or the System Port Numbers are
changed, all Elite applications in each related subnet need to be
re-started as signified with the following dialog warning:
4-2
6880801D90-D
Gold Series™ Elite Inbound Event Display
System Port Numbers
Only one System Port Number for all BMRs in the database can be stored
and modified per system. This is done under the heading “Port Number”
in the Message Router table. When entering a Port Number it must fall
within the range from 1024 to 65535.
Note: For selecting port numbers in a SmartZone OmniLink™ trunking
system, refer to system documentation.
Note: Administrators should leave the default System Port Number as is
unless there is a port conflict with another application.
Install Inbound Event Display
1.
Shut down the Console Database Manager (CDM).
2.
Place the Inbound Event Display CD ROM in the CDM PC.
3.
Locate and double-click the IEDsetup.exe file to complete the
installation. Rebooting again is not required.
Restart the CDM.
4.
Configure Console Database Manager (CDM) for
Inbound Event Display
1.
Verify/Add Radio Message and/or Radio Status capabilities to all
resources that will be displayed in Inbound Event Display.
Radio Message needs to be added to the resource in the CDM if
the user wants to monitor radio messages on the resource. Radio
Status needs to be added to the resource in the CDM if a user
wants to monitor radio status codes on the resource. Radio Status
and Radio Message are not supported on all system types. Please
consult the system planner for appropriate usage.
2.
Add the Event Status and Event Display capabilities to all operator
positions that will be running Inbound Event Display .
Refer to the CDM User’s Guide for details on adding capabilities.
Install Broadcast Message Router
6880801D90-D
4-3
Configure Alias Database Manager (ADM) for
Inbound Event Display
If desired, ensure aliases have been entered in the ADM for all talkgroups
and radio message codes that is displayed in the Inbound Event Display.
Refer to the ADM User’s Guide for details.
4-4
6880801D90-D
Gold Series™ Elite Inbound Event Display
Chapter 5
Elite Admin Configuration
This section includes procedures for configuring and customizing the
various features of Inbound Event Display from within the Elite Admin
application.
If an Inbound Event Display configuration already exists, selecting
Inbound Event Display from the Edit drop-down menu produces the
Configuration Summary window; otherwise the Configuration Wizard
appears, prompting creation of a new Inbound Event Display
configuration.
System Administrators setting up Inbound Event Display configurations
should also read the section at the end of this chapter regarding
alternative uses for Inbound Event Display.
Selecting Inbound Event Display in Elite Admin
Elite Admin Configuration
6880801D90-D
5-1
Elite Admin Toolbar and Menu
When the Inbound Event Display capability is configured for a system,
the following changes or functions are enabled:
Icon
Item
Show/Hide
Inbound Event
Display button
Description
Shows or Hides the Inbound Event
Display window. Note that in the
Edit/Toolbar function (selecting
which buttons to show or hide in a
toolbar) the button is shown with
the actual name of the configuration
next to it.
Inbound Event Display
Enables creation or editing of an
Inbound Event Display interface.
5-2
6880801D90-D
Gold Series™ Elite Inbound Event Display
Creating an Inbound Event Display
If an Inbound Event Display configuration does not exist from the main
Admin window, select Edit then Inbound Event Display to display the
Inbound Event Display Wizard.
If an Inbound Event Display already exists, select Edit then Inbound
Event Display to display Configuration Summary window.
Creating a new Inbound Event Display includes using the Inbound Event
Display Wizard to:
• Specify a Name for an Inbound Event Display queue
• Specify Message Code Formats
• Specify Status Code Formats
• Specify Sorting Criteria
• Classify Sorting Order
• Specify Order of Classifications
• Specify Order within Classifications
Elite Admin Configuration
6880801D90-D
5-3
Using the Wizard
Creating a new IED configuration is facilitated using the Inbound Event
Display Wizard. Users are presented with a series of screens to create an
Inbound Event Display configuration.
When moving through the screens, clicking Cancel prompts the
user to exit the current window without accepting any changes,
returning to the Admin main window. Clicking Back and Next
moves in the sequence to the previous or next window
respectively, and Finish ends and accepts the configurations made,
resulting in the Configuration Summary.
Specifying a Name for an Inbound Event Display
1.
Type an Inbound Event Display Name in the text entry bar. The
length of this name cannot exceed 256 characters.
Note: If no other name is typed in the default setting for the Event
Display Name then default name is "Inbound Event
Display." Once all configurations are finished, this name
appears in the Window title bar of the IED and as the name
of the show/hide button in the Design Toolbar dialog.
If the name entry box is left blank a warning dialog appears
asking to name the Inbound Event Display before
proceeding, and if the name is too long a warning dialog
appears asking to shorten the name.
2.
5-4
Clicking Next moves on to the Message Code dialog window and
Finish returns to the Configuration Summary Screen.
6880801D90-D
Gold Series™ Elite Inbound Event Display
Specifying Message and Status Codes
This section defines Message and Status Codes and their formats.
1.
Selecting the Message check box enables selection of radio
buttons for either All Message Codes or Message Codes* as shown
above. Selecting the radio button for All Message Codes will
monitor all available message codes. Selecting the Message
Codes* radio button enables the text box where one or more codes,
or a range of message codes, can be specified to be monitored.
2.
Selecting the Status check box enables the choices for monitoring
All Status Codes, or one or more or a range of Status Codes* as
entered in the neighboring text box.
3.
Clicking Next moves to the Sorting dialog window.
Code Formats
Codes can be specified either with a range of two numbers using the dash
between them, or as numbers followed by a comma. For example where
a range of 2-6 is typed the result is 2, 3, 4, 5, 6. The numerical order that
Codes are entered is ignored and automatically arranged sequentially.
Elite Admin Configuration
6880801D90-D
5-5
Specifying Sorting Criteria
The Inbound Event Display Wizard provides the ability to sort events
based on received time. Sorting ability is grouped into Classifications,
and within that group the Order within Classifications.
Classifications include Primary Resource, Event State such as Hold,
Acknowledged and Unacknowledged, and Event Type such as Radio
Message and Radio Status.
Classification Sorting Order
Check the box Sort by Classifications to toggle on the frames for Order of
Classifications and Order within Classifications (unchecking the box does
not clear the selections in the frames). Once active, listed items can be
moved higher or lower in sorting priority using the Move arrow buttons.
For each selection made on the left, choices within the classification on the
right will change:
•
Selecting Primary Resource shows Primary and Non-Primary resources.
•
Selecting Event State shows Acknowledged, Unacknowledged, and Held
events.
•
Selecting Event Type shows Radio Message and Radio Status.
Note:
5-6
If only one Event Type is being monitored the “Event Type”
check box will not be shown.
6880801D90-D
Gold Series™ Elite Inbound Event Display
When the sorting screen is accessed via Customize from the Summary
dialog, the screen shown above changes to include a section where the
user can select Received Time Order:
Note: Refer to the Sorting Scenarios on Page 5-17.
Elite Admin Configuration
6880801D90-D
5-7
Configuration Summary from the Wizard
At the end of the Inbound Event Display Wizard process, the
Configuration Summary screen shows an Inbound Event Display
Interface Preview region at the top of the window.
A window pane for Properties and Customize is located on the left,
containing elements of this configuration organized in the familiar "tree"
fashion and the root of which (at the top of the tree) is the folder name of
this configuration file (the default name “Inbound Event Display” appears
here).
The Property Preview region shows text details of an item selected from
the pane on the left. Clicking on an item then clicking “Customize...”
takes the user to that section.
5-8
6880801D90-D
Gold Series™ Elite Inbound Event Display
Customization
The Inbound Event Display configuration can be customized by
accessing the Configuration Summary screen from the main Admin
window, under Edit then selecting Inbound Event Display.
Note: When Configuration Summary is accessed from Dispatch, only the
item Preferences can be modified.
The Configuration Summary screen shows an Inbound Event Display
Interface Preview region at the top, and organized in the familiar "tree"
fashion in the Properties and Customize window pane at lower left are
elements of this configuration. The highest part of the tree is the folder
name of this configuration file (For example, "Inbound Event Display”).
Clicking on a Plus sign (+) expands a branch and a Minus signs collapses
a branch. Click an element in the list then “Customize...” to open the
corresponding dialog. The Property Preview window pane at the right
contains text details of the configuration.
Elite Admin Configuration
6880801D90-D
5-9
Preferences dialog
Four regions displayed in the Preferences dialog are General Information,
Log to File, Enable Audible Indication, and Customize Inbound Event
Display.
In General Information an administrator can select:
• Name: Type a new name for the display.
• Show the Inbound Event Display upon Dispatch startup.
• Show the Preview tile in the Inbound Event Display window.
• Allow Modifications in Dispatch enables a dispatcher to make
modifications. An “Inbound Event Display…” menu selection will
then be visible under the Edit menu in Elite Dispatch.
In Log to File (only available when running Windows® 2000 or later),
checking the box enables saving all Inbound Event Display message event
data (regardless of selected content columns) to a log file that has the
default name of [Current_elt_Name] . [Current_IED_Name] . log.
Log files can be opened with Notepad or imported into Microsoft Excel.
The default saving location is C:\Documents and Settings\All Users\
Documents \CENTRACOM\Event Display. To change this location, see
“Appendix A, Registry Settings.”
Note: Windows Explorer may display the path differently between
operating system versions. For example, in Windows XP the
Documents folder is displayed as Shared Documents.
The File Size limit is 20 megabytes, which can be set using the scrollable
box.
5-10
6880801D90-D
Gold Series™ Elite Inbound Event Display
Note: If the log file is not backed up once the designated file size limit is
reached, data thereafter will be lost. Also note that a separator
line is added to the log file after each Dispatch session. This
happens when Dispatch is started up or the dispatch user changes
to another configuration file then back to the current configuration
file.
In Audible Indication, the ability is enabled to hear a tone in Dispatch
when an event is received.
Note: if this is selected make sure to “turn off” Enable Tones on
Status/Message on the Edit/Current Configuration screen.
In Customize Inbound Event Display, Total Rows to be shown in the
display window can be specified by entering the number of rows desired.
Selected Content refers to the title that appears at column headings of the
display. The up and down arrows are used to position a column on the
IED window from left to right: closer a selection is located to the top of
the list, closer the column appears toward the left of the display. The
following table provides a description for each item on the Selected
Content listing.
Note: If Event State is checked it must be the top entry in the list.
Note: The Primary Resource and Event State columns do not have
heading titles displayed at the top of their respective columns.
Item
Event State
Resource
Unit Alias
Alias
Time
Primary
Resource
Unit ID
Event
Code
Secure Key
Elite Admin Configuration
Description
UnAcknowledged, Acknowledged, Held
The resource name
The alias for the unit
The alias for the Status Code/Message Code
The time stamp of the event
A Primary Resource indicator ( * - an asterisk). No
indicator will mean the resource is not primary.
The Unit ID
A text wording of the message code
The Message code of the event
A resource’s encryption key number.
6880801D90-D
5-11
Resource Display Filter
Filters and Sorting Dialogs
The Resource Display Filter allows a user to select resources to be
monitored by the Inbound Event Display. Selecting the checkbox for
Radio enables the list of either All resources, selecting Primary or NonPrimary resources. Additionally, by checking the box for Additional
Resources, resources in the left window pane become active for selection
and can be moved into or out of the Monitored pane by clicking the left
and right arrows buttons.
The type of Additional Resource that can be monitored may vary in later
versions but at press time, only Radio is available.
Note: For ASTRO SmartZone Release 3.0 Users, in all operator
positions it is recommended to configure the Inbound Event
Display to receive any and all talkgroup radio messages in order
to provide redundancy protection in the event one operator
position fails. Configuring the Inbound Event Display to filter out
any talkgroups is NOT recommended.
5-12
6880801D90-D
Gold Series™ Elite Inbound Event Display
Message Code Display Filter dialog
The Message Code Display Filter dialog provides an administrator the
ability to choose the details of which radio message codes are displayed
in the Inbound Event Display .
For individual or set of monitored resources, specific Messages Codes or
ranges of Messages Codes can be selected.
The user has the option of monitoring Message Codes in Event Display
by checking or unchecking the checkbox.
Elite Admin Configuration
6880801D90-D
5-13
Specifying Message Codes for Monitored Resources
When entering Message Codes, integers (whole numbers), are used. The
Customize Message Code Display Filter dialog has groups of controls,
organized into regions for:
•
All Monitored Resources
•
Primary/Non-Primary Resources, grouped into either All Primary
or All Non-Primary can be specified.
•
Special Resources. The "Special Resources" frame and checkbox
provides for monitoring specific Radio Resources in the list as
shown.
Message Codes Display Filter Default settings
By default, the Inbound Event Display is set up to display all radio
message codes for all monitored resources.
Operating Filter Dialog Controls
For each of the regions in the Filter interface, buttons and possible
selection choices are active when the checkboxes are checked.
Administrators can choose to have the Inbound Event Display interface
show all or specific Resource Message Codes in the display, by using the
radio buttons "All Message Codes" or "Message Codes*:"
•
Selecting "Message Codes*:" enables the corresponding text box
where the specific or ranges of codes are then entered. Unchecking
"All Monitored Resources", "All Primary Resources", or "All NonPrimary Resources” disables the "Message Codes*:” textbox but
does not blank out any entered codes.
Special Resources
5-14
•
Checking "Special Resources" enables the checkbox list called
"Monitored Radio Resources displaying customized Message Codes"
and the radio button options for specifying Message Codes.
Regardless if the list box is enabled or disabled, the individual
resources are listed. Exiting the Message Code Display Filter dialog
while "Special Resources" is unchecked removes specified Message
Codes.
•
When multiple Radio Resources are configured to display the same
Message Codes, the Message Code options are updated and
displayed by the set of selected resources. When multiple Resources
6880801D90-D
Gold Series™ Elite Inbound Event Display
are configured to display different Message Codes, the radio buttons
are initialized to be empty. The rationale behind this is so the
Administrator can redefine a group of Resources displaying different
Message Codes, to display the same set of Message Codes.
•
Specifying the Message Code option for a selected Resource(s)
automatically checks the items for the Resource if the resources have
not been checked previously.
Status Code Display Filter dialog
The Status Code Display Filter dialog operation is identical to the
Message Code Display Filter for designating specific or ranges of Radio
Status Codes. Please refer to previous section Message Code Display
Filter dialog for details.
Elite Admin Configuration
6880801D90-D
5-15
Sorting dialog
The Customize Inbound Event Display Sorting dialog provides an
administrator the ability to specify the received time sorting order and the
classification sorting order.
The default setting is Oldest on Top (meaning First-in-First-Displayed).
This means the oldest event will always be shown on the top of the list,
with others shown chronologically after it.
For more details please see “Using the Wizard” in “Creating an Inbound
Event Display.”
5-16
6880801D90-D
Gold Series™ Elite Inbound Event Display
Sorting Scenarios
To demonstrate the implications of sorting, the following scenario shows
how the displayed list of content changes in the Inbound Event Display as
sorting parameters are selected.
•
The first example shows the table of initial displayed content before
sorting is applied.
•
The second example assumes sorting by Received Time Order,
sorted first by Primary/Non-Primary and then by Event State.
•
The third example assumes Event State is placed first in the Order of
Classifications.
•
The fourth example assumes sorting of Message and Status Codes by
adding Event Type then positioning Event State first, Event Type
second, then Primary Resource third.
1 Initial displayed content
The table below shows sample events before sorting was applied.
Inbound Event State
Acknowledged
Acknowledged
Unacknowledged
Held
Unacknowledged
Held
Acknowledged
Elite Admin Configuration
UNIT_ID
00000002
00000001
00000007
00000005
00000006
00000004
00000008
Resource
RSC_B
RSC_C
RSC_D
RSC_A
RSC_A
RSC_C
RSC_A
6880801D90-D
Timestamp
12:04
12:05
12:08
12:09
12:11
12:14
12:22
5-17
2 Sort by Received Time Order then Primary/non-Primary
If the “Oldest on Top” (First-in-First-Displayed) was selected as shown
in the Received Time Order above,, then the selection is made to sort
first by Primary Resource (where RSC_A and RSC_B are Primary and
where RSC_C and RSC_D are non-primary), and second by Event
Status (e.g. Acknowledged, Unacknowledged, Held).
Thus, the Inbound Event Display would display events as shown in the
table below (no alphabetical sorting is implied). The first two events
are from Primary resources, and both are acknowledged.
Since oldest on top is specified, Event 1 (RSC_B) is displayed before
Event 2 (RSC_A). In each of the groups following those two
(separated for clarity here), the same criterion is applied.
5-18
Inbound Event State
Acknowledged
Acknowledged
UNIT_ID
00000002
00000008
Resource
RSC_B
RSC_A
Timestamp
12:04
12:22
Unacknowledged
Held
00000006
00000005
RSC_A
RSC_A
12:11
12:09
Acknowledged
Unacknowledged
Held
00000001
00000007
00000004
RSC_C
RSC_D
RSC_C
12:05
12:08
12:14
6880801D90-D
Gold Series™ Elite Inbound Event Display
3 Event State placed first in the Order of Classifications
This next example assumes that Event State is placed first in the Order
of Classifications.
The Inbound Event Display would display:
Inbound Event State
Acknowledged
Acknowledged
Acknowledged
Unacknowledged
Unacknowledged
Held
Held
Elite Admin Configuration
UNIT_ID
00000002
00000008
00000001
00000006
00000007
00000005
00000004
Resource
RSC_B
RSC_A
RSC_C
RSC_A
RSC_D
RSC_A
RSC_C
6880801D90-D
Timestamp
12:04
12:22
12:05
12:11
12:08
12:09
12:14
5-19
4 Monitor Message and Status Codes
This example assumes the selection is made to monitor Message and
Status Codes by adding Event Type then positioning at the top of the
Order of Classifications window (with the arrow buttons), Event State
first, Event Type second then Primary Resource third.
The Inbound Event Display would then display:
Note: RTT (Request to talk) is a Radio Message while “Out to Lunch”
and “On Scene” are Radio Statuses.
5-20
Inbound
Event State
Acknowledged
Acknowledged
Acknowledged
Resource
UNIT_ALIAS
ALIAS
Timestamp
RSC_B
RSC_C
RSC_A
00000002
00000001
00000008
12:04
12:05
12:22
Unacknowledg
ed
Unacknowledg
ed
Held
Held
RSC_A
00000006
RTT
RTT
Out To
Lunch
RTT
RSC_D
00000007
12:08
RSC_A
RSC_C
00000005
00000004
On
scene
RTT
Out To
Lunch
6880801D90-D
12:11
12:09
12:14
Gold Series™ Elite Inbound Event Display
Operations dialog
The Customize Inbound Event Display Operations dialog contains three
regions:
• Operations Menu Items
• Inbound Event Display Toolbar
• Double-click Action
Each of the items listed in the Operations Menu Items can be selected as
indicated by the checkboxes to appear in the dropdown menu of the
Inbound Event Display interface. As denoted above, an item must be
checked in the Operations Menu Items list on the left, for it to be
available in the Toolbar pane on the right.
The Configure… button becomes active only for Acknowledge and
Acknowledge Next when they are selected in the Operations Menu Items
list box. When the user clicks the Configure button, the Configure
Acknowledge Operations dialog window appears. In order to engage the
Configure function, however, first uncheck the checkbox next to the
button icon in the Toolbar pane.
The disabled (grayed-out) matching item in the Menu pane now becomes
enabled (darkened) and the Configure… button is enabled.
The user can select Delete Event or Hold Event radio buttons.
Elite Admin Configuration
6880801D90-D
5-21
The Icon buttons shown on the Toolbar pane can be repositioned with
the arrow buttons. As well, a user can use the Separator button to add a
separator/space between icon buttons appearing on the toolbar.
To choose what will happen when the user double-clicks on any event,
open the double-click menu and choose either Acknowledge or Hold.
5-22
6880801D90-D
Gold Series™ Elite Inbound Event Display
Chapter 6
Dispatch Operation with
Inbound Event Display
This chapter describes operator use of the Inbound Event Display. The
following graphics illustrate the typical components of an Inbound Event
Display :
Title Bar
Drop down menus
Window
buttons
Resource
Tile
Column
title button
IED Toolbar
Primary
Resource
Indicator
Status
Indicator
Error Log
Highlighted /
Acknowledged
Message event
System Status
Indicator buttons
Dispatch Operation with Inbound Event Display
Clock
Window size
control
6880801D90-D
6-1
Dropdown Menus and Handling Events
The Inbound Event Display window contains drop-down menus for
Inbound Event Display, Operations, View, and Help.
The functions that operators can take on events, using buttons and
selecting items in the Operations drop-down menu, are described in the
next section "Responding to Events."
•
While the display is visible, column width can be changed by
clicking and dragging a column divider.
•
Primary Resources are designated as an asterisk (*).
•
When the queue list grows longer than the window height, a vertical
scroll bar will appear on the right of the window.
The following table describes the contents and functions of items in the
drop down menus:
Menu
Inbound
Event
Display
View Menu
Item
Hide
Description
Allows the user to hide the
window
Activity Log
View Menu
Auxiliary I/O
Window
Error Log
Contents
Using Help
Shows/Hides the Activity Log
window
Shows/Hides the Auxiliary
Input/Output window
Shows/Hides the Error Log
Lists all Help topics
Describes how to use Windows
help
Displays Dispatch copyright
information and software version
number
View Menu
Help Menu
Help Menu
Help Menu
About Elite
Dispatch
Dispatchers can show/hide the Inbound Event Display by selecting Show
Inbound Event Display from the View menu of the main Dispatch
window or by clicking the Inbound Event Display button on the Dispatch
toolbar:
Show/Hide Inbound Event Display button.
6-2
6880801D90-D
Gold Series™ Elite Inbound Event Display
Responding to Events
To respond to entries in the Inbound Event Display operators should first
understand the implications for taking actions on events in the queue.
These implications become clear when operators understand the functions
of the Inbound Event Display operations buttons and menu selections in
the following sections.
Depending on the action an operator takes on an event, a message's
location in the list may change, depending on sorting parameters.
After selecting an event from the queue, operators can perform actions
by:
•
Clicking an operations button from the Inbound Event Display
toolbar.
•
Selecting an operation from the Inbound Event Display Operations
menu.
•
Double Clicking. A double-click action be configured in the system
to perform an action.
•
Opening the flap in the Inbound Event Display resource tile to view
its features.
•
Communicating with the resource by clicking the transmit button.
Gold Series™ Elite Inbound Event Display
6880801D90-D
6-3
Menu Operations and Buttons
The following table outlines operator actions available in the Inbound
Event Display:
Button
Menu Item
Acknowledge
Description
This function selects and Acknowledges a
resource signified with a Green checkmark;
it Holds a previously Acknowledged event
or Deletes it (depending on how the feature
has been configured *). Resources that
were just Acknowledged previously may be
moved to another location in the queue
(depending on how the sorting feature is
configured).
This function routes audio to the Select
speaker and takes control of an event, so
communication between a Dispatcher and
the resource can commence when the
Transmit button is pressed, or clicked on the
resource tile. It also causes the resource to
be selected and updates the Resource Tile
display.
* Note that if deleted, the event is deleted
from every operator position in the system
configured with Inbound Event Display .
6-4
Acknowledge
Next
Acknowledge Next acknowledges the entry
at the top of the list.
Hold
Puts the selected event on Hold. Also deselects the resource and switches the audio
out of the selected speaker.
Delete
Blanks out the Tile Preview. Deletes the
selected event. De-Selects the resource.
Clear Error
Line
Clears the latest error message that was
displayed on the Status Bar text area.
Deleting All
Delete all events without clicking on any
item in the list first, blanks out the Tile
Preview, and deselects the Resource.
6880801D90-D
Gold Series™ Elite Inbound Event Display
Delete by Unit
After operators select an event from the list,
clicking this button deletes all messages in
the queue associated with that Unit
including the event that is highlighted.
Delete by
Resource
After operators select an event from the list,
clicking this button deletes all messages in
the queue associated with that Resource
including the event that is highlighted.
Event Status Indicators
A graphic indicator for an event's State can appear at the far left of the
Inbound Event Display queue as shown in the table below, such as Hold
or Acknowledge. A graphic Status indicator shows what action has been
taken on an event.
Status
Description
Acknowledge (Green Checkmark)
Hold (Yellow Hand)
(Blank, no indicator)
Unacknowledged. No graphic indicator for
an event. No action has yet been taken.
Gold Series™ Elite Inbound Event Display
6880801D90-D
6-5
Handling Events in the Queue
Some examples for handling events in the queue include Acknowledging,
Acknowledging the next event at the top of the list, deleting a selected
event, deleting all events for a resource, or Holding an event. Some
actions populate the resource tile while other actions do not, in both the
Inbound Event Display and on the Dispatch desktop (if visible in the
currently selected folder). The following scenario demonstrates taking
some actions on events in the list:
An event is chosen in the Inbound Event Display (clicked once) but not selected.
Operations can be conducted on the resource either from the toolbar or from the
Operations menu.
Double-click causes the entry to become selected and Acknowledged receiving the
checkmark and repositioned in the list. The resource tile shows that resource's
information and is highlighted. The cursor has not moved from where it conducted
the double-clicking.
6-6
6880801D90-D
Gold Series™ Elite Inbound Event Display
Double-clicking causes the item to be selected and Acknowledged, while
automatically changing the previously acknowledged event to Hold.
Clicking the Delete button deletes the selected event, sets the resource tile blank
and only the Acknowledge Next button in the toolbar remains active.
Clicking Acknowledge Next performs the same actions as Acknowledge except it
automatically acknowledges the item at the top of the list with a single click of the
icon. In this case, the operator has also chosen to view resource features by
opening the flap.
Gold Series™ Elite Inbound Event Display
6880801D90-D
6-7
Modify Inbound Event Display Preferences
From the main Dispatch interface select the drop-down Edit menu then
select Inbound Event Display.
•
The Configuration Summary screen shows the name of the Inbound
Event Display configuration in the window title bar as well as the
folder in the Properties and Customize window at lower left.
This Configuration Summary screen shows the Inbound Event
Display Interface Preview consisting of a resource tile region and
the various operations buttons. Properties and Customize resides
in the bottom left window pane, which operates in the familiar
"tree" fashion, with the various branches of Inbound Event Display
parameters signified as small page icons.
6-8
6880801D90-D
Gold Series™ Elite Inbound Event Display
The following table shows example information when clicking on
Preferences. The items below can be modified after clicking the
Customize button:
General Information
Name: Inbound Event Display
Show Inbound Event Display:
Yes
Enable Audible Indication
•
Name of the Configuration
•
Start Dispatch with Inbound
Event Display presented on
screen
Sound audio when a radio
message event is received at the
console
Configurable for Primary or All
Radio Resources
Enable customization of the
Maximum rows to display
•
•
Customize Inbound Event
Display
Total Rows: 100
Selected Content:
1. Event State
2. Resource
3. Unit Alias
4. Alias
5. Time
6. Primary Resource
7. Unit ID
8. Event
9. Code
10. Secure Key
•
•
The column titles of the
Inbound Event Display that will
be listed left (the top item e.g.
Event State) to right
•
Click Customize to display the Customize Inbound Event Display
Preferences screen.
•
General Information consists of the Name of the configuration and
toggle boxes for Showing the Inbound Event Display on start up and
enabling audio indication of a message event. Maximum rows are
selected in the Customize pane as well as the column titles for
Selected Content. Again, note that the top item in the list is the leftmost column in the Inbound Event Display interface. Use the Arrow
Up and Down buttons to move an item in the list and thus its column
position.
Gold Series™ Elite Inbound Event Display
6880801D90-D
6-9
Customize Inbound Event Display Preferences as viewed in Elite Dispatch.
6-10
6880801D90-D
Gold Series™ Elite Inbound Event Display
Appendix A
Registry Settings
Registry values can be used to control the behavior of certain
aspects of the IED interface. The following table summarizes
these values.
Warning: This suggestion requires the use of the Registry Editor
(REGEDIT.EXE). Changes made to the Windows
registry happen immediately, and no backup is
automatically made. Do not edit the Windows registry
unless you are confident about doing so. Microsoft
have issued the following warning with respect to the
Registry Editor: "Using Registry Editor incorrectly
can cause serious, system-wide problems that may
require you to re-install Windows to correct them.
Microsoft cannot guarantee that any problems
resulting from the use of Registry Editor can be
solved. Use this tool at your own risk."
The key is:
HKEY_LOCAL_MACHINE/SOFTWARE/Motorola/Console/Elite.
Name
Type
Valid Value
Explanation
EventDisplayPath
REG_SZ
No restriction
Path of the Event
Display log file.
Registry Values
Appendix A
6880801D90-D
A-1
This page intentionally left blank.
A-2
6880801D90-D
Gold Series™ Elite Inbound Event Display
Glossary
TERM
DEFINITION
Acknowledge
An action for Acknowledging an event in the Inbound Event
Display causes the resource to be enabled for communication
with the console operator.
Acknowledge Next
An action for Acknowledging the message event at the top of
the listed events in the Inbound Event Display .
ADM
Alias Database Manager - A CENTRACOM Gold Series
application program that configures aliases for subscriber
radio units, status and message numbers, and phone numbers.
Admin Program
The Elite set up program used to configure Elite dispatch
screens.
Audio Indication
Events received at the console can be configured to produce an
audible beep in the speakers of the CIE.
BMR
Broadcast Message Router
BMRC
Broadcast Message Router Configuration
CDM
Console Database Manager - A CENTRACOM Gold Series
database application program.
CIE
Console Interface Electronics.
Classification Sorting
Order
Displaying radio messages on the Inbound Event Display
queue in the hierarchy of received time stamp; messages can
be sorted by the classifications of Primary Resource and Event
State.
Configuration Summary
An Inbound Event Display dialog summarizing the
configurable parameters of an Inbound Event Display
configuration.
Deselect
A selected resource (highlighted on the screen) can be
deselected by clicking the resource tile or another resource.
Elite Dispatch Program
Windows PC graphical user interface for dispatching from operator
positions in a CENTRACOM console system.
Administrators can select which message codes received at the
console are displayed in the IED Inbound Event Display .
Filter
Hold
An operator action to a message event causing it to be on Hold status.
Host List
IP Addresses of all Message Routers
Inbound Emergency
A signalling feature that allows a radio to transmit an
emergency signal to the console.
Inbound Event Display
A floating window displayed in Elite Dispatch that serves as a call
queue for radio messages. This is available to operator positions that
have the capability assigned in the Console Database Manager
(CDM) application.
Message Codes
A code designating a message to be displayed in the IED window
from a subscriber without taking up air time to convey information.
Gold Series™ Elite Inbound Event Display
6880801D90-D
Glossary - 1
TERM
DEFINITION
“Op” or “OP”
Operator Position
Order within
Classification
Sorting Order within a classification is based on either Primary
Resource, Event State or Event Type. Order within the class can
occur for elements such as Primary, Non-Primary, Unacknowledged,
Acknowledged and Held, Radio Message and Radio Status.Based on
either the selection of Primary Resource or Event State for sorting
criteria, Primary or Non-Primary or Unacknowledged,
Acknowledged and Held are more detailed sorting within the chosen
class.
A radio resource selected by an administrator as high priority to the
Op, designated on the resource display with a diamond symbol and in
IED Inbound Event Display as an asterisk (*).
Primary Resource and
Indicator
Radio Message
An Event Type displayed in the IED window. Note that Radio
Message needs to be added to a resource in the Console
Database Manager (CDM) if the user wants to monitor radio
message codes on the resource.
Radio Status
An Event Type displayed in the IED window. Note that Radio
Status needs to be added to a resource in the Console Database
Manager (CDM) if a user wants to monitor radio status codes
on the resource. Most radio subscriber units have buttons that
are labeled with status numbers such as 1 = lunch and 2 =
fueling.
Status Codes
A code designating the status of a subscriber without taking
up air time to convey the information. Status numbers can
range from 0 to 65,535 inclusive.
Sorting
Sorting messages can be performed by displaying the Received
Time -with the oldest message at the top of the list or with the
newest message at the top of the list - in the Inbound Event
Display. Further sorting can include classifications by Primary
Resource, Event State (Acknowledged, Held etc.) and Event
Type Messages.
Wizard
IED dialog windows for creation of a new configuration. The
wizard provide default settings of configurations for how
events are displayed and handled by operators.
2-Glossary
6880801D90-D
Gold Series™ Elite Inbound Event Display
Index
A
Active Directory .............................. 2-5
Activity Log
show/hide .................................... 6-2
Add trusted domain ......................... 2-6
Add Trusting Domain...................... 2-7
Admin
Classification Radio Message
and Status................................ 5-6
Classification Sorting
Criteria.................................... 5-6
Configuration .............................. 5-1
Configuration Creating................ 5-3
Configuration Customize ............ 5-9
Configuration using Wizard ........ 5-4
Configuration Wizard,
Summary................................. 5-8
Content Alias............................. 5-11
Content Code............................. 5-11
Content Event............................ 5-11
Content Event State................... 5-11
Content Primary Resource ........ 5-11
Content Resource ...................... 5-11
Content Secure Key................... 5-11
Content Time............................. 5-11
Content Unit Alias..................... 5-11
Content Unit ID......................... 5-11
Customize Preferences .............. 5-10
Dialog Message Code Filter ...... 5-13
Dialog Operating....................... 5-14
Dialog Operations ..................... 5-21
Dialog Sorting ........................... 5-16
Dialog Status Code Filter .......... 5-15
Elite Admin Edit Toolbar,
Menu....................................... 5-2
Filters and Sorting Dialogs........ 5-12
Message Code Default
setting ................................... 5-14
Message Code Formats ............... 5-5
Message Code Specifying ......... 5-14
Sorting Scenario........................ 5-17
Specify Message and Status
Codes ...................................... 5-5
Specifying Config. Name............ 5-4
Specifying Special Resources ... 5-14
Advanced TCP/IP Settings .............. 2-3
Alias Database Manager
Configure for IED ....................... 4-4
Aux I/O
show/hide .................................... 6-2
B
BMR
BMRC Port Numbers .................. 4-3
Configuration .............................. 4-1
crash ............................................ 3-2
Install........................................... 3-1
Install, select Custom .................. 3-3
Setting up a Broadcast
Message Router Service.......... 3-5
subnet .......................................... 3-2
Verify or Stop BMR.................. 3-10
Buttons
Acknowledge Next...................... 6-4
Clear Error Line .......................... 6-4
Delete .......................................... 6-4
Delete by resource....................... 6-5
Delete by unit .............................. 6-5
Deleting All................................. 6-4
Hold ............................................ 6-4
Buttons
Acknowledge .............................. 6-4
C
cannot verify.................................... 2-7
CDM
Configure for IED ....................... 4-3
D
Dispatch
Event Status Indicators................ 6-5
Menus and Handling Events........ 6-2
Operation with IED ..................... 6-1
Operations and Buttons ............... 6-4
Responding to Events.................. 6-3
DNS suffix....................................... 2-4
Domain name............................2-6, 2-7
Domain Suffixes
setup ............................................ 2-1
Domain Trusts ................................. 2-5
Gold Series™ Elite Inbound Event 6880801D90-D
Index - 1
Windows 2000 Server ................. 2-5
Windows Server 2003 ................. 2-9
Domains and Trusts ......................... 2-5
E
Error Log
show/hide .................................... 6-2
Event Display
Handling events in,...................... 6-6
Modify Preferences ..................... 6-8
Event Display Wizard...................... 5-3
H
Handling events
examples ..................................... 6-6
Help
Calling for help ............................ vii
I
IED
Introduction................................. 1-1
LAN Setup .................................. 3-1
Network configuration ................ 2-1
Overview..................................... 1-2
show/hide window ...................... 6-2
IED window
interface appearance.................... 1-2
show/hide button ......................... 6-2
Install
CENTRACOM software ............. 3-2
Installation
Notes before installation.............. 3-2
Steps to install IED...................... 4-3
Internet Protocol (TCP/IP)............... 2-2
IP addresses ..................................... 3-2
2-Index
6880801D90-D
L
LAN
steps to establish IED .................. 3-1
Log to File ..................................... 5-10
N
Network
Configuration for IED ................. 2-1
O
Operations
buttons and drop down
actions on events..................... 6-3
Double-click action ..................... 6-3
P
Primary Resource
Content Column in IED............. 5-11
S
share .........................................2-5, 2-9
Status
Event indicators........................... 6-5
Status Codes .................................... 5-5
T
Trust .......................... 2-5, 2-6, 2-7, 2-9
W
Warranties & Copyrights..................... i
Wizard
Status Code ................................. 5-3
Gold Series™ Elite Inbound Event Display