1
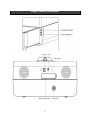
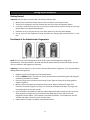
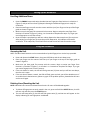
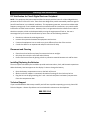
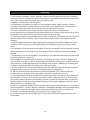
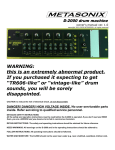
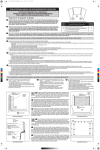
RadioVault Owner’s Manual REV 1 (4/12) Table of Contents Control, Indicators, and Display…………………………………………………………………………………………………....... Pg. 2 Setting Up the Radio……………………………………………………………………………………………………………………….…Pg. 4 Connect the Power Source Installing/Replacing the Batteries Setting the Time and Date using the iPhone/iPod Time Sync Setting the Time and Date Manually Using the Radio………………………………………………………………………………………………………………………………… Pg. 5 Setting the Alarm Arming, Disarming, and Reviewing the Alarm (Alarm On and Off) Snooze Operation Resetting the Alarm to Come On the Next Scheduled Day Charging Your iPhone/iPod Listening to iPhone/iPod Listening to the Radio Using the Aux Input Using the Sleep Function Setting Up the Biometrics………………………………………………………………………………………………………………….Pg. 8 Getting Started Enrollment of the Administrator Fingerprint Enrolling Additional Users Using the Biometrics………………………………………………………………………………………………………………………… Pg. 9 Accessing the Unit Deleting Users/Resetting the Unit Warning and Maintenance……………………………………………………………………………………………………………...Pg. 10 FCC Notification for Class B Digital Device or Peripheral Installing/Replacing the Batteries Technical Support Warranty………………………………………………………………………………………………………………………………………… Pg. 13 Unit Information/Record Important: Taking the time to fill out the information below and stapling a copy of your receipt to this manual will help expedite any service needs. Purchased From: Purchased Date: Serial Number: Key Number: 1 Display, Controls, and Indicators 2 Display, Controls, and Indicators 3 Set Up the Radio Connect the Power Source The DC adapter must be plugged in for the unit to fully function. Plug the DC adapter cable into the standard 120v wall socket and the DC adapter jack on the back of the unit. Installing/Replacing the Batteries The unit requires a 9v battery be installed to provide continuous alarm, clock, and biometric operations. When the battery low icon appears on the display it’s time to change the battery. Open the battery compartment cover on the back of the unit. Make sure the DC adapter is connected, otherwise all settings for the clock may be lost. Plug the 9v into the plug matching the + and – terminals and place into battery compartment. Close the compartment door. Setting the Time and Date Using the iPhone/iPod Time Sync Some older iPod Touch’s, iPod Nano’s, and iPod Classics may not allow this feature. Important: The iPhone/iPod must be in the dock station to sync. The unit must be in the OFF position. Press and hold the TIME button for 3 seconds. Once sync is completed, the updated time will appear on the display. Press TIME button once to see the Month and Date. Setting the Time and Date Manually Important: The iPhone/iPod cannot be in the dock station. The unit must be in the OFF position. Press and hold the TIME button until the Year appears and flashes on the display. Press the VOL + or VOL – to adjust the Year. Press the >>| button, the Month will appear and flash. Adjust by using the VOL + or VOL – button. Press the >>| button, the Date will appear and flash. Adjust by using the VOL + or VOL – button. Press the >>| button, the clock display format will appear and flash (12hr or 24hr clock). Adjust by using the VOL + or VOL – button. Press the >>| button, the Hour section of the time will appear and flash. Adjust by using the VOL + or VOL – button. Press the >>| button, the Minute section of the time will appear and flash. Adjust by using the VOL + or VOL – button. The |<< or >>| buttons can be used to go back or forward between the Date and Time settings. At any point in the process the OK button can be pressed to exit and confirm changes 4 Using the Radio Setting the Alarms This unit has dual alarms that can be set to different times and different sources (Buzzer, Radio, iPhone/iPod). The frequencies of each alarm can be set to Daily, Weekdays, and Weekend. The unit must be in the OFF position. Press and hold the ALARM button until the Alarm 1 Source (image of a bell = Buzzer/Beeper) appears and flashes. Adjust by using the VOL + or VOL – button (Buzzer/Beeper, Radio, or iPhone/iPod). Press the >>| button, the Frequencies section of Alarm 1 will appear and flash. Adjust by using the VOL + or VOL – button (Weekdays, Daily, and Weekend). Press the >>| button, the Hour section of the Alarm 1 time will appear and flash. Adjust by using the VOL + or VOL – button. Press the >>| button, the Minute section of the Alarm 1 time will appear and flash. Adjust by using the VOL + or VOL – button. Press the >>| button, the Volume section for Alarm 1 will appear and flash. Adjust by using the VOL + or VOL – button. Press the >>| button to go to Alarm 2 section. Follow the same steps above to set Alarm 2. The |<< or >>| buttons can be used to go back or forward between the Alarm 1 and Alarm 2 settings. At any point in the process the OK button can be pressed to exit and confirm changes. Arming, Disarming, and Reviewing the Alarm (Alarm On and Off) Important: Alarms are not automatically armed when set. Active alarms are indicated by alarm icons on the display. Press to ALARM button to arm or disarm the desired Alarm sequence (Alarm 1, Alarm 2, Alarm 1 and Alarm 2, and OFF). If Alarm 1 or Alarm 2 appears on the display they’re active, press the ALARM button to disarm them if desired. To review the alarm, use the ‘Setting the Alarms’ instructions above. Snooze Operation Press the SNOOZE button when the alarm begins to sound. The alarm will be silenced for five (5) minutes then sound again. The SNOOZE button can be pressed until the alarm is disarmed. Resetting the Alarm to come on the Next Scheduled Day When the alarm is sounding, press the ON/OFF button to stop the alarm and reset it to come on the next scheduled day. 5 Using the Radio Charging Your iPhone/iPod Gently place the iPhone/iPod into the dock station. While docked with the DC power connected, the iPhone/iPod will recharge until full. Listening to iPhone/iPod Important: The DC adapter must be plugged in to listen to the iPhone/iPod. Place the iPhone/iPod into the dock station and press the ON/OFF button. The default source is AUX and can be changed by pressing the SOURCE button. Change the source to iPhone by pressing the SOURCE button to cycle through the sources (AUX. iPhone, and Radio). Press the >|| button to pause and play the music. Press the |<< or >>| button to skip the previous or next track on you iPhone/iPod. Press and hold the |<< or >>| button to rewind of fast-forward the track. Press the VOL + or VOL – to adjust the system volume. Press the EQ button to select Bass or Treble, then press the VOL + or VOL – to adjust the setting. To turn the unit off press the ON/OFF button. Listening to the Radio Set up the antenna by extending the FM wire fully and away from the unit for the best reception. Important: Do not strip, alter or attach to other antennas. Press the ON/OFF button to turn the unit on. The default source is AUX and can be changed by pressing the SOURCE button. Change the source to Radio by pressing the SOURCE button to cycle through the sources (AUX, iPhone, and Radio). Press the |<< or the >>| button to search for the desired station. Press and hold the |<< or >>| button to quickly scan through stations. The unit can save up to 16 presets to memory. Press the CH – or CH+ button to cycle through the presets. The current preset channel will appear in the bottom right of the display. To set a preset use the CH – or CH+ button to choose the desired preset location and press the OK button for 3 seconds to save the desired station to that preset location. Press the VOL + or VOL – to adjust the system volume. Press the EQ button to select Bass or Treble, then press the VOL + or VOL – to adjust the setting. To turn the unit off press the ON/OFF button. 6 Using the Radio Using the AUX Input This unit can play any portable audio device with a standard 3.5mm headphone jack. Plug one end of a standard audio patch cord into the line-out or headphone jack on your device and the other end of the cord in the AUX in jack on the back of the unit. Press the ON/OFF button to turn the unit on. The default source is AUX and can be changed by pressing the SOURCE button. Change the source to AUX by pressing the SOURCE button to cycle through the sources (AUX, iPhone, and Radio). Press the VOL + or VOL – to adjust the system volume. Press the EQ button to select Bass or Treble, then press the VOL + or VOL – to adjust the setting. To turn the unit off press the ON/OFF button. Using the Sleep Function Sleep mode allows you to sleep listening to the Radio or iPhone/iPod, turning the unit off after a specified time (Off, 90m, 75m, 60m, 45m, 30m, or 15m). Press the ON/OFF button to turn the unit on. The default source is AUX and can be changed by pressing the SOURCE button. Change the source to desired source by pressing the SOURCE button to cycle through the sources (AUX, iPhone, and Radio). Press the VOL + or VOL – to adjust the system volume. Press the SLEEP button to cycle to the desired off time and press the OK button to confirm. When active Sleep will appear on the display next to the Volume indicator Stop listening at any time by pressing the ON/OFF button. 7 Setting Up the Biometrics Getting Started Important: Set your keys to the side. Don’t lock them inside the safe! Make sure to remove the backup key from the unit before use and secure them. The key is for emergency use only to unlock the case in the event of fingerprint failure. If the key is used to access the unit; it can only be removed from the lock cylinder by returning the key back to its original locked position. Please do not try to remove the key in any other position or this may cause damage. Do not try to use the fingerprint scanner and electronic locking system while the key is in the unit. Enrollment of the Administrator Fingerprints NOTE: The unit can store 120 fingerprints with the first two enrolled fingerprints assigned as administrators. If the Learn Button is pressed and the LED flashes red once and the unit beeps once the unit has reached its 120 fingerprints maximum. Important: The unit requires the first and the second administrator’s fingerprint to be enrolled before adding additional fingerprints. Register the first two fingerprints as the administrator. Press the ENROLL Button. You will hear two (2) beeps and the LED will flash green indicating the enrollment procedure has started. Place your finger over the scanner with the tip of your finger at the top of the finger guide as shown in Figure B. Make sure you have good, flat contact with the scanner. Begin to swipe your finger from Position 1 to Position 2 (Figure C), taking 1 to 2 seconds to complete the swipe. Try to get your entire fingerprint to cross the scanner. Once the swipe is completed you will hear a beep. Repeat the above step three (3) more times. After swiping your finger four (4) times the unit will beep two (2) times and No User will disappear from the display. This indicates a successful enrollment. If the swipe fails, the LED will flash red and the unit will wait for another swipe. Repeat steps 1 through 5 to add the second administrator. 8 Setting Up the Biometrics Enrolling Additional Users Press the ENROLL button and swipe the administrator fingerprint from Position 1 to Position 2 (Figure C) and you will hear three (3) beeps indicating the additional fingerprint is ready for enrollment. Place the new finger to enroll over the scanner with the tip of your finger at the top of the finger guide as shown in Figure B. Make sure you have good, flat contact with the scanner. Begin to swipe the new finger from Position 1 to Position 2 (Figure C), taking 1 to 2 seconds to complete the swipe. Try to get your entire fingerprint to cross the scanner. Once the swipe is completed you will hear a beep. Repeat the above step three (3) more times. After swiping your finger four (4) times the unit will beep twice, this indicates a successful enrollment. If the swipe fails, the LED will flash red and the unit will wait for another swipe. Using the Biometrics Accessing the Unit NOTE: The MicroVault Biometric can be accessed either by valid fingerprint or via the keys provided. Press and release the START Button, the green LED flashes and the unit beeps once. Place your finger over the scanner with the tip of your finger at the top of the finger guide as shown in Figure B. Make sure you have good, flat contact with the scanner. Begin to swipe your finger from Position 1 to Position 2 (Figure C), it will take 1 to 2 seconds to complete the swipe. Try to get your entire fingerprint to cross the scanner. If the unit detects a match, the LED will flash green two (2) times and you will hear two beeps, then the unit is open. If the unit doesn’t detect a match, the LED will flash green and red, you will be denied access. If an enrolled user is denied access, please try again. If the problem persists, please delete all users and re-enroll again. Deleting Users/Resetting the Unit NOTE: Individual users cannot be deleted from the unit. All users will be deleted together. To delete all fingerprints currently stored in the unit, press and hold the DELETE Button, the LED will turn red, and then press the START Button. The unit will beep twice (2), the LED will flash green twice (2), and No User will appear on the display indicating all user fingerprints are deleted. 9 Warnings and Maintenance FCC Notification for Class B Digital Device or Peripheral NOTE: This equipment has been tested and found to comply with the limits for a Class B digital device, pursuant to Part 15 of the FCC rules. These limits are designed to provide reasonable protection against harmful interference in a residential installation. This equipment generates, uses and can radiate radio frequency energy and, if not installed and used in accordance with the instructions, may cause harmful interference to radio communication. However, there is no guarantee that the interference to radio or television reception, which can be determined by turning the equipement off and on, the user is encouraged to try to correct the interference by one or more of the following measures: Reorient or relocate the receiving antenna. Increase the separation between the equipment and receiver. Connect the equipment into an outlet on a circuit different from that of the receiver. Consult the dealer or an experienced radio/TV technician for help. Placement and Cleaning Place the on level surface and away from excessive heat or sunlight. Only clean the unit with a soft cloth and mild soap. Protect furniture surfaces by placing a cloth or protective material between unit and furniture. Installing/Replacing the Batteries The unit requires a 9v battery be installed to provide continuous alarm, clock, and biometric operations. When the battery low icon appears on the display it’s time to change the battery. Open the battery compartment cover on the back of the unit. Make sure the DC adapter is connected, otherwise all settings for the clock may be lost. Plug the 9v into the plug matching the + and – terminals and place into battery compartment. Close the compartment door. Technical Support If you have followed the above steps carefully and still have a problem operating your unit, phone CSP Technical Support. Almost all problems can be solved within minutes over the telephone. 888-220-1116 10 Notes 11 Notes 12 Warranty 1. Cannon Security Products, LLC (the “Company”) warrants to the original consumer (the “Purchaser’) that this product (the “Product”) will be free from defects in workmanship and materials for a period of one (1) year from the date of purchase. These warranties are not assignable or transferable to any other person. 2. Any damage to the product as a result of misuse, tampering, abuse, neglect, accident, improper installation, modification, unauthorized service, destruction, or the alteration of the serial number, or use violative of the instructions furnished by the Company will void this warranty. 3. The sole responsibility of the Company shall be limited to the repair or replacement (in its sole discretion) of any component of the Product which fails to conform to this warranty at no cost to the purchaser for a period of one (1) year from the date of original purchase. 4. Contact the Company directly to obtain service under this warranty. If it becomes necessary to send a defective product to the Company, a Return Authorization Number must first be obtained from the company. 5. Products shipped without prior Return Authorization and Return Authorization Number may not be accepted, and the Company will not be responsible for their disposition and/or cost of return to the owner. 6. The Company will not assume any responsibility for any loss or damage incurred in shipping. All return authorized products should include a copy of the original invoice in order that this warranty may be honored. 7. This warranty is not an insurance policy. The Company is not responsible for damage to or theft of the Purchaser’s product or its contents. 8. The obligation of Company under this warranty is contingent upon proper use of the Product, and shall not apply to Products, or parts or components thereof, which have been put in unusual or extreme environments or any damage caused by an act of God or force of nature. Modifying or tampering with the Product, which might affect the Product’s use, voids this warranty 9. Without limitation, this warranty specifically excludes any liability for defects or damages caused by, or aggravated by, human error or the use of unauthorized parts or components. 10. We recommend that the enclosed warranty cared be completed in full, and returned to the Company within ten (10) days of the original date of purchase to validate this warranty. 11. Any implied warranties which the purchaser may have are limited to the duration of the warranties described above. There are no further warranties which extend or apply beyond the face hereof, and the company expressly disclaims and excludes any and all warranties of merchant ability or fitness for a particular purpose. Some states do not allow limitations on how long an implied warranty lasts, so the above limitation may not apply to you. 12. Repair or replacement shall be the sole remedy for the purchaser under this warranty. The company shall not be liable for any direct, indirect, incidental or consequential damages, losses or expense arising from the use or misuse of the Product. Some states do not allow the exclusion or limitations of incidental or consequential damages, so the limitation may not apply to you. 13. This warranty gives you specific legal rights, and you may also have other rights which vary from state to state. 13 14 WWW.CANNONSECURITYPRODUCTS.COM 15