1
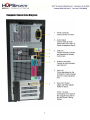
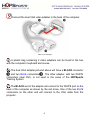
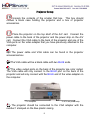
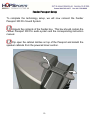
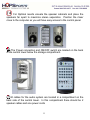
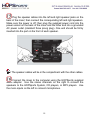
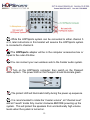
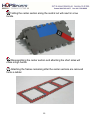
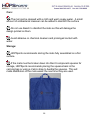
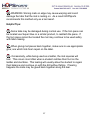
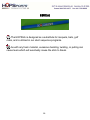
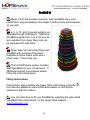
Table of Contents Welcome Letter……………………………………………………....... 2 HOPSports Training System Contents……………………………… 3 System Setup…………………………………………………………... 4 A/V Cart……………………………………………………….. 4 Computer……………………………………………………… 5 Projector………………………………………………………. 9 Sound System………………………………………………… 10 Activating the HOPSports Training System………………………… 15 The Keyspan RF Remote Control……….…………………………… 17 Accessing the HOPSports Video Library………………………...…. 21 Shutting off the HOPSports Training System………………………. 22 The Training Tools ……………………………………………………. 23 Assembly and care of the HOPSports Mat ……………….. 23 HOPStick ………………………………..……………………. 28 SandBells …………………………………………………….. 29 T-BOW ……………………………...………………………… 32 Trouble Shooting Tips…………………………………………………. 33 The Projector…………………………………………………………… 34 The Computer………………………………………………………….. 35 Receiving New Content……………………………………………….. 40 iTunes…………………………………………………………………… 41 1 WELCOME TO HOPSports® We are so excited that your school has become a member of the HOPSports Training System community! We look forward to a long and successful partnership in bringing active and healthy lifestyles to our youth. HOPSports is a multi-media, technology driven, standards-compliant physical education system. For HOPSports, the nation-wide success of its educational model combines the need for effective and comprehensive programs from the administrative perspective, with a system that teachers and students alike respond to positively. Consequently, the entire structure of the educational pyramid is able to achieve success - empowering all participants in the spectrum! The HOPSports commitment is first and foremost to provide students with the foundation for a healthy and active lifestyle. Movement and energy education are the key components for the lessons. HOPSports provides a turn-key media cart containing Vista Media Center preloaded with lessons taught by athletes and performers including The Harlem Globetrotters, Chris Draft, Guillermo Gomez, Tezoro Productions, Ringling Brothers Barnum and Bailey, Jenny Blake, Byron Davis, Cheryl Broughton, and Olympians Buddy Lee, Annett Davis and Nicole Giordano. For any technology-related questions (CPU & Projector), please contact DELL™ GOLD TECHNICAL SUPPORT 24/7 at (866) 461-3355. For any HOPSports-related questions, please contact HOPSupport at (866) 762-4677 between 9 a.m. & 5 p.m. (PT), Monday through Friday. Or, e-mail your questions to [email protected]. 2 Your HOPSports Training System should contain the following: o 30 HOPSports training mats* o 30 HOPSticks* o 10 T-BOW®* o 60 SandBell® * o One Dell 4210X projector o One Dell OptiPlex 960, Intel Core 2 Duo Processor (2.66 GHz) operating Microsoft Windows Vista Ultimate (cords, remote control, infrared sensor, manuals, etc., all included in the box) o One Fender Passport 300 Pro Audio System o One Audio/Visual Cart o Over 150 Lesson Plans - equivalent to two years repeatable curriculum – preinstalled on the Dell CPU We sincerely appreciate your participation in the HOPSports Training System program. This is the future of physically active lifestyles for our children. HOPSports has merged entertainment with physical education making movement, fitness and sports fun for everyone. Thanks for caring about kids, Tom Root, Founder HOPSports, Inc. [email protected] *Full HOPSports Training System order, actual number of training tools may vary. 3 GETTING STARTED A/V Cart Setup Remove the Box containing the A/V cart from the pallet. Open the box and remove the contents. The box should contain 3 plastic shelves, 4 long legs, 4 short legs, 4 casters, and a 3 prong plug (ULV approved) electrical assembly with a 15 ft. cord. The shelves can be distinguished in the following way: 1) The top shelf has a molded plastic handle 2) The middle shelf has leg connection posts on both sides 3) The bottom shelf has leg connection posts on the finished side and holes for the casters on the unfinished side. Insert the casters into the unfinished side of the bottom shelf. Place one long leg over each leg post on the bottom shelf. Place the middle shelf on legs from the bottom shelf. Repeat steps 3 and 4 for the top shelf, using the shorter legs. The electrical assembly comes in two pieces with screws. There are 4 screw holes along the long side of the top shelf. 4 Computer Setup Now that the cart is together we can assemble your HOPSportsTraining System (HTS). We will set up the computer first since it is the center piece of the system. Unpack the contents of the larger Dell box from your pallet. This box should contain your computer, a box of computer accessories (e.g. cables and mouse), disks for the factory installed software, and a box containing the computer keyboard. Your remote control and I/R Receiver can be found in the computer accessories box. The HOPSports Lesson Plans are preloaded on your computer and accessible through the Media Center interface. 5 The disks included with the computer are for re-installation of Dell installed software ONLY. These disks should be kept in a secure location. Since the HTS content is preloaded, you will not receive a set of disks containing the HOPSports program lessons. Place the computer on the bottom shelf of the A/V cart. Connect the power cable to the computer and the power strip on the A/V cart. Connect I/R sensor, mouse and keyboard to USB ports on the back of the computer. Position the computer so that it faces the narrow side of the A/V cart. Otherwise, the computer will hit the 3 outlet electrical assembly. Connect the I/R sensor, mouse, and keyboard to open USB ports on the back of the computer. The power cable and video adapter can be found in the computer accessories box. Attach the power cable to computer (#4 in image on next page) and plug into the A/V cart power strip. 6 Computer Connections Diagram 7 Connect the dual VGA video adapter to the back of the computer. Dual VGA Adapter A plastic bag containing 2 video adapters can be found in the box with the computer’s keyboard and mouse. The dual VGA adapter pictured above will have a BLACK connector and two BLUE connectors . The other adapter, with two WHITE connectors (dual DVI), is not used in the setup of the HOPSports Training System. The BLACK end of the adapter will connect to the WHITE port on the back of the computer as shown by the red arrow. One of the two BLUE connectors on the other end will connect to the VGA cable from the projector. 8 Projector Setup Unpack the contents of the smaller Dell box. This box should contain a black case holding the projector and a box of projector accessories. Place the projector on the top shelf of the A/V cart. Connect the power cable to the back of the projector and the power strip on the A/V cart. Connect the VGA cable to the back of the projector and one of the VGA ports on the video adapter that you have previously attached to the computer. The power cable and VGA cable can be found in the projector accessories box. The VGA cable will be a black cable with two BLUE ends. The video output ports on the back of the projector are color coded. The VGA cable will only connect to the BLUE port on the back of the projector and will only connect with the BLUE end of the video adapter on the computer. To computer To A/V cart power strip The projector should be connected to the VGA adapter with the number 1 stamped on the blue plastic casing. 9 Fender Passport Setup To complete the technology setup, we will now connect the Fender Passport 300 Pro Sound System. Unpack the contents of the Fender box. This box should contain the Fender Passport 300 Pro audio system and the corresponding instruction manual. Flip open the cabinet latches on top of the Passport and detach the speaker cabinets from the powered mixer section. 10 For Optimal results elevate the speaker cabinets and place the speakers far apart to maximize stereo separation. Position the mixer close to the computer so you will have easy access to the control panel. The Power connection and ON/OFF switch are located on the back of the central tower below the storage compartment. Rear View Front View All cables for the audio system are located in a compartment on the back side of the central tower. In this compartment there should be 2 speaker cables and one power cords 11 Plug the speaker cables into the left and right speaker jacks on the back of the mixer; then connect the corresponding left and right speakers. Make sure the power is off; then plug the supplied power cord into the power socket on the back of the mixer and the other end into a grounded AC power outlet (standard three prong plug). One end should be firmly inserted into the port on the front of each speaker. The speaker cables will be in the compartment with the other cables. Connect the mixer to the computer using the HOPSports supplied audio adapter. Use the stereo channels on the right to connect the speakers to the HOPSports System, CD players, or MP3 players. Use the mono inputs on the left to connect microphones. 12 While the HOPSports system can be connected to either channel 5 or 6, later instructions in this booklet will assume the HOPSports system is connected to channel 6. The HOPSports adapter will be in the computer accessories box or taped to the outer Alto Box. You can connect your own wireless sets to the Fender audio system. Turn on the HOPSports computer; then switch on the Passport audio system. The power LED on the Passport should illuminate green. The protect LED will illuminate briefly during the power up sequence. It is recommended to rotate the “master volume”, all “channel level” and all “reverb” knobs fully counter clockwise BEFORE powering up the system. This will protect the speakers from unintentionally high volume levels when the system is turned on. 13 Adjust volume levels until audio can be heard by everyone. Turn the master volume knob up to ¼ volume Start a video on the HOPSports system Slowly turn the level knob for channel 6 clockwise. The LED above the knob should be green. If it turns yellow, rotate the level knob counter clockwise and increase the volume on the computer, or turn the master volume knob clockwise. Please note the level knob and LED for channel one are pointed to in the image below, you will be adjusting the knobs under channel 6. 14 Activating the HOPSports Training System With all components plugged in, it is time to turn on your HOPSports Training System! Turn on the projector with the projector remote or by firmly pushing the power button located on top of the projector. The BLUE power button on the projector’s remote is located in the top right corner. Push firmly for a few seconds and the projector will begin warming up. A light should come on showing that the projector is waiting for a signal. Let’s turn on the Dell with Vista Media Center! The power button is located at the top right corner as you are looking at the front of the computer. Press the power button firmly and the power button will light up. Windows will load and you will see a desktop screen. 15 Note: It is recommended to turn on the projector before starting the computer. Turn on your Alto OEX-400 sound system by pressing the ON/OFF switch located on the back of the control tower above the storage compartment. When the sound system is on, a green light will be on directly to the left of the monitor volume control knob on the front panel of the central tower. 16 The Keyspan RF Remote for Windows Vista Do not connect the Keyspan remote until the computer has completed the start up sequence and the Windows desktop appears. This section of the HOPSports Training System User Guide is designed to supplement the information found in the “RF Remote Control and Receiver for Windows Vista Home Premium and Windows Vista Ultimate” provided by the manufacturer. Please refer to that document if you have any questions about the product. 17 Insert included batteries in the remote control and connect the RF receiver to an available USB port on the computer. RF receiver Trouble Shooting the Keyspan Remote Press the connect button on the receiver. The LED will light and stay illuminated for 20 seconds. While the LED is lit, hold the remote control near the receiver and press and hold the “more” and “back” buttons simultaneously for 3 seconds. The LED on the receiver will blink 3 times to confirm the connection. The “more” button has a letter i on it The “back” button has a left pointing arrow. Refer to the diagram on the next page for the layout of the remote control. 18 Remote Control Button Diagram 19 Information and Tips regarding the Keyspan Remote Operating Distance: approximately 60 feet Batteries: 2 size AAA (included in package) Make sure you are pointing the remote control at the computer. This remote control uses a radio frequency signal; therefore it will work without a direct line of sight to the receiver. There may be a slight delay between pressing a button on the remote control and seeing the response on the computer. 20 Accessing HOPSports Content Library Please refer to the remote diagram found on page 19 for the location of the buttons mentioned below Once at the main screen (desktop) there should be only two icons. The GREEN Windows Media Center icon and the iTunes icon are located in the middle of your screen. You can use the mouse to select Media Center or simply push the GREEN Windows MC button on the middle of your remote. Pushing this button will automatically take you to the Vista Media Center. You will need to scroll up with the mouse or use the Directional Pad’s up button to go up two clicks to the Picture/Video Library. From this point you need to scroll to the Right two clicks to highlight and select the Video Library. This is where all of the HOPSports content is located. Select a Lesson Plan by scrolling and selecting. The OK button in the middle of the Directional Pad is how you select. Once you select a lesson plan, allow a few moments for the file to load. If at any point during the lesson you wish to change workouts, either push “Pause,” “Stop” or simply push the “Back” button to go back one screen at a time. NOTE: The “Free Music Choice” Lesson Plans allow you to play songs of your choice while following the lesson. You can upload songs into the pre-installed iTunes file or play CDs in Windows Media PLAYER to create a more customized lesson for your class. 21 To shut off the computer from inside Media Center (using the remote): Press the back button on the remote until you are at the main menu (Picture Library should be highlighted). Press the UP arrow once and select “TASKS.” Selecting the first option, "Close," will close the Media Center and return you to the desktop. From this point follow the shut down instructions on the bottom of page 6. Selecting the third option, "Shut Down," will close all programs and power off the computer. This symbol looks like a circle with a line down the middle. In the event the computer freezes, press and hold the power button on the front of the CPU for three to five seconds. This will power down the computer and allow you to restart. Please note: Powering off the computer will take a minute or two. Do not unplug the Computer or Projector before it is done powering down. This will result in error messages the next time the computer is powered up and a much longer power up sequence. 22 Training Tools Included With your System Training Tool Hopsports Mat Hopsports Ball Hopstick Jump Rope Stretch Band Full System Quantity* 30 30 30 30 30 Mini System Quantity* 5 0 10 0 0 *Numbers reflect standard package quantities. HOPSport Training Mat * Please Note: actual mat design may vary slightly from that shown Assembly Instructions: Remove the 9 squares which comprise the HOPSports mat from the carrying bag. Locate the center square containing the HOPSports logo and place it on the floor in the middle of your assembly area with the logo facing up. Position yourself so that the HOPSports logo is right-side up. 23 Place the remaining 8 squares around the center starting with the square with the number 9 directly above the center square and progressing clockwise as the numbers increase. The arrows on each square should point to the outer edge of the assembled mat. When completed the mat should resemble the image on page 20 though it may not match exactly as the graphic design of the mat has been revised several times. Make sure all connection tabs are pushed down fully. Position the completed mat so that the arrow on the piece with the number nine is pointing toward the wall on which the programs will be projected. This is not necessary for all programs; however certain warm-ups do use the mat numbers to correctly position students. Hurdles and Ladders: The Mat can be disassembled to form hurdles and ladders. The center of each mat section, except the one containing the HOPSports logo, can be removed. 24 Folding the center section along the central cut will result in a low hurdle. Disassembling the center section and attaching the short sides will make a high hurdle. Attaching the frames remaining after the center sections are removed forms a ladder. 25 Care: The mat can be cleaned with a cloth and warm soapy water. A small amount of antibacterial cleanser can be added to disinfect the surface Do not use bleach to disinfect the mats as this will damage the design printed on them. Avoid abrasive or chemical cleaners and prolonged contact with water. Storage: HOPSports recommends storing the mats fully assembled on a flat surface. If the mats must be broken down into their 9 component squares for storage, HOPSports recommends placing the squares back in the carrying bag or using a Velcro strap to bundle the squares. This will make distribution of the mats easier the next time they are used. 26 WARNING: Storing mats on edge may cause warping and could damage the tabs that the mat is resting on. As a result HOPSports recommends this method only as a last resort. Helpful Tips: Some tabs may be damaged during normal use. If the torn piece can be located use Super Glue or a similar product, to reattach the piece. If the torn piece cannot be located the mat may continue to be used safely with tabs missing. When gluing mat pieces back together, make sure to use appropriate glue; one which lists foam repair on the label. Occasionally, while being used as a ladder, the mat squares will tear. This occurs most often when a student catches their foot on the ladder and stumbles. This tearing will usually allow the student to regain their balance and continue on with the drill without falling. If tearing happens the mats may be glued back together along the tear. 27 HOPStick The HOPStick is designed as a substitute for racquets, bats, golf clubs, and is utilized in our stunt sequence programs. As with any foam material, excessive bending, twisting, or pulling can cause tears which will eventually cause the stick to break. 28 SandBell ® Made of soft and durable neoprene, each SandBell has a color coded fabric ring and displays the weight in both pounds and kilograms on one side. 4, 6, 8, 10, and 12 pound weights are available through HOPSports. Additional SandBell weights from 2 up to 50 pounds are available from Hyper Wear and can be purchased through them. Hyper Wear recommends filling each SandBell with Quickrete Play Sand available at Home Depot and Lowe’s nation-wide. Prices may vary. The full HOPSports system includes filled SandBells for your convenience. If additional product is purchased please follow the instructions below. Filling Instructions: Please Note: Step numbers are Hyper Wear instructions, while the icon denotes additional useful information based on HOPSports experience with the product. You can learn how to fill your SandBell by watching the video titled “SandBell Filling Instructions” on the Hyper Wear website, www.hyperwear.com 29 Purchase Play Sand at the local hardware store. The standard HOPSports system requires 480 pounds of sand to completely fill all the SandBells included in the system. Sand is usually sold in 50 pound bags. Dry sand will pour much easier than damp sand. You will need a funnel with a long stem. A funnel is available for purchase through the Hyper Wear website. HOPSports has found a Transmission Fluid Funnel has the right combination of a wide mouth and long stem. These are available for purchase at Wal-Mart or your local automotive supply store. Pull the filling Nozzle out of the empty SandBell by putting your finger inside the Nozzle and pressing it against the inside wall of the SandBell while pulling out. Insert Funnel stem into empty SandBell Nozzle as far as it will go. Scoop sand from bag (using another cup) and pour slowly into Funnel, about 8 fluid ounces of sand equals one pound. The above conversion is for Quickrete Play Sand only. Other brands will have different weight to volume ratios. Continue filling with sand until you reach the desired weight and feel. Once filled, remove the funnel. 30 Reaching the exact weight on the SandBell is not required and will not negatively impact your use of the product. Using your finger push the Nozzle back into the SandBell along the interior wall of the SandBell. Use a stick or pen to push the Nozzle completely into the SandBell. Once the Nozzle is fully extended inside the SandBell, work the sand around to flatten the Nozzle. HOPSports uses large rubber bands to tie off the end of the Nozzle to prevent leakage. While the process in steps seven and eight will work, we encourage using rubber bands as an additional measure especially in the environment of a Physical Education classroom, or after school program. 31 T-BOW® Please follow all instructions given in T-BOW content to assure safe use of this item. T-BOW training utilizes an unstable surface and injury could result from improper usage. Additional instruction can be obtained by downloading the T-BOW Functional Training Manual from the T-BOW website www.tbowusa.com under “Multifunctional Training”. 32 Troubleshooting Tips Make sure that all components of the system are indeed plugged in. All components are color-coded. For example, the BLUE VGA cables connect to the blue ports on the CPU and projector. The Infrared (IR) Sensor is what allows the remote to control the CPU. Ensure that the IR Sensor is plugged into any one of the six USB ports located on the back side of the computer. These USB ports are also where the Mouse and Keyboard connect. Also ensure that the Infrared Sensor is either elevated or pointed in a direction that it can pick up the Remote’s signal. WARNING: When turning off your HOPSports Training System, it is imperative that you follow the proper procedure to maintain the integrity of the system. Shut down the Dell by clicking on the Windows symbol in the bottom left hand side of your screen. Scroll over to the right-facing arrow and select “Shut Down.” → Turning off the projector is simple but requires two (2) full minutes of cooling down before being unplugged. Doing this will extend the life of your projector and keep you from needing expensive replacement bulbs. 33 The Projector In order to transfer ownership of your projector from HOPS, you will need to call Dell Customer Care at 1-800-624-9897, and be ready with the Service Tag number and Express Service Code. Locate the “Service Tag number” as well as the “Express Service Code.” Both numbers are found on the bottom of the projector as well as on its Dell box. An example of the Service Tag number is “CCSNT91.” An example of the Express Service Code is “4183074901.” FYI - If your projector’s temperature light comes on, follow these steps to reset your projector: 1. Unplug the power cord from the projector. 2. Then push and hold the projector’s power button for TWO (2) minutes. This will reset your projector and should be done BEFORE calling Dell’s Customer Care. 3. Plug the power cord back into the projector and press the power button “on.” This process should reset the projector. At this point, no temperature light should be “on.” If the temperature light does come on after you have completed this process, then call Dell’s Technical Service number at 877-671-3355 and press Option 2 for help. 34 The Computer Locate the “Service Tag number” as well as the “Express Service Code.” The Service Tag number can be found on a sticker on top of the computer as well as on its Dell box. The Express Service Code is only found on the sticker on top of the computer. If you have not done so already please write these two numbers on page 5 under “important computer information. An example of the Service Tag number is “70N92G1.” An example of the Express Service Code is “1527650593.” The computer comes with only a 30 day trial of anti-virus software. As such, it is not recommended to connect your HOPSports computer to the school network or the internet unless your site IT representative has installed full versions of the software used in your facility. 35 HOPSports recommends transferring ownership of the computer to your site once the system has been fully set up. You will need your Service Tag number and Express Service Code to complete this process. Please Note: This is the procedure for domestic ownership transfers only. A different form must be used to transfer ownership internationally. Required form fields and relevant web links have been artificially highlighted in the images contained in this section they will not appear yellow on your computer screen. Go to support.dell.com 36 Select “Ownership Transfers” from the options along the left side of the screen If you are accessing the internet through your HOPSports machine AND running Internet Explorer you can click on “Find my Service Tag”. Otherwise click “What if I’m not using the computer that I need to transfer ownership?” o Please Note: The HOPSports machine is not equipped with antivirus software. We strongly recommend transferring the ownership of the system on your office or home computer. 37 Enter the Service Tag Number and Express Service Code of the HOPsports Computer in the form. On the next line enter the Service Tag Number for the projector. Enter the information for HOPSports as the original owner. Please Note: HOPSports is both the first and last name of the original owner. o HOPSports o 24715 Avenue Rockefeller o Valencia, CA 91355 o 661-702-8946 Enter your information as the new owner and click submit. 38 39 Receiving New Content HOPSports may periodically mail you Content Disk(s) with which to update your Content Library. --Open your DVD/CD drive by pushing the button below it and to the right (near the top of the computer). --A screen will prompt you to “Run Application” --Select “Run Application” --After a few moments it will ask you to “Allow” --Select “Allow” --Then Click “Next” when prompted These simple steps will begin your content upload and will automatically organize and update your Content Library. Click “Finish” when the Disk(s) are done uploading and the “Finish” button appears. You may then remove the DVD and return it to HOPS with the self-addressed, postage-paid envelope. HOPSports Mini users will be charged for content updates. 40 iTunes iTunes comes pre-loaded on your computer so you can play the music of your choice during our “Free Music Choice” Lesson Plans. Load a CD of your choosing into the Disk Drive and the Computer will prompt you to either “Play the Audio CD” with various media players, “Show Songs using iTunes,” or “IMPORT songs using iTunes.” Select “Import.” 41 iTunes will then import the songs from your CD into your Music Library. To play your songs, click on Music at the top left side and your songs will appear to the right. 42 Highlight the song of choice and push play at the top left side. 43 Once you’ve pressed play, you may play songs simultaneously with our Lesson Plans by minimizing iTunes (click the highlighted line at the top left corner of iTunes) and then clicking on, and maximizing the Media Center. Now you should be able to hear your music while working out to HOPS lesson plans. If your remote changes the song instead of operating Media Center, simply use the mouse to maximize Media Center as the primary program. 44