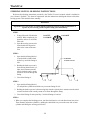
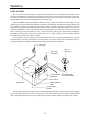
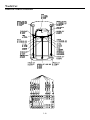
1
2010 OWNER'S MANUAL
World Cat
CUSTOMER INFORMATION
OWNER’S PORTFOLIO
To help you enjoy the many features, benefits, and accessories on your new World Cat, we have provided you with the following materials:
• World Cat Owner’s Manual (model specific)
• Vendor Supplied Manuals for various accessories
• Warranty Information
We refer to this package as the “Owner’s Portfolio”, and will reference it often throughout this text.
The portfolio contains a wealth of information, including advice on safety, operation, performance, maintenance, and warranty. Reading and maintaining this information is extremely important, and could be the
difference between a positive and negative experience on the water.
For you convenience, World Cat also provides the NMMA text Sportfish, Cruisers, Yachts Owner’s
Manual. It will be referenced occasionally in your owner’s manual, and provides supplemental information
on safety and basic boating practices.
WARRANTY INFORMATION
Upon purchasing your new World Cat, the dealer is responsible for completing the warranty card provided by the factory. The form is in triplicate, with one copy for you, the dealer, and the factory. Keep your
copy in a secure place so it can be referenced quickly in the event of a warranty issue. The 10 year limited
hull warranty is transferable, and a copy is included at the back of this manual should you decide to sell
your boat.
DEALER RESPONSIBILITIES
Our dealers are an extension of the factory, and we expect them to provide you with great customer
service and help prepare you for a positive ownership experience. Therefore, we set forth a list of responsibilities for our dealers as follows:
• Provide courteous service and explanation of the product prior to the sale.
• Provide sea trials, if requested, for potential owners.
• Provide a detailed orientation of your boat’s features and general operation upon delivery,
including safety and performance.
• Provide the customer with the “Owner’s Portfolio” and explain the information included
therein.
• Complete and sign delivery checklist.
• Provide service after the sale, or help the customer locate a qualified service at home or
away.
• Explain, complete, and submit all warranty information in a timely manner after the purchase.
World Cat
OWNER’S RESPONSIBILITIES
As a consumer you should also take an active part in the delivery and safe operation of your new catamaran. Some of your responsibilities are:
• Perform a walk through prior to the final delivery and ensure that the systems are functioning properly.
• Read all literature in your “Owner’s Portfolio” and operate the vessel in accordance with
those instructions.
• Study and understand the limited warranty information.
• Maintain the boat and perform service according to the instructions in this manual,
including the 20 hour inspection for the vessel and engines.
Once your warranty information is processed, World Cat will maintain a record of your boat using the
Hull Identification Number (HIN), which is located on the starboard side of the transom. Information
regarding the dealership, owner, and the factory installed accessories will be recorded to help you should a
problem arise. Also, you will receive an invitation to join Team World Cat and a survey to rate your purchasing experience and the initial impressions of our company. We ask that you join our family of owners
and let us know your feelings about the purchase and the quality of our product.
MANUAL LEGEND
Throughout this manual you will encounter signals to alert of important information. Text printed in
bold letters and the warning system shown below is of particular importance. Please review this information prior to reading the manual.
! DANGER
this symbol alerts you to hazards or unsafe practices which will cause extensive property damage,
severe personal injury or death if the warning is ignored.
! WARNING
this symbol alerts you to hazards or unsafe practices which can cause extensive property damage, severe
personal injury or death if the warning is ignored.
! CAUTION
this symbol alerts you to hazards or unsafe practices which can cause personal injury or property damage if the warning is ignored.
NOTICE
this symbol is not hazard related. it contains information on installation, operation, or maintenance
which is needed to ensure the proper operation of your boat.
World Cat
TABLE OF CONTENTS
CUSTOMER INFORMATION ..........................................................................................................
I
Chapter 1: Safety and Regulations
OPERATOR RESPONSIBILITIES...................................................................................................
1-1
REGISTRATION.................................................................................................................................
1-1
COAST GUARD REQUIRED SAFETY EQUIPMENT..................................................................
1-1
RECOMMENDED SAFETY EQUIPMENT ....................................................................................
1-2
CAPACITY INFORMATION ............................................................................................................
1-2
POLLUTION REGULATIONS .........................................................................................................
1-3
OIL AND HAZARDOUS SUBSTANCES .................................................................................
1-3
DISPOSAL OF PLASTICS/DUNNAGE/GARBAGE................................................................
1-3
BOATING SAFETY GUIDELINES ..................................................................................................
1-4
PRE-DEPARTURE......................................................................................................................
1-4
LAUNCHING ..............................................................................................................................
1-4
UNDERWAY...............................................................................................................................
1-4
RETURNING...............................................................................................................................
1-4
TRAILERING.......................................................................................................................................
1-5
ANCHORING.......................................................................................................................................
1-5
SHALLOW WATER ...........................................................................................................................
1-5
EMERGENCY SITUATIONS............................................................................................................
1-6
EMERGENCY STOP SWITCH ..................................................................................................
1-6
COMMUNICATION ...................................................................................................................
1-6
RENDERING ASSISTANCE......................................................................................................
1-6
REPORTING ACCIDENTS ........................................................................................................
1-6
WEATHER...................................................................................................................................
1-6
TOWING ......................................................................................................................................
1-6
CARBON MONOXIDE.......................................................................................................................
1-7
World Cat
Chapter 2: Performance
OVERVIEW .........................................................................................................................................
2-1
MOTOR TRIM
BOW UP CONDITION ...............................................................................................................
2-1
BOW DOWN CONDITION........................................................................................................
2-1
ENGINE CONTROLS.........................................................................................................................
2-2
STEERING CONTROLS ....................................................................................................................
2-2
STEERING MAINTENANCE............................................................................................................
2-2
STEERING SYSTEM DIAGRAM .....................................................................................................
2-3
STEERING SYSTEM BLEEDING INSTRUCTIONS ....................................................................
2-4
HANDLING CHARACTERISTICS ..................................................................................................
2-5
TURNING CHARACTERISTICS...............................................................................................
2-5
ADVERSE SEA CONDITIONS .................................................................................................
2-5
BOATING TIPS ...................................................................................................................................
2-6
PERFORMANCE FACTORS ............................................................................................................
2-6
ENGINE EFFICIENCY ...............................................................................................................
2-6
PROPELLER CONDITION ........................................................................................................
2-6
WEATHER CONDITIONS .........................................................................................................
2-6
LOAD...........................................................................................................................................
2-7
MARINE GROWTH....................................................................................................................
2-7
BOTTOM PAINT ........................................................................................................................
2-7
Chapter 3: Systems Information
OVERVIEW .........................................................................................................................................
3-1
FUELING GUIDELINES
BEFORE FUELING ....................................................................................................................
3-1
DURING FUELING ....................................................................................................................
3-1
AFTER FUELING .......................................................................................................................
3-1
FUEL SYSTEM....................................................................................................................................
3-2
FUEL SYSTEM DIAGRAM...............................................................................................................
3-2
ELECTRICAL SYSTEM ....................................................................................................................
3-3
BATTERY SYSTEM ...........................................................................................................................
3-3
BATTERY DISTRIBUTION ......................................................................................................
3-3
VOLTAGE SENSOR RELAY.....................................................................................................
3-4
EMERGENCY PARALLEL........................................................................................................
3-4
World Cat
24 HOUR CIRCUITS ..................................................................................................................
3-4
ANCHOR WINDLASS ...............................................................................................................
3-4
BATTERY SELECTION ....................................................................................................................
3-4
BATTERY CARE ................................................................................................................................
3-5
WIRING AND CIRCUIT PROTECTION ........................................................................................
3-6
DIGITAL CONTROL SYSTEM ........................................................................................................
3-6
TYPICAL DIGITAL CONTROL DIAGRAM..................................................................................
3-7
ACCESSORIES....................................................................................................................................
3-8
GAUGE PACKAGES ..........................................................................................................................
3-10
YAMAHA™ ................................................................................................................................
3-10
HONDA™....................................................................................................................................
3-10
SUZUKI™ ...................................................................................................................................
3-10
PLUMBING SYSTEMS ......................................................................................................................
3-10
Chapter 4: Maintenance and Service
OVERVIEW .........................................................................................................................................
4-1
GELCOAT MAINTENANCE ............................................................................................................
4-1
CLEANING .................................................................................................................................
4-1
WAXING......................................................................................................................................
4-1
REPAIR........................................................................................................................................
4-2
BOTTOM PAINT.................................................................................................................................
4-2
UPHOLSTERY ....................................................................................................................................
4-3
TRIM/PLEXIGLASS/POLYETHYLENE ........................................................................................
4-3
STAINLESS/ALUMINUM..................................................................................................................
4-3
BILGE COMPARTMENTS ...............................................................................................................
4-3
COCKPIT DRAINS .............................................................................................................................
4-3
WINTERIZATION ..............................................................................................................................
4-4
Chapter 5: Model Specific
TABLE OF CONTENTS .....................................................................................................................
MODEL SPECIFIC INFORMATION FOR YOUR BOAT
Warranty Information
5-1
World Cat
World Cat
CHAPTER 1
SAFETY AND REGULATIONS
OPERATOR RESPONSIBILITIES
Prior to enjoying your World Cat, it is important to read and understand all the information detailed in your
“Owner’s Portfolio”. Knowing how to operate and maintain the systems on your vessel can make your experiences
safe and enjoyable, as well as increase the performance and longevity of your boat. Federal law and most state laws
clearly indicate that it is the operator’s responsibility to maintain their vessel, and to operate it in a manner which protects the safety of their passengers and others. Reference page 8 of the Sportfish, Cruisers, Yachts Owner’s Manual
for a detailed list of owner responsibilities.
This manual will provide you a basic understanding of boating practices; however, we recommend all owners
review federal, state, and local regulations regarding safety and traffic prior to using your World Cat. The U.S. Coast
Guard Auxiliary and U.S. Power Squadrons offer excellent educational opportunities on a local level and are open to
anyone. If a chapter does not exist in your area, reference page 8 of the Sportfish, Cruisers, Yachts Owner’s Manual or
contact the following numbers for other educational opportunities:
BOATING EDUCATION HOTLINE.................................1-800-336-BOAT (2628)
U.S. COAST GUARD BOATING HOTLINE....................1-800-368-5647
REGISTRATION
Vessels are required by federal and state law to be registered in the state where they are primarily used. Registration numbers and validation stickers must be displayed per regulations, and a certificate of registration must be on
board while the vessel is being operated. When traveling away from your home waters, contact authorities at your
destination to determine if any additional registration is required. Some areas require permits or temporary registrations to operate in their waters. When completing registration forms you will be asked for the Hull Identification
Number (HIN). On your World Cat, the HIN is located on the starboard side of the transom. This number is unique to
your boat and will be important for registering your vessel, as well as, communicating with your dealer and our service department. Including this information in any correspondence or conversations will help our support network
serve you better.
COAST GUARD REQUIRED SAFETY EQUIPMENT
Once you have reviewed safe boating guidelines and filed for registration, it is time to equip your vessel. The
U.S. Coast Guard’s (U.S.C.G.) list of required equipment is shown below. To review the guidelines for each item, reference pages 17 and 18 of the Sportfish, Cruisers, Yachts Owner’s Manual.
• Audible Signaling Device (Bell, Horn, or Whistle)
• Fire Extinguisher
• Navigation / Anchor Lights
• Flotation Devices (PFD’s)
• Visual Signaling Devices
NOTICE
Remember to check with state and local agencies to ensure that additional items are not required to operate
your boat in their waterways.
1-1
World Cat
RECOMMENDED SAFETY EQUIPMENT
Although not required, there are several additional items which help to ensure safety, and provide convenience
for you and passengers. A list of these items can be found in the Sportfish, Cruisers, Yachts Owner’s Manual on page
18. Perform an annual inventory to keep tools, spare parts, and safety equipment in good condition. Immediately
replace any items that have been removed from the kit.
! CAUTION
Use only marine grade replacement parts. Most automotive and residential parts are not suitable for use in
the harsh marine environment. Using them could lead to premature product failure, property damage, or
personal injury.
CAPACITY INFORMATION
On all boats under 26 feet in length, the manufacturer
is required to provide capacity information. If you own a
250 SF, 250 SF, or 250 DC you will find a rectangular
metal plate near the helm. This plate will provide information on horsepower ratings and total capacities which
include person capacities, motor(s) and gear. As an owner
you should be aware of the weight on board. Exceeding
capacity can endanger your passengers and vessel, as well
as void any warranty remaining on the boat should a failure
occur. Remember this is a guideline for normal operation,
and does not release you from responsibility should an
accident occur. You must use rational judgement when
adverse conditions are expected, and reduce your loads to
create a margin of safety.
Pursuant to NMMA certification, all World Cats over 26’ in length are “Yacht Certified” and carry the placard
shown below. Person and gear capacities are not predetermined, they are left to the operator’s discretion. Therefore,
the amount of load allowed onboard should result from considering all safety precautions.
Horsepower ratings, however, are set by World
Cat and should not be exceeded. The second
page in Chapter 5 of this manual will provide
information on the maximum horsepower ratings for your boat. Exceeding the factory recommendation will result in loss of warranty
coverage on your vessel.
1-2
World Cat
POLLUTION REGULATIONS
The Refuse Act of 1899 prohibits throwing, discharging or depositing any refuse matter of any kind (including
trash, garbage, oil and other liquid pollutants) into the waters of the United States. This information is provided in a
pamphlet, that normally received when registering your boat. Use the information below as a guideline, but study the
pamphlet and understand any local regulations regarding pollution control. As the operator, you are also liable for
individuals on your vessel disposing of materials in an improper manner.
OIL AND HAZARDOUS SUBSTANCES
The Federal Water Pollution Control Act prohibits the discharge of oil or hazardous substances which may be
harmful into U.S. navigable water. Vessels 26 feet in length and over must display a placard at least 5 by 8
inches, made of durable material. The placard must be installed in a conspicuous place in the rigging compartments or near the bilge pumps and state the following:
DISPOSAL OF PLASTICS/DUNNAGE/GARBAGE
Boats 26 feet in length and over must display a Save Our Seas Placard which outlines the rules for dumping
waste offshore. The placards must be at least 4” x 9” and should be displayed in an area visible during normal
operation. They can be purchased from your dealer or marine equipment suppliers.
1-3
World Cat
BOATING SAFETY GUIDELINES
As an owner/operator you should be prepared to handle any situation which arises before departure, while underway, or upon return to dock. Careful planning will add safety and pleasure to your experience and give you the confidence to handle emergencies if they develop. Listed below are some general guidelines which you should follow
before any trip:
PRE-DEPARTURE:
• Establish a float plan and provide it to a person whom you trust. The plan should give the details of your
trip, including where you are going and when you expect to return. If you deviate from the plan, notify
that person as soon as possible.
• If you anticipate operating in a new area, understand the local rules and request charts or information on
any hazards you may not be aware of.
• If you are towing the boat, inspect the trailer including tires, lights, brakes, winch, and overall mechanical
appearance. For trailering information see page 4
• Verify that you have all necessary safety equipment. This should include all the USCG required equipment as well as spare parts or other items you decided to include.
• Check fuel levels and determine if you require additional fuel for your trip.
• Examine the weight of the gear on your vessel and make sure you are not overloaded. Distribute the
weight evenly on your vessel to ensure predictable performance.
LAUNCHING:
• Prepare your boat prior to backing down, (i.e. secure all lose items, install garboard drain), then launch
your vessel and move away quickly.
• Move your vessel away from the dock and complete a full system check. Ensure that electronics, pumps,
and safety equipment are in working order.
• Instruct a passenger on the operation of the boat, and the location and function of all safety equipment
onboard. You should never be the only person capable of safely operating your vessel.
UNDERWAY: (INFORMATION ON OPERATION AND HANDLING IS LOCATED IN CHAPTER 2)
• Obey all “Rules of the Road” and any local regulations. Use the information located on page 19 of the
Sportfish, Cruisers, Yachts Owner’s Manual to understand right of way and the various navigational and
hazard indicators you will see on the water.
• Never operate a boat under the influence of alcohol or drugs.
• Do not allow individuals under the age of 16 to operate the vessel. Maintain direct supervision of inexperienced operators.
• Ensure that all passengers are safely seated while underway, and are using the hand rails World Cat has
provided to remain securely in their seats.
• Use your electronics and judgement to remain abreast of changing weather. Storms develop quickly and
you should be prepared to protect your passengers and vessel. See page 16 of the Sportfish, Cruisers,
Yachts Owner’s Manual for more tips on weather.
• Maintain a safe speed and respect other boaters as well as those on land. Obey all “No Wake Zones” and
be aware of smaller vessels. The wake you produce could endanger other crafts and their passengers.
• Know the limitations of your craft and your experience. Understand the boats handling characteristics and
do not attempt to operate the vessel in conditions that are unsafe or beyond your experience level.
1-4
World Cat
RETURNING
• Obey navigational markers and be aware of any tidal changes since departure.
• Collect and dispose of refuse properly to maintain our waters for future generations.
• Prepare your boat for loading before moving to the dock. Quickly pull your vessel from the water and
move away from the ramp to complete the preparation for trailering.
• Verify that trailer systems are working properly and all items are secured before leaving.
• Wash the boat and perform general maintenance, upon returning home. (See instructions in Chapter 4).
As stated above, these are only general guidelines for safe boating. We recommend using these and any other
available resources to protect your passengers as well as your vessel. Checklists can be an important tool in accomplishing this, see the example on page 35 of the Sportfish, Cruisers, Yachts Owner’s Manual.
TRAILERING
Due to the nature of the hull, catamarans require specialized trailers. Your dealer will be able to provide them, as
well as, information on safe trailering practices. Tow vehicles should be rated to handle the load and stresses which
accompany trailering your boat. A properly matched trailer should carry 5-10% of the total vessel weight on the
tongue. Routine inspections should be performed on the vehicle and trailer prior to each trip, and thorough checks
scheduled on an annual basis.
ANCHORING
World Cat offers an anchor and anchor windlass as optional equipment on all boats. The anchor we supply is
known as a plow style. However, there are several types of anchors available, each designed to operate in specific
bottom conditions. Your dealer can provide information on which styles are most effective in your area. See page 46
of the Sportfish, Cruisers, Yachts Owner’s Manual for more information and tips concerning anchoring.
! CAUTION
Never anchor your boat off the stern. The weight at the transom, combined with adverse sea conditions
could allow water to enter the boat over the transom wall.
SHALLOW WATER
Although your World Cat draws a small amount of water for its size, shallow water should be a concern of all
boaters. To avoid this hazard, pay particular attention to navigational markers and know the area you are operating in.
Be aware of tidal changes, including those that have occurred during your trip. Rocks, stumps, or other hazards are
more prevalent in shallow water and can cause major damage to your hull bottom. Engines can also suffer damage if
they are allowed to run in the sand or mud.
If you do become grounded, tilt the motors up to reduce the draft at the transom. Often this will solve the problem; however, it may be necessary to rock the boat from side to side to break the suction along the keel. If you are
grounded on an incoming tide, allowing the water to rise can help. Being grounded on an outgoing tide is a larger
issue, you need to act quickly to free your boat and avoid being driven further aground. Use the anchor to secure the
boat and await the incoming tide, or use it to pull yourself free.
EMERGENCY SITUATIONS
Unfortunately, even the safest boating practices cannot eliminate the potential of emergency situations developing. Therefore you should prepare yourself, and your crew, to handle any problems that may arise. Establish specific
plans for fires, man overboard, collision, etc., and review them with your passengers prior to departing. Planning
allows people to remain calm, and gives everyone the confidence to resolve the problem. Section 4 of the Sportfish,
Cruisers, Yachts Owner’s Manual provides information on emergency procedures. Below is important information
which all owners should be aware.
1-5
World Cat
EMERGENCY STOP SWITCH
Lanyard clips are provided on all World Cats and when used properly provide an emergency stop for the
engines should the driver fall from the helm position, or need to perform an emergency shutdown to respond to
or avoid an accident. The clip attaches the driver to the ignition panel using a cord. A pull on the cord will
release the clip from the shut-off switch on the panel and shutdown the engines. To restart the engines, simply
reinstall the clip. This should only be used to prevent or react to accidents, and the operator is solely responsible for the decision.
COMMUNICATION
If you witness an emergency or become involved in one, you should request assistance via radio communication or visual signals. Review the information in Section 4 of the Sportfish, Cruisers, Yachts Owner’s Manual
for detailed information on how and when to request assistance.
RENDERING ASSISTANCE
Owners are required by law to render assistance to other boaters involved in an emergency situation such as
fire, collision, casualty, etc., as long as it does not endanger your vessel or its passengers.
REPORTING ACCIDENTS
Federal regulations require that operators involved in an accident file a written account of the situation within
48 hours. Reports should be submitted to the State Boating Law Administrator. You can obtain forms through
the USCG or local authorities (i.e. harbor patrol, sheriff or police offices). In the event that a casualty or disappearance occurs as the result of an accident, you must notify the authorities immediately by phone or radio and
fill out a written statement.
WEATHER
Pay attention to weather patterns. If you find yourself in the path of a storm, seek shelter immediately. If you
cannot reach a dock, seek refuge inside the boat while the storm advances. Never get in the water, and stay
clear of metal components on your boat. If lightning strikes, it would likely pass through metal objects seeking
a ground.
TOWING
Due to an accident or loss of power, it may become necessary to tow another vessel or have your boat towed. If
you are providing assistance, never attempt to tow a boat larger than your own. Be certain to use proper lines
(ropes) and rational judgement to prevent further damage. Tow lines are under heavy strain, therefore passengers should remain clear of the lines to protect themselves from injury. For more information on towing, reference page 30 of the Sportfish, Cruisers, Yachts Owner’s Manual.
1-6
World Cat
CARBON MONOXIDE (CO)
! DANGER
Carbon Monoxide (CO) is a colorless, odorless, and tasteless gas produced by the exhaust system of any
combustible engine. CO can cause brain damage or death, if inhaled over an extended period of time. To
protect yourself and your passengers, never block the ventilation outlets in cabins, consoles, or other
enclosed spaces.
One of the most important considerations when dealing with boating safety is carbon monoxide. Commonly
referred to as (CO), carbon monoxide is a colorless, odorless, and tasteless gas emitted from any engine exhaust.
Including inboards and outboards. A CO particle is close in weight to the air we consume; therefore it does not rise or
fall in the atmosphere, but accumulates in enclosed spaces. Boat owners with enclosed heads, cabins, or canvas enclosures should pay particular attention to CO. Be aware that fumes produced on your boat can affect other vessels and
other boats can affect you. A primary concern is the use of generators when boats are moored adjacent to each other.
Carbon Monoxide is poisonous and potentially fatal if inhaled over an extended period of time. Symptoms of CO
poisoning include:
• Dizziness
• Nausea / Vomiting
• Headache / Throbbing in the temples
• Fatigue
• Muscular twitching
• Inability to focus or think clearly
If you or any of passengers experience any of these symptoms, leave the area and find a source of fresh air immediately. If your symptoms persist, seek medical attention.
1-7
World Cat
CHAPTER 2
PERFORMANCE
OVERVIEW
This chapter will provide information on the performance characteristics of your catamaran; This is
not a substitute for seamanship training or hands-on experience. First time boat owners should use the
resources detailed in Chapter 1 to learn proper methods of boat operation. Experienced boaters who have
never owned a catamaran, should study this chapter completely. Do not assume that previous boating experience will apply to all situations, as there are several subtle differences in the handling characteristics of
twin hulled boats. For existing catamaran owners, this chapter should be a reference.
MOTOR TRIM
The smooth riding characteristics of a catamaran are a result of the twin hull design. Their ability to
slice through oncoming waves is far superior to the slamming characteristics seen on conventional vessels.
Motor trim plays an integral part in how your catamaran accomplishes this. In a level or bow down attitude, your boat will slice through larger chop but you may experience sluggish performance, a wetter ride
and increased bow steering in a following sea. In a bow up attitude the boat will perform better, but may
ride less smoothly. Experiment with the trim settings in various sea conditions to determine what you are
most comfortable with. When using the trim to correct a listing condition, imagine an “X” connecting the
starboard engine to the port bow, and port engine to the starboard bow (see drawing below).
BOW UP CONDITION
To correct a bow up condition on the port sponson,
adjust the motor trim “down” on the starboard
engine. This will help the starboard sponson to rise
and level the vessel. If moving to the lowest trim setting on the starboard engine does not correct the list,
trim the port engine “up” to assist the change.
Reverse the instructions to accommodate for a bow
up condition on the starboard sponson.
BOW DOWN CONDITION
To correct a bow down condition on the port sponson, adjust the motor trim “up” on the starboard
engine. This will help the starboard sponson to fall
and level the vessel. If cavitation occurs on the starboard engine, lower it to correct the problem, then
trim the port engine “down” to assist the change.
Reverse the instructions to accommodate for a bow
down condition on the starboard sponson.
2-1
World Cat
ENGINE CONTROLS
All factory rigged boats will come equipped with a binnacle, which controls the throttle, shift, and trim
mechanisms for your engine. For diagrams and general information about this system, review pages 70 and
71 of the Sportfish, Cruisers, Yachts Owner’s Manual. Also read the owner’s manual provided by the binnacle manufacturer to determine how to operate the features on your binnacle. If any components of this
system need to be replaced, be certain to use the same style and length as the original equipment.
STEERING CONTROLS
Catamarans offer unsurpassed steering control. The wide spacing of the engines, advanced steering
components, and handling characteristics of the World Cat hull give operators exceptional maneuverability
in even the tightest spaces.
Because of the superior tracking abilities of the World Cat hull, oversteering can present a problem,
especially for owners accustomed to operating conventional boats. Conventional vessels have a tendency
to lose tracking abilities in rough and following sea conditions, making constant course corrections necessary. However, catamarans do not exhibit those traits and require operators to take a “hands off” approach.
To do so, relax your grip and fight the urge to make constant corrections.
STEERING MAINTENANCE
The design of a catamaran hull requires a special steering system which features a “liquid tie-bar”, as
opposed to the mechanical version used in conventional boats. For this reason, all World Cats are equipped
with a hydraulic steering system, featuring steering cylinders mounted on each engine and a steering system valve. This system enables both engines to respond in unison to adjustments at the helm.
In order to maintain the excellent steering characteristics of your boat, occasionally you will need to
adjust the steering system to realign the motors (known as motor toe). To do so follow these instructions:
1. Using the helm, center the starboard motor.
2. Find the steering system valve, located under the inspection port on the center of the transom.
3. Open the valve by rotating it 90 degrees (the handle will be parallel to the valve body when
open). This will isolate the port engine, so that it can be adjusted manually.
4. Center the port motor manually; then close the steering system ball valve and reinstall the
inspection port.
Similar to hydraulic braking systems in an automobile, it may become necessary to bleed the steering
system occasionally to remove air from the lines. We have provided diagrams of the steering system on
pages 4 thru 5, and the Teleflex™ owner’s manual in your “Owner’s Portfolio”. Use these resources, and
your dealer, to keep the steering system in excellent working order. Be aware, these are routine maintenance procedures and are not covered under warranty by World Cat.
! CAUTION
Routinely check hydraulic fluid levels, and all connections for leaks or any sign of mechanical failure. Lubricate all mechanical parts at least annually with high quality marine grease. Failure to
do so may result in impaired or unresponsive steering.
2-2
World Cat
BD
POR
THIS IS A REPRESENTATION OF A TYPICAL WORLD
CAT STEERING SYSTEM. THE LENGTHS OF THE
STEERING HOSES AND PIGTAILS WILL VARY
DEPENDING ON THE MODEL YOU HAVE.
ST
T
STEERING SYSTEM DIAGRAM
A
B
D
C
E
ITEM
A
B
C
QUANTITY
DESCRIPTION
1
SEA STAR II HELM
KEVLAR STEERING HOSE
2
1
STEERING SYSTEM VALVE
D
KEVLAR PIGTAIL 4’−6’
3
E
STEERING CYLINDERS
2
2-3
World Cat
STEERING SYSTEM - BLEEDING INSTRUCTIONS
Reference the bleeding instructions provided by the Teleflex™ owner’s manual, which is included in
your “Owner’s Portfolio”. Use them in conjunction with the instructions and diagram below to bleed the
steering system. This should be done annually.
NOTICE
If possible, have your dealer or trained marine technician perform routine maintenance or
repairs on your steering system. Replace faulty parts immediately.
STEP 1
1. Using a filler tube, fill the helm
with oil. When completed, you
should be able to see oil in the
filler tube.
counter
clockwise
clockwise
2. Open the steering system valve
located under the inspection
plate in the center of the transom.
STEP 2
1. Open the bleed fitting labeled
#1 and pull the cylinder shaft
all the way out on the fitting #1
side.
steering
system valve
2. Holding the shaft to prevent it
from moving back into the cylinder, have someone turn the
wheel clockwise until a steady
stream of oil flows through the
fitting.
3. Close bleed fitting #1.
STEP 3
3
2
1
4
1. Open the bleed fitting labeled
#2. and pull the cylinder shaft all the way out on the fitting #2 side.
2. Holding the shaft to prevent it from moving back into the cylinder, have someone turn the wheel
counter-clockwise until a steady stream of oil flows through the fitting.
3. Close bleed fitting #2 and repeat Step 3 for bleed fittings #3 and #4.
STEP 4
1. When you complete the bleeding process, turn the wheel hard over in each direction at least twice.
Then manually adjust the cylinders by pulling the shaft all the way out on the same side of each
cylinder and closing the steering system valve.
2-4
World Cat
HANDLING CHARACTERISTICS
World Cat’s patented Vectroflo™ hull is a semi-displacement hull, which exhibits characteristics of
both planing and displacement hulls. Planing hulls provide speed and economy of operation since a limited
amount of the hull is in contact with the water. However, they feature flat sections along the chine which
can result in poor handling at low speeds and harder impacts at high speed. Displacement hulls provide
superior handling characteristics, even at low speed, and an improved ride in rough water. Speed and economy suffer however, since more of the hull is submerged. World Cat has taken the best characteristics of
these two designs and incorporated them in the Vectroflo™ hull. Our proven design provides a superior
ride, excellent handling characteristics in a variety of conditions, and speed with economy of operation. To
help you experience “The Ultimate Ride”, study the following sections.
TURNING CHARACTERISTICS
Turning a catamaran is slightly different than cornering on a conventional vessel. Imagine the difference between an automobile and a motorcycle. Automobiles take turns in a flatter, more stable, manner similar to catamarans hulls, while motorcycles pitch hard into a turn similar to a monohull. Do
not underestimate a catamaran’s cornering ability however, hard adjustments to the steering wheel
can make a World Cat bite quickly and execute high performance turns. Experiment with the handling ability of your cat so you are prepared for any situation on the water.
ADVERSE SEA CONDITIONS
Catamarans are designed to handle some of the roughest waters in the world, but that is no substitute
for common sense. As an operator you are responsible for the safety of your passengers and vessel;
therefore, your trips should be limited by your level of experience. Planning and paying constant
attention to the weather and sea conditions is paramount. If you are forced to operate in dangerous
seas however, you can be confident that your World Cat, when operated properly, can handle them
safely. Following are some tips on how to handle your boat in adverse sea conditions.
• When traveling into the wind, changing your direction a few degrees to allow one sponson to
settle before the other, can make the ride smoother and allow for increased speed.
• In a rough chop with short wave intervals, increasing your speed may allow the boat to skim
across the tops of each wave. This will result in a smoother ride.
• Steer to avoid larger swells and breaking waves.
• In a following sea, position your vessel on the back of a wave and match its speed to remain
ahead of the trough. Speed is paramount. Work the throttle to avoid going over the wave or
being thrown down the face of a following wave.
• When entering an inlet, use the same method of matching wave speeds. Often there are breakers
in an inlet so be aware of shallow water conditions.
2-5
World Cat
BOATING TIPS
Experience is the best way to determine the handling characteristics of your catamaran. Operating the
boat in multiple sea conditions and under various loads will help you predict how the boat will perform in
any situation. World Cat provides the following recommendations regarding the performance of your catamaran:
• Establish an RPM chart which details the speed and fuel consumption at various RPM levels to
achieve the most economical operation.
• Monitor fuel gauges to determine the amount of operating time remaining at a given reading.
• Determine minimum speed for effective steering in close quarters.
• Determine the turning radius required at various speeds.
• Determine the rates of acceleration and deceleration with various load conditions. Include the
distance required to stop the boat at various speeds.
Use the information provided in section 6 of the Sportfish, Cruisers, Yachts Owner’s Manual for more
information on boat handling.
PERFORMANCE FACTORS
Proper setup and maintenance of the systems on your boat is important to ensuring proper performance, but be aware they are not the only factors which affect it. Several things which contribute to the
level of performance of your catamaran can change between or during trips.
ENGINE EFFICIENCY
Without proper maintenance, your engine(s) will gradually lose power, resulting in a loss of speed.
Use the recommendations in the engine’s owners manual to schedule routine maintenance procedures and as a guide for the correct RPM range for your engines. Neglecting to do so may result in
loss of performance and an increased risk of failure.
PROPELLER CONDITION
The size and condition of your prop also plays a major role in the performance of your catamaran. A
damaged prop can result in lower speeds, sudden drops in RPM, increased fuel consumption, and
severe vibration while running. Improperly sized props can cause damage to your engine as a result
of exceeding the maximum or minimum RPM levels.
WEATHER CONDITIONS
Barometric pressure and humidity can affect the output of your engines. For example, on an
extremely hot and humid day, your engine can experience as much as a 10 percent loss in horsepower. Although you should monitor your engines’ performance, be aware that the weather could be
a major factor in your boats performance.
2-6
World Cat
LOAD
Increased load can obviously affect performance, especially if the load is unbalanced. Passengers,
gear, and fuel are all examples of things which can affect your vessel. Fuel levels change through the
day, and greatly affect the attitude of your boat. When necessary, make adjustments to engine trim
and load distribution to compensate for fuel usage.
MARINE GROWTH
If you store your boat in the water or fail to clean it after each trip, the existence of marine growth
can contribute to a loss of performance. A decline in speed or increased fuel consumption can occur.
Prevent this by applying a marine growth inhibitor or by cleaning your boat thoroughly after each
trip.
BOTTOM PAINT
Bottom painting your catamaran will also change the performance. Although not significant, you can
expect a drop in speed between 1 and 5 miles per hour.
2-7
World Cat
CHAPTER 3
SYSTEMS INFORMATION
OVERVIEW
This chapter will provide you with basic information for all the systems on your boat. Understanding this information is imperative, as it directly contributes to the safety and enjoyment of your trips on the water. If you need further information on any of these systems talk with your dealer.
FUELING GUIDELINES
Study the following guidelines thoroughly, and consult your dealer if you have questions. Be sure to read the
engine manufacturers recommendations regarding the type and grade of fuel to use for your engines. If you are using
a 2 stroke outboard engine, be sure to fill the oil tanks with manufacturer approved oil during each fill-up.
! WARNING
Avoid methanol or other alcohol based fuels or additives which can deteriorate fuel hoses, Alcohol based
fuels also absorb water which can lead to engine damage.
! DANGER
Follow all safety guidelines while fueling. Leaking or spilled fuel is an explosion hazard. Regular checks of
the fuel system are needed to protect you and the vessel.
BEFORE FUELING
1.
Shut down the engines and turn off all electrical devices including the batteries.
2.
Close all hatches, portlights, and doors to prevent accumulation of fuel vapors.
3.
Extinguish cigarettes or other lighted materials.
4.
Keep a properly charged and correctly rated fire extinguisher nearby.
DURING FUELING
1.
Use common sense and obey all safety regulations related to fuel handling.
2.
Avoid static sparks by maintaining contact between the fuel nozzle and fuel fill.
AFTER FUELING
1.
Secure the fuel cap and inspect for leaks.
2.
Clean up any spilled fuel and dispose of the cleaning material accordingly. Do not store fuel soaked material on your boat.
3.
Open all hatches, portlights, and doors to allow for ventilation.
4.
Check for fuel vapors using a “sniff test” and do not turn on electrical devices, including batteries, until
you are certain the fumes have dissipated.
3-1
World Cat
FUEL SYSTEM
Due to the nature of the hull design, each World Cat is equipped with a port and starboard fuel system. These
systems act independently, providing fuel to the engine on their respective side. Tanks are constructed of polyethylene material to prevent corrosion, and feature dual hull side vents to avoid over-pressurization of the system. This
helps eliminate “blow back” and its damaging effects on your gelcoat.
Hoses are NMMA certified, and fittings are clamped securely to reduce the potential for leaks. However, comprehensive checks of hoses and fittings should be completed at least annually, including those normally hidden from
view. Tighten all connections, replace deteriorated hoses, clamps or fittings, and replace the fuel/water separators
during this check. World Cat has provided inspection plates in the cockpit floor and along the gunwales to assist you
with annual maintenance. To access the inspection ports along the gunwale, you will need to remove the cockpit bolsters by removing the screws that hold it in place. To access the screws, pull up gently on the bottom of the bolster
and locate the drain grommets. The factory installs screws in every other grommet to secure the bolster. Remove
these and pull up and out on the cushion to remove.
If you experience fuel flow problems, remove the fuel feed hose from your engine and connect it to a portable
fuel tank. Doing so will help you determine if your fuel system or the engine is the source of the problem. Fuel system repairs and engine maintenance should be performed by a qualified marine technician.
FUEL VENT
(HULLSIDE)
FUEL VENT
(HULLSIDE)
FUEL FILL
(DECK TOP)
FILL
VENT
VENT
TO FUEL/WATER
SEPARATOR
SST HOSE CLAMPS
(2 PER CONNECTION)
FUEL PICK−UP
SENDING UNIT
MANUFACTURER’S
LABEL
TO FUEL GAUGE
AT DASH
The fuel/water separators are installed between the tank pickup and the engine. They are located in the aft rigging
space on all models except the 270 SD, 270 TE, and 330 TE. On those models, they are mounted on the hullside and
can be reached through access doors on the cockpit walls. Inspect these filters regularly and replace when needed.
3-2
World Cat
ELECTRICAL SYSTEM
The electrical system on your catamaran consists of three major components: the battery system, wiring and circuit protection, and accessories. It is important that you understand the principles of the electrical system, so that you
can protect the components and troubleshoot any problems you experience.
BATTERY SYSTEM
Your World Cat is equipped with three batteries, excluding the 320 EC and 330 TE which have four. Two of the
batteries are dedicated as “cranking batteries”; the third bank controls the DC accessories and is commonly referred
to as the “house” bank. To help maintain your batteries, a management system is installed on your boat. This system,
controlled by the panel shown below, enables you to engage or disconnect the batteries, distribute electrical charge,
and parallel batteries in the event of a failure. Chapter 5 of this manual will provide details regarding the location and
wiring of your batteries and management panel.
ESSENTIAL CIRCUIT 24 HR. SUPPLY
dc main
10A
10A
10A
10A
fwd. stbd.
float switch
fwd. port
float switch
aft stbd.
float switch
aft port
float switch
VSR LED
INDICATOR
VSR LED
INDICATOR
HOUSE
emerg
parallel
WINCH
BREAKER
PLUG
stbd
start
port
start
SAMPLE OF A BATTERY MANAGEMENT PANEL FROM A 330 TE
BATTERY DISTRIBUTION
The drawing above illustrates the normal operating position for the battery management panel. The “PORT
START”, “STBD START”, and “HOUSE” switches as well as the “DC MAIN” breaker are in the “ON” position and the “EMERG PARALLEL” is “OFF”. In this position, you are supplying power to the engines
through the cranking leads and to the DC accessories through the 50 Amp “DC MAIN” breaker. When you
have finished your trip, turn the “PORT START”, “STBD START” and “HOUSE” switches off prior to leaving the boat. The “DC MAIN” can remain “ON” at all times.
3-3
World Cat
VOLTAGE SENSOR RELAY (VSR)
The twin voltage relay sensors are integrated into the battery switch cluster. They distribute the charging output from the engine alternator to the “cranking” and “house” batteries. After starting an engine, the alternator
sends electricity back to the “cranking” battery to recharge it. Once the “cranking battery” is fully charged
(13.6 volts), the VSR closes to allow the alternator output to charge the “house” battery. When the VSR is
operating, the LED indicator located on the management panel will be lit. It will remain lit until the battery is
fully charged, or the “cranking” battery voltage falls below 13.6 volts. It is common for the VSR to cycle
“ON” and “OFF” during operation. However, constant cycling could indicate a problem in the system and
should be checked by your dealer.
EMERGENCY PARALLEL
In the event of a battery failure, the “EMERG PARALLEL” switch allows you to mechanically link the port
“cranking” battery to the starboard engine or vice versa. The switch should remain in the “OFF” position when
not in use. To prevent voltage spikes or drops which can damage electrical components, you cannot draw
power from the house battery using the “EMERG PARALLEL” switch.
24 HOUR CIRCUITS
The push-in breakers located across the top of the management panel protect the 24 hour essential circuit wiring. Per NMMA and USCG guidelines, these breakers are constantly energized to provide power for bilge
pumps and memory functions. This helps to protect your vessel even when you are not available. The
“HOUSE” switch does not need to be “ON” for these breakers to have power. Inspect the breakers regularly,
and push-in to reset. If a breaker trips constantly, have your dealer investigate the problem as soon as possible
to prevent damage to your boat.
ANCHOR WINDLASS
A 50 Amp breaker is installed at the factory for owners who request the anchor windlass option; otherwise, a
blank is installed to permit aftermarket additions. If you choose to add a windlass to your boat, contact your
dealer for information on selecting a breaker to fit the panel.
! DANGER
Disconnect the battery cables from the batteries prior to removing or working on the battery management
panel. Failure to do so could result in electric shock. Reference the NMMA pamphlet in your “Owner’s
Portfolio” for more information.
BATTERY SELECTION
World Cat supplies the original batteries onboard your vessel. They are DekaTM model DP31DT batteries. In the
even of a failure, replacements must be of equal size and specifications (see below):
CCA: 650
MCA: 810
RESERVE CAPACITY @ 25A: 182min
20AH RATE = 100
3-4
World Cat
BATTERY CARE
Batteries should be secured in a non-metallic tray and insulated boots should cover the terminals. Depending on
the style of battery you choose, inspect the electrolyte and perform routine maintenance as suggested by the manufacturer. Remove corrosion from the terminals quickly to prevent failure. Use a stiff brush and a solution of water and
baking soda to remove corrosion, then grease the terminals to prevent further build-up. Be careful to clean up thoroughly to avoid contaminating the electrolyte.
When servicing the batteries, follow the safety procedures shown below and work to avoid electrolyte spills
which can harm you and your vessel.
! DANGER
All batteries contain an electrolyte, commonly sulfuric acid, which is a caustic and volatile chemical. Use
extreme caution when charging or servicing.
SAFETY
1.
Use protective clothing and accessories such as aprons, gloves, and eye wear to protect yourself while servicing batteries.
2.
Avoid cigarettes, open flames, and sparks. Batteries can produce toxic and explosive gases; therefore,
store or charge them in a well ventilated space.
3.
Keep batteries out of the reach of children and pets.
EXPOSURE
If you are exposed to the electrolyte solution, follow these procedures and seek immediate medical attention.
EXTERNAL - Flush with large amounts of water for contact with the skin. If severe irritation occurs or it contacts your eyes, seek medical attention immediately.
INTERNAL - Consume large amounts of water or milk, coupled with milk of magnesia. a beaten egg, or vegetable oil. Seek medical attention immediately.
The guidelines above are basic and do not alleviate the owner of responsibility should an accident occur. Use
good judgement and common sense to avoid an accident.
! CAUTION
When reconnecting your batteries, always connect the black cable to the negative terminal and red cable to
the positive one. Reversing them can damage you electrical system and create the potential electric shock.
! CAUTION
Never disconnect a battery while underway. Doing so may result in damage to your boat’s electrical system
and the engine’s alternator.
3-5
World Cat
WIRING AND CIRCUIT PROTECTION
All World Cat are wired using marine grade tin coated copper wire, instead of standard copper wire. Tin coated
copper is manufactured to withstand the harsh saltwater environment better than standard copper, which is used for
residential applications. Environmentally sealed Deutsch™ connectors are installed on all accessories located below
the waterline to ensure watertight connections. The remaining devices are installed with high quality splices and terminals, which are heat shrunk to protect the integrity of the connection. Harnesses are routed through PVC rigging
tubes to prevent chaffing and covered with sheathing when necessary.
DIGITAL CONTROL SYSTEM
All World Cats come equipped with a digital control system, consisting of a control unit and remote switch pod.
The control unit houses the circuit protection for all the accessories activated by the switch pods. A label is mounted
on the control unit to advise you which breaker controls a given funtion. If a breaker trips, simply push it in to reset.
When possible have your dealer replace a defective breaker. If that is impractical, remove the cover from the control
unit and pull out on the original breaker. Replace by snapping in a new breaker, being sure to use a breaker identical
in capacity to the original.
! CAUTION
Failing to use the correct replacement breaker could result in failure of the device or damage to the electrical system. Contact your dealer for repair information.
Accessories not integrated into the control unit can include lights with integrated switches, marine head controls,
stereos, aftermarket electronics and 12V outlets. These devices draw current from the accessory fuse blocks. The fuse
blocks are similar to those found in automobiles, and use snap-in fuses to protect a circuit. You can obtain replacements for these fuses from your dealer or local auto-parts store. Always replace a damaged fuse with one of equal rating.
Ground blocks are another integral part of your electrical system. These are connected to the common battery
ground and individual appliances, to provide a path for current flow back to batteries.
! CAUTION
When working on your electrical system, disconnect the batteries to prevent shock, or damage to your electrical system. If possible, have an electrician perform repairs.
For customers unfamiliar with electrical systems, World Cat recommends the following book:
Boating Magazine’s: Powerboater’s Guide to Electrical Systems
Written by: Ed Sherman
Publisher: International Marine (Division of McGraw Hill Companies)
Copyright: 2000 International Marine.
3-6
PORT
BILGE
LIVE
WELL
STBD
BILGE
RAW
WATER
ACC
2
CPIT
LIGHTS
10A
20A
20A
8
10
5
7
9
3-7
BATTERY NEGATIVE
H
O
R
N
5A
10A
6
3
10A
10A
GROUND BLOCK
20A
20A
5A
4
1
FROM HARNESSES OR
DISTRIBUTION PANEL
ACC
3
ACC
1
FUSE BLOCK
2
BATTERY POSITIVE
ANC
L
T
S
NAV
SWITCH POD
power
ground
16= KEYPAD (+)
15= N/A 10A
14= CPITL / 5A
12= LWELL / 5A
11= HORN / 10A
8= STBDB / 5A
7= PORTB / 5A
6= ACC 3 / 5A
5= ACC 2 / 5A
4= ACC 1 / 10A
3= RWATER 15A
11
3
12
4
5
14
6
15
7
16
8
World Cat
TYPICAL DIGITAL CONTROL DIAGRAM
World Cat
ACCESSORIES
Electrical accessories include all lights, pumps, and gauges assembled into your catamaran. Certain accessories
are standard to each model, while others are optional equipment. Below is a list of accessories and their function.
Beside each accessory is a list of the boats on which the item is standard. For information on optional equipment see
Chapter 5 in this manual.
NAVAGATIONAL LIGHTS (ALL)
Per USCG guidelines, all powered vessels must have navigational and anchor lights. Every World Cat is
equipped with navigational lights at the bow, a pole light near the stern, or mast light on the hardtop. These
lights must be used in accordance with USCG regulations when anchored or underway.
COCKPIT LIGHTS (ALL)
Activated by the digital control system, cockpit lights are located at floor level and in boxes to provide light
while operating in low light conditions,
CABIN / CONSOLE LIGHTS (ALL)
Lights located in the cabin or in consoles have an integrated power switch and are tied directly into the fuse
block. Operate them with the switch located at the base of the light.
SPREADER LIGHTS (HARDTOP OPTION ONLY)
Attached to the hardtop or hardtop frame, spreader lights illuminate the cockpit in low light situations. They
are operated using the switch on the dome light and are protected by the fuse block in the hardtop radio box.
DOME LIGHT (HARDTOP OPTION ONLY)
Located under the hardtop radio box, this light features both white and red lamps for nighttime operation. It is
powered by the fuse block located in the radio box.
BILGE PUMP / FLOAT SWITCH (ALL)
Bilge Pumps evacuate standing water in the bilge. They can be operated manual from the switch pod, or automatically by the float switch. The float switches are connected to the fuses along the top of the battery management panel.
RAW WATER PUMP (ALL)
Supplies pressure to the raw water system. It is activated by the switch pod and contains a pressure switch similar to a residential well pump. You can leave this appliance on at all times while underway.
FRESHWATER PUMP (ALL)
Supplies pressure to the freshwater system. It is activated by the switch pod and contains a pressure switch
similar to a residential well pump. You can leave this appliance on at all times while underway.
LIVEWELL PUMP (ALL EXCEPT 270 LC)
Supplies water to the livewell system and is activated by the switch pod. Use the button as follows:
• Press one time for continuous operation,
• Press two times for a 3 min. “ON” / 3 min. “OFF” cycle
• Press three times for a 5 min. “ON” / 5 min. “OFF” cycle.
3-8
World Cat
MACERATOR PUMP (270 TE / 330 TE)
Used to evacuate waste and debris from fishboxes. Pump is activated using the switch pod (mid 2004) or toggle switches at the dash (2003 and early 2004).
12V OUTLETS (ALL)
Located strategically throughout the boat, these outlets provide power to aftermarket accessories such as cell
phones, electric reels, and spotlights. Each outlet is independently wired to the fuse panel.
MARINE HEAD (270 SC / 330 TE)
The marine head is powered by the fuse panel, and has a separate control panel mounted near the head. The
control panel activates the solenoid to allow for water intake and discharge. A macerator pump is incorporated
into the head. See Chapter 5 in this manual for operating instructions.
ANCHOR WINDLASS (OPTIONAL)
Use to deploy and retrieve the anchor. This accessory is controlled by a dedicated switch at the helm. The fuse
is located at the battery management panel.
STEREO (OPTIONAL)
Similar to an automotive stereo, the unit can be operated using the faceplate or a remote keypad which is
mounted near the helm. It is powered by the fuse block, and the memory wire is connected to a 24 hour circuit.
WINDSHIELD WIPERS (250 DC / 270 EC / 270 SC)
Operated by a rotary switch mounted near the helm, these function identically to those found on passenger
automobiles.
HORN (ALL)
Operated by the digital control unit, these function identically to those found on passenger automobiles.
ACC (ALL)
“ACC 1” is reserved for the standard freshwater pump on most models. However, the remaining “ACC”
switches can be used to operate aftermarket products. Be aware of the power requirements for any add-on
products, so you do not exceed the capacity of the breaker supplying the switch. Failure to do so could damage the appliance and/or the electrical system.
3-9
World Cat
GAUGE PACKAGES
World Cat provides Honda™, Suzuki™, and Yamaha™ engine packages with manufacturer supplied instrumentation. Below is a list of the standard packages and a description of their function.
YAMAHA™
Yamaha™ packages feature a four piece digital gauge package with a tachometer for each engine, speedometer, and fuel management gauge. Instructions on the operation and features of these gauges is included in your
engine owner’s manual.
HONDA™
Honda™ packages feature a three piece digital gauge package with a tachometer for each engine, multifunction speedometer including fuel management. Instructions on the operation and features of these gauges is
included in your engine owner’s manual.
SUZUKI™
For Suzuki™ packages, the gauges listed below are clustered for one engine. Therefore, there will be two identical setups on your boat, with each cluster monitoring the engine function and fuel status for a given sponson.
• TACHOMETER
The tachometer monitors the RPM levels of the engine. Honda tachometers also include a digital hour
meter, which tracks the amount of time the engine is running. Suzuki tachometers include a systems monitor indicator which features a Low Oil Pressure Warning, Engine Temperature Warning, Check Engine
Warning, and Over-Rev Limit Warning.
• FUEL GAUGE
The fuel gauge displays the remaining fuel level for the tank associated with a given engine.
• TRIM GAUGE
Displays the engine trim height.
• VOLTMETER
Monitors the voltage on the cranking circuit for a given engine.
PLUMBING SYSTEM
The intake and discharge of water is integral to several of the features and accessories provided on your boat,
including livewells, fishboxes, sanitation devices, and water systems. World Cat installs the plumbing components
for these systems using high quality marine hoses and stainless clamps. However, this does not eliminate the need for
routine checks of plumbing components or connections. A failure resulting from a deteriorated hose or connection,
could cause your boat to take on water or become swamped. Information is provided in Chapter 5 of this manual,
regarding the location, function, and routing for the plumbing components on your boat. Review these materials and
talk with your dealer should you have a question.
3-10
World Cat
CHAPTER 4
MAINTENANCE AND SERVICE
OVERVIEW
This chapter provides basic information for maintaining the original appearance and dependable performance of your World Cat. Although your vessel is constructed of the finest materials available, the
harsh saltwater environment and other factors, including geography and usage rate, will affect its finish
and function over time. It is imperative that you understand how to care for your catamaran properly. Some
simple steps will help maintain its aesthetics, value, and reliability.
GELCOAT MAINTENANCE
Gelcoat is a thin layer of resin mixed with colored pigments, which provides the exterior finish on your
boat. Gelcoat provides a smooth durable surface to protect the fiberglass construction of the hull, but is still
flexible enough to absorb the pressure exerted upon it during operation. Mainly used for cosmetics, gelcoat
is relatively simple to maintain. However, without routine cleaning, it will discolor due to the microscopic
pores in the surface. Following are some instructions for maintaining your gelcoat.
CLEANING
After each trip on the water, or after trailering long distances, you should clean the boat immediately.
Washing the boat with mild detergents, such as dishwashing soaps, and fresh water will help eliminate build up or discoloration resulting from environmental pollutants. Use a sponge or other soft
cleaning device on the smooth exterior surfaces of the hull and deck. A soft brush can be used when
cleaning nonskid portions of the deck. Make sure to rinse the boat thoroughly after cleaning.
! CAUTION
Using strong or caustic cleaning agents, such as bleach, citrus based cleaners, or one containing
ammonia, will damage the appearance and strength of your gelcoat.
WAXING
Similar to automotive finishes, gelcoat will begin to fade over an extended period of time. Constant
exposure to environmental pollutants and this aging process will result in a loss of shine. However, it
is possible to restore the original luster and color using a polishing compound (mild abrasive) or a
rubbing compound (harsh abrasive). Each will remove scratches, discoloration, and help restore
weathered gelcoat surfaces but you should select what to use based on the severity of the problem.
Use the following steps to restore the finish of your gelcoat.
1. Clean the affected area completely using a mild detergent.
2. Gently wet sand the affected area using a fine sandpaper (600 grit) to remove any stains. Use
plenty of water and always sand in one direction using curved strokes. Sanding in alternating
directions could result in damage to the finish.
3. Apply polishing compound to a buffing pad and follow the manufacturers instructions. If you
apply the compound mechanically, we recommend a lamb wool buffing pad and a electric buffer
capable of 1750 to 1800 RPM.
4-1
World Cat
4. When you have completely buffed the area, wash away any remaining compound using clean
water.
5. After thoroughly cleaning the surface, wax the affected area. This will help restore the finish and
provide a seal against future discoloration.
! CAUTION
Protect metal surfaces when using abrasive cleaners, polishing compounds or rubbing compounds. They can damage the metal’s protective finish leading to rust.
! CAUTION
When using an electric buffer, maintain constant motion. Allowing the pad to rest on an isolated
spot can cause heat buildup, which can damage the gelcoat.
! CAUTION
Routinely clean and wax your catamaran to help prevent the need for excessive use of rubbing
and polishing compounds, which over time can deteriorate the gelcoat.
By following the instructions listed above you can guarantee that your catamaran will remain in near
showroom condition and remain a source of pride for years to come.
REPAIR
Although gelcoat is a flexible material capable of handling environmental punishment and extended
use, it is susceptible to scratches, blistering and cracking over time. Gel coat distortion or cracking is
unappealing, but rarely represents any structural failure. Have your dealer inspect any damage to
your gelcoat to determine the nature of the failure . If it is only cosmetic, they can provide color
matched kits, instructions, and any chemicals you need for application or cleanup. Structural damage
should be repaired by your dealer or a trained fiberglass repair shop.
! WARNING
Gelcoat and the chemicals used for its application and cleanup are extremely flammable and
toxic. Follow all handling and mixing instructions, provide for proper ventilation, and keep water
containers nearby to submerse catalyzed materials.
BOTTOM PAINT
If you intend to leave your boat in wet storage, or routinely dock it for more than a few days, you
should coat the hull beneath the water line with anti-fouling paint. This will help prevent marine growth,
such as barnacles, which damage the gelcoat and affect performance. World Cat recommends using an
epoxy barrier coat prior to bottom painting a new vessel. This will help to prevent, but not eliminate,
gelcoat blistering on the hull, which is not warranted by World Cat. Your dealer can provide information on
bottom painting to protect against environmental toxins in your area. Anti-fouling paints are made to dissolve over time, so inspect and clean the hull bottom annually and recoat when necessary.
4-2
World Cat
UPHOLSTERY
Basic Stains - Clean with a mild detergent and a soft to medium brush, or an all purpose cleaner such
as Fantastic™. Rinse with fresh water after cleaning.
Mildew - Use a 4 to 1 mixture of water and ammonia, brushing the stain vigorously to remove the
bacteria responsible for the mildew. If the stain remains, briefly apply bleach to the area and rinse
with fresh water.
! WARNING
Do not mix ammonia and household bleach. Doing so will result in the formation of deadly chlorine gas. If it is necessary to use bleach, clean up any traces of ammonia and ventilate the work
space for a minimum of 15 minutes prior to applying bleach.
Tough Stains or Mildew - Use a mixture of 1 tablespoon of ammonia, 1/4 cup of hydrogen peroxide, and 3/4 cup distilled water. Briefly, apply to the surface, allowing the peroxide to bubble. Rinse
with fresh water
TRIM / PLEXIGLASS / POLYETHYLENE
World Cat uses vinyl, plexiglass, and polyethylene material (Starboard™) throughout the interior of
our catamarans. Use the following instructions to care for these items:
• Use mild detergents to clean vinyl trim commonly used in cabins and helm. Routinely use a
commercially available surface protector to seal the vinyl.
• Surface or glass cleaners can be used to clean plexiglass. It is commonly used for radio boxes
and as a protective material for instrument panels.
• Starboard™ can be cleaned using surface cleaners such as 409™.
STAINLESS / ALUMINUM
Stainless steel and aluminum are used throughout your vessel. World Cat uses only marine grade stainless hardware and anodized aluminum to provide you with years of service; however, these metals can
deteriorate and fail if improperly cared for. Upon returning, clean all hardware using a mild detergent and
rinse thoroughly with fresh water. Avoid using abrasive cleaners or chlorine based products, as they will
remove the metal’s protective coating and lead to pitting or rust. Throughout the year coat the metal using
a non-abrasive metal protector to help displace moisture, remove contaminates, and shield the metal.
World Cat recommends high quality sealants such as Boeshield T-9™ developed by Boeing™ Aviation. If
you cannot find it locally call PMS Products Inc. at 800-962-1732.
BILGE COMPARTMENTS
Routinely check the condition of the bilge compartments in your boat. This will help identify potential
problems and eliminate odors associated with stagnant water and the buildup of residue. Clean the compartments using a freshwater rinse. This will also enable you to check the function of your drain system
and the operation of the bilge pumps.
4-3
World Cat
COCKPIT DRAINS
All World Cats have four drains located in the cockpit, two on both the starboard and port sides. These
drains are designed to quickly evacuate the cockpit should the boat become swamped. Flushing these
drains routinely will ensure the safety of your crew and vessel, as well as, eliminate the potential for odors
associated with fish residue. These drains are evacuated through the scuppers located on the hullside. Each
scupper has a rubber flap to prevent water from entering the boat. Check this material occasionally to keep
them free of debris and in good working condition.
WINTERIZATION
Routine maintenance checks should be performed prior to each trip in accordance with Chapter 1, but
a broader analysis should be done before winterizing your catamaran and prior to the first trip of the season. If your local climate does not require winter storage, complete the following steps at least annually to
ensure the safe operation of your boat.
1. Do not leave loose items or personal affects onboard during storage. Remove all trash and debris
prior to cleaning the boat.
2. Before storage clean the boat thoroughly, including exterior surfaces, fishboxes, livewells, and
thru hull fittings. If possible leave lids open slightly to allow fresh air exchange. Remove the
garboard drains and store the boat with the bow up to allow drainage.
3. Inspect all electrical connections and the operation of pumps or other electrical devices. Perform
repairs if necessary. Coat electrical panels with an anti-corrosive spray, available from your
dealer.
4. Inspect the batteries and charge fully to prevent damage during storage. Disconnect the cables
and apply a coat of grease to the terminals to prohibit corrosion.
5. Inspect all plumbing components and connections to prevent leaks. Replace any damaged hoses.
Drain all lines and devices to prevent damage from freezing. Lubricate valves to maintain proper
operation. Use the manufacturers recommendations for portable and marine heads.
6. Inspect fuel system components and replace fuel/water separators. You can keep the system fuel
but do not overfill, and use a fuel additive to prevent condensation.
7. Lubricate hinges and coat all metal surfaces with Boeshield T-9™ or other metal protector.
Tighten down hardware if necessary.
8. Inspect caulking around hardware, windows, hatches, etc. to prevent water damage. Normal use
will break down sealants and can lead to costly repairs if not maintained.
9. Remove or cover all electrical devices to prevent damage from UV rays. The rays will cloud
electrical displays and make them hard to read.
10. Remove cushions and store indoors to prevent damage.
11. Winterize the engines and controls per manufacturers recommendations and inspect all connections, filters, and parts thoroughly. Replace parts as needed.
4-4
World Cat
CHAPTER 5
TABLE OF CONTENTS
MODEL SPECIFICATIONS / OPTIONAL FEATURES..............................
5-2
STANDARD FEATURES
Battery Layout and Management...........................................................................
5-3
Additional Emergency Parallel Switch ..................................................................
5-3
Bilge Pump Location / Access .................................................................................
5-3
Freshwater System ...................................................................................................
5-4
Seacocks ....................................................................................................................
5-4
Livewell System ........................................................................................................
5-4
Raw Water System ...................................................................................................
5-5
Marine Head .............................................................................................................
5-5
Initial Start-Up ...................................................................................................................
5-6
Normal Use ........................................................................................................................
5-6
Deck Pump-Out Procedure ................................................................................................
5-6
Overboard Discharge Procedure ........................................................................................
5-6
OPTIONAL FEATURES
Stereo System ............................................................................................................
5-7
Anchor Windlass ......................................................................................................
5-7
Outriggers .................................................................................................................
5-7
SYSTEM DIAGRAMS
Access Plate and Rigging Tube Diagram ...............................................................
5-8
Hull Wiring Diagram ...............................................................................................
5-9
Hardtop Wiring Diagram ........................................................................................
5-10
Console Wiring Diagram .........................................................................................
5-11
Battery Management System Diagram ..................................................................
5-12
Dash Panel Wiring Diagram ...................................................................................
5-13
Accessory Panel Wiring Diagram ...........................................................................
5-14
Water System Diagram............................................................................................
5-15
Thru Hull Diagram ..................................................................................................
5-16
5-1
World Cat
MODEL SPECIFICATIONS
DIMENSIONS
LENGTH (W/ BOW PULPIT)...............................................................................................
29’ 1”
BEAM (AMIDSHIPS).............................................................................................................
9’ 6”
BEAM (TRANSOM) ...............................................................................................................
9’ 6”
TRAILERING HEIGHT (KEEL TO HARDTOP)*............................................................
10’ 6”
BRIDGE CLEARANCE (FLOAT LINE TO HARDTOP)* ...............................................
9’ 4”
TRANSOM HEIGHT (ENGINE SHAFT LENGTH)..........................................................
25”
HULL DRAFT .........................................................................................................................
15”
FREEBOARD (AFT) ..............................................................................................................
26”
RATINGS & CAPACITIES
DRY WEIGHT (W/ TWIN 250’S).........................................................................................
9700 LBS.
HORSEPOWER (MAX).........................................................................................................
500 HP
FUEL CAPACITY ..................................................................................................................
250 GAL.
FRESHWATER.......................................................................................................................
20 GAL.
OPTIONAL ACCESSORIES
•
•
•
•
•
•
•
•
•
•
•
•
•
•
Anchor (Stainless or Aluminum) - includes 300’ rope and 15’ chain
Clarion™ Sirius™ Stereo w/ CD
Extended Swim Platform w/ Ladder
Foldaway Aft Seating (Port / Stbd)
Rupp™ Outriggers (15’ or 18’ Rigid Poles / 15’ or 18’ Telescoping Poles)
Stainless Steel Anchor
Taco™ Outriggers (GS-270 w/ 15’ or 18’ Telescoping Poles / GS-350 w/ 15’ or 18’ Telescoping Poles)
Teleflex™ Electronic Controls
TR1 Autopilot
Underwater Light Package
Windlass (Standard or Freefall) - includes rope, chain and anchor
Hullside Graphics Package
Canvas Package (Front, Side, and Aft Curtains)
Colored Hullside Gelcoat (Carolina Blue / Fighting Lady Yellow)
* When considering clearance dimensions add 24” to the overall dimension for the hardtop mast light when
extended, and factor in aftermarket accessories which could add to the overall height.
5-2
World Cat
STANDARD FEATURES
BATTERY LAYOUT AND MANAGEMENT
The 290 CC is equipped with three batteries, which are located in the helm leaning post. They can be
reached using the access hatch located on the forward vertical wall of the leaning post. A cranking battery
is installed on each side, and a dedicated house battery is installed in the center. Wire leads run through the
hull harness to the battery management panel which is above the battery access door. See Chapter 3 for
information regarding the operation of this panel. The engine cranking leads run aft, through a hull rigging
tube, from the management panel to a positive stud mounted on the bulkhead in each aft rigging compartment. The negative engine leads are connected to the common battery ground using a negative buss also
located in the aft rigging compartment.
The house battery provides the power for a majority of your DC accessories. The main battery lead
runs to the “HOUSE” switch on the battery management panel. From there current is routed to the dash
and circuit breaker through the 80 amp “DC Main” breaker located in the center of the battery management
panel. During normal operation this breaker can remain in the “ON” position, and the “HOUSE” switch
can be used to control the flow of current. The main ground for all DC accessories is tied into the common
ground on all batteries. For a detailed drawing of the battery management panel connections, see the diagram on page 13 of this chapter.
ADDITIONAL EMERGENCY PARALLEL
As an additional feature, the 290 CC management panel contains a secondary “EMERG PARALLEL”
switch. It allows you to mechanically link the starboard “cranking” battery to the house battery. Furthermore, engaging both “EMERG PARALLEL” switches will connect all three batteries into a single bank.
The switches should remain in the “OFF” position when not in use. To prevent voltage spikes or drops
which can damage electrical components, you should trip the DC Mains 1 breaker prior to cranking
engines with the house battery in parallel. Once you are running, the breaker can be reset to allow the full
alternator output to power the electronics. This is a safety feature and should not be used in-lieu of the
VSR’s to charge batteries while underway. Doing so, could result in premature battery failure and increases
the risk of electrical failure while at sea.
BILGE PUMPS / FLOAT SWITCHES
Your 290 CC is equipped with two 1500 GPH bilge pumps located aft. Each pump is connected to a
float switch which automatically triggers the pump when water comes to rest in the bilge. The float
switches are connected to the battery management panel through the hull harness and receive power from
the breakers on the right side of the panel. These breakers are constantly energized and ensure the safety of
your boat even when the battery switches are in the “off” position. The pumps can be manually engaged
using the switch at the dash.
The aft bilge pumps are located behind the aft rigging compartment and can accessed through the
inspection plates in the motorwell, forward of the engines. The wiring for these pumps is secured to the
centerline stringer which is visible from the hatch. Inspect the operation of your bilge pumps and their connections at least annually. To do so, activate the pump by momentarily lifting the arm on the float switch,
then check the operation using the manual switch. When testing, do not allow the pumps to run dry for
more than two to three seconds. Extended dry operation can result in damage to your pump. Keeping your
bilge areas clean can also help extend the life of your pump.
5-3
World Cat
FRESHWATER SYSTEM
The freshwater pump is mounted to the hullside and can be reached through the access door in the starboard gunwale. The pump is connected to the 20 gallon freshwater tank located in the hull forward of the
starboard fuel tank. The tank is filled through a fitting located on the starboard side of the deck. Similar to
residential well pumps, the freshwater pump pressurizes the system to 45 psi. then shuts down until the
pressure drops below that level. Most owners leave the pump “on” throughout the day, and use the system
when necessary. On the 290 CC, the freshwater pump feeds the pull out shower located on the aft transom
wall, freshwater wiper rinse and the marine head. To view the layout of the freshwater system see the
drawing on page 15.
SEACOCKS
Ball valves (seacocks) are installed on the water intake for both the livewell and raw water system. The
seacock must be in the open position for these systems to work. When open, the handle will be parallel to
the valve. In the closed position the handle is perpendicular to the valve (see picture below). World Cat recommends that the seacocks remain in the closed position when not in use, or when the boat is left unattended to prevent the vessel from taking on water due to a plumbing failure.
OPEN
CLOSED
LIVEWELL SYSTEM
The 290 CC has a 42 gallon livewell system. which is supplied by a dual purpose livewell pump. The
pump is located in the port bilge compartment and can be reached through the inspection port in the motorwell. The wiring is secured to the pump using a tie-strap, and must be disconnected prior to removing the
pump.
The livewell pump draws water through the strainer mounted on the inboard side of the port sponson.
A seacock is installed between the pickup and the pump to allow you to seal the system between use, or in
the event of a plumbing failure.
To operate the livewell, first verify that the seacock is open, then check the y-valve located in the rigging space beneath the livewell. To access this area, use the inspection hatch located on the starboard vertical wall of the helm leaning post. The valve allows you to choose between the overflow drain for normal
operation, and the end of day drain for residue removal and final draining. When you have completed these
steps, engage the livewell pump using the switch at the dash. Water will fill the tank until it is level with the
overboard drain, which evacuates water through the hullside. To clear bait residue from the tank during
5-4
World Cat
operation, temporarily change the orientation of the y-valve. When you have finished using the livewell,
remove the water by changing the y-valve to select the lower drain.
NOTICE
While underway, leaving your livewell seacock open could result in inadvertently filling your livewell. To
prevent this, close the seacock when the pump is not in operation.
NOTICE
Operating the engines in reverse can cause excessive ventilation near the livewell intake, causing the pump
to airlock. To prevent this, turn the pumps “OFF” prior to any continuous or high speed reverse operation.
If your pump does becomes air locked, turn the pump “OFF” for 15 to 30 seconds to correct the problem.
RAW WATER SYSTEM
The raw water pump and strainer are mounted on the rigging wall in the starboard bilge compartment,
which can be accessed through the motorwell hatch. The strainer is connected to a high speed pickup
through the seacock located on the inboard side of the starboard sponson. The seacock must be open for the
system to work. Similar to the freshwater pump, the raw water system in controlled by a pressure switch
set at 45 psi. The pump will cycle on and off as needed to maintain this pressure. Most owners leave the
pump “on” throughout the day, and use the system when necessary. On the 290 CC, the raw water pump
feeds the raw water outlet located on the helm leaning post and the anchor washdown at the bow. A washdown hose has been included with your boat to use with this system. To view the layout of the raw water
system see the drawing on page 15.
MARINE HEAD
The 290 CC comes equipped with a marine head. The control panel for the head is located on the head
instrument panel located on the aft vertical wall of the console headliner. Power is supplied to this panel
through a 25 amp breaker located on the battery management panel.
Water is supplied to the system from the freshwater tank; therefore, to operate the toilet the freshwater
system must be pressurized. A solenoid, installed near the head inlet, prevents water from filling the bowl
prior to each use. The macerator pump, located at the rear of the toilet, removes waste from the bowl and
pumps it into the 15 gallon holding tank.
! WARNING
If the solenoid fails or becomes locked in the open position, shut off the supply system quickly and
evacuate the bowl.
The holding tank is mounted in the port hull forward of the gas tank, it can be accessed via the inspection plate or by removing the floor lid. This tank can be evacuated using the deck pump-out fitting located
on the port side of the deck near the helm or by overboard discharge using the macerator pump and seacock
supplied on your vessel. To access the seacock, open the inspection hatch installed in the port gunwale.
Open the seacock and use the keyswitch on the head switch panel to evacuate the tank.
5-5
World Cat
INITIAL START UP
On each trip, prior to using the head, complete the following steps:
1. Turn on the freshwater system.
2. Fill 1/3 of the bowl with water using the lower switch on the control panel
3. Hold down the flush switch for 5 seconds to evacuate the bowl and refill with water.
NORMAL USE
Use the steps below for normal operation.
1. Hold the upper switch on the panel down for 5 seconds. This will purge the bowl and refill
it with water.
2.
In the event of inclement weather or rough seas, use the lower switch to remove water
from the bowl and prevent sloshing.
! CAUTION
Large quantities of waste or paper can clog the head and cause odor issues. To prevent this, flush
often and if necessary perform an extra flush to purge the discharge line.
! CAUTION
Do not dispose of foreign objects in the head. Doing so may damage the macerator pump or outlet
hoses. Clogging or puncturing these lines will lead to odor problems.
DECK PUMP-OUT
Upon returning, use the following instruction to empty the holding tank.
1. Remove the cap from the deck pump-out fitting located on deck, outboard of the helm position.
2. Use the vacuum hose at the pump-out station to clean the tank, then remove the hose and replace
the deck fitting.
OVERBOARD DISCHARGE
Use the following steps to discharge the contents of the holding tank overboard:
1. Open the overboard discharge seacock. To access, open the inspection hatch installed in the port
gunwale near the helm.
2. Use the keyswitch located on the head switch panel to evacuate the tank.
3. Inspect the tank level and repeat step 2 if needed, otherwise close the discharge seacock.
! CAUTION
Discharging waste in inland waters and some coastal areas is illegal. Check with local and state
authorities in your region to determine the proper method for waste disposal.
For more instructions on operation, winterization and troubleshooting the marine head, see the Jabsco™ manual
supplied in your “Owner’s Portfolio”.
5-6
World Cat
OPTIONAL FEATURES
STEREO
If chosen, your 290 CC can be equipped with an optional Clarion™ stereo unit. The unit is mounted on
the hardtop electronics panel. Two speakers are mounted in the front of the hardtop forward of the console,
and the remaining two are installed in the face of the hardtop electronics panel pointing aft. You can control the unit using the faceplate. Power is supplied to the stereo through an accessory fuse block; therefore,
the “house” battery switch must be in the “on” position to use the unit.
ANCHOR WINDLASS
World Cat provides an optional anchor windlass manufactured by Simpson Lawrence™. If you choose
this option, you will receive the windlass, an anchor, anchor rope, and chain which is matched to your vessel’s size. The rocker switch to control the windlass is mounted at the helm, and foot switches are installed
at the windlass. The manufacturer’s instruction manual is provided, in the “Owner’s Portfolio”, detailing
their use.
The circuit breaker for the anchor windlass is mounted in the center of the battery management panel.
The panel is connected to the “Stbd Start” battery switch. If you choose not to have the factory install your
windlass, World Cat provides wires in the deck harness to allow for aftermarket installs. Regardless of
type, a directional control solenoid and rocker style switch will be needed to add the aftermarket windlass.
Please refer to the windlass’s user manual for proper installation.
OUTRIGGERS
Outriggers enhance the fishability of your catamaran and can be a great asset when hunting a trophy
catch. World Cat offers Rupp™ and Taco™ outriggers as an option on the 290 EC. The units are mounted
on the fiberglass hardtop and operated using the handles above and outboard of the walkthrough. Use the
information provided in Chapter 4 to maintain the aluminum on the outriggers and grease the telescoping
joints frequently to prevent damage from salt spray.
BATTERY CHARGER
Combined with the battery management system, this system helps ensure that your vessel will be ready
to fish whenever you are. The charger is located on the bulkhead aft of the batteries, to access open the
hatch located on the forward wall of the helm leaning post.
5-7
World Cat
ACCESS PLATE AND RIGGING TUBE DIAGRAM
4" ACCESS PLATE
(COOLER DRAIN)
2" RIGGING TUBE
(COOLER DRAIN)
6" ACCESS PLATE
(DRAIN ACCESS)
6" ACCESS PLATE
(DRAIN ACCESS)
4" ACCESS PLATE
(RIGGING ACCESS)
R 0. 4991
Fwd Gas Tank B/H
FISHBOX CLOSEOUTS
(PUMP ACCESS)
R0.4991
8" ACCESS PLATE
(RIGGING ACCESS)
Fwd Gas Tank B/H
GUNWALE ACCESS HATCHES
(PUMP ACCESS)
8" ACCESS PLATE
(WATER TANK ACCESS)
8" ACCESS PLATE
(WASTE TANK ACCESS)
8" ACCESS PLATE
(FUEL TANK ACCESS)
3" RIGGING TUBES
(HULL RIGGING)
8" ACCESS PLATE
(STEERING VALVE ACCESS)
5-8
World Cat
HULL WIRING DIAGRAM
WINDLASS WIRING
FOOTSWITCHES / STORAGE LIGHT
13 − 14 GA ORG/BRN
14 − 14 GA ORG/BLU
19 − 4 GA RED
52 − 4 GA YEL
13 − 14 GA ORG/BRN
14 − 14 GA ORG/BLU
18 − 14 GA BLU/RED
52 − 14 GA YEL
TO CONSOLE (SEE
WIRING DETAIL PAGE )
TO CONSOLE (SEE
WIRING DETAIL PAGE )
BATTERY MANAGEMENT
WIRING (SEE PAGE)
BATTERY MANAGEMENT
WIRING (SEE PAGE)
WATER TANK SENDER
WASTE TANK SENDER
FS − 14 GA PNK/BLU
30 − 14 GA RED
62 − 14 GA YEL
WS − 14 GA PNK/GRY
29 − 14 GA RED
59 − 14 GA YEL
PORT FUEL GROUND
60 − 14 GA GRN/YEL
C−PIT LIGHT (WHT)
2 − 16 GA BLU/WHT
59 − 16 GA YEL
C−PIT LIGHT (RED)
3 − 16 GA BLU/RED
59 − 16 GA YEL
C−PIT LIGHT (WHT)
2 − 16 GA BLU/WHT
59 − 16 GA YEL
FUEL SENDER / C−PIT LIGHT (RED)
44 − 16 GA PNK
60 − 16 GA GRN/YEL
3 − 16 GA BLU/RED
59 − 16 GA YEL
COCKPIT OUTLET 12V
32 − 10 GA RED
59 − 10 GA YEL
NEGATIVE STUD
NEGATIVE STUD
57
56
58
59
60
−
−
−
−
−
63 − 12 GRN/YEL
62 − 4 GA YEL
61 − 8 GA YEL
57 − 2 GA YEL
2 GA YEL
2 GA YEL
8 GA YEL
4 GA YEL
12 GA GRN/YEL
POSITIVE STUD
42 − 2 GA RED
SUZUKI ECM WIRE
POSITIVE STUD
37 − 14 GA RED
41 − 2 GA RED
RAW WATER PUMP
SUZUKI ECM WIRE
9 − 12 GA BRN
61 − 12 GA YEL
40 − 14 GA RED
PORT BILGE PUMP
4 − 14 GA BRN
5 − 14 GA BRN/WHT
58 − 14 GA YEL
STBD BILGE PUMP
UNDERWATER LIGHTS LIVEWELL PUMP
15 − 16 GA BLU
58 − 16 GA YEL
UNDERWATER LIGHTS
12 − 14 GA BRN
58 − 14 GA YEL
15 − 16 GA BLU
61 − 16 GA YEL
5-9
6 − 14 GA BRN
7 − 14 GA BRN/RED
61 − 14 GA YEL
World Cat
HARDTOP WIRING DIAGRAM
5-10
World Cat
CONSOLE WIRING DIAGRAM
COMPASS / FUEL GAUGES
44 − 14 GA PNK
43 − 14 GA PNK/BLK
21 − 16 GA GRY
51 − 16 GA YEL
TO DASH SWITCH PANEL
(SEE PAGE −)
CONSOLE LIGHTS (2 EA)
17 − 16 GA BLU
64 − 17 GA YEL
TO HARDTOP HARNESS
25 − 14 GA ORG
24 − 14 GA ORG/RED
23 − 14 GA ORG/BLK
22 − 6 GA RED
21 − 14 GA GRY
53 − 6 GA YEL
1 − 14 GA ORG
31 − 14 GA WHT/YEL
CONSOLE FUSE BLOCK
(SEE BELOW)
CONSOLE PANEL
(SEE PAGE − )
WIPER CONTROLS
26 − 14 GA ORG/BLU
25 − 14 GA ORG
24 − 14 GA ORG/RED
23 − 14 GA ORG/BLK
20 − 14 GA RED
51 − 14 GA YEL
DASH 12V OUTLET
28 − 12 GA RED
51 − 12 GA YEL
HULL HARNESS (PORT SIDE)
HULL HARNESS (STBD SIDE)
SOLENOID − F−WATER RINSE
26 − 14 GA ORG/BLU
51 − 14 GA YEL
2A
console
lights
2A
storage
light
CONNECTIONS TO THE ITEMS SHOWN HERE CAN BE REACHED THROUGH THE
ACCESS DOORS LOCATED ON THE CONSOLE BULKHEAD OR BY REMOVING THE
ELECTRONICS BOX
34
51
16
14 GA BLU/RED
LABEL: STORAGE LT
16 GA RED
LABEL: CONSOLE LTS
5-11
8 GA RED
LABEL: FUSE BLOCK
18
14 GA YEL
LABEL: CONSOLE LTS
10 GA YEL
LABEL: MARINE HEAD
10 GA YEL
LABEL: PANEL GROUND
8 GA YEL
LABEL: CONSOLE GRND
50 65 64
World Cat
W
Y
FS
Z
FS
8 GA RED
LABEL: FUSE BLOCK
14 GA RED
LABEL: PORT START
W
V
PS
UG
PL
22
X
R
U
34
T
Z
Y
32
S
UG
PL
22
34
AUX
BATT
AUX
5-12
55
4
SS
6
5
4
31
DT 06 − 6S
55
14 GA WHT/YEL
LABEL: STEREO MEMORY
31
PS
PS
1
2
3
14 GA RED
LABEL: PORT START
6
SS
PS
28
32
10 GA RED
LABEL: PORT 12V
BATT
29
27
UG
PL
14 GA PNK/BLU
LABEL: F−WATER SENDER
32 22 PS 34
P1
35
20
33
30
S
P1
X
WS
V
R
33
T
U
P1
14 GA PNK/GRY
LABEL: WASTE SENDER
WS 33
10 GA RED
LABEL: STBD 12V
UG
PL
BATTERY PANEL WIRING DIAGRAM
World Cat
P1
P2
DASH WIRING DIAGRAM
5-13
World Cat
ACCESSORY PANEL WIRING DIAGRAM
5-14
World Cat
WATER SYSTEMS DIAGRAM
RAW WATER OUTLET
(located under anchor locker lid)
TO MARINE HEAD
TEE FITTING
TO WINDSHIELD WASHER
SOLENOID (CONSOLE)
INLET
VENT
OUTLET
F−WATER PUMP
1 6"
of
wire
Blaster
SHURflo
20700247
PRO
3/4"
TANK SENDER
TEE FITTING
RAW WATER OUTLET
(located on leanbar)
TRANSOM SHOWER
TEE FITTING
RAW WATER PUMP
RAW WATER STRAINER
RAW WATER INLET
AND SEACOCK
5-15
I
B
5-16
B
C
T−HULL
DESCRIPTION
a
aft bilge pump
b
scuppers
fuel vents
c
waste discharge
d
e
waste tank vent
f
floor fishbox drain
g
fwd cooler drain
h
forward fishbox drain
i
anchor lid drain
j
forward floor drain
waste tank vent
k
l
livewell overflow
fishbox lid drain
m
garboard drain
n
L
M
F
HG
C K
J
D
E C
H
F M
n
C
A
PORT
STERN
I
STBD
World Cat
THRU HULL DIAGRAM