1
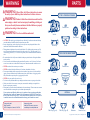
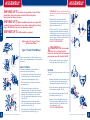
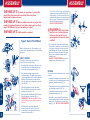
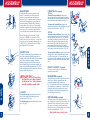
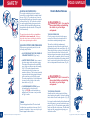
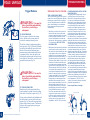
TROUBLE SHOOTING
TYPE 2: SWIVEL FRONT WHEEL
WHEEL ADJUSTMENT:
It should be noted that all three wheel vehicles
can be easily influenced to deviate from a straight
line. In most cases strollers can have a tendency
to pull to the right/left due to many factors.
Including uneven tire pressure, improper wheel
installation, road conditions and manufacturing
tolerances. If you find your Baby Trend stroller
to significantly track or pull to the left or right
while use on flat terrain, follow the sequence of
the instructions on page 3 / page 5 to realign your
front wheel.
FLAT TIRE:
The jogging stroller features bicycle tires to
allow for extended wear and ease of pushing.
Just like a bicycle tire, the jogging stroller can
suffer from flat tires. If you have a flat tire, you
can use a standard bicycle tire repair kit to repair
the tire or you can take the tire to a bicycle
shop for repair. If you experience numerous
flat tires, you may want to purchase thorn proof
inner tubes for the jogging stroller. These can be
purchased at bicycle stores or at many national
retail stores. The correct size to purchase is
shown on the sidewall of the tire.
IF YOU EXPERIENCE ANY DIFFICULTY IN USING THIS PRODUCT,
PLEASE CONTACT OUR CUSTOMER SERVICE DEPARTMENT AT
1-800-328-7363 BETWEEN THE HOURS OF 8:00 A.M. AND 4:30 P.M. PACIFIC
STANDARD TIME FOR ASSISTANCE. PLEASE HAVE YOUR MODEL NUMBER AND
MANUFACTURING DATE AVAILABLE WHEN YOU CALL. THIS INFORMATION CAN BE
FOUND ON A SMALL STICKER ON THE INSIDE OF THE STROLLER FRAME.
Read all instructions BEFORE assembly and USE of product.
KEEP INSTRUCTIONS FOR FUTURE USE.
Expedition LX
Jogging Stroller
Type 1: Fixed front wheel
Type 2: Lockable swivel front wheel
Instruction Manual
Convenience through innovation and thoughtful design
04.08
Contact us by mail:
Baby Trend, Inc.
1607 S. Campus Ave., Ontario, CA 91761
Contact us by phone:
1-800-328-7363 (8:00am ~ 4:30pm PST)
or online http://www.babytrend.com
Convenience through innovation and thoughtful design
www.babytrend.com
WARNING
PARTS
WARNING: Please follow all of these instructions to ensure
the safety of your child. Keep these instructions for future reference.
TYPE 1: FIXED FRONT WHEEL
WARNING: Failure to follow these instructions could result in
WARNING: Never leave children unattended.
Contact us by mail:
Baby Trend, Inc.
1607 S. Campus Ave., Ontario, CA 91761
1
Copyright © 2007 - 2008, Baby Trend Inc., All Rights Reserved.
Contact us by phone:
1-800-328-7363 (8:00am ~ 4:30pm PST)
or online http://www.babytrend.com
Fender Screws
Stroller
Parent Tray
Front Wheel
Fender
Rear Wheels
TYPE 2: SWIVEL FRONT WHEEL
Fender Screws
Stroller
Parent Tray
Front Wheel
Fender
Rear Wheels
Type 2
• CAUTION: This single jogger is designed for one child only. Use with more than one child may
cause the unbalance condition which can injure/ harm your child.
• Purses, shopping bags, parcels, diaper bags or accessory items may change the balance of the
stroller and cause hazardous unstable conditions.
• The maximum weight that can be carried in the basket is 5 lb, child tray and parent tray are 3 lbs
each. The maximum weight can be carried in the side pockets (2) is 3 lbs, back pockets (2) is 3
lbs and canopy pockets is (2) 1 lb. Excessive weight may cause a hazardous unstable condition to
exist.
• Be certain the stroller is fully erect and latched in the open position before allowing the children
near the stroller.
• Use of the stroller with children weighing more than 50 pounds or over 42 inches tall, will cause
excessive wear and stress on the stroller and may cause a hazardous unstable condition to exist.
• NEVER use the stroller on stairways or escalators.
• NEVER use the stroller with roller skates, in-line skates, skateboards or bicycles.
• We recommend that the child occupant be at least 6 months of age prior to use of the stroller for
jogging. Because children develop at different rates, please discuss the use of a jogging stroller
with your health care provider prior to jogging with your child.
• NEVER allow your stroller to be used as a toy.
• To clean use only mild household soap or detergent and warm water on a sponge or clean cloth.
• Check your stroller for loose screws, worn parts, torn material or stitching on a regular basis.
Replace or repair parts as needed.
• Discontinue use of stroller should it malfunction or become damaged. Please contact our customer
service Parts Hotline to arrange for repair or obtain replacement parts.
If you experience any difficulty with the use of our product or have a question regarding these
instructions, please contact our Customer Service Department at 1-800-328-7363 between the
hours of 8:00 a.m. and 4:30 p.m. (PST). Please do not return the product to the store as once it
is returned it cannot be re-sold and the materials and energy used to make it are wasted.
Type 1
serious injury or death. Avoid serious injury from falling or sliding out.
Always use the safety harness and insure that the children are properly
positioned according to these instructions.
OPTIONAL
Child Tray (Type A)
Child Tray (Type B)
Pedometer
Infant Car Seat
Copyright © 2007 - 2008, Baby Trend Inc., All Rights Reserved.
2
ASSEMBLY
ASSEMBLY
IMPORTANT! To ensure safe operation of your stroller,
please follow these instructions carefully. Please keep these
instructions for future reference.
product for damaged hardware, loose joints, missing parts or sharp
edges. NEVER use if any parts are mssing or broken.
IMPORTANT! Adult assembly is required.
Skip to page 5 if you have Type 2
Swivel Front Wheel
Type 1: Fixed Front Wheel
Fig. 1
Remove stroller from box. The front wheel, rear
wheels, fender, and parent tray need to be installed
prior to use.
Loosen
FRONT WHEEL
Fig. 2a
To attach the front wheel, unfold stroller as
described in the section following:
Fig. 2b
• Lean the stroller backwards so that it rests on
the handle and rear axle frame and the front
wheel forks are pointing upward. (Fig. 1)
• The brake release lever must be in the open
position. (Fig. 6)
Fig. 3a
• The front wheel features a quick release
attachment system. The quick release must be
open enough for the wheel to slide on the forks.
Rotate the lever forward to loosen one side
(Fig. 2a) and loosen the finger nut on the other
side. (Fig. 2b)
Fig. 3b
Fork Plate
Slot
Retainer Plate
Ring
3
Lever
Fig. 3c
Copyright © 2007 - 2008, Baby Trend Inc., All Rights Reserved.
• Slide the front wheel onto the front forks.
(Fig. 3a) Make sure the front forks are in the
position as shown on Fig. 3b.
• Line up the tab on the Retainer Plate with the
Slot on both sides of the forks. (Fig. 3c)
• With the wheel in position, tighten the
finger nut on the axle until it is very close
to contacting the fork and rotate the lever to
tighten it as shown in Fig. 4.
Tighten
Loosen
• Close the lever (Fig. 5) and you should feel
significant resistance and the wheel should
be held tightly. If you do not, open the lever
and tighten the finger nut a bit more and close
the lever again. Continue to do this until the
wheel is held tightly in the fork.
DO NOT OVER TIGHTEN.
WARNING: Always make
Fig. 4
Close
Close
Fig. 5
Open
Type 1
Type 1
IMPORTANT! Before assembly and each use, inspect this
IMPORTANT! The tab on the Retainer Plate
must be lined up with the slot before tighten
the wheel.
Open
Fig. 6
sure the lever is in closed postion
before use. Leaving the lever in opened
postion can cause the wheel to fall off.
• Close the brake release lever by rotating it
toward the front of the stroller. (Fig. 6).
FENDER
To secure the fender to the frame, use the 4 screws
provided.
• Examine the bottom of the front fender. You
will notice four 1/4 inch diameter plastic
tubes protruding from the bottom (Fig. 7a).
Fig. 7a
• These tubes must be lined up with the holes in
the front frame assembly (Fig. 7b).
• Line up the front fender and press onto the
front frame assembly (Fig. 7c).
• Insert the 4 screws through the underside
of the front frame assembly into the front
fender's plastic tubes. Tighten the screws
only until snug (Fig. 7d).
NO NOT OVER-TIGHTEN.
Fig. 7b
Fig. 7c
Fig. 7d
Copyright © 2007 - 2008, Baby Trend Inc., All Rights Reserved.
4
ASSEMBLY
ASSEMBLY
IMPORTANT! To ensure safe operation of your stroller,
please follow these instructions carefully. Please keep these
instructions for future reference.
IMPORTANT! Before assembly and each use, inspect this
product for damaged hardware, loose joints, missing parts or sharp
edges. NEVER use if any parts are mssing or broken.
IMPORTANT! Adult assembly is required.
Type 2: Swivel Front Wheel
Remove stroller from box. The front wheel, rear
wheels, fender, and parent tray need to be installed
prior to use.
Fig. 1
FRONT WHEEL
To attach the front wheel, unfold stroller as
described in the section following:
Loosen
• Lean the stroller backwards so that it rests on
the handle and rear axle frame and the front
wheel forks are pointing upward. (Fig. 1)
Fig. 2a
Fig. 2b
• The front wheel features a quick release
attachment system. The quick release must be
open enough for the wheel to slide on the forks.
Rotate the lever forward to loosen one side
(Fig. 2a) and loosen the finger nut on the other
side. (Fig. 2b)
Type 2
Fig. 3b
Fork Plate
Slot
Retainer Plate
Ring
5
• Line up the tab on the Retainer Plate with the
Slot on both sides of the forks. (Fig. 3c)
IMPORTANT! The tab on the Retainer Plate
must be lined up with the slot before tighten
the wheel.
Lever
Fig. 3c
Copyright © 2007 - 2008, Baby Trend Inc., All Rights Reserved.
• With the wheel in position, tighten the
finger nut on the axle until it is very close
to contacting the fork and rotate the lever to
tighten it as shown in Fig. 4.
Tighten
Loosen
Fig. 4
WARNING: Always make
Close
sure the lever is in closed postion
before use. Leaving the lever in
opened postion can cause the wheel
to fall off.
• If you experience front wheel wobble that is
beyond what is normal for use while walking
or jogging you may have to adjust the front
wheel housing nut. This nut is located under
the footrest located at the front of the jogger.
You can use a standard cresent wrench to
tighten the nut.
DO NOT OVER TIGHTEN this can cause
damage to the wheel housing. (Fig. 6)
Open
Fig. 5
Fig. 6
FENDER
To secure the fender to the frame, use the 4 screws
provided.
• Examine the bottom of the front fender. You
will notice four 1/4 inch diameter plastic tubes
protruding from the bottom (Fig. 7a).
Fig. 7a
• These tubes must be lined up with the holes in
the front frame assembly (Fig. 7b).
• Line up the front fender and press onto the
front frame assembly (Fig. 7c).
Fig. 7b
• Insert the 4 screws through the underside of
the front frame assembly into the front fender's
plastic tubes. Tighten the screws only until
snug (Fig. 7d). DO NOT OVER TIGHTEN.
Fig. 7c
Type 2
• Slide the front wheel onto the front forks.
(Fig. 3a) Make sure the front forks are in the
position as shown on Fig. 3b.
Fig. 3a
• Close the lever (Fig. 5) and you should feel
significant resistance and the wheel should
be held tightly. If you do not, open the lever
and tighten the finger nut a bit more and close
the lever again. Continue to do this until the
wheel is held tightly in the fork.
DO NOT OVER TIGHTEN.
Fig. 7d
Copyright © 2007 - 2008, Baby Trend Inc., All Rights Reserved.
6
ASSEMBLY
ASSEMBLY
REAR WHEEL
Fig. 8
Lean the stroller forward to rest on the front
wheel. To attach the rear wheels, push each
wheel's axle into the plastic corner fitting as
shown in Fig. 8. Depress the metal lever on the
inside of the corner fitting as you push the axle
into corner fitting. When the wheel will not go
on any farther, release the lever. Check that the
wheel has locked into the corner fitting by pulling
on the wheel. If not locked, lift upward on the
lever, push the wheel on farther and release lever.
Ensure that the wheels are firmly locked
into place. NEVER use the stroller if the
wheels are not locked into place, contact our
customer service department immediately at
1-800- 328-7363, between the hours of 8:00am
and 4:30pm PST, for assistance.
Fig. 9
Open
To attach the parent tray, align the fittings on the
ends of the parent tray with the fittings on the
outsides of the handle. Hook the hole in the parent
tray. Pull outward on the opposite end while
pushing down on the tray until locked onto the
stoller handle. Please be careful not to pinch your
fingers when installing the parent tray. (Fig. 9) To
remove the parent tray, pull outward on one end of
the tray while lifting upward.
WARNING: Do not place
hot liquids or more than 3 pounds
in the parent tray. Serious burns or
unstable conditions could result.
Type 2
Fig. 10a
Close
CANOPY
To open the canopy: push forward on the front
edge of the canopy while holding the rear of
canopy in place. (Fig. 10a)
To fold the canopy: pull backwards on the front
edge. (Fig. 10b)
Fig. 10b
7
Copyright © 2007 - 2008, Baby Trend Inc., All Rights Reserved.
TYPE A:
To attach the front child tray: line up make
fittings of the child tray with the female fitting on the
outside of the center joint and push inward (toward the
rear of the stroller) until locked in place. (Fig. 11a)
To remove the front child tray: depress the
button on the underside of the male fitting and pull
the tray outward to remove. (Fig. 11b)
TYPE B:
To attach the front child tray: Insert the tray clip
into the fitting on the stroller’s fold joint. Check
the tray clip locks into place. (Fig. 11c) Push the
angled tray onto the post at the end of the right
armrest, while pressing downward on the snap
button, until locked into place. Rotate the tray
downward until latched onto the left armrest.
Please check that the snap button comes through
and securely latches the tray in place. (Fig. 11d)
To open the front child tray: press inward on left
side tray release button and rotate upward on the
tray. Please see figure 11e. Please note that you
may remove the tray completely by depressing the
buttons on each side while pulling forward on the
tray.
Fig. 11a
Fig. 11b
Fig. 11c
Fig. 11d
Fig. 11e
INFANT CAR SEAT (if equipped)
Type 1 & 2
PARENT TRAY
CHILD TRAY (if equipped)
Please refer to the infant car seat instruction
manual for more details.
PEDOMETER (if equipped)
The pedometer is located in a seperate box inside
the main box. Silde the pedometer onto the
provided mounting bracket as shown in
Fig. 12. Instructions on how to use the pedometer
are included in the seperate box. Caution: When
folding the stroller, please make sure to rotate
the pedometer inside towards the parent tray to
prevent damage when folded.
Fig. 12
MP3 SPEAKER (if equipped)
The canopy comes with a speaker sewn into a
mp3 storage pocket on the side of the canopy. The
speaker has a wire with a male jack for use with
mp3 player so you and your child can listen to
music while you jog. Connect male end of speaker
wire into your mp3 player. (Fig. 13)
Your stroller is now ready to use.
Fig. 13
Copyright © 2007 - 2008, Baby Trend Inc., All Rights Reserved.
8
SAFETY
SAFETY
Before placing your children in the stroller,
please follow the instructions below.
WARNING: Always
check with your pediatrician for a
recommended starting age / weight
for your baby in an all terrain stroller.
WARNING: Always set
BRAKES
Fig. 14
Fig. 15
To engage brakes, apply light downward pressure
to the brake lever located on each rear wheel. The
stroller may require slight forward or rearward
movement in order to line up the teeth on the
brake with each wheel brake cluster. (Fig. 14)
Check that the stroller will not move and that both
brakes are properly applied. To release, gently lift
up on the brake lever.
Your stroller may come equipped with a caliper
brake system. (Fig. 15) The front wheel bicycle
style caliper brake system that is designed to assist
you in slowing the stroller on a hill or in the event
of an emergency. Squeeze the brake handle to
slow the stroller. (Fig. 16) The hand brake is not
to be used as a parking brake.
WARNING: Always lock
the front swivel wheel in STRAIGHT
position before placing or removing
your children from the jogger.
Fig. 16
Type 1 only
9
The type 2 swivel jogger come equipped with a
front wheel locking device. Fig. 17a is a remote
release lever located under the right side handle.
Pull to disengage the wheel and push to engage
Copyright © 2007 - 2008, Baby Trend Inc., All Rights Reserved.
Fig. 17a
WARNING: Avoid serious
Unlock Lock
injury from falling or sliding out.
Always use the safety harness.
Fig. 17b
Lock
STRANGULATION
HAZARD: Child can
Unlock
Fig. 17c
strangle in loose straps. Never leave
child in seat when straps are loose
or undone.
Type 2 only
TO SECURE THE CHILD
The shoulder straps of the 5-point harness have
2 attachment positions. Select the position that
places the shoulder strap level with, or below the
top of the child's shoulder.
Type 1 & 2
Type 1 & 2
brakes when the stroller is not being
pushed so that the stroller will not
roll away. NEVER leave stroller
unattended on a hill or incline as
the stroller may slide down the hill.
the locking device located under the footrest.
Fig. 17b front wheel lock works in a horizontal
motion from left to right, locking and unlocking
the wheel. Fig. 17c front wheel lock works in a
vertical motion from top to bottom, locking and
unlocking the wheel.
Shoulder Strap
•Carefully place the child in the stroller seat
and bring the safety harness around the
child's waist and over the shoulders. Place the
crotch strap between the child's legs. Insert
the male end of each shoulder/waist belt into
the buckle on the crotch strap. Tighten the
harness to be snug around the child's waist
and over the child's shoulders Please see
figure 18a.
Waist Strap
Squeeze
Adjust for a snug fit
Crotch Strap
Fig. 18a
• To release, apply pressure to both sides of
each male clip until the clip is released. See
figure 18b. This process requires a moderate
amount of effort so as to prevent an accidental
release by your child.
Fig. 18b
Copyright © 2007 - 2008, Baby Trend Inc., All Rights Reserved.
10
SAFETY
FOLD / UNFOLD
SEATBACK POSITIONING
The seat has a multiple position recline that is
controlled by a strap and buckle assembly behind
the seat. (Fig. 19) To recline the seat, loosen the
strap through the buckle and adjust to the required
recline position. (Fig. 20) To place the seat back
in a more upright position, press upward on the
seat back with one hand while pulling the strap
through the buckle with the other. The strap will
lock automatically.
Fig. 19
Fig. 20
WARNING:
Care must be
taken when folding and unfolding
the stroller to prevent finger
entrapment.
TO FOLD STROLLER
Close the canopy as described in the canopy
section. Recline seat by releasing buckle as
described in seatback positioning section.
Fig. 23
JOGGING WITH YOUR STROLLER
The stroller is folded by simultaneously
depressing the safety lock on the right side and
fold buttons located on the central joints. (Fig. 23)
When the fold latches are released, the handle will
begin to fall toward the floor. Release the fold
buttons and press downward on the stroller handle
until the stroller is completely folded. Secure the
stroller in the folded position by hooking the fold
latch, located on the right side of the stroller, over
the rivet that protrudes from the frame. (Fig. 24)
Fig. 24
Type 1 & 2
When you are jogging with your child, use the
following safety features:
•LOCK THE FRONT SWIVEL WHEEL IN
STRAIGHT POSITION (Type 2 only)
•SAFETY WRIST STRAP: Always connect
the safety strap to either wrist when jogging.
This strap will keep the stroller from rolling
away in the event that you trip while running.
(Fig. 21) The safety strap must remain
connected to the rear lower frame cross
member at all times. This location is intended
to prevent the stroller being tipped backward
in the event that you do fall to the ground.
The safety strap includes a Velcro attachment
for storage, on the left side of the stroller,
when not in use. (Fig. 22)
•CALIPER BRAKE SYSTEM: Squeeze
the brake handle to slow the stroller.
(Fig. 16) NEVER use the hand brake as a
parking brake. This feature is only available
on Type 1 stroller.
Fig. 22
TIRES
Tires are shipped un-inflated. The tires should
be inflated on a regular basis to between 20 to 25
pounds of air pressure. Always use a bicycle style
hand air pump to inflate the tires.
Copyright © 2007 - 2008, Baby Trend Inc., All Rights Reserved.
Type 1 & 2
The upright position should be used only for a
child that is at least 6 months old. Always readjust the safety harness, including the shoulder
belts, when repositioning the seatback.
Fig. 21
11
Handle Button Release
WARNING: Care must be
taken when folding and unfolding
the stroller to prevent finger
entrapment.
Fig. 25
TO UNFOLD STROLLER
Stand the stroller on the ground with all three
wheels touching the ground. Release the folding
latch, which is located on the right side. (Fig. 25)
Lift up on the stroller handle with both hands until
the stroller frame is erect and locked in the open
position. (Fig. 26) The stroller has spring-loaded
latches on both sides of the frame. Test that both
latches are fully engaged prior to placing your
child in the stroller.
Fig. 26
Copyright © 2007 - 2008, Baby Trend Inc., All Rights Reserved.
12
FOLD / UNFOLD
TROUBLE SHOOTING
Trigger Release
WARNING:
Care must be
taken when folding and unfolding
the stroller to prevent finger
entrapment.
Fig. 23
Type 1 & 2
Fig. 24
TO FOLD STROLLER
Close the canopy as described in the canopy
section. Recline seat by releasing buckle as
described in seatback positioning section.
The stroller is folded by simultaneously pulling
each trigger fold. (Fig. 23) When the fold latches
are released, the handle will begin to fall toward
the floor. Release the fold buttons and press
downward on the stroller handle until the stroller
is completely folded. Secure the stroller in the
folded position by hooking the fold latch, located
on the right side of the stroller, over the rivet that
protrudes from the frame.(Fig. 24)
WARNING: Care must be
taken when folding and unfolding
the stroller to prevent finger
entrapment.
Fig. 25
Fig. 26
13
TO UNFOLD STROLLER
Stand the stroller on the ground with all three
wheels touching the ground. Release the folding
latch, which is located on the right side. (Fig. 25)
Lift up on the stroller handle with both hands until
the stroller frame is erect and locked in the open
position. (Fig. 26) The stroller has spring-loaded
latches on both sides of the frame. Test that both
latches are fully engaged prior to placing your
child in the stroller.
Copyright © 2007 - 2008, Baby Trend Inc., All Rights Reserved.
STROLLER PULLS TO ONE SIDE:
CALIPER BRAKE DOES NOT SLOW THE
STROLLER DOWN:
The jogging stroller is equipped with a bicycle
TYPE 1: FIXED FRONT WHEEL
style caliper brake to assist you in slowing
The fixed front wheel jogging stroller is unusual
in that it has no swiveling front wheel. Therefore, the stroller. It is designed with a quick release
lever for ease in detaching the front wheel of
the stroller may at times feel like it is pulling to
the stroller. If you are experiencing inadequate
one side. This problem can have two different
slowing when applying the hand brake, please
causes, either individually or in combination.
review the drawing below in the instruction
Please perform the following steps in their
manual to ensure that the quick release lever
numbered order.
is in the down position (i.e. facing the front of
the stroller). If the quick release lever is in the
1. The stroller is sensitive to the air pressure in
closed position and you are still experiencing a
the tires. If the rear tires do not have equal
pressure, the stroller will feel like it is pulling braking problem, the brake cable tension needs
to be adjusted. This is accomplished in two
to the side with the tire with the lower tire
different ways. If the brake is slowing the stroller
pressure. Check that the rear tires have the
same pressure. Add air pressure to a maximum slightly, the cable tension can be fine tuned via
the tension nut located on the end of the brake
of 25 pounds using a BICYCLE STYLE
cable just above the caliper. Turn the tension nut
HAND AIR PUMP.
counter clockwise to increase tension. If at the
2. The alignment of the front wheel of the stroller maximum adjustment of the tension nut you still
do not have adequate braking, you will need to
can also cause the stroller to pull to one side.
The stroller is designed so that the front wheel adjust the length of the brake cable. To adjust the
length of the cable, first return the tension nut to
can be adjusted to correct for any alignment
its factory setting by turning it clockwise until
problem. Page 3 of the instructions shows an
expanded view of the front fork assembly. To it stops. Loosen the cable clamp nut that holds
the brake cable to the brake caliper. Squeeze
align the front wheel, first loosen the wheel
via the quick release handle as in step 2 of the the caliper together so that the brake pads are
just touching the rim of the front wheel. Pull
instructions. Grab the front wheel directly in
the cable through the cable clamp nut until the
front of the stroller and push the wheel in the
opposite direction of the pulling problem. You slack is removed. Retighten the cable clamp
nut. Retest the braking and fine tune the tension
will notice that the axle will move within the
via the tension nut until adequate slowing is
slot on the fork. Move the wheel to the side
achieved. Please keep in mind that the brakes are
a small amount. Retighten the quick release
designed to be adjustable in order to compensate
handle. Give the empty stroller a push across
an empty smooth surface (let go of the handle) for the wearing of the brake pads over time. If
you experience difficulty, please call our customer
and note if the stroller now runs straight.
service department at 1-800-328-7363 for
Re-adjust the axle a small amount at a time
assistance. Also, most bicycle shops can quickly
until the stroller runs straight. Please note
perform this adjustment for you.
that a very minute movement of the axle will
affect the tracking of the stroller. Once you
Reverse steps if brakes are too tight.
have aligned the front wheel, you can mark
the holding plate position with a marking pen
if you detach the front wheel on a regular
basis. Please note that the hole in the fork is
Fine Tune Tension Nut
designed to allow the stroller to be adjusted
Quick Release
to pull to the right, go straight, or pull to the
Lever
left. If you continue to have difficulty with
tracking, please call our customer service
department at 1-800-328-7363 for assistance.
Cable Clamp
Nut
Brake Cable
Copyright © 2007 - 2008, Baby Trend Inc., All Rights Reserved.
14