1
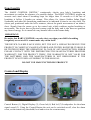
CE1011
Baby Control
User Guide and Warranty for
•
BC-200 one sensor pad,
•
BC-210 two sensor pads,
•
BC-230 three sensor pads,
•
BC-230i four sensor pads for twins
Digital Apnoe Alarm Systems.
Important phone numbers, addresses:
Dear Customer!
Congratulations to you and your newborn baby and to your wisdom in purchasing the “Baby
Control Digital”. Not only will your child be sleeping peacefully!
Some of the features why it worth to choose Baby Control:
•
•
•
•
•
•
•
Large Sensor Pads*: the size of the sensor pad is 30 x 50 cm. Depending on the product having 1, 2,
3 or 4 (twins) sensor pads. The product with 3 sensor pads is able to cover the whole resting place of
the baby, even large cots.
Extra Sensor Pads:* Extra sensor pads can be used at the baby's temporary resting-place. You have to
carry only the control unit.
Excellent Lateral Sensitivity
Usable for all mattress models.
Digital movement display*: luminous display can be clearly seen at night.
Digitally adjustable sensitivity by 9 degrees*: with the control button you can setup the sensitivity
level (threshold) of the control unit.
Event Memory*: The control unit stores the event of the last 10 minutes before the alarm.
•
•
•
•
In case of an alarm it is vital to know and understand the previous events for an examination process.
Double Safety Horn*
Battery voltage monitor: The control unit warns you, if the batteries are low.
Two Years Guarantee*
*- only Baby Control possess these features in the market!
Product Packages:
A BC-200 package contains:
1 BC-103 control unit,
1 BC-101 sensor pads,
A BC-210 package contains:
1 BC-103 control unit,
2 BC-101 sensor pads,
A BC-230 package contains:
1 BC-104 control unit,
3 BC-101 sensor pads,
1 ”Y” extension unit.
A BC-230i package contains:
1 BC-104 control unit,
4 db BC-101 sensor pads,
2 ”Y” extension unit.
Additionally all packages contains:
2 AA Batteries,
Warranty,
User Guide.
Functionality
The „BABY CONTROL DIGITAL” continuously checks your baby’s breathing and
movements to confirm the absence of a possible danger. The BABY CONTROL triggers an
acoustic and visual alarm if breathing stops for longer than 12 seconds or if the rate of
breathing is bellow 8 breaths per minute. This allows for Apnea (Sudden Infant Death
Syndrome) and other life threatening conditions to be indicated in time to save the child. The
sensor pad, positioned under the bed’s mattress, detects the gentle movements of an infant’s
chest. Signals from the sensor go to the control unit, which confirms regular breathing or
movements. The device has no physical contact with the baby and it also does not generate
any form of energy. So it cannot have any harmful effect to the human body.
IMPORTANT:
Do notice that BABY CONTROL can only alert you when your child is breathing
irregularly or not at all. It cannot make any action itself!
THE DEVICE CAN HELP SAVE LIVES, BUT IT IS NOT A LIFESAVING DEVICE! THE
PRODUCT IS CAREFULLY MANUFACTORED AND TESTED. HOWEVER IT SHOULD
BE TESTED DURING THE OPERATION! IN CASE OF ANY MALFUNCTION, ERROR
PLEASE CONTACT WITH THE DISTRIBUTOR! THE MANUFACTURER PROVIDES
WARRANTY FOR THE PRODUCT ITSELF. THE WARRANTY IS NOT VALID FOR
THE BATTERIES AND THE MANUFACTURER IS NOT RESPONSIBLE IF THE
PRODUCT IS NOT USED ACCORDING TO THIS MANUAL.
DO NOT USE MALFUNCTIONING PRODUCT!
Control and Display
Control Button (1), Digital Display (2), Green led (6) Red led (7) Loudspeaker for the alarm
signal sound (3). Using the Control Button the unit can be switched on-off, clear the alarm
event, set the sensitivity (threshold) level and review the event memory.
Operation
1. Place the sensor pad on the bed bottom. Place the mattress on the sensor pad and be sure
that the sensor is well positioned with the mattress using the following guidelines:
• Center of the sensor pad should be approximately in the position of where the baby’s
chest will be.
• The pad should be on a smooth & solid surface – It should not be bent!
• If there is only a spring grid supporting the bed, place a solid board (wood, plywood
etc.) between the pad and the spring grid.
• If you want to use the BABY CONTROL in multiple beds, use the extra sensor pads.
• Install them in each bed and change only the location of the control unit.
• Up to two sensor pads can be used in each bed with a single control unit if the child has
grown up.
2. Connecting batteries to the control unit
• Remove the upper section of the unit
• Use only 2 new size AA alkaline batteries.
• Polarity of the batteries is clearly marked in the battery compartment.
• If the batteries are OK the indicators will flash and you will hear a beep.
• Switch the unit OFF again (position 0).
• If there is no beep after turning ON, check the batteries.
3. Attaching the control unit to the bed – using the fastening belt:
• The unit should be visible and should not be covered by anything.
• For bigger children we recommend to locate the unit out of their reach.
• It is also possible to use a wall mount holder to attach the control unit to the wall.
4. Connecting the sensor’s cable to the unit – you should hear a click:
• Route the cable in such a way that there is no slack long enough to make a loop. For
bigger children the cable should be out of their reach.
• If you do not use the entire length of the cable, fix the excess firmly under the mattress.
• If you position the control unit in another room, use the extension cable (5 m), which is
provided with the set, only one extension cable can be used.
• If you use two sensor pads in a bed, a cable splitter is provided in the set.
• To disconnect the cable from the unit – press the connector tab towards the cable.
Usage
1. Put the baby to bed.
2. Turn on the unit (confirmed by a beep (3) and a flash (6,7) of all LED indicators).
• Press and hold the red button (1) for 2 seconds.(if the time is less then 2 seconds the unit
will not be switched on!)
• The sensitivity level (2) shows up 10 times after the turn on, and then the digital display
will be blank.
3. The green led (6) indicator will flash as the baby breathes or moves.
4. Turn off the unit (press the red button (1) twice) before you take the baby out of the bed. (If
the alarm is on the unit can be switched off pressing the red button(1) once)
While everything goes well
After placing the baby and turning the unit on the digital display(2) shows the sensitivity level
every 2 seconds and the green light flashes.
(Sensitivity level 9: max, 1: min, 0: no movement (alert)).
Setting the sensitivity (threshold) level
1. Turn the control unit off and wait a few seconds.
2. Press the red button(1) and hold it for 20 seconds until you see the „L”-„E” letter on the
digital display(2) then release the button.
3. On the display the numbers are changing slowly from 1 to 9.
4. When the required sensitivity (threshold) level is displayed press the red button(1).
5. Now the new level setup is stored and the unit turns on automatically.
Important Information:
Decreasing the threshold level, the sensor pads will be more sensitive in terms of the
surronding intrusive vibrations e.g.: a powerful air movement (fan, air-conditioning…), by
walking close the bed and by other sources
Increasing the threshold level, it will be harder to sense the baby's movement, while the sensor
pad will be less sensitive in terms of the surrounding vibration.
e.g: if you set the level to:1 then the unit will be the most sensitive,
if you set the level to:9 then it will be the less sensitive.
The default sensitivity (threshold) level is:
3
Alarm
If the baby is not breathing for longer than 12 seconds, or the breath rate is too slow, after 4
warning signal an alarm signal will sound and the red indicator will flash. On the display(2)
the „H”-„E”-„L”-„P” letters will be displayed. (If movement is detected during the 4 warning
signal the alarm will not sound.
Check the baby and provide first aid if necessary (make sure that there are no reasons for
choking, start resuscitation, call for emergency help).
In some cases of Apnea the sound of the unit itself can wake the baby up and he/she will start
to breath again on his/her own.
Alarm can be stopped by the switching the unit off.
There may be rare cases of false alarms, especially when the child is crawling and moves off
the sensor pad.
Event Memory
The control unit is capable to store the event of the last 10 minutes before the alarm.
In case of an alarm it is vital to know and understand the previous events for an examination
process.
Review the event memory:
1. Turn off the unit and wait a few seconds
2. Then push the red button(1) and hold it for 10 seconds until you see the „P” and „L”
letters on the display
3. Release the button
4. On the display you can select which minute you would like to see ,„1 P”, „2 P” ... „9 P”
(changes slowly in the display).
5. When you see the required time press the button
6. The measured values will begin to show up
Press the button again and the unit will return to the normal mode.
Battery Replacement
If the batteries are low, the red indicator will flash and the digital display shows error "E",
there will be beep sound after it is tuned on.
For safety reason the unit can not be switched off until you remove/replace the batteries.
In this case replace the batteries. Use only 2 new size AA alkaline batteries (orientation is
clearly marked in the battery compartment). Switch the BABY CONTROL on after battery
replacement and you should hear a beep sound. If there is no beep, check the batteries.
Important: Do not use rechargeable accumulators!
Test
You can test function of the BABY CONTROL in the following way (should be tested once a
week):
1. If the baby is in the bed and the unit is ON, the green indicator should flash as the baby is
breathing or moving.
2. Leave the unit ON and take the baby out of the bed. The green indicator may continue to
blink for a certain time (vibrations of the bed caused by the baby’s removal). Do not hold or
touch the bed – the device may detect your breathing.
3. When the flashing has stopped for 12 seconds, the unit will make warning beeps and will
start the alarm sound. The red indicator should flash when the alarm is triggered. Stop alarm
by pressing the button.
If the device does not work as described above, check that:
1. There is a beep after switching it on. If not or the digital display shows error "E" then check
the batteries. For safety reason the unit can not be switched off until you remove/replace the
batteries.
2. After taking the baby out of the bed the green indicator stops flashing (within a minute or
so) – if not, the device is detecting some intrusive vibrations – see the following warning.
Important warning:
The BABY CONTROL is a very sensitive instrument, capable of sensing a sleeping baby’s
breathing. Intrusive vibrations of the bed, the floor or the entire building can influence its
performance. The bed should not be in physical contact with another bed (which is used by
another person or animal) or with any device that generates vibrations. Intrusive vibrations can
also be caused by a powerful air movement (fan, air-conditioning…), by walking close the bed
and by other sources. If you move the bed to a new location, you should test the BABY
CONTROL before you use it.
Do not use a mattress made of hard material such as expanded polystyrene– it may result in
the failure of the device (such materials are extremely sensitive to air movements).
To avoid any disturbance please see the „Setting Sensitivity Level” part.
„Twins” operation (only for BC-230i)
Using the device for twins:
It is essential that each baby has its own bed and there are separate sensor pads installed in
each bed. The beds cannot touch. The children cannot even share one bed!
Incorrect solutions can endanger one baby’s life!
1.
Place at least one sensor pad under each baby.
Connect the sensor pads to the left and the right connection points of the control unit, to
identify the sensor pads for each baby. With the given “T” splitter you can also use two sensor
pads for each baby. Make sure that you use one “T” splitter for one baby.
2.
„Twins” operation switch on - switch off
1.
Turn off the BC-230i device
2.
Press the button and hold it for at least 30 seconds, until the „S”-„E” sign display.
3.
Release the button, then “1” and “2” appears continuously.
Press the button at “1” if you would like to have the device in single mode. Press the
button at “2” if you wish to have the twin mode.
4.
It can happen that temporary the twin operation has to be switched off (e.g.: one of the baby is
taken out from the bed)
5.
Then press the button.
6.
The device is switched to single mode,
7.
When you put the baby back the press the button again, this will switch back to “twins”
mode.
Test the “Twins” operation
1.
Remove one of the baby from the bed
2.
The alarm should sound
Medical Instructions
About Sudden Infant Death Syndrome
"SIDS is the sudden death of an infant under one year of age which remains unexplained after
a thorough case investigation, including performance of a complete autopsy, examination of
the death scene, and review of the clinical history."
(Dr. Marian Willinger, 1991.)
In a typical situation parents check on their supposedly sleeping infant to find him or her dead.
This is the worse tragedy parents can face, a tragedy which leaves them with sadness and a
feeling of vulnerability that lasts throughout their lives.
Since medicine can not tell them why their baby died, they blame themselves and often other
innocent people. Their lives and those around them are changed forever.
Being prepared
Still today, "cot death" is an unforeseeable occurrence from which every 500th baby dies. 80%
of infants affected are entirely healthy beforehand. Only 20% come from so-called risk groups
(former premature births or babies already suffering from life threatening conditions or with a
"cot death" among close relatives).
Only a prompt alarm in the event of irregularities provides the possibility of introducing lifesaving measures within the shortest possible time. Such measures should be learned
beforehand in special courses. Our instructional film "Lifeline" shows the main situations for
which parents should be prepared.
What Can Be Done?
Unfortunately, we cannot expect to prevent all SIDS deaths now. To do so require a much
greater understanding of SIDS, which will be achieved only with a commitment from those
who value babies and with a considerably expanded research effort. However, there are things
that can be done to reduce the risk of SIDS.
Parent-To-Be
1. Get medical care early in pregnancy, preferably within the first three months, followed by
regular checkups at the doctor's office or health clinic. Make every effort to assure good
nutrition. These measures can reduce the risk of premature birth, a major risk factor for SIDS.
2. Do not smoke, use cocaine, or use heroin. Tobacco, cocaine, or heroin use during pregnancy
increases the infant's risk for SIDS.
3. Don’t get pregnant during the teenage years. If you are a teen and already have one infant,
take extreme caution not to become pregnant again. The SIDS rate decreases for babies born to
older mothers. It is highest for babies born to teenage mothers. The more babies a teen mother
has, the greater at risk they are.
4. Wait at least one year between the birth of a child and the next pregnancy. The shorter the
interval between pregnancies, the higher the SIDS rate.
Parents
1. Place infants to sleep on their backs, even though they may sleep more soundly on their
stomachs. Infants who sleep on their stomachs and sides have a much higher rate of SIDS than
infants who sleep on their backs.
2. Place infants to sleep in a baby bed with a firm mattress. There should be nothing in the bed
but the baby - no covers, no pillows, no bumper pads, no positioning devices and no toys. Soft
mattresses and heavy covering are associated with the risk for SIDS.
3. Keep your baby’s crib in the parents’ room until the infant is at least 6 months of age.
Studies clearly show that infants are safest when their beds are close to their mothers.
4. Do not place your baby to sleep in an adult bed. Typical adult beds are not safe for babies.
Do not fall asleep with your baby on a couch or in a chair.
5. Do not over-clothe the infant while she sleeps. Just use enough clothes to keep the baby
warm without having to use cover. Keep the room at a temperature that is comfortable for you.
Overheating an infant may increase the risk for SIDS.
6. Avoid exposing the infant to tobacco smoke. Don't have your infant in the same house or
car with someone who is smoking. The greater the exposure to tobacco smoke, the greater the
risk of SIDS.
7. Breast-feed babies whenever possible. Breast milk decreases the occurrence of respiratory
and gastrointestinal infections. Studies show that breast-fed babies have a lower SIDS rate
than formula-fed babies do.
8. Avoid exposing the infant to people with respiratory infections. Avoid crowds. Carefully
clean anything that comes in contact with the baby. Have people wash their hands before
holding or playing with your baby. SIDS often occurs in association with relatively minor
respiratory (mild cold) and gastrointestinal infections (vomiting and diarrhea).
9. Offer your baby a pacifier. Some studies have shown a lower rate of SIDS among babies
who use pacifiers.
10. If your baby has periods of not breathing, going limp or turning blue, tell your pediatrician
at once.
11. If your baby stops breathing or gags excessively after spitting up, discuss this with your
pediatrician immediately.
12. Thoroughly discuss each of the above points with all caregivers. If you take your baby to
daycare or leave him with a sitter, provide a copy of this list to them. Make sure they follow
all recommendations.
Specification
Power: . . . . . . . . . . . . . . . . . . . . . . . . 2 "AA" or "R6" normal battery
Control: . . . . . . . . . . . . . . . . . . . . . . microprocessor
Operational temperature: . . . . . . . . . + 5 ÷ + 40 °C
Operational time: . . . . . . . . . . . . . . . min. 1500 hours with the normal battery
Environment:. . . . . . . . . . . . . . . . . . . protect the product against a direct radiant heat
from humidity, high vapour content, splashing water
Cleaning:. . . . . . . . . . . . . . . . . . . . . . only dry cleaning, do not use liquids
Maintenance: . . . . . . . . . . . . . . . . . . no maintenance is required
Lifetime of the product: . . . . . . . . . . . 2 Years
Declaration of Comformity
Manufacturer:
The subject of the declaration:
VMD 95 Kereskedelmi és Szolgáltató Kft.
Baby Control Digital Apnoe Alarm Systems
The manufacturers declares that the product to which this declaration refers conforms with the
relevant harmonized standards under the following Hungarian Directives
16/2006. (III.27.)
IEC 60601-1-8:2004
MSZ EN ISO/IEC 17050-1:2005
Place and Date of Declaration: Budapest, 2007. 01. 31.
Baby Control uses battery. The device has no physical contact with the baby and it also
does not generate any form of energy. So it cannot have any harmful effect on the little
human body.
Baby Control
Apnoe Alarm Warranty
Please ask the retailer to fill the below form!
Manufacturing number:..........................
Date: 200…...........................
Retailer: .............................................……………
Baby Control is a medical device. It monitors and alerts, but cannot prevent any type of distress. The
responsibility of assistance rests on you. Baby Control Digital senses movements and motion only and cannot
monitor other occurrences. The purpose of the device is to alert you when stopping or slowing of movement
occurs.
Warranty: The Manufacturer warrants, to the original owner of this product, that the Baby Control Digital
Movement Monitor to be free from defects in materials and workmanship for a period of two (2) years from
the date of original purchase. If this system fails to function properly, when used as directed under normal
conditions, within the two-year period, the Manufacturer will either repair or replace the product, at our
option, free of charge. It must be returned complete in its original package prepaid postage and insured to your
distributor. This product must be accompanied by of a proof of purchase receipt indicating it is within the
Warranty Period. This Warranty does not apply to a product that has been damaged as a result of improper
maintenance or other misuse. This Warranty is also void if the owner repairs or modifies the product in any
way. The manufacturer is not liable for any incidental or consequential damages with regards to this product.
Warranty also excludes any liability other than above. No other Warranties are given.
Returns: All returns are subject to return policy