1
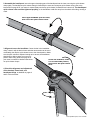
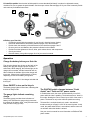
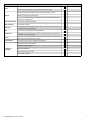
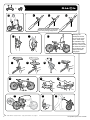
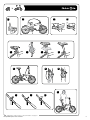
Assembly & Usage Guide - IZIP
This guide is intended to be followed by
an experienced bicycle mechanic. If you
have any doubts about your ability to
safely assemble a bicycle, please let a
professional do the work for you!
While assembling this bicycle, be sure to
refer to the Bicycle torque values reference
sheet at the back of your owner’s manual.
Components that are not properly tightened
could fail, causing injury.
1. Install the front wheel in the fork, tightening the two axle nuts with a 15mm wrench to 390 in-lbs/44.1 Nm. Follow the
instructions on page 70 of your owner’s manual (Front Wheel - Bolt-on Installation). Make sure the wheel is facing in the correct
direction so the motor does not spin backward: from the perspective of a rider seated on the bike, the left side of the hub has a
circle of 6 bolts, and the motor wire exits the right side.
The front brake needs to be disengaged before the wheel will fit in the fork (see diagram below). Re-engage the brake before
riding. See the section of your owner’s manual beginning on page 74 for more information on brakes.
After the wheel is installed, connect the motor to the mating plug on the fork leg. Each side of the plug body has an embossed
arrow; match the arrows to properly align and connect the plugs. Make sure the plugs are engaged completely or the motor will
not run!
Pull back rubber boot. Squeeze brake arms
inward and pull “noodle” out of holder. To
re-close brake, simply reverse the process.
Noodle
Boot
Last updated April 9, 2013 10:30 AM
1
2. Assemble the handlepost. Insert the upper telescoping part of the handlepost into the lower, securing the quick release
clamp tightly. The handlepost quick release clamp is functionally the same as a seat post quick release clamp; refer to the
instructions on page 66 of your owner’s manual (Seat post clamp: quick release) for detailed use instructions. The handlepost
quick release collar must be tightened properly, or the handlebars could turn away from the wheel while riding, causing a
crash.
Insert upper handlebar post into lower,
then secure the quick release collar.
3. Align and secure the handlebar. Center the bar in the handlebar
clamp, rotate it until the brake levers and other accessories can be used
comfortably, then flip the quick release lever to the closed position. Make
sure the quick release is adjusted enough to be secure; the handlebars
should not be able to rotate or move out of
position while riding. Reference page 66 of
your owner’s manual for detailed instructions
Center the handlebar, rotate
it to a comfortable position,
on quick release clamps.
then secure the quick release
lever.
4. Check the alignment and adjustment
of the headset, frame latch, and
handlepost hinge, as detailed on pages 4
and 5 of this document.
2
Last updated April 9, 2013 10:30 AM
5. Install the pedals. Note that the left-side pedal is reverse threaded (left-hand); it needs to be tightened counterclockwise. Be sure to grease the pedal threads. See the torque values chart and page 65 of your owner’s manual (Pedals
and crank set) for detailed instructions.
A
B
6. Before your first ride:
• Familiarize yourself with the operation of your bicycle’s electrical system (below).
• Read and understand the information printed on pages 4-9 of this document.
• Double check the assembly of the bike based on the checklist on pages 6 and 7.
• Be sure your tires are inflated to the pressure indicated on the sidewall.
• Double-check the tightness of all nuts, bolts, quick release levers, and components.
• Check your brakes.
• Read the battery care guide on pages 42-43 of your owner’s manual.
Operation
Charge the battery before your first ride
First plug the charger into the port on the back of the
battery, then plug the charger’s power cord into a
wall socket. While charging, the indicator light on the
charger will turn amber, and the internal fan will run.
When finished, the indicator light on the charger will
turn green. Charge time is approximately 4-6 hours,
depending on the current battery charge level.
Charge only with the 36V Li-ion charger included with
the bicycle.
Press ON/OFF to turn on the bicycle
The battery gauge lights will illuminate, indicating that
the bike is ready to ride.
The gauge lights indicate remaining
charge
The battery gauge provides three indications of
battery level. Because the gauge simply measures
the voltage of the battery pack, it may fluctuate under
load (like when riding up a hill).
The PAS/TAG switch changes between “Pedal
Assist” and “Twist and Go” power modes.
In Pedal Assist mode, the motor will automatically run at 50%
power while the rider is pedaling. The throttle acts as a “boost” in
this mode, allowing the rider to control up to 100% of the motor’s
power. The throttle is only active while the pedals are turning.
Twist and Go is a simple throttle-only mode. Just twist the
throttle toward you to apply 0-100% of the motor’s power. In this
mode, the pedal assist sensor is not enabled, and the motor will
not activate unless the throttle is twisted.
See your owner’s manual for more information on PAS and TAG
power modes.
Last updated April 9, 2013 10:30 AM
3
The instructions on the following pages are reproduced from printed materials created and copyrighted by Dahon.
Headset
Your headset should be checked
periodically. If there is play
or looseness in the fork or
handlepost, the headset may
need to be adjusted. A properly
adjusted headset eliminates play
or looseness while allowing the
handlebars to be turned easily.
The following instructions explain
how to adjust the headset.
WARNING: If you are in
any way unsure of how to
make these adjustments, take
your bike to a qualified bicycle
technician for professional
adjustment.
Step 1 - First open the handlepost
clamp. Loosen the clamp screw
with a 6 mm Allen key by turning it
counter-clockwise as indicated by
the arrow.
Step 2 - Tighten the headset screw
with a 10 mm Allen key. Turn
the headset screw clockwise as
indicated by the arrow. Tighten the
screw with a torque of 6.8~11.3
Nm.
Step 4 - After the adjustment and
before you tighten the clamp screw
again please check again to make
sure that the handlepost and
handlebar are in correct alignment,
and that they are perpendicular
to the front wheel as shown in the
picture above.
Step 5 - Tighten the clamp screw
by turning it clockwise as indicated
by the arrow. Tighten the screw
with a torque of 11.3 Nm.
Step 3 - Occasionally apply some
Loctite 222 (Loctite 242 is also
acceptable) to the clamp screw.
In this case take out the clamp
screw and place a small drop of
Loctite 222 (or Loctite 242) on the
threads of this screw. Then replace
the clamp screw.
WARNING: Failure to
appropriately tighten the
headset can lead to damage to
the bicycle or injury to the rider.
Frame Latch
The frame hinge is the most
important part of a folding bicycle.
Care should be taken to check
that the hinge is adjusted correctly
before each ride.
Your frame hinge will need periodic
adjustment. If there is play or
looseness in the frame it may need
to be adjusted. A properly adjusted
hinge eliminates play or looseness
and a correctly tightened hinge will
close with a strong seal, and the
frame will feel solid.
WARNING: If you are in
any way unsure of how to
make these adjustments
yourself, take your bike to a
qualified technician for
professional adjustment.
WARNING: Failure to
appropriately tighten the
frame latch can lead to damage
to the bicycle or injury to the
rider. Do NOT cycle with a loose
frame hinge.
Dahon uses a variety of frame
hinges on its bikes. Please check
your bike to see which of the
following instructions is applicable.
4
© 2009 DAHON, BPSA • 2009.09.DS.EN
17
The ViseGrip™ Hinge (also
applies to the Eco frame’s
hinge)
Use a 6mm wrench (if you do not
have the right sized wrench you
can also use an adjustable wrench
or small pliers) to tighten or loosen
the hinge.
Adjust the hinge bolt so that the
hinge opens and closes with the
correct amount of force which is
49~59 N for aluminum frames and
29~59 N for steel frames.
NOTE: Adjust in 1/16-turn
increments only, otherwise you will
quickly over-tighten or over-loosen
the hinge.
FRAME HINGE CLOSED
FRAME HINGE OPEN
Always double-check the Phillips-head screw at the end
of the hinge latch bolt. It should be fully tightened. Apply
threadlocker if needed to avoid loosening over time.
Tools Needed:
• 10 mm wrench
• 6 mm Allen key
TIGHTEN: Turn the hinge latch
bolt downwards (facing the hinge
head on) as indicated by the
arrow.
LOOSEN: Turn the hinge latch bolt
upwards (facing the hinge head
on) as indicated by the arrow.
Last updated April 9, 2013 10:30 AM
Handlepost Hinge
CAUTION: Do NOT cycle with a loose handlepost
hinge.
The Different Handlepost Hinges
OPEN
CLOSED
RADIUS V
The latch of the handlepost hinge on Dahon folding
bikes should be checked before each ride to make sure
that it closes tightly to secure the handlepost. A closed
handlepost hinge with a properly adjusted and secured
latch should have little to no side-to-side movement. Inspect
the handlepost periodically to ensure that it is properly
adjusted.
Different versions of the handlepost hinge can be found on
Dahon bikes. They look slightly different, but the adjustment
of the hinge latch is basically the same for both versions.
Please check the handlepost hinge to find out which hinge
version is used and follow the appropriate instructions for
adjusting the latch.
NOTE: For details about how to open the hinge, please
refer to the included “folding instructions”.
These instructions are only for the adjustment of the hinge
itself. Regarding the adjustment of the headset, please refer
to the “headset instructions”.
ECO
WARNING: If you are in any way unsure of how to
make these adjustments, take your bike to a
qualified bicycle technician for professional
adjustment.
RADIUS
To check if the latch needs to be adjusted, close the
handlepost hinge and then close the hinge latch. If the
latch is loose after closing or if too much force is required to
close it, then the latch needs to be adjusted.
© 2009 DAHON, BPSA • 2009.09.DS.EN
Last updated April 9, 2013 10:30 AM
15
5
Dealer Pre-delivery Checklist
Part
Item to Check
Passed
Remarks
The frame is free from damage or defect.
All frame joints are free from physical defect or damage.
Frame
The main hinge(s) opens and closes freely.
The main hinge(s) is free from all play when locked.
The main hinge safety latch functions correctly.
Any magnetix fold holding latches are securely tightened on both front and rear.
Brake Levers
Brake Cables
Moves and returns freely with the brake cable seated correctly within the lever.
Calipers can move freely, are free from damage, and the cable locking nut is secure.
Any excess cable should be tied or cut to a sensible length and capped.
Brake Blocks
Are correctly positioned to make contact with the rim. Retaining nuts are secure.
Brake Calipers
Front and rear calipers are correctly centered, movement is smooth and effective in
gripping the wheel rim.
Drivetrain
Pedal, cranks, chain rings, bottom bracket and derailleur(s) are securely fastened and
correctly aligned.
Part
Item to Check
Passed
Remarks
The chain
is correctly tensioned between the front and rear sprockets, free from physical
© 2009 DAHON, BPSA
• 2009.09.DS.EN
4Chain
defects and rust.
Chain and gear
selector assembly
Moves freely and correctly through the gear selections, and are correctly aligned in all
gears.
Cable locking nut is secure.
Derailleur(s)/hub
actuator
Any excess cable should be tied or cut to a sensible length and capped.
Gear selection
Mechanism is securely fixed to the handlebars.
Chain guard
Is free from physical defect or damage, is correctly positioned. Retaining nuts are secure.
Handlebar and
handlepost
Are free from physical defect or damage.
Handlepost, stem,
handlebar
All bolts are secure and correctly tightened.
Headset
Is correctly tightened and adjusted.
Opens and closes freely.
Handlepost hinge
Is free from all play when locked.
Safety lock operates correctly.
Saddle and
seatpost
All seat bolts, saddle bolts, and seat quick releases are correctly tightened and adjusted.
Saddle
Saddle alignment is correct (forward and level)
Slides freely and smoothly in the frame for folding.
Seatpost
(For bikes fitted with PostPumps or suspension seatposts) Functioning and operating
correctly.
© 2009 DAHON, BPSA • 2009.09.DS.EN
6
5
Last updated April 9, 2013 10:30 AM
Part
Tires
Item to Check
Passed
Remarks
Are free from physical damage or defect, are correctly seated in the right direction.
Have the correct air pressure, dust caps are present on the valves.
Wheel rims, bearings and spokes are free of physical damage or defect.
Wheels
Wheel nuts and spoke nipples are tight.
Front and rear wheel are free from wobble or buckle, do not foul the brake blocks,
mudguards, or anything else.
Wheel quick release
Are correctly installed and adjusted.
Wheel bearings
Are correctly adjusted.
Reflectors
Are both present and securely fastened to the front and rear wheels, at the front of
the bike and at the rear of the bike.
Bell
Is present and securely fastened to the handlebar
Accessories
Mudguards, racks, kickstands, and supports are firmly attached to the bodywork,
all supports are in place and tight.
Lights
Lights and wiring are firmly attached and functioning correctly. If a dynamo hub is
fitted, check that rotation direction is correct.
Owner Manual
The correct owner manual is supplied with the bicycle.
Support bracket functions correctly.
Magnetix is correctly aligned.
Folding and
unfolding
Bike folds completely.
Bike stands stably when folded.
Bike unfolds completely.
6
© 2009 DAHON, BPSA • 2009.09.DS.EN
Last updated April 9, 2013 10:30 AM
7
2
1
3
4
Rotate the handlebar so the brake
levers are pointing straight down.
5
6
8
9
12
10
11
13
15
8
Extending the
handlepost until the
red dot on the upper
post is visible helps
the handlebars align
properly when folded.
Be sure to lower it past
the minimum insertion
line (marked on the
upper post) before
riding again.
7
©2009 DAHON | 2008.11.IL.UNO | http://www.dahon.com/support
14
16
17
Last updated April 9, 2013 10:30 AM
2
1
5
3
6
7
9
4
8
10
11
15
12
13
©2009 DAHON | 2008.11.IL.UNO | http://www.dahon.com/support
Last updated April 9, 2013 10:30 AM
14
9