1
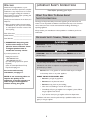
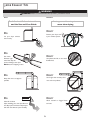
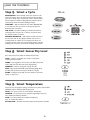
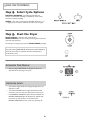
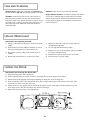
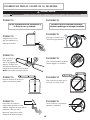
Dryer Use & Care Guide Important Safety Instructions . . . . . . . . 1-2 Dryer Exhaust Tips . . . . . . . . . . . . . . . . . . . . 3 Operating Tips . . . . . . . . . . . . . . . . . . . . . . . 4 Using the Controls . . . . . . . . . . . . . . . . . . 5-6 Special Laundry Tips . . . . . . . . . . . . . . . . . . 7 Care and Cleaning . . . . . . . . . . . . . . . . . . . . 8 Replace Drum Light . . . . . . . . . . . . . . . . . . . 8 Reverse the Door . . . . . . . . . . . . . . . . . . . . . 8 Troubleshooting . . . . . . . . . . . . . . . . . . . . . 9 Drying Rack . . . . . . . . . . . . . . . . . . . . . . . . .10 Amana® Major Appliance Warranty . . . . 11 Guía de uso y cuidado . . . . . . . . . . . . . . . 12 A/12/06 Part No. 2207676 www.amana.com Litho U.S.A. ©2006. All Rights Reserved. Tous droits réservés. Todos los derechos reservados. ND-68 WELCOME Welcome and congratulations on your purchase of an Amana® dryer! Your complete satisfaction is very important to us. For best results, we suggest reading this material to help acquaint you with proper operating and maintenance procedures. Should you need assistance in the future, it is helpful to: 1) Have complete model and serial number identification of your dryer.This is located on a data plate in the lower center of the door opening. Date of Purchase ____________________ Model Number ______________________ Serial Number ______________________ 2) IMPORTANT: Keep this guide and the sales receipt in a safe place for future reference. Proof of original purchase date is needed for warranty service. If you have questions, call: Maytag Services, LLC 1-800-688-9900 USA 1-800-688-2080 USA TTY (for deaf, hearing impaired or speech impaired) (Mon.–Fri., 8am–8pm Eastern Time) http://www.maytag.com For service and warranty information, see page 11. NOTE: In our continuing effort to improve the quality of our appliances, it may be necessary to make changes to the appliance without revising this guide. I MPORTANT SAFETY INSTRUCTIONS Read before operating your dryer. WHAT YOU NEED TO KNOW ABOUT SAFETY INSTRUCTIONS Warnings and Important Safety Instructions appearing in this manual are not meant to cover all possible conditions and situations that may occur. Common sense, caution, and care must be exercised when installing, maintaining or operating appliance. Always contact your manufacturer about problems or conditions you do not understand. RECOGNIZE SAFETY SYMBOLS, WORDS, LABELS WARNING WARNING – Hazards or unsafe practices which COULD result in severe personal injury or death. CAUTION CAUTION – Hazards or unsafe practices which COULD result in minor personal injury. WARNING For your safety, the information in this manual must be followed to minimize the risk of fire or explosion or to prevent property damage, personal injury or death. – Do not store or use gasoline or other flammable vapors and liquids in the vicinity of this or any other appliance. WHAT TO DO IF YOU SMELL GAS: • Do not try to light any appliance. • Do not touch any electrical switch. • Do not use any phone in your building. • Clear the room, building or area of all occupants. • Immediately call your gas supplier from a neighbor’s phone. Follow the gas supplier’s instructions. • If you cannot reach your gas supplier, call the fire department. Installation and service must be performed by a qualified installer, service agency or the gas supplier. 1 I MPORTANT SAFETY INSTRUCTIONS WARNING IMPORTANT SAFETY NOTICE & WARNING To reduce the risk of fire, electric shock or injury to persons when using the appliance, follow basic precautions, including the following: The California Safe Drinking Water and Toxic Enforcement Act of 1986 (Proposition 65) requires the Governor of California to publish a list of substances known to the State of California to cause cancer or reproductive harm, and requires businesses to warn customers of potential exposures to such substances. 1) Read all instructions before using the appliance. 2) To avoid the possibility of fire or explosion: a. Do not dry items that have been previously cleaned in, washed in, soaked in, or spotted with gasoline, drycleaning solvents, other flammable or explosive substances as they give off vapors that could ignite or explode. Any material on which you have used a cleaning solvent, or which is saturated with flammable liquids or solids, should not be placed in the dryer until all traces of these flammable liquids or solids and their fumes have been removed.There are many highly flammable items used in homes, such as: acetone, denatured alcohol, gasoline, kerosene, some liquid household cleaners, some spot removers, turpentine, waxes and wax removers. Users of this appliance are hereby warned that the burning of gas can result in low–level exposure to some of the listed substances, including benzene, formaldehyde, and soot, due primarily to the incomplete combustion of natural gas or liquid petroleum (LP) fuels. Exhaust ducts should be kept free of obstructions and properly exhausted dryers will minimize exposure. WARNING Gas leaks may occur in your system and result in a dangerous situation. Gas leaks may not be detected by smell alone. Gas suppliers recommend you purchase and install an UL approved gas detector. Install and use in accordance with the manufacturer's instructions. b. Items containing foam rubber (may be labeled latex foam) or similarly textured rubber-like materials must not be dried on a heat setting. Foam rubber materials when heated, can under certain circumstances produce fire by spontaneous combustion. 3) Do not allow children to play on or in the appliance. Close supervision of children is necessary when the appliance is used near children. WARNING 4) Before the appliance is removed from service or discarded, remove the door to the drying compartment. Do not place into your dryer items that have been spotted or soaked with vegetable oil or cooking oil. Even after being washed, these items may contain significant amounts of these oils. The remaining oil can ignite spontaneously. The potential for spontaneous ignition increases when the items containing vegetable oil or cooking oil are exposed to heat. Heat sources, such as your dryer, can warm these items, allowing an oxidation reaction in the oil to occur. Oxidation creates heat. If this heat cannot escape, the items can become hot enough to catch fire. Piling, stacking or storing these kinds of items may prevent heat from escaping and can create a fire hazard. 5) Do not reach into the appliance if the drum is moving. 6) Do not install or store this appliance where it will be exposed to the weather. 7) Do not tamper with controls. 8) Do not repair or replace any part of the appliance or attempt any servicing unless specifically recommended in published user-repair instructions that you understand and have the skills to carry out. 9) Do not use fabric softeners or products to eliminate static unless recommended for dryer use by the manufacturer of the fabric softener or product. All washed and unwashed fabrics that contain vegetable oil or cooking oil can be dangerous. Washing these items in hot water with extra detergent will reduce, but will not eliminate, the hazard. Always use the “cool down” cycle for these items to reduce the items’ temperature. Never remove these items from the dryer hot or interrupt the drying cycle until the items have run through the “cool down” cycle. Never pile or stack these items when they are hot. 10) Clean the lint screen before or after each load. 11) Keep the area around the exhaust opening and surrounding areas free from lint accumulation, dust and dirt. 12) The interior of the dryer and exhaust duct should be cleaned periodically by qualified service personnel. 13) This appliance must be properly grounded. Never plug the appliance cord into a receptacle which is not grounded adequately and in accordance with local and national codes. See installation instructions for grounding this appliance. 14) Do not sit on top of the dryer. 2 SAVE THESE INSTRUCTIONS DRYER EXHAUST TIPS WARNING WARNING: Plastic or nonmetal flexible duct presents a potential fire hazard. DO DON’T Read the installation instructions and the Use and Care Guide. Let a poor exhaust system cause slow drying. DON’T DO Restrict your dryer with a poor exhaust system. Let your dryer exhaust the air easily. DO Use 4-inch diameter rigid metal duct.Tape all joints, including at the dryer. Never use lint-trapping screws. DON’T Use plastic, thin foil, or non-metal flexible duct. DO DON’T DO DON’T Use longer than necessary duct runs with many elbows. Keep duct runs as straight as possible. Allow crushed or clogged ducts and vent. Clean all old ducts before installing your new dryer. Be sure vent flap opens and closes freely. Inspect and clean the exhaust system annually. 3 OPERATING TIPS CLEAN • • • THE LINT FILTER After each load. To shorten drying time. To operate more energy efficiently. ¢¢¢¢¢ @@@@@ ÀÀÀÀÀ QQQQQ @@@@@ ÀÀÀÀÀ QQQQQ ¢¢¢¢¢ NOTE: Do not operate the dryer without the lint filter in place. LOAD THE DRYER PROPERLY • By placing only one wash load in the dryer at a time. • Avoid very small loads or mixing heavyweight and lightweight clothes. • When only one or two articles need drying, add a few similar items to improve tumbling and drying efficiency. • When drying large, bulky items such as a blanket or comforter, it may be necessary to reposition the load during the cycle to ensure even drying. ADD A FABRIC SOFTENER SHEET (IF DESIRED) • After loading the dryer. • To control static cling. • Before the load becomes warm.This helps prevent greasy-looking softener stains. • And remove any used softener sheets from the dryer to prevent greasy-looking softener stains. 4 U SING THE CONTROLS Step 1 Select a Cycle Step 2 Select Sensor Dry Level SENSOR DRY – Automatically senses the moisture in the load and shuts the dryer off when the selected dryness level (very dry to damp dry) is reached.This cycle is recommended for the majority of loads including delicates, wrinkle free and cotton/sturdy items like towels, bedding and jeans. TIME DRY – May be selected for any load if SENSOR DRY is not used. Press the up or down arrow pad to select the desired number of minutes. AIR FLUFF – Provides tumbling in unheated air. Used for freshening items. Press the up or down arrow pad to select the desired number of minutes. REMOVE WRINKLES – Will release wrinkles from items that are clean and dry but slightly wrinkled, such as from a crowded closet or suitcase or from sitting in the dryer too long after the end of the cycle. It provides 8 minutes of heated tumbling and 10 minutes of cool down tumbling without heat. Press the arrow pad to select the desired dryness level. VERY – Used to completely dry sturdy or bulky items including towels and jeans. MORE – Uses slightly less time to dry than VERY with similar results. May find some blue jean seams slightly damp. NORMAL – Used for drying the majority of loads. LESS – Still provides the benefit of the load being slightly damp, but items will dry faster once they are laid flat or hung dry. DAMP – Designed to partially dry items. Used for items that lay flat or hang to dry. Step 3 Select Temperature There are four temperature settings. Press the arrow pad to select HIGH, MEDIUM, LOW or EXTRA LOW temperatures. HIGH – For sturdy cottons or those labeled “Tumble Dry.” MEDIUM – For permanent press, synthetics, lightweight cottons or items labeled “Tumble Dry Medium.” LOW – For heat sensitive items labeled “Tumble Dry Low” or “Tumble Dry Warm.” EXTRA LOW – Provides the lowest heated dry temperature possible. 5 USING THE CONTROLS Step 4 Select Cycle Options Step 5 Start the Dryer PREVENT WRINKLES – Provides approximately 95 minutes of intermittent tumbling in unheated air at the end of the cycle to reduce wrinkling. SIGNAL – The end of cycle signal is adjustable. Press the “+” or “–” signal pad to increase or decrease the volume of the signal. START/PAUSE – Close the door and press the START/PAUSE pad to start the dryer. Pressing OFF cancels the cycle and stops the dryer. To interrupt a running cycle, press the START/PAUSE pad again. NOTE: If the dryer has not reached the cool down portion of the cycle, pressing START/PAUSE will pause the cycle indefinitely. If the dryer has moved to cool down, the time will continue to count down to zero. ESTIMATED TIME DISPLAY • After pressing START/PAUSE, the display will show the estimated time remaining in the cycle. INDICATOR LIGHTS • The indicator lights beside the settings will light when the selection is made. • The COOL DOWN indicator light will illuminate when the dryer moves into the cool-down portion of the cycle. • If the PREVENT WRINKLES option has been selected, the PREVENT WRINKLES light will illuminate to indicate that the load is dry and the dryer has moved into the PREVENT WRINKLES portion of the cycle (see Step 4). 6 S PECIAL LAUNDRY TIPS Please follow the care label or manufacturer’s instructions for drying special items. If care label instructions are not available, use the following information as a guide. Bedspreads & Comforters • Follow the care label instructions or dry on the SENSOR DRY cycle and HIGH temperature setting. • Be sure the item is thoroughly dry before using or storing. • May require repositioning to ensure even drying. Blankets • Use SENSOR DRY and dry only one blanket at a time for best tumbling action. • Be sure the item is thoroughly dry before using or storing. Curtains & Draperies • Use the SENSOR DRY cycle and EXTRA LOW temperature setting to help minimize wrinkling. • Dry these in small loads for best results and remove as soon as possible. Cloth Diapers • Use SENSOR DRY and the HIGH temperature setting for soft, fluffy diapers. Down–Filled Items • Use SENSOR DRY and the EXTRA LOW temperature setting. • Place a clean pair of sneakers in the dryer with the item to fluff the down comforters, etc. Adding a couple of dry towels shortens dry time and absorbs moisture. Foam Rubber (rug backs, stuffed toys, shoulder pads, etc.) • Do not dry on a heat setting. Use the AIR FLUFF special cycle (no heat). • WARNING – Drying a rubber item with heat may damage it or be a fire hazard. (jackets, sleeping bags, comforters, etc.) Pillows Plastics (shower curtains, outdoor furniture covers, etc.) • Use SENSOR DRY. • Add a couple of dry towels and a pair of clean sneakers to help the tumbling action and to fluff the item. • Do not dryer-dry kapok or foam pillows. • Use the AIR FLUFF cycle or TIME DRY and the EXTRA LOW temperature setting depending on the care label instructions. AVOID DRYER DRYING • • • Fiberglass items (curtains, draperies, etc.) Woolens, unless recommended on the label. Vegetable or cooking oil soaked items. (See pg. 2) 7 C ARE AND CLEANING Control Panel – Clean with a soft, damp cloth. Do not use abrasive substances. Do not spray cleaners directly on the panel. Cabinet – Wipe off any marks with soap and water. Dryer Exhaust System – Should be inspected and cleaned once a year to maintain optimum performance.The outside exhaust hood should be cleaned more frequently to ensure proper operation. (Refer to the Installation Instructions for more information.) Tumbler – Remove any stains such as crayon, ink pen or fabric dye (from new items such as towels or jeans) with an all-purpose cleaner. Then tumble old towels or rags to remove any excess stain or cleaning substance. Once these steps are done, stains may still be visible, but should not transfer to subsequent loads. R EPLACE DRUM LIGHT Instructions for replacing the bulb: 1) Unplug or disconnect the dryer from the electrical power supply. 2) Open the door and use a Phillips screwdriver to remove the screw attaching the lens to the tumbler front. 3) Remove lens cover by pulling cover toward center of tumbler. 4) Rotate bulb counterclockwise to remove from socket. REVERSE THE 5) Replace the bulb with a 120 volt, 10 watt maximum candelabra base light bulb. 6) Turn the light bulb clockwise into socket. 7) Replace lens cover by hooking plastic tabs into tumbler front below the light housing. 8) Reinstall the screw into the lens cover screw hole. 9) Reconnect dryer to power supply. DOOR Instructions for reversing the dryer door: 1) Remove the hinge hole covers and screws. 2) While supporting the door, remove 2 screws in the hinges that secure the hinges to the cabinet. 3) Remove door by lifting slightly at the hinges and pulling the hinge tabs out of the hinge slots. 4) Move the following parts to the opposite side of the door: 2 hinges and 4 hinge screws, 4 door screws, door strike and screw, inner door cover plate and screw. 5) Attach the door to the opposite side of the cabinet using the 2 counter sunk hinge screws. (See below). Screw the lower hinge screw in first.This will help to align the door and hinges. 6) Replace the hinge hole covers to the opposite side. 8 TROUBLESHOOTING CHECK THESE POINTS IF YOUR AMANA DRYER... Doesn’t Run • • • • Be sure the door is latched shut. Be sure the power cord is plugged into a live electrical outlet. Check the home’s circuit breaker and fuses. Press the START/PAUSE pad again if the door is opened during the cycle. Doesn’t Heat • • • • • Check the home’s circuit breaker and fuses. Select a heat setting, not AIR FLUFF. On a gas dryer, check that the gas supply is on. Clean the lint filter and exhaust duct. Dryer may have moved into the cool-down portion of the cycle. Doesn’t Dry • • • • • • • • • Check all of the above, plus... Be sure the exhaust hood at the outside of the home can open and close freely. Check exhaust system for lint build-up. Ducting should be inspected and cleaned annually. Use 4” rigid metal exhaust duct. Do not overload. 1 Wash load = 1 Dryer load. Sort heavy items from lightweight items. Large, bulky items like blankets or comforters may require repositioning to ensure even drying. Check that the washer is draining properly to extract adequate water from the load. Clothes load too small to tumble properly. Add a few towels. Is Noisy • Check the load for objects such as coins, loose buttons, nails, etc. Remove promptly. • It is normal to hear the dryer gas valve or heating element cycle on and off during the drying cycle. • Be sure the dryer is leveled properly as outlined in the installation manual. • Be sure the rubber feet are installed on the leveling legs. • It is normal for the dryer to hum due to the high velocity of air moving through the dryer drum and exhaust system. Dries Unevenly Has an Odor “PF” Appears in the Display • Seams, pockets and other similar heavy areas may not be completely dry when the rest of the load has reached the selected dryness level. This is normal. Select the SENSOR DRY LEVEL VERY setting if desired. • If one heavy item is dried with a lightweight load, such as one towel with sheets, it is possible that the heavy item will not be completely dry when the rest of the load has reached the selected dryness level. Sort heavy items from lightweight items for best drying results. • Household odors such as from painting, varnishing, strong cleaners, etc. may enter the dryer with the surrounding room air. This is normal as the dryer draws the air from the room, heats it, pulls it through the tumbler and exhausts it to the outside. When these odors are present in the air, ventilate the room completely before using the dryer. • The dryer has experienced a power failure. Press OFF, then restart the cycle. For further assistance, call Maytag Services, LLC toll-free at 1-800-688-9900 USA. U.S. customers using TTY for deaf, hearing impaired or speech impaired, call 1-800-688-2080. 9 D RYING RACK (SELECT MODELS) USING THE DRYING RACK The drying rack allows you to dry items that you don’t want to tumble dry; for example, sneakers, washable sweaters, stuffed toys, pillows, etc. The rack remains stationary, but the drum rotates. (Make sure nothing hangs over the edges of the rack.) To Use Rack: 1) Open dryer door. 2) Position drying rack in tumbler with the two extension wires toward you.These wires will brace the rack against the front surface of the tumbler. Legs will rest on front ledge and at back of drum. 3) Place wet items on the rack, leaving space between them so air can reach all surfaces. SUGGESTED ITEMS 4) Close dryer door. 5) Use the TIME DRY cycle or use SENSOR DRY LEVEL NORMAL setting. Select time according to moisture and weight of item. Push the START/PAUSE button. It may be necessary to reset the controls if a longer drying time is needed. SUGGESTED TEMPERATURE SETTINGS Washable sweaters (block to shape and lay flat on rack) Heat Stuffed toys* (foam or rubber filled) AIR FLUFF Sneakers AIR FLUFF or Heat Stuffed toys or pillows (cotton or polyester fiber filled) To Remove Rack: 1) Open dryer door. Foam rubber pillows* 2) Lift rack straight up and out. Note: If not included with your dryer, contact your Amana dealer for the accessory kit MAL1000AXX or call 1-877-232-6771 USA. Heat WARNING AIR FLUFF *WARNING – When drying foam rubber, plastic or rubber with heat, it is possible they will suffer damage and could lead to a fire hazard. 10 AMANA® MAJOR APPLIANCE WARRANTY ONE YEAR LIMITED WARRANTY For one year from the date of purchase, when this major appliance is operated and maintained according to instructions attached to or furnished with the product, Amana brand of Maytag Corporation or Maytag Limited (hereafter “Amana”) will pay for factory specified replacement parts and repair labor to correct defects in materials or workmanship. Service must be provided by a Amana designated service company. This limited warranty applies only when the major appliance is used in the country in which it was purchased. ITEMS AMANA WILL NOT PAY FOR 1. Service calls to correct the installation of your major appliance, to instruct you how to use your major appliance, to replace or repair house fuses or to correct house wiring or plumbing. 2. Service calls to repair or replace appliance light bulbs, air filters or water filters. Those consumable parts are excluded from warranty coverage. 3. Repairs when your major appliance is used for other than normal, single-family household use. 4. Damage resulting from accident, alteration, misuse, abuse, fire, flood, acts of God, improper installation, installation not in accordance with electrical or plumbing codes, or use of products not approved by Amana. 5. Any food loss due to refrigerator or freezer product failures. 6. Replacement parts or repair labor costs for units operated outside the United States or Canada. 7. Pickup and delivery. This major appliance is designed to be repaired in the home. 8. Repairs to parts or systems resulting from unauthorized modifications made to the appliance. 9. Expenses for travel and transportation for product service in remote locations. 10. The removal and reinstallation of your appliance if it is installed in an inaccessible location or is not installed in accordance with published installation instructions. 11. Replacement parts or repair labor costs when the major appliance is used in a country other than the country in which it was purchased. DISCLAIMER OF IMPLIED WARRANTIES; LIMITATION OF REMEDIES CUSTOMER'S SOLE AND EXCLUSIVE REMEDY UNDER THIS LIMITED WARRANTY SHALL BE PRODUCT REPAIR AS PROVIDED HEREIN. IMPLIED WARRANTIES, INCLUDING WARRANTIES OF MERCHANTABILITY OR FITNESS FOR A PARTICULAR PURPOSE, ARE LIMITED TO ONE YEAR OR THE SHORTEST PERIOD ALLOWED BY LAW. AMANA SHALL NOT BE LIABLE FOR INCIDENTAL OR CONSEQUENTIAL DAMAGES. SOME STATES AND PROVINCES DO NOT ALLOW THE EXCLUSION OR LIMITATION OF INCIDENTAL OR CONSEQUENTIAL DAMAGES, OR LIMITATIONS ON THE DURATION OF IMPLIED WARRANTIES OF MERCHANTABILITY OR FITNESS, SO THESE EXCLUSIONS OR LIMITATIONS MAY NOT APPLY TO YOU. THIS WARRANTY GIVES YOU SPECIFIC LEGAL RIGHTS AND YOU MAY ALSO HAVE OTHER RIGHTS, WHICH VARY FROM STATE TO STATE OR PROVINCE TO PROVINCE. Outside the 50 United States and Canada, this warranty does not apply. Contact your authorized Amana dealer to determine if another warranty applies. If you need service, first see the “Troubleshooting” section of the Use & Care Guide. After checking “Troubleshooting,” additional help can be found by checking the “Assistance or Service” section or by calling Amana. In the U.S.A., call 1-800-688-9900. In Canada, call 1-800-688-2002. ND-68 Secadora Guía de uso y cuidado Instrucciones importantes sobre seguridad . . . . . . . . . . . . . . . . . . . . . . . 13-14 Sugerencias para el escape de la secadora . . 15 Sugerencias para el funcionamiento . . . . . . . . 16 Uso de los controles . . . . . . . . . . . . . . . . . . . 17-18 Sugerencias especiales para el lavado . . . . . . 19 Cuidado y limpieza . . . . . . . . . . . . . . . . . . . . . . . 20 Reemplazo de la luz del tambor . . . . . . . . . . . . 20 Inversión de la puerta . . . . . . . . . . . . . . . . . . . . . 20 Solución de problemas . . . . . . . . . . . . . . . . . . . .21 Rejilla de secado . . . . . . . . . . . . . . . . . . . . . . . . . .22 Garantía de los electrodomésticos principales de Amana® . . . . . . . . . . Ultima página BIENVENIDA ¡Nuestra bienvenida y felicitaciones por la compra de una secadora Amana®! Su completa satisfacción es muy importante para nosotros. Para obtener los mejores resultados le sugerimos que lea esta guía para familiarizarse con los procedimientos apropiados de funcionamiento y mantenimiento. Si usted necesita ayuda en el futuro, es útil tener: 1) El número completo de modelo y de serie para identificación de su secadora. Se encuentran en una placa de datos situada en la sección central inferior de la abertura de la puerta. Fecha de compra ____________________ Número de modelo __________________ Número de serie ____________________ 2) IMPORTANTE: Conserve esta guía y el recibo de compra en un lugar seguro para referencia futura. Para obtener servicio bajo la garantía es necesario comprobar la fecha de compra original. Si tiene alguna consulta, llame a: Maytag Services, LLC 1-800-688-9900 EE.UU. (Lunes a Viernes, 8:00 a.m. - 8:00 p.m. Hora del Este) http://www.maytag.com Para información sobre servicio y garantía, ver la página última. NOTA: En nuestro continuo afán de mejorar la calidad de nuestros electrodomésticos, puede que sea necesario hacer modificaciones a la secadora sin actualizar esta guía. INSTRUCCIONES IMPORTANTES SOBRE SEGURIDAD Lea antes de poner en funcionamiento su secadora. INFORMACIÓN SOBRE LAS INSTRUCCIONES DE SEGURIDAD Las advertencias e instrucciones importantes sobre seguridad que aparecen en este manual no están destinadas a cubrir todas las posibles circunstancias y situaciones que puedan ocurrir. Se debe ejercer sentido común, precaución y cuidado cuando instale, efectúe mantenimiento o cuando use este electrodoméstico. Siempre póngase en contacto con su fabricante si surgen problemas o situaciones que usted no comprenda. RECONOZCA LOS SÍMBOLOS, ADVERTENCIAS Y ETIQUETAS DE SEGURIDAD ADVERTENCIA ADVERTENCIA: Peligros o prácticas no seguras que PODRIAN causar lesión personal grave o mortal. PRECAUCIÓN PRECAUCIÓN: Peligros o prácticas no seguras que PODRIAN causar lesión personal menos grave. ADVERTENCIA Para su seguridad, se debe seguir estrictamente la información proporcionada en esta guía a fin de reducir a un mínimo el riesgo de incendio o explosión o para evitar daños materiales y lesiones personales o mortales. – No almacene ni use gasolina u otros vapores y líquidos inflamables en la proximidad de este o de cualquier otro electrodoméstico. QUE HACER SI PERCIBE OLOR A GAS • No trate de encender ningún electrodoméstico. • No toque ningún interruptor eléctrico. • No use ningún teléfono en su edificio. • Haga salir de la habitación, del edificio o del área a todos los ocupantes. • Llame inmediatamente a su proveedor de gas de un teléfono vecino. Siga las instrucciones del proveedor de gas. • Si no puede localizar a su proveedor de gas, llame al departamento de bomberos. La instalación y el servicio deben ser efectuados por un instalador calificado, una agencia de servicio o el proveedor de gas. 13 INSTRUCCIONES IMPORTANTES SOBRE SEGURIDAD ADVERTENCIA Para reducir el riesgo de incendio, explosión, choque eléctrico, daños materiales o lesiones personales cuando usa su electrodoméstico, siga las precauciones básicas y las que se indican a continuación: 1) Lea todas las instrucciones antes de usar el electrodoméstico. 2) Para evitar la posibilidad de incendio o de explosión: a. No seque artículos que han sido previamente limpiados, lavados, sumergidos o manchados con gasolina, solventes de limpiar en seco u otras sustancias inflamables o explosivas pues pueden emitir vapores inflamables o producir una explosión. Cualquier material en el cual haya usado un agente de limpieza o que esté saturado con líquidos o sólidos inflamables, no debe ser colocado en la secadora hasta que todos los restos de tales líquidos o sólidos inflamables y sus vapores hayan sido eliminados. Existen muchos artículos de uso doméstico que son altamente inflamables tal como: la acetona, el alcohol desnaturalizado, la gasolina, el kerosén, algunos líquidos de limpieza domésticos, algunos quitamanchas, agua ras, ceras y quitaceras. b. Los artículos que contienen goma de espuma (pueden estar etiquetados como goma látex) o materiales de textura similar a la goma no deben ser secados en un ajuste de calor muy alto. Los materiales de goma de espuma cuando se calientan, pueden bajo ciertas circunstancias producir incendio por combustión espontánea. 3) No deje que los niños jueguen en la secadora o dentro de ella. Es necesario supervisar estrictamente a los niños cuando la secadora está siendo usada cerca de ellos. 4) Antes de que la secadora sea puesta fuera de servicio o descartada, retire la puerta del compartimiento de secado. 5) No introduzca la mano en la secadora si el tambor está girando. 6) No instale ni guarde esta secadora donde estará expuesta a las inclemencias del tiempo. 7) No altere los controles. 8) No repare ni reemplace ninguna pieza de la secadora ni intente efectuar ningún servicio a menos que se recomiende específicamente en las instrucciones de reparación por el usuario y que usted comprenda y tenga habilidad para efectuarlas. 9) No use suavizadores de telas o productos para eliminar la estática a menos que sean recomendados para uso en la secadora por el fabricante del suavizador de telas o del producto. 10) Limpie el filtro de pelusas antes o después de cada secado. 11) Mantenga el área alrededor de la abertura del escape y las áreas vecinas libres de acumulación de pelusas, polvo y suciedad. 12) El interior de la secadora y el conducto de escape deben ser limpiados periódicamente por personal de servicio calificado. 13) Este electrodoméstico debe ser puesto a tierra de manera apropiada. Nunca enchufe el cordón del electrodoméstico en un tomacorriente que no esté debidamente puesto a tierra y de acuerdo con el código nacional y local.Vea las instrucciones de instalación para la puesta a tierra de este electrodoméstico.. 14 14) No se siente en la parte superior de la secadora. AVISO Y ADVERTENCIA IMPORTANTE SOBRE SEGURIDAD La Ley de 1986 del Estado de California sobre Seguridad y Contaminación del Agua Potable (Propuesta 65) (California Safe Drinking Water and Toxic Enforcement Act of 1986) exige que el Gobernador de California publique una lista de las sustancias que según el Estado de California causan cáncer o daño al sistema reproductor y exige a las empresas que adviertan a sus clientes de la exposición potencial a tales sustancias. Se advierte a los usuarios de este electrodoméstico que la combustión del gas puede resultar en exposición de bajo nivel a algunas de las sustancias publicadas en la lista, incluyendo benceno, formaldehído y hollín, debido principalmente a la combustión incompleta del gas natural o del gas licuado. Los conductos de escape deben mantenerse libre de obstrucciones y estar debidamente ventilados hacia el exterior para reducir a un mínimo la exposición a tales sustancias. ADVERTENCIA En su sistema se pueden producir fugas de gas y causar una situación peligrosa. Es posible que las fugas de gas no puedan detectarse con el olfato solamente. Los proveedores de gas recomiendan que compre e instale un detector de gas aprobado por UL. Instálelo y úselo de acuerdo con las instrucciones del fabricante. ADVERTENCIA No coloque en su secadora artículos que estén manchados o empapados con aceite vegetal o aceite de cocina. Aún después de ser lavados estos artículos pueden contener cantidades significativas de estos aceites. El aceite restante puede encenderse espontáneamente. El peligro de emisión espontánea aumenta cuando los artículos que contienen aceite vegetal o aceite de cocina son expuestos al calor. Las fuentes de calor, tal como una secadora , pueden calentar estos artículos permitiendo que se produzca una reacción de oxidación en el aceite. La oxidación crea calor. Si este calor no puede escapar, los artículos quedan lo suficientemente calientes como para prenderse fuego. Al amontonar, apilar o guardar este tipo de artículos se evita que el calor escape y se crea un peligro de incendio. Todas las telas lavadas y no lavadas que contengan aceite vegetal o aceite de cocina pueden ser peligrosas. Si lava estos artículos en agua caliente y con detergente adicional reducirá, pero no eliminará, el peligro. Siempre use el ciclo “cool down” (enfriamiento) para estos artículos a fin de reducir la temperatura de los artículos. Nunca saque estos artículos de la secadora caliente ni interrumpa el ciclo de secado hasta que los artículos no hayan pasado por el ciclo “cool down”, Nunca amontone ni apile estos artículos cuando estén calientes. CONSERVE ESTAS INSTRUCCIONES S UGERENCIAS PARA EL ESCAPE DE LA SECADORA ADVERTENCIA ADVERTENCIA: Los conductos flexibles de plástico o no metálicos presentan un peligro potencial de incendio. INCORRECTO CORRECTO Permitir que un sistema de escape deficiente prolongue el tiempo de secado. Lea las instrucciones de instalación y la Guía de uso y cuidado INCORRECTO CORRECTO Restringir su secadora con un sistema de escape deficiente. Asegúrese de que el aire salga con facilidad por el escape de la secadora. CORRECTO Use un conducto de metal rígido de 10,2 cm (4 pulgadas) de diámetro. Coloque cinta obturadora en todas las juntas incluyendo en la conexión con la secadora. Nunca use tornillos que atrapen pelusas. cm INCORRECTO Usar conductos flexibles de plástico, aluminio delgado o no metálicos. CORRECTO INCORRECTO CORRECTO INCORRECTO Instale el conducto de manera que quede lo más derecho posible. Limpie todos los conductos antiguos antes de instalar su nueva secadora. Asegúrese de que la aleta de ventilación se abra y se cierre libremente. Inspeccione y limpie anualmente el sistema de escape. Usar conductos más largos que lo necesario con muchos codos. Uso de conductos o respiraderos aplastados u obstruidos. 15 S UGERENCIAS PARA EL FUNCIONAMIENTO LIMPIE • • • EL FILTRO DE LAS PELUSAS Después de cada secado. Para acortar el tiempo de secado. Para que la secadora aconomice de energía. ¢¢¢¢¢ @@@@@ ÀÀÀÀÀ QQQQQ @@@@@ ÀÀÀÀÀ QQQQQ ¢¢¢¢¢ NOTA: Nunca haga funcionar la secadora sin tener instalado el filtro de las pelusas. CARGUE LA ROPA EN LA SECADORA EN FORMA ADECUADA • Colocando en la secadora solamente una carga de ropa lavada a la vez. • Evitando colocar artículos muy pequeños o mezclar ropas muy pesadas con ropas livianas. • Cuando necesite secar solo uno o dos artículos agregue unos pocos artículos similares para mejorar la circulación y la eficacia del secado. • Cuando seque artículos grandes y voluminosos tal como frazadas o cobertores, puede que sea necesario volver a distribuir la ropa durante el ciclo para asegurar un secado uniforme. AGREGUE UNA HOJA DE SUAVIZADOR DE TELAS (SI LO DESEA) • Después de colocar la ropa en la secadora. • Para controlar la estática. • Antes de que la ropa comience a calentarse. Esto evita las manchas de aspecto grasiento que deja el suavizador. • Retire cualquier hoja de suavizador usada de la secadora para evitar que el suavizador deje manchas de aspecto grasiento. 16 U SO DE LOS CONTROLES Paso 1 Selección el ciclo Paso 2 Selección del nivel del sensor de secado ‘SENSOR DRY’ (Sensor de secado) – Detecta automáticamente la humedad en la ropa y apaga la secadora cuando se ha alcanzado el nivel de secado seleccionado (muy seco a secado húmedo). Este ciclo se recomienda para la mayoría de la ropa incluyendo ropas delicadas, telas inarrugables y algodón/fuertes como toallas, ropa de cama y vaqueros. ‘TIME DRY’ (Tiempo de secado) – Puede ser seleccionado para cualquier carga de ropa si no se usa ‘SENSOR DRY’. Oprima la tecla ascendente o descendente para seleccionar el número de minutos deseados. ‘AIR FLUFF’ (Aire frío) – Ofrece agitación en aire sin calor. Se usa para refrescar la ropa. Oprima la tecla ascendente o descendente para seleccionar el número de minutos deseados. ‘REMOVE WRINKLES’ (Eliminación de arrugas) – Elimina las arrugas de los artículos que están limpios y secos pero ligeramente arrugados, tal como aquellos que han estado guardados en un armario o en una maleta muy apretados o que se han dejado en la secadora durante mucho tiempo después de terminarse el ciclo. Provee 8 minutos de agitación con calor y 10 minutos de agitación de enfriamiento sin calor. Oprima la tecla flechada para seleccionar el nivel de secado deseado. ‘VERY’ (Muy seco) – Se usa para secar completamente artículos gruesos o voluminosos, incluyendo toallas y vaqueros. ‘MORE ’ (Más seco) – Usa relativamente menos tiempo para secar que el ajuste VERY seco con resultados similares. Puede que algunas costuras de los vaqueros queden levemente húmedas. ‘NORMAL’ (Normal seco) – Se usa para secar la mayoría de la ropa de lavado. ‘LESS’ (Menos seco) – Aún ofrece la ventaja de que la ropa esté ligeramente húmeda, pero los artículos se secarán más rápido cuando sean puestos a secar horizontalmente o colgados en una cuerda. ‘DAMP’ (Secado húmedo) – Se usa para secar parcialmente la ropa. Se recomienda para los artículos que deben secarse sobre una superficie plana o colgarse para secarlos. Paso 3 Selección la temperatura Existen cuatro ajustes de temperatura. Oprima la tecla flechada para seleccionar temperatura ‘HIGH’ (Alta), ‘MEDIUM’ (Mediana), ‘LOW’ (Baja) o ‘EXTRA LOW’ (Muy baja). ‘HIGH’ – Para los algodones fuertes o aquellos etiquetados ‘Tumble Dry’ (Secar en secadora). ‘MEDIUM’ – Para planchado permanente, telas sintéticas, algodones livianos o los artículos etiquetados ‘Tumble Medium Dry’ (Secar con temperatura mediana). ‘LOW’ – Para los artículos delicados etiquetados ‘Tumble Dry Low’ (Secar con temperatura baja) o ‘Tumble Dry Warm’ (Secar con temperatura tibia). ‘EXTRA LOW’ – Proporciona la temperatura de secado más baja posible. 17 USO DE LOS CONTROLES Paso 4 Selección de las opciones ‘PREVENT WRINKLES’ (Planchado permanente) – Proporciona aproximadamente 95 minutos de agitación intermitente en aire sin calor al final del ciclo para reducir las arrugas. ‘SIGNAL’ (Avisador) – El avisador de fin de ciclo es regulable. Oprima la tecla “+” or “–” para aumentar o disminuir el volumen de la señal sonora. Paso 5 Puesta en marcha de la secadora ‘START/PAUSE’ (Puesta en marcha/Pausa) – Cierre la puerta y oprima la tecla ‘START/PAUSE’ para poner en marcha la secadora. Si se oprime ‘OFF’ (Apagado), el ciclo se cancela y la secadora se detiene. Para interrumpir un ciclo en curso, oprima nuevamente la tecla ‘START/PAUSE’. NOTA: Si la secadora no ha llegado a la porción de enfriamiento del ciclo, al oprimir ‘START/PAUSE’ el ciclo se interrumpirá indefinidamente. Si la secadora llegó a la porción de enfriamiento, el tiempo continuará descontándose hasta llegar a cero. DESPLIEGUE DEL TIEMPO ESTIMADO • Después de oprimir ‘START/PAUSE’, este indicator mostrará el tiempo estimado restante del ciclo. LUCES INDICADORAS • Las luces indicadoras junto a los ajustes se iluminarán cuando se haga la selección. • La luz indicadora ‘COOL DOWN’ (Enfriamiento) se iluminará cuando la secadora pasa a la parte de enfriamiento del ciclo. • Si se ha seleccionado la opoción ‘PREVENT WRINKLES’ la luz de ‘PREVENT WRINKLES’ se iluminará para indicar que la ropa está seca y que la secadora ha pasado a la parte de ‘PREVENT WRINKLES’ del ciclo (Ver la Paso 4). 18 S UGERENCIAS ESPECIALES PARA EL LAVADO Por favor siga la etiqueta de cuidado o las instrucciones del fabricante para secar artículos especiales. Si las instrucciones de la etiqueta de cuidado no están disponibles, use la siguiente información como una guía. Cobertores y cobijas • Siga las instrucciones de la etiqueta de cuidado o seque usando el ciclo ‘SENSOR DRY’ (Sensor de secado) y temperatura ‘HIGH’ (Alta). • Asegúrese de que el artículo esté completamente seco antes de usarlo o guardarlo. • Puede que necesiten ser cambiados de posición para asegurar un secado uniforme. Frazadas • Use ‘SENSOR DRY’ y seque de una frazada a la vez para una mejor acción de agitación. • Asegúrese de que el artículo esté completamente seco antes de usarlo o guardarlo. Cortinajes y cortinas • Use el ciclo ‘SENSOR DRY’ y el ajuste de temperatura ‘EXTRA LOW’ (Muy baja) para ayudar a eliminar las arrugas. • Seque estos artículos en cargas pequeñas para mejores resultados y retírelos tan pronto como sea posible. Pañales de tela • Use ‘SENSOR DRY’ y el ajuste de temperatura ‘HIGH’ para pañales suaves y esponjosos. Artículos rellenos con plumas (chaquetas, sacos de dormir, cobertores, etc.) • Use ‘SENSOR DRY’ y el ajuste de temperatura ‘EXTRA LOW’. • Coloque un par limpio de zapatillas de tenis en la secadora con el artículo para esponjar los cobertores rellenos de plumas, etc. Si se agrega un par de toallas secas se acorta el tiempo de secado y se absorbe la humedad. Goma de espuma (forros de alfombras, muñecos de peluche, hombreras, etc.) • No seque en un ajuste con calor. Use el ciclo especial ‘AIR FLUFF’ (Aire Frío) (sin calor). • ADVERTENCIA – Si se seca un artículo de goma con calor lo puede dañar o puede constituir un peligro de incendio. Almohadas • Use ‘SENSOR DRY’. • Agregue un par de toallas secas y un par de zapatillas de tenis limpias para ayudar la acción del tambor y para esponjar el artículo. • No seque en la secadora almohadas capoc o de espuma. Plásticos (cortinas de duchas, fundas de muebles de patio, etc.) EVITE • • • • Use ‘AIR FLUFF’ o ‘TIME DRY’ (Tiempo de secado) y el ajuste de temperatura ‘EXTRA LOW’ dependiendo de las instrucciones de la etiqueta de cuidado. SECAR EN LA SECADORA Artículos de fibra de vidrio (cortinas, cortinajes, etc.) Artículos de lana a menos que se recomiende en la etiqueta. Artículos empapados con aceite vegetal o aceite de cocina. (Ver página 14) 19 C UIDADO Y LIMPIEZA Panel de control – limpie con un paño suave y húmedo. No use sustancias abrasivas. No rocíe el limpiador directamente en el panel. Gabinete – limpie cualquier marca que tenga con agua y jabón. Tambor – quite cualquier mancha tal como de crayón, tinta de pluma o tintas de telas (provenientes de artículos nuevos tales como toallas o vaqueros) con un limpiador para todo propósito. Luego coloque en el tambor toallas viejas o estropajos para quitar cualquier resto de mancha o de sustancia de limpieza. Una vez que se hayan realizado estos pasos, puede que las manchas todavía sean visibles, pero no se transferirán a las cargas de ropa subsiguientes. Sistema de escape de la secadora – debe ser inspeccionado y limpiado una vez al año para mantener un rendimiento óptimo. La campana de escape exterior debe ser limpiada más frecuentemente para asegurar funcionamiento adecuado. (Consulte las Instrucciones de Instalación para obtener mayor información. R EEMPLAZO DE LA LUZ DEL TAMBOR Instrucciones para reemplazar el foco: 5) Reemplace el foco con un foco de 120 voltios, 10 watts máximo, con base de candelabro. 1) Desenchufe o desconecte la secadora del suministro de energía eléctrica. 6) Gire el foco a la derecha en el casquillo. 2) Abra la puerta y use un destornillador Phillips para sacar el tornillo que sujeta el lente a la parte delantera del tambor. 7) Vuelva a colocar la cubierta del lente enganchando las lengüetas de plástico en la parte delantera del tambor debajo de la caja de la luz. 3) Saque la cubierta del lente tirando de la cubierta hacia el centro del tambor. 8) Vuelva a instalar el tornillo en el agujero de la cubierta del lente. 4) Gire el foco a la izquierda para sacarlo del casquillo. 9) Vuelva a enchufar la secadora en la fuente de alimentación. I NVERSIÓN DE LA PUERTA Instrucciones para invertir la puerta de la secadora. 1) Saque las cubiertas de los agujeros de las bisagra y los tornillos. 2) Mientras sujeta la puerta, saque dos tornillos de las bisagras que aseguran las bisagras al gabinete. 3) Saque la puerta levantándola ligeramente de las bisagras y tirando las lengüetas de la bisagra hacia fuera de las ranuras de las bisagras. 4) Mueva las siguientes piezas al otro lado de la puerta: 2 bisagras y 4 tornillos de bisagras, 4 tornillos de la puerta, el cerrojo de la puerta y el tornillo, la placa interior de cubierta de la puerta y el tornillo. 5) Instale la puerta en el lado opuesto del gabinete usando los 2 tornillos de cabeza avellanada de la bisagra. (Ver a continuación). Atornille primero el tornillo inferior de la bisagra. Esto ayudará a alinear la puerta y las bisagras. 6) Vuelva a colocar las tapas de los agujeros de la bisagra en el lado opuesto. 20 S OLUCIÓN DE PROBLEMAS VERIFIQUE No funciona No calienta LO SIGUIENTE SI SU SECADORA • • • • • • • • • AMANA… Asegúrese de que la puerta esté bien cerrada. Asegúrese de que el cordón eléctrico esté enchufado en un tomacorriente eléctrico con corriente. Verifique el disyuntor y los fusibles del hogar. Oprima la tecla ‘START/PAUSE’ (Puesta en marcha/Pausa) nuevamente si la puerta se abre durante el ciclo. Verifique el disyuntor y los fusibles del hogar. Seleccione un ajuste de calor, no seleccione ‘AIR FLUFF’ (Aire frío). En una secadora de gas, verifique que el gas esté abierto. Limpie el filtro de pelusas y el conducto de escape. La secadora puede haber pasado a la porción de enfriamiento del ciclo. • Verifique todo lo anterior, además de lo siguiente… • Asegúrese de que la caperuza de escape en el exterior de la casa se cierre y se abra con facilidad. • Verifique el sistema de escape para ver si hay acumulación de pelusas. El conducto debe ser inspeccionado y limpiado anualmente. • Use un conducto de metal rígido de 10,2 cm (4”). • No sobrecargue. 1 carga de ropa lavada = 1 carga de la secadora. • Separe los artículos pesados de los artículos livianos. • Los artículos grandes, voluminosos como cobertores o cubrecamas pueden requerir redistribución para asegurar un secado uniforme. • Verifique que la lavadora esté desaguando en forma adecuada para extraer suficiente agua de la carga. • La carga de ropa es demasiada pequeña para girar en forma debida. Agregue unas pocas toallas. No seca Es ruidosa No seca en forma pareja uniforme Tiene olor “PF” aparece en la pantalla • Verifique la carga de ropa para ver si hay objetos tales como monedas, botones sueltos, clavos, etc. Retírelos inmediatamente. • Es normal oír la válvula de gas de la secadora o el ciclo del elemento calefactor encenderse y apagarse durante el ciclo de secado. • Asegúrese de que la secadora esté bien nivelada como se describe en el manual de instalación. • Asegúrese de que las patas de goma hayan sido instaladas en los tornillos niveladores. • Es normal que la secadora haga un ruido debido a la alta velocidad del aire que se mueve a través del tambor de la secadora y del sistema de escape. • Las costuras, bolsillos y otras áreas similares pueden no estar completamente secas cuando el resto de la carga ha alcanzado el nivel de secado seleccionado. Esto es normal. Seleccione el ‘SENSOR DRY LEVEL VERY’ (Nivel del sensor de secado muy) si se desea. • Si un artículo pesado se seca en una carga de artículos livianos tales como una toalla con sábanas, es posible que el artículo pesado no esté completamente seco cuando el resto de la ropa ha llegado al nivel de secado seleccionado. Separe los artículos pesados de los livianos para obtener los mejores resultados de secado. • Los olores domésticos tales como olor de pintura, barnices, limpiadores fuertes, etc. pueden pe-netrar en la secadora con el aire ambiente. Esto es normal pues la secadora extrae el aire de la habitación, lo calienta, lo pasa a través del tambor y lo hace salir al exterior. Cuando estos olores están presentes en el aire, ventile completamente la habitación antes de usar la secadora. • La secadora experimentó una falla de energía eléctrica. Oprima ‘OFF’(Apagado) para reanudar el ciclo. Para mayor ayuda, llame gratuitamente a Maytag Services, LLC al 1-800-688-9900 EE.UU. 21 R EJILLA DE SECADO (MODELOS SELECTOS) USO DE LA REJILLA DE SECADO La rejilla de secado le permite secar artículos que no desee que giren en el tambor, como por ejemplo zapatos deportivos, suéteres lavables, peluches, almohadas, etc. La rejilla permanece estacionaria mientras el tambor gira. (Asegúrese de que nada cuelgue por fuera de los bordes de la rejilla.) Para usar la rejilla: 1) Abra la puerta de la secadora. 2) Coloque la rejilla de secado en el tambor con los dos alambres de extensión hacia usted. Esos alambres soportarán la rejilla sobre la superficie delantera del tambor. Las patas descansarán en el borde delantero y en la parte trasera del tambor. 3) Coloque los artículos mojados en la rejilla, dejando espacio entre ellos para que el aire pueda llegar a todas las superficies. 4) Cierre la puerta de la secadora. 5) Use el ciclo de ‘TIME DRY’ (Secado por tiempo) o el posición del ‘SENSOR DRY LEVEL NORMAL’ (Nivel del sensor de secado normal). Seleccione la duración del ciclo de acuerdo con la humedad y peso del artículo. Oprima el botón de ‘START/PAUSE’ (Puesta en marcha/Pausa). Puede que sea necesario restablecer los controles si se requiere untiempo de secado más largo. ARTÍCULOS SUGERIDOS Suéteres lavables (regrese su forma y extiéndalo sobre la rejilla) Peluches o almohadas (rellenos de fibra de algodón o poliéster) Peluches* (rellenos de goma o de espuma) Almohadas de gomaespuma* Zapatos deportivos Para retirar la rejilla: 1) Abra la puerta de la secadora. 2) Levante la rejilla derecho hacia arriba ysáquela. AJUSTES SUGERIDOS DE TEMPERATURA ‘Heat’ (Calor) ‘Heat’ ‘AIR FLUFF’ (Aire frío) ‘AIR FLUFF’ ‘AIR FLUFF’ o ‘Heat’ ADVERTENCIA *ADVERTENCIA: Cuando seque goma espuma, plástico o goma con calor, es posible que sufran daños y podrían causar riesgos de incendio. Nota: Si el juego de accesorios MAL1000AXX no fue incluido con su secadora, póngase en contacto con su distribuidor Amana o llame al 1-877-232-6771 EE.UU. 22 GARANTÍA DE LOS ELECTRODOMÉSTICOS PRINCIPALES DE AMANA® GARANTÍA LIMITADA DE UN AÑO Durante un año a partir de la fecha de compra, siempre y cuando se dé a este electrodoméstico principal un uso y mantenimiento de conformidad con las instrucciones adjuntas o provistas con el producto, la marca Amana de Maytag Corporation o Maytag Limited (en lo sucesivo denominada “Amana”) se hará cargo del costo de las piezas de repuesto especificadas de fábrica y del trabajo de reparación para corregir defectos en los materiales o en la mano de obra. El servicio deberá ser suministrado por una compañía de servicio designada por Amana. Esta garantía limitada se aplica sólo cuando el electrodoméstico principal se use en el país en donde se compró. AMANA NO PAGARÁ POR LOS SIGUIENTES ARTÍCULOS 1. Visitas de servicio técnico para corregir la instalación de su electrodoméstico principal, para enseñarle a usar su electrodoméstico principal, para cambiar o reparar fusibles domésticos o para corregir la instalación eléctrica o de la tubería de la casa. 2. Visitas de servicio técnico para reparar o reemplazar focos para electrodomésticos, filtros de aire o filtros de agua. Esos insumos están excluidos de la cobertura de la garantía. 3. Reparaciones cuando su electrodoméstico principal se use de un modo diferente al doméstico normal de una familia. 4. Daños causados por accidente, alteración, uso indebido, abuso, incendio, inundación, actos fortuitos, instalación incorrecta, instalación que no esté de acuerdo con los códigos eléctricos o de plomería, o el empleo de productos no aprobados por Amana. 5. Cualquier pérdida de comida debido a fallas del refrigerador o del congelador. 6. Piezas de repuesto o gastos de reparación para electrodomésticos que se empleen fuera de los Estados Unidos o Canadá. 7. Recogida y entrega. Este electrodoméstico principal está diseñado para ser reparado en el hogar. 8. Reparaciones de piezas o sistemas como resultado de modificaciones no autorizadas que se hayan efectuado en el electrodoméstico. 9. Gastos de viaje y transporte para obtener servicio del producto en lugares remotos. 10. La remoción e instalación de su electrodoméstico si estuviera instalado en un lugar inaccesible o si no estuviera instalado de conformidad con las instrucciones de instalación publicadas. 11. Piezas de repuesto o gastos de reparación cuando el electrodoméstico principal se use en un país diferente del país en donde se compró. EXCLUSIÓN DE GARANTÍAS IMPLÍCITAS; LIMITACIÓN DE RECURSOS EL ÚNICO Y EXCLUSIVO RECURSO DEL CLIENTE SEGÚN LOS TÉRMINOS DE ESTA GARANTÍA LIMITADA SERÁ EL DE REPARAR EL PRODUCTO SEGÚN SE ESTIPULA EN LA PRESENTE. LAS GARANTÍAS IMPLÍCITAS, INCLUYENDO LAS GARANTÍAS DE COMERCIABILIDAD O DE CAPACIDAD PARA UN PROPÓSITO PARTICULAR, SERÁN LIMITADAS A UN AÑO O AL PERÍODO MÁS CORTO PERMITIDO POR LEY. AMANA NO SE RESPONSABILIZARÁ POR DAÑOS INCIDENTALES O CONSECUENTES. ALGUNOS ESTADOS Y PROVINCIAS NO PERMITEN LAS EXCLUSIONES O LIMITACIONES POR DAÑOS INCIDENTALES O CONSECUENTES, O LIMITACIONES ACERCA DE CUÁNTO DEBE DURAR UNA GARANTÍA IMPLÍCITA DE COMERCIABILIDAD O CAPACIDAD, DE MODO QUE LAS LIMITACIONES O EXCLUSIONES ARRIBA MENCIONADAS PUEDEN NO APLICARSE EN SU CASO. ESTA GARANTÍA LE OTORGA DERECHOS LEGALES ESPECÍFICOS Y ES POSIBLE QUE USTED TENGA TAMBIÉN OTROS DERECHOS QUE PUEDEN VARIAR DE UN ESTADO A OTRO O DE UNA PROVINCIA A OTRA. Esta garantía no tiene vigor fuera de los cincuenta Estados Unidos y Canadá. Póngase en contacto con el distribuidor autorizado de Amana para determinar si corresponde otra garantía. Si necesita servicio, consulte primero la sección "Solución de problemas" del Manual de uso y cuidado. Después de consultar la sección “Solución de problemas”, puede encontrar ayuda adicional en la sección “Ayuda o servicio técnico,” o llamando a Amana. En los EE.UU., llame al 1-800-688-9900. En Canadá, llame al 1-800-688-2002. MAYTAG and the “M” Symbol are registered trademarks of Maytag Limited. All other marks are trademarks of Maytag Corporation or its related companies. MAYTAG et le symbole “M” sont des marques de commerce déposées de Maytag Limited. Toutes les autres marques de commerce appartiennent à Maytag Corporation ou ses filiales ou sociétés affiliées. MAYTAG y la “M” son marcas registradas de Maytag Limited. Todas las otras marcas son propiedad de Maytag Corporation ou ses filiales ou sociétés affiliées. A/12/06 Part No. 2207676 www.amana.com Litho U.S.A. ©2006. All Rights Reserved. Tous droits réservés. Todos los derechos reservados. 1