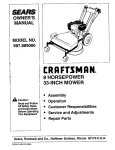
1
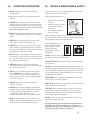
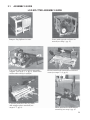
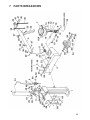
LOG SPLITTERS
ENGINE DRIVEN, TRAILER MOUNTED
Assembly, Parts
& Operator's Manual
For Models
T22B & T22H
June 2006
Form: T22B-HLogsplit.pm7
TABLE OF CONTENTS
SECTION
DESCRIPTION
PAGE
1
2
3
4
Introduction .............................................................. 1
2.1
2.2
2.3
2.4
2.5
2.6
2.7
2.8
2.9
Safety............................................................................ 2
Training & Preparation ........................................... 3
Safety Wear .............................................................. 3
Operating Safety ...................................................... 4
Operating Procedure ............................................... 5
Repair & Maintenance Safety ................................. 5
Towing Safety .......................................................... 6
Fire Prevention ........................................................ 6
Hydraulic Safety ...................................................... 7
Safety Decals ............................................................ 7
3.1
Assembly Instructions.............................................. 8
Assembly Guide .................................................. 9-10
4.1
4.2
4.3
4.4
4.5
Operation .................................................................. 11
Engine Oil Recommendations ............................... 11
Filling Hydraulic System ...................................... 12
Towing .................................................................... 12
Starting Instructions ............................................. 12
Operation ............................................................... 13
5
Maintenance ............................................................. 14
6
Specifications ........................................................... 14
7
8
7.1
Parts Breakdown..................................................... 15
Parts List........................................................... 16-17
Limited Warranty .................................................... 18
1
INTRODUCTION
Congratulations on your choice of Log Splitters. This equipment has been designed and manufactured to
meet the needs of a discriminating buyer for the splitting of logs.
The Gearmore trailer mounted, engine driven log splitters are the latest compact designed splitters. The units
are available with two different engines 6 H.P. Briggs and Stratton or 5.5 H.P. Honda. The log splitters can be
used in the vertical or horizontal position. The 2" ball hitch allows the log splitter to be towed by ATVs, utility
vehicles, small tractors, etc.
Safe, efficient and trouble free operation of your Log Splitter requires that you and anyone else who will be
operating or maintaining the machine, read and understand the Safety, Operation, and Maintenance information contained within the Operator's Manual.
Keep this manual handy for frequent reference and to pass on to new operators or owners. Call your dealer,
or us if you need assistance, information or additional copies of the manuals.
1
2
SAFETY
SAFETY ALERT SYMBOL
This Safety Alert symbol means
ATTENTION! BECOME
ALERT! YOUR SAFETY IS INVOLVED!
The Safety Alert symbol identifies
important safety messages on the
Log Splitter and in the manual.
When you see this symbol, be alert
to the possibility of personal injury
or death. Follow the instructions
in the safety message.
Why is SAFETY important to you?
3 Big Reasons
Accidents Disable and Kill
Accidents Cost
Accidents Can Be Avoided
SIGNAL WORDS:
Note the use of the signal words DANGER,
WARNING and CAUTION with the safety
messages. The appropriate signal word for
each message has been selected using the
following guide-lines:
DANGER - Indicates an imminently hazardous
situation that, if not avoided, will result
in death or serious injury. This signal
word is to be limited to the most
extreme situations typically for
machine components which, for
functional purposes, cannot be guarded.
WARNING - Indicates a potentially hazardous
situation that, if not avoided, could
result in death or serious injury, and
includes hazards that are exposed
when guards are removed. It may
also be used to alert against unsafe
practices.
CAUTION - Indicates a potentially hazardous
situation that, if not avoided, may
result in minor or moderate injury.
It may also be used to alert against
unsafe practices.
If you have any questions not answered in this manual or require additional copies or the manual is
damaged, please contact your dealer.
2
2.1
TRAINING & PREPARATION
Before operating this Log Splitter, read and
understand this manual completely. Become
familiar with it for your own
safety. To fail to do so may
cause serious injury. DO NOT
allow anyone to operate this
Log Splitter who has not read
this manual.
NEVER use your Log Splitter for any other purposes than splitting wood. It is designed for this
use and any other use may cause an injury.
NEVER allow children to operate your Log
Splitter nor adults lacking proper instructions.
Keep them away from your work area. Your Log
Splitter is not a toy. Only the operator is to be
near your Log Splitter during use. Keep all others, including pets a minimum of 10 feet away
from your work zone. Flying wood can be hazardous. If a helper is assisting in loading logs,
NEVER activate the control until the helper
is clear of the area. More accidents occur when
more than one person operates the Log Splitter
than at any other time.
2.2 SAFETY WEAR
NEVER wear loose clothing or jewelry that can
be caught by moving parts of your Log Splitter
and pull you into it. Keep clothing away from all
moving parts of your Log Splitter. Wear proper
head gear to keep hair away from moving parts.
ALWAYS wear safety
shoes. A dropped log can
seriously injure your foot.
ALWAYS wear safety
glasses. A piece of
splitting log could fly off
and hit your eyes.
If you wear gloves, be sure they are tight fitting
without loose cuffs or draw strings.
Have a first aid kit available
should the need arise and
learn how to use it.
ALWAYS wear protective
hearing devices as needed.
NEVER operate your Log Splitter when under
the influence of alcohol, drugs or medication. A
clear mind is essential for safety.
NEVER allow a person who is tired or otherwise
not alert to use your Log Splitter.
PREPARE LOGS PROPERLY
BOTH ends of each log should be cut as square
as possible to help prevent the log from riding
out of the splitter during operation.
PROLONGED EXPOSURE TO LOUD
NOISE MAY CAUSE PERMANENT
HEARING LOSS!
Tractors with or without equipment attached can often be noisy enough to cause
permanent, partial hearing loss. We
recommend that you wear hearing protection on a full-time basis if the noise in the
Operator's position exceeds 80db. Noise
over 85db on a long-term basis can cause
severe hearing loss. Noise over 90db
adjacent to the Operator over a long-term
basis may cause permanent, total hearing loss. NOTE: Hearing loss from loud
noise (from tractors, chain saws, radios,
and other such sources close to the ear) is
cumulative over a lifetime without hope of
natural recovery.
3
2.3
OPERATING SAFETY
YOU are responsible for the SAFE operation and
maintenance of your Log Splitter. YOU must ensure that you and anyone else who is going to operate, maintain or work around the Log Splitter
be familiar with the operating and maintenance
procedures and related SAFETY information
contained in this manual. This manual will take
you step-by-step through your working day and
alerts you to all good safety practices that should
be adhered to while operating the Log Splitter.
Remember, YOU are the key to safety. Good
safety practices not only protect you, but also the
people around you. Make these practices a working part of your safety program. Be certain that
EVERYONE operating this equipment is familiar with the recommended operating and maintenance procedures and follows all the safety
precautions. Most accidents can be prevented. Do
not risk injury or death by ignoring good safety
practices.
•
Log Splitter owners must give operating
instructions to operators or employees before
allowing them to operate the machine, and at
least annually thereafter per OSHA (Occupational Safety and Health Administration)
regulation 1928.57.
•
The most important safety feature on this
equipment is a SAFE operator. It is the operator’s responsibility to read and understand
ALL Safety and Operating instructions in the
manual and to follow these. Most accidents
can be avoided.
•
A person who has not read and understood all
operating and safety instructions is not qualified to operate the machine. An untrained
operator exposes himself and bystanders to
possible serious injury or death.
•
Do not modify the equipment in any way.
Unauthorized modification may impair the
function and/or safety and could affect the life
of the equipment.
•
Think SAFETY! Work SAFELY!
4
OPERATE IN SAFE ENVIRONMENT AND ON
SAFE GROUND
1. NEVER operate your
Log Splitter on slippery,
wet, muddy or icy surfaces.
Safe footing is essential in
preventing accidents.
2. ONLY operate your Log Splitter on level
ground and not on a side hill. It could tip over
or rolling logs or poor footing could cause an
accident. (This also prevents the spillage of
gas from the tank).
3. NEVER attempt to move the Log Splitter
over hilly or uneven terrain without a tow
vehicle or adequate help.
4. ALWAYS block wheels to prevent movement
of Log Splitter while in operation.
5. Keep work area clean. Immediately remove
split wood around your Log Splitter so that
you don’t stumble over it.
6. When using your Log Splitter, use in daylight
or under good artificial light.
2.4
OPERATING PROCEDURE
2.5
REPAIR & MAINTENANCE SAFETY
♦ ONLY operate the Log Splitter from the
operator zone.
Good maintenance is your responsibility. Poor maintenance is an invitation to trouble.
♦ Know how to stop the unit and disengage the
controls.
Follow good shop practices.
♦ NEVER place hands or feet between log and
splitting wedge or between log and ram during
forward or reverse stroke. To do so may result
in crushed or amputated fingers or worse. You
may lose an arm or foot.
♦ DON’T straddle the Log Splitter when using it.
A slip in any position could result in a serious
injury.
♦ NEVER try to split two logs on top of each
other. One may fly out and injure you.
♦ NEVER allow one person to operate the valve
while another is positioning the log, as serious
injury could result from starting operation with
the hands near the ram or wedge.
♦ DON’T step over Log Splitter when the engine
is running. You may trip or accidently activate
the ram if you step over it. If you need to get to
the other side, walk around.
♦ NEVER attempt to load your Log Splitter
when the ram is in motion. You may get caught
by the ram and injured.
♦ ONLY use your hand to operate the control
lever. NEVER use your foot or a rope or any
other extension device. This could result in
your inability to stop your Log Splitter quickly
and cause an injury.
♦ NEVER move the Log Splitter while the
engine is running
♦ NEVER leave your Log Splitter unattended
with the engine running. Shut off the engine if
you are leaving your Log Splitter even for a
short period of time. Someone could
accidentally activate the ram and be injured.
♦ DON’T run the engine in an enclosed area.
Exhaust gases contain carbon monoxide. This
odorless gas can be deadly when inhaled.
•
•
•
Keep service area clean
and dry.
Be sure electrical outlets
and tools are properly
grounded.
Use adequate light for
the job at hand.
Make sure there is plenty of ventilation. Never operate
the engine of the towing vehicle in a closed building. The
exhaust fumes may cause asphyxiation.
A fire extinguisher and
first aid kit should be
kept readily accessible
while performing
maintenance on this
equipment.
DON’T operate your Log Splitter in poor mechanical
condition or when in need of repair.
PERIODICALLY check that all nuts, bolts and screws
are tightened.
DON’T alter your Log Splitter in any manner, such as
attaching a rope or extension to the control lever or adding to the width or height of the wedge unless approved
by the manufacturer. Such alterations may cause your
Log Splitter to be unsafe.
PERFORM all recommended maintenance procedures
before you use your Log Splitter.
REPLACE all damaged or worn parts such as hydraulic
hoses and fittings immediately.
NEVER tamper with the engine to run it at excessive
speeds. This increases the hazard of personal injury.
The maximum engine speed is preset by the manufacturer and is within safety limits.
DON’T service or repair your Log Splitter without removing the spark plug wire.
All replacement parts must meet manufacturer’s
specifications. The manufacturer will not be responsible for injuries or damages caused by use of
unapproved parts and/or accessories.
5
2.6
TOWING SAFETY
2.7
FIRE PREVENTION
OBEY all state and local regulations when towing on public roads and highways.
NEVER operate your Log Splitter near a flame or
spark. Hydraulic oil and gasoline are flammable
and can explode.
BEFORE towing, be certain that the Log Splitter
is correctly and securely attached to the towing
vehicle and that a safety chain is in place. Leave
slack in chains for turning allowance.
DO NOT fill the gas tank while the engine is hot
or running. Allow the engine to cool before refueling.
DON’T allow anyone to sit or ride on your Log
Splitter. They can easily fall off and be seriously
injured.
NEVER smoke while operating or refueling your
Log Splitter. Gas fumes can easily explode.
BEFORE using your Log Splitter, disconnect
it from the towing vehicle. A log can easily be
pushed forward onto the vehicle.
Only refuel your Log Splitter outdoors in a clear
area void of gas fumes or spilled gas. Always use
an approved fuel container. Always replace the gas
cap securely.
NEVER carry any cargo or wood on your Log
Splitter. It may fall off and endanger vehicles
that are following you.
If gasoline is spilled, move machine away from the
area of the spill and avoid creating any source of
ignition until the spilled gas has evaporated.
Allow for added length of your Log Splitter when
turning, parking, crossing intersections and in all
driving situations.
Take a Class B fire extinguisher
with you when operating your
Log Splitter in dry areas as a
precautionary measure against
possible flying sparks.
Be careful when backing up. You can easily jackknife your Log Splitter.
Adjust towing speed for terrain and conditions.
DO NOT exceed 45 MPH. Be extra cautious and
reduce speed when towing over bumpy or rough
terrain including railroad crossings.
Completely drain the fuel tank prior to storage.
This guards against the accumulation of fuel
fumes, which could result in a fire hazard.
ALWAYS store gasoline in an approved, tightly
sealed container. Store the container in a cool, dry
place. DO NOT store in the house or near a heating appliance.
NOTE:
This unit is equipped with an internal combustion engine and should not be used on or near any
unimproved forest covered, brush covered or grass
covered land unless the engine’s exhaust system is
equipped with a spark arrester meeting applicable
local or state laws (if any). If a spark arrester is
used, it should be maintained in effective working
order by the operator.
In the state of California, the above is required by
law (Section 442 of the California Public Resources
Code). Other states may have similar laws. Federal laws apply on federal lands. A spark arrester
muffler (optional by manufacturer) is available as
an accessory at your nearest engine dealer. Check
legal requirements in your area.
6
2.8
HYDRAULIC SAFETY
The hydraulic system of your Log Splitter requires
careful inspection along with the mechanical
parts. Be sure to replace frayed, kinked, cracked
or otherwise damaged hydraulic components. Just
because it isn’t leaking today doesn’t mean that it
will not fail tomorrow.
Fluid escaping from a very small hole
can almost be invisible. Do not check for
leaks with your hand. Escaping fluid
under pressure can have sufficient force
to penetrate skin causing serious personal injury
or even death. Leaks can be detected by passing a
piece of cardboard or wood over the suspected leak
and looking for discoloration.
If injured by escaping fluid, see a doctor at
once. Serious infection or reaction can develop
if proper medical treatment is not administered
immediately.
Should it become necessary to loosen or remove
any hydraulic fitting or line, be sure to relieve all
pressure by shutting off the engine and moving
the control handle back and forth several times.
DO NOT remove the cap from the hydraulic tank
or reservoir while your Log Splitter is running.
Hot oil under pressure could result in serious
injury.
The pressure relief valve on your Log Splitter is
preset at the factory. DO NOT adjust the valve.
Only a qualified service technician should perform
this adjustment.
2.9
SAFETY DECALS
Part No. DL51-1-57
Location: Top, forward section of hydraulic
cylinder
2.9
SAFETY DECALS
ALWAYS REPLACE
MISSING OR
DAMAGED DECALS
WARNING
1. READ AND UNDERSTAND OPERATOR’S
MANUAL THOROUGHLY BEFORE
OPERATION. FAILURE TO DO SO MAY
RESULT IN SERIOUS INJURY.
2. KEEP ALL SHIELDS IN PLACE.
3. KEEP HANDS, FEET AND CLOTHING
AWAY FROM POWER DRIVEN PARTS.
4. ALWAYS WEAR SAFETY GLASSES AND
SAFETY SHOES DURING OPERATION.
5. ALWAYS OPERATE OUT-OF-DOORS WITH
GOOD VENTILATION.
6. ALWAYS STOP ENGINE AND REMOVE
SPARK PLUG WIRE BEFORE PERFORMING
MAINTENANCE OPERATIONS.
7. ALWAYS SHUT OFF ENGINE WHEN
LEAVING LOG SPLITTER UNATTENDED,
EVEN FOR A SHORT PERIOD OF TIME.
8. ONLY ONE PERSON SHOULD LOAD AND
OPERATE THE LOG SPLITTER. KEEP ALL
OTHERS CLEAR DURING OPERATION.
NEVER ALLOW ONE PERSON TO
OPERATE VALVE WHILE ANOTHER IS
POSITIONING THE LOG.
9. ALWAYS POSITION LOG WITH HANDS ON
THE SIDES OF LOG. KEEP HANDS CLEAR
OF ENDS.
10. KEEP ALL CHILDREN AWAY FROM THE
LOG SPLITTER.
11. DO NOT STEP OVER THE LOG SPLITTER.
12. ONLY USE HANDS TO OPERATE THE
CONTROL VALVE.
13. DO NOT OPERATE THE LOG SPLITTER
WHILE UNDER THE INFLUENCE OF
ALCOHOL, DRUGS OR MEDICATION.
14. ALWAYS OPERATE THE LOG SPLITTER
ON LEVEL, DRY, NON-SLIPPERY
SURFACES. KEEP OFF SLOPES.
15. KEEP WORK AREA CLEAR OF SPLIT
WOOD, DEBRIS OR OTHER OBSTACLES.
16. ALWAYS STAY IN THE OPERATOR ZONE
WHEN USING THE LOG SPLITTER.
17. ALWAYS SPLIT WOOD IN THE DIRECTION
OF THE GRAIN ONLY.
18. DO NOT ADD GASOLINE WHILE THE
ENGINE IS HOT OR RUNNING. ALLOW
ALL SPILLED GAS TO EVAPORATE
BEFORE USING LOG SPLITTER.
Part No. DL51-1-32
Location: Top of hydraulic cylinder
7
3
ASSEMBLY INSTRUCTIONS
NOTE:
The following instructions pertain to Gearmore Log Splitters, models T22B & T22H.
This Log Splitter comes partially assembled. Refer to the drawing and parts list should it become necessary to disassemble the unit for repair or replacement of parts.
STEP 1: Remove the top board from the crate.
Leave the side board facing the tank and wheels
in place. Remove the two end boards and the front
board.
CAUTION: FLATTEN EXPOSED NAILS
WITH A HAMMER TO AVOID
POSSIBLE INJURY.
STEP 2: Remove the tongue assembly (3)* from
the crate. Put the ground stand (34)* in the upright position and lock in place with pin (37)*.
STEP 3: Set one of the wood blocks from the
crate underneath the tank (2)* so that it sits in the
upright position.
STEP 4: Attach the tongue (3)* to the tank/axle
assembly (2)* as shown in the diagram using the
two 1/2" NC x 4 1/2" hex cap screws (27)*, lockwashers (28)* and 1/2" NC hex nuts (30)* provided in
the hardware kit. Flatwashers are included in the
hardware kit should it be necessary to use them
as spacers to eliminate play between the tongue
and tank/tongue mounting plate. Tighten. The side
board on the crate keeps the unit stable. Remove
the board after this assembly step is complete.
STEP 5: Roll the tank/tongue assembly (2 & 3)*
off the bottom board of the crate.
beam. You may need to wiggle the plate back and
forth until the holes line up. Use the 3/8" bolts and
3
/8" lockwashers provided in the hardware kit.
Place the 3/8" flatwashers provided in the hardware
kit in front of the lockwashers next to the hole.
Push the stripper plate (71)* down until there is
no play in the bolts. Tighten.
STEP 8: Slide the beam (1)* off the bottom of
the crate and carefully set it upright. Roll the
tank/tongue assembly (2 & 3)* into position between the two tabs on the beam (1)* as shown in
the diagram. Slide the pivot pin (25)* through the
holes and secure with clip pin (26)*.
STEP 9: Lower the beam (1)* to the horizontal
position so that the hole in the beam fits over the
pin (32)* on the tongue (3)*. Lock in place with the
lynch pin (31)* provided in the hardware kit.
STEP 10: Connect the 3/4" I.D. x 35" return hose
(53)* to the 3/4" NPT x 3/4" tube fitting on the valve
(5)*. Tighten hose clamp (18)*. Remove the plastic
plug from the other valve port and connect the
1
/2" I.D. pressure hose coming from the pump (9)*
to the swivel elbow fitting (50)* on the valve (5)*.
Tighten the nut securely.
STEP 11: Remove the pin and cotter from the
valve (5)* handle. Put the handle in the upright
position and secure with pin and cotter.
STEP 6: Remove the stripper plate (71)* from
the beam (1)* and set it aside. Turn the beam assembly (1)* 90º and center it on the bottom of the
crate. Then slide the cylinder (4)* back as far as
possible from the beam foot plate until it locks.
STEP 7:
Attach the stripper plate (71)* to the
* See Parts Breakdown (Pages 15 - 17) in this manual.
8
3.1
ASSEMBLY GUIDE
LOG SPLITTER ASSEMBLY GUIDE
Compact Log Splitter in crate.
Crate with side board in place to provide
support. (see steps 1 - 4, pg. 8). Wood block
under tank to keep it upright.
Cylinder pushed all the way back
and stripper plate attached (see
steps 6 - 7, pg. 8).
Crate with top and end piece removed (see Step 1, pg. 8).
Beam rotated and centered on bottom of
crate (see steps 5 - 6, pg. 8).
Beam attached to tank/tongue
assembly (see step 8, pg. 8).
9
3.1
ASSEMBLY GUIDE
Log Splitter locked down in horizontal position
(see step 9, pg. 8).
Log Splitter with hoses connected and valve handle in
position (see steps 10 - 11, pg. 8).
10
4
OPERATING INSTRUCTIONS
STEP 1: Starting
CAUTION: DO NOT START OR RUN
THE ENGINE WITHOUT OIL IN THE
HYDRAULIC RESERVOIR AND ENGINE.
IMPORTANT: The engine and hydraulic tank are
shipped without oil. See the engine operating and
maintenance instructions manual packed with
your Log Splitter for the type of crankcase oil, fuel,
etc. The engine manufacturer recommends leadfree gasoline only.
CAUTION: DO NOT START OR RUN
THE ENGINE BEFORE READING ALL
OPERATING INSTRUCTIONS AND
NOTES ON SAFETY THOROUGHLY.
STEP 2: The hydraulic reservoir should be filled
with an SAE20 hydraulic oil. If hydraulic oil is
difficult to obtain, automatic transmission fluid
can be substituted and should be used instead
of hydraulic oil when temperatures are below
32º F. Use only clean oil and take care to prevent
dirt from entering the hydraulic reservoir.
CAUTION: WHEN TIGHTENING THE
BREATHER CAP ON THE TANK, POINT
THE HOLE AWAY FROM THE ENGINE
AND THE OPERATOR ZONE.
4.1
ENGINE OIL RECOMMENDATIONS
BRIGGS & STRATTON ENGINES:
For temperatures above 40º F use an SAE30W
oil. Using multigrade oil may increase oil consumption. Using SAE 30W oil below 40º F will
result in hard starting and possible engine bore
damage. For temperatures below 40º F use an
SAE10W-30 or SAE5W-30 oil. Oil capacity for
the 6 H.P. engine is approximately 5/8 quart (20
ounces; 0.6 liter). Refer to Briggs & Stratton engine owner's manual for additional information.
HONDA ENGINES:
For temperatures above 50º F, use an SAE30W
oil. Using multigrade oil may increase oil consumption. For temperatures below 50º F use an
SAE10W-30 oil. Using SAE30W oil below 40º F
may result in hard starting and possible engine
bore damage due to inadequate lubrication.
SAE10W-30 is recommended for general use.
Refer to the Honda engine owner's manual. Oil
capacity is 0.58 quart (19 ounces; 0.55 liter).
ALWAYS check oil level before starting the
engine. Keep oil level at full.
11
4.2
FILLING HYDRAULIC SYSTEM
Fill the hydraulic reservoir with at least four
gallons of hydraulic fluid. After the hydraulic
reservoir and the engine crankcase are filled
with oil, start the engine. The hydraulic pump
should prime itself. With the engine running,
move the hydraulic valve lever toward the
wedge. This will cause the cylinder to extend
and expel air. When the cylinder is fully extended, retract it. Repeat this procedure several
times. An erratic movement of the cylinder
indicates that there is still air in the system.
More oil should then be added to bring the fluid
level up to the "OK" range on the dipstick. Total
hydraulic capacity is 5 gallons.
NOTE: If the tank is overfilled, it will tend
to expel oil from the breather cap when the
cylinder is retracted. After adding more oil to
the tank, cycle the cylinder again until it has a
constant speed indicating that all oil has been
expelled. Check the oil level in the reservoir
again with the dipstick to make sure it is in the
"OK" range.
4.3
TOWING
The Log Splitter is equipped with road speed
tires, a Class I coupler (2" diameter ball required) and safety chains. Before towing, the
safety chains must be secured to the hitch or
bumper of the vehicle. Local regulations should
be checked regarding licensing, lights, towing,
etc. See also Towing Safety in the Safety information section of this manual.
When transporting the machine, review and
follow these instructions:
1. Be sure all bystanders are clear of the
machine.
2. Be sure that the machine is securely attached to the tow vehicle.
3. Be sure you are in compliance with all
applicable lighting and marking regulations when transporting. Check with
your local authorities.
4. Be sure your machine can clearly be
seen by overtaking and oncoming traffic.
5. NEVER allow riders on your Log Splitter.
6. DO NOT drink and drive.
12
4.4
STARTING INSTRUCTIONS
HONDA 5.5 H.P. ENGINE
1.
2.
3.
4.
5.
6.
7.
To start a cold engine, turn the fuel valve to
the "ON" position.
Move the choke to the "ON" position.
Move the throttle control to the "FAST"
position.
Pull the starter grip slightly until resistance
is felt.Then pull rapidly to start engine.
Move the choke lever to the "OFF" position, if
it was used to start the engine, as soon as it
warms up enough and is running smoothly.
When the engine starts, move the throttle to
the "FAST" position. It is recommended that
the engine be operated in the "FAST" position
for maximum performance.
To stop the engine, move the throttle lever to
the "SLOW" position and then to the "STOP"
position. Turn fuel valve to "OFF"
BRIGGS & STRATTON 6 H.P. ENGINE
1.
2.
3.
4.
5.
Move control lever to "FAST".
Push primer bulb three (3) times.
NOTE: Do not use primer to restart a warm
engine after a short shutdown.
Grasp starter rope handle and pull out slowly
until resistance is felt. Then pull rapidly with
a full arm stroke.
NOTE: If engine fails to start after three (3)
pulls, repeat instructions 1 and 2.
When engine starts, leave control lever at
"FAST". The throttle must be in the "FAST"
position for maximum performance.
To stop the engine, move the throttle lever to
"SLOW" and then to "STOP".
NOTE:
To start a warm engine, move the throttle lever to
the "FAST" position and then pull the starter grip
until the engine starts.
The engine maximum governed speed is preset
at the factory at 3600 RPM, no load speed. When
splitting wood, the throttle should be set at the
maximum setting to develop the horsepower required for the pump.
4.5
OPERATION
WARNING: ALWAYS WEAR SAFETY
GLASSES DURING OPERATION
DANGER: KEEP HANDS AND FEET
CLEAR OF RAM, STRIPPER PLATES
AND BASE PLATE AT ALL TIMES.
1. Set up the Log Splitter in a clear, level
area and block the wheels. Make sure
that the suction port on the tanks is
always on the lower side of the Log
Splitter.
2. Place a log on the beam against the foot
plate. Make sure that the log is securely
on the foot plate and up against the
beam.
IMPORTANT: Leaving the valve in the
"actuate" position at the end of the
stroke may damage the pump. Always
use extra care when splitting logs with
unsquare ends.
NOTE: For operation in wooded areas, obtain
a spark arrester for the exhaust system. See the
engine operating and maintenance manual and
check with your authorized Briggs & Stratton or
Honda service center. See also Fire Prevention in
the Safety Information Section of this manual.
IMPORTANT:
TO EXTEND THE LIFE OF THE HYDRAULIC
CYLINDER, AVOID "BOTTOMING OUT" WEDGE
PLATE TO THE FOOT PIECE. TO CONFORM
WITH INDUSTRY SAFETY RECOMMENDATIONS, THE WEDGE STOPS 2 INCHES FROM
THE END OF THE STROKE.
Both ends of each log should be cut as
square as possible to help prevent the log
from riding out of the splitter during
operation.
3. Depress the valve handle so that the
cylinder will drive the wedge into the log.
Extend the cylinder until the log splits or
to the end of its stroke. If the log has not
completely split after the cylinder has
reached the end of its extension, retract
the cylinder.
13
5
MAINTENANCE
By following a good maintenance program, your
equipment will last for many years.
1.
Consult the operating and maintenance
instructions of the engine manufacturer for
engine care and maintenance.
2.
Always check the oil level of the hydraulic
reservoir before operation. Operating the Log
Splitter without an adequate oil supply will
cause severe damage to the pump.
3.
Change the oil filter after the first 25 hours of
operation. Thereafter, change the oil filter
every 100 hours or seasonally, whichever
comes first.
4.
If the wedge becomes dull or nicked, a grinder
or sharpening tool can be used to sharpen it
while still attached to the cylinder. If it is
necessary to remove the wedge, the stripper
plate (71)* must be taken off by removing the
3
/8" bolts (68)*. Then remove the cylinder
support (66)* by taking out the 3/8" bolts (63)*.
Then remove the 1/2" x 3 1/2" bolt (51)* that
connects the wedge to the cylinder. The
return hose (53)* may need to be disconnected
from the valve. Loosen hose clamp (18)* and
pull the hose off the fitting. Lift up the
cylinder carefully and slide the wedge out of
the channel.
5.
Clean the breather cap after 25 hours of
operation. Clean it more often when operated
in dusty conditions. To clean, remove the
breather from the tank and flush with
kerosene or liquid detergent to remove the
dirt.
6.
See also Repair and Maintenance Safety in
the Safety Information section of this manual.
7.
All replacement parts must meet
manufacturer's specifications.
*
SeePartsBreakdown(Pages15-17)
in this manual.
14
6
SPECIFICATIONS
Splitting Force:
Beam Size:
Cylinder Size:
Valve Type:
Pump:
Engine:
22 Tons
6" x 6"
4" x 24"
Auto-Return
2-Stage, 11 GPM
Honda 5.5 H.P. or
Briggs & Stratton 6 H.P.
Filter:
Replaceable
Hoses & Fittings:
Included
Tires:
4.80 x 8" Road Speed
Safety Chains:
Included
Ground Stand:
Included
Coupler:
2" Ball
Wedge Height:
7"
Cycle Time:•
13 Seconds
Max. Log Length:
26"
Total Reservoir Capacity:
17 Quarts
Height:
39" Horizontal
62" Vertical
Length:
77 1/2"
Width:
44"
Built-In Log Cradle:
Yes
Shipping Weight:
T22H - 430 lbs.
T22B - 430 lbs.
• Ideal case cycle times. Actual cycle times vary
depending on temperature, engine speed, pump
efficiency, altitude, etc.
7
PARTS BREAKDOWN
15
7.1
PARTS LIST
REF #
1
2
3
4
5
6
7
8
9
10
11
12
13
14
15
16
16A
17
18
19
20
21
22
23
24
25
26
27
28
29
30
31
32
33
34
35
36
16
QTY.
1
1
1
1
1
1
1
1
1
1
1
1
1
1
1
1
1
4
7
1
3
2
1
1
4
1
1
1
1
1
1
1
1
2
3
3
1
1
1
1
1
2
1
PART NO.
DESCRIPTION
LS401301
LS401302
LS401348
LS401345
LS401340
LS401338
HC390129
HC390406A
LS401136
HC390529
HC390532
HC390601
HC390601A
HC390601B
HC390705B
LS400833L
LS400834L
LS400838L
LS400837
Obtain Locally
Obtain Locally
LS400321
Obtain Locally
Obtain Locally
Obtain Locally
HC390341
HC390316
HC390255
HC390320
HC390601B
HC390349
LS401174
LS400429
P71022WC
Obtain Locally
Obtain Locally
Obtain Locally
Obtain Locally
Obtain Locally
P794
P7810A
Obtain Locally
LS401339
HW17322
HW172718
22 Ton Compact Log Splitter w/B & S 6 H.P. Engine
22 Ton Compact Log Splitter w/Honda 5.5 H.P. Engine
Beam
Complete Beam Assembly
Tank/Axle
Tongue
4" Hydraulic Cylinder
Auto-Return Valve
Wedge
6 H.P. Briggs & Stratton Engine
5.5 H.P. Honda Engine
Filter Assembly Complete
Filter Element (see list of equivalent filter elements)
Filter Base
11 GPM Pump
1
/2" I.D. Coupler Half (pump side)
Coupler Spider
7
/8" I.D. Coupler Half (engine side)
Complete Coupler
5
/16" x 1" Grade 5 Hex Cap Screw
5
/16" NC Locknut
3
/16" Square Engine Key
5
/16" NC x 1 1/2" Hex Cap Screw T22H
5
/16" NC x 1 1/2" Hex Cap Screw T22B
5
/16" NC x 2 1/2" Hex Cap Screw T22B
1
/2" x 90º Street Elbow
Worm Gear Clamp
3
/4" x 11" Suction Hose
3
/4" NPT x 3/4" Hose Fitting
Filter Base
3
/4" x 2 1/2" Nipple
1 1/4" I.D. Grommet
Breather Cap w/Dipstick
5
/8" x 6" Pivot Pin
1
/8" "R" Clip Pin
1
/2" NC x 4 1/2" Hex Cap Screw
1
/2" Lockwasher
1
/2" NC Hex Nut
5
/8" Lockwasher
1
/4" Lynch Pin
Stabilizer Pin
5
/8" NF Hex Nut
Ground Stand
1 3/4" O.D. x .44" I.D. x 3.5mm Washer
M10 x 1.5 x 85mm Bolt
7.1
PARTS LIST
REF #
QTY.
37
38
39
1
3
2
2
1
1
8
1
1
1
1
1
1
1
1
1
1
1
2
2
4
4
2
2
2
2
2
2
6
1
1
1
4
2
2
1
1
40
41
42
43
44
45
46
47
48
49
50
51
52
53
54
55
56
57
58
59
60
61
62
63
64
65
66
67
68
69
70
71
PART NO.
DESCRIPTION
P7958
HW172809
LS400323
LS400345
HW172717
HW172716
HW172908
LS400346
HC390369
HC390368
HC390343
HC390347
HC390324
HC390311
HC390302
Obtain Locally
HC390329
HC390256
LS400312B
BE22176
BE22175
BE22174
LS400312
Obtain Locally
HN17120
Obtain Locally
LS400332
Obtain Locally
Obtain Locally
LS401353
LS401349
LS401354
Obtain Locally
Obtain Locally
Obtain Locally
LS401352
LS401155
Locking Pin
M10 x 1.5 Lock Nut
12" Safety Chain w/"S" Hooks
"S" Hook
M10 x 1.5 x 115mm Bolt
M10 x 1.5 x 100mm Bolt
10mm Washer
Hitch Coupler for 2" Ball
1
/2" Steel Tube
1
/2" NPT Female x 1/2" NPT Male 45º Elbow
1
/2" x 1/2" Nipple
Steel Tube Fitting
3
/4" NPT x 3/4" Tube 45º
3
/4" to 1/2" Reducer
Swivel Elbow 90º
1
/2" NX x 3 1/2" Grade 5 Hex Cap Screw
1
/2" I.D. x 42" Hydraulic Pressure Hose
3
/4" I.D. x 35" Hydraulic Return Hose
Pre-greased Wheel Assembly
Grease Seal
Bearing Cone
Bearing Cup
4.80 x 8" Road Speed Tire
3
/4" Light Flat Washer
3
/4" NF Slotted Nut
1
/8" x 1 1/2" Cotter Pin
Hub Cap
3
/8" NC x 1 1/2" Bolt
3
/8" Lockwasher
Cylinder Support Plate
Cylinder Support
Stripper Plate
3
/8" NC x 1" Grade 5 Hex Cap Screw
5
/16" x 3/4" Hex Cap Screw
5
/16" Lockwasher
Stripper Assembly
Hardware Kit
REPLACEMENT FILTER CARTRIDGE
HC390601 INTERCHANGES WITH:
FRAM 1653A
NAPA 1553
Cross #1A9023
Baldwin #BT839
Wicks #51553
REPAIR KITS:
DESCRIPTION:
HC390423A
HC390720B
HC390120F
HC390171
O-Ring Kit for Valves HC390406A & HC390406S
O-Ring Kit for Pumps HC390705B & HC390709
O-Ring Kit for 4" x 24" Cylinder
O-Ring Kit for 4 1/2" x 24" Cylinder
17
8
LIMITED WARRANTY
GEARMORE, INC., warrants each new Gearmore product to be free from defects in material and
workmanship for a period of twelve (12) months from date of purchase to the original purchaser.
This warranty shall not apply to implements or parts that have been subject to misuse, negligence,
accident, or that have been altered in any way.
Our obligation shall be limited to repairing or replacement of any part, provided that such part is
returned within thirty (30) days from date of failure to Gearmore through the dealer from whom
the purchase was made, transportation charges prepaid.
This warranty shall not be interpreted to render us liable for injury or damages of any kind or nature,
direct, consequential or contingent, to person or property. This warranty does not extend to loss
of crops, loss because of delay in harvesting or any other expenses, for any other reasons.
Gearmore in no way warranties engines, tires, or other trade accessories, since these items are
warranted separately by these respective manufacturers.
Gearmore reserves the right to make improvements in design or changes in specification at any
time, without incurring any obligations to owners or units previously sold.
GEARMORE, INC.
13477 Benson Ave.
Chino, CA 91710
Always refer to and heed machine operating warning decals on machine.
The serial number of this product is stored in our computer database, thus submitting a warranty registration card is not required.
18