1
30AWH004HB/30AWH006HB/30AWH008HB/30AWH012HB/30AWH015HB
30AWH004XB/30AWH006XB/30AWH008XB/30AWH012XB/30AWH015XB
30AWH004NX/30AWH006NX/30AWH008NX/30AWH012NX/30AWH015NX
SERVICE MANUAL
Engineering Department of Italy
November, 2010
SM_30AW.indd 1
14-03-2011 14:40:43
TABLE OF CONTENTS
Section Contents
1
2
3
4
5
6
7
8
Page
1.1
Unit specifications -------------------------------------------------------------------------
2
1.2
Dimension -----------------------------------------------------------------------------------
5
2.1
General precautions for safety----------------------------------------------------------
7
2.2
R-410A ----------------------------------------------------------------------------------------
7
2.3
Electrical connections---------------------------------------------------------------------
8
2.4
Operating limits ----------------------------------------------------------------------------
8
3.1
Installation -----------------------------------------------------------------------------------
9
3.2
Preliminary operations -------------------------------------------------------------------
12
3.3
Water connections ------------------------------------------------------------------------
13
3.4
Refrigerant schematics -------------------------------------------------------------------
20
3.5
Refrigerant schematics -------------------------------------------------------------------
25
4.1
Aux iliary electrical connections -------------------------------------------------------
22
4.2
Applications ---------------------------------------------------------------------------------
27
4.3
Range Description (Systems capacity)------------------------------------------------
28
4.4
Wiring diagrams ----------------------------------------------------------------------------
29
5.1
Introduction ---------------------------------------------------------------------------------
56
5.2
Unit Control----------------------------------------------------------------------------------
56
6.1
Diagnostic ------------------------------------------------------------------------------------
71
6.2
GMC alarm codes --------------------------------------------------------------------------
74
6.3
GMC I/O ---------------------------------------------------------------------------------------
75
6.4
Troubleshooting ----------------------------------------------------------------------------
76
7.1
Dry contacts control -----------------------------------------------------------------------
90
7.2
33AW-RC1 user interface -----------------------------------------------------------------
91
7.3
33AW-CS1 User interface-----------------------------------------------------------------
92
8.1
8.1 Refrigerant charge check ------------------------------------------------------------
102
8.2
Cleaning the coil ---------------------------------------------------------------------------
102
8.3
Replacement of the main parts --------------------------------------------------------
103
8.4
Periodic Inspection Items ----------------------------------------------------------------
119
For the spare parts refer to specific document -------------------------------------
120
9
10
10
Extended rating ----------------------------------------------------------------------------
121
11
11.1
Additional information -------------------------------------------------------------------
136
2
SM_30AW.indd 2
30AW
14-03-2011 14:40:44
Unit specification
1
1.1 Unit specifications
30AWH004HB
30AWH004XB
30AWH004NX
AIR/WATER
INVERTER HEAT PUMP
MODEL NAME
TYPE
ELECTRICAL (V-Ph-Hz)
TYPE
COMPRESSOR
REFRIGERANT CHARGED
LIQUID RECEIVER
REFRIGERANT CONTROL PMV
MAKER
MODEL
Nominal Output kW
POLE
CAPACITY Btu/h
EER Btu/hW
kg
Manufacturer
Volume (in l)
Pulse Motor Valve
Manufacturer
Model
W*H*D (mm)
OUTDOOR COIL
FAN UNIT
SYST.RUNNING CURRENT
SYST.POWER INPUT
INSTALLATION FUSE
OUTER DIMENSION
TOTAL WEIGHT kg
PIPING
PUMP
SOUND POWER LEVEL
Fujikoki
SEV16RC9
SEV16RC9
CAM-30YGTF
925*777.6*12,7
910*777.6*25,4
890*777.6*38,1
1*3
2*6
3*6
7-LSW/7
7-LSW/7
FIN PITCH (FPI)
1.41 (18)
1.41 (18)
1.41 (18)
FAN
MOTOR
RATING OUTPUT (W)
RATING VOLTAGE (V)
RATING ROTATION SPEED (l/
min)
Rotation speed (rpm)
1 Propeller fan
S-23567FV-5
1 Propeller fan
S-23567FV-5
43
140
1 Propeller fan
S-23567FV-5
1000
1000
1000
200 - 600
200 - 600
200 - 680
Max Flow (m^3/h)
2520
2464
2465
max (A)
max (kW)
type
HEIGHT (mm)
WIDTH (mm)
LENGTH (mm)
Unit without hydronic module
Unit with hydronic module
BPHE INLET PIPE ASSY
PUMP INLET PIPE ASSY
7,2
2
10 A Type B
Refrigernat BPHE
MAKER
MODEL
NUMBER OF PLATES
Design Pressure (bar)
Test Pressure (bar)
Manufacturer
Model
SETTINGS
11
14
2.3
2.7
15 A Type B
15 A Type B
821
908
326
60
58
68
63
61
71
Ø 22 mm, th.1mm
Ø 22 mm, th.1mm
Ø 12.7 mm (1/2 ”) th 0.89 Ø 12.7 mm (1/2 ”) th 0.89 Ø 12.7 mm (1/2 ”) th 0.89
Ø 6.35 mm (1/4 ”) th 0.71 Ø 6.35 mm (1/4 ”) th 0.71 Ø 6.35 mm (1/4 ”) th 0.71
Ø 6.35 mm (1/4 ”) th 0.71 Ø 6.35 mm (1/4 ”) th 0.71 Ø 6.35 mm (1/4 ”) th 0.71
Ø 7.94 mm th 0.71
Ø 7.94 mm th 0.71
Ø 7.94 mm th 0.71
ALFA LAVAL
ALFA LAVAL
ALFA LAVAL
ACH30-26H
ACH30-36H
ACH30-48H
26
36
48
45
45
45
69
69
69
Salmson
NYL 63-15
3 speed (manual setting)
H
1
H
1
H
1.2
X
0.8
X
0.8
X
1.0
H
2
H
2
H
2
X
N.A.
X
N.A.
X
N.A.
MAXIMUM WATER SIDE
OPERATING PRESSURE ( kPa )
WATER PRESSURE DROP,
X VERSION (CHF) ( kPa )
AVAILABLE STATIC PRESSURE,
H VERSION (AC) ( kPa )
POWER SUPPLY
NUI CONNECTIONS
SUI CONNECTIONS
{Lw dB(A)} Cool-Heat
300
16
3
SM_30AW.indd 3
0,67
7-LSW/7
EXPANSION TANK VOLUME
INSTALLATION CABLES
Pacific
Hermetic compressor
BLDC Twin Rotary
TOSHIBA
DA150A1F-20F
1,10
4 poles
4470 - 15252
13,2
R410A - 1,810
ROW-CIR
NET WATER VOLUME
HYDRONIC CIRCUIT
0,50
30AWH008HB
30AWH008XB
30AWH008NX
AIR/WATER
INVERTER HEAT PUMP
FIN-TUBE/OD
Refrigerant
BPHE
Hermetic compressor
BLDC Single Rotary
TOSHIBA
DA89X1C-23FZ
0,75
4 poles
2650 - 9042
13,3
R410A – 1,195
30AWH006HB
30AWH006XB
30AWH006NX
AIR/WATER
INVERTER HEAT PUMP
230-1-50
Hermetic compressor
BLDC Twin Rotary
TOSHIBA
DA111A1F-20F1
0,75
4 poles
3300 - 11260
13,5
R410A - 1,350
Frigomec
0,50
9.5
14.5
47
43
40
64.0 - 62.0
H07 RN-F 3x2.5mm2
H03 VV-F 4x0.75mm2
H03 VV-F 6x0.75mm2
64.0 - 62.0
65.0 - 64.0
30AW
14-03-2011 14:40:45
MODEL NAME
TYPE
ELECTRICAL (V-Ph-Hz)
TYPE
COMPRESSOR
REFRIGERANT CHARGED
LIQUID RECEIVER
REFRIGERANT CONTROL PMV
MAKER
MODEL
Nominal Output kW
POLE
CAPACITY W - Btu/h
EER Btu/hW
kg
Manufacturer
Volume (in l)
Pulse Motor Valve
Manufacturer
Model
W*H*D (mm)
OUTDOOR COIL
FAN UNIT
SYST.RUNNING CURRENT
SYST.POWER INPUT
INSTALLATION FUSE
OUTER DIMENSION
TOTAL WEIGHT kg
PIPING
PUMP
2*8
2*(6+1)
7-LSW/7
13-LSW/9,52
FIN PITCH (FPI)
1.41 (18)
1.69 (15)
FAN
MOTOR
RATING OUTPUT (W)
RATING VOLTAGE (V)
RATING ROTATION SPEED (l/min)
Rotation speed (rpm)
2 Propeller fans
S-28567FV-6
63
140
805
250 - 730
2 Propeller fans
ICF-280-A100
97
280
1050
200 – 820
Max Flow (m^3/h)
6358
6120
max (A)
max (kW)
type
HEIGHT (mm)
WIDTH (mm)
LENGTH (mm)
Unit without hydronic module
Unit with hydronic module
BPHE INLET PIPE ASSY
PUMP INLET PIPE ASSY
23
5.1
25 A Type D
20
5.1
25 A Type D
Refrigernat BPHE
MAKER
MODEL
NUMBER OF PLATES
Design Pressure (bar)
Test Pressure (bar)
Manufacturer
Model
SETTINGS
EXPANSION TANK VOLUME
SOUND POWER LEVEL
MAXIMUM WATER SIDE
OPERATING PRESSURE ( kPa )
WATER PRESSURE DROP,
X VERSION (CHF) ( kPa )
AVAILABLE STATIC PRESSURE,
H VERSION (AC) ( kPa )
POWER SUPPLY
NUI CONNECTIONS
SUI CONNECTIONS
{Lw dB(A)} Cool-Heat
4
SM_30AW.indd 4
890*1321*38.1
ROW-CIR
NET WATER VOLUME
INSTALLATION CABLES
910*1296*25.4
FIN-TUBE/OD
Refrigerant
BPHE
30AWH015HB
30AWH012HB
30AWH015XB
30AWH012XB
30AWH015NX
30AWH012NX
AIR/WATER
AIR/WATER
INVERTER HEAT PUMP
INVERTER HEAT PUMP
230-1-50
230-1-50
Hermetic compressor
Hermetic compressor
BLDC Twin Rotary
BLDC Twin Rotary
TOSHIBA
TOSHIBA
DA420A3F-21M
DA422A3F-26M
3.75
3.75
8 poles
4 poles
13100 - 44697
13100 - 44697
12.8
13.1
R410A - 2.450
R410A - 3.385
Frigomec
0,88
0,88
Saginomiya
Saginomiya
Seisakusho Inc
Seisakusho Inc
UKV-25D
UKV-25D100
1363
908
326
99
105
124
130
Ø 22 mm, th.1mm
Ø 22 mm, th.1mm
Ø 12.7 mm (1/2 ”) th
Ø 12.7 mm (1/2 ”)
0.89mm
th0.89mm
Ø 9.52 mm (3/8 ”) th
Ø 9.52 mm (3/8 ”) th
0.71mm
0.71mm
Ø 7.94 mm th 0.71
Ø 7.94 mm th 0.71
Ø 9.52 (3/8 ”) th 0.89
Ø 9.52 (3/8 ”) th 0.89
ALFA LAVAL
ALFA LAVAL
ACH-70X-36H
ACH-70X-36H
36
36
45
45
69
69
Salmson
SXM 25-60
3 speed (manual setting)
H
2.5
H
2.5
X
2.3
X
2.3
H
3
H
3
X
N.A.
X
N.A.
300
26.0
33.0
45
30
H07 RN-F 3x2.5mm2
H03 VV-F 4x0.75mm2
H03 VV-F 6x0.75mm2
68.0 - 67.0
69.0 – 68.0
30AW
14-03-2011 14:40:45
Unit specification
1
1.2 Dimensions
30AWH
004
006
008
012
015
A
908
908
908
908
908
B
821
821
821
1363
1363
C
326
326
326
326
326
D
350
350
350
350
350
E
87
87
87
174
174
5
SM_30AW.indd 5
F
356
356
356
640
640
G
466
466
466
750
750
H
40
40
40
44
44
L
60
60
60
69
69
30AW
14-03-2011 14:41:05
General Informations
2
Precautions for safety
Ensure that all Local, National and International regulations are satisfied.
t3FBEUIJTi13&$"65*0/4'034"'&5:wDBSFGVMMZCFGPSF*OTUBMMBUJPO
t5IFQSFDBVUJPOTEFTDSJCFECFMPXJODMVEFUIFJNQPSUBOUJUFNT
regarding safety. Observe them without fail.
t"GUFSUIFJOTUBMMBUJPOXPSLQFSGPSNBUSJBMPQFSBUJPOUPDIFDLGPS
any problem. Follow the Owner’s Manual to explain how to use and
maintain the unit to the customer.
t5VSOPòUIFNBJOQPXFSTVQQMZTXJUDIPSCSFBLFS
CFGPSFUIFVOJU
maintenance.
t"TLUIFDVTUPNFSUPLFFQUIF*OTUBMMBUJPO.BOVBMUPHFUIFSXJUIUIF
Owner’s Manual.
Explanation of illustrated marks
Indicates prohibited items.
Indicates mandatory items.
Indicates cautions (including danger/warnings).
Explanation of indications
DANGER
Indicates contents will cause death or serious injury if
used incorrectly.
WARNING
CAUTION
Indicates contents could cause death or serious injury if
used incorrectly.
Indicates contents could cause an injury or damage to
property, furniture or pets if the instructions are not
followed carefully.
General notes
t1MFBTFFOTVSFUIJTJTSFBEUIPSPVHIMZBOELFQUGPSGVUVSFSFGFSFODF
t#FGPSFBOZSFQBJSTPSNBJOUFOBODFJTDBSSJFEPVUBOBTTFTTNFOUPGUIF
potential risks must be undertaken, and appropriate measures taken to
ensure the safety of all personnel.
t%POPUBUUFNQUUPSFQBJSNPWFNPEJGZPSSFJOTUBMMUIFVOJUPOZPVS
own.
LIABILITY
The manufacturer declines any liability and invalidate the unit warranty
for damage resulting from:
t*NQSPQFSJOTUBMMBUJPOJODMVEJOHGBJMVSFUPGPMMPXJOTUSVDUJPOTJOUIF
manuals.
t.PEJöDBUJPOTPSFSSPSTJOUIFFMFDUSJDBMPSSFGSJHFSBOUPSXBUFS
connections.
t6OBQQSPWFEVOJUTDPVQMJOHJODMVEJOHPUIFSNBOVGBDUVSFSTVOJUT
t6TFPGUIFVOJUVOEFSDPOEJUJPOPUIFSUIBOUIPTFJOEJDBUFE
All of the packaging materials used for your new appliance are
compatible with the environment and can be recycled.
Units handling
Ensure adequate personal protective equipment is used.
Inspect equipment for damage due to improper transportation or handling: file an immediate claim with the shipping company.
Dispose of the packaging material in accordance with local requirements.
When lifting the unit, absolutely do not use hooks inserted in the side handles, use special equipment (e.g. lifting devices, trolleys, etc.).
Do not step or put anything on the unit. It may cause an injury or damage the unit.
Do not place containers filled with liquids or other objects onto the unit.
This appliance must not be used by persons (and children) with reduced physical, emotional or mental faculties or by persons with no experience or
knowledge if they are not under the control of a person responsible for their safety, or if not instructed to the use of this appliance. Make sure that children do
not play with the appliance.
6
SM_30AW.indd 6
30AW
14-03-2011 14:41:06
General Informations
2
2.1 General precautions for safety
t"TLBOBVUIPSJ[FEEFBMFSPSRVBMJöFEJOTUBMMBUJPOQSPGFTTJPOBMUPJOTUBMM
maintain the heat pump. Inappropriate installation may result in water
leakage, electric shock or fire.
t5VSOPòUIFNBJOQPXFSTVQQMZTXJUDIPSCSFBLFSCFGPSFBUUFNQUJOH
BOZFMFDUSJDBMXPSL.BLFTVSFBMMQPXFSTXJUDIFTBSFPò'BJMVSFUPEP
so may cause electric shock.
t8IFONPWJOHUIFIFBUQVNQGPSJOTUBMMBUJPOJOUPBOPUIFSQMBDFCF
very careful not to enter any gaseous matter other than the specified
refrigerant into the refrigeration cycle.
t*GBJSPSBOZPUIFSHBTJTNJYFEJOUIFSFGSJHFSBOUUIFHBTQSFTTVSFJOUIF
refrigeration cycle becomes abnormally high and it may cause pipe
burst and injuries on persons.
t%POPUNPEJGZUIJTVOJUCZSFNPWJOHBOZPGUIFTBGFUZHVBSETPSCZCZ
passing any of the safety interlock switches.
t"GUFSVOQBDLJOHUIFVOJUFYBNJOFJUDBSFGVMMZGPSQPTTJCMFEBNBHF
t%POPUJOTUBMMJOBQMBDFUIBUNJHIUJODSFBTFUIFWJCSBUJPOPGUIFVOJU
t5PBWPJEQFSTPOBMJOKVSZXJUITIBSQFEHFT
CFDBSFGVMXIFOIBOEMJOH
parts.
t1FSGPSNJOTUBMMBUJPOXPSLQSPQFSMZBDDPSEJOHUPUIF*OTUBMMBUJPO
Manual. Inappropriate installation may result in water leakage, electric
shock or fire.
t8IFOUIFIFBUQVNQJTJOTUBMMFEJOBTNBMMSPPNQSPWJEF
appropriate measures to ensure that the concentration of refrigerant
leakage occurred in the room does not exceed the critical level.
t*OTUBMMUIFIFBUQVNQTFDVSFMZJOBMPDBUJPOXIFSFUIFCBTFDBOTVTUBJO
the weight adequately.
t*GUIFIFBUQVNQJTOPUJOTUBMMFEDPSSFDUMZBDDJEFOUTNBZPDDVSEVFUP
the falling unit.
t*GSFGSJHFSBOUHBTIBTMFBLFEEVSJOHUIFJOTUBMMBUJPOXPSLWFOUJMBUFUIF
room immediately. If the leaked refrigerant gas comes in contact with
fire, noxious gas may generate.
t"GUFSUIFJOTUBMMBUJPOXPSLDPOöSNUIBUSFGSJHFSBOUHBTEPFTOPUMFBL
If refrigerant gas leaks into the room and flows near a fire source, such
as a cooking range, noxious gas might generate.
t&MFDUSJDBMXPSLNVTUCFQFSGPSNFECZBRVBMJöFEFMFDUSJDJBOJO
accordance with the Installation Manual.
t6TFUIFTQFDJöFEDBCMFTGPSXJSJOHBOEDPOOFDUUIFNöSNMZUPUIF
terminals.
t5PQSFWFOUFYUFSOBMGPSDFTBQQMJFEUPUIFUFSNJOBMTGSPNBòFDUJOHUIF
terminals:
t#FTVSFUPQSPWJEFHSPVOEJOH%POPUDPOOFDUHSPVOEXJSFTUPHBT
pipes, water pipes, lightning rods or ground wires for telephone
cables.
t%POPUJOTUBMMUIFIFBUQVNQJOBMPDBUJPOTVCKFDUUPBSJTLPG
exposure to a combustible gas.
2.2 R-410A
t"TGPSPUIFS)'$3"SFGSJHFSBOUJTPOMZDPNQBUJCMFXJUIPJMT
recommended by the compressor manufacturer.
t"WBDVVNQVNQJTOPUFOPVHIUPSFNPWFNPJTUVSFGSPNPJM
t0JMTBCTPSCNPJTUVSFSBQJEMZ%POPUFYQPTFPJMUPBUNPTQIFSF
t/FWFSPQFOTZTUFNUPBUNPTQIFSFXIJMFJUJTVOEFSWBDVVN
t8IFOUIFTZTUFNNVTUCFPQFOFEGPSTFSWJDFCSFBLWBDVVNXJUIESZ
nitrogen.
t%POPUWFOU3"JOUPUIFBUNPTQIFSF
This heat pump adopts the new HFC refrigerant (R410A) which does not
destroy ozone layer.
t3"SFGSJHFSBOUPQFSBUFTBUIJHIFSQSFTTVSFTUIBO3
Be sure that servicing equipment and replacement components are
designed to operate with R-410A.
t3"SFGSJHFSBOUDZMJOEFSTIBWFBEJQUVCFXIJDIBMMPXTMJRVJEUP
flow out with the cylinder in a vertical position with the valve at the
top.
t3"TZTUFNTTIPVMECFDIBSHFEXJUIMJRVJESFGSJHFSBOU6TFB
commercial type metering device in the manifold hose in order to
vaporize the liquid refrigerant before it enters in the unit.
7
SM_30AW.indd 7
30AW
14-03-2011 14:41:07
General Informations
2
2.3 Electrical connections
All electrical connections are the responsibility of the installer.
DANGER
CAUTION
Electrical shock can cause severe personal injury or death. These
operations are carried out by qualified personnel only.
t$POOFDUUIFDPOOFDUJOHDBCMFDPSSFDUMZ*GUIFDPOOFDUJOHDBCMFJT
connected in a wrong way, electric parts may be damaged.
t$POOFDUJPOUPUIFNBJOTTVQQMZJTPGUIF:UZQFUIFSFGPSFUIFDBCMF
must only be replaced by the technical support in order to prevent any
risk.
t6TFUIFTQFDJöFEDBCMFTGPSXJSJOHBOEDPOOFDUUIFNöSNMZUPUIF
terminals.
WARNING
t5IJTVOJUDPNQMJFTXJUI.BDIJOFSZ%JSFDUJWF&$
electromagnetic compatibility (2004/108/EC) and pressure equipment
(EEC/97/23) Directives.
t5PBWPJEFMFDUSJDTIPDLPSöSFNBLFTVSFUIFTFPQFSBUJPOTBSFDBSSJFE
out by qualified personnel only.
t&OTVSFUIBUOBUJPOBMTBGFUZDPEFSFRVJSFNFOUTIBWFCFFOGPMMPXFEGPS
the main supply circuit.
t'PMMPXBMMDVSSFOUOBUJPOBMTBGFUZDPEFSFRVJSFNFOUT
t&OTVSFUIBUBQSPQFSMZTJ[FEBOEDPOOFDUFEHSPVOEXJSFJTJOQMBDF
t$IFDLUIBUWPMUBHFBOEGSFRVFODZPGUIFNBJOTQPXFSTVQQMZBSFUIPTF
SFRVJSFEUIFBWBJMBCMFQPXFSNVTUCFBEFRVBUFUPPQFSBUFBOZPUIFS
possible appliances connected to the same line.
t$IFDLUIBUUIFJNQFEBODFPGUIFNBJOTQPXFSTVQQMZJTJO
conformance with the unit power input indicated in the rating plate of
the unit.
t.BLFTVSFUIBUQSPQFSMZTJ[FEEJTDPOOFDUJOHBOETBGFUZTXJUDIFTBSF
installed closed to the unit
t5IFEJTDPOOFDUJPOEFWJDFTGSPNUIFNBJOTTVQQMZNVTUBMMPXGVMM
disconnection under the conditions provided for by overvoltage class
III.
WARNING
t#FTVSFUPQSPWJEFHSPVOEJOHJOBQQSPQSJBUFHSPVOEJOHNBZDBVTF
electric shock.
t%POPUDPOOFDUHSPVOEXJSFTUPHBTQJQFTXBUFSQJQFTMJHIUOJOH
rods or ground wires for telephone cables.
DANGER:
Do not modify this unit by removing any of the safety guards or by bypassing any of the safety interlock switches.
Contact the qualified service if one of the following events takes place:
tIPUPSEBNBHFEQPXFSTVQQMZDBCMF
tVOVTVBMOPJTFEVSJOHPQFSBUJPO
tGSFRVFOUPQFSBUJPOPGUIFQSPUFDUJPOEFWJDFT
tVOVTVBMTNFMMTVDIBTTNFMMPGCVSOJOH
2.4 Operating limits
Operation in heating
Operation in cooling
70
20
18
Outlet water temperature [°C]
Outlet water temperature [°C]
60
16
14
12
10
8
6
4
50
40
30
20
2
10
0
-5
0
5
10
15
20
25
30
35
40
45
-25
50
-20
-15
-10
-5
0
5
10
15
20
25
30
35
Outdoor air temperature [°C]
Outdoor air temperature [°C]
NOTE: For the 30AWH 004_ and 30AWH006_ units use a minimum External Air Temperature of +5 °C. (- -30AWH006_ ,-.-30AWH004_)
MODEL NAME
Operating voltage limits
30AWH004HB
30AWH004XB
30AWH004NX
230 - 50
207 - 253
30AWH006HB
30AWH006XB
30AWH006NX
230 – 50
207 - 253
8
SM_30AW.indd 8
30AWH008HB
30AWH008XB
30AWH008NX
230 - 50
207 - 253
30AWH012HB
30AWH012XB
30AWH012NX
230 - 50
207 - 253
30AWH015HB
30AWH015XB
30AWH015NX
230 - 50
207 - 253
30AW
14-03-2011 14:41:08
Installation
3
Installation location
INSTALLATION
t"MPDBUJPOXIJDIQSPWJEFTBTVóDJFOUTQBDFBSPVOEUIFVOJU
t"MPDBUJPOXIFSFUIFPQFSBUJPOOPJTFBOEEJTDIBSHFEBJSBSFOPU
disruptive to your neighbours.
t"MPDBUJPOUIBUJTOPUFYQPTFEUPBTUSPOHXJOE
t"MPDBUJPOUIBUEPFTOPUCMPDLBQBTTBHF
t8IFOUIFVOJUJTJOTUBMMFEJOBOFMFWBUFEQPTJUJPOCFTVSFUPTFDVSFJUT
feet.
t5IFSFNVTUCFTVóDJFOUTQBDFGPSDBSSZJOHJOUIFVOJU
t"MPDBUJPOXIFSFUIFESBJOXBUFSEPFTOPUDBVTFBQSPCMFN
t*GUIFVOJUJTJOTUBMMFEJOBOBSFBXIFSFIFBWZTOPXGBMMTNBZPDDVSNVTU
be raised at least 200 mm above the usual snow level.
t5IFTVQQPSUNVTUCFTVJUBCMFGPSUIFVOJUXFJHIU
SITING THE UNIT
WATWER CONNECTIONS
CAUTION:
t*OTUBMMUIFVOJUJOBMPDBUJPOXIFSFUIFEJTDIBSHFBJSJTOPUCMPDLFE
t8IFOBOVOJUJTJOTUBMMFEJOBMPDBUJPOUIBUJTFYQPTFEUPBTUSPOH
wind like a coast or on a high storey of a building, ensure normal fan
operation by using a duct or a wind shield.
t8IFOJOTUBMMJOHUIFVOJUJOBMPDBUJPOUIBUJTDPOTUBOUMZFYQPTFEUPB
strong wind such as the upper stairs or rooftop of a building, apply
windproof measures referring to the following:
ELECTRICAL CONNECTIONS
CONTROL WIRING (OPTIONAL)
Examples:
t*OTUBMMUIFVOJUTPUIBUUIFEJTDIBSHFQPSUPGUIFIFBUQVNQJTTFUBU
right angle to any seasonal wind direction.
t4VQQPTJOHUIFXJOEEJSFDUJPOEVSJOHUIFPQFSBUJPOTFBTPOPGUIFIFBU
pump, install the unit so that the discharge port is set at right angle to
the wind direction.
t*OTUBMMBUJPOJOUIFGPMMPXJOHQMBDFTNBZSFTVMUJOQSPEVDUGBVMUT
Do not install the unit in such places below.
t"MPDBUJPOGVMMPGNBDIJOFPJM
t"MPDBUJPOGVMMPGTVMQIVSJDHBT
t"MPDBUJPOXIFSFIJHIGSFRVFODZSBEJPXBWFTBSFMJLFMZUPCFHFOFSBUFE
as from audio equipment, welders, and medical equipment.
POWER WIRING
FILLING THE SYSTEM
FLUSHING WATWER AN AIR
CHEECKING FOR WATWER LEAKS
CONFIGURING AND CHECKING THE SYSTEM
/
50
0
/Strong wind
9
SM_30AW.indd 9
30AW
14-03-2011 14:41:09
Installation
3
Minimum clearances
Obstacle at rear side
Upper side is free
Obstacles at both right and left sides.
150
or more
200
or more
Single unit installation
150
or more
300
or more
t5IFIFJHIUPGUIFPCTUBDMFTIPVMECFMPXFSUIBOUIFIFJHIUPGUIFPVUEPPSVOJU
200 or more
Serial installation of two or more units
150
or more
300
or more
300
or more
t
300
or more
5IFIFJHIUPGUIFPCTUBDMFTIPVMECFMPXFSUIBOUIFIFJHIUPGUIFPVUEPPSVOJU
Obstacle at rear side
500
or more
Obstacle also at the upper side
150
or more
Obstacle at front side
Upper side is free
Obstacles at both right and left sides.
500
or more
1000
or more
Single unit installation
Obstacle at front side
1000
or more
10
SM_30AW.indd 10
1000
or more
Obstacle also at the upper side
30AW
14-03-2011 14:41:11
3
Installation
Minimum clearances
Obstacles at both front and rear sides
Standard installation
Open the upper side and both right and left sides.
The height of obstacle at both front and rear side, should be lower than the height of the outdoor unit.
Serial installation of two or more units
300
or more
300
or more
1000
or more
1000
or more
200
or more
150
or more
Single unit installation
Serial installation at front and rear sides
Standard installation
Open the upper side and both right and left sides.
The height of obstacle at both front and rear side, should be lower than the height of the outdoor unit.
1000
or more
300
or more
1500
or more
11
SM_30AW.indd 11
2000
or more
200
or more
30AW
14-03-2011 14:41:12
3
Installation
3.2 Preliminary operations
150
600
150
430
365
400
15 mm or less
Knockout
hole
Drain nipple
mounting hole
t
Before installation, check strength and horizontality of the base so that
abnormal sound does not generate.
According to the dimensions and clearances, fix the base firmly with the
anchor bolts (Anchor bolt, nut: M10 x 2 pairs).
4FUUIFPVUNBSHJOPGUIFBODIPSCPMUUPNNPSMFTT
If the unit is installed in a very windy place, protect the fan with a wind
protection screen and check that it works correctly.
3.2.1 Opening cable knockouts
There is a pre-cut part that can be removed for running wires.
Do not remove the unit front panel for easier drilling of the knockouts.
The pre-cut section of the sheet can be removed by punching the 3 connection points along the line first using a screwdriver and finally with
your hands. When the cable knockout is open, remove the burrs and fit
the cable protective bush supplied with the unit for cable protection.
3.2.1 How to remove the front panel
1. Remove screws of the front panel.
2. Pull the front panel downward with the handle.
3.2.1 Drain hose and base pan knockouts
In case of draining through the drain hose, attach the drain nipple (A)
and use the drain hose (Inner diam.: 16 mm) sold on the market. When
there is a possibility of freezing of drain at the cold district or a snowfall
area, be careful for drainage ability of drain.
The drainage ability increases when knockout holes on the base pan are
opened. (Open the knockout hole to outside using a hammer (B), etc.).
B
12
SM_30AW.indd 12
A
30AW
14-03-2011 14:41:14
3
Installation
3.3 Water connections
3.3.1 Hydronic module
The 30AWH__H units are equipped with an integrated hydronic module
that allows fast installation with the aid of a few external components.
The 30AWH__X and 30AWH__NX units, on the other hand, do not have
a circulation pump and expansion vessel. For this reason, they must be
provided outside. In any case, all the necessary protections and valves
are to be inserted in the water circuit inside the unit. Refer to the figure
below for the exact connection of the water pipes.
/
0
/
0
/Entering water (1” GAS – M)
0 Leaving water (1” GAS – M)
1 Drain water (1/2 ” GAS – F)
1
1
/
0
1
2
3
4
5
6
automatic purge valve
flow switch
safety valve (outlet 1/2’)
temperature probe
circulation pump
plug to unblock the seizing pump
expansion vessel
water drain
30 AWH
Unit
Nominal water flow
008
012
015
0,20
0,28
0,33
0,58
0,69
l/s
Min
l
14
21
28
42
49
Max
l
65
65
65
95
95
Max water loop
pressure
Max
kPa
300
300
300
300
300
Filling water
pressure
Min
kPa
120
120
120
120
120
Max elevation 30AW
upper
Max
m
20
20
20
20
20
012-015
13
SM_30AW.indd 13
006
Std
Water loop content
for 30AWH_H units
004-006-008
004
30AW
14-03-2011 14:41:17
3
Installation
30AWH__X , 30AWH__NX integrated water circuit
2
1.
2.
3.
4.
1
2
1
automatic purge valve
flow switch
safety valve (outlet 1/2’)
temperature probe
4
30 AWH
4
Unit
004
006
008
012
015
Std
l/s
0,20
0,28
0,33
0,58
0,69
Min
l
14
21
28
42
49
Max
l
Max water loop
pressure
Max
kPa
300
300
300
300
300
Filling water
pressure
Min
kPa
120
120
120
120
120
Max elevation 30AW
upper
Max
m
20
20
20
20
20
Nominal water flow
3
3
4
Water loop content
for 30AWH__X,
30AWH__NX
4
According to
expansion vessel installed
Note: The correct dimensioning of the expansion vessel is left to the
installer as a function of the type of plant.
The discharge of the safety valve can be channelled to the outside of the
machine using the pre-cut holes. In this case, it is necessary to provide a
open drain funnel.
3.3.2 Water connections
ATTENTION:
Make the plate heat exchanger hydraulic connections with the
necessary components, using material which will guarantee that the
screwed joints are leakproof.
The typical hydraulic circuit diagrams (par. 3.3.3) show a typical water
circuit installation.
For an application with a water circuit, the following recommendations
must be taken into account:
1. The presence of particles in the water can lead to obstructions in the
heat exchanger. It is therefore necessary to protect the heat
exchanger inlet with an extractable mesh filter. The filter mesh gauge
must be at least 10 mesh/cm^2.
2. After assembling the system, or repairing the circuit, the whole
system must be thoroughly cleaned with special attention paid to
the state of the filters.
3. Pump flow rate control is made through a flow control valve, which
must be installed on the delivery pipe during installation.
4. When water has to reach temperatures below 5°C, or the equipment
is installed in areas subject to temperatures below 0°C, it is necessary
to mix water with inhibited ethylene glycol in suitable quantity.
1. The pump must be fitted immediately before of the heat exchanger
and after the connection to the system return (unit without hydronic
module).
2. *UJTBEWJTBCMFUPJOTUBMMTIVUPòWBMWFTUPBMMPXJTPMBUJPOPGUIF
most important circuit components, as well as the heat exchanger
itself. These valves (ball, globe or butterfly valves) should produce a
minimum loss of charge when they are open.
3. Provide unit and system drains and vents at the lowest system point.
4. Install purges in the higher sections of the installation.
5. Pressure ports and pressure gauges should be installed upstream
and downstream of the water pump.
6. All piping must be adequately insulated and supported.
14
SM_30AW.indd 14
30AW
14-03-2011 14:41:19
Installation
3
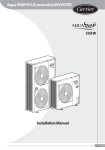
3.3.3 Typical hydraulic circuit diagrams
Hydraulic circuit diagrams for 30AWH___H
3
1
2
6
4
9
7
3
8
1
5
1.
2.
3.
4.
5.
TIVUPòWBMWFT
line filter for water (10 mesh/cm^2)
pressure gauges
filling valve
system drain valve (at the lowest points of the circuit)
6.
7.
8.
9.
air flushing valve (in the highest parts of the circuit)
3-way valve
sanitary water accumulation tank
inside system
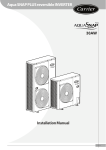
Hydraulic circuit diagrams for 30AWH___X and 30AWH___NX
3
11
3
1
6
2
10
4
9
7
8
1
5
1.
2.
3.
4.
5.
TIVUPòWBMWFT
line filter for water (10 mesh/cm^2)
pressure gauges
filling valve
system drain valve (at the lowest points of the circuit)
6. air flushing valve (in the highest parts of the circuit)
7. 3-way valve
8. sanitary water accumulation tank
9. inside system
10. water circulation pump
11. expansion vessel
TO PREVENT THE WATER CIRCUIT FREEZING DURING DEFROST OPERATION OR CONTINUOUS COMPRESSOR FREQUENCY
MODULATIONS, BE SURE OF THE MINIMUM RECOMMENDED VOLUME IN THE WATER LOOP
15
SM_30AW.indd 15
30AW
14-03-2011 14:41:21
3
Installation
3.3.4 Available static pressure (H version)
30AWH006H
30AWH006H
30AWH004H
60
AVAILABLE STATIC PRESSURE [kPa]
AVAILABLE STATIC PRESSURE [kPa]
65
60
55
50
45
40
35
30
25
20
15
10
5
0
0,0
0,1
0,2
A
WATER FLOW RATE (l/s)
0,3
0,4
55
50
45
40
35
30
25
20
15
10
5
0
0
0,1
0,3
0,4
0,5
0,6
WATER FLOW RATE (l/s)
30AWH008H
30AWH008H
30AWH012H
- 30AWH015H
30AWH012H
90
AVAILABLE STATIC PRESSURE [kPa]
60
AVAILABLE STATIC PRESSURE [kPa]
0,2
0,5
55
50
45
40
35
30
25
20
15
10
5
0
0
0,1
0,2
0,3
0,4
0,5
0,6
WATER FLOW RATE (l/s)
80
70
60
50
40
30
20
10
0
0
0,1
0,2
0,3
0,4
0,5
0,6
0,7
0,8
0,9
WATER FLOW RATE (l/s)
3.3.5 Water circuitpressure drop (X and NX version)
30AWH004X
30AWH006X
30AWH006X
WATER CIRCUIT PRESSURE DROP(kPa)
WATER CIRCUIT PRESSURE DROP(kPa)
70
65
60
55
50
45
40
35
30
25
20
15
10
5
0
0,0
0,1
0,2
A
0,3
0,4
0,5
WATER FLOW RATE (l/s)
55
50
45
40
35
30
25
20
15
10
5
0
0
0,1
35
30
25
20
15
10
5
0
0,1
0,2
0,3
0,4
0,5
0,6
WATER FLOW RATE (l/s)
16
SM_30AW.indd 16
0,3
0,4
0,5
0,6
30AWH012X - 30AWH015X
WATER CIRCUIT PRESSURE DROP(kPa)
WATER CIRCUIT PRESSURE DROP(kPa)
30AWH008X
40
0
0,2
WATER FLOW RATE (l/s)
60
50
40
30
20
10
0
0
0,1
0,2
0,3
0,4
0,5
0,6
0,7
0,8
0,9
WATER FLOW RATE (l/s)
30AW
14-03-2011 14:41:25
3
Installation
3.3.6 Circulating water Pump (only H version)
Water flow setting
Pump Speed Setting procedure:
The best speed setting will provide adequate circulation and provide
UIFDPSSFDUøPXBOESFUVSOUFNQFSBUVSFEJòFSFOUJBMT5IJTXJMMBDIJFWF
NBYJNVNFDPOPNZBOEFóDJFODZ
1. Set the speed selector to minimum (one)
Speed selector
2. Open all thermostatic or manual radiator valves to maximum
3. Set any room thermostatic controls to maximum
4. Start up system and pump should start
5. 8BJU_NJOTBOENFBTVSFXBUFSUFNQFSBUVSFEJòFSFOUJBM
(leaving water temperature-entering water temperature)
Shaft protection plug
6. 8BUFS5FNQFSBUVSF%JòFSFOUJBMTIPVMECF¡$JG8BUFSEFMUB
temperature is more than 6°C select a higher pump speed An
BMUFSOBUJWFTPMVUJPOJTNFBTVSFXBUFSQSFTTVSFEJòFSFOUJBMCFUXFFO
unit water IN-OUT pipes and select pump speed to match the unit
nominal water flow (see unit available static pressure curves).
Pumps have a manual speed selector (3 speed settings) which allow for
adjustment of speed to match the requirements of the system.
Anti-seizing pump
The 30AWH__H units are equipped with protection against the seizing
of the pump motor shaft. To allow this function, do not empty the
system or disconnect the power during long periods of inactivity.
In any case, if the pump rotor shaft seizes after a long period of
inactivity, the user must do the following to unblock it:
- Disconnect the power
- Remove the front panel
- Unscrew the shaft-protection plug on the back of the pump
- Insert a screwdriver in the slot and turn the rotor shaft
- Remount the protection plug
- Reconnect the power
3.3.7 External water pump selection (X and NX version)
Pump Speed Setting procedure is the same used for 30AWH---H version.
"OBMUFSOBUJWFTPMVUJPOJTNFBTVSFXBUFSQSFTTVSFEJòFSFOUJBMCFGPSFBOE
after external water pump and select pump speed to match the unit
nominal water flow (see water pump curves)
Pump has to be selected in order to provide nominal water flow at
expected water loop pressure loss.
Centrifugal Pump Curves.
Water loop pressure loss estimation at nominal water flow is needed to
define water pump size.
17
SM_30AW.indd 17
30AW
14-03-2011 14:41:26
Installation
3
3.3.8 Water loop charging, system cleaning and Water Characteristics
Charge the water loop, with water, until the pressure on the hydro unit
reads 0.15MPa (1.5bar )
Setting NUI Code104 (installation mode) = 1 water pump is forced on.
Loosen the cap of the air purge valve located on the top of back up
heater to purge air from the water circuit. If air remains in the system the
system will not operate correctly.
Looking for Code 111 (water flow switch status) the installer can verify if
the water fill operating is completed (when water is flowing, parameter
111 = 1)
When completing the Test Run, during the commissioning of the
system, the water pressure in the system may drop below 1,5 bar. In this
event please add more water to the system.
In the case of a new installation, or cleaning the circuit, it is necessary to
perform a preventive cleaning of the system.
In order to guarantee the good operation of the product, each time you
clean the system, replace the water or add glycol, check that the liquid
appears clear, without visible impurities and that the hardness is less
than 20 °f.
3.3.9 Expansion vessel (Volume calculation)
Where:
V: Necessary total vessel capacity (L)
Ⱦ 8BUFSFYQBOTJPODPFóDJFOUBUBWFSBHFIPUXBUFSUFNQFSBUVSF
Vs: Total water volume in the closed system (Do not include Hot Water
Cylinder)
P1: System pressure at tank setting position (Mpa_abs*). (Pipe inner
pressure during pump operation before heating device operates =
water supply pressure)
P2: Maximum pressure used during operation at tank setting position
(Mpa_abs*=safety valve setting pressure)
An expansion vessel has to be added in the water loop with 30AWH___X
and 30AWH___NX.
The capacity of the internal expansion vessel fitted in 30AWH__H :
t MJUFSTGPSTJ[FTBOE
t MJUFSTGPSTJ[FBOE'PSUIJTNPEFMUIFFYQBOTJPOWFTTFM
has been dimensioned for a typical terminal fan coil water loop)
If water loop content is higher than specified in the installation manual,
an additional expansion vessel has to be added.
The expansion volume can be calculated using the following formula.
* The absolute pressure valve (abs.) is obtained by adding the atmospheric pressure (0,1 MPa (1 bar)) to the gauge pressure.
The initial pressure of this expansion Vessel is 0.1Mpa (1 bar).
The release pressure of the safety valve is 0.3Mpa (3 bar).
E s Vs
V P1
1
P2
Water temperature and expansion coefficient (ε)
Water temperature and expansion coefficient (ε)
Hot water temperature (°C)
Expansion rate (ε)
Hot water temperature (°C)
Expansion rate (ε)
0
0.0002
50
0.0121
4
0.0000
55
0.0145
5
0.0000
60
0.0171
10
0.0003
65
0.0198
15
0.0008
70
0.0229
20
0.0017
75
0.0258
25
0.0029
80
0.0292
30
0.0043
85
0.0324
35
0.0050
90
0.0961
40
0.0078
95
0.0967
45
0.0100
-
-
Example: Maximum hot water temperature 55°C, initial water charge 0.2MPa and system volume 200 litres. The calculated Vessel capacity is:
11.6 0.0145 s 200
(0.2 0.1)
1
(0.3 0.1)
18
SM_30AW.indd 18
30AW
14-03-2011 14:41:27
3
Installation
30 AWH
Unit
l/s
004
006
008
012
015
0,20
0,28
0,33
0,58
0,69
Nominal water flow
Std
Water loop content for
30AWH___H units
Min
l
14
21
28
42
49
Max
l
65
65
65
95
95
Max water loop pressure
Max
kPa
300
300
300
300
300
Filling water pressure
Min
kPa
120
120
120
120
120
Max elevation 30AW upper
Max
m
20
20
20
20
20
Pipe water content
Internal Diameter
Outer diameter
14 mm
16 mm
18 mm
22 mm
28 mm
35 mm
3/8'' Gas
1/2'' Gas
3/4'' Gas
1' Gas
12 mm
14 mm
16 mm
20 mm
25 mm
32 mm
"12.7 mm (1/2'')"
"16.3 mm (5/8'')"
"21.7 mm (7/8'')"
"27.4 mm (11/16'')"
copper
steel
% Inhibited
Ethylene
10%
Glycol
Freezing temperature (*)
-4 °C
Capacity
0,996
Correction
Absorbed power
0,990
Factors
Loss of head
1,003
(*) Note: Temperature values are indicative.
Always refer to the temperatures indicated for the specific product used
Liters / meter
0,11 l/m
0,15 l/m
0,20 l/m
0,31 l/m
0,49 l/m
0,80 l/m
0,13 l/m
0,21 l/m
0,37 l/m
0,59 l/m
20%
30%
40%
-9 °C
0,991
0,978
1,010
-15 °C
0,983
0,964
1,020
-23 °C
0,974
1,008
1,033
TABLE TO USE FOR CALCULATING THE WATER CONTENT IN THE SYSTEM
Installed Unit
.............
Unit content (*)
l
.............
Pipe content (**)
l
.............
Uses (fan-coil, panels, radiators, etc.) (***)
l
.............
Total content (****)
l
.............
(*) Consult the technical data table
(**) Consult the pipe water content table
(***) Consult the manual for the installed uses
(****) The water content of the system must be between the minimum and maximum values for the units with hydronic kit and greater than the minimum
value for units without hydronic kit. The minimum value is necessary to provide optimal comfort.
For units without hydronic kit, add a suitable expansion vessel to the water content of the system.
19
SM_30AW.indd 19
30AW
14-03-2011 14:41:27
Installation
3
3.4 Refrigerant schematics
Refrigerant Circuit
N°
Component
N°
Component
0
4-way valve
9
TR sensor
1
TS sensor
10
Liquid tank
2
Check joint
11
Pulse Motor Valve
3
Accumulator
12
Distributor
4
Muffler
13
TE sensor
5
TD sensor
13*
TL sensor (only 015)
6
DC twin rotary compressor
14
Propellor fan
7
BPHE
15
TO sensor
8
Muffler
16
Heat exchanger
20
SM_30AW.indd 20
30AW
14-03-2011 14:41:28
4
Electrical connections
All field electrical connections are the responsibility of the installer.
WARNING
Make water connections before electrical connections.
Make ground connection prior to any other electrical connections
30AWH
Unit
Power supply
004_
006_
V- ph - Hz
008_
012_
015_
230 - 1 -50
Allowable Voltage Range
V
Maximum power drawn
kW
2
2.3
2,7
5.1
5.1
Maximum current drawn
A
7,2
11
14
23
20
25 - D type
25 - D type
Power Fuses
207 ÷ 253
Type
Current
gL type
A
10 - B type
15 - B type
15 - B type
Power supply cables
mm2
H07RN-F 3 x 2.5mm2
Maximum Pump Current
External circulation
A
2
Use cables H03VV-F 4x0.75 mm2 to connect the control to wire NUI
and H03VV-F 6x0.75 mm2 to connect the control to wire SUI
Check the supply voltage and frequency of the unit.
Remove the front panel, the electric parts appear at the front side.
The power supply cables can be inserted into the pipe holes. Be sure
to fix the power cable with bundling band to avoid contact with the
compressor and the hot pipes.
To ensure good tensile strength, the electric cables must be fastened
using the cable-holder on the plate (Only for size 015 use the strain relif
supplied with the unit).
Terminal block
/
1
WARNING:
t8SPOHXJSJOHNBZDBVTFBCVSOPVUUPTPNFFMFDUSJDBMQBSUT
t#FTVSFUPVTFUIFDPSEDMBNQTBUUBDIFEUPUIFQSPEVDU
t%POPUEBNBHFPSTDSBUDIUIFDPOEVDUJWFDPSFBOEJOOFSJOTVMBUPSPG
power and inter-connecting cables when peeling them.
t6TFUIFQPXFSBOE*OUFSDPOOFDUJOHDBCMFTXJUITQFDJöFEUIJDLOFTT
specified type and protective devices required.
t$POOFDUUIFDPOOFDUJOHDBCMFUPUIFUFSNJOBMBTJEFOUJöFEXJUIUIFJS
respective numbers on the terminal block of the unit.
0
L N
10
10
40
30
t5IFNBJOTTVQQMZDPOOFDUJOHDBCMFNVTUCF)3/'UZQF*&$
57) or higher, with synthetic rubber insulation with Neoprene coating,
according to EN 60335-2-40 codes.
/
0
t5IFJOTUBMMBUJPOGVTF#UZQF#UZQFPS%UZQFJOBDDPSEJOH
with the version) must be used for the power supply line of this heat
pump.
t*ODPSSFDUJODPNQMFUFXJSJOHNJHIUDBVTFBOFMFDUSJDBMöSFPSTNPLF
t1SFQBSFUIFFYDMVTJWFQPXFSTVQQMZGPSUIFIFBUQVNQ
t&OTVSFUIBUNBJOTTVQQMZDPOOFDUJPOJTNBEFUISPVHIBTXJUDIUIBU
disconnects all poles, with contact gap of a least 3 mm.
/ Earth line
0 Power cable
The unit can be controlled and set via:
t6TFS$PNGPSU*OUFSGBDFXJSFDPOUSPM"8$40QUJPOBM
t8JSFSFNPUFDPOUSPM"83$0QUJPOBM
t4XJUDIFTOPUTVQQMJFE
21
SM_30AW.indd 21
/ Power supply terminal block
0 Power cable
1Ground connector
30AW
14-03-2011 14:41:29
Electrical connections
4
4.1 Auxiliary electrical connections
Terminal Block H Version
33AW-CS1
Remote control
Alarm Input
CWG Y
C
W G 23
Y24 1
2 3 6 7
8 21 22
2 3 6 7
ECO
HTG/CLG
ON/OFF
33AW-RC1
Remote control
+ 12 V
SUI ALARM
N
N
18
10
N N L
11
12
3 Ways
valve
External
temperature
probe
4
5
16
13 14
4 19 9
External
heat source
/ defrost
15
Limitation
frequency
Alarm + defrost /
Dehumidifier
Sanitary Input
Alarm /
Ambient
temperature
reached
Electric heater /
Additional Water
pump
Terminal Block X Version
33AW-CS1
Remote control
Alarm Input
CWG Y
23 24 1
2 3 6 7
8 21 22
ECO
HTG/CLG
ON/OFF
33AW-RC1
Remote control
+ 12 V
SUI ALARM
N
N
18
10
11
3 Ways
valve
External
temperature
probe
12
4
5
16
13 14
External
heat source
/ defrost
Limitation
frequency
Alarm + defrost /
Dehumidifier
Electric heater /
Additional Water
pump
15
Sanitary Input
Alarm /
Ambient
temperature
reached
External Water
pump
Output Dry-contact, High voltage
Input Dry-contact, Low voltage
22
SM_30AW.indd 22
30AW
14-03-2011 14:41:50
Electrical connections
4
Terminal Block NX Version
33AW-CS1
Remote control
CWGY
23
13 14
2415
1
2 3 6 7
8 21 22
33AW-RC1
Remote control
HTG/CLG
ON/OFF
1
N N
2 L3 10
4 20
5 12
6
7
4 19
8 9 10
13 11
14 12
15
Sanitary
Input
3 Ways
valve
External Pump
Bus
RS 485
Defrost signal or air
temperature reached signal
Alarm and
defrost status
4.1.1 Sanitary hot water
The 30AWH units drive a 3-way valve (7) to manage a sanitary water
accumulation tank. The operating logic provides that, in the case of
a request for sanitary water by an accumulation tank (8), the system
controls a 3-way valve to direct the hot water only to the tank and to
operate at the maximum capacity to provide water at 60 °C (compatible
with the operating envelope).
Procedure to install a three way valve:
3. Connect Sanitary Hot Water dry contact thermostat/request (eg.
45°C ON, 55°C OFF) to 13 and 15 terminals (7 and 8 in NX version)
Closing that contact, GMC drives three way valve and AQUASNAP runs
BU¡$JOIFBUJOHNPEFUPPCUBJOIPUXBUFSQSJPSJUZ4)8
XIFO
contact opens, GMC drives back the system in the previous mode
DPPMJOHIFBUJOHPSPò Attention:
1)The sanitary water request has higher priority than the
programmed operating mode in both heating and cooling mode.
2)NUI code 146 configure SHW logic when Aquasnap unit is in OFF
mode.
1. Install three way valve on water piping closer as possible to
AQUASNAP
2. Connect electrically three way valve to N, 18, 10 terminals (1,2 and
QJOTJO/9WFSTJPO
JODBTFPGUISFFXBZWBMWFXJUITQSJOHSFUVSO
only connect N and 10 terminals
9
7
23
SM_30AW.indd 23
8
30AW
14-03-2011 14:42:06
Electrical connections
4
4.1.2 External heat source
An External Heat Source can be driven by Aquasnap Plus.
For this feature is necessary install 33AW-CS1 interface
Procedure to install an External Heat Source
1. Connect electrically EHS to N and 4 terminals to a relay that drives
EHS
2. Configure parameter 106 through 33AW-CS1 interface (1 for EHS)
3. Configure outdoor temperature limits (parameter 148 and 150).
When the OAT is less than second parameter both the HP and the
EHS will be operative as per algorithm.
8IFOUIF0"5JTMFTTUIBOöSTUQBSBNFUFS"RVBTOBQJTTXJUDIFEJOPò
mode and EHS is activated (eg.with par.148 = -2 EHS is activated with
OAT < -2°C + hysteresis)
4. To change the delta T needed to activate the EHS change the
parameter 152. (Factory default 5 °C).
Examples of water circuitation:
Load
TFC, floor or
radiators
Water collector
Check valve
4.1.3 Dehumidifier or a Humidifier
A Dehumidifier or a Humidifier can be driven by Aquasnap
Plus using humidity sensor into 33AW-CS1 interface.
For this feature is necessary install 33AW-CS1 interface
1. Connect electrically a Dehumidifier or a Humidifier to
N, 11 terminals to a relay that drives Dehumidifier (NO
contact) or a Humidifier (NC contact)
2. Configure parameter 108 through 33AW-CS1. (2 for
dehumidifier /Humid.)
3. Configure ambient humidity limit (parameter 107)
where Dehumidifier or a Humidifier is activated (eg.
with par.107 = 65, Dehumidifier is activated with
BNCJFOUIVNJEJUZ63
24
SM_30AW.indd 24
30AW
14-03-2011 14:42:08
Electrical connections
4
4.1.4 Silent/night mode
Silent/night mode is a system setting to limit maximum AQUASNAP
noise level.
Noise level is reduced limiting maximum compressor frequency.
With the contact closed, the unit will operate with a maximum
frequency lower than the standard one, otherwise it will operate in
standard mode.
&HSFEVDJOHBUNBYDPNQSFTTPSGSFRVFODZNBYJNVNOPJTFMFWFMJT
reduced of 3dBA
Short-Cut to Frequency reduction Mode
1. Configure code 5 through 33AW-CS1 interface or through DST (2 for
Silent/night mode active).
$POöHVSFDPNQSFTTPSGSFRVFODZSFEVDUJPO/VJDPEF
NBYJNVN
DPNQSFTTPSGSFRVFODZQBSBNFUFSSBOHFJTGSPNUP
3. Select Silent/night mode on scheduling
This feature is available using 33AW-CS1 interface dry contact to
frequency reduction mode (PINS 13-14).
Press the active key among Hold ( ) key for 10 seconds to make Night
mode active and can de-activate the Night mode by pressing the Hold
( ) key again for 10 seconds. When Frequency reduction / Night /
Silence mode is active, NUI will display the ( ) Icon. If FR mode is active,
this will always override the selection done in program schedule.
4.1.5 Stop Unit or Defrosting signals
- Ambient Temperature Reached: If suitably programmed using the
User Comfort Interface, and operating with this interface, a signal
is provided that indicates that the ambient temperature has been
SFBDIFE5IJTTJHOBMDBOCFVTFEUPUVSOPòGBODPJMT1*/4//6*
CODE: 147)
Several outputs are used for more than one condition. It is possible to
configure these outputs through the User Comfort Interface installation
menu (refer to the 33AW-CS1 manual).
Refer to the tables of next page and figures on paragraph 4.1 for the
correct pin-outs and use of the signals.
There are several signals available on the terminal strip to indicate
particular conditions or the stop of the external unit.
The available signals are:
- Defrosting: When operating in Heating mode, depending on the
external environmental conditions, the unit could perform
defrosting cycles to clean the external battery of any ice formations.
Under these conditions, it is not possible to guarantee the requested temperature output water temperature, which could reduce
general comfort. (PINS: 4-N or 11-N, NUI CODE: 106 or 108)
- Alarm: Indicates an alarm condition that stops the compressor.
(PINS: 5-N or 11-N, NUI CODE: 147 or108)
4.1.6 External temperature probe
3kΩ @ 25°C, Carrier code: 33AW-RAS01) remote. Connect the terminals
of the probe between PINS 23 and 24 of the terminal strip.
If the positioning of the external unit could induce a non-representative
reading of the external temperature by the probe positioned on the
machine, an additional temperature probe can be provided (NTC 2 wire,
4.1.7 External water circulator for 30AWH__X and 30AWH__NX units
Units without an integrated pump allow driving an external one.
The signal is supplied between PINS 16 and N of the terminal strip (PINS
1 and 4 for the NX version).
4.1.8 Additional Water pump (PINS 12-N)
It is managed in the following way:
If OAT > temperature set in nui code 148
The additional water pump activation depending by the nui code 156
1. ON/ OFF depending on the outdoor unit water pump logic, in case
PG4)8BDUJWBUJPO"%%81JT0/
2. ON/ OFF depending on the outdoor unit water pump logic, in case
PG4)8BDUJWBUJPO"%%81JT0''
If OAT < temperature set in nui code 148
The additional water pump activation depending by the nui code 157
(0. always ON, 1. always OFF or 2. ON/OFF depending by EHS).
25
SM_30AW.indd 25
30AW
14-03-2011 14:42:09
30AWH__H
Signal
Limits
33AW-CSI
Installation
Menu Code
23 - 24
Input (NTC 3kΩ @25°C)
N.A.
126
Sanitary Water Request
13 - 15
Input (contact switch quality
>25mA@12V)
N.A.
153
Maximum Frequency Reduction Compressor
13 - 14
Input (contact switch quality
>25mA@12V)
N.A.
5-6.
3-way valve
10 - 18 - N
Output 230Vac (18-N: Power
Suply, 10:Signal)
1 ph ~ 230V, 2A
N.A.
1- External Heat Source Request
2- Defrost
4-N
Relay Output Contact
1 ph ~ 230V, 2A
106 - 148 -150 -151 152 -154 -155
1- Alarm
2- Ambient temperature reached
5-N
Relay Output Contact
1 ph ~ 230V, 2A
147
1- Alarm + defrost
2- Humidifier
11 - N
Relay Output Contact
1 ph ~ 230V, 2A
107 - 108
1- Trace heater
2- Additional WP
12 - N
Relay Output Contact
1 ph ~ 230V, 2A
156 - 157
Alarm input
21
Input (contact switch quality
>25mA@12V)
N.A.
N.A.
Description
PIN
Additional external temperature probe
ON / OFF
6-3
Dry contact
N.A.
N.A.
NORMAL / ECO Mode
8-3
Dry contact
N.A.
N.A.
Heating / Cooling Mode
7-3
Dry contact
N.A.
N.A.
Signal
Limits
33AW-CSI
Installation
Menu Code
30AWH__X
Description
PIN
Additional external temperature probe
23 - 24
Input (NTC 3kΩ @25°C)
N.A.
126
Sanitary Water Request
13 - 15
Input (contact switch quality
>25mA@12V)
N.A.
153
Maximum Frequency Reduction Compressor
13 - 14
Input (contact switch quality
>25mA@12V)
N.A.
5-6
3-way valve
10 - 18 - N
Output 230Vac (18-N: Power
Suply, 10:Signal)
1 ph ~ 230V, 2A
N.A.
1- External Heat Source Request
2- Defrost
4-N
Relay Output Contact
1 ph ~ 230V, 2A
106 - 148 -150 -151 152 -154 -155
1- Alarm
2- Ambient temperature reached
5-N
Relay Output Contact
1 ph ~ 230V, 2A
147
1- Alarm + defrost
2- Humidifier
11 - N
Relay Output Contact
1 ph ~ 230V, 2A
107 - 108
1- Trace heater
2- Additional WP
12 - N
Relay Output Contact
1 ph ~ 230V, 2A
156 - 157
Alarm input
21
Input (contact switch quality
>25mA@12V)
N.A.
N.A.
External water pump
16 - N
Relay Output Contact
1 ph ~ 230V, 2A
N.A.
ON / OFF
6-3
Dry contact
N.A.
N.A.
NORMAL / ECO Mode
8–3
Dry contact
N.A.
N.A.
Heating / Cooling Mode
7–3
Dry contact
N.A.
N.A.
30AWH__NX
Description
PIN
Signal
Limits
33AW-CSI
Installation
Menu Code
Sanitary Water Request
7-8
Input (contact switch quality
>25mA@12V)
N.A.
N.A.
3-way valve
1-2-3
Output 230Vac
1 ph ~ 230V, 2A
N.A.
Water Circulator
1-4
Output 230Vac
1 ph ~ 230V, 2A
N.A.
Alarm
5-6
Input (contact switch quality
>25mA@12V)
N.A.
147
Defrost
9 - 10
Input (contact switch quality
>25mA@12V)
N.A.
106
BUS RS485
11 - 12
26
SM_30AW.indd 26
30AW
14-03-2011 14:42:10
4.2 Applications
Heating Applications
External
heat source
Space heating
LWT 55°C
Sanitary hot
water
Mid temp radiator
LWT 45°C
60°C
33AW-CS1
INTERFACE
Heat pump
outdoor unit
LWT 35°C
Water temperature range produced by AQUASNAP
air to water heat pump 20-60°C
Under floor heating
Humidifier
55°C
Sanitary hot
water
Mid temp radiator
60°C
45°C
33AW-CS1
INTERFACE
35°C
Under floor heating
Heat pump
outdoor unit
27
SM_30AW.indd 27
30AW
14-03-2011 14:42:12
Electrical connections
4
Cooling Applications
4.3 Range Description (Systems capacity)
HEATING
EWT-LWT
OAT
30-35°C
7/6°C
COOLING
40-45°C
7/6°C
23-18°C
35°C
12-7°C
35°C
Capacity
kW
COP
W/W
Capacity
kW
COP
W/W
LWA
[dB(A)]
Capacity
kW
EER
W/W
Capacity
kW
EER
W/W
LWA
[dB(A)]
30AWH004HB
4.10
4,05
3.90
3.2
62
4.90
4.05
3.30
2.91
64
30AWH006HB
5.80
4.20
5.80
3.01
62
7.00
3.61
4.70
2.91
64
30AWH008HB
7.20
3.91
7.40
3.16
64
7.80
3.90
5.80
2.91
65
30AWH012HB
11.90
3.91
12.95
3.01
67
13.45
3.61
10.20
2.91
68
30AWH015HB
14.50
4.06
14.0
3.21
68
16.00
3.81
13.00
2.91
69
30AWH004XB /NX
4.08
4.13
3.88
3.25
62
4.79
4.04
3.20
2.93
64
30AWH006XB /NX
5.76
4.30
5.76
3.06
62
6.86
3.62
4.56
2.90
64
30AWH008XB /NX
7.16
3.98
7.36
3.20
64
7.66
3.95
5.64
2.89
65
30AWH012XB /NX
11.86
3.95
12.91
3.03
67
13.15
3.57
9.90
2.86
68
30AWH015XB /NX
14.47
4.09
13.96
3.22
68
15.66
3.76
12.68
2.86
69
Data according to EN14511
28
SM_30AW.indd 28
30AW
14-03-2011 14:42:13
Electrical connections
4
4.4 Wiring diagrams
Inverter control size 004HB
29
SM_30AW.indd 29
30AW
14-03-2011 14:42:16
Electrical connections
4
GMC control size 004HB
30
SM_30AW.indd 30
30AW
14-03-2011 14:42:18
Electrical connections
4
Inverter control size 004XB
31
SM_30AW.indd 31
30AW
14-03-2011 14:42:21
Electrical connections
4
GMC control size 004XB
32
SM_30AW.indd 32
30AW
14-03-2011 14:42:24
Electrical connections
4
Inverter control size 006HB
33
SM_30AW.indd 33
30AW
14-03-2011 14:42:27
Electrical connections
4
GMC control size 006HB
34
SM_30AW.indd 34
30AW
14-03-2011 14:42:29
Electrical connections
4
Inverter control size 006XB
35
SM_30AW.indd 35
30AW
14-03-2011 14:42:32
Electrical connections
4
GMC control size 006XB
36
SM_30AW.indd 36
30AW
14-03-2011 14:42:35
Electrical connections
4
Inverter control size 006NX
37
SM_30AW.indd 37
30AW
14-03-2011 14:42:38
Electrical connections
4
GMC control size 006NX
38
SM_30AW.indd 38
30AW
14-03-2011 14:42:40
Electrical connections
4
Inverter control size 008HB
39
SM_30AW.indd 39
30AW
14-03-2011 14:42:42
Electrical connections
4
GMC control size 008HB
40
SM_30AW.indd 40
30AW
14-03-2011 14:42:45
Electrical connections
4
Inverter control size 008XB
41
SM_30AW.indd 41
30AW
14-03-2011 14:42:48
Electrical connections
4
GMC control size 008XB
42
SM_30AW.indd 42
30AW
14-03-2011 14:42:50
Electrical connections
4
Inverter control size 008NX
43
SM_30AW.indd 43
30AW
14-03-2011 14:42:53
Electrical connections
4
GMC control size 008NX
44
SM_30AW.indd 44
30AW
14-03-2011 14:42:56
Electrical connections
4
Inverter control size 012HB
45
SM_30AW.indd 45
30AW
14-03-2011 14:42:58
Electrical connections
4
GMC control size 012HB
46
SM_30AW.indd 46
30AW
14-03-2011 14:43:01
Electrical connections
4
Inverter control size 012XB
47
SM_30AW.indd 47
30AW
14-03-2011 14:43:04
Electrical connections
4
GMC control size 012XB
48
SM_30AW.indd 48
30AW
14-03-2011 14:43:07
Electrical connections
4
Inverter control size 012NX
49
SM_30AW.indd 49
30AW
14-03-2011 14:43:10
Electrical connections
4
GMC control size 012NX
50
SM_30AW.indd 50
30AW
14-03-2011 14:43:13
Inverter control size 015HB
51
SM_30AW.indd 51
30AW
14-03-2011 14:43:16
GMC control size 015HB
52
SM_30AW.indd 52
30AW
14-03-2011 14:43:19
Inverter control size 015XB
53
SM_30AW.indd 53
30AW
14-03-2011 14:44:58
GMC control size 015XB
54
SM_30AW.indd 54
30AW
14-03-2011 14:45:01
Control management
5
Inverter controller
GMC controller
30AWH012_
30AWH015_
30AWH004_
30AWH006_
30AWH008_
Wired remote (RC1)
Code: 33AW-RC1_
Wired remote (CS1)
Code: 33AW-CS1_
55
SM_30AW.indd 55
30AW
14-03-2011 14:45:03
5
Control management
5.1 Introduction
USER INTERFACES
GMC CONTROL
INVERTER CONTROLLER
Users can select the desired operating
NPEFUISPVHIEJòFSFOUSFNPUFDPOUSPMMFST
Control is based on the GMC platform developed by Carrier. For the
30AWH AquaSnap PLUS inverter chiller / heat pump a new GMC board
has been developed as well as new algorithms have been implemented.
The GMC control elaborates the request from the user interface and
translates it into a message for the chiller unit control. It continuously
analyzes the water, indoor ambient conditions and the customer
requests sending updated signals to the chiller unit control.
The chiller unit control takes care of the system reliability and satisfies
the requests coming from Inverter control tuning chiller unit fan, PMV,
compressor.
The chiller unit control continuously sends back signals to the Inverter
control.
5.2 Unit Control
The main flow of logic in this control is as follows: The control reads
in inputs from discrete inputs, analog inputs, communications. These
inputs are then processed by mode control. After the mode control
comes the protections that protect the unit from damage. After the
protections, the outputs are energized or de-energized. Then the loop
repeats itself.
High voltage communications is used to communicate from the GMC
board to inverter control.
Maximum values are maximum compressor frequency allowed unless
limited by a protection or message received from the User Interface.
The User Interface can limit the maximum compressor frequency from
UP
A2W
Size
Inverter
Capacity
(kW)
GMC Control
returned to Inverter
(HP)
Minimum
Cooling
(Hz)
Maximum
Cooling
(Hz)
Minimum
Heating
(Hz)
Maximum
Heating
(Hz)
4
4
1,25
20
90
20
95
6
6
1,75
10,2
100
10,2
104
8
8
3
10,2
82
10,2
104
12
12
5
15
65
15
60
15
15
6
10,2
65
10,2
70
56
SM_30AW.indd 56
30AW
14-03-2011 14:45:05
Control management
5
When power supply is reset
When a unit is powered up, depending on its Auto Start configuration, it will start up with its last operating parameters, or
OFF Mode.
The EEPROM is available for saving the operating environment of the control in the event of a power-reset condition. If not
configured for auto start, at the power up the system will remain in OFF Mode.
All the NUI codes will be restored on a power up condition.
Fail Mode
When the unit has a diagnostic failure, fail mode is executed.
*GUIF0QFSBUJOH.PEFJT'"*-UIFOUIFPOCPBSE-&%XJMMCMJOLUIFGBVMUDPEFTFOEUIF'PSDFE0òNFTTBHFUPUIF6OJUJO
case of not recoverable error and Water pump remains energized. In addition and if connected, the same message code
will be sent to NUI and, as an alternative, the alarm relay output should be activated as defined.
Anti Freeze Protection in Off Mode
5IJTBMHPSJUINQSPUFDUTUIFSPPNGSPNGSFF[JOHXIFOJO0ò.PEFBOEJGTFMFDUFECZUIF6TFS)0.&"/5*'3&&;&FOBCMFE
AF: AntiFreeze
that can also select the Antifreeze Temperature. An hysteresis of - 0°C /+2°C should be applied.
NUI Code 2
Disable
START
HOME
ANTIFREEZE
CHILLER
UNIT: OFF
WP: OFF after
35 sec. if
was ON
NUI: OFF
enable
CHILLER UNIT: OFF
WP: OFF after 30 sec. if
was ON
NUI: OFF + Antifreeze
T<AF Value
AF
STATUS
T< AF Value
57
SM_30AW.indd 57
Mode: ON Heat
WSP: 35°C
WP: ON
NUI: Display Antifreeze
30AW
14-03-2011 14:45:05
Control management
5
Operating mode selection
The operating mode is selected based on the command chosen by the remote control.
Cooling Mode
Depending by the system configuration and when the operating mode is cool, the system could operate as follows:
With Comfort NUI (CS1).
With SUI (RC1) / Dry inputs.
The WSP (Water Set Point) will be defined as follow:
- Fixed WSP: as per the appropriate variable value (Standard and Eco)
- Climatic Curve depending by OAT (see the controls manuals and the paragraph 7.3.5 )
For more information about the cooling mode logics used to determine the WSP, refers to the SUI or NUI manuals.
OAT: Outdoor
Air
Temperature
WSP: Water Set Point
Heating Mode
Depending by the system configuration and when the operating mode is Heat, the system could operate as follows:
With Confort NUI (CS1).
With SUI (RC!) / Dry inputs
The WSP will be defined as follow:
- Fixed WSP: as per the appropriate variable value (Standard and Eco)
- Climatic Curve depending by OAT (see the controls manuals and the paragraph 7.3.5 )
Off Mode
If the Operating Mode is OFF then:
- All outputs must be de-energized except those turn on by protections.
- Send Forced OFF Message to the unit
- Water pump is de-energized AFTER 30 SEC.
- Antifreeze and all protections algorithms will be always operative
- Sanitary Hot Water management in OFF mode is based on code 153 (1: always active 2: active only in HTG or CLG
mode)
In case of User Interface is Simple User Interface (dry contacts). The code 100 must be 0 or 1 & code 101 must be 0.
*GUIFWBMVFPGUIFDPEFJTUIFTUBUFPGUIFVOJUJTi$POUSPMMFE0ò$ZDMFw5IJTGFBUVSFJTBWBJMBCMFJO)FBUJOHNPEFJO
Cooling mode and in SHW demand. Every time the compressor turns on a timer restarts to count the Compressor Run
Time (CRT).
8IFOUIFESZDPOUBDU0òTJHOBMJTSFDFJWFEUIFi$POUSPMMFE0ò$ZDMFwGFBUVSFSFBETUIF$PNQSFTTPS3VO5JNF
- If CRT < 18 minutes the compressor frequency is progressively reduced from the current to the
minimum value until CRT >18 minutes.
*G$35NJOVUFTUIFVOJUJTUVSOFE0ò
Compressor Frequency Calculation
- When the Frequency reduction mode is activated through the NUI Bus, RS 485 bus or Limitation Frequency Input, the
max compressor frequency
'O
.BYJNVN$PPMJOH)FBU)['3&23&%6$5UIBUWBMVFDPVMECFTFUCFUXFFOBOE
- When the Unit Mode is OFF, the unit operates in cool/heat satisfied mode with a compressor frequency of zero, F(n) =0.
Calculating Frequency
The calculated water temperature exiting exchanger and calculated set point are continuously monitored. The frequency
is calculated on the values of LWT and WSP. If the leaving water temperature changes causing a positive delta or if the
calculated set point changes, a normal demand calculation is performed every 90 seconds (60 in heat mode). Now the
frequency is calculated on the values of E(n) and ΔE(n).
Demand vs. Satisfied
8IFOUIFDPNQSFTTPSJTPòBOEEFMUB'UIFDPNQSFTTPSJTBMMPXFEUPTUBSU'NBY'DNJO'O
PSJOIFBUJOH'
max (Fhmin, F(n)) ) , and demand calculations execute every 90 (60 in Heat mode)
seconds.
8IFOUIFDPNQSFTTPSJTPòTFOE$PPM)FBU4BUJTöFENFTTBHFUPUIFVOJU
- When the compressor is on send the Cool/Heat Demand message to the unit.
Water pump is always energized
58
SM_30AW.indd 58
LWT: Leaving water
temperature
WSP:
calculated water
set point
F(n): frequency
sent to the
unit, clamped
between zero
and Fcmax
E(n)=LWT- WSP
ΔE(n): E(n-1)-E(n)
Fcmax:
maximum compressor
speed allowed
in cooling
Fcmin:
minimum
compressor
speed allowed
in cooling
Fhmax:
maximum
compressor
speed allowed
in heating
Fhmin:
minimum
compressor
speed allowed
in heating
30AW
14-03-2011 14:45:05
Control management
5
Dehumidifier activation (X and H terminal block pins 11 – N)
External dehumidifier source is based on NUI Relative Humidity value, (For this feature is necessary install 33AW-CS1
interface).
Two codes shall be accesses through NUI:
Code 108:
It is for defining availability of external dehumidifier.
1 = Alarm or Defrost
2 = External Dehumidifier activation
Code 107:
- It is Relative Humidity Limit value to activate the heat source.
- If Relative Humidity is higher than Humidity Limit, Output PINS 11-N must be forced ON and display dry mode icon on
NUI.
0VUQVUTIPVMECFGPSDFE0''XIFO3FMBUJWF)VNJEJUZJTMFTTUIBOTFMFDUFEWBMVF
Protections are activated based on operative Mode.
NUI code 108
and 107
Compressor Short Cycling Protection (Timeguard)
'PSSFMJBCJMJUZQVSQPTFTXIFOUIFDPNQSFTTPSHPFTGSPN0OUP0òJUNVTUSFNBJOPòGPSBNJOJNVNPGNJOVUFTBOE
seconds. During that time F(n) = 0, and a Cool Satisfied or Heat Satisfied message is sent to the Unit depending on the
mode.
5PBWPJETIPSUBOEGSFRVFOUPOPòDZDMFTUIFDPOUSPMBMHPSJUINXJMMBWPJEVOJUUVSOJOHPOVOUJMNJOVUFTIBWFFMBQTFEJG
last on cycle was shorter than 10 minutes. (The maximum number of cycles for hours is six).
8IFOUIFDPNQSFTTPSJTSFBEZUPUVSOPOBSBOEPNEFMBZPGoTFDPOETIPMETUIFDPNQSFTTPSPò
Water Pump remains always ON during Timeguard.
Minimum Compressor Run Time
For reliability purposes this algorithm forces the compressor to run for a minimum amount of time.
0ODFUIFDPNQSFTTPSJTSVOOJOHJUNVTUSVOGPSBNJOJNVNPGNJOVUFTCFGPSFTXJUDIJOHPò
This protection is ignored when:
"EJBHOPTUJDGPSDFTUIFDPNQSFTTPSPò
6TFSSFRVFTUTUIFVOJUUPUVSOPò
- A/C Power Interruption
- A mode change occurs
- 20 second loss of high voltage communications
- High temperature protection
Water Freeze Protection
When the water starts gets too cold, there is the risk of freezing in the heat exchanger.
Certain actions are taken to prevent freezing.
This protection starts if TR or Tw go down particular values as per conditions below.
TR
Tw
-3 °C
5 °C
-5 °C
4 °C
-7 °C
2 °C
H
N
M
Compressor OFF
Tw:
Min(Actual
Water
Temperature
Entering,
Actual Water
Temperature
Exiting)
Fr(n):
real frequency
from the Unit
Fcmin:
minimum
compressor
speed allowed
in cooling
TR:
Refrigerant
temperature
While in Zone N or H the frequency can’t increase.
While in Zone M the frequency is forced to decrease until Fcmin.
#FMPX[POF.UVSOPòUIFDPNQSFTTPSBOETFUNPEF0''
59
SM_30AW.indd 59
30AW
14-03-2011 14:45:06
Control management
5
High Temperature Protection
When the water starts to get to hot, this is a sign that the pressure in the system is increasing.
Certain actions are taken to decrease the pressure.
Tw:
Max(Actual
Water
Temperature
Entering,
Actual Water
Temperature
Exiting)
Tr: Actual
Refrigerant
Temperature
Fr(n):
real frequency
from the chiller
unit
Fhmin:
minimum
compressor
speed allowed
in heating
Tw
Compressor OFF
62 °C
M
61 °C
L
60 °C
N
While in Zone N or L the frequency can’t increase.
While in Zone M the frequency is forced to decrease until Fcmin.
*G5XŻPS5Sƥ¡$UIFOUVSOPòUIFDPNQSFTTPSBOETFU'
Anti frost protection
This function shall run when the unit is manually stopped or shutdown due to alarm. It shall protect the water exchanger
against freezing risk because of low outside temperature conditions.
The following logic shall be used:
EJòFSFOUGBMMEPXOUISFTIPMEMJNJUTIBWFCFFOCFEFöOFEUPTFRVFOUJBMMZQPXFS0O
o Trace Heater (first intervention) (when installed).
o Water Pump (second intervention)
P6OJU0OJO)FBU.PEFBOE5)0ò EJòFSFOUSJTFVQUISFTIPMEMJNJUTIBWFCFFOEFöOFEUPTFRVFOUJBMMZ1PXFS0ò
P6OJU0òBOE5)0O
P8BUFS1VNQ0ò
P5SBDFIFBUFS0ò
TH
WP
HP
Threshold A
[(EWT or LWT < (DELTA SP + 4°C))]
ON
OFF
OFF
Threshold B
[(EWT or LWT < (DELTA SP + 3°C))]
ON
ON
OFF
Threshold C
[(EWT or LWT < (DELTA SP + 2°C )]
OFF
ON
ON
Threshold D
[(EWT and LWT > (DELTA SP + 5°C)]
OFF
OFF
OFF
DELTA SP: NUI CODE
109
WP: Water Pump
TH: Trace heater
HP: Heat Pump
OAT: Outdoor Air
Temperature
EWT: Enter Water
Temperature
LWT: Leaving Water
Temperature
A/C Power Interruption
This algorithm handles the case of losing A/C line cycles.
*GUIF"$XBWFGPSNJTMPTUGPSNJMMJTFDPOETGPSDFUIFDPNQSFTTPSPòCZTFOEJOH'PSDFE0òTJHOBMUP6OJU5IFOTFOE
cool satisfied or heat satisfied until time guard expires.
Envelope Limitation Protection
This function limits frequency based on a combination of OAT and LWT, in order to guarantee the unit envelope. The
FOWFMPQFMJNJUTBSFEJòFSFOUGPSIFBUJOHBOEDPPMJOHNPEFBOEDIBOHFGSPNBTJ[FUPBOPUIFS
HEATING
-20 °C ≤OAT≤30 °C
20 °C≤LWT≤60 °C
OAT: Outdoor Air
Temperature
LWT: Leaving Water
Temperature
COOLING
0 °C ≤ OAT ≤ 46 °C
4 °C ≤ LWT ≤ 18 °C
For more details see par 2.4 Operation Limits
When the OAT and/or LWT values are out of these limits the Aquasnap unit doesn’t stop but it works in particular
conditions in order to preserve the compressor (frequency and for uptime limitation).
60
SM_30AW.indd 60
30AW
14-03-2011 14:45:07
5
Control management
Unit Status and Defrost output or Tair Setpoint status
Based on the NUI code 147 set-up, the Output J7 Pin 2 (N-5 on the terminal block) could play for one of these Functions:
- ALARM: The intent of this output is to point out the alarm condition. This signal could be
used by an external control to verify if the Unit is able to operate with the requested function.
- Tair SETPOINT STATUS: The intent of this output is to give signal to a potential Fan Coil System when the T ambient
set-up measured by the NUI is reached. A hysteresis of +1°C / – 1°C is used. This signal could be used like a window
contact by the Fan Coil to stop the fans and/or the water valves.
NUI code 147
Sanitary water Input and 3 Way Valve Output
The combination of the Sanitary Water Inputs and Outputs should be able to manage an external Sanitary Water Boiler
and this is the logic that is driving this function:
- When an external Sanitary Water Boiler needs hot water from the units, it close the dry contact Pins 13-15 on the
terminal block.
- The routing that is always running in order to verify Input changes detect this need and the unit mode, whichever
it is the current status, become in HEAT mode at the max allowed WSP admitted as per the Enveloped Limitation
protection.
- In case of no alarm or defrost is active, the 3 Way Valve Output (pins N-10-18 on terminal block) become ON while, vice
versa, this output is always OFF in case of alarm and/or Defrost
- In addition, the NUI, if available, will display the relative Icon.
5IFDPEF4)8JOPòNPEF
EFUFSNJOFTJGUIF4)8-PHJDTIBMMCFBDUJWFPSOPUXIFO4ZTUFN.PEFJT0''*O)FBU
or Cool Mode the SHW logic is always actives.
NOTE: when SHW is ON, EHS is always OFF
SHW: Sanitary
Hot Water
EHS: External
Heat Source
WSP: water set-point
NUI code 153
Water Pump On / Off Management
The water pump should be always ON apart if any alarms are active or if the unit is in OFF mode (selected or forced by the
unit itself ).
When the system turn OFF the water pump must be ON for additional 30 seconds.
8IFOUIFVOJUJTTUPQQFEGPSNPSFUIBOIPVSTUIFQVNQTIBMMCFTUBSUFEGPSTFDPOETTUBSUJOHUIFQVNQQFSJPEJDBMMZ
for few seconds increases the life time of the pump.
If OAT < temperature set in code 148
The main water pump activation depending by the code 155 (0. always ON, 1. always OFF or 2. ON/ OFF depending by
EHS)
SHW: Sanitary
Hot Water
EHS: External
Heat Source
NUI codes 148,
155
Additional water Pump On / Off Management
The management for the additional water pump, linked to the pin 12 on the X and H terminal block, is the following:
If OAT > temperature set in code 148
The additional water pump activation depending by the code 156
0/0''EFQFOEJOHCZNBJO81MPHJDJODBTFPG4)8BDUJWBUJPO"%%81JT0/
0/0''EFQFOEJOHCZNBJO81MPHJDJODBTFPG4)8BDUJWBUJPO"%%81JT0''
If OAT < temperature set in code 148
The additional water pump activation depending by the code 157 (0. always ON, 1. always OFF or 2. ON/ OFF depending
by EHS)
SHW: Sanitary
Hot Water
EHS: External
Heat Source
WP: Water
Pump
ADD WP:
Additional
Water Pump
NUI codes 148,
156, 157
Flow Switch Protection
*GXBUFSJTOPUøPXJOHUISPVHIUIFIFBUFYDIBOHFSUIFDPNQSFTTPSDBOOPUUVSOPOBOEJGJUJTPOJUJTGPSDFEPò8BUFS
1VNQXJMMCFGPSDFE0OPS0òBTQFSøPXTXJUDIPVUQVU
- If flow switch contact is open (no water flow) Unit and WP turn OFF.
- The system retries to start for 5 times before displaying alarm.
The compressor is allowed to turn on if requested to when the water is flowing through the heat exchanger (flow switch
contact OFF) and timeguard has expired.
61
SM_30AW.indd 61
Settings:
Size 4kW = 300 l/h
Other Sizes = 420 l/h
30AW
14-03-2011 14:45:07
Control management
5
Backup External Heat Source functionality (X and H terminal block pins 5 – N)
This functionality is valid when user mode is HEATING MODE.
Between pins 5 and N of terminal strip (see paragraph 4.1) an output is available (1 ph ~ 230V, 2A max) to activate a
backup external heat source (such as Electric Heater or Boiler).
This functions is activates using the NUI.
NUI Codes for this function:
106: 1 for External heat source (2 for Defrost Output)
148: OAT limit for External heat source (-20°C / +65°C)
150: Auxiliary OAT limit. This code is defining the EHS threshold value under witch both HP and EHS will be operative as
per algorithm. (-20°C / +30°C)
151: Auxiliary Delay. Delay time before switching the back-up EHS ON min. (1 min / 60 min)
152: Auxiliary Hysteresis. Delta T needed to activate the Auxiliary Heater. (1°C / 20°C)
153: SHW in OFF MODE. This code is defining if, when System mode is OFF, the SHW logic can be activated.
154: EHS OUTPUT. This code is defining the EHS output status when EHS is activated and OAT<Code 148
155: Main water pump vs EHS OAT. This code is defining the water pump logic when EHS is activated and OAT<Code 148
156: Additional WP vs SHW (0 Trace heater Output active)
157: Additional WP ( X and H terminal block pins 12 – N)
OAT < T set in CODE 148
SHW: Sanitary Hot
Water
EHS: External Heat
Source
HP: Heat Pump
OAT: Outdoor Air
Temperature
WP: Water Pump
NUI Codes
106, 148,
150, 151,
152, 153,
154, 155,
156, 157
T set in CODE 148 < OAT < T set in CODE 148
A
B
C
Water Temperature Set-point
E 152 Auxiliary Hyst
Indoor Temperature Set Point
HP System mode
OFF
ON
ON
Frost protection
ON
OFF
OFF
EHS timer
OFF
OFF
ON
EHS OUTPUT
CODE 154
0=Always ON
1=ON/OFF based
on room T
OFF
ON
2=ON/OFF based
on WSP
ON
OFF
Max Frequency
MAIN WATER
PUMP CODE
155
ADDITIONAL
WATER PUMP
CODE 157
0=Always OFF
1=ON/OFF based
on EHS ON/OFF
OFF
ON
OFF
ON
ON
OFF
OFF
OFF
ON
OFF
OFF
OFF
ON
OFF
OFF
OFF
As per standard logic
Depending by EHS ON/OFF
2=Always ON
ON
0=Always OFF
1=ON/OFF based
on EHS ON/OFF
OFF
2=Always ON
OFF
CODE 151
AUX Delay
Depending on main water pump or, when SHW is active, by CODE 156
Depending by EHS ON/OFF
ON
If code 148 < OAT < code 150:
When LWT is below the water set-point minus the auxiliary hysteresis (code 152) starts the EHS timer (A). When the set delay
(code 151) is passed (B) the External Heat Source turns ON and the HP is regulated at the max frequency. The EHS turns
OFF when the LWT reached the water temperature set point (C) (EHS timer is set to 0). The additional water pump will be
activated depending by main water pump (always ON if main water pump is ON) and by the code 156 (ON or OFF as per SHW
activation).
If OAT < code 148:
The HP turns OFF (frost protection is active)
The EHS turns ON/OFF depending by setting of the code 154 (Always ON, Based on Room temperature or Water
Temperature).
The main water pump activation depending by the code 155 (always ON, always OFF or depending by EHS status)
The auxiliary water pump activation depending by the code 157 (always ON, always OFF or depending by EHS status)
NOTE:
*ODBTFPG4)8BDUJWBUJPOQJOTDMPTFE
IFBUQVNQXJMMUVSOPOBOECBDLVQIFBUFSXJMMUVSOPò5IJTXJMMIBQQFOJOCPUI
the above strategies based on OAT value.
In case of EHS installation it is mandatory to install a thermal switch on the water circuit to protect the system from too high
water temperatures. This protection item has to be located Immediately downsteam the EHS (according to local/national
legislations).
62
SM_30AW.indd 62
30AW
14-03-2011 14:45:09
5
Control management
System Diagnostics
The control contains diagnostic tests to verify the integrity of the system.
The On Board LED is located on the circuit board. It is used to display normal operation status and diagnostic fault code
information.
The control board status LED will flash at a rate of one (1) second ON and one (1) second OFF while the control is operating
normally.
When in a diagnostic fault code, it will blink out the fault code.
Once a failure occurs, the system is considered failed. The failure could be recoverable or not. The lowest diagnostic number
that is active will be the fault code that is displayed.
When a diagnostic is active the onboard LED will blink the fault code out. The sequence will be 4 seconds with the onboard
-&%TPò5IFPOCPBSE-&%XJMMCMJOLBUBSBUFPGIBMGTFDPOEPOIBMGTFDPOEPòGPSFBDIOVNCFSJOUIFUFOTEJHJU5IFO
TFDPOETPò5IFPOCPBSE-&%XJMMCMJOLBUBSBUFPGIBMGTFDPOEPOIBMGTFDPOEPòGPSFBDIOVNCFSJOUIFPOFTEJHJU*GUIF
fault code is less than 10 the delay will be 6 seconds between onboard LED flash sequences.
Fault Codes associated with diagnostic will be available through communications.
Fault code 14 and 8 shall be give top priority and shall by pass other fault codes. Fault codes priority order shall be the same
as in the given below table in absence of Fault codes 14 and 8.
Recoverable:
self healing
diagnostic
Not
Recoverable:
Must cycle
power up to the
unit to fix the
system.
SUI Alarm:
When any diagnostic is active and in case SUI is connected, SUI Alarm LED shall blink as just the same way as Onboard LED. In
absence of diagnostics SUI Alarm LED shall remain OFF.
Fault codes on NUI:
Main Board shall communicate the diagnostic with NUI. User or Installer can view these fault codes through an entry into
User settings mode or Installer settings Mode and scroll to the fault code as mentioned in the Variable table. NUI shall scroll all
the active fault codes. In absence of diagnostics, NUI shall display blank. NUI shall also manage to store the latest 4 fault codes
and Installer can view this value by scrolling to Fault code History parameter.
For more information about the fault code on controls NUI and/or SUI refer to their specific manuals.
For specification of fault code refer to the specific paragraph:
i(.$BMBSNDPEFTw
Output test
This test will be used by the Installer to test and/or to force ON the outputs, setting the code 104 on the NUI:
0. No test
1. Water pump
2. Alarm / Ambient temperature reached
3. External Heat Source / Defrost
NUI Code 104
4. Alarm + defrost / Humidity
5. Trace Heater / Additional Water Pump
6. 3 Way Valve
7. SUI Alarm
8. N.A.
5PQFSGPSNBOZPVUQVUUFTUUIF6OJUNVTUCFJO0òJGOPU0òNVTUCFGPSDFE
"GUFSNJOVUFTUIFVOJUBVUPNBUJDBMMZFYJU
GSPNPVUQVUUFTU5PQFSGPSNBOZPVUQVUUFTUUIF6OJUNVTUCFJO0òJGOPU0òNVTUCFGPSDFE
Pulse Modulating Valve [PMV] control (cooling and heating operation)
Pulse Modulation Valve is a refrigerant bi-flow electronic expansion device driven by a stepper motor.
It’s use to optimize refrigerant superheating and avoid refrigerant liquid back into the compressor.
1) The PMV is controlled with 50 to 500 pulses during the operation, respectively.
5IF1.7JTDPOUSPMMFEVTJOHUIFUFNQFSBUVSFEJòFSFODFCFUXFFO
54TFOTPSBOE53TFOTPSJODPPMJOHNPEF54TFOTPSBOE5&TFOTPSJOIFBUJOHNPEF5IFUBSHFUJTUPNBJOUBJOUIF
UFNQFSBUVSFEJòFSFODFGSPNUP,
3) During max loading conditions, the refrigerant circuit pressures & temperatures can increase excessively, so the PMV is
controlled by the TD sensor.
63
SM_30AW.indd 63
TS: Suction
temperature
TR:
Refrigerant
temperature
TE: Entering
(in Heat
exchanger)
temperature
30AW
14-03-2011 14:45:10
Control management
5
Discharge temperature release control
1) This function controls the compressor frequency, when the discharge temperature has increased due to max load
condition or during PMV control. It subdivides the frequency control up to a unit of 0.6 Hz to stabilize the cycle.
2) When the discharge temperature is detected in an abnormal stop zone, the unit stops the compressor and restarts it after
2 minutes, 30 seconds (time guard). The error count is cleared when operation of 10 minutes without error occurs. If the
abnormal stop zone has been detected 4 times without clearing, an error code is displayed.
* Possible causes include excessive amount of refrigerant, defective PMV, or blockage in the refrigeration cycle.
TD: Discharge
temperature
TD[oC]
Error stop ("P03" displayed after 4 error counts)
a
Frequency down
b
c
Frequency holding
d
Frequency slow-up
(Based on command)
e
As command
a
b
c
d
e
30AWH004
117
112
108
105
98
30AWH006
117
112
108
105
98
30AWH008
117
107
103
100
93
30AWH012
111
106
100
95
90
30AWH015
111
109
106
103
96
Current release control
The output frequency and the output voltage are controlled by AC current detected on the P.C. board.
The max current value of the inverter are shown in table below.
[A]
l1 value [A]
Frequency down
COOL
Hold
Hold
Normal operation
64
SM_30AW.indd 64
HEAT
30AWH004
6.3
6.3
30AWH006
8.5
10.8
30AWH008
10.1
12
30AWH012
23
23
30AWH015
20
20
30AW
14-03-2011 14:45:11
Control management
5
Outdoor fan control
Allocations of fan tap revolutions
FAN TAP
W1
W2
W3
W4
W5
W6
W7
W8
W9
WA
WB
WC
WD
WE
WF
WG
30AWH004
0
200
280
320
350
380
420
460
500
530
560
580
600
600
600
600
30AWH006
0
200
250
300
350
400
450
500
550
580
600
600
600
600
600
600
30AWH008
200
240
280
310
350
380
420
450
490
520
580
630
680
680
680
-
30AWH012
Higher fan
250
260
270
280
330
380
430
480
530
590
650
700
730
750
-
-
30AWH012
Lower fan
OFF
OFF
250
260
310
360
410
460
510
570
630
380
710
730
-
-
30AWH015
Higher fan
200
240
240
260
320
380
480
540
640
740
780
780
780
780
-
-
30AWH015
Lower fan
0
0
200
280
360
400
500
560
660
760
820
820
820
820
-
-
5XPEJòFSFOUBMHPSJUINTGPSFBDITJ[FNBOBHFGBOTQFFEPOFGPSDPPMJOHBOEPOFGPSIFBUJOHPQFSBUJPOT
1) Cooling fan control
004-006 sizes.
The blowing air volume is controlled as follow:
1. When strong wind blows at outdoor side, the operation of heat pump continues with the fan motor stopped.
2. Whether the fan is locked or not detected, and the operation of heat pump stops and an alarm is displayed if the fan is
locked.
3. According to each operation mode, by the conditions of outdoor temperature (TO) and compressor revolution, the
speed of outdoor fan shown in the table is selected
~ 13.8
~ 31.7
32.3 ~ MAX
Compressor speed
(Hz)
MIN
MAX
MIN
MAX
MIN
MAX
TO ≤ 38 °C
W3
W4
WD
WE
WF
WG
TO ≤ 28 °C
W3
W4
WB
WD
WE
WG
TO
TO ≤ 15 °C
W3
W4
W8
WB
WA
WD
TO ≤ 5,5 °C
W2
W4
W3
W6
W5
W8
TO ≤ 0 °C
W2
W2
W2
W3
W3
W5
TO ≤ 0 °C
W1
W1
W1
W2
W2
W3
TO ≤ 38 °C
W3
W4
WC
WD
WD
WE
TO ≤ 38 °C
W3
W4
W3
W4
WC
WD
When To is abnormal
WE
WG
WE
WG
WE
WG
During
ECO
mode
008 size
1. The outdoor fan is controlled by TE, TD, and TO sensors and also revolution frequency of the operation. The outdoor is
controlled by every 1 tap of DC fan control (15 taps).
2. Only during 60 seconds after the operation has started, the fan is fixed with the maximum fan tap which corresponds to
the zone in the following table. After then the fan is controlled by TE sensor temperature.
3. Considering a case that TE sensor has come out of the holder, the fan is controlled so that revolution frequency of the
fan increases regardless of TE if temperature of TD sensor has risen.
65
SM_30AW.indd 65
30AW
14-03-2011 14:45:13
Control management
5
The output frequency and the output voltage are controlled by AC current detected on the P.C. board.
The max current value of the inverter are shown in table below.
TE(oC)
MAX
46
+30 rpm/20 sec.
37
Hold zone
34
-30 rpm/20 sec.
20
MIN
TO
TO < 5C
5 <= TO < 10C
25 <= TO
TO error
MIN
W1
W2
10 <= TO < 15C 15 <= TO < 20C 20 <= TO < 25C
W3
W4
W5
WA
W1
MAX
W6
W8
WA
WC
WE
WE
WE
015 size
1. The outdoor fan is controlled by TL sensor, TO sensor and the operation frequency. The outdoor fan is controlled by
every 1 tap of DC fan control (14 taps).
2. Only for 60 seconds after the operation has started, the maximum fan tap corresponding to the zone in the following
table is fixed and then the fan is controlled by temperature of TL sensor.
Temp. range
20 Hz
or lower
20 Hz
to 45HZ
MIN
MAX
MIN
MAX
MIN
MAX
38 °C ≤ TO
W6
WC
W8
WC
WA
WD
29 °C ≤ TO < 38°C
W5
WB
W7
WC
W9
WC
15 °C ≤ TO < 29°C
W4
W8
W6
WA
W8
WC
5 °C ≤ TO < 15°C
W3
W6
W5
W8
W7
WA
0 °C ≤ TO < 5°C
W2
W4
W4
W6
W5
W8
- 4 °C ≤ TO < 0°C
W2
W3
W3
W5
W4
W6
TO< - 4°C
W1
W2
W1
W4
W2
W6
TO error
W1
WC
W1
WC
W2
WD
66
SM_30AW.indd 66
45 Hz
or higher
30AW
14-03-2011 14:45:14
Control management
5
2) Heating fan control
004-006 sizes
The blowing air volume at the outdoor unit side is controlled as follow:
1. When strong wind blows at outdoor side, the operation of heat pump continues with the fan motor stopped.
2. Whether the fan is locked or not detected, and the operation of heat pump stops and an alarm is displayed if the fan is
locked.
3. According to each operation mode, by the conditions of outdoor temperature (TO) and compressor revolution, the
speed of outdoor fan shown in the table is selected.
~ 16.8
~ 47.9
48.5 ~ MAX
MIN
MAX
MAX
TO ≤ 15 °C
W4
W9
WA
WB
Compressor speed
(Hz)
TO < 15 °C
W4
WA
TO < 5.5 °C
W9
WB
WE
TO < -5.0 °C
WC
WD
WE
TO ≥ 15 °C
W4
W4
W7
TO < 15 °C
W4
W4
W9
TO < 5.5 °C
W6
W4
WA
TO < 5.5 °C
W8
WB
WC
When To is abnormal
WB
WC
WE
TO
During
ECO
mode
008 size
1. The outdoor fan is controlled by TE sensor, TO sensor and the operation frequency. (From Min. W1 to Max. are controlled
according to the following table.)
2. During 3 minutes after start-up, the fan is fixed with the maximum fan tap corresponding to zone in the following table.
After then the fan is controlled by temperature of TE sensor.
3. If status, TE > 24°C continues for 5 minutes, the operation stops. This status is same to the usual Thermo-OFF which has
no alarm display, and the fan restarts after 2 minutes and 30 seconds. This intermittent operation is not abnormal
Temp. range
f <38.9 Hz
38.9 Hz ≤ f <67.6 Hz
10 °C ≤ TO
W7
W8
67.6 Hz ≤ f
W9
5 °C ≤ TO < 10°C
WA
WB
WD
-5 °C ≤ TO < 5°C
WE
WF
WF
TO ≤ - 5°C
WE
WF
WF
TO error
WE
WF
WF
012 size
1. This control function lowers the fan tap according to the TE sensor value when the outdoor temperature is high.
2. When a status TE > 20C is detected continuously for 5 minutes, the operation may stop. Thisstatus does not output an error
code and is assumed as usual status of thermo-OFF. The fan restarts after approx. 2 minutes 30 seconds and this intermittent
operation is not an issue.
3. This control function does not work for 30 minutes after activation, 1 minute after defrosting and during defrost operation
Control for fan tap by outdoor temperature in normal operation.
TO
10≤TO
5≤TO<10
TO<5
MIN
W1
W1
W1
MAX
WE
WE
WE
015 size
1. The outdoor fan is controlled by TE sensor, TO sensor and the operation frequency. (Control from minimum W1 to maximum (according to the following table)
2. For 3 minutes after the operation has started, the maximum fan tap corresponding to the zone in the following table is
fixed and then the fan is controlled by temperature of TE sensor.
3. When TE e 24°C continues for 5 minutes, the compressor stops. It is the same status as the normal thermostat- OFF
without error display. The compressor restarts after approx. 2 minutes 30 seconds and this intermittent operation is not
abnormal.
Temp. range
20 Hz or lower
20 Hz to 45HZ
45 Hz or higher
MAX
MAX
MAX
10 °C ≤ TO
W7
W8
W9
5 °C ≤ TO < 10°C
W9
WA
WB
WC
-3 °C ≤ TO < 5°C
WB
WB
-10 °C ≤ TO < -3°C
WC
WC
WC
TO ≤ - 10°C
WD
WD
WD
TO error
WD
WD
WD
67
SM_30AW.indd 67
30AW
14-03-2011 14:45:15
Control management
5
Coil heating control (compressor warm up process)
5IJTDPOUSPMSPVUJOFNBJOUBJOTTVóDJFOUMZIFBUFEUIFDPNQSFTTPSTUPQQFECZQPXFSJOHPOUIFXJOEJOHTJOTUFBEPGB
crankcase heater. The control purpose is to prevent slackness of refrigerant inside the compressor.
5PBWPJEDPNQSFTTPSEBNBHJOHEVSJOHUIFJOTUBMMBUJPOUFTUNPEFPSBGUFSMPOHDPNQSFTTPSPòUJNFJUTBEWJTFEUPTUBSU
the system when the control has interrupted the compressor warm up process.
3. A judgment for electricity is performed by TD and TO sensors. In the event of TO sensor failure, a backup control is automatically performed by TE sensor (judging the TO sensor defect checking the outdoor LED display).
4. The right coil heating is controlled by TD and TE sensor.
'PSFBDINPEFMUIFDPNQSFTTPSXBSNVQQSPDFTTJTJOUFSSVQUFEUVSOJOHPòUIFQPXFSTVQQMZXIFO5%JT¡$PSNPSF
L
M
004
10W
30W
006-008 012
10W
25W
30W
50W
015
40W*
40W
TO: Outdoor
Temperature
TE: Entering
(in Heat
exchanger)
temperature
TD: Discharge
temperature
008 size
NOTIFICATION
It is not an abnormal phenomenon
that electro-noise may be heard
while heating the coil.
JOUFSNJUUFOUQPXFSPONJOVUFTPONJOVUFTPò
68
SM_30AW.indd 68
30AW
14-03-2011 14:45:17
5
Control management
High-Pressure suppression TE control
1. This control routine suppresses that pressure which becomes abnormally too high during the cooling operation.
TE: Entering
*UTUPQTUIFDPNQSFTTPSJG5&Ż¡$BOEDPVOUPOUIFFSSPSDPVOUFS"GUFSNJOVUFTTFDPOETPGDPNQSFTTPSPòUJNF (in Heat
guard) if TE < 67°C, the compressor is enable to restart. After the compressor restart, the unit current is continuously conexchanger)
USPMMFEGPSNJOJNVNNJOVUFTöYJOHUIFMJNJUGSPNUPPGUIFDPOUSPMWBMVFEFöOFEGPSDVSSFOUSFMFBTFDPOUSPM
temperature
The error counter will be cleared if TE < 67 for 10 minutes of continuous operation.
3. When TE ≥ 67°C is detected again within 10 minutes, 1 is added to the error counter and restart is repeated.
4. If the errors counted are 10, the value is considered as a malfunctioning and the system operation is locked out .
Over-current preventive control
1. This control routine stops the compressor when over-current preventive circuit has detected an abnormal current.
2. The compressor restarts with error count 1 after 2 minutes 30 seconds (time guard).
3. If the error counted are 4, the value is considered as a malfunctioning and the system operation is locked out.
Current release value shift control
1. This control routine prevents troubles of the electron parts such as G-Tr of inverter compressor drive system and
compressor’s troubles during cooling operation.
2. This control corrects the current release control value (l1) by TO sensor value.
3. The value corrected is based upon the following control diagram and correction value table.
TO[oC]
T+8
I1 x a%
T+7
T+5
T+4
T+2
I1 x b%
I1 x c%
T+1
T
T-1
I1 x d%
As I1
T
a
b
c
d
39°C
30AWH004
30AWH006
30AWH008
30AWH012
30AWH015
69
SM_30AW.indd 69
30AW
14-03-2011 14:45:18
Control management
5
Defrost control (Only in heating opearation)
In heating operation, defrost operation is performed when TE sensor temperature satisfies any condition in A zone to D
zone.
a
b
c
d
(A)
(B)
(C)
(D)
27'70''
27'40''
34'
-
-5
-7
-
-20
Size 004-006
29
29
35
-
-4
-6
-10
-25
Size 008
34
40
55
90
-5
-10
-13
-18
Size 012
39
45
55
150
-5
-10
-2
-23
Size 015
A zone
Defrost operation is performed in this zone when TE0-TE ≥ 3**** continued for T seconds**
B zone
Defrost operation is performed in this zone when TE0-TE ≥ 3**** continued for T seconds**
C zone
Defrost operation is performed when this zone continued for T seconds**
D zone
Defrost operation is performed when this zone continued for T seconds**
TE: Entering
(in Heat
exchanger)
temperature
TE0: minimum
TE value
calculated 1015 min. after
each
compressor
restart in
heating
operation
* The minimum TE value between 10 and 15 minutes of compressor run time is stored inside the memory as TE0. TE0 is
calculated after each compressor restart in heating operation.
** 120 sec for sizes 004 , 006, 012
*** 2,5 for 004 and 006 sizes
****2,5 for 008 size
During the defrost:
tUIFSFWPMVUJPOTGSFRVFODZPGDPNQSFTTPSDIBOHFUPHVBSBOUFFUIFSJHIURVBOUJUZPGPJMJOTJEFUIFDPNQSFTTPS
tUIF1.7QPTJUJPOJTöYFE
The defrost operation is immediately finished if TE sensor temperature has become ε °C or more, or it also is also finished
when defrost operation has continued for τ minutes.
size
Є [°C]
τ [min]
004
006
+8
008
012
015
+12
15
10
For 004, 006 and 008 sizes, defrost operation is also finished if TE is kept at+5°C or higher for 80seconds.
For 012 and 015 sizes, defrost operation is also finished if -7 ≤ TE < 12 has continued for 60 seconds.
After defrost operation has finished, the compressor and the outdoor fan start heating operation after stopped for approx.
50 seconds.
70
SM_30AW.indd 70
30AW
14-03-2011 14:45:19
6
Diagnostic
6.1 Diagnostic
6.1 Inverter alarms
6.1.1 Error codes 30AWH012 only
t8IFO DPNQSFTTPS DBTF UIFSNPTUBU PQFSBUFT UIF DPNNVOJDBUJPO JT
interrupted on the serial circuit. If the case thermostat operation happens
continuously, a serial communication error occurs because of a serial
message has been sent.
t#FGPSFBDIFDLDPOöSNFBDICJUPGUIF%*1TXJUDIJTTFUUP0''QPTJUJPO
Troubles of the unit can be diagnosed by LED indications on the cycle
control P.C. board of the unit. When multiple errors are detected, the
latest error is displayed.
t8IFO-&%JT0OUIFSFJTUIFNBJODBVTFPGUSPVCMFPOUIFPCKFDUJWFQBSU
of control at CDB side and the unit stops.
t8IFO-&%'MBTIJOHUIFSFJTUIFNBJODBVTFPGUSPVCMFPOUIFPCKFDUJWF
part of control at PC board side and the unit stops.
LED indication and code checking
LED indication
D800
D800 O: Red
D801 O: Yellow
D802 O: Yellow
D803 O: Yellow
G: Flashing
): Off
D: On
Cycle control P.C. board
LED indication
D801
D802
Cause
D803
D
)
)
)
Heat exchanger sensor (TE) error
)
)
D
)
Suction sensor (TS) error
D
D
)
)
Hot gas discharge sensor (TD) error
)
D
)
D
High-pressure protection error
)
D
)
)
Outdoor air temperature sensor error (TO)
D
D
D
)
Outdoor motorised fan error DC
D
)
)
D
Communication error between IPDU (Abnormal stop)
)
D
)
D
High-pressure release operation
)
D
D
)
Discharge temp. error: hot gas is too high
D
D
)
D
EEPROM error
)
)
D
D
Communication error between IPDU (No abnormal stop)
G
)
)
)
G-Tr short-circuit protection
)
G
)
)
Detect circuit error
G
G
)
)
Current sensor error
)
)
G
)
Comp. lock error
G
)
G
)
Comp. break down
IPDU are the Inverter Board.
LED
indication
ATTENTION: Problems of 30AWH004 -30AWH006
-30AWH008 units can be diagnosed by GMC board.
71
SM_30AW.indd 71
30AW
14-03-2011 14:45:19
Diagnostic
6
6.1.2 Error codes 30AWH015 only
c) If there is an error, any of LED D800 to D804 goes on. (Display 1)
d) When pushing the pushdown button switch SW800 for approx. 1
second, the display is exchanged. (Display 2)
e) When pushing SW800 again or after 2 minutes, the status returns to
that of Display 1.
The error which is generating at present and the latest error (Latest error
information including present)
can be confirmed by lighting LED D800 toD804 on the control P.C.
board.
a) When all DIP switch SW803 are OFF, the status of error which is generating at present is displayed.
b) <1> only of DIP switch SW803 is turned on, the error which generated
before (Latest error information including present) is displayed.
4
3
2
1
ON
1
ON
2
4
Latest error
SW803
3
Present error
SW803
Display 1)
(Initial display)
(Legend)
D800 (Yellow)
D801 (Yellow)
D802 (Yellow)
D803 (Yellow)
D804 (Yellow)
D805 (Green)
Display 2)
(SW800 operation)
: Go off,
: Go on,
: Flash
Error contents
Normal
Discharge temp. sensor (TD) error
Heat exchanger temp. sensor (TE) error
Heat exchanger temp. sensor (TL) error
Outside temp. sensor (TO) error
Suction temp. sensor (TS) error
Heat sink temp. sensor (TH) error
Heat exchanger sensor (TE, TS) miswiring
EEPROM error
Compressor break down
Compressor lock
Current detection circuit error
Case thermostat operation
Model unset
Communication error between MCU
Other error (Compressor disorder, etc.)
Discharge temp. error
Power supply error
Heat sink overheat error
Gas leak detection
4-way valve reverse error
High pressure protective operation
Fan system error
Driving element short-circuit
Position detection circuit erro
72
SM_30AW.indd 72
30AW
14-03-2011 14:45:21
6
Diagnostic
The values detected by the controller, such as temperature sensor or current value are simply confirmed.
(Legend)
D803 (Yellow)
D804 (Yellow)
D805 (Green)
: Go off,
Temperature sensor (°C)
SW803
SW803
3
2
4
Compressor
operation
frequency
(rpm)
ON
4
3
3
2
1
ON
ON
1
1
2
ON
4
3
4
2
1
ON
SW803
2
TCJ
SW803
3
4
1
ON
2
3
4
3
2
1
ON
LED
display
PMV
opening
(Pulse)
4
4
TC
SW803
3
TA
SW803
2
TH
SW803
: Go on
1
ON
3
2
1
ON
3
2
1
ON
3
1
ON
2
4
TL
SW803
4
TO
SW803
4
TS
SW803
3
4
TE
SW803
2
1
ON
Item
setup
TD
SW803
Current
(A)
1
D800 (Yellow)
D801 (Yellow)
D802 (Yellow)
Below –25
–25 to –21
–20 to –16
–15 to –11
–10 to – 5
–5 to –1
0 to 4
5 to 9
10 to 14
15 to 19
20 to 24
25 to 29
30 to 34
35 to 39
40 to 44
45 to 49
50 to 54
55 to 59
60 to 64
65 to 69
70 to 74
75 to 79
80 to 84
85 to 89
90 to 94
95 to 99
100 to 104
105 to 109
110 to 114
115 to 119
Over 120
Sensor error, unconnected
0 to 0.9
1 to 1.9
2 to 2.9
3 to 3.9
4 to 4.9
5 to 5.9
6 to 6.9
7 to 7.9
8 to 8.9
9 to 9.9
10 to 10.9
11 to 11.9
12 to 12.9
13 to 13.9
14 to 14.9
15 to 15.9
16 to 16.9
17 to 17.9
18 to 18.9
19 to 19.9
20 to 20.9
21 to 21.9
22 to 22.9
23 to 23.9
24 to 24.9
25 to 25.9
26 to 26.9
27 to 27.9
28 to 28.9
29 to 29.9
30 to 30.9
Over 31
0 to 4
5 to 9
10 to 14
15 to 19
20 to 24
25 to 29
30 to 34
35 to 39
40 to 44
45 to 49
50 to 54
55 to 59
60 to 64
65 to 69
70 to 74
75 to 79
80 to 84
85 to 89
80 to 84
95 to 99
100 to 104
105 to 109
110 to 114
115 to 119
120 to 124
125 to 129
130 to 134
135 to 139
140 to 144
145 to 149
150 to 154
Over 155
0 to 19
20 to 39
40 to 59
60 to 79
80 to 99
100 to 119
120 to 139
140 to 159
160 to 179
180 to 199
200 to 219
220 to 239
240 to 259
260 to 279
280 to 299
300 to 319
320 to 339
340 to 359
360 to 379
380 to 399
400 to 419
420 to 439
440 to 459
460 to 479
480 to 499
500
—
—
—
—
—
—
As TD, TL and TH are sensors for high temperature, there is error at normal temperature or below position.
For current value, the current for the outdoor unit only is displayed.
73
SM_30AW.indd 73
30AW
14-03-2011 14:45:22
Diagnostic
6
6.2 GMC alarm codes
BOEUIBOSFNBJOTPòBHBJOGPSTFDPOET*GUIFFSSPSDPEFIBTEJHJUT
the flashing is interrupted for 2 seconds between the first and second
digits.
&YBNQMFFSSPS-&%PòGPSTFDPOETøBTIFTBUBGSFRVFODZPG)[
0òGPSTFDPOETøBTIFTBUBGSFRVFODZPG)[0òGPSTFDPOET
5IFDZDMFSFQFBUTVOUJMUIF-&%UVSOTPòCFDBVTFUIFQSPCMFNJT
resolved or if an error with higher priority occurs.
There is a LED on the GMC board that displays any board errors. The
error code can be identified from the flashing LED using the following
table. In the case of more than one error, the error with the highest
priority will be displayed until it is resolved.
In the case of normal operation, the LED flashes at a frequency of ½ Hz.
*OUIFDBTFPGBOFSSPSUIF-&%SFNBJOTPòGPSTFDPOETUIFOBUB
frequency of 1Hz, it flashes a number of times equal to the error code
74
SM_30AW.indd 74
30AW
14-03-2011 14:45:24
Diagnostic
6
NOTE: Unit status OFF means that unit immediately stops.
6.3 GMC I/O
PERIPHERAL INPUT DEVICE DESCRIPTION
Reference
Type
Units
Min
Max
Water Enter Exchanger
Sensor
J6A
Sensor (Analog)
Volts
0
5
Refrigerant Sensor
J6B
Sensor (Analog)
Volts
0
5
Water Exit Exchanger
Sensor
J6C
Sensor (Analog)
Volts
0
5
Outdoor Air Sensor
J22 Pin 1-2
Sensor (Analog)
Volts
0
5
Flow Switch Input
J17
Switch input (Discrete)
None
0
1
Mode (Heat/Cool)
J18 Pin 1 (pin 2 common for ECO and On/
0ò Switch input (Discrete)
None
0
1
EOL Test Start
Test
Analog
Voltage
0
5
Remote Control
J5 Pin 1 to 4
Discrete
Voltage
0
5
Zero Crossing
Zero Crossing
Discrete
Voltage (DC)
0
5
Eco
J20 Pin 3
Switch input (Discrete)
None
0
1
Communications
Interrupt
Comm Int
RS485 Communications
Voltage (DC)
0
5
Power Limitation
Switch
J16 Pin 5 - 1
Switch input (Discrete)
None
0
1
Inverter Rx
HV Rx
Discrete
Voltage (AC)
0
264
SanWat Dry contact
J20 Pin 4 - 7
Switch input (Discrete)
None
0
1
0O0ò
J16 Pin 4
Switch input (Discrete)
None
0
1
Safety Input
J11 Pin2
Switch input (Discrete)
None
0
1
PERIPHERAL OUTPUT DEVICE DESCRIPTION
Description
Reference
Type
Units
220V min
220V Max
Trace Heater / Additional Water pump
J4, Pin3
Relay
Voltage
198
264
Water Pump Speed 1
Alarms /TFC Contact
J7 Pin 1
J7 Pin 2
Relay
Relay
Amps
0.3
2
Power Factor
1
1
Freq
48
52
Voltage
198
264
Amps
0.3
2
Power Factor
0.85
0.98
Freq
48
52
Voltage
198
264
Amps
0.3
2
Power Factor
0.85
0.98
Freq
48
52
75
SM_30AW.indd 75
# Cycles / Year
15000
15000
15000
30AW
14-03-2011 14:45:26
Diagnostic
Description
Reference
Type
Units
220V min
220V Max
EHS/defrost
J7 Pin 3
Relay
Voltage
198
264
Alarm Status for SUI
(Low and High flashing as
per on board led timing)
J11 Pin5
Alarm + defrost status/
Dehumidifier
J7 Pin 4
3 Way Valve
Open collector
Relay
J4 Pin 5
Relay
Amps
0.3
2
Power Factor
0.85
0.98
Freq
48
52
Voltage
10
12
Amps
0.01
0.012
Voltage
198
264
Amps
0.3
2
Power Factor
1
1
Freq
48
52
Amps
0.01
0.012
Voltage
198
264
Amps
0.3
2
Power Factor
1
1
Freq
48
52
6
# Cycles / Year
15000
N/A
15000
15000
Control Board Status
LED (LED Board)
Control Operating
Status
LED
mAmps
4
6
N/A
2 Way Remote Control
Output
J5
Bitstream
Voltage (DC)
0
18
N/A
Communications
Transmit
Trans
RS485 Communications
mAmps
5
95
N/A
Communications
Direction
Dir
RS485 Communications
Inverter Transmit
HV Tx
Discrete
Voltage (AC)
0
264
N/A
6.3.1 System Block Diagram
Refrig
Temp (J6B)
Leaving
Water
Temp (J6C)
Outdoor Air
Sensor (J22,
PIN 1-2)
Entering
Water
Temp
(J6A)
Mode
Heat/Cool
(J18)
On Board
LED
Alarm + Defrost / Dehumidifier output (J7 Pin 4)
Water Pump Speed 1 (J7, Pin1)
L
N
G
High Voltage
Communications P47, P51
with Toshiba
inverter board
Carrier
Monobloc
Control Board
Alarms Defrost / TFC output (J7, Pin2)
Ext. Heat Source / Defrost Output (J7, Pin 3)
3 Way Valve ( J4, Pin5 )
Exchange Electric Heater / additional WP (J4, Pin 3 )
Serial Communication
P00
Zero Cross
Communications Board
12 Vac
RS485
Communications
NUI
P24, P25, P23, P03
On/Off
(J16 Pin 4)
Alarm status for SUI (J11, Pin5 )
Flow
Switch (J17)
Water
Sanitary
Eco/Anti Input (J20
freeze
Pin4)
Switch
(J20 Pin3)
Frequency
Limit Input
(J16 Pin5)
76
SM_30AW.indd 76
All Versions
Only H and X Version
30AW
14-03-2011 14:45:28
Diagnostic
6
6.4 Troubleshooting
Fault code 3 – Enter Water Temperature sensor fault
Is the TA sensor correctly connected?
(See Wiring Diagrams)
NO
Correctly connect the TA Sensor
YES
Are the resistance characteristics of the
temperature sensor TA normal?*
NO
Replace defective TA Sensor
* Check resistance curve
YES
Check indoor P.C. Board - replace if
defective
Fault code 4 – Actual Refrigerant Temperature sensor fault
Is the TR sensor correctly connected?
(See Wiring Diagrams)
NO
Correctly connect the TR Sensor
YES
Are the resistance characteristics of the
temperature sensor TR normal?*
NO
Correct connect the TR Sensor
* Check resistance curve
YES
Check indoor P.C. Board - replace if
defective
Fault code 5 – Outdoor Air sensor of GMC fault
Is the sensor correctly connected? (See
Wiring Diagrams)
NO
Correctly connect the Sensor
YES
Are the resistance characteristics of the
temperature sensor normal?*
NO
Correct connect the Sensor
* Check resistance curve
YES
Check indoor P.C. Board - replace if
defective
77
SM_30AW.indd 77
30AW
14-03-2011 14:45:30
Diagnostic
6
Fault code 6 – Loss communication to NUI control
Are the connections of NUI and GMC board
correct?
NO
Check and correct the connections
YES
Are all cables and connectors correctly
fitted?
NO
Check cabling between NUI and GMC
board
YES
Check GMC Board - if defective,
replace
Check NUI error - if defective, replace
Fault code 7 – NUI control Room sensor fault
Is the sensor correctly connected?
NO
Correctly connect the Sensor
NO
Replace defective Sensor
YES
Are the resistance characteristics of the
temperature sensor normal?*
YES
Check NUI - replace if defective
*Check resistance tabl e
78
SM_30AW.indd 78
30AW
14-03-2011 14:45:31
Diagnostic
6
Fault code 9 – Flow Switch error / Water Pump
NO
NO
Flow switch is
connected to board?
Pump rotates?
Perform air vent
YES
Connect flow switch
connector to board
YES
YES
Excess air noise comes from
inside the pump?
Built-in pump is
connected to board?
NO
NO
Connect pump
connector to board
YES
Flow switch is
normal?
NO
Replace flow switch
YES
Chattering noise comes from
flow switch?
Replace pump
YES
NO
Pump stops 2-3 minutes after
its rotation started?
YES
NO
Dirt clogging inside
water circuit
Remove waste
Flow shortage
12 meters or longer water
pipe to a branch, or 5 or
less branches
TR sensor characteristic is correct?
NO
Fit buffer tank and
the second pump
Replace TR sensor
YES
F l ow swi tch i s normal ?
NO
A ttach or repl ace f l ow switch
YES
Check G.M.C. Board –
replace if defective
79
SM_30AW.indd 79
30AW
14-03-2011 14:45:31
Diagnostic
6
Fault code 13 – Loss communication to RS485
Are the connections correct?
(See Wiring Diagrams)
NO
Check and correct the connections
NO
Check cabling
YES
Are all cables and connectors correctly
fitted?
YES
Check GMC Board - if defective,
replace
Fault code 14 – Loss of signal from inverter board
Are the connections of inverter board and
GMC board correct? (See Wiring Diagrams)
NO
Check and correct the connections
YES
Are all cables and connectors correctly
fitted?
NO
Check cabling between inverter board
and GMC board
YES
Check GMC Board - if defective,
replace
Check Inverter Board - if defective,
replace
Fault code 15 – Exit water temperature sensor fault
Is the sensor correctly connected?
(See Wiring Diagrams)
NO
Correctly connect the Sensor
NO
Replace defective Sensor
YES
Are the resistance characteristics of the
temperature sensor normal?*
YES
Check GMC board - replace if defective
*Check resistance table
80
SM_30AW.indd 80
30AW
14-03-2011 14:45:32
Diagnostic
6
Fault code 17 – Inverter Air sensor fault
NO
Is the sensor correctly connected?
(See Wiring Diagrams)
Correctly connect the Sensor
YES
Are the resistance characteristics of the
temperature sensor normal?*
NO
Replace defective Sensor
YES
Check Inverter board - replace if defective
*Check resistance table
Fault code 18 – G - Tr Short-circuit protection
Is the power supply (line) voltage correct?
NO
Correct the power supply voltage
YES
Are the inter-connections and cabling
correct? (See Wiring Diagrams)
NO
Correct any inter-connecting or cabling
errors
YES
YES
Does relay RY01 operate?
Does the error code ‘Code 12 (o18??)’
appear when connector 3P is removed
from the compressor?
YES
NO
Has the AC fuse fused?
YES
Replace PC
board
NO
Replace PC board
Is compressor normal?
NO
YES
Check/Replace PC board
defective
Replace defective
compressor - a rare short
circuit may have occurred
81
SM_30AW.indd 81
30AW
14-03-2011 14:45:33
Diagnostic
6
Fault code 21 – Inverter current sensor fault
Is the power supply cabling and sensor
cabling correct? (See Wiring Diagrams)
NO
Check and correct cable
NO
Correctly connect the Sensors
NO
Replace defective Sensors
YES
Check inverter board
Fault code 22 – Heat exchanger Sensors TE/TS
Are the sensors correctly connected?
(See Wiring Diagrams)
YES
Are the resistance characteristics of the
temperature sensors normal?*
YES
Check Inverter board - replace if defective
*Check resistance table
Fault code 23 – Discharge Temperature Sensor
Is the sensor correctly connected?
(See Wiring Diagrams)
NO
Correctly connect the Sensor
NO
Replace defective Sensor
YES
Are the resistance characteristics of the
temperature sensor normal?*
YES
Check Inverter board - replace if defective
*Check resistance table
82
SM_30AW.indd 82
30AW
14-03-2011 14:45:35
Diagnostic
6
Fault code Fault code 24 – Outdoor fan motor error– Compressor lock
Are connectors CN300, CN301, CN302 and CN303 connected
correctly?*
NO
YES
Is it possible to freely rotate the fan with hands when CN300,
CN301, CN302 & CN303 are disconnected?*
NO
YES
Normal resistance value between leads:
Between (1) (Red lead) and (2) (White lead)
Between (2) (White lead) and (3) (Black lead)
Between (3) (Black lead) and (1) (Red lead) on wind
ing
connector CN301 & CN303*
NO
YES
Normal resistance value between leads:
Between _ (Yellow lead) and _ (Pink lead) of motor connector
CN300 & CN302
Normal fan motor
NO
Defective Fan Motor
* 30AW004-006-008 have only CN300 connector
For the nominal resistance value, check
the relative tables.
Note:
A Ground circuit error inside the motor is rarely detected
even with the above check.
When the circuit is not normal, even after replacing the
P.C. Board, replace the outdoor fan motor
30AWH012
30AWH015
30AWH004
30AWH006
30AWH008
Fan Motor
Winding
Motor position
detection
CN301
CN300
CN303
CN302
CN300
83
SM_30AW.indd 83
30AW
14-03-2011 14:45:36
Diagnostic
6
Fault code 27 – Compressor lock
NO
I s the power suppl y vol tage correct?
C orrect power supply voltage
YES
NO
Are the connections of cables and
connectors correct?
Check and correct the
cabling & connections
YES
Is the compressor
functional?
NO
Has there been a refrigerant
leak?
YES
NO
Compressor lock - replace
YES
Does the electronic expansion
valve operate normally?
NO
Check TE and TS Sensors, replace
if defective
Check expansion valve, replace if
defective
YES
Check GMC & inverter Board – if
defective, replace
Fault code 28 – Discharge temperature error
Is the protective control, such
as discharge temperature
release, normal?
NO
Are the connections of
cables and connectors
correct?
NO
Check and correct the
cabling & connections
YES
YES
Check parts, if defective
replace
Is the refrigerant charge correct?
NO
Check and correct the
refrigerant charge
YES
Does and overload condition exist?
YES
Delete the cause of
overload
NO
Are the resistance characteristics of the TD
sensor normal?
NO
Replace the TD sensor
YES
Check Inverter board,
replace if defective
84
SM_30AW.indd 84
30AW
14-03-2011 14:45:37
Diagnostic
6
Fault code 29 – Compressor break down
Is the power supply voltage normal?
NO
Correct the power supply
voltage
YES
Does and overload condition exist?
YES
Delete the cause of
overload
NO
Check and correct circuit
cables
NO
Is the current detected by the current sensor
normal?
YES
Check P.C. boards, if
defective replace.
85
SM_30AW.indd 85
30AW
14-03-2011 14:45:38
Diagnostic
6
Fault code 14 – High temperature release
NO
Does the unit operate?
YES
NO
Are the inter-connecting
cables correctly wired?
Correct inter-connecting
cabling
YES
NO
Are the connectors
correctly located?
Check P.C. Board - if
defect, replace
NO
Ensure connectors are
located correctly
YES
Does the voltage measured
between _and _ on the
terminal block (1,2,3) of
the unit vary?*
YES
Is a DC Voltage of 280V
measured between the
terminals of the electrolytic
capacitor on inverter main
board
NO
Replace inverter board
YES
* As shown below, perform
measurement within 20 seconds
of power ON
See DIODE data at the end of
session
S5277G**
Black
3
White
2
Is a DC Voltage of 7V
supplied to the CDB? Are
cables between Pin 2 and
Pin 5 on CN800 normal?
NO
Replace inverter board /
Ensure cabling is correct
NO
Connect thermocouple
CN500
YES
+
Is case thermocouple
(CN500) connected?
1
YES
Inter - terminal block
** S5277G or equivalent (G or
J type) (Diode with rated
voltage of 400V or more is
acceptable).
NO
Does case thermocouple
operate?
NO
Normal Fan Motor
YES
Are the LEDs on receiver or
main board flashing?
YES
Check receiver board,
replace if defect
Check & Correct refrigerant
charge
Change GMC Board
** S5277G or equivalent (G or J type) (Diode
with rated voltage of 400V or more is
acceptable).
86
SM_30AW.indd 86
30AW
14-03-2011 14:45:39
6
Diagnostic
6.4.1 Relational graph of temperature sensor resistance value and temperature
For 004, 006, 008, 012, sizes
TR, TA sensor
20
15
10
Resistenc e [kΩ ]
5
0
0
10
20
30
40
50
60
70
Temperature [°C]
Resistence [k Ω ]
T<10°C
200
20
150
15
100
10
50
5
0
0
-30
-20
-10
0
10
20
30
40
50
60
70
80
TE,TO,TS
sensor
Resistence [k Ω ]
T >10°C
90
Temperature [°C]
200
20
150
15
Resistence [k Ω ]
T<50°C
100
10
TD
sensor
Resistence [k Ω ]
T>50°C
5
50
0
0
10
20
30
40
50
60
70
80
90
0
100 110 120 130 140
Temperature [°C]
87
SM_30AW.indd 87
30AW
14-03-2011 14:45:41
Diagnostic
6
For 004, 006, 008, 012, 015 sizes
LWT,EWT
sensors
100
2
90
1.8
80
1.6
70
1.4
60
Resistence [k Ω]
50
T<50°C
40
1.2
30
0.6
20
0.4
10
0.2
1
Resistence [kΩ ]
T>50°C
0.8
0
-35
-15
5
25
45
65
85
105
0
125
Temperature [°C]
Only 015 size
TR, TA, TE, TS,TO
40
sensors
35
30
25
Resistence [k Ω]
20
15
10
5
0
0
20
40
60
80
100
120
80
100
120
Temperature [°C]
TD, TL sensor 180
160
140
120
100
Resistence [k Ω]
80
60
40
20
0
0
20
40
60
Temperature [°C]
88
SM_30AW.indd 88
30AW
14-03-2011 14:45:44
Diagnostic
6
6.4.1 Resistance values of main components
4
6
8
12
15
Ω
T ref
[°C]
Ω
T ref
[°C]
Ω
T ref
[°C]
Ω
T ref
[°C]
Ω
T ref
[°C]
PMV
46±4
25
46±4
25
46±4
20
46±3
20
46±3
20
4 Way
1795±150
25
1795±150
25
1765±150
24
1774±150
24
1489±150
22
22±2
25
22±2
25
22.4±2
24
35.2±2
24
17.9±2
22
Fan
motor
21.9±2
25
21.9±2
25
22.6±2
24
34.8±2
24
18.9±2
22
21.9±2
25
21.9±2
25
22.6±2
24
35±2
24
17.7±2
22
HP size: 4-6-8 kW
Pump: NYL 63-15
V1
V2
V3
Main
246.1±20
177.4±20
108.8±10
Ω
Aux
137.8±10
137.8±10
137.8±10
Ω
°C
T ref [°C]
23
23
23
V1
V2
V3
Main
144.7±15
107.3±10
70.9±7
Aux
72.8±7
72.8±7
72.8±7
Ω
T ref [°C]
23
23
23
°C
HP size: 12-15 kW
Pump: SXM 25-60
89
SM_30AW.indd 89
Ω
30AW
14-03-2011 14:45:44
Carrier interfaces
7
The AquaSnap PLUS can use the following user interfaces:
ESZDPOUBDUT
UIF"RVB4OBQ1-64"83$SFNPUFDPOUSPMMFS
the 33AW-CS1 Comfort Series programmable thermostat
the Carrier Dealer Service Tool.
7.1 Dry contacts control
90
SM_30AW.indd 90
30AW
14-03-2011 14:45:45
Carrier interfaces
7
7.2 33AW-RC1 user interface
WARNING:
#FGPSFJOTUBMMJOHUIFSFNPUFDPOUSPMMFSUVSOPòBMMQPXFSUPUIFVOJUUIBU
will supply power to the remote controller. Electrical shock can cause
personal injury or death.
- Open the remote controller rear mounting base to expose mounting
holes. The base can be removed to simplify mounting (snap apart
carefully at hinge to separate mounting base from remainder of the
remote controller).
- Route the remote controller wires through the large hole in the
mounting base. Level mounting base against wall (for aesthetic value
only).
- Mark the wall through the 2 mounting holes. Drill two 5 mm mounting
holes in wall where marked.
- Secure mounting base correctly to wall with 2 screws and anchors
provided, (additional anchoring holes available for more secure
mounting if needed) making sure all wires extend through hole in
mounting base.
- Adjust length and routing of each wire to reach the proper terminal in
the connector block on the mounting base. (Strip only 6 mm of
insulation from each wire to prevent adjacent wires from shorting
together when connected).
- Match and connect equipment wires to proper terminals in the
connector block.
- Both power and communication wires must be connected correctly for
proper remote controller operation.
- Push any excess wire into the wall and against mounting base..
91
SM_30AW.indd 91
30AW
14-03-2011 14:45:45
Carrier interfaces
7
7.2.1 I/O features details
mode at the max WSP
Water Pump
For x and NX version, 230VAC WP output is on terminal block (230V 2A
max)
Alarm & Defrost
In case of Unit alarm or Defrost, an output is available on terminal block
(H version 230V, X version dry contact)
External Heat Source
When an EHS is requested a 230V output is energized to drive an
external heat source
SHW 3Way Valve
In case of SHW input is activated, unit is forced in heat mode at max
WSP and a 230 VAC 2A max output is available to drive, a 3WV
Alarm code
An alternate 5V signal is activated to point out on SUI the error code
On /Off
4UBOEBSE0ò.PEFPS'SFRVFODZUPDBOCFTFMFDUFECZDPEFJG
used an external thermostat
Heat / Cool
- Fixed Water Set Point can be selected for Heat (code 113) and Cool
(code 115)
- Floating WSP based on OAT Climatic Curve can be selected (Installer
customized CC or predefined Carrier CC) code 112, 117-125
ECO
%JòFSFOUEFMUBGSPNUP¡$
POöYFE841DBOCFEFöOFEGPS)FBU
(code 114) and Cool (code 116)
Night Mode
(Frequency Reduction) To reduce max noise, max frequency can be
reduced (code 5, 6)
Sanitary Hot Water
In case SHW dry contact input is exercised, unit is always moved in Heat
7.2.2 Main settings
CODE
33AW-RC1 AND DRY-CONTACTS SETTINGS
Unit ON/OFF mode input
146
0''PS$POUSPMMFE0òDZDMF
Heating & cooling mode input
302
Heat only, Cool only or Reversible
in heating
113
From + 20°C to +60°C
in cooling
Leaving Water Temperature
(LWT) set-point
115
From +4°C to +25°C
Climatic curve
112
No predefined Climatic Curve (Installer has to draw CC)
1-12 HTG CC
1-2 CLG CC
See Nui manual or paragraph 7.3.5 for climatic curve details.
Remote Out-door Air Temperature sensor
126
Enabled or disabled
(when disabled the 30AWH OAT sensor is enabled)
ECO mode input
in heating
114
From 1°C to 20°C lower than LWT set-point (113)
in cooling
116
From 1°C to 10°C higher than LWT set-point (115)
Night mode
input
005
Enabled or Disabled
frequency
006
'PSNUPPGUIFDPNQSFTTPSOPNJOBMGSFRVFODZ
Sanitary Hot Water (SHW)
demand input
3W valve output
-
Enabled
.BY-85BMMPXFEXJUIJOUIFDPNQSFTTPSFOWFMPQFTXJUDIPòBU¡$
-
Enabled
External Heat Source / Defrost output
106
Alarm or Terminal Fan-coil contact
147
Alarm or terminal Fan-coil
Alarm Defrost or humidity selection
108
Alarm Defrost or humidity selection
Water pump output
-
Alternative heat-source (e.g. gas-boiler) or Defrost output
Enabled
For more details refer to specific manuals
7.3 33AW-CS1 User interface
5ISFFEJòFSFOUBQQMJDBUJPOT
1. Service tool, for programming (customs settings) and diagnosis
purposes, when temporarily wired to the 30AWH…
2. All of the above, plus remote controller and programmer, when
installed in a room that is not representative of the indoor
temperature and relative humidity (e.g. basement, technical room,
garage, etc.).
3. All of the above, plus room thermostat and hygrostat, and many
customizable functions.
92
SM_30AW.indd 92
30AW
14-03-2011 14:46:01
Carrier interfaces
Carrier’s NUI series programmable user interface is wall-mounted,
low-voltage user interface which maintains room temperature by
controlling the operation of a heating and/or air conditioning system.
i)FBUQVNQwi"JSDPOEJUJPOFSwBOEi)FBUPOMZwBSFBWBJMBCMFXJUIUIF
present versions. A variety of features are provided including separate
heating and cooling set-points, keypad lockout, backlighting, and builtin installer test etc. Programming features include 7-day (all days the
same), 5/2 (Mon-Fri and Sat-Sun) and 1-day (all 7 days individually) with
2 or 4 or 6 periods per day.
This Installation Instruction covers installation, configuration, and
startup of NUI. For operational details, consult the Owner’s Manual.
Install User Interface
1. Turn OFF all power to unit.
2. If an existing User Interface is being replaced:
a. Remove existing User Interface from wall.
b. Disconnect wires from existing User Interface, one at a time.
c. As each wire is disconnected, record wire colour and terminal
marking.
3. Open the NUI (mounting base) to expose mounting holes. The base
can be removed to simplify mounting. Press the thumb release at
thetop of the NUI and snap apart carefully to separate mounting
base from remainder of the NUI.
4. Route the NUI wires through large hole in mounting base. Level
mounting base against wall and mark wall through 2 mounting
holes.
5. Drill two 5mm mounting holes in wall where marked.
6. Secure mounting base to the wall with 2 anchors and screws
provided making sure all the wires extend through hole in the
mounting base.
7. Adjust length and routing of each wire to reach proper terminal and
connector block on mounting base with 6.5mm of extra wire. Strip
only 6.5mm of insulation from each wire to prevent adjacent wires
from shorting together when connected.
8. Match and connect equipment wires to proper terminals of the
connector blocks. Refer to wiring diagram for more details.
9. Push any excess wire into wall and against mounting base. Seal hole
JOXBMMUPQSFWFOUBJSMFBLT-FBLTDBOBòFDUPQFSBUJPO
10. Snap case back together. Attach thermostat to back plate by
inserting tab on bottom edge and hinging up until top snap secures.
11. Close thermostat assembly making sure pins on back of circuit board
align with sockets in connector.
12. Turn ON power to unit.
WARNING:
#FGPSFJOTUBMMJOHUIFSFNPUFDPOUSPMMFSUVSOPòBMMQPXFSUPUIFVOJUUIBU
will supply power to the remote controller. Electrical shock can cause
personal injury or death.
User Interface Location
· Approximately 5 ft (1.5m) from floor.
· Close to or in a frequently used room, preferably on an inside
partitioning wall.
· On a section of wall without pipes or duct work.
User Interface should NOT be mounted
· Close to a window, on an outside wall, or next to a door leading to the
outside.
· Exposed to direct light or heat from the sun, a lamp, fireplace, or other
temperature-radiating objects which could cause a false reading.
· Close to or in direct airflow from supply registers and return-air
registers.
· In areas with poor air circulation, such as behind a door or in an alcove.
93
SM_30AW.indd 93
7
30AW
14-03-2011 14:46:02
Carrier interfaces
7
7.3.1 Main functions
User functionality (comfort):
t0OFUPVDIJOUFSGBDFUPTFMFDUEJòFSFOUSPPNUFNQFSBUVSFTFU
tQPJOUNPEF)PNF4MFFQ"XBZ
t%JTQMBZPG
t$MJNBUJDEJTQMBZ3PPN50"55BOE3PPN3)
t5JNFBOEEBZPGUIFXFFL
t)FBUTPVSDF)FBU1VNQ/JHIU4)8&)4
t.PEF0ò0òXJUIIPNFBOUJGSFF[F)FBUBOE$PPM
t"MBSNT
t3PPNTFUQPJOUNPEF
t3PPN63TFUQPJOUUPESJWFB%FIVNJEJöFS)VNJEJöFS
t4DIFEVMJOHQFSJPETEBZSPPNTQNPEF)FBU1VNQ
t0O0òBOEOJHIUPQUJPO
t3PPNTFOTPSBEKVTUNFOU
t%JòFSFOUUFNQFSBUVSFWBMVFDBOCFEJTQMBZFE
t,FZQBEDBOCFMPDLFE
t4FUQPJOUDBOCFUFNQPSBSZPSQFSNBOFOUMZNPEJöFE
t4IPSUDVUUP/JHIUNPEFCVUUPO for 10 sec)
t.VMUJQVSQPTFVTFS*OUFSGBDF$PNGPSU1SPHSBNNFS$POUSPMBOE4FSWJDF
tool
t.BJO$PNNJTTJPOJOHGFBUVSFT
t'PSDFPVUQVUTPOBOEUFTU)ZESBVMJDDJSDVJUDPEF
t%FöOFEJòFSFOUTZTUFNUZQFBOEVTFSJOUFSGBDFDPEF
t$POöHVSFUFSNJOBMCMPDLPVUQVUTDPEF
t8BUFSUFNQFSBUVSFTFUQPJOUTDMJNBUJDDVSWFTDPEFUP
t'SPTU1SPUFDUJPOTFUQPJOUTDPEF
t$POUSPMMFE0''TFUUJOHDPEF
t#BDLVQ)FBUFSTUSBUFHZDPEF
t4BOJUBSZNPEFTFUVQDPEF
t&YUFSOBM4FOTPSJOTUBMMFEDPEF
t.BJO4FSWJDFGFBUVSFT
t3FBE)FBU1VNQUFNQFSBUVSFTDPEFUP
t%JTQMBZ$PNQSFTTPS)[DPEF
t%JTQMBZøPXTXJUDITUBUVTDPEF
t"MBSNIJTUPSZDPEF
t%JTQMBZ$PNQSFTTPSXBUFSQVNQSVOUJNFDPEF
7.3.2 Displayed icons
Room air
temperature
Sanitary Hot
Water Mode
Compressor ON / Frequency reduction
Child lock
Back-up EHS
mode
Home anti-freeze
mode
On / Off
Timer on
Time clock
Cooling mode
Heating mode
Humidifier / Dehumidifier
Activated
Room relative
humidity %
Outdoor air
temperature
Alarm
warning
Service
mode
Day of the week
and weekly timer
I am at home
mode
I am away
mode
94
SM_30AW.indd 94
I sleep
mode
30AW
14-03-2011 14:46:03
7
Carrier interfaces
7.3.3 Control buttons
Mode
Up &
down
Hold
Zone
Done
Home
Sleep
Away
Days
Period
Day/hour/min
Start time
For more details refer to specific manuals.
7.3.4 Codes table
Code Nr.
Name
1
MODE
2
HOME ANTIFREEZE
3
HOME ANTIFREEZE
TEMPERATURE
4
ADJUST WATER
TEMPERATURE
SET-POINT
5
6
VALUE RANGE
DESCRIPTION
STANDARD
Min
Max
-
-
0ò
1
2
1. Disable
6°C
12°C
6°C
This code is use to adjust the water set-point changing the setted
climatic curve. The value setted modifies the maximum temperature of heating and cooling climatic curves.
-5°C
+5°C
0°C
FREQUENCY
REDUCTION MODE
This code is use to activate Silence / Frequency Reduction / Night
mode:
1. Not Active
2. Active
1
2
1. Not active
FREQUENCY
REDUCTION VALUE
This code is use to set the value of the outdoor unit frequency
SFEVDUJPOJO
This code is only displayed from the NUI based on room mode
selection:
1. Home
2. Sleep
3. Away
1
3
1
This code displays the control room set-point set by the user.
12°C
38°C
20°C
This code is use to select the Unit Mode:
0ò
2. Cooling
3. Heating
This code is use to enable the Home Atifreeze option when the
TZTUFNJT0ò
1. Disable
This code is use to select the threshold temperature value
under witch the Home Antifreeze protection starts (-0/+2 °C of
hysteresis).
7(
)
ROOM MODE
8(
)
CONTROL ROOM
SET-POINT
9(
)
ROOM AIR
TEMPERATURE
This code displays the room air temperature read by the internal
NUI Thermistor.
-20°C
50°C
-
10 (
)
RELATIVE HUMIDITY
SENSOR VALUE
This code displays the relative humidity value read by the internal
NUI sensor.
0
100
-
95
SM_30AW.indd 95
30AW
14-03-2011 14:46:18
Carrier interfaces
Code Nr.
Name
VALUE RANGE
DESCRIPTION
Min
Max
STANDARD
11 (
)
OUTDOOR
TEMPERATURE
This code displays the Outdoor Air Temperature. The valid OAT
value is used with this priority:
1. OAT from GMC thermistor (if it is installed)
2. OAT from inverter, read by TO sensor.
-30°C
90°C
-
12 (
)
GMC OUTDOOR AIR
TEMPERATURE
This code displays the Outdoor Air Temperature read by GMC
thermistor.
-
-
-
-5°C
+5°C
0°C
2
6
4
TEMPERATURE ROOM
SENSOR ADJUSTMENT
13
This code is use to adjust the temperature read by the sensor in
order to recover bad positioning of the user interface.
This code is use to select how many period per day will be available for the scheduling:
2
4
6
14
DAY PERIOD
15
HOME HEAT TEMPERATURE
With this code the User can select the HOME Temperature setpoint in Heating Mode
12°C
38°C
20°C
16
HOME COOL TEMPERATURE
With this code the User can select the HOME Temperature setpoint in Cooling Mode
12°C
38°C
24°C
17
SLEEP HEAT
TEMPERATURE
With this code the User can select the SLEEP Temperature setpoint in Heating mode
12°C
38°C
18°C
18
SLEEP COOL
TEMPERATURE
With this code the User can select the SLEEP Temperature setpoint in Cooling Mode
12°C
38°C
26°C
19
AWAY HEAT
TEMPERATURE
With this code the User can select the AWAY Temperature setpoint in Heating mode
12°C
38°C
15°C
20
AWAY COOL
TEMPERATURE
With this code the User can select the AWAY Temperature setpoint in Cooling Mode
12°C
38°C
28°C
12°C
38°C
20°C
21 (
)
USER ROOM
SET-POINT
This code displays the room set-point that the user, pressing the
temporary/hold button, is selecting as temporary or hold.
22 (
)
FAULT CODE
This code displays the last fault code occurred.
-
-
-
23 (
)
FAULT HISTORY
This code displays the recent 4 fault codes stored.
-
-
-
SYSTEM TYPE
This code is use to set the System type:
1. A2W Monobloc fixed Water Temperature Value (dry contacts)
2. A2W Monobloc Climatic Curve setup (dry contacts)
3. A2W Monobloc Comfort with NUI
4. A2W Monobloc Comfort with NUI as Thermostat
5. N.A.
6. A2W Monobloc RS485
7. N.A.
1
7
1. A2W
USER INTERFACE TYPE
This code is use to define if NUI User Interface is used and how it
is used:
0. Not Used (Input Relay active/SUI)
1. NUI Installed
2. NUI used as programmer
0
2
0. Not used
100
101
7
102 (
)
NUI SOFTWARE
RELEASE
This code displays the NUI Software Release
-
-
-
103 (
)
NUI SOFTWARE
VERSION
This code displays the NUI Software Version
-
-
-
0
9
0. No test
no
yes
no
This code is use to select the output connected at PIN 4 on
terminal strip:
1. External Heat Source
2. Defrost Output
1
2
1
This code is use to define the humidity threshold limit to enable
the output for the external de-humidifier system.
20
100
This code is use to force Output ON to test (max 10 minutes):
0. No test
1. Water pump
2. Alarm / Ambient temperature reached
3. External Heat Source / Defrost
104
OUTPUT TEST
4. Alarm + Defrost / Humidity
5. Trace Heater / Additional Water Pump
6. 3 Way valve
7. SUI Alarm
8. Blank
105
RESET PUMP
RUN-TIME
106
EXTERNAL HEAT
SOURCE / DEFROST
107
HUMIDITY LIMIT
This code is use to reset the water pump timer to zero.
96
SM_30AW.indd 96
30AW
14-03-2011 14:46:19
7
Carrier interfaces
Code Nr.
Name
108
ALARM-DEFROST OR
HUMIDITY
SELECTION
109
FROST DELTA
SET-POINT
110
RESET COMPRESSOR
RUN-TIME
111 (
)
FLOW SWITCH STATUS
VALUE RANGE
DESCRIPTION
STANDARD
Min
Max
1
2
2
This code is use to set the frost delta set-point used by the Anti
frost protection logic as per algorithm.
0°C
6°C
1°C
This code is use to reset the compressor timer to zero.
No
yes
No
-
-
-
0
12
0
This code is use to set the fixed heating water set-point.
20°C
60°C
45°C
This code is use to set the temperature reduction value for fixed
heating water set-point when the unit is in ECO mode.
1°C
20°C
5°C
This code is use to set the fixed cooling water set-point.
4°C
25°C
7°C
1°C
10°C
5°C
0
2
0
This code is use to select the output connected at PIN 11 on
terminal strip:
1. Unit alarms and/or Defrost
2. Humidity Control
This code displayes the Flow Switch status:
0. Water not flowing
1. Water flowing
This code is use to select the heat climatic curve number:
0. No predefined climatic curve (Installer has to draw CC)
1 - 12. Refers to NUI manuals for climatic curve details.
112
HEAT CLIMATIC
CURVE NUMBER
113
HEAT WATER
SET-POINT
114
ECO HEAT
TEMPERATURE
REDUCTION
115
COOL WATER
SET-POINT
116
ECO COOL
TEMPERATURE
REDUCTION
This code is use to set the temperature reduction value for fixed
cooling water set-point when the unit is in ECO mode.
117
COOL CLIMATIC
NUMBER
This code is use to select the cool climatic curve number:
0. No predefined climatic curve (Installer has to draw CC)
1 - 2. Refers to NUI manuals for climatic curve details
118
MIN OUTDOOR
AIR TEMPERATURE
HEATING
This code is use to select the minimum outdoor temperature of
the heating climatic curve, depending on the country where the
system is installed.
-20°C
+10°C
-7°C
119
MAX OUTDOOR
AIR TEMPERATURE
HEATING
This code is use to select the maximum outdoor temperature of
the heating climatic curve.
10°C
30°C
20°C
120
MIN WATER TEMPERATURE HEATING
This code is use to select the minimum water temperature of the
heating climatic curve.
20°C
60°C
40°C
121
MAX WATER TEMPERATURE HEATING
This code is use to select the maximum water temperature of the
heating climatic curve.
20°C
60°C
55°C
122
MAX OUTDOOR
AIR TEMPERATURE
COOLING
This code is use to select the maximum outdoor temperature of
the cooling climatic curve, depending on the country where the
system is installed.
24°C
46°c
40°C
123
MIN OUTDOOR AIR
TEMPERATURE COOLING
This code is use to select the minimum outdoor temperature of
the cooling climatic curve
0°C
30°C
22°C
124
MIN WATER TEMPERATURE COOLING
This code is use to select the minimum water temperature of the
cooling climatic curve.
4°C
20°C
4°C
125
MAX WATER TEMPERATURE COOLING
This code is use to select the maximum water temperature of the
cooling climatic curve.
4°C
20°C
12°C
126
GMC OAT THERMISTOR
1
2
2
-
-
-
-
-
-
-
-
-
-
-
-
-
-
-
This code displayes the maximum compressor frequency calculated by GMC control board.
-
-
-
This code displays the requested frequency by the system
control.
-
-
-
127 (
)
TO SENSOR VALUE
128 (
)
TE SENSOR VALUE
129 (
)
TS SENSOR VALUE
130 (
)
TD SENSOR VALUE
131 (
)
CDU MODE
132 (
)
MAX COMPRESSOR
FREQUENCY
133 (
)
REQUESTED
FREQUENCY
This code is use to define if GMC OAT thermistor is installed or n
ot:
1. GMC thermistor installed
2. GMC thermistor not installed
This code displayes the outdoor air temperature value read by
the TO sensor.
This code displayes the refrigerant temperature value read by the
TE sensor.
This code displayes the suction temperature value read by the
TS sensor.
This code displayes the discharge temperature value read by the
TD sensor.
This code displayes the actual Heat Pump operating mode:
0ò
2. Cool
3. Heat
4. Fail
5. Defrost
97
SM_30AW.indd 97
30AW
14-03-2011 14:46:20
Carrier interfaces
Code Nr.
Name
VALUE RANGE
DESCRIPTION
STANDARD
Min
Max
This code displays the real compressor frequency
-
-
-
134 (
)
REAL FREQUENCY
135 (
)
COMPRESSOR
RUNTIME
This code displays the working on hours of the compressor..
-
-
-
136 (
)
CDU CAPACITY
This code displays the nominal heat pump capacity [kW].
-
-
-
137 (
)
EWT SENSOR VALUE
-
-
-
138 (
)
LWT SENSOR VALUE
-
-
-
139 (
)
TR SENSOR VALUE
-
-
-
140 (
)
SYSTEM MODE
-
-
-
141 (
)
DEF MODULE
-
-
-
142 (
)
GMC SOFTWARE
VERSION
This code displays the GMC Software Version
-
-
-
143 (
)
GMC SOFTWARE
RELEASE
This code displays the GMC Software Release
-
-
-
144 (
)
WATER PUMP
RUNTIME
This code displays the working on hours of the water pump.
-
-
-
145 (
)
CURRENT WATER SETPOINT
This code displays the current water set-point defined by the
system control.
-
-
-
1
2
1
1
2
1
-20°C
65°C
-20°C
1
7
1
-20°C
30°C
0°C
1 Min
60 Min
10 Min
1°C
20°C
5°C
1
2
1
146
DRY CONTACT OFF
147
ALARM / SATISFIED AIR
ROOM
TEMPERATURE
148
EXTERNAL HEAT
SOURCE OAT LIMIT
149
TEMPERATURE LIST
150
AUXILIARY OAT LIMIT
151
AUXILIARY DELAY
152
AUXILIARY
HYSTERESIS
153
SANITARY HOT
WATER IN OFF MODE
This code displays the Entering Water Temperature read by the
EWT sensor.
This code displays the Leaving Water Temperature read by the
LWT sensor.
This code displays the refrigerant temperature value read by the
TR sensor.
This code displayes the operating mode requested by the System
Control:
0ò
1. Stand by
2. Cooling
3. Heating
4. N.A.
5. N.A.
6. Rating Heating
7. Rating Cooling
8. Freeze Protection
9. Defrost
10. High Temperature Protection
11. Timeguard
12. System Fail
This code displays the list of the all fault codes detected by the
outdoor unit. If no fault are occurring, no codes will be displayed.
5IJTDPEFJTVTFUPTFUUIFEJòFSFOU0''MPHJDT
1. Standard OFF
$POUSPMMFE0ò$ZDMFPOMZJG)1JTDPOUSPMMFECZESZDPOUBDU
This code is use to select the output connected at PIN 5 on
terminal strip:
1. Alarm signal
2. Signal of reached air temperature set-point
This code is use to set the OAT threshold value under which only
the external heat source will be operative as per algorithm. (Stop
HP)
This code is use to set which temperature the NUI shall display in
temperature zone.
1. Indoor air temperature
2. Leaving water temperature (from LWT sensor)
3. Entering water temperature (from EWT sensor)
4. Refrigerant temperature (from TR sensor)
5. Suction temperature (from TS sensor)
6. Discharge temperature (from TD sensor)
7. Refrigerant temperature (from TE sensor)
This code is use to set the OAT threshold value under which both
the heat pump and the external heat source will be operative as
per algorithm.
This code is use to set the delay time after which, when (temperature set in code 148) < OAT < (temperature set in code 150),
the external heat source will switch on . The counting of the time
starts when the activation of the EHS is required as per algorithm
(if (current water temperature) < (water temperature set-point –
auxiliary hysteresis)
This code is use to set the hysteresis temperature needed to
activate the external heat source..
5IJTDPEFJTVTFUPEFöOFJGXIFOTZTUFNNPEFJTPòUIFTBOJUBSZ
hot water logic can be activated:
1. Yes, SHW logic is always actives
2. No, SHW logic can be activated only in Heat or Cool mode
98
SM_30AW.indd 98
7
30AW
14-03-2011 14:46:21
7
Carrier interfaces
Code Nr.
Name
154
EXTERNAL HEAT
SOURCE STATUS
155
MAIN WATER PUMP
LOGIC VS EHS STATUS
156
TRACE HEATER / ADDITIONAL WP LOGIC
157
ADDITIONAL WATER
PUMP LOGIC
158
DELTA AIR
SET-POINT
302
UNIT CONFIGURATION
VALUE RANGE
DESCRIPTION
This code is use to define the external heat source status when
EHS is activated and OAT < temperature value set in Code 148:
0. Always On
0O0òEFQFOEJOHCZBDUVBM3PPN5FNQFSBUVSFWTSPPNUFNperature set-point(same hysteresis of Thermostat function). In
DBTFPG/6*JTOPUJOTUBMMFEPSSPPNTFOTPSVOBWBJMBCMF0O0ò
depending by water set-point (+1/-4 °C of hysteresis)
0O0òEFQFOEJOHCZXBUFSTFUQPJOU¡$PGIZTUFSFTJT
This code is use to define the water pump logic when EHS is
activated and OAT < (temperature value set in Code 148):
"MXBZT0ò
0O0òEFQFOEJOHCZ&)40O0òTUBUVT
2. Always On
This code is use to select the output connected at PIN 11 on
terminal strip. In case an additional water pump option is active,
this code is use to select its operating logic vs the SHW request (if
OAT > (temperature value set in Code 148)).
0. Trace he
"EEJUJPOBMXBUFSQVNQ0O0òEFQFOEJOHCZNBJOXBUFS
pump logic. This it means that in case of SHW activation, the
additional WP will be ON.
"EEJUJPOBMXBUFSQVNQ0O0òEFQFOEJOHCZNBJOXBUFS
pump logic, but always OFF when SHW is activated.
This code is use to define the additional water pump logic, if it
has been installed, when OAT < temperature value set in Code
148:
"MXBZT0ò
0O0òEFQFOEJOHCZ&)40O0òTUBUVT
2. Always On
This code is use to define the hysteresis versus the temperature
SPPN4FU1PJOUUP0òUIF6OJUXIFOUIF4ZTUFN5ZQFJT/6*
installed and used as Thermostat (100 NUI code = 4).
This code is use to configure the unit:
Cooling Only
1. Heat & Cooling
2. Heating Only
STANDARD
Min
Max
0
2
1
0
2
1
0
2
1
0
2
2
0.2°C
1°C
0.3 °C
0
2
1
0.
7.3.5 Climatic curves
Pre-set curves
Twelve heating curves and two cooling curves are available by accessing
to parameters 112 and 117 respectively of installer configuration table.
The curves are set to maintain a target indoor temperature of 20°C.
99
SM_30AW.indd 99
30AW
14-03-2011 14:46:23
Carrier interfaces
100
SM_30AW.indd 100
7
30AW
14-03-2011 14:46:25
Carrier interfaces
7
Custom curves
Parameters 112 and 117 set to 0 allows to load in the control a custom
climatic curve.
Below figures show which parameter of installer configuration table
need to be set to create customized heating and cooling curves.
1.
2.
3.
4.
5.
6.
7.
8.
CODE N°121
CODE N°120
CODE N°118
CODE N°119
CODE N° 125
CODE N° 124
CODE N° 123
CODE N° 122
NOTE: In case application requires fixed water set point in necessary to set an horizontal climatic curve by setting NUI code120=121 for Heating Climatic
Curve and 124=125 for Cooling Climatic Curve.
101
SM_30AW.indd 101
30AW
14-03-2011 14:46:26
Maintenance
8
8.1 Refrigerant charge check
IMPORTANT: All maintenance operations must be performed by qualified personnel.
This check becomes necessary after any refrigerant leak or after
replacement of the compressor.
The best method to correctly charge refrigerant is to completely empty
the refrigerant circuit using refrigerant recovery equipment.
Then charge the exact quantity of refrigerant according to the data
shown on the unit nameplate.
R-410A systems must be charged with liquid refrigerant.
Use the special recharging equipment (normally on the market) to
control the refrigerant correctly.
When it is necessary to recharge refrigerant, charge the specified
amount of new refrigerant according to the following steps:
1. Recover the refrigerant, and check no refrigerant remains in the
equipment.
2. Connect the charge hose to packed valve service port (see the
Check joint in the figure illustrated in chapter 3.4 Refrigerant
schematics).
3. Connect the charge hose of the vacuum pump adapter.
4. Place the handle of the gauge manifold Low in the fully opened
position, and turn on the vacuum pump’s power switch. Then,
evacuating the refrigerant in the cycle.
5. When the compound gauge’s pointer has indicated -0.1 MPa
( - 76 cmHg ), place the handle Low in the fully closed position, and
UVSOPòUIFWBDVVNQVNQTQPXFSTXJUDI
6. Keep the status set as it is for 1 to 2 minutes, and ensure that the
compound gauge’s pointer does not return.
7. Set the refrigerant cylinder to the electronic balance, connect the
connecting hose to the cylinder and the connecting port of the
electronic balance, and charge liquid refrigerant.
IMPORTANT:
- Never charge refrigerant exceeding the specified amount.
- If the specified amount of refrigerant cannot be charged, charge
refrigerant bit by bit in COOL mode.
- Do not carry out additional charging. When additional charging is
carried out if refrigerant leaks, the refrigerant composition changes
in the refrigeration cycle, that is characteristics of the heat pump
changes, refrigerant exceeding the specified amount is charged, and
working pressure in the refrigeration cycle becomes abnormally high
pressure, and may cause a rupture or personal injury.
- A cylinder with siphon enables liquid to be charged without the
cylinder turned upside down.(see the figure below)
8.2 Cleaning the coil
If necessary, proceed as follows for more careful cleaning of the coil:
- Switch the mains supply OFF.
- Remove unit top cover by losening the fixing screws and lifting
thecover. Carefully clean the coil with a vacuum cleaner from inside to
outside.
With the same vacuum cleaner, remove the dust from inside the fan
compartment and the fan blades. Avoid any damage to the blades
which may cause future vibrations and noise.
Replace the unit cover and tighten the screws.
102
SM_30AW.indd 102
30AW
14-03-2011 14:46:27
8
Maintenance
8.3 Replacement of the main parts
N°
Exchange
parts
name
Work procedure (IMPORTANT: Ensure gloves are
worn at all times to avoid risk of injury)
Common
procedure
t Detachment
4UPQPQFSBUJPOPGUIFIFBUQVNQBOEUVSOPò
switch of the breaker.
3FNPWFUIFGSPOUQBOFM451tQDT
After unscrewing the screws, remove the front
panel while drawing it downward.
3. Remove the power cable from cord clamp and
terminal.
3FNPWFUIFSPPGQMBUF451tQDT
Remarks
30 AWH 004, 30 AWH 006, 30 AWH 008
(1)
Gloves
Front panel
tAttachment
.PVOUUIFSPPGQMBUF451tQDT
6. Connect the power cable and to terminal, and
then fix them with cord clamp.
REQUIREMENT
Secure the power cables using a tie-wrap or rubber band to ensure they do not come into contact
with the compressor, valves and discharge pipe.
"UUBDIUIFGSPOUQBOFM451tQDT
(2)
Side
cabinet
tDetachment
Roof plate
Inverter assembly
1. Perform the work from 1 to 4 of (1).
2. Remove the screws fixing the inverter assembly
BOEUIFTJEFDBCJOFU.tQD
3. Remove the screws fixing the GMC assembly and
UIFTJEFDBCJOFU451tQDT
4. Remove the screw for the side cabinet and the
QJQJOHQBOFM3FBS
451tQD
5. Remove the screw for the side cabinet and the
CBTFQMBUF451tQDT
6. Remove the screws for the side cabinet and heat
FYDIBOHFS451tQDT
7. Remove the screws of the side cabinet and the
Brazzed plate heat exchanger assembly. (ST8P
tQDT
tAttachment
8. Replace the cabinet removed and attach the
UBLFOPòTDSFXTUPUIFPSJHJOBMQPTJUJPOT
(3)
Air-outlet
cabinet
GMC assembly
t Detachment
1. Perform the work from 1 to 4 of (1).
2. Remove the screws for the air-outlet cabinet and
UIFQBSUJUJPOQMBUF451tQDT
3. Remove the screws for the air-outlet cabinet and
UIFCBTFQMBUF451tQDT
4. Remove the screws for the air-outlet cabinet and
UIFIFBUFYDIBOHFS.tQD
t"UUBDINFOU
5. Replace the cabinet removed and attach the
UBLFOPòTDSFXTUPUIFPSJHJOBMQPTJUJPOT
103
SM_30AW.indd 103
Side cabinet
Heat exchanger
Motor fan
Air outlet cabinet
30AW
14-03-2011 14:46:29
Maintenance
N°
Exchange
parts
name
(4)
Inverter
assembly
Work procedure (IMPORTANT: Ensure gloves are
worn at all times to avoid risk of injury)
8
Remarks
Inverter cover
1. Perform the works from 1 to 4 of (1) and (2) .
WARNING
'PSNJOVUFBGUFSUIFQPXFSJTUVSOFEPòEPOPU
disassemble the inverter to prevent an electric shock.
Perform discharging by connecting the discharging
resistance or plug of soldering iron to + , – terminals
of the C10 too 13 electrolytic capacitor (760μF) of
P.C. board.
Never use a screwdriver or similar device to discharge the electrolytic capacitor components as a
electric shock may occur.
Under system fault condition, the electrolytic capacitor components may not have discharged. Ensure
these are discharged before proceeding.
P.C. Board
Inverter assembly
2. Remove the inverter cover to gain access to
inspect the P.C.Board
5BLFPòTDSFXT451tQDT
öYJOHUIF
main body and the inverter box.
4. Remove various lead wires from the holder at
upper part of the inverter box and wiring holder at
right side of the terminal block.
5. Remove the lead wire from the bundled part at left
side of the terminal block.
6. Pull the inverter box upward.
7. Disconnect connectors of various lead wires.
Terminal
block
T
Heat sink
k
REQUIREMENT
As each connector has a lock mechanism, avoid to
remove the connector by holding the lead wire, but
by holding the connector.
Different lock mechanisms of different inverter board connectors
(5)
Control
P.C. board
assembly
t%JTDPOOFDUMFBEXJSFTBOEDPOOFDUPSTDPOOFDUFE
from the control P.C. board assembly to other parts
1. Lead wires Connection with the power terminal
block: 3 wires (Black, White, Orange) Earth wire: 1
wire (Black)
2. Connectors
Connection with compressor: Remove 3P connector.
Connection with reactor: Remove the relay connectors from P08, P11 and P31,P30.CN500:
TE sensor (2P)CN501:
TD sensor (3P)
CN502: TO sensor (2P)
CN503: TS sensor (3P)
CN300: Outdoor fan (3P)
CN500: Case thermo. (2P)
CN701: 4-way valve (3P)
CN700: PMV (Pulse Motor Valve)
Control P.C. board assembly
REQUIREMENT
As each connector has a lock mechanism, avoid to
remove the connector by holding the lead wire, but
by holding the connector.
$VUPòUJFMBQXIJDIöYFTWBSJPVTMFBEXJSFTUPUIF
inverter assembly.
5BLFPòUIFTDSFXTöYJOHUIF1$CPBSEBOEUIF
base.
5BLFPòTDSFXTöYJOHUIFIFBUTJOLBOENBJO
control board assembly side, and replace the board
with a new one.
Caution: When mounting a new board, check that
the board is correctly set in the groove of the base
holder of P.C. board base. Attach the P.C. board so
that the heat sink comes securely contact with the
metal sheet.
t.PVOUUIFJOWFSUFSBTTFNCMZ
heat sink
P.C. Board
Fixed Sc
Screws
c
Fixed S
Screws
Caution:
Mount the inverter assembly to the partition plate so
that hooks of the heat sink cover do not come near
the partition plate but also near the fan side.
t"UUBDIUIFSFNPWFEDPOOFDUPSTBUUIF1$CPBSE
BOEBUUBDIUIFUBLFOPòTDSFXTUPUIFPSJHJOBM
positions.
104
SM_30AW.indd 104
Heat sink
30AW
14-03-2011 14:46:32
Maintenance
N°
Exchange
parts
name
Work procedure (IMPORTANT: Ensure gloves are
worn at all times to avoid risk of injury)
(6)
Reactors
1. Perform the works from 1 to 4 of (1) and (2).
2. Remove the inverter assembly item (4).
3. Remove the reactors’ connectors.
5BLFPòUIFTDSFXT451tQDT
öYJOH
the reactor to the partition plate.
5. Pull the reactor upward and detach it from the
partition plate.
6. Replace the fail reactor with a new one.
(7)
(8)
GMC
Board
assembly
Fan motor
8
Remarks
Connector
Reactors
Screws
1. Perform the works from 1 to 4 of (1).
5BLFPòUIFTDSFXT455Y-QDT
öYJOHUIF
GMC cover and remove it gain access to inspect the
board.
3. Disconnect lead wires and connectors connected
from the GMC board assembly to other parts.
J6A Water Enter Exchanger Sensor
J6B TR Sensor
J6C Water Exit Exchanger Sensor
J22 Outdoor Air Sensor
J18 Mode (Heat/Cool)
J5 Remote Control
J20 Eco / Antifreeze Switch
J8 Communications Receive
J16 ON/OFF and Power limitation Switch
J20 Sanitary Water Dry contact
J4 Water Exchanger and 3 way valve
J7 Water pump Speed – Defrost and TFC status – EHS
and Dehumidifier
J11 Alarm status and Defrost signal
REQUIREMENT
As each connector has a lock mechanism, avoid to
remove the connector by holding the lead wire, but
by holding the connector.
4. Pull the GMC assembly upward and detach it from
the partition plate. The GMC board is attach to the
partition plate by two hooks.
5. Remove 4 hooking claws of GMC board base and
pull the GMC board upward.
6. Replace the fail GMC board with a new one.
Caution: When mounting a new board, check that
the board is correctly set in the groove of the base
holder of GMC board base.
7. Attach the removed connectors at the GMC board
BOEBUUBDIUIFUBLFOPòTDSFXTUPUIFPSJHJOBM
positions.
1. Perform the works from 1 to 4 of (1) and (3).
5BLFPòUIFøBOHFOVUöYJOHUIFGBONPUPSBOEUIF
propeller. Lose the flange nut by turning clockwise.
(To tighten the flange nut, turn counter-clockwise.)
3. Remove the propeller fan.
4. Disconnect the connector for fan motor from the
inverter.
5BLFPòUIFöYJOHTDSFXT451YQDT
holding by hands so that the fan motor does not fall.
6. Replace the fail fan motor with a new one.
Hooks
GMC cover
GMC board
Flange nut
Propeller
Expansion vessel
Caution:
Be sure that the propeller fan does not come to
contact with the fan motor lead.
Fan motor
105
SM_30AW.indd 105
30AW
14-03-2011 14:46:34
Maintenance
N°
Exchange
parts
name
Work procedure (IMPORTANT: Ensure gloves are
worn at all times to avoid risk of injury)
(9)
Compressor
Perform the works from 1 to 4 of (1) and (2), (3), (4),
(6), (7).
1. Discharge refrigerant gas.
3FNPWFUIFQJQJOHQBOFMUBLFPòUIFöYJOHTDSFXT
451tQDT
3FNPWFUIFQBSUJUJPOQMBUFUBLFPòTDSFXTGSPNUIF
CBTFQMBUF451tQDT
BOEGSPNUIF
IFBUFYDIBOHFS451tQDT
3FNPWF
also the nut fixing the liquid receiver and the partition plate.
4. Remove the noise-insulator.
5. Remove the terminal covers of the compressor, and
disconnect lead wires of the compressor and the
compressor thermo assembly from the terminal.
6. Remove pipes connected to the compressor with a
burner.
8
Remarks
CAUTION
Ensure flames of burner do not damage 4-way valve
or PMV. (If doing so, a malfunction may be caused.)
Piping panel
Screws
Partition plate
Liquid receiver nut
4-way valve
5BLFPòUIFöYJOHTDSFXTPGUIFCPUUPNQMBUFBOE
IFBUFYDIBOHFS451tQDT
8. Pull upward the refrigerating cycle.
5BLFPòOVUöYJOHUIFDPNQSFTTPSUPUIFCPUUPN
place.
Compressor
CAUTION
When reconnecting the lead wires to the
compressor terminals after replacement of the
compressor, be sure to caulk the Faston terminal
without loosening.
Terminal cover
10. Draw out the compressor toward you
Noise-insulator
PMV
Noise-insulator
(10)
Liquid
receiver
1. Perform the works from 1 to 4 of (1) and (2), (3), (4),
(6), (7).
2. Discharge refrigerant gas.
3. Remove the nut fixing the liquid receiver and the
partition plate.
3FNPWFUIFQBSUJUJPOQMBUFUBLFPòTDSFXTGSPNUIF
CBTFQMBUF451tQDT
BOEGSPNUIF
IFBUFYDIBOHFS451tQDT
5. Remove pipes connected to the liquid receiver with
a burner.
CAUTION
Ensure flames of burner do not damage other components. (If doing so, a malfunction may be caused.)
106
SM_30AW.indd 106
Liquid receiver
Partition plate
4 way valve
30AW
14-03-2011 14:46:36
Maintenance
N°
Exchange
parts
name
Work procedure (IMPORTANT: Ensure gloves are
worn at all times to avoid risk of injury)
(11)
Pulse
modulating
valve
(PMV)
coil
t%FUBDINFOU
1. Perform the works from 1 to 4 of (1) and (3).
2. Hold outside of the coil by hands and turn it while
lifting upward.
5IFöYJOHIPPLTDPNFPòUIFöYJOHDPODBWJUJFTBOE
then the coil can be removed from PMV body.
Remarks
t"UUBDINFOU
4. Match the positioning extrusion of the coil surely to
the concave part of PMV body, and then fix it.
(12)
Fan guard
8
t Detachment
1. Perform works from 1 to 4 of (1) and (3).
2. Remove the front cabinet, and put it down so that
fan guard side directs downward.
Caution: Perform works on a corrugated cardboard,
cloth, etc. to prevent flaw on the product.
3. Remove the screws fixing the bell-mouth (ST8P Ø8.2
tQDT
4. Remove the bell-mouth.
5. Remove the screws fixing the fan guard (ST8P Ø8.2
tQDT
6. Remove hanging hook of the fan guard by pushing
with a minus screwdriver.
PMV Coil
Bell-mouth
h
w
Screw
t"UUBDINFOU
7. Fix the hanging hooks by pushing with hands.
REQUIREMENT
Hanging Hooks
w
Screw
107
SM_30AW.indd 107
30AW
14-03-2011 14:46:38
Maintenance
N°
Exchange
parts
name
Work procedure (IMPORTANT: Ensure gloves are
worn at all times to avoid risk of injury)
Water
circuit
CAUTION:
To replace a water circuit part, first close the water
supply source valve and the valve of water pipe
connected to the unit.
8
Remarks
Entering water
Flow switch
Automatic purge valve
Water pump motor
Exiting water
Water Pump
Relief valve
Water Drain
BPHE
(13)
(14)
Expansion
vessel
(Only H
versions)
Relief
valve
1. Perform works from 1 to 4 of (1) and (3).
2. Remove the fixed band of the expansion vessel.
451tQDT
3. Remove the expansion vessel connection (flare nut).
4. Replace the packing to new one when installing the
expansion vessel.
IMPORTANT:
After the expansion vessel replacement repair,
open the water supply source valve and water
piping valve to pass water through the hydro unit, and
check that the expansion vessel connection has no
water leakage.
Fixed band
Expansion
on vessel
Nut
Screw
1. Perform works from 1 to 4 of (1) and (2).
2. Remove the piping panel.
3. Remove the relief valve.
CAUTION:
The relief valve connection uses an O ring for water
TFBM#FDBSFGVMOPUUPTDSBUDIUIF0SJOHPUIFSXJTF
water leakage may occur.
IMPORTANT:
After the relief valve replacement repair, open the
water supply source valve and water piping valve to
pass water through the hydro unit, and check that
the relief valve connection has no water leakage.
108
SM_30AW.indd 108
Relief valve
30AW
14-03-2011 14:46:40
Maintenance
N°
Exchange
parts
name
Work procedure (IMPORTANT: Ensure gloves are
worn at all times to avoid risk of injury)
(15)
Automatic
purge
valve
1. Perform works from 1 to 4 of (1) and (2).
2. Remove the automatic purge valve.
IMPORTANT
After the automatic purge valve replacement repair,
open the water supply source valve and water
piping valve to pass water through the hydro unit,
and check that the air vent valve connection has no
water leakage.
(16)
(17)
Flow
switch
Water
heat
exchanger
(BPHE)
Remarks
TWI
sensor
TR sensor
TWO
sensor
Flow switch
1. Perform works from 1 to 4 of (1) and (2).
2. Remove the relative connector
3. Remove the flow switch.
CAUTION:
The flow switch connection uses an O ring for water
TFBM#FDBSFGVMOPUUPTDSBUDIUIF0SJOHPUIFSXJTF
water leakage may occur.
Place a flow sensor parallel to the water heat
exchanger inlet pipe so that the wire is place on the
right side from the front view.
Automatic purge
valve
1. Perform works from 1 to 4 of (1) and (2).
2. Disconnect all the power source cable and cylinder
connection cable.
3. Discharge refrigerant gas.
5BLFPòUIFOVUDPOOFDUJOHUIFIFBUFYDIBOHFSUP
the water circuit
5. Remove refrigerant pipes connected to the compressor with a burner.
CAUTION
Ensure flames of burner do not damage PMV. (If
doing so, a malfunction may be caused.)
5BLFPòUIFOVUTöYJOHUIFXBUFSIFBUFYDIBOHFSUP
the heat exchanger cover.
5BLFPòUIFTDSFXTöYJOHUIFIFBUFYDIBOHFSDPWFS
UPUIFCBTFQMBUF451tQDT
BOEUIF
JOMFUXBUFSQJQF451tQDT
IMPORTANT:
After the water heat exchanger replacement repair,
open the water supply source valve and water
piping source valve to pass water through the hydro
unit, and check that the connection has no water
leakage.
After connecting the refrigerant pipe, check that the
connection has no refrigerant leakage.
(18)
BPHE
E
PMV
Heat exchanger coverr
Nut
1. Perform works from 1 to 4 of (1) and (2).
2. Take the sensors out.
109
SM_30AW.indd 109
8
30AW
14-03-2011 14:46:41
Maintenance
N°
Exchange
parts
name
Work procedure (IMPORTANT: Ensure gloves are
worn at all times to avoid risk of injury)
(19)
Pump
(Only H
versions)
1. Perform works from 1 to 4 of (1) and (2).
2. Remove the relative connectors
3. Remove the 2 nuts of the heater connection and the
lower side of the pump.
4. Remove the pump pulling it out.
8
Remarks
Pump motor
Nuts
CAUTION:
The pump connection uses a liquid packing for
water seal. When replacing the pump, use a
packing which was slathered with the liquid gasket.
IMPORTANT:
After the pump replacement repair, open the water
supply source valve and water piping valve to pass
water through the hydro unit, and check that the
pump connection has no water leakage.
30 AWH 012, 30 AWH 015
(1)
Common
procedure
t%FUBDINFOU
4UPQPQFSBUJPOPGUIFIFBUQVNQBOEUVSOPò
switch of the breaker.
3FNPWFUIFGSPOUQBOFM451tQDT
After unscrewing the screws, remove the front
panel while drawing it downward.
3. Remove the power cable from cord clamp and
terminal.
3FNPWFUIFSPPGQMBUF451tQDT
Gloves
t"UUBDINFOU
.PVOUUIFSPPGQMBUF451tQDT
9. Connect the power cable and to terminal, and then
fix them with cord clamp.
REQUIREMENT
Secure the power cables using a tie-wrap or rubber
band to ensure they do not come into contact with
the compressor, valves and discharge pipe.
"UUBDIUIFGSPOUQBOFM451tQDT
Front panel
Gloves
Roof plate
(2)
Side
cabinet
t %FUBDINFOU
1. Perform the work from 1 to 4 of (1).
2. Remove the screws fixing the inverter assembly and
UIFTJEFDBCJOFU.tQDBOE451t
9.5, 1 pc.).
3. Remove the screws fixing the GMC assembly and
UIFTJEFDBCJOFU451tQDT
4. Remove the screw for the side cabinet and the
QJQJOHQBOFM3FBS
451tQD
5. Remove the screw for the side cabinet and the base
QMBUF451tQDT
6. Remove the screws for the side cabinet and the fin
HVBSE451tQDT
7. Remove the screws of the side cabinet and the
Brazzed plate heat exchanger assembly. (ST8P Ø9.75
tQDT
Side cabinet
t "UUBDINFOU
8. Replace the cabinet removed and attach the takenPòTDSFXTUPUIFPSJHJOBMQPTJUJPOT
110
SM_30AW.indd 110
30AW
14-03-2011 14:46:44
Maintenance
N°
Exchange
parts
name
(3)
Air-outlet
cabinet
Work procedure (IMPORTANT: Ensure gloves are
worn at all times to avoid risk of injury)
8
Remarks
Heat exchanger
t %FUBDINFOU
1. Perform the work from 1 to 4 of (1).
2. Remove the screws for the air-outlet cabinet and
UIFQBSUJUJPOQMBUF451tQDT
3. Remove the screws for the air-outlet cabinet and
UIFCBTFQMBUF451tQDT
4. Remove the screws for the air-outlet cabinet and
UIFöOHVBSE451tQDT
5. Remove the screw for the air-outlet cabinet and the
IFBUFYDIBOHFS.tQD
Fin guard
t "UUBDINFOU
6. Replace the cabinet removed and attach the takenPòTDSFXTUPUIFPSJHJOBMQPTJUJPOT
(4)
Inverter
assembly
(012)
Air-outlet cabinet
1. Perform the works from 1 to 4 of (1) and (3) .
WARNING
'PSNJOVUFBGUFSUIFQPXFSJTUVSOFEPòEPOPUEJsassemble the inverter to prevent an electric shock.
Perform discharging by connecting the discharging
resistance or plug of soldering iron to + , – terminals
of the C10 too 13 electrolytic capacitor (760μF) of
P.C. board.
Never use a screwdriver or similar device to discharge the electrolytic capacitor components as a
electric shock may occur.
Under system fault condition, the electrolytic capacitor components may not have discharged. Ensure
these are discharged before proceeding.
2. Remove connectors which are connected from the
cycle P.C. board to the other parts.
3. Lead wires Connection with the power terminal
block: 3 wires (Black, White, Orange)
Earth wire: 1 wire (Black)
4. Connectors
Connection with compressor: Remove 3P connector.
Connection with reactor: Remove the relay
connectors from P08, P09 and P12, P13.
CN600: TD sensor (3P)
CN601: TO sensor (2P)
CN604: TE sensor (2P)
CN605: TS sensor (3P)
CN301: Upper outdoor fan (3P)
CN300: Detection of upper outdoor fan (5P)
CN302: Lower outdoor fan (3P)
CN303: Detection of lower outdoor fan (5P)
CN500: Case thermo. (2P)
CN700: 4-way valve (3P)
CN702: PMV (Pulse Motor Valve) (6P)
P.C. Board
One of two hooks
Heat sink cover
Different lock mechanisms of different inverter board connectors
REQUIREMENT
As each connector has a lock mechanism, avoid to
remove the connector by holding the lead wire, but
by holding the connector.
$VUPòUJFMBQXIJDIöYFTWBSJPVTMFBEXJSFTUPUIF
inverter assembly.
6. Lift up the hook (upper left) with the partition plate
upward just removing.
111
SM_30AW.indd 111
30AW
14-03-2011 14:46:47
Maintenance
N°
Exchange
parts
name
Work procedure (IMPORTANT: Ensure gloves are
worn at all times to avoid risk of injury)
(5)
Cycle PC
board
(012)
1. Perform the works from 1 to 4 of (1) ,(3) and (4).
2. Remove connectors and lead wires:
Connector
CN800: Connection with IPDU P.C. board (5P)
CN01: Connection with IPDU P.C. board (5P)
CN02: Indoor/Outdoor connection terminal block
(3P)
CN03: Connection with IPDU P.C. board (3P)
CN04: Connection with IPDU P.C. board (2P).
8
Remarks
REQUIREMENT
As each connector has a lock mechanism, avoid to
remove the connector by holding the lead wire, but
by holding the connector.
3. Remove the supporting hooks at 4 corners to remove the cycle P.C. board.
4. Mount a new cycle P.C. board.
5. Lift up the hook (upper left) with the partition plate
upward just removing.
(6)
IPDU P.C.
board
(012)
1. Perform the works from 1 to 4 of (1) ,(3), (4), and (5).
2. Remove the screws of the inverter assembly to sepaSBUFUIFJOWFSUFSBTTFNCMZ.tQDT
3. Remove the connectors and the lead wires which
are connected from IPDU P.C. board to the other
parts.
Connector
CN04: Connection with cycle P.C. board (3P)
CN05: Connection with cycle P.C. board (2P)
CN06: Connection with cycle P.C. board (5P)
CN13: Connection with cycle P.C. board (5P)
CN600: Heat sink sensor (2P)
Lead wire
CN01: Connection with power terminal block (Red)
CN02: Connection with power terminal block (White)
CN03: Connection with inverter box (Black)
CN09: Connection with compressor (Red)
CN10: Connection with compressor (White)
CN11: Connection with compressor (Black)
Rectifier diode
+ : Red lead wire
– : White lead wire
ATTENTION:
The rectifier diode has polarity, so be careful to + and
–. If + and – are mistaken, a trouble is caused.
~ : Orange lead wire (Top)
~ : Brown lead wire (Bottom)
REQUIREMENT
As each connector has a lock mechanism, avoid to
remove the connector by holding the lead wire, but
by holding the connector.
3FNPWFUIFIFBUTJOLDPWFS.tQDT
5. Remove the two screws which fix the heat sink and
*(#5BOEBMTPUBLFPòTVQQPSUIPPLTPGUIF1$
board (5 positions) to remove IPDU P.C. board.
6. Mount a new IPDU P.C. board.
112
SM_30AW.indd 112
30AW
14-03-2011 14:46:47
Maintenance
N°
Exchange
parts
name
Work procedure (IMPORTANT: Ensure gloves are
worn at all times to avoid risk of injury)
(7)
Reactors
(012)
1. Perform the works from 1 to 4 of (1) and (2).
2. Remove the inverter assembly item (4).
3. Remove the reactors’ connectors.
5BLFPòUIFTDSFXT451tQDT
öYJOH
the reactor to the partition plate.
5. Pull the reactor upward and detach it from the
partition plate.
6. Replace the fail reactor with a new one.
(8)
Control
P.C. Board
(015)
8
Remarks
Partition plate
Screws
Reactors
1. Perform the works from 1 to 4 of (1) and (2).
WARNING
Never disassemble the inverter for 1 minute after poXFSTVQQMZIBTCFFOUVSOFEPòCFDBVTFBOFMFDUSJD
shock may be caused.
2. Remove the connectors connected to the control
P.C. board. (Indoor power supply, Temperature
sensor, PMV coil, 4-way valve coil, Compressor case
thermo, Fan motor)
t6OMPDLUIFMPDLPGUIFIPVTJOHQBSUBOEUIFO
remove the connectors.
3. Remove the lead wires connected to the control P.C
board.
Compressor lead U: CN200 Red
V: CN201 White
W: CN202 Black
Reactor cord CN05 White CN06 White
4. Remove the earth wire from the control P.C. board.
(Trust B tight screw Ø4 × 6, 1 pc.)
5. Remove the fixing screws of the control P.C. board.
(Screw with collar for fixing element Ø3 × 16, 9 pcs.
Pan S tight screw for fixing board Ø3 × 20, 1 pc.)
6. Remove the control P.C. board. (Supporter: 5
positions)
NOTE :
Be careful to take out because there is sealing
material for the heat sink.
7. Replace the control P.C. board with a new one.
NOTE :
t#FTVSFOPUUPDPOGVTFGPS$PNQSFTTPSMFBE7
(CN201 White), Reactor lead CN05 and CN06.
t#FTVSFOPUUPDPNFPòPGUIFJOTVMBUJOHTIFFU
Control P.C. board
Compressor
case thermo.
Lower
wer
fan
an motor
motor
Temperature
emperature
sensor
Upper fan motor
Reactor lead
Compressor lead
lead
Earth
Ear
th wire
4-way valve coil
PMV coil
P.C. board
fixing screw
Attention: The inverter board is fixed at the side cabinet by a steel braket. When replace the P.C. Board
remember to detach it from the defective board and
to screw it at the new one.
Indoor power supply
Element fixing screws
(9 positions)
Insulating sheet
Control P.C. board
Sealing material
Steel braket
113
SM_30AW.indd 113
30AW
14-03-2011 14:46:49
Maintenance
N°
Exchange
parts
name
Work procedure (IMPORTANT: Ensure gloves are
worn at all times to avoid risk of injury)
(9)
Reactor
(015)
1. Perform the works from 1 to 4 of (1) and (2).
2. Remove the reactor lead connected to the control
P.C. board. CN05 White, CN06 White
3. Cut the bundling band which bundled the compressor lead and fan motor lead.
4. Remove the reactor. (Trust B tight screw, Ø4 × 6, 2
pcs.)
5. Replace the reactor with a new one.
8
Remarks
Bundling band
(Compressor lead, Reactor lead)
Control P.C. board
Reactor lead
NOTE :
Be sure to bundle the removed bundling band with
the bundling band on the market.
Be careful so that the fan motor lead does not come
to contact with the reactor body.
Reactor lead
Bundling band
Reactor body
(Compressor lead, Reactor lead)
Fan motor lead
Bundling band
(Fan motor lead, Reactor lead)
(10)
GMC
Board
assembly
1. Perform the works from 1 to 4 of (1).
5BLFPòUIFTDSFXT455Y-QDT
öYJOHUIF
GMC cover and remove it gain access to inspect the
board.
3. Disconnect lead wires and connectors connected
from the GMC board assembly to other parts.
J6A Water Enter Exchanger Sensor J6B TR Sensor
J6C Water Exit Exchanger Sensor
J22 Outdoor Air Sensor
J18 Mode (Heat/Cool)
J5 Remote Control
J20 Eco / Antifreeze Switch
J8 Communications Receive
J16 ON/OFF and Power limitation Switch
J20 Sanitary Water Dry contact
J4 Water Exchanger and 3 way valve
J7 Water pump Speed – Defrost and TFC status
– EHS and Dehumidifier
J11 Alarm status and Defrost signal
Hooks
GMC cover
REQUIREMENT
As each connector has a lock mechanism, avoid to
remove the connector by holding the lead wire, but
by holding the connector.
4. Pull the GMC assembly upward and detach it from
the partition plate. The GMC board is attach to the
partition plate by two hooks.
5. Remove 4 hooking claws of GMC board base and
pull the GMC board upward.
6. Replace the fail GMC board with a new one.
GMC board
Caution: When mounting a new board, check that the
board is correctly set in the groove of the base holder
of GMC board base.
7. Attach the removed connectors at the GMC board
BOEBUUBDIUIFUBLFOPòTDSFXTUPUIFPSJHJOBM
positions.
114
SM_30AW.indd 114
30AW
14-03-2011 14:46:51
Maintenance
N°
Exchange
parts
name
Work procedure (IMPORTANT: Ensure gloves are
worn at all times to avoid risk of injury)
(11)
Fan motor
1 Perform the works from 1 to 4 of (1) and (3).
5BLFPòUIFøBOHFOVUöYJOHUIFGBONPUPSBOEUIF
propeller. Lose the flange nut by turning clockwise.
(To tighten the flange nut, turn counter-clockwise.)
3. Remove the propeller fan.
4. Disconnect the connector for fan motor from the
inverter.
5BLFPòUIFöYJOHTDSFXTQDT
IPMEJOHCZIBOET
so that the fan motor does not fall.
6. Replace the fail fan motor with a new one.
Remarks
Flange nut
Caution:
The same propeller fan and the fan motor are used
at upper and lower sides.
Be sure that the propeller fan does not come to
contact with the fan motor lead.
(12)
8
Propeller
Compressor
Piping panel
Perform the works from 1 to 4 of (1) and (2), (3), (4),
(7), (8).
1. Discharge refrigerant gas.
3FNPWFUIFQJQJOHQBOFMUBLFPòUIFöYJOHTDSFXT
451tQDT
3FNPWFUIFQBSUJUJPOQMBUFUBLFPòTDSFXTGSPNUIF
CBTFQMBUF451tQDT
BOEGSPNUIF
IFBUFYDIBOHFS451tQDT
3FNPWF
also the nut fixing the liquid receiver and the partition plate.
4. Remove the noise-insulator.
5. Remove the terminal covers of the compressor, and
disconnect lead wires of the compressor and the
compressor thermo assembly from the terminal.
6. Remove pipes connected to the compressor with a
burner.
CAUTION
Ensure flames of burner do not damage 4-way valve
or PMV. (If doing so, a malfunction may be caused.)
Screws
Terminal cover
Check joint
5BLFPòUIFöYJOHTDSFXTPGUIFCPUUPNQMBUFBOE
IFBUFYDIBOHFS451tQDT
8. Pull upward the refrigerating cycle.
5BLFPòOVUöYJOHUIFDPNQSFTTPSUPUIFCPUUPN
place.
CAUTION
When reconnecting the lead wires to the compressor
terminals after replacement of the compressor, be
sure to caulk the Faston terminal without loosening.
10. Draw out the compressor toward you
Lead wires
N
Noise insulator
Nuts
115
SM_30AW.indd 115
30AW
14-03-2011 14:46:52
Maintenance
N°
Exchange
parts
name
Work procedure (IMPORTANT: Ensure gloves are
worn at all times to avoid risk of injury)
(13)
Liquid
receiver
1. Perform the works from 1 to 4 of (1) and (2),
(3), (4), (5), (8).
2. Discharge refrigerant gas.
3. Remove the nut fixing the liquid receiver and
the partition plate.
3FNPWFUIFQBSUJUJPOQMBUFUBLFPòTDSFXTGSPNUIF
CBTFQMBUF451tQDT
BOEGSPNUIF
IFBUFYDIBOHFS451tQDT
5. Remove pipes connected to the liquid receiver
with a burner.
CAUTION
Ensure flames of burner do not damage other
components. (If doing so, a malfunction may be
caused.)
8
Remarks
Liquid receiver
Nut
Partition plate
te
(14)
Pulse
modulating
valve
(PMV)
coil
t%FUBDINFOU
1. Perform the works from 1 to 4 of (1) and (2).
2. Hold outside of the coil by hands and turn it while
lifting upward.
5IFöYJOHIPPLTDPNFPòUIFöYJOHDPODBWJUJFTBOE
then the coil can be removed from PMV body.
Fan guard
t%FUBDINFOU
1. Perform works from 1 to 4 of (1) and (3).
2. Remove the front cabinet, and put it down so that
fan guard side directs downward.
Caution: Perform works on a corrugated cardboard,
cloth, etc. to prevent flaw on the product.
3. Remove the screws fixing the bell-mouth (ST8P Ø8.2
tQDT
4. Remove the bell-mouth.
5. Remove the screws fixing the fan guard (ST8P Ø8.2
tQDT
6. Remove hanging hook of the fan guard by pushing
with a minus screwdriver.
PMV body
PMV coil
t"UUBDINFOU
4. Match the positioning extrusion of the coil surely to
the concave part of PMV body, and then fix it.
Bell-mouth
Screw
Hanging Hooks
t"UUBDINFOU
7. Fix the hanging hooks by pushing with hands.
REQUIREMENT
Check that all the hanging hooks are fixed to the
specified positions.
"GUFSBUUBDINFOUöYJUXJUITDSFXT451t
2 pcs).
9. Mount the bell-mouth coupling on metal lip of airoutlet cabinet.
"GUFSBUUBDINFOUöYJUXJUITDSFXT451t
2 pcs).
116
SM_30AW.indd 116
Screw
30AW
14-03-2011 14:46:55
8
Maintenance
N°
Remarks
Work procedure (IMPORTANT: Ensure gloves are
worn at all times to avoid risk of injury)
(15)
Water
circuit
CAUTION:
Remarks
Expansion vessel
To replace a water circuit part, first close the water
supply source valve and the valve of water pipe
connected to the unit.
Automatic purge
valve
Entering
water
Flow switch
Exiting water
Water drain
Water Pump
mp
(16)
Expansion
vessel
(Only H
versions)
Relief valve
Relie
e
BPHE
BPH
Expansion
vessel
v
1. Perform works from 1 to 4 of (1), (2).
2. Remove the expansion vessel connection (flare nut).
3. Replace the packing to new one when installing the
expansion vessel.
IMPORTANT:
After the expansion vessel replacement repair,
open the water supply source valve and water
piping valve to pass water through the hydro unit,
and check that the expansion vessel connection has
no water leakage.
IInlet water
Automatic
purge valve
Nut
(17)
Relief
valve
1. Perform works from 1 to 4 of (1).
2. Remove the piping panel
3. Remove the relief valve.
CAUTION:
The relief valve connection uses an O ring for water
TFBM#FDBSFGVMOPUUPTDSBUDIUIF0SJOHPUIFSXJTF
water leakage may occur.
IMPORTANT:
After the relief valve replacement repair, open the
water supply source valve and water piping valve to
pass water through the hydro unit, and check that
the relief valve connection has no water leakage.
(18)
Automatic
purge
valve
1. Perform works from 1 to 4 of (1) and (2).
2. Remove the automatic purge valve.
IMPORTANT
After the automatic purge valve replacement repair,
open the water supply source valve and water
piping valve to pass water through the hydro unit,
and check that the air vent valve connection has no
water leakage.
117
SM_30AW.indd 117
Relief valve
ge
Automatic purge
valve
30AW
14-03-2011 14:46:58
N°
Remarks
(19)
Flow
switch
Work procedure (IMPORTANT: Ensure gloves are
worn at all times to avoid risk of injury)
Remarks
1. Perform works from 1 to 4 of (1) and (2).
2. Remove the relative connector
3. Remove the flow switch.
CAUTION:
The flow switch connection uses an O ring for water
TFBM#FDBSFGVMOPUUPTDSBUDIUIF0SJOHPUIFSXJTF
water leakage may occur.
Place a flow sensor parallel to the water heat
exchanger inlet pipe so that the wire is place on the
right side from the front view.
(20)
Water
heat
exchanger
(BPHE)
1. Perform works from 1 to 4 of (1) and (2).
2. Disconnect all the power source cable, unit connection cable, and cylinder connection cable.
3. Discharge refrigerant gas.
5BLFPòUIFOVUDPOOFDUJOHUIFIFBUFYDIBOHFSUP
the water circuit
5. Remove refrigerant pipes connected to the compressor with a burner.
CAUTION
Ensure flames of burner do not damage PMV. (If
doing so, a malfunction may be caused.)
Flow switch
BPHE
5BLFPòUIFOVUTöYJOHUIFXBUFSIFBUFYDIBOHFSUP
the heat exchanger cover.
5BLFPòUIFTDSFXTöYJOHUIFIFBUFYDIBOHFSDPWFS
UPUIFCBTFQMBUF451tQDT
BOEUIF
JOMFUXBUFSQJQF451tQDT
IMPORTANT:
After the water heat exchanger replacement repair,
open the water supply source valve and water
piping source valve to pass water through the hydro
unit, and check that the connection has no water
leakage.
After connecting the refrigerant pipe, check that the
connection has no refrigerant leakage.
(21)
TWI sensor
1. Perform works from 1 to 4 of (1) and (2).
TWO
2. Take the sensors out.
sensor
(22)
Pump
(Only H
versions)
Heat exchanger cover
Water pump motor
1. Perform works from 1 to 4 of (1) and (2).
2. Remove the relative connectors
3. Remove the 2 nuts of the heater connection and the
lower side of the pump.
4. Remove the pump pulling it out.
Water pump
Nuts
CAUTION:
The pump connection uses a liquid packing for
water seal. When replacing the pump, use a
packing which was slathered with the liquid gasket.
IMPORTANT:
After the pump replacement repair, open the water
supply source valve and water piping valve to pass
water through the hydro unit, and check that the
pump connection has no water leakage.
118
SM_30AW.indd 118
30AW
14-03-2011 14:46:59
8.4 Periodic Inspection Items
Unit
Frequency
Periodic inspection details
Insulation measurement (Power source circuit/
Compressor)
Annually
Insulation measurement with a mega tester
Operation check
Annually
Hot water supply/ Heating/ Cooling operation
check with remote controller.
Refrigerant leakage/ Water leakage inspection.
Annually
Visual inspection and check with a leak tester: No
leakage must be found.
Water heat exchanger inspection (Internal dirt
and clogging)
Annually
Checking for water dirtiness in a closed cycle,
Cleaning.
Inlet / Outlet water temperature measurement
Annually
Temperature measurement: Temperature measurement during an operation.
Circulation pump inspection
Annually
No leakage or abnormal noise must be found
(Replacement every 10 years: Charged).
Automatic air purge valve inspection
Annually
Water leakage, Air vent.
Expansion vessel
Annually
Visual check for charge pressure abnormality,
water leakage, or corrosion.
Heater assembly
Annually
Check for appearance damage, deformation, or
loose terminal.
Flow switch
Annually
Operation check while running
Safety valve
Annually
Water leakage, Appearance check, Drainage
check.
Power source measurement (No-load voltage/
Rated operation)
Annually
Electronic voltage measurement: 230V ±23V
Operation frequency (Unit operation check)
Annually
Frequency check by rated operation
Air heat exchanger inspection (Dirt and clogging)
Annually
Visual inspection, Clear clogging
Fan inspection (Scratch, damage)
Annually
Check for scratches or damages to the fan or
abnormal motor sound
Cycle parts (Compressor, 4-way valve, Pulse motor
valve)
Annually
Operation check by trial run
Inverter control board, GMC board, Terminal block
Annually
Check for loose connector and connecting
terminal
119
SM_30AW.indd 119
30AW
14-03-2011 14:47:00
Spare Parts
9
For the spare parts refer to specific document.
120
SM_30AW.indd 120
30AW
14-03-2011 14:47:00
SM_30AW.indd 121
-25
-25
-15
-15
121
-5
1.50
2.50
3.50
4.50
5.50
6.50
7.50
COP 40-45 °C
-5
1.50
2.50
3.50
4.50
5.50
6.50
7.50
5
5
COP 30-35 °C
15
15
25
25
35
OAT [°C]
Max
Med
Min
Frequency
35
OAT [°C]
Frequency
Max
Med
Min
-25
-25
-15
-15
-5
-5
15
25
35
0.00
1.00
2.00
3.00
4.00
5.00
6.00
7.00
8.00
9.00
10.00
11.00
12.00
0.00
1.00
2.00
3.00
4.00
5
15
CAPACITY [kW] 40-45°C
25
35
OAT [°C]
Max
Med
Min
Frequency
OAT [°C]
Max
Med
Min
5.00
Frequency
6.00
5
CAPACITY [kW] 30-35°C
7.00
8.00
9.00
10.00
11.00
12.00
Extended rating
10
10 Extended rating
Size 004 Heating
30AW
14-03-2011 14:47:02
SM_30AW.indd 122
-25
-25
-15
-15
-5
-5
122
1.50
2.00
2.50
3.00
3.50
4.00
4.50
5.00
1.50
2.00
2.50
3.00
3.50
4.00
4.50
5.00
5
COP 55-60 °C
5
COP 50-55 °C
15
15
25
25
OAT [°C]
Frequency
Max
Med
Min
35
35
OAT [°C]
Frequency
Max
Med
Min
-25
-25
-15
-15
-5
-5
0.00
1.00
2.00
3.00
4.00
5.00
6.00
7.00
8.00
9.00
10.00
11.00
12.00
0.00
1.00
2.00
3.00
4.00
5.00
6.00
7.00
8.00
9.00
10.00
11.00
12.00
15
5
15
CAPACITY [kW] 55-60°C
5
CAPACITY [kW] 50-55°C
25
25
35
35
OAT [°C]
Max
Med
Min
Frequency
OAT [°C]
Max
Med
Min
Frequency
Extended rating
10
30AW
14-03-2011 14:47:03
SM_30AW.indd 123
123
35
40
45
45
50
OAT [°C]
Frequency
50
12.00
1.00
0.00
2.00
2.00
OAT [°C]
3.00
4.00
0.00
4.00
6.00
5.00
6.00
8.00
10.00
Max
Med
Min
0
5
10
0
5
10
CAPACITY [kW] 23-18 °C
0.00
7.00
12.00
30
40
8.00
25
35
14.00
30
9.00
COP 23-18 °C
25
16.00
20
20
10.00
15
15
18.00
10
10
1.00
2.00
3.00
4.00
5.00
11.00
5
5
Frequency
Max
Med
Min
6.00
7.00
8.00
CAPACITY [kW] 12-7 °C
20.00
0
0
COP 12-7 °C
22.00
24.00
0.00
2.00
4.00
6.00
8.00
10.00
12.00
14.00
15
15
20
20
25
25
30
30
35
35
40
40
45
45
50
OAT [°C]
OAT [°C]
Max
Med
Min
Frequency
50
Frequency
Max
Med
Min
Extended rating
10
Size 004 Cooling
30AW
14-03-2011 14:47:05
SM_30AW.indd 124
-25
-25
-15
-15
5
124
-5
1.50
2.50
3.50
4.50
5.50
6.50
7.50
5
COP 40-45 °C
-5
1.50
2.50
3.50
4.50
5.50
6.50
7.50
COP 30-35 °C
15
15
25
25
35
35
OAT [°C]
Max
Med
Min
Frequency
OAT [°C]
Max
Med
Min
Frequency
-25
-25
-15
-15
0.00
5
-5
0.00
1.00
2.00
3.00
4.00
5.00
6.00
7.00
8.00
9.00
10.00
11.00
12.00
5
CAPACITY [kW] 40-45 °C
-5
1.00
2.00
3.00
4.00
5.00
6.00
7.00
8.00
9.00
10.00
11.00
12.00
CAPACITY [kW] 30-35 °C
15
15
25
25
OAT [°C]
Max
Med
Min
Frequency
OAT [°C]
35
35
Max
Med
Min
Frequency
Size 006 Heating
30AW
14-03-2011 14:47:06
125
SM_30AW.indd 125
30AW
14-03-2011 14:47:08
-25
-25
-15
-15
5
-5
1.50
2.00
2.50
3.00
3.50
4.00
4.50
5.00
5
COP 55-60 °C
-5
1.50
2.00
2.50
3.00
3.50
4.00
4.50
5.00
COP 50-55 °C
15
15
25
25
35
35
OAT [°C]
Max
Med
Min
Frequency
OAT [°C]
Max
Med
Min
Frequency
-25
-25
-15
-15
0.00
5
-5
0.00
1.00
2.00
3.00
4.00
5.00
6.00
7.00
8.00
9.00
10.00
11.00
12.00
5
CAPACITY [kW] 55-60 °C
-5
1.00
2.00
3.00
4.00
5.00
6.00
7.00
8.00
9.00
10.00
11.00
12.00
CAPACITY [kW] 50-55 °C
15
15
25
25
35
35
OAT [°C]
Max
Med
Min
Frequency
OAT [°C]
Max
Med
Min
Frequency
SM_30AW.indd 126
0
126
-1.00
1.00
3.00
5.00
7.00
9.00
11.00
13.00
15.00
17.00
19.00
21.00
23.00
25.00
0.00
2.00
4.00
6.00
8.00
10.00
12.00
14.00
0
5
5
10
10
15
15
25
30
25
30
COP 23-18 °C
20
20
COP 12-7 °C
35
35
40
40
45
45
OAT [°C]
50
OAT [°C]
Max
Med
Min
Frequency
50
Frequency
Max
Med
Min
0
0.00
2.00
4.00
6.00
8.00
10.00
12.00
0.00
1.00
2.00
3.00
4.00
5.00
6.00
7.00
8.00
0
5
5
10
10
15
15
25
30
20
25
30
CAPACITY 12-7 °C
20
CAPACITY 12-7 °C
35
35
40
40
45
45
OAT [°C]
50
OAT [°C]
Max
Med
Min
Frequency
50
Max
Med
Min
Frequency
Size 006 Cooling
30AW
14-03-2011 14:47:09
SM_30AW.indd 127
-25
-25
-15
-15
5
127
-5
1.50
2.50
3.50
4.50
5.50
6.50
7.50
5
COP 40-45 °C
-5
1.50
2.50
3.50
4.50
5.50
6.50
7.50
COP 30-35 °C
15
15
25
25
35
35
OAT [°C]
Max
Med
Min
Frequency
OAT [°C]
Max
Med
Min
Frequency
-25
-25
-15
-15
0.00
5
-5
0.00
1.00
2.00
3.00
4.00
5.00
6.00
7.00
8.00
9.00
10.00
11.00
12.00
5
CAPACITY [kW] 40-45 °C
-5
1.00
2.00
3.00
4.00
5.00
6.00
7.00
8.00
9.00
10.00
11.00
12.00
CAPACITY [kW] 30-35 °C
15
15
25
25
35
35
OAT [°C]
Max
Med
Min
Frequency
OAT [°C]
Max
Med
Min
Frequency
Size 008 Heating
30AW
14-03-2011 14:47:11
128
SM_30AW.indd 128
30AW
14-03-2011 14:47:12
-25
-25
-15
-15
5
-5
1.50
2.00
2.50
3.00
3.50
4.00
4.50
5.00
5
COP 55-60 °C
-5
1.50
2.00
2.50
3.00
3.50
4.00
4.50
5.00
COP 50-55 °C
15
15
25
25
35
35
OAT [°C]
Max
Med
Min
Frequency
OAT [°C]
Max
Med
Min
Frequency
-25
-25
-15
-15
0.00
5
-5
0.00
1.00
2.00
3.00
4.00
5.00
6.00
7.00
8.00
9.00
10.00
11.00
12.00
5
CAPACITY [kW] 55-60 °C
-5
1.00
2.00
3.00
4.00
5.00
6.00
7.00
8.00
9.00
10.00
11.00
12.00
CAPACITY [kW] 50-55 °C
15
15
25
25
35
35
OAT [°C]
Max
Med
Min
Frequency
OAT [°C]
Max
Med
Min
Frequency
SM_30AW.indd 129
129
30
45
50
0.00
1.00
0.00
2.00
2.00
OAT [°C]
3.00
4.00
0.00
4.00
6.00
5.00
6.00
8.00
10.00
12.00
0
0
7.00
Frequency
Max
Med
Min
OAT [°C]
8.00
40
50
14.00
35
45
9.00
30
40
16.00
25
35
10.00
COP 23-18 °C
25
18.00
20
20
11.00
15
15
20.00
10
10
1.00
2.00
3.00
4.00
5.00
22.00
5
5
Frequency
Max
Med
Min
6.00
7.00
8.00
12.00
0
0
COP 12-7 °C
24.00
0.00
2.00
4.00
6.00
8.00
10.00
12.00
14.00
5
5
10
10
15
15
25
30
20
25
30
CAPACITY [kW] 23-18 °C
20
CAPACITY [kW] 12-7 °C
35
35
40
40
45
45
50
50
OAT [°C]
Frequency
Max
Med
Min
OAT [°C]
Frequency
Max
Med
Min
Size 008 Cooling
30AW
14-03-2011 14:47:14
SM_30AW.indd 130
-25
-25
-15
-15
5
130
-5
1.50
2.50
3.50
4.50
5.50
6.50
7.50
5
COP 40-45 °C
-5
1.50
2.50
3.50
4.50
5.50
6.50
7.50
COP 30-35 °C
15
15
25
25
35
35
OAT [°C]
Max
Med
Min
Frequency
OAT [°C]
Max
Med
Min
Frequency
-25
-25
-15
-15
0.00
5
-5
0.00
2.00
4.00
6.00
8.00
10.00
12.00
14.00
16.00
18.00
20.00
22.00
24.00
26.00
5
CAPACITY [kW] 40-45 °C
-5
2.00
4.00
6.00
8.00
10.00
12.00
14.00
16.00
18.00
20.00
22.00
24.00
26.00
CAPACITY [kW] 30-35 °C
15
15
25
25
35
35
OAT [°C]
Max
Med
Min
Frequency
OAT [°C]
Max
Med
Min
Frequency
Size 012 Heating
30AW
14-03-2011 14:47:16
131
SM_30AW.indd 131
30AW
14-03-2011 14:47:17
-25
-25
-15
-15
1.50
5
-5
1.50
2.00
2.50
3.00
3.50
4.00
5
COP 55-60 °C
-5
2.00
2.50
3.00
3.50
4.00
COP 50-55 °C
15
15
25
25
35
35
OAT [°C]
Max
Med
Min
Frequency
OAT [°C]
Max
Med
Min
Frequency
-25
-25
-15
-15
0.00
5
-5
0.00
2.00
4.00
6.00
8.00
10.00
12.00
14.00
16.00
18.00
5
CAPACITY [kW] 55-60 °C
-5
2.00
4.00
6.00
8.00
10.00
12.00
14.00
16.00
18.00
CAPACITY [kW] 50-55 °C
15
15
25
25
35
35
OAT [°C]
Max
Med
Min
Frequency
OAT [°C]
Max
Med
Min
Frequency
SM_30AW.indd 132
132
30
40
45
50
50
Frequency
Max
Med
Min
OAT [°C]
0.00
0.00
2.00
2.00
OAT [°C]
4.00
0.00
6.00
4.00
8.00
10.00
6.00
8.00
10.00
12.00
35
45
14.00
30
40
12.00
25
35
14.00
COP 23-18 °C
25
16.00
20
20
18.00
15
15
16.00
10
10
2.00
4.00
6.00
8.00
10.00
12.00
18.00
5
5
Frequency
Max
Med
Min
14.00
16.00
18.00
20.00
20.00
0
0
COP 12-7 °C
20.00
0.00
2.00
4.00
6.00
8.00
10.00
12.00
0
0
5
5
10
10
15
15
25
30
20
25
30
CAPACITY [kW] 23-18 °C
20
CAPACITY [kW] 12-7 °C
35
35
40
40
45
45
50
50
OAT [°C]
Frequency
Max
Med
Min
OAT [°C]
Frequency
Max
Med
Min
Size 012 Cooling
30AW
14-03-2011 14:47:19
SM_30AW.indd 133
-25
-25
-15
-15
133
-5
1.50
2.50
3.50
4.50
5.50
6.50
7.50
COP 40-45 °C
-5
1.50
2.50
3.50
4.50
5.50
6.50
7.50
COP 30-35 °C
5
5
15
15
25
25
35
35
OAT [°C]
Max
Med
Min
Frequency
OAT [°C]
Max
Med
Min
Frequency
-25
-25
-15
-15
0.00
5
-5
0.00
2.00
4.00
6.00
8.00
10.00
12.00
14.00
16.00
18.00
20.00
22.00
24.00
26.00
5
CAPACITY [kW] 40-45 °C
-5
2.00
4.00
6.00
8.00
10.00
12.00
14.00
16.00
18.00
20.00
22.00
24.00
26.00
CAPACITY [kW] 30-35 °C
15
15
25
25
35
35
OAT [°C]
Max
Med
Min
Frequency
OAT [°C]
Max
Med
Min
Frequency
Size 015 Heating
30AW
14-03-2011 14:47:20
134
SM_30AW.indd 134
30AW
14-03-2011 14:47:22
-25
-25
-15
-15
1.50
-5
1.50
2.00
2.50
3.00
3.50
4.00
COP 55-60 °C
-5
2.00
2.50
3.00
3.50
4.00
COP 50-55 °C
5
5
15
15
25
25
35
35
OAT [°C]
Max
Med
Min
Frequency
OAT [°C]
Max
Med
Min
Frequency
-25
-25
-15
-15
0.00
5
-5
0.00
2.00
4.00
6.00
8.00
10.00
12.00
14.00
16.00
18.00
20.00
5
CAPACITY [kW] 55-60 °C
-5
2.00
4.00
6.00
8.00
10.00
12.00
14.00
16.00
18.00
20.00
CAPACITY [kW] 50-55 °C
15
15
25
25
35
35
OAT [°C]
Max
Med
Min
Frequency
OAT [°C]
Max
Med
Min
Frequency
SM_30AW.indd 135
135
0.00
2.00
4.00
6.00
8.00
10.00
12.00
14.00
16.00
18.00
20.00
0.00
2.00
4.00
6.00
8.00
10.00
12.00
0
0
5
5
10
10
15
15
20
20
25
COP 23-18 °C
25
COP 12-7 °C
30
30
35
35
40
40
45
45
50
50
OAT [°C]
Frequency
Max
Med
Min
OAT [°C]
Frequency
Max
Med
Min
0.00
2.00
4.00
6.00
8.00
10.00
12.00
14.00
16.00
18.00
20.00
22.00
24.00
0.00
2.00
4.00
6.00
8.00
10.00
12.00
14.00
16.00
18.00
20.00
0
0
5
5
10
10
15
15
25
30
20
25
30
CAPACITY [kW] 23-18 °C
20
CAPACITY [kW] 12-7 °C
35
35
40
40
45
45
50
50
OAT [°C]
Frequency
Max
Med
Min
OAT [°C]
Frequency
Max
Med
Min
Size 015 Cooling
30AW
14-03-2011 14:47:23
Additional Informations
11
11.1 Additional information
136
SM_30AW.indd 136
30AW
14-03-2011 14:47:24
Additional Informations
11
11.1 Additional information
137
SM_30AW.indd 137
30AW
14-03-2011 14:47:25
L010129H30-0111
Via R. Sanzio, 9 - 20058 Villasanta (MI) Italy - Tel. 039/3636.1
The manufacturer reserves the right to change any product specifications without notice.
November, 2010 Supersedes October, 2008.
SM_30AW.indd 138
Printed in Italy
14-03-2011 14:47:25