1
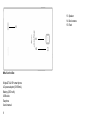
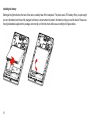
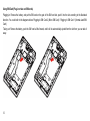
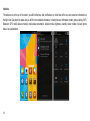
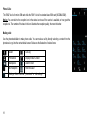
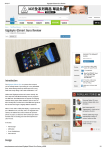
TALK 5H USER’S MANUAL 2 INTRODUCTION ............................................................................................................................................................................................... 5 GETTING STARTED......................................................................................................................................................................................... 5 Important Safety Precautions ........................................................................................................................................................................ 5 Cleaning the Panel ........................................................................................................................................................................................ 6 Cleaning the Phone ....................................................................................................................................................................................... 6 Features ........................................................................................................................................................................................................ 6 Buttons overview ........................................................................................................................................................................................... 7 What’s int he Box ........................................................................................................................................................................................... 8 Installing the battery..................................................................................................................................................................................... 10 Charging the Battery .................................................................................................................................................................................... 11 Using SIM Card (Plug-in or take out SIM cards) .......................................................................................................................................... 12 Using the Phone .............................................................................................................................................................................................. 13 Power on/off the Phone ............................................................................................................................................................................... 13 Battery saving and screen lock .................................................................................................................................................................... 13 Connecting to PC......................................................................................................................................................................................... 13 Interface....................................................................................................................................................................................................... 14 Icons on the Homescreen ............................................................................................................................................................................ 15 Icons on the status bar ................................................................................................................................................................................ 15 Settings........................................................................................................................................................................................................ 16 SIM management ..................................................................................................................................................................................... 16 Wi-Fi......................................................................................................................................................................................................... 16 Bluetooth .................................................................................................................................................................................................. 17 3 USB host .................................................................................................................................................................................................. 17 Phone Calls: ................................................................................................................................................................................................ 18 Making calls: ................................................................................................................................................................................................ 18 Call Menu .................................................................................................................................................................................................... 19 Emergency Calls:......................................................................................................................................................................................... 19 Call log......................................................................................................................................................................................................... 19 Sending Messages: ..................................................................................................................................................................................... 20 FM Radio ..................................................................................................................................................................................................... 20 Recorder: ..................................................................................................................................................................................................... 20 Stock Browser:............................................................................................................................................................................................. 21 Specification: ................................................................................................................................................................................................... 21 4 INTRODUCTION First of all, thank you very much for purchasing WayteQ product! Please read this manual carefully before using this product. This company will continue to provide new functions for the development of the product, and there will be no separate change in the case of any change in the product’s performance and functions. If the actual setup and the application methods are not identical to those as set forth in this manual, please access to the latest product information of our web site. GETTING STARTED Important Safety Precautions Always follow these basic safety precautions when using your Phone. This will reduce the risk of fire, electric shock and injury. Warning: To reduce the risk of fire of shock hazard, do not expose this product to rain or water. To prevent the risk of electric shock, do not remove the cover. There are no user-serviceable parts inside. Opening will void your warranty. Unplug the Phone before performing maintenance. Keep your Phone out of direct sunlight and heat sources. Protect the power cord. Route power cords so that they are not likely to be walked on or pinched by items placed on or against them. Pay particular attention to the point where the power cord is attached to the Phone. Only use the AC adapter included with the Phone. Using any other power adapter will void your warranty. Unplug the power cord from the outlet when the unit is not in charging condition. 5 Cleaning the Panel Treat the screen gently. The screen is made of glass and can be scratched or broken. To clean fingerprints or dust from the screen, it is recommended to use a soft, non-abrasive cloth such as a camera lens cloth to clean the screen. If you use a commercial Cleaning Kit, do not apply the cleaning liquid directly to the screen. Clean the screen with cleaning cloth moistened with the liquid. Cleaning the Phone Clean the outer surface of the Phone (excluding the screen) with a soft cloth dampened with water. Features ● Displays Alarm, Browser, Calculator, Calendar, Camera, Clock, Email, File Browser, Gallery, Music, Setting, Movie Player and etc ● Displays digital photos, Play Music and Video ● Dual SIM card support ● Wi-Fi function to connect with your AP router for internet browsing ● Micro Secure Digital™ (micro SD) slot for external storage ● Capacitive touch screen for all user operations ● 4 GB Internal Memory ● USB2.0 OTG for connection to the PC or USB flash drive 6 Buttons overview 1. Earphone 2. Volume + 3. Volume – 4. Menu 5. Home 6. Back 7. Charging LED 8. Speaker 9. Proximity sensor 10. Front camera 11. Power 12. USB 7 13. Speaker 14. Back camera 15. Flash 13 14 15 What’s int he Box WayteQ TALK 5H smart phone AC power adapter (5V/800mA) Battery (2500 mAh) USB cable Earphone User’s manual 8 9 Installing the battery Starting at the right bottom on the back of the device, carefully take off the backplane. This phone uses Li-PO battery. When you just bought your unit, the battery hasn’t been fully charged, but there is a decent amount of power in the battery to help you boot the device. Please use the original batteries supplied in the package, and correctly put it into the phone before use according to the figures below. 10 Charging the Battery Plug the AC power adapter into the Phone and into a wall outlet. Icon will turn to icon while the battery is charging. * It is strongly recommended you fully charge the device for about 5-8 hours before use. * When charging battery, the battery indicator for a fully charged battery is a steady blue battery icon on the notification bar. icon means the battery is still being charged, even when 100% has been displayed for battery level on the Settings → About phone → Status screen. Notice: Bundled charger (5V-800mAh). Please charge the device with the screen turned off. If it is charged with the screen on, there is a chance that the battery won’t be fully charged. Please do not charge the phone with a charger of 9V or 12V output, WayteQ will not be held responsible for damages resulted from false charging. 11 Using SIM Card (Plug-in or take out SIM cards) Plugging-in: Remove the battery, and put the SIM card on the gate of the SIM card slot, push it into the slot according to the illustrated direction. You could refer to the diagrams below: Plugging-in SIM Card 2 (Micro SIM Card) / Plugging in SIM Card 1 (Normal-sized SIM Card) Taking out: Remove the battery, push the SIM card a little forward, and it will be automatically ejected from the slot then you can take it away. 12 Using the Phone Power on/off the Phone To power on press and hold Power button for 2 second. Wait until a screen with a lock icon shows up, gently tap the “Lock” icon and slide it toward the unlock icon. To power off press and hold the Power button for 2 seconds until “Power off” window pops up on screen where you can choose OK option to power off the device. Battery saving and screen lock When the phone goes into battery saving mode, the display will black out and the OS will go to the lock screen. Press the power button again and the screen will be awakened. Notice: battery saving mode will only put off the display, running applications such as music player will continue to work. Notice: If the phone cracked down, you could long press the power button for 8 seconds to force a restart. Connecting to PC Boot the PC, and connect the device to the PC via the USB cable, then you can transmit data between the PC and your mobile phone. Pull down status bar at the left top of the screen. Choose „USB connected” and tap „Turn on USB storage”. Mounting as USB mass storage, then you can copy or delete files from your mobile phone with your PC. For a better use of your tablet, tap “Turn off USB storage” every time you unmount USB storage. Notice: While the mobile phone is mounted in mass storage mode, you cannot play media files on your phone. WayteQ will not be held responsible for damages resulted from this kind of false operations. 13 Interface The status bar is on the top of the screen, you will find the time, date, notifications on the left side of the bar, and connection information on the right side. Drag down the status bar you will find more detailed information, including the user information, battery sta tus, setting, Wi-Fi, Bluetooth, GPS, mobile data connection, mobile data consumption, airplane mode, brightness, standby, screen rotation lock and phone status. As is listed below: 14 Icons on the Homescreen Icons Functions Back Icons Functions Return to Home Screen Menu New devices found and recognized Time Battery Status Icons on the status bar New Message Failed to send message USB Debugging Connected Connected to PC via USB Mute No SIM card Missed Calls Bluetooth on Alarm GSM information, Roaming, No Reception Silent Downloading Music Playing Wi-Fi Connected, internet service available Calendar Notifications EDGE connected, data being exchanged New Emails Charging Airplane Mode Battery Status Speaker on 15 Settings SIM management Go to Settings -> SIM management to set working parameters of SIM cards. When using two SIM cards at the same time after tapping call icon in call log or dialer, you can choose which SIM card you want to use for the call in the appearing menu. Wi-Fi Turning on: Open the app drawer and find the Setting icon, touch to open the setting menu, slide the Wi-Fi switcher to turn on Wi-Fi. Setting Wi-Fi and Connecting to the Internet: Once the Wi-Fi is turned on, the system will automatically search for nearby SSIDs as illustrated: Touching the SSID you need to connect to, for example, the “CUBE_4”, then it will require you to put in the password, click “connect” once you put in the correct password. The system will help you obtain the IP address. Once it is successfully connected, you will see a connected icon in the status bar. 16 Bluetooth The screen will display the names of the other Bluetooth devices, which are normally the models of the devices, and you can rename them according to your individual needs. Once you found the other Bluetooth devices, you can touch to pair it with your phone. Once the pairing request is granted by the owner of the other device, you will be able to send files to or receive files from the paired device without consuming your mobile network flow. USB host Mounting a USB flash disk: Connecting the USB disk to your mobile phone via OTG cable (not included), and open the file explorer app to use the USB flash. 17 Phone Calls: The “SIM2” slot is for micro SIM card while the “SIM1” slot is for standard sized SIM card (WCDMA/GSM). Notice: You can refer to the reception icon in the status bar to see if the service is available, or how good the reception is. The number of the bars in the icon illustrate the reception quality, the more the better. Making calls: Use the phonebook/dialer to make phone calls. You can make a call by directly selecting a contact from the phonebook or go into the contact detail screen. Below are the illustration of related icons: Dialer Call Log Phonebook Display Similar Contact Backspace Dialer Screen No Reception Hide the Dialer Settings: Select “fast dial”, “phonebook” or “call settings”. 18 Call Menu Touch to answer a phone call. If you are wearing a headset, you can press the button on the headset to answer. Touch or press the power button to reject a phone call. If you are wearing a headset, you can press and hold the button to reject. When you are not available for answering a phone call, you can drag the ring upward to the message button, and the phone will automatically send a message to the number of the incoming call. Contact Avatar Hang up Emergency Calls: If you are within the service range of GSM mobile network, you should be able to make emergency calls, even if there isn’t any SIM card in your phone. Call log Incoming Call Missed Calls Successfully Made Incoming Call Answered Touch to delete call records or go to call settings Touch to make fast call Search for Contact Notice: You can see the numbers or the contacts’ names of missed incoming calls by opening the notification panel or the dialer. Other operations: touch a call record to make a phone call, or save as a new contact, or send a short message, or make a video call, or delete it from the call log. 19 Sending Messages: You can send or receive text messages while you are within the service areas. You can also choose to send multimedia messages to anyone with a phone number. To manage messages tap icon. FM Radio Touch the icon in the app drawer to launch the FM radio app (you can only use the FM radio with a headset plugged in). : Search / Speaker / FM recording : Switching to the previous / next frequency range, there may or may not be any program. : Switch to the previous / next channel. Notice: 1. Pentagram before the channel means it is added as favorite. Favorite channels appears on the top of the list. 2. Channels which don’t have a pentagram before them are not added as favorite, they are just automatically found by search. Recorder: Touch the to launch the recorder, press to start recording, press to stop. Touch to play the audios just recorded. Playing the recorded audio: the stock music player app will automatically find the recorded audio, if not, you can use the file explorer to find the piece. 20 Stock Browser: When the phone is connected to mobile network or Wi-Fi, you can launch the stock browser app to visit webpages. You can type the web address into the address bar, and then touch “visit” to load the content of the webpage. Specification: CPU RAM ROM FM Bluetooth Wi-Fi Network Frequencies: Display Touchscreen MIC Speaker Vibrating Motor Sensors SIM Slot GPS OTG Earphone MT6589 Quad-core Cortex-A7 processor 1GB 4GB Yes Bluetooth V4.0 Wi-Fi 802.11b/g/n WCDMA/GSM WCDMA: 2100MHZ, GSM: 900MHZ + 1800MHZ 5.5-inch IPS display, 1280*720 Capacitive 5-point Yes (For recording and phone calls) High quality stereo speaker Yes Light Sensor for auto-brightness adjusting, Proximity Sensor, G-Sensor. Dual SIM/dual standby. Standard-sized SIM card and Micro SIM card. (Hot-plug not supported) Yes Yes, connected to USB flash disks and input devices 3,5mm 21 Operating System Cameras Battery Battery Life SNR Dimensions Weight 22 Android 4.1 Front-facing 1.3MP camera and rear-facing 8.0MP camera with auto-focus support 2500 mAh SIM plugged in battery life approx 330h Audio playback battery life approx 30 hours Video playback battery life approx 4.8 hours (Notice: Above are the standard test results, actual battery life may vary according to the environment and the audio/video files being played) Above 95db 154.2*78.6*9.5MM 200g 23 wayteq.eu 24