1
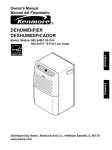
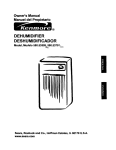
Owner's Manual
Manuel del Propietario
®
DEHUMIDIFIER
DESHUMIDIFICADOR
Model, Modelo 580.54501
580.54701
50 Pint
70 Pint Low Temp
Sears, Roebuck and Co., Hoffman Estates, IL 60179 U.S.A.
www.sears.com
TABLE OF CONTENTS ................................ 2
OPTIONS FOR DISPOSING
WARRANTY ..................................................
OF COLLECTED WATER ............................. 8
SAFETY INSTRUCTIONS
2
MAINTENANCE
............................ 3
ELECTRICAL REQUIREMENTS
.................. 4
INSTALLING YOUR DEHUMIDIFIER .............. 5
6
Control Panel ...........................................
7
9
Air filter .....................................................
9
9
Water bucket cleaning .............................. 9
AUTOMATIC SHUT OFF .............................. 5
Features ...................................................
Grille and case .........................................
General cleaning ......................................
CHOOSING THE PROPER LOCATION ....... 5
6
9
Cleaning inside the unit ............................ 9
Defrost Control Function .......................... 5
OPERATION .................................................
............................................
TROUBLESHOOTING
................................ 10
ESPAIqOL ...................................................
11
MASTER PROTECTION AGREEMENTS ...23
SERVICE NUMBERS .................... Back cover
FULL ONE YEAR WARRANTY
ON DEHUMIDIFIER
For one year from the date of purchase, if the Dehumidifier is operated and maintained
according to the owner's instructions furnished with the product, Sears will repair the
Dehumidifier free of charge, if defective in materials or workmanship.
FULL FIVE YEAR WARRANTY ON SEALED
REFRIGERATION
SYSTEM
For five years from the date of purchase, when this Dehumidifier is operated and maintained according
to owner's instructions furnished with the product, Sears will repair the sealed refrigeration system
(consisting of refrigerant, connecting tubing, and compressor motor) free of charge, if defective in
material or workmanship.
WARRANTY SERVICE IS AVAILABLE BY RETURNING UNIT TO THE NEAREST SEARS
SERVICE CENTER IN THE UNITED STATES. CALL 1-800-4-MY-HOME e FOR NEAREST
SERVICE CENTER TO YOU,
This warranty applies only while this Dehumidifier is used in the United States.
This warranty gives you specific legal dghts, and you may also have other dghts which vary from state to
state.
Sears, Roebuck and Co., D/817WA, Hoffman Estates, IL 60179 U.S.A.
-2-
A
IMPORTANT
SAFETY INSTRUCTIONS
To reduce the risk of fire, electric shock or injury when using your dehumidifier,
safety precautions must be followed:
the following
• Do not block the inlet or outlet.
• Do not place the power cord near a heater.
It may cause fire and electric shock.
It may cause failure of appliance or performance
deterioration.
• Do not use the power cord near flammable gas
or combustibles such as gasoline, benzene,
thinner, etc.
It may cause explosion or fire.
• Hold the plug by the head when taking it out.
Otherwise, it may cause electdc shock and damage.
• Turn off the main power switch when not using
the dehumidifier for a long time.
Turningoffthe unitwillsave on energycosts.
• Do not disassemble or modify products.
It may cause electric shock and failure.
• Plug in the power cord properly.
Otherwise, it may cause electdc shock or fire.
• Make sure the dehumidifier is the correct size
for the area you want to dehumidify.
It is net designedto dehumidifythe entire house.
• Do not operate or stop the unit by inserting or
pulling out the power plug.
It may cause electric shockor fire.
• Install the dehumidifier properly only on a floor.
For properoperation,yourdehumidifiershouldbe
installed only on a floor.
• Do not damage the power cord or usa an
unspecified power cord.
It may cause electric shockor fire.
• Close all doors, windows and other outside
openings to the room.
The dehumidifier must be operated in an enclosed area
to be most effective.
• Do not modify power cord length.
It may cause electric shockor fire
• When removing the filter be aware that some
metal parts may have sharp edges.
Sharp edges may cause injury.
• Do not share the outlet with other appliances.
it may cause electric shock or fire.
• Always plug into a grounded outlet.
Not grounding unit may cause electdc shock.
• Use a soft cloth to clean. Do not use wax,
thinner, or a strong detergent.
The appearance of the dehumidifier may detedorate,
change color, or develop surface flaws.
• Unplug the unit if strange sounds, odors, or
smoke come fi'om it.
Unplugging the unit may avoidelectdc shock or fire
hazard.
• Be sure to replace the bucket properly after
emptying to prevent water from collecting on
the floor.
Otherwise, it will cause property damage.
• Do not use the socket if it is loose or damaged.
It may cause fire and electric shock.
• Do not operate with wet hands or in damp
environment.
It may cause electric shock.
• Ventilate before operating defumidifier when
gas goes out.
It may cause explosion, fire, and bum.
• The 50 pint model(54501) may not operate
efficiently if the room temperature is below
65"F(18°C). The 70 pint Low Temperature
model(54701) may not operate efficiently if the
room temperature is below 42"F(6"C).
Low temperatures could cause coils to frost.
• Do not clean the dehumidifier with water.
Water may enter the unit and degrade the insulation. It
may cause an electdc shock.
• Do not put a pet or house plant where it will be
exposed to direct air flow.
Thisc0uid injurethe pet or plant.
• Unplug unit before cleaning the unit.
Since the fan rotates at high speed during operation, it
may cause injury.
• Do not use the water collected in the bucket for
drinking purposes.
It is not sanitary and could cause illness or personal
injury.
• If water enters the product, turn off the
dehumidifier's power switch, then unplug the
unit. Contact service for repair.
It will cause machine failure or electric shock.
• Insert the filter securely. Clean it every two
weeks.
Operation withoutfilterswill cause unit failure.
• Do not allow children to play with this product.
-3-
/
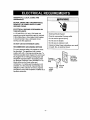
OBSERVE ALL LOCAL CODES AND
ORDINANCES.
DO NOT, UNDER ANY CIRCUMSTANCES,
REMOVE THE POWER SUPPLY CORD
GROUND PRONG.
ELECTRICAL GROUND IS REQUIRED ON
THIS APPLIANCE.
A 115-volt 60 Hz, AC only, 15A fused and
properly grounded electrical supply is required.
A time delay fuse or time delay circuit breaker
is recommended. Use a dedicated circuit,
serving only this appliance.
Electrical Shock Hazard
Plug into a grounded 3 prong outlet.
Do not remove ground prong.
Do not use an adapter.
Do not use an extension cord.
DO NOT USE AN EXTENSION CORD.
RECOMMENDED
GROUNDING
Failure to follow these instructions can result
in death, fire, or electrical shock.
METHOD
For your personal safety, this appliance must
be grounded. This appliance has a power
supply cord with a 3-prong grounding plug. To
minimize possible shock hazard, the cord must
be plugged into a mating grounding type wall
receptacle and grounded in accordance with
the National Electrical Code (ANSI/NFPA 70)
latest edition and all local codes and
ordinances. If a mating wall receptacle is not
available, it is the personal responsibility and
obligation of the customer to have a properly
grounded 3-prong wall receptacle installed by a
qualified electrician.
-4-
[_3-prong
3 ron
-P g
grounding
plug
_ _
_[_'1
Power ---47
supply
cord
_
Ill
i=\._
_J
Ground
prong
t
ii
I
grounding
tvoewall
---
receptacle
• Installthedehumidifier
ona levelfloorstrongenough
to
supporttheunitwitha fullbucketofwater.
• Forbestperformance,
allowatleast12-18inchesofair
spaceonallsidesoftheunitforgoodaircirculation.
•Keepalloutsidedoors,windows,and
otheropenings
closed
whenoperating
thedehumidifier.
Humidoutdoorairwilladd
totheunit'sworkload.
• For maximum efficiency,install your dehumidifier in an
area where the temperature wil not fall below 65
degrees °F.
• At temperature below 65 degrees °F,(floor level) the
evaporator coils will becomes covered with frost,
reducing dehumidification performance.
(t8'C)
Defrost Operation
The dehumidifier has a built-in defrost control that
senses frost built up on the evaporator coils.During
defrost the 50 pint (54501)will turn the compressor
off, keeping the fan on to defrost the coils.The 70 pint
(54701 low temp model) compressor continues to run
and turns the fan off,(70 pint uses a refrigerant
reversing valve to enhance defrost performance).
65'F
(18"C1
65"F
• Use the dehumidifier in a basement to help
prevent moisture damage.
• Use the dehumidifier in cooking, laundry,
bathing, and dishwashing areas that have
excessive moisture.
• Use the dehumidifier to prevent moisture
damage anywhere books or valuables are
stored.
• When the bucket is full, or when the bucket is not in the proper position, the Bucket Full light turns on
and the unit automatically shuts off.
Also, when bucket is out of position, the unit will beep 3 times.
• The bucket must be replaced in the proper position for the dehumidifier to work. The light will
be on and the dehumidifier will not run if the bucket is not in the proper position,
• The dehumidifier will shut off once the desired humidity setting is reached,
-5-
H
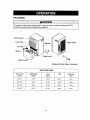
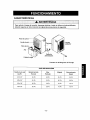
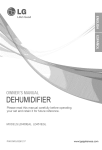
FEATURES
Control
Front Grille
Grille
Cabinet
Air Filter
Handle
Water bucket
Power cord
(Optional)
Drain Hose Connector
SELECTION GUIDE
Room Size
(sq-ft)
Moderately
Damp
Very
Damp
Wet
Extremely
Wet
22'x 22'
35 Pt
35 Pt
35 Pt
35 Pt
30'x 30'
35 Pt
35 Pt
50 Pt
50 Pt
30'x 50'
50 Pt
50 P[
50 Pt
70 Pt
40'x 50'
50 Pt
50 Pt
70 Pt
70 Pt
-6-
7
4
3
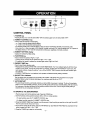
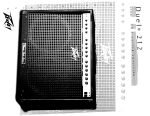
CONTROLPANEL
1. POWER key
Pressing this key once turns the dehumidifier "ON" and pressing againturns the dehumidifier "OFF".
2. HUMIDITY CONTROL keys
Press to select the desired humidity setting.
• /_. : Used to raise the desired humidity setting.
• V : Used to lower the desired humidity setting.
• The desired humidity can be selected within e range of 35% to 70% Relative Humidity in increments of 5%.
• If you press the V key once again at 35% Relative Humidity, continuous "On" mode is selected and "On" appears in
the display window. In "On" mode the unit operates continuously, regardless of humidity conditions.
3. HUMIDITY
SETTING
display
Displaysthe selected humiditysetting.
4. FAN SPEED key
Press to set the fan speed as "High" or "Low".
• Pressingthiskey changesthe fan speed from High--, Low --, High.
• The selected fan speed is indicatedbyindicatorlightsmarked "High" and "Low'.
5. ENERGY TIMER key
Press to selecttimedoperationcycle.
• Pressing this key selects EITHER THE 3 OR 6 HOUR TIMER MODE. The Timer indicatorlightwill shiftfrom3 hour
On/Offto 6 hour On/Off. The unitwill run for either 3 or 6 hours,andthen shutoff completely for 3 or 6 hours. The
cyclerepeats untilyouchange the setting.To turn offthe ENERGY TIMER function, press key untilindicatorlights
are both "Off".
• If ENERGY TIMER function is not selected, unit operates until desired humidity setting is reached.
6. BUCKET FULL Indicator
Thislight glows when the bucket is full and needs to be emptied. It also glows when the bucket is not properly
positioned. When bucket full indicator light glows, the compressor and fen will tum "OFF".
7. AUTO RESTART
• The Auto Restart function automatically restarts your dehumidifier once power is restored. The fan will immediately
begin to run for approximately 2 minutes, and the unit will operate at the previoushumidity setting. After two minutes,
the compressor may also start based on the humidity conditions in the room. Once the target humidity setting is
reached, the fan and compressor will shut off.
TO OPERATE THE DEHUMIDIFIER:
1. Plugthe power cord into the electdceloutlet. Press the POWER key.
2. Set the Humiditycontrolanywherebetween 35% to 70% for normal operation.
• For less humidity,pressthe V HUMIDITY CONTROL key.
• For higher humidity, presstheA HUMIDITY CONTROL key.
3. Pressthe ENERGY TIMER key if desired,to set the amount of timefor whichyouwantthe unit to cycle On andOff.
The time can be set for3 hoursor 6 hours.
4. If youwant to changethe fan speed,pressthe FAN SPEED key. Each time the FAN SPEED key is pressedthe fan
speed changesfrom High _ Low -, High.
5. Press the POWER keyto stop the unitmanually.
-7-
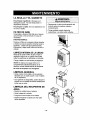
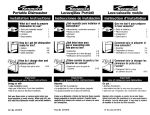
EMPTYING THE BUCKET
MANUALLY
USING A GARDEN
1. When the bucket is full, slide it out by
grasping the handle and emptying it into a
large sink or tub, and then replace it
properly. See Figure 1.
You have the option of attaching a garden hose
to your dehumidifier to drain water later than
using the water bucket.
HOSE
The empty water bucket must still be installed
for the dehumidifier to operate.
2. Empty the bucket when the indicator light
turns on.
Attach hose prior to initial operation.
3. Do not remove the bucket while the
dehumidifier is operating.
Moving the bucket can cause water to drop
on the base pan or the floor.
First, remove the drain hole cover on the rear
grille. Use needlenose pliers to pull the drain
hole cover out. Figure 2.
Next, connect a garden hose to the threaded
end of the drain hose connection, being careful
not to overtighten the hose.
4. Carry the bucket by supporting it from the
bottom as well as by the handle.
Carrying by only the handle may cause the
handle or bucket cover te break.
Slide
drain
stem
Push
out the bucket. Look into the dehumidifier
hole on the rear grill. You will see the
that the drain hose connector fits into.
the connector firmly into the stem.
Make sure that the garden hose is not bent or
kinked. The hose should lie flat from the
dehumidifier to the drain.
When not in use, the drain hose connector can
be stored in the water bucket.
Lilt the cover off the water bucket and place the
connector into the V shape grooves directly
below the bucket handle.
An optional drain hose (#9181) is available for
purchase through Sears Retail stores.
Figure 1
DRAINHOLE COVER
(OPTIONAL)
DRAIN HOSE
CONNECTOR
/
TAKE OUT
INSERT
(OPTIONAL)
DRAIN HOSE
CONNECTOR
Figure 2
-8-
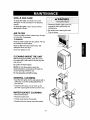
GRILLE AND CASE
To clean the case: Use water and a mild
detergent. Do not use bleach or an abrasive
cleaner.
• Disconnect power supply cord from
receptacle before performing any
maintenance.
To clean the grille: Use a vacuum with an
attachment or brush.
• Be careful when cleaning the coils.
Fins are sharp.
AIR FILTER
Check and clean air filter at least every 30 days
or more often if necessary.
TO REMOVE:
Remove water bucket from the cabinet. Pull out
the air filter as shown above.
Wash air filter with warm water and a mild
detergent. Rinse and dry it.
Once dry, replace in unit.
CLEANING
INSIDE THE UNIT
After removing the air filter, clean the coil on
the inside with a soft brush to remove any soft
and wet soil.
Be careful of Sharp Edges]
NOTE: Do not allow water to enter the
electrical/machine compartment through the
circular opening behind the coil
Do not spray the coil with a hose.
GENERAL
CLEANING
• Dust the front grille and the side panels with a
soft brush or use the dusting attachment of
your vacuum.
• If cabinet paint chips, you can touch up the
paint with a good grade enamel to prevent rust.
WATER BUCKET
CLEANING
• Slide out the bucket.
• Remove bucket cover.
• Put the cover back on the bucket.
• Bucket should be cleaned every few weeks.
-9-
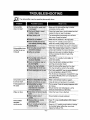
The dehumidifier may be operating abnonmally when:
Dehumidifier
does not start
m_e)aeh_mOi_e_
i • Make sure the dehumidifier pug s pushed
completelyinto the outletl
-,-(3beck tile house-fuseorc_rc-uit
L_reaker
boxand
Ii Bu_k_ is _
in___tai_ed;
• Make sure the bucket is in the dght place.
;11
ly-ie_-is/;_
• Press the _ humidity control button to
lower the humidity setting below room level.
• Unit has 2 minute delay once power is restarted.
Dehumidifier does
not dry the air as
it should
II Oi8 _t al]_ e_h
;re_
_ _isi_e
Dehumidifier seems
to run too much
II_de_=s_rge
Frost appears on
the coils
i B_ifl_
; _!_ _i_
lime _
• When first installed, allow at least 3 or 4 days to
achieve and maintain the desired dryness.
• Referto the Selection Gude on page 6.
• Close all doors and windows t-ot-h-eoutside.
_
_e_
• This is normal. Frost will usually disappear within
• 60 minutes.
Ensure that the room temperature is at the
minimum of 65"F(18°C) or 42"F(6'C).
F(6°ci
Water on floor
Dehumidifier
operates
continuously
• Press @ toraisehumiditysettng o 35%or above
.............................
i R_m H#_it':li_hi_tha_
• Press the @ humidity control button to change
the humidity higher setting than room level,
highest humidity is 70%.
-10-
iNDICE DE MATERIAS ................................ 11
GARANTIA ..................................................
OPCIONES PARA LA ELIMINACiON DEL
AGUA CREADA ............................................ 17
11
MANTENIMIENTO
INSTRUCCIONES DE SEGURIDAD .............. 12
...................................... 18
REQUERIMIENTOS ELI_CTRICOS ............ 13
La rejilla y el gabinete .............................. 18
INSTALACI6N DEL DESHUMIDIFICADOR ... 14
Filtro de aire .......................................... 18
Control de descongelamiento ................. 14
Limpieza intema de la unidad ................ 18
SELECClON
Limpieza General ................................... 18
DEL LUGAR ADECUADO ...14
APAGADO AUTOMATICO .......................... 14
FUNCIONAMIENTO
Caracteristicas
Limpieza del recipiente de agua ............. 18
.................................... 15
SOLUCION DE PROBLEMAS .................... 19
....................................... 15
ACUERDOS DE PROTECCION
ESPECIALtZADA .......................................... 23
Panel de control ...................................... 16
PARA PEDIRSERVICIO.................Cubierta Trasera
UN AI_IO DE GARANTiA EN TODAS LAS PARTES DEL
DESHUMIDIFICADOR
Durante un aSo a par_ir de la compra, si el deshumidificador es usado y mantenido de acuerdo con
las instrucciones del usuario adjuntas o suministradas con el aparato, Sears reparar_ el
deshumidificador sin costo alguno si 6ste muestra defectos en los materiales omano de obra.
CINCO ANOS DE GARANTiA COMPLETA EN EL SISTEMA DE
REFRIGERACION
Durante cinco aSos a partir de la compra, si el deshumidificador es usado y mantenido de acuerdo
con las instrucciones del usuario adjuntas o suministradas con el aparato, Sears reparara el
sistema de refrigeraci6n sellado (el cual consta de refrigerante, los tubos conectores y el motor
compresor) si _ste muestra defectos en los materiales o mano de obra.
SE OFRECE SERVIClO DE GARANTiA AL REGRESAR LA UNIDAD AL CENTRO DE
SERVICIO SEARS MAS CERCANO EN TODOS LOS ESTADOS UNIDOS. LLAME
1-800-4-MY-HOME ® PARA A MAS CERCANO CENTRO DEL SERVICIO A USTED.
Esta garantia s61otiene validez mientras el deshumidificador se est_ usando en los Estados Unidos.
Esta garantia le confiere derechos legales especificos, pero usted podria gozar de otros
derechos que pueden variar de Estado a Estado.
Sears, Roebuck
and Co., D/817WA,
Hoffman
-11 -
Estates,
IL 60179 U.S.A.
A
IMPORTANTES
INSTRUCCIONES
DE SEGURIDAD
Pars reducir el riesgo de incendio, descarga el6ctrica o lesion al utilizar su deshumidificador
deber_n seguirse en rode memento las siguientes precauciones de seguridad.
• No coloque el cable de alimentaci6n cerca de una
estufa.
Podria producirse un incendio y una descarga electdca.
• No utilice el cable de alJmentaci6n cerca de gas
inflamable o combustibles, come gasolina, benceno,
disolvente, etc.
Podria producirse una explosibn o incendio.
• No desmonte ni modifique los productos.
Puede causar una descarga el6ctrica
• Enchufe el cable de alimentaci6n adecuadamente.
De Io contrario, puede ocasionar un incendio o una
descarga electrica.
• No encienda ni apague la unidad insertando o
retirando la clavija.
Causar_ una descarga el6ctrica o incendio
• No dafie el cable ni utilice un cable de slJmentaci6n
no especificsdo.
Podria producirse unadescarga electrica o incendio.
• No modifique la Iongitud del cable de alimentacidn.
Causara una descarga el_ctrica o incendie.
• No comparta el enchufe con otros aparatos.
Causara una descarga el6ctrica o incendio.
• Realica siempre la conexi6n aun enchufe con toma
de tierra.
Si no hay toms de tierra, podria producirse una
dsscarga electdca.
• Desenchufe la unidad si emits un sonido extral_o,
olores o humo.
Desenchufar la unidad puede evitar el riesgo de
descargas el_ctricas o de incendios.
• No utilice el enchufe si est:_flojo o dafiado.
Pedalsproducirseunadescarga el6ctricao incendio.
• No utilice la unidad con las manes mojadss o en un
entorno h0medo.
Puede causar una descarga el_ctrica o incendio.
• Si hay una fuga de gas, ventile la habitaci6n antes de
utilizar el deshumidificador.
Podria producirse una explosi6n, incendioy
quemsduras.
• No limpie el deshumidificador con agua.
E[ agua podria introducirseen la unidad y degradar el
aislamiento. Podria producirse una descarga el6ctdca.
• Desenchufe la unidad antes de limpiarla.
Come el ventilador gira aalts velocidad duranteel
funcionamiento, podrlan producirse lesiones.
• Si entra agua en el producto, apague el interrupter
del deshumidificador y, a continuaci6n, desenchufe
la unidad. P6ngase con contacto con el centre de
servicio para tareas de reparaci6n.
Causara fallo de la maquina o descarga electrica.
-12-
• No bloquee la entrada ni la salida.
Puede causar fallas de aplicaci6no deterioro en su
mndimiento.
• Sujete la clavija per la cabeza cuando la saque.
De Io contrario,podris ocurriruna descargaelbctricay
dar_os.
• Apague el interrupter de contacto cuando no vaya a
utilizar el deshumidificador durante un largo periodo
de tiempo.
Apagar la unidad ahorrara gasto en energia.
• Aseg,',rese de que el deshumidificador tiene la
capacidad adecuada para la zona que desea
deshumidificar,
No esta dise_adopars enfriar la casa entera.
•Instale el deshumidificador en el suelo debidamente.
Para un funcionamiento adecuado, su deshumidificador
se deberia instalar 0nicamente on el suelo.
• Cierre todas las puertas, ventanas y aberturas al
exterior de la habitacibn.
Para una mayor eflcacia,el deshumidificadordebe
utilizarseen una zona cerrada.
• AI extraer el filtro, sea consciente de que las piezas
met_licas pueden tener bordes afilados.
Losbordesafllsdospuedenprovocarlesiones.
• Utilice un pare suave para limpiar la unidad. No
utilica cera, disolvente ni un detergente fuerte.
Podria detedorarseel aspectodel deshumidificador,
cambiarel color o producirse desperfectos en su
superfide.
• Asegurese de reemplazar la cubeta debidamente
cuando vaya a vaciarla psra evitar que el agua caiga
al susie.
De Io contrario, se causaran danes a la propiedad.
• El modelo de 50 pintas (54501) tal vez no funcione
con eficiencia si la temperatura de la sals est_ per
debajo de los 65°F(18°C). El modelo de 70 pintas
(54701) tal vez no funcione con eficiencia si la
temperatura de la sala est', per debajo de los
420F(6°C).
Las bajastemperaturaspodrianproducirescarchaen
losserpentines.
• No coloque ningdn animal o planta expuestos al flujo
de aire directo.
Esto podria lesionar al animal o danar la planta.
• No utilice el agua acumulada en la cubeta para beber.
No es salubre y podria causar enfermedades oponer
en desgo su salud.
•Inserte el filtro con seguridad. Limpielo cada dos
semanas,
Ponerla unidaden marcha sinflltrosprovocardfsllos
en la unidad.
• No permita que los nifios jueguen con este producto.
RESPETE TODOS LOS CODIGOS Y
REGLAMENTOS.
BAJO NINGUNA CIRCUNSTANCIA CORTE,
QUITE O EVITE EL use DE LA CONEXION
A TIERRA DE ESTA CLAVIJA.
ESTE APARATO NECESITA SER
CONECTADO A TIERRA.
Se requiere una alimentaci6n el6ctdca CA,
adecuadamente conectada a tierra con un
fusible de 15 A, de 60 Hz y de 115 V. Se
recomienda un fusible de retardo o un
disyuntor de circuito que alimente solamente a
este aparato.
NO USE CABLE ELI_CTRICO DE
EXTENSION.
METODO RECOMENDADO
TIERRA
DE CONEXION A
Per su propia seguridad este aparato debe
cenectarse a tierra. Este aparato viene
equipado con un cable de alimentaci6n y una
clavija de tres terminales. Para reducir al
m&ximo el peligro de cheque el6ctrico, el cable
debe estar conectado a una conexi6n de pared
con conexi6n a tierra, y esta conexi6n debe
hacerse de acuerde con la 61tima edici6n del
Peligrode chequeel6ctrico
Conecteen una conexi6nde paredde 3 terminales
Noquite la terminal de conexi6na tierra
No use adaptadores
No use cableel6ctricode extensi6n
Si no se siguenestas instrucciones,puerie
ocasionarsela muerte,un incendioo un cheque
el_ctdco.
Cable de-alimentaci6n con
clavija dotada de
conexi6n a tierra
de 3 terminales.
Toma de corriente
de pared con
conexi6n a tierra.
C6dige EI6ctrico Nacional (ANSI/NFPA 70), as{
come con los c6digos y reglamentes locales. Si
no existe una conexi6n de pared adecuada, el
cliente tiene la responsabi[idad y la obligaci6n
de mandar instalar, con un electricista
calificado, una conexi6n de pared adecuada de
tres terminales con conexi6n a tierra.
-13-
_'_"_._"l
"'-J
II
Terminal de
r
_
conexi6n a tierra.
Bajo ninguna
circunstancia corte, quite o
evite el use de la conexi6n
a tierra de esta clavija.
• Instaleel deshumidificadoren un pisoniveladoIo suficientemente
s61idocomo parasoportarla unidadcon el recipienteIlenode
agua.
• Para Iograrun m_ximorendimiento,deje un espaciolibre de 12 a
18 pulgadaen todoel espacioque circundeal aparatoconobjeto
de manteneruna buenacirculaci6nde aire
• Mantengatodaslas puertas,ventanasy otrasentradasde aire
cerradasal operarel deshumidificador El aire hL_medo
del
exteriorhar_ique el aparatotrabajeen exceso
° Para unaeficaciamaxima,instale su
deshumidificadoren un sitiodonde la temperaturano
bajede los 65 °F (18 °C )
• A temperaturaspot debajode 65 °F (18 °C) (a nivel del
suelo), la bateffadel evaporadorse cubrir_de escarcha,
disminuyendola capacidadde deshurnidificaci6n.
Proceso de desescarche
El deshumidificadorIlevaintegrado
uncontrolde
desescarcheque detectala aparici6nde escarchaen
la bateriadel evaporador
Duranteel desescarcheen el modelode 50 pintas
(54501)se aparagar_,el compresor,manteniendo
el ventiladoren marchapara desescarcharla bateria
En el modelode 70 pintas( 54701modelabaja
temperatura) el compresorcontinunaen marchay se
apaga el ventilador(el modelo70 pintasa utilizauna
v_,lvulade cuatrovfaspara el procesode desescarche)
• Useel deshumidificadoren un s6tanopara ayudara evitar los
da_osque causa la humedad
• Use el deshurnidificadoral cocinar,al lavarla ropa,al baSarseyen
lugaresen que lavala vajilla en que haydemasiada humedad
• Use el deshumidificadorpara evitarlos daSosque causa la
humedaden librosy objetosvaliososalmacenados.
• Cuando el cubo esta repleto, o cuando el cubo no esta en la posicion apropiada, el Cubo
Repleto ligero prende y la unidad apaga automaticamente.
Tambien, cuando cubo es fuera de posicion, la unidad hace pip pip 3 times.
• La cubeta debe ser re=ubicado en la posici6n apropiada para que el deshumedecedor
funcione. La luz sera encendida y el deshumedecedor no funcionar6 si la cubeta no est6
en la posici6n apropiada.
• El deshumidificador
se apagar6 cuando se alcance la humedad deseada.
-14-
CARACTERiSTICAS
ADMERTENClA
!
Para reducir el riesgo de incendio, descarga el6ctrica o lesi6n al utilizar su deshumidificador,
I deber&n seguirse
en todo momento las siguientes precauciones de seguridad.
I
Panel de control -Parrilla
Carcasa
- Parrilla
posterior
Filtro de aire
alimentaci6n
Cubeta de agua
Cable de
Conector de la Manguera de Drenaje
GUiA DE SELECUiON
Tamafio de la sala
(sq-ft)
Moderademente
H0medo
Muy
H0medo
Mojado
22'× 22'
35 Pt
35 Pt
35 Pt
35 Pt
30'x 30'
35 Pt
35 Pt
50 Pt
50 Pt
30'x 50'
50 Pt
50 Pt
50 Pt
70 Pt
40'x 50'
50 Pt
50 Pt
70 Pt
70 Pt
-15-
Extremedameute
Mojado
6
5
PANELDE
4
7
3
CONTROL
1. Tecla POWER
Si pulse una vez esta teda, el deshumidificadorse enciende, "ON", y si la vuelve a pulsarel deshurnidificador
se
apaga, "OFF'.
2. Teclas HUMIDITY
CONTROL
Pulsepara selecoionarel ajuste de humedaddeseado.
• A : soutilizepare aurnentarel ajuste de humedaddeseado.
• V : se utilizepara disminuirel ajuste de humedad deseado.
• La humedad deseada puede seleccionarsedentin de unos pardrnetros quevayan de135% a170% de humedad
relativeen incrernentesdel 5%.
• Si pulse la tecla V una vez rnas a 35% de HurnedadRelativa, se selecdonarael mode "ON" continuadoy "ON"
aparecer_en la ventanade visualizaci6n.En rnodo"ON", la unidadfunciona_ continuarnente,sinque irnportenlas
condicionesde hurnedad.
3. Visualizador
HUMIDITY
SETTING
Se visualizeon pantalla el ajuste de humedadseleccionado.
4. Tecla FAN SPEED
Pulsepara ajustarla velocidaddel ventiladoren "High"(alta) o "Low" (baja).
• Si pulsa esta tecla la velocidaddel ventiladorcambiado High-, Low -, High.
• La velocidaddel ventiladorselecoionadase indica rnediante pJlotosconla indicaci6n"High" y "Low".
5. Tecla ENERGY TIMER
Pulsepare seleccionarel ciclode operaci6nprogramado.
• Pulsaresta tecla hardque se selecoioneEL MODe DE 3 6 6 HORAS DEL TEMPORIZADOR.
La luz indicadoradel temporizadorcambiarade las 3 boresencendido/apagadoalas 6 horas encendido/apagado.
La unidadfuncionara 3 6 6 horasy, seguidamente,se apagar_ totalrnenteotras 3 6 6 horas.El ciclose repitehasta
quecambieel ajuste.
• Si no se ha selecoionadola funci6n ENERGY TIMER, la unidadfuncionara haste alcarzarel ajuste de humidad
deseado.
6. Indicador BUCKET FULL
Este piloto se iluminacuandola cubetaestd Ilenayes necesariovaciaria. Tambi6nse ilurninacuandola cobeta no
est_ colocadacorrectamente.Cuandoel pilotode cubeta nena se ilumina,seapaga el compresory el ventiIedor.
7. AUTO RESTART
La funci6n de reinicioautorn_ticoreiniciaautomaticarnentea su aparatodeshumidificadorunavez que regrese ta
alimentaci6n.El ventiladorcornienza a funcionar inmediatarnenteunos 2 rninutosy la unidadfunciona segt_nel aJuste
de hurnedadanterior.Transcurridos2 minutes, el compresortarnbi6npuede arrancar calculandolas condicionesde
hurnedadde la sala. Una vez alcanzado el objetivode hurnedad,el cornpresory el ventiladorse apagar_,n.
PARA UTILIZAR
EL DESHUMIDIFICADOR:
1. Enchufeel cablede alimentaci6nen la tornael6ctrica.Pulse la tecla POWER.
2. Ajusteel controlde hurnedad de135% a170% pare un funcionarniento normal.
• Pare rnenos humedad,pulse la tecla (V) HUMIDITY CONTROL.
• Pare una mayor hurnedad,pulse la tecla ( A ) HUMIDITY CONTROL.
3. Pulsela tecta ENERGY TIMER si desea ajustarel tiernpoon que desea que la unidadrealiceel ciclode encendido
y apagado. El tiernpopuede ajustarse a 3 o 6 horas
4. Si desea cambiar la velocidaddel ventilador,pulseta tecla FAN SPEED. Cada vez que se pulsa la tecla FAN
SPEED, la velocidaddel ventiladorcarnbiade High-, Low -, High.
5. Pulsela tecla POWER pare detener rnnanualrnente
]a unidad.
-16-
VACIAR LA CUBETA
MANUALMENTE
USO DE UNA MANGUERA DE
JARDiN
1. Cuando la cubeta est_ Ilena, deslicela hacia el
exterior agarrando el asa y vaciando el liquido en
una bafiera o lavamanos grande y rep6ngalo
debidamente. Figura 1.
2. Vacie la cubeta cuando la luz indicadora se
encienda.
Tiene la opciSn de acoplar una manguera de jardin a
su deshumidificador para drenar el agua m_tstarde
usando la cubeta del agua.
La cubeta vacia debe instalarse para que el
deshumidificador pueda seguir funcionado.
Acople la manguera antes de la operacion inicial.
En primer lugar, quite la tapa del orificio de drenaje
de la parrilla posterior.
3. No saque la cubeta mientras del deshumidificador
est6 en funcionamiento. Sacar la cuberta puedo
provo car que se caiga el gua en el coletor base o
en el suelo.
Use alicates de nariz de aguja y quite la tapa de la
manguera de drenaje estirando de ella. Figura 2.
4. Transporte la cubeta agarrandola desde el fondo
tanto como del asa. Transportarla s61ocon el asa
puede provocar que se rompa el asa o la cubierta
de la cubeta.
A continuaci6n, conecte una manguera de jardin al
extreme roscado de la conexi6n de la manguera de
drenaje, teniendo cuidado para no apretar
demasiado la manguera.
Deslice la buqueta hacia el exterior. Mire en el
interior del orificio de drenaje del deshumidificador
de la parrilla posterior. Ver_ el tallo en el que se
conecta el conector de la manguera de drenaje.
Empuje el conector firmemente en el tallo.
Aseg_rese de que la manguera de jardin no est:_
doblada ni plegada. La manguera deber[a descansar
plana desde el deshumidificador al drenaje.
Hay disponible una manguera de drenaje opcional
(#9181) en su tienda Sears m_s cercana.
Figura 1
LACUBIERTADELORIFICIODE DRENAJE
coNECTOR
DE LAMANGUER,
DE DRENAJE
RETIRE
INSERTANDO
J
CONECTORDELA
MANGUERA
DEDRENAJE
)
Figura 2
-17-
LA REJILLA Y EL GABINETE
Para limpiar el gabinete: Use agua y un
detergente suave. No use blanqueador ni
limpiadores abrasivos.
• Desconecte el cable de alimentaci6n del
Para limpiar la rejilla: Use una aspiradora con
un cone o cepillo.
• Tenga cuidado cuando limpie los
serpentines. Las aletas est_n afiladas.
FILTRO DE AIRE
Compruebe y limpie el filtro del aire al menos
cada 30 dias o m&s a menudo en caso de
necesidad.
PARA RETIRARLO:
Flexione el filtro en la esquina inferior derecha
y deslice la esquina superior derecha hacia la
izquierda. L,_velo con agua jabonosa tibia.
Enju&guelo y d6jelo secar antes de volvedo a
colocar.
LIMPIEZA INTERNA DE LA UNIDAD
Despu6s de quitar el filtro de aire, limpie el
serpentin intemo con un cepillo suave para
quitar las particulas no adheddas o h_medas.
!Tenga cuidado con los bordes puntiagudos!
NOTA: No deje que el agua entre en el
compartimiento el6ctrico/mec&ncio en la
abertura circular situada detr_s del serpentin.
No rocie el serpentin con manguera.
LIMPIEZA
GENERAL
• Quite el polvo de la rejilla y de los paneles
laterales con un cepillo suave o use el cepillo
de su aspiradera.
• Si el gabinete se despostilla, puede retocar la
pintura con un esmalte de buena calidad para
evitar que se oxide.
LIMPIEZA
AGUA
DEL RECIPIENTE
enchufe antes de realizar cualquier
mantenimiento.
DE
• Deslice la cubeta hacia el exterior.
• Quite la tapa de la cubeta.
• Ponga de nuevo la tapa en la cubeta.
• Deberia limpiarse la cubeta una vez cada
vadas semanas.
-18-
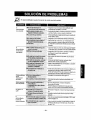
Eldeshumidificador
puedefuncionardemodeanormalcuando:
El
deshurnidificador
" Aseg_rese
de quelaclaviadel deshurnidiflcador
esta
completamenteinsertadaen el eechufe,
_i'$pa_
_
_ i_mJp_
_
a_i
_
_
,, y cambieel fusibleovuelvaaconecbrelinterrdptor.
El deshumidificad-or
seapagaautomaticamente
cuandeeste
i
ocurre,
vacie
meubeta.
a
;--G_'_-
: "; _e_,r_;_e_'_;_-ei_-es_
_o_'d-_-&_
_;n_;_ie
ba__ar
ia humedadperdebajodelajustedelnivelde lasale.
- L_un,_'e_
_fune
_nader_ra&-_rnfnuio's-una
V_zserei;,i_"
emepar,
to
El
noseca elaire
_
_
_
_
° Cuandoseinstaiaperprimeravez,debeesperaralmenes3
" m_ _Jj___
comedebiera
: Aseg0msedequ; nohay _rtinas pe_ia-n-as
o'mol;ilia-rio- ,
quab(oqueanlapartefrontalo posteriordel
deshumidificadar.
II_ p_
_
_ _i
• Pulse
elbot6n
decontrol
delahu_edad_
humedad.
parebajai:
la
_i_
_
_
_ i__
baj_
....
.........
El deshumidificador
pare=
revoludona_e
Im_y
demesiado
Apareceesr_reha
en losserpentir,es
Elmodelo
de50pintas
(54501)tel
_ nofuncione
COnoeficienc_a
si]a
temperatura
delasalaest_perdebajo
delos65°F118
C).
• Elmodelo
de70pintas54701talveznofuncione
coneficienrJa
si la
empeauradelasaaes_podebaodelos42°F.6"C
debetener
salida
alexterior.
• CoesultelaGuiede Seiecci6ndela p_gina15.
_;_
:'Cier_re
todas
ias_p-uertas
y_ntan;s comuni_d;s _n ;(_. exterior.
ESnormal.Normalmente,
laescarchadesaparece
m _..._1_._
_es_di_
_: . franscurrides
60 minutos.
Aseq_resede qualatemperaturadela salaes_lcoma
minima,a 65"F(18'C)pareunfuncionamiento
adecuade,
_.
Hayaguaene{
__
i
s_e,e
• Compruebela mangueraencasede quehayaincorperado
una.
_ _ _de{_g_
_
_
" Consultelasopeionespareeliminarel aguaquase haya
produo_e.
El
i!s_(_r_(
• Pulse_
fu.c
ono,e
maneracontinuada
pare etevarelajustede humedadun 35%o m_s
Pu,se
e,control
deburned°,
aus,e
do
humedadamas alto queelnivelde lesela,El valorm_s
alto ese( 70%.
-19-
I
Master Protection Agreements
Acuerdos de Protecci6n Especializada
Congratulations
on making a smart purchase.
Your new Kenmore ®product is designed and
manufactured for years of dependable operation.
But like all products, it may require preventive
maintenance or repair from time to time.
That's when having a Master Protection Agreement
can save you money and aggravation.
iEnhorabuena! Ha realizado una comprs inteligente.
Su nuevo aparato Kenmore® est_ diseSado y fabricado
pare ofrecerle ar_os de buen funcionamiento.
Sin embargo, al igual qua todos los productos, puede
precisar un mantenimiento preventive o incluso slguna
reparaci6n de vez en cuando. En esas ocasiones, un
Master Protection Agreement puede ayudsrle a ahorrar
dinero e inconvenientes.
Purchase a Maser Protection Agreement now and
protect yourself from unexpected hassle and
expense.
Adquiera un Maser Protection Agreement ahora, y
prot6jase a si mismo de molestias y gastos inespersdos.
The Master Protection Agreement also helps extend
the life of your new product. Here's what's included
in the Agreement:
[]
Expert service by our 12,000 professional
repair specialists
[]
Unlimited service and no charge for parts and
labor on all covered repairs
[]
"No-lemon" guarantee - replacement of your
covered product if four or more product failures
occur within twelve months
[]
Product replacement
can't be fixed
[]
Annual Preventive Maintenance
request - no extra charge
[]
Fast help by phone - phone support from a
Sears technician on products requiring in-home
repair, plus convenient repair scheduling
[]
Power surge protection against electrical
damage due to power fluctuations
[]
Rental reimbursement if repair of your covered
product takes longer than promised
if your covered product
Check at your
Once you purchase the Agreement, a simp}e phone
call is all that it takes for you to schedule service.
You can call anytime day or night, or schedule a
service appointment online.
Sears has over 12,000 professional repair
specialists, who have access to over 4.5 million
quality parts and accessories. That's the kind of
professionalism you can count on to help prolong
the life of your new purchase for years to come.
Purchase your Master Protection Agreement today!
Some limitations
and exclusions
apply.
For prices and additional
information
call
1-800-827-6655.
Sears
Installation
Service
For Sears professional installation of home
appliances, garage door openers, water
heaters, and other major home items, in the
U.S.A. call 1-800-4-MY-HOME ®
El Master Protection Agreement le ayudar_ tambien a
prolongsr la vide de su nuevo aparato. Los siguientes
servicios estan incluidos:
[]
Servicio experto per parte de cualquiera de
nuestros 12.000 t6cnicos pmfesionales especialistas
de Sears.
[]
Prestacibn de servicios sin limitaciones y sin
cargarle las plazas o Is mane de obra en todas las
repsrsciones cubiertas per el acuerdo.
[]
Garantia seria de sustituci6n de las plazas del
producto cubierto per el acuerdo, si custro o mas
plazas se mostrasen defectuosas en un periodo de
dace mesas.
[]
Sustituci6n del producto per otto nuevo, si el
defectuoso no pudiese repararse.
[]
Control de mantenimiento anual prevenUvo,
siempre qua Io desee y sin gasto adicional alguno.
[]
Asistencia telef6nica inmediata de un tecnico
especialista en productos qua hen de ser reparados a
domicilio, adem&s de una programaci6n adecuada de
la reparaci6n.
[]
Protecci6n centre subidas de tensi6n qua
provoquen da_os electricos debidos alas
fluctuaciones en el suministro.
[]
Reintegro del alquiler si la reparaci6n del producto
nave rn_s tiempo del promtetido
Una vez qua haya adquirido el Agreement, no necositar_
m_s qua una simple Ilamada pare solicitar el servicia de
su aparato. Ademas, padre hacerlo en cualquier memento
del die o de la noche, o solicitar una cite pare prestaci6n
de servicios online.
Sears cuentacon mas de 12.000 tdcnicos profesionales
especialistas en reparaciones, con acceso amas de 4,5
millones de plazas de sustituci6n y accosorios de calidad.
_ste sere el tipo de profesionalidad y servicio con el qua
podr_ center pare prciongar la vide de su nuevo producto
per touches aSos. iAdquiera hey mismo su Master
Protection Agreement!
Se eplicar_n algunas limitaciones y
restricciones.
Si de.sea hacer alguna consulta sabre los
precios u otra informaci6n adicional, le rogamos
llama al teiefono 1-800-827-6655.
Servicios
de Instalaci6n
Sears
Pare solicitar servicios de instalaci6n profesionales
de Sears de electrodomesticos, mandos de aperture
de puertas de garajes, calentadores de ague y otres
aparatos en los Estados Unidos, puede Ilamar a
1-800-4-MY-HOME
®
- 23 -
/
/
71i{iiiii!
iii!iii!
_iii!
_
!7i!i{ii7
i
Your Home
For repair- in your home-of all major brand appliances,
lawn and garden equ ment, or heating and cooling systems,
no matter who made it, no matter who sold it!
i,!ii_i
71!17!
3_:_
For the replacement parts, accessories and
owner's manuals that you need to do-it-yourself.
_i: i!i
For Sears professional installation of home appliances
and items like garage door openers and water heaters.
i i:iii!
1 . 800-4 . MY = HOME ® (1-800-4694663)
! ii{i{17
Call anytime
day or night (U S A and Canada)
W3NW sears
com
_
sears
.......
ca
......
2::
......
s_
: :s:
<
Our Home
For repair of carry in items like vacuums
lawn equipment
and electronics, call or go on-line for the location of your nearest
......
Sears
....
Parts
Center
............
.....
1 800 488 1222
.......
Call anytime
.......
.....
......
......
-
& Repair
....
day or night (U S A only)
....
www.sears.com
.....
To purchase a protection agreement (U S A )
or maintenance
agreement
(Canada) on a product serviced
by Sears:
....
,x
....
1 - 800 - 827 - 6655 (u.S.A. )
Pare pedir servicio de reparaci6n
a domicilio,
.....
5?
y para ordenar
1 " 888 "SU " HOG_t
(1-888 -784-6427)
pi ezas:
s_
- 361 - 6665 (c anada )
1 -81111
Au Canada
pour service
en fran_:ais:
1- 800 -LE-FOYER _c
(1-800-533-6937)
www , sears , ca
Registered Trademark / TU Trademark / s_ Service Mark of Sears, Roebuck and Co,
® Marca Regi_trada / T_ Marca de F_brica ! s_ Marca de Servido de Sears, Roebuck and Co.
uc Marque de commerce / Mo Marque d6pos6e de Sears, Roebuck and Co.
.......
© Sears, Roebuck and Co.
Part No.: 3828A2.0803B
.....