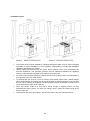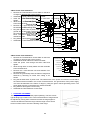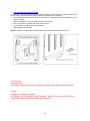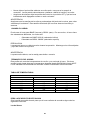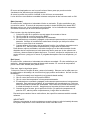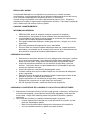
1
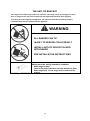
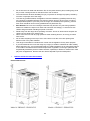
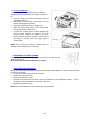
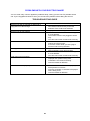
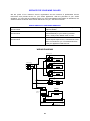
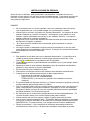
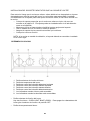
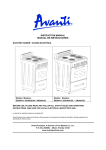
INSTRUCTION MANUAL MANUAL DE INSTRUCCIONES Model Numbers / Nos. de Modelos: ER2001G / ER2002CSS / ER2401G / ER2402CSS ELECTRIC RANGE COCINA ELECTRICA BEFORE USE, PLEASE READ AND FOLLOW ALL SAFETY RULES AND OPERATING INSTRUCTIONS. AND SAVE FOR LOCAL ELECTRICAL INSPECTOR’S USE. La sección en español empieza en la página 25. Avanti Products has a policy of continuous improvement on its products and reserves the right to change materials and specifications without notice. Avanti Products, A Division of The Mackle Co., Inc. P.O. Box 520604 - Miami, Florida 33152 www.avantiproducts.com TABLE OF CONTENTS Range Safety 3 Important Safeguides 4 The Anti-tip Bracket 5 Help Us Help You … 6 Parts and Features 7 Important Safety Instructions 8 Installation Instructions 9 Before Using Your Electric Range 9 Important Precautions and Recommendations 10 Installation of Your Electric Range 11 Electrical Connection 13 Leveling the Range 14 Anti-tip Bracket Installation 15 Operating Your Electric Range 16 Control Panel 16 Using the Surface Unit 16 Cookware Tips 17 Using the Oven 18 Care and Maintenance 20 General Information 20 Cleaning Your Range 20 Cleaning Surface Units and Reflector Bowls 20 Lift-up Cooktop 21 Removing the Oven Door 21 Removable Storage Drawer 21 Replacing the Oven Light 22 Troubleshooting Guide 22 Service for Your Appliance 23 Wiring Diagram 23 Your Avanti Products Warranty 24 Instrucciones en Español 25 ~ 34 Registration Information and Registration Card 35 2 RANGE SAFETY Your safety and the safety of others are very important. We have provided many important safety messages in this manual and on your appliance. Always read and obey all safety messages. This is the Safety Alert Symbol. This symbol alerts you to potential hazards that can kill or injure you and others. All safety messages will follow the Safety Alert Symbol and either the words “DANGER”, “WARNING” or “CAUTION”. These words mean: Danger means that failure to heed this safety statement may result in severe personal injury or death. Warning means that failure to heed this safety statement may result in extensive product damage, serious personal injury, or death. Caution means that failure to heed this safety statement may result in minor or moderate personal injury, or property or equipment damage. All safety messages will alert you to what the potential hazard is, tell you how to reduce the chance of injury, and let you know what can happen if the instructions are not followed. 3 IMPORTANT SAFEGUIDES Before the appliance is used, it must be properly positioned and installed as described in this manual, so read the manual carefully. To reduce the risk of fire, electrical shock or injury when using the appliance, follow basic precaution, including the following: • • • • • • • • • • • • • • • • • It is recommended that a separate circuit, serving only your appliance be provided. Use receptacles that cannot be turned off by a switch or pull chain. Never clean appliance parts with flammable fluids. These fumes can create a fire hazard or explosion. And do not store or use gasoline or other flammable vapors and liquids in the vicinity of this or any other appliance. The fumes can create a fire hazard or explosion. Before proceeding with cleaning and maintenance operations, make sure the power line of the unit is disconnected. Unplug the appliance or disconnect power before cleaning or servicing. Failure to do so can result in electrical shock or death. Do not attempt to repair or replace any part of your appliance unless it is specifically recommended in this manual. All other servicing should be referred to a qualified technician. This appliance shall not be used for space heating. The surface unit should not be operated without cookware. This information is based on safety considerations. All openings in the wall behind the appliance and in the floor under the appliance shall be sealed. Keep appliance area clear and free from combustible materials, gasoline, and other flammable vapors. Do not obstruct the flow of ventilation air. Disconnect the electrical supply to the appliance before servicing. When removing appliance for cleaning and/or service: • Disconnect AC power supply. • Carefully remove the range by pulling outward. CAUTION: Range is heavy. Use care in handling. The misuse of oven door (e.g. stepping, sitting, or leaning on them) can result in potential hazards and /or injuries. When installing or removing the range for service, a rolling life jack should be used. Do not push against any of the edges of the range in an attempt to slide it into or out of the installation. Pushing or pulling a range (rather than using a lift jack) also increases the possibility of bending the leg spindles or the internal coupling connectors. It is important for the appliance to be leveled in order to work properly. You may need to make several adjustments to level it. Never allow children to operate, play with or crawl inside the appliance. Electrical Grounding Instructions - The appliance must be installed and grounded by a qualified technician in accordance with the National Electrical Code ANSI/NFPA No. 70 (Latest Edition) and local electrical code requirements. Replacement Parts – Only authorized replacement parts may be used in performing service on the range. Replacement parts are available from factory authorized parts distributors. Contact the nearest Avanti service center in your area. 4 THE ANTI-TIP BRACKET The range will not tip during normal use. However, the range can tip if you apply too much force or weight to the open door without the anti-tip bracket fastened down properly. To reduce the risk of tipping the appliance, the appliance must be secured by properly installed anti-tip devices packed with the appliance. WARNING • ALL RANGES CAN TIP • INJURY TO PERSON COULD RESULT • INSTALL ANTI-TIP DEVICE PACKED WITH RANGE • SEE INSTALLATION INSTRUCTIONS Making sure the anti-tip bracket is installed: • • • Slide range forward. Look for the anti-tip bracket securely attached to floor. Slide range back so rear range foot is under anti-tip bracket. 5 HELP US HELP YOU... Read this guide carefully. Write down the model and serial numbers. It is intended to help you operate and maintain your new Electric Range properly. You'll find them on a plate located on the front bottom wall of the Electric Range. Keep it handy to answer your questions. If you don't understand something or you need more assistance, please call: Please write these numbers here: ____________________________________ Date of Purchase Avanti Customer Service 800-220-5570 ____________________________________ Model Number Keep proof of original purchase date (such as your sales slip) with this guide to establish the warranty period. ____________________________________ Serial Number Use these numbers in any correspondence or service calls concerning your Electric Range. If you received a damaged Electric Range, immediately contact the dealer (or builder) that sold you the Electric Range. Save time and money. Before you call for service, check the Troubleshooting Guide. It lists causes of minor operating problems that you can correct yourself. IF YOU NEED SERVICE NEXT, if you are still not pleased, write all the details, including your telephone number, and send it to: We're proud of our service and want you to be pleased. If for some reason you are not happy with the service you receive, here are some steps to follow for further assistance. FIRST, contact the people who serviced your Electric Range. Explain why you are not pleased. In most cases, this will solve the problem. Customer Service Avanti Products 10880 NW 30 Street Miami, FL 33172 USA 6 PARTS & FEATURES 1. 2. 3. 4. 5. 6. 7. 8. 9. OVEN VENT BACKSPLASH 6” BURNERS (3) COOKTOP 8” BURNER (1) CONTROL PANEL OVEN DOOR HANDLE GLASS OVEN DOOR DRAWER HANDLE 10. 11. 12. 13. 14. 15. 16. 17. 18. LEVELING LEGS RATING LABEL ANTI-TIP BRACKET BROIL HEATING ELEMENT OVEN LIGHT BROILER TRAY AND GRID WIRE RACKS (2) BAKE ELEMENT (NOT SHOWN) REMOVABLE STORAGE DRAWER 7 IMPORTANT SAFETY INSTRUCTIONS WARNING • • • • • • • • • • • • • • • • • To reduce the risk of fire, electrical shock, or injury when using the range, follow these basic precautions: Read all instructions before using the range. WARNING: TO REDUCE THE RISK OF TIPPING OF THE RANGE, THE RANGE MUST BE SECURED BY PROPERLY INSTALLED ANTI-TIP DEVICES. TO CHECK IF THE DEVICES ARE INSTALLED PROPERLY, SILDE RANGE FORWARD, LOOK FOR ANTI-TIP BRACKET SECURELY ATTACHED TO FLOOR, AND SLIDE RANGE BACK SO REAR RANGE FOOT IS UNDER ANTI-TIP BRACKET. CAUTION: Do not store items of interest to children in cabinets above a range or on the backsplash of a range – children climbing on the range to reach items could be seriously injured. Proper Installation - Be sure the range is properly installed and grounded by a qualified technician. Never use your appliance for warming or heating the room. Do Not Leave Children Alone - Children should not be left alone or unattended in area where the appliance is in use. They should never be allowed to sit or stand on any part of the appliance. Wear Proper Apparel - Loose fitting or hanging garments should never be worn while using the appliance. User Servicing - Do not repair or replace any part of the appliance unless specifically recommended in the manual. All other servicing should be referred to a qualified technician. Storage in or on Appliance - Flammable materials should not be stored in an oven or near the surface units. Do Not Use Water on Grease Fires - Smother fire or flame or use dry chemical or foamtype extinguisher. Use Only Dry Potholders - Moist of damp potholders on hot surfaces may result in burns from steam. Do not let potholder touch hot heating elements. Do not use a towel or other bulky cloth. Use Proper Pan Size - This appliance is equipped with one or more surface units of different size. Select utensils having flat bottoms large enough to cover the surface unit heating element. The use of undersized utensils will expose a portion of the heating element to direct contact and may result in ignition of clothing. Proper relationship of utensil to burner will also improve efficiency. Never Leave Surface Units Unattended at High Heat Settings – Boil over causes smoking and greasy spillovers that may ignite. Make Sure Reflector Pans or Drip Bowls Are in Place - Absence of these pans or bowls during cooking may subject wiring or components underneath to damage. Protective Liners - Do not use aluminum foil to line surface unit drip bowls or oven bottoms, except as suggested in the manual. Improper installation of these liners may result in a risk of electric shock, or fire. Glazed Cooking Utensils - Only certain types of glass, glass/ceramic, ceramic, earthenware, or other glazed utensils are suitable for range top service without breaking due to sudden change in temperature. Utensil Handles Should Be turned Inward and Not Extend Over Adjacent Surface Units – To minimize burns, ignition of flammable materials, and spillage due to unintentional contact with the utensil, the handle of a utensil should be positioned so that it is turned inward, and does not extend over adjacent surface units. 8 • • • • • • • • Do Not Soak Removable Heating Elements – Heating elements should never be immersed in water. Do Not Cook on Broken Cook-top – If cook-top should break, cleaning solutions and spillovers may penetrate the broken cook-top and create a risk of electric shock. Contact a qualified technician immediately. Clean Cook-top With Caution – If a wet sponge or cloth is used to wipe spills on a hot cooking area, be careful to avoid steam burn. Some cleaners can produce noxious fumes if applied to a hot surface. Use Care When Opening Door – Let hot air or steam escape before removing or replacing food. Do Not Heat Unopened Food Containers – Build-up of pressure may cause container to burst and result in injury. Keep Oven Vent Ducts Unobstructed. Placement of Oven Racks – Always place oven racks in desired location while oven is cool. If rack must be moved while oven is hot, do not let potholder contact hot heating element in oven. Do Not Touch Surface Units, Heating Elements, Interior Surfaces of Oven or Areas Near Units - Surface units and heating elements may be hot even though they are dark in color. Area near surface and interior surfaces of an oven become hot enough to cause burns. During and after use, do not touch, or let clothing or other flammable materials contact surface units, areas near units or interior surfaces of oven until they have had sufficient time to cool. Other surfaces of the appliance may become hot enough to cause burns – among these surfaces are oven vent openings and surfaces near these openings, oven doors, and window of oven doors. This Unit Is For Indoor Use Only -SAVE THESE INSTRUCTIONS- INSTALLATION INSTRUCTIONS WARNING HAVE THIS RANGE INSTALLED BY A QUALIFIED INSTALLER. Improper installation, adjustment, alteration, or maintenance can cause injury or property damage. Consult a qualified installer, or service agency. IMPORTANT – SAVE FOR THE LOCAL ELECTRICAL INSPECTOR’S USE. BEFORE USING YOUR ELECTRIC RANGE • Remove the exterior and interior packing. • Check to be sure you have all of the following parts: • 3 Six Inch Coiled Burners with Reflector Bowls • 1 Eight Inch Coiled Burner with Reflector Bowls • 2 Oven Racks • 1 Broiler Tray and Grid • 2 Anti-tip Bracket • 1 Instruction Manual • Clean the interior surface with lukewarm water using a soft cloth. 9 • • • • • Have your range installed and properly grounded by a qualified installer in accordance with the installation instructions. Do not attempt to repair or replace any part of your range unless it is specifically recommended in this manual. Do not remove permanently affixed labels, warnings, or plates from the product. This may void the warranty. The installer should leave these instructions with the consumer who should retain for local inspector’s use and for future reference. Please observe all local and national codes and ordinances. NOTICE Before you use this range for the first time: The heating elements have a protective coating, which must be burned off before use. To do this, open the oven door and set the temperature control knob to 450°F. Turn the function selector to the Bake element and the Broil element separately to approximately 15 minutes. It is important to ensure adequate ventilation during this period. The burners also have a protective coating, which must be burned off before use. To do this, set the burner selector to the maximum setting 5 minutes. It is important to ensure adequate ventilation. Switch off the burners and allow cooling completely. IMPORTANT: This range is designed and manufactured solely for the cooking of domestic (household) food and is not suitable for any non domestic application and therefore should not be used in a commercial environment. The range warranty will be void if the range is used within a non domestic environment i.e. a semi commercial, commercial or communal environment. IMPORTANT PRECAUTIONS AND RECOMMENDATIONS After having unpacked the range, check to ensure that it is not damaged and the oven door closes correctly. In case of doubt, do not use it and consult your supplier or a professionally qualified technician. Packing elements (i.e. plastic bags, polystyrene foam, packing straps, etc.) should not be left around within easy reach of children, as these may cause serious injuries. The range has been thoroughly tested for safe and efficient operation. However, as with any appliance, there are specific installation and safety precautions that must be followed to ensure safe and satisfactory operation. • Do not attempt to modify the technical characteristics of the appliance as this may become dangerous to use. • Do not carry out cleaning or maintenance operations on the appliance without having previously disconnected it from the electric power supply. • After use, ensure that the knobs are in position. • Never touch the appliance with wet hands or feet. • Do not operate the appliance barefooted. • Do not allow children or other incapable people to use the appliance without supervision. • During and after use of the range, certain parts will become very hot. Do not touch hot parts. • Keep children away from the range when it is in use. • Fire Risk! Do not store flammable materials in the oven or in the bottom drawer. • Fire Risk! Do not attempt to dry clothing or any other type of textile in the oven or in the bottom drawer. • Make sure that electrical cables connecting other appliances in the proximity of the range cannot come into contact with the hob or become entrapped in the oven door. 10 • • • • • • • • • Do not line the oven walls with aluminum foil. Do not place shelves, pans, backing trays, broil tray or other cooking utensils on the base of the oven chamber. The manufacturer declines all liability for injury to persons or damage to property caused by incorrect or improper use of the range. To avoid any possible hazard, the appliance must be installed by qualified personnel only. Any repairs by unqualified persons may result in electric shock or short circuit. In order to avoid possible injuries to your body or to the range, do not attempt ant repairs by yourself. Such work should be carried out by qualified service personnel only. Burn Hazard! The oven and cooking accessories may become very hot during operation. Make sure children are kept out of reach and warn them accordingly. To avoid burns use clothes and gloves when handling hot parts or utensils. Stand away from the range when operating oven door. Hot air or steam which escapes can cause burns to hands, face, and/or eyes. Never clean the oven with any high-pressure steam cleaning devices, as it may provoke a short circuit. Do not leave anything on the top of oven vent. Never cover the oven vent opening with aluminum foil or any other material. This range is intended for household use. Never use the appliance for any other purpose. If you should decide not to use the range any longer (or decide to substitute an older model), before disposing of it, it is recommended that it be made inoperative in an appropriate manner in accordance to health and environmental protection regulations, ensuring in particular that all potentially hazardous parts be made harmless, especially in relation to children who could play with old appliances. Remove the door before disposal to prevent entrapment. INSTALLATION OF ELECTRIC RANGE Product Dimensions Model #: ER2001G / ER2002CSS Model #: ER2401G / ER2402CSS 11 Installation Figure Model #: ER2001G/ER2002CSS • • • • • • Model #: ER2401G/ER2402CSS The electric range must be installed by a qualified technician. Make sure you have everything necessary for correct installation. It is the installer’s responsibility to comply with installation clearances specified in the manual. Cabinet opening dimensions that are shown above must be used. Given dimensions are minimum clearances. The minimum spacings must be maintained between the appliance cooking surface and the horizontal surface above the cooking top. 30 inches is the minimum clearance between the top of the cooking surface and the bottom of an unprotected wood or metal cabinet To eliminate the risk of burns or fire by reaching over heated surface units, cabinet storage space located above the surface units should be avoided. If cabinet storage is to be provided, the risk can be reduced by installing a range hood that projects horizontally a minimum of 5 inches beyond the bottom of the cabinets. Place your electric range on a floor that is strong enough to support it when it is fully assembled as above picture. To level your electric range, adjust the leveling legs at the bottom of the unit. Avoid locating the unit in moist areas. As this may result in the risk of electrical shock. 12 ELECTRICAL CONNECTION • The appliance must be properly installed and grounded by a qualified technician in accordance WARNING with the National Electrical Code ANSI/NFPA No. 70shock. (LatestIf Edition) and local electrical code Improper grounding can result in the risk of electrical the power cord is damaged, have it requirements. Installation should be made by a licensed electrician. replaced by an authorized Avanti Products service center. • The range may be connected by means of permanent “Hard Wiring” or “Power Supply Cord Kit”. Power supply cord is not supplied, but is available through your local electric supply house. • Use only 3-conductor or 4-conductor UL listed range cord rated at 40 amps with 125/250V minimum voltage range. These cords may be provided with strain relief or conduit connector. • The range must be connected to the proper electrical voltage and frequency as specified on the rating label. • The range can be connected directly to the fused disconnect (or circuit breaker box) through flexible, armoured or non-metallic sheathed, copper cable (with grounding wire). Allow two to three feet of slack in the line so that it can be moved if servicing is ever necessary. • For personal safety, the range must be properly grounded. • Remove house fuse or open circuit breaker before beginning installation. • Do not attempt to repair or replace any part of the appliance unless it is specifically recommended in this manual. All other servicing should be referred to a qualified technician. • To minimize the possibility of electric shock, disconnect this appliance from the A/C power supply before attempting any maintenance. NOTE: Turning the appliance off does not disconnect the appliance from the power supply. We recommend having a qualified technician service your appliance. 13 3-Wire Power Cord Installation • Remove the Terminal Block Access Plate on the back of range by removing the 2 fixing screws. • Assemble the strain relief in the hole on bracket. • Insert the power cord through Cut Ground Strapthe strain relief and tighten. Terminal Block • Allow enough slack to easily attach the cord terminals to the terminal block. Neutral Wire • Remove the 3 wire terminal nuts and washers from the terminal block. Grounding Wire • Plug the terminal holes of power cord. The neutral or ground wire of the power cord must be connected to Wires the neutral terminalPower located in the center of terminal block. The power leads must be connected to the Power Cord outside terminals. • Plug washers and tightenBracket nuts securely. • Assemble the Terminal Block Access Plate. Screws Grounding Screw Terminal Block Access Plate Cut Ground Strap Terminal Block Neutral Wire Power Wires Power Cord Bracket 4-Wire Power Cord Installation • Remove the Terminal Block Access Plate on the back Cut Ground Strap Grounding Screw of range by removing the 2 fixing screws. Terminal Block • Assemble the strain relief in the hole on bracket. Neutral Wire • Insert the power cord through the strain relief and Grounding Wire tighten. • Allow enough slack to easily attach the cord terminals Power Wires to the terminal block. Power Cord • Remove the 3 wire terminal nuts and washers from Bracket the terminal block. • Remove the ground strap from the frame of range and terminal by removing its screw and cutting is as shown. • Plug the terminal holes of power cord. The neutral wire of the power cord must be connected to the neutral terminal located in the center of terminal block. The ground wire of the power supply cord must be attached to the frame of range by using the green colored grounding screw. The power leads must be connected to the outside terminals. • Plug washers and tighten nuts securely. • Assemble the Terminal Block Access Plate. LEVELING THE RANGE The range must be level to obtain proper operating. The four screws type leveling legs located on the corners at the bottom of range should be adjusted by turning them clockwise to make the range higher or counter-clockwise to lower the range until the range is level. Use a level on surface units to check the leveling of the range. 14 ANTI-TIP BRACKET INSALLATION To reduce the risk of tipping the range by abnormal usage or improper door loading, the range must be secured by properly installing the anti-tip device packed with the appliance. • Place the anti-tip bracket on the floor as shown figure. Anti-tip bracket can be installed on either right or left side. • Make the locations of 2 holes of ant-tip bracket on the floor. • Use a 5/16” masonry drill bit and insert plastic anchor. • Secure bracket to floor using screws supplied. • Slide appliance into position. NOTE: If range is relocated, the bracket must be removed and installed in new location. ATTENTION: OVENS VARY: COOKING TIMES AND OVEN TEMPERATURES MAY NEED ADJUSTMENT AVISO: HORNOS PUEDEN VARIAR: EL TIEMPO DE COCCION PUEDE VARIAR. EN ESE CASO AJUSTES DE LA TEMPERATURA PUDIERAN SER NECESARIOS 15 OPERATING YOUR RANGE CONTROL PANEL 1. Oven Function Selector Knob 5. Rear Right Burner Control Knob 2. Oven Thermostat Knob 6. Front Right Burner Control Knob 3. Front Left Burner Control Knob 7. Oven Power Indicator Light 4. Rear Left Burner Control Knob 8. Burners Power Indicator Light OVEN FUNCTION SELECTOR KNOB There are three functions – OVEN LIGHT, BAKE AND BROIL. To switch off the heating elements of oven turn the function selector to the setting position. OVEN THERMOSTAT CONTROL KNOB Turn the knob clockwise to select the desired temperature up to 450°F. To switch off the oven turn the thermostat control to the setting position. BURNER CONTROL KNOB The range comes with four burners. To operate the burners simply push in and turn the knob to the desired position. These controls go from low to high power output, having a number of positions To switch off the Burner, turn the burner control knob to the setting position. OPERATING INDICATOR LIGHTS The OVEN and BURNERS indicating lights will come in use. separately when oven and top burners are USING THE SURFACE UNITS Your range is equipped with four surface units with two different sizes. Three of them are 6” and one of them is 8” in size. The surface controls are easily operated. Simply push in and turn the knob to the desired position. When the element is energized, the indicator light marked TOP will be lit regardless of the setting when one or more of the elements are turned on. The control has a variable of power output from LO to HI with a number of 16 positions. The range of heat is increased by turning the knob to HI, decreased by turning the knob to LO. The solid dot in the surface unit mark shows which surface unit is activated by that knob. IMPORTANT: To switch on, always lightly press the control knob inwards then turn. COOKWARE TIPS The physical characteristics of pots and pans influence the performance of any cooking systems. Therefore, emphasis must be placed on the importance of using proper cookware. • Use cooking vessels with flat bottoms and tight fitting lids to conserve energy and shorten cooking times. • Only certain types of glass, glass/ceramic, ceramic, earthenware or other glazed utensils are suitable for cooktop. Manufacturers suggest using low to medium heat selections when using glass cookware. • Pan size should match the element size. A slightly larger pan covers the entire element and prevents spillovers from contacting the heat surface and burning in. Using a smaller pan than the element is a waste of energy. • To avoid spattering and to maximize efficiency, pan bottoms should be clean and dry before coming in contact with the elements. • Wipe spills off the elements with a damp cloth as soon as they cool to cut down on clean up time. Be sure the control is . If a surface unit stays red for a long time, the bottom of the pan is not flat enough or is too small for the surface unit. Prolonged usage of incorrect utensils could result in damage to the surface unit, cooktop, wiring and surrounding areas. To prevent damage use correct utensil, start cooking on position 12 and turn control down to continue cooking. Never leave an empty utensil, or one which has boiled dry, on a hot surface unit. The utensil could overheat and damage the utensils or surface unit. Always be sure that all control knobs are turned to and the indicator lights are when you are not cooking. WARNING Make sure that the handles of cookware do not stick out over the edge of the range, to avoid them being knocked over by accident. This also makes it more difficult for children to reach the cooking pots/pans. USING THE OVEN You can use your range for Bake and Broil. For that reason, the oven has two different heating elements which are: - Bake element 2100W (Lower heating element) - Broil element 2000W (Upper heating element) CAUTION: The oven door becomes very hot during operation. Keep children well out of reach. WARNING: The door is hot, use the handle. 17 OVEN THERMOSTAT This only sets the cooking temperature and does not switch the oven on. Rotate clockwise until the required temperature is reached (From WARM to 450°F). The power indicator light signals when the heat elements are switched or switched . Temperature Setting Table Knob Setting Temperature in °F Temperature in °C WARM 150 65 200 200 93 250 250 121 300 300 149 350 350 177 400 400 204 450 450 232 FUNCTION SELECTOR KNOB Rotate the knob clockwise to set the oven for one of the following functions. Oven Light The oven is equipped with a light that illuminates the oven to enable visually controlling the food that is cooking. By turning the knob onto the setting you light the oven cavity. The oven remains lighted while any of function is . Bake In this setting only the hidden lower element is switched . Heat is distributed by natural convection. The thermostat can be set from WARM to 450°F. During the operating, the oven indicator light is turned . During operation the oven indicator light is always . In order to bake, use the following steps: 1. Place the rack in the correct position, before turn the oven . 2. Turn the function selector knob to the Bake position. 3. Turn the thermostat control knob to the desired temperature. 4. The bottom heat element will cycle and to maintain the selected temperature. Check food for doneness at minimum time on recipe. Cook longer if necessary. 5. When baking is completed, turn the function selector knob and thermostat control knob to the position, open door fully and remove the food. For best cooking results, always remember that hot air must circulate around the pans in the oven so that even heat reaches all parts of the oven. Therefore, place the pans in the center of oven and allow at least 2” space between pan and the surface of cavity. 18 Broil In this setting only the upper element is switched . Heat is distributed by radiation. Use with the oven door closed and the thermostat can be set from WARM to 450°F. In order to broil, use the following steps: 1. Place the meat on the broil grid in broiler pan. Always use the grid so that the fat drips into the broiler pan, otherwise the juices may catch on fire. Do not broil without using the broiler pan. 2. Position the broiler pan on the second level from the top. 3. Turn the function selector knob to the Broil position. 4. Turn the thermostat control knob to the desired temperature. 5. The upper heat element will cycle and to maintain the selected temperature. For best results the oven should be preheated 5 minutes before adding the food to be broiled. Turn food over about halfway through the broiling time. Always broil with the oven door closed. 6. When broiling is completed, turn the function selector knob and thermostat control knob to the position, open door fully and remove the food. Always remember that when the oven is hot, outside surfaces of the range get hot. IMPORTANT: Always use suitable protective gloves when inserting/removing the broiler pan, shelves, pans and other cooking utensils from the oven. OVEN RACK The rack is designed with stop-locks so that when placed correctly on the rack supporters, they will stop before coming completely out from the oven, and will not tilt when removing food from or placing food on them. When placing cookware on the rack, pull the rack out to the bump on the rack support. Place the cookware on the rack, then slide the rack back into the oven. To remove the rack from the oven, pull it towards you, tilt the front end upward and pull it out. 19 CARE AND MAINTENANCE • • • • • • • • • • • • • • • • GENERAL INFORMATION CAUTION: Before any operation of cleaning and maintenance disconnect the appliance from the electrical supply. It is advisable to clean when the appliance is cold and especially for cleaning the enameled parts. Avoid leaving alkaline or acidic substances (lemon juice, vinegar, etc.) on the surfaces. Avoid using cleaning products with a chlorine or acidic base. The oven must always be cleaned after every use, using suitable products and keeping in mind that its operation for 30 minutes on the highest temperature eliminates most grime reducing it to ashes. CLEANING YOUR RANGE Disconnect the A/C from the main power box or designated circuit breaker, turn off the range, make sure all surface units are off and cool before removing anything, then remove all items including shelves and rack. Wash the inside surfaces with a warm water and baking soda solution. The solution should be about 2 tablespoons of baking soda to a quart of water. Wash the shelves and rack with a mild detergent solution. The outside of the range should be cleaned with mild detergent and warm water. Wring excess water out of the sponge or cloth when cleaning area of the controls, or any electrical parts. Wash the outside cabinet with warm water and mild liquid detergent. Rinse well and wipe dry with a clean soft cloth. Do not use steel wool or steel brush on the cook-top. CLEANING SURFACE UNITS AND REFLECTOR BOWLS Disconnect the A/C from the main power box or designated circuit breaker and turn off the range to make sure that burners are off and cool before removing burners and reflector bowls. Removing the burners and reflector bowls as following: • Lift the edge of the unit opposite from the receptacle, just enough to clear the reflector bowl. • Pull the surface unit gently out of the mounting receptacle. • After the unit has been removed, the reflector bowl can be lifted out of their mounting. Clean the burners and reflector bowls with mild detergent and warm water. Wring excess water out of the sponge or cloth when cleaning them. Replace the burners and reflector bowls as following: • Line up the opening of the reflector bowls with the burners receptacle, hold the surface unit as level as possible with the terminal just positioned into the receptacle, then push the surface units’ terminal into the receptacle. • When the terminal is pushed into the receptacles as far as it will go, push down the edge of the surface unit opposite the receptacle. NOTE: Do not immerse burners in water or any other liquids. 20 LIFT-UP COOKTOP You can access the area beneath of the cooktop for cleaning purposes by lifting up the cooktop. In order to do: • Hold the cooktop from front left and right corners of cooktop and pull it up. • After lifting up the cooktop high enough, set the support rod into place as shown. • Leave the cooktop on the tip of support rod. • Wipe with warm soapy water. Use a soapy steelwool pad on heavily soiled areas. • To lower the cooktop, lift the cooktop holding from the front edge. Replace the support rod to its previous place. Lower the cooktop in its place. During replacement of the cooktop, be sure that the front edge of cooktop covers the upper edge of control panel. NOTE: Do not drop the cooktop. Personal injury or damage to the cooktop frame could result. REMOVABLE STORAGE DRAWER For cleaning, you can remove the drawer by pulling it out until the stop point and lifting it up. Never store any flammable material in the drawer. REPLACING THE OVEN LIGHT Before any maintenance is started involving electrical parts of the appliance, it must be disconnected from the power supply. • Let the oven cavity and broil burner cool down. • Switch off the electric supply. • Remove the protective cover. • Unscrew and replace the bulb with a new one suitable for high temperature (300°C ~ 570°C) having the same specifications: 240V 60Hz, 15W, E14. • Replace the protective cover. NOTE: Oven bulb replacement is not covered by your guarantee. 21 PROBLEMS WITH YOUR ELECTRIC RANGE? You can solve many common appliance problems easily, saving you the cost of a possible service call. Try the suggestions below to see if you can solve the problem before calling the servicer. TROUBLESHOOTING GUIDE PROBLEM Surface units will not maintain a rolling boil or frying rate is not fast enough • • Foods cook slowly Surface units do not operate • • • Control knobs will not turn • • • Oven light does not work Oven does not work Food does not broil properly Food does not bake properly • • • • • • • • • • • • 22 POSSIBLE CAUSE You must use pans that are absolutely flat. Pan bottoms should closely match the diameter of the surface unit selected. Improper cookware being used. You have blown a household fuse or tripped a circuit breaker. The surface units are not plugged in all the way. You have not set the control knobs correctly. If it is a surface unit control knob, you are not pushing in before turning. If it is oven control knob, you are trying to turn the knob to wrong direction. Light bulb is loose or defective. Switch operating oven light is broken. You have blown a household fuse or tripped a circuit breaker. You have not set the control knobs correctly. The oven control knob is not set at Broil. Improper rack position being used. Cookware is not suited for broiling. Oven thermostat is defective. The oven control knob is not set properly. Rack position is incorrect. Incorrect cookware or cookware of improper size is being used. Oven thermostat is defective. SERVICE FOR YOUR WINE CHILLER We are proud of our customer service organization and the network of professional service technicians that provide service on your Avanti appliances. With the purchase of your Avanti appliance, you can have the confidence that if you ever need additional information or assistance, the Avanti Products Customer Service team will be here for you. Just call us toll-free. Product Information 800-323-5029 Part Orders 800-220-5570 In-Home Repair Service 800-220-5570 AVANTI PRODUCTS CUSTOMER SERVICES Whatever your questions are about our products, help is available. You may order parts and accessories that will be delivered directly to your home by personal check, money order, Master Card, or Visa. An Avanti Products authorized service center will provide expert repair service, scheduled at a time that is convenient for you. Our trained servicers know your appliance inside and out. WIRING DIAGRAM INDICATING LIGHT RED WH WH P1 L2 H2 P2 WH RED L1 POWER SWITCH TERMINAL BLOCK L2 L2 RED WH WH BL P1 L2 E GR E H2 BURNER 2 240V/1250W P2 L1 L1 BURNER 1 240V/1250W H1 BL RED L1 H1 POWER SWITCH 240V/60Hz WH RED P1 L2 RED H2 P2 RED RED L1 BURNER 3 240V/1250W H1 POWER SWITCH RED WH BK P1 L2 H2 BURNER 4 240V/2100W P2 RED BK L1 H1 POWER SWITCH WH BK OVEN HEATER 240V/2200W FUNCTION SWITCH P3 P1 P2 5 2 1 3 4 RED OVEN HEATER 240V/2000W RED WH WH THERMOSTAT RED WH OVEN LIGHT RED WH INDICATING LIGHT 23 YOUR AVANTI WARRANTY WARRANTY – ELECTRIC RANGE LENGTH OF WARRANTY FULL ONE YEAR WARRANTY FROM DATE OF PURCHASE ON ALL PARTS EXCEPT GLASS PARTS. IN RENTAL OR COMMERCIAL USE, THE WARRANTY PERIOD IS 90 DAYS. FULL 30-DAY WARRANTY FROM DATE OF PURCHASE ON GLASS PARTS AND FINISH OF PORCELAIN ENAMEL, PAINTED OR BRIGHT METAL FINISHED PARTS WE WILL PAY FOR REPLACEMENT PARTS AND REPAIR LABOR TO CORRECT DEFECTS IN MATERIALS OR WORKMANSHIP. SERVICE MUST BE PROVIDED BY AN AUTHORIZED SERVICE COMPANY. REPLACEMENT PARTS AND REPAIR LABOR TO CORRECT DEFECTS IN MATERIAL OR WORKMANSHIP. SERVICE MUST BE PROVIDED BY AN AUTHORIZED SERVICE COMPANY. WE WILL NOY PAY FOR A. Service calls to: 1. Correct the installation of your range. 2. Instruct you how to use your range. 3. Replace house fuses or correct house wiring. 4. Replace owner-accessible light bulbs. B. Surcharges including, but not limited to, any after hour, weekend, or holiday service calls, tolls, ferry trip charges, or mileage expense for serviced calls to remote areas, including the state of Alaska. C. Pick up and delivery. Your range is designed to be repaired in the home. D. Damage to your range caused by accident, misuse, fire, flood, acts of God, or use of products not mentioned in this manual. E. Repairs to parts or systems caused as a result of unauthorized modifications made to the appliance. F. Repairs when your range is used in other than normal, single-family household use. AVANTI PRODUCTS SHALL NOT BE LIABLE FOR INCIDENTAL OR CONSEQUENTIAL DAMAGES. Some states do not allow the exclusion or limitation of incidental or consequential damages, so this exclusion or limitation may not apply to you. This warranty gives you specific legal rights, and you may also have other rights that vary from state to state. This warranty is not valid outside the Continental United States. 24 INSTRUCCIONES EN ESPAÑOL Antes de usar su artefacto, debe posicionarlo correctamente e instalarlo tal como se describe en este manual, así que lea el manual cuidadosamente. Para reducir el riesgo de incendio, choque eléctrico o daño cuando use la cocina, siga las precauciones básicas, incluyendo las siguientes: DANGER • Se recomienda usar un circuito separado, que sirva solamente para esta cocina. Use receptáculos que no se puedan apagar con un interruptor o cadena. • Nunca limpie la cocina o sus partes con líquidos inflamables. Los vapores de estos podrían ocasionar un incendio o explosión. No almacene o use gasolina u otros líquidos o gases inflamables cerca a éste u otro artefacto eléctrico. Los vapores podrían ocasionar un incendio o explosión. • Asegúrese que el enchufe del artefacto este desconectado de la electricidad antes de empezar a limpiarlo o repararlo. • Si no desconecta el artefacto de la electricidad, podría ocasionar un choque eléctrico o muerte. • No intente reparar o reemplazar ninguna parte de su artefacto a no ser que esté específicamente recomendado en este manual. Cualquier otro mantenimiento debe ser realizado por un técnico calificado. WARNING • • • • • • • • • • • • Este artefacto no se debe usar como calentador de ambiente. La superficie de la unidad se deber operar solamente cuando tenga recipientes sobre ella. Esta información está basada en consideraciones de seguridad. Todas las aperturas en la pared detrás de este artefacto y en el piso debajo, deben estar selladas. Mantenga el área de este artefacto despejada y libre de materiales combustibles, gasolina, y otros vapores o líquidos inflamables. No obstruya el flujo de ventilación del aire. Desconecte el suministro eléctrico del artefacto antes de darle mantenimiento. Cuando mueva el artefacto para limpiarlo o darle mantenimiento: o Desconecte el suministro de electricidad. o Hale la cocina hacia Ud. cuidadosamente. PRECAUCION: La cocina es muy pesada. Sea cuidadoso cuando la manipule. El uso descuidado de la puerta del horno (ej. Pararse, sentarse o apoyarse contra él) puede ocasionar peligros potenciales y/o daños. Use una carretilla para movilizar la cocina cuando la instale o retire. No empuje los lados o esquinas de la cocina para instalarla o empujarla en el sitio de instalación. Empujarla o jalarla (en lugar de usar una carretilla) también aumenta la posibilidad de doblar las patas o los conectores internos. Es importante que la cocina esté nivelada para que funcione apropiadamente. Tal vez sea necesario hacer unos cuantos ajustes para poder nivelarla. Nunca permita que los niños operen, jueguen o gateen dentro de la cocina. Instrucciones para electricidad a tierra – El artefacto debe ser instalado y conectado a tierra por un técnico calificado, de acuerdo con los Códigos Eléctricos Nacionales ANSI/NFPA No. 70 (ultima edición) y los códigos eléctricos locales establecidos. Partes de reemplazo – Solo use partes de reemplazo autorizadas cuando de mantenimiento a esta cocina. Las partes de reemplazo autorizadas se pueden 25 conseguir en los distribuidores de partes autorizados. Contacte el centro de servicio de Avanti más cercano. EL SOPORTE PARA EVITAR QUE LA COCINA SE VOLTEE La cocina no se inclinará durante el uso normal. Sin embargo, la cocina se podría inclinar si aplica mucha fuerza o peso para abrir la puerta, si es que el soporte para evitar que la cocina se voltee no esté ajustado correctamente. Para reducir el riesgo de que la cocina se voltee, el soporte para evitar que la cocina se voltee deberá estar correctamente instalado. ADVERTENCIA • TODAS LAS COCINAS SE PUEDEN VOLTEAR • PERSONAS PODRIAN RESULTAR HERIDAS • INSTALE EL SOPORTE PARA EVITAR QUE LA COCINA SE VOLTEE, QUE VIENE INCLUIDO • LEA LAS INSTRUCCIONES DE INSTALACION Asegúrese que el soporte para evitar que la cocina se voltee esté instalado: • Hale la cocina hacia adelante. • Verifique que el soporte para evitar que la cocina se voltee esté instalado en la parte del piso. • Empuje la cocina hacia atrás para que las patas posteriores queden sobre el soporte para evitar que la cocina se voltee. CONEXIÓN ELECTRICA ADVERTENCIA Conexión a tierra incorrecta puede ocasionar el riesgo de choque eléctrico. Si el cordón eléctrico se encuentra dañado, haga que un Centro de Servicio autorizado por Avanti Products lo reemplace. o o o o o o o El electrodoméstico debe se propiamente instalado y conectado a tierra por un técnico calificado, de acuerdo a los Códigos Nacionales Eléctricos ANSI/NFPA No.70 (ultima edición) y los códigos eléctricos locales requeridos. La instalación debe ser hecha por un electricista licenciado. La cocina debe ser conectada de forma permanente con Cables Fijos o un Juego de Cables de Suministro Eléctrico. El cable de suministro eléctrico no se incluye, pero está disponible a través de las casas de suministro eléctrico locales. Use solamente cables de 3-conductores o 4-conductores, aprobados por UL, de ratio de 40amps con 125/250V mínimos de rango de voltaje. Estos cables pueden ser provistos con un interruptor o con un conector de conducto. La cocina debe estar conectada al voltaje eléctrico correcto y a la frecuencia especificada en la etiqueta de especificaciones. La cocina puede ser conectada directamente a la caja de fusibles usando un cable de cobre (con cable a tierra) que sea flexible, blindado o enfundado sin metal. Permita 2 o 3 pies de distancia en la línea para que se puede mover si alguna vez necesita servicio. Para seguridad personal, la cocina debe estar correctamente conectada a tierra. Remueva el fusible o apague el interruptor antes de empezar la instalación. 26 o o No intente reparar o reemplazar cualquier pieza o pare de la cocina a no ser que sea recomendado específicamente en este manual. Cualquier otro tipo de servicio o mantenimiento debe ser referido a un técnico calificado. Para minimizar la posibilidad de choque eléctrico, desconecte la cocina del suministro eléctrico A/C, antes de empezar el mantenimiento. NOTA: Apagar la cocina no la desconecta del suministro eléctrico. Recomendamos que llame un técnico calificado para dar mantenimiento a su cocina. INSTALACION DEL CORDON DE 3 ALAMBRES o o o o o o o o Retire la placa de acceso del bloque terminal que se encuentra en la parte de atrás de la cocina, removiendo los 2 tornillos. Ensamble el interruptor en el agujero del soporte. Inserte el cordón eléctrico al interruptor y ajuste. Deje suficiente espacio para conectar las terminales de cordón al bloque terminal fácilmente. Retire las 3 arandelas y tuercas de alambre del bloque terminal. Coloque el cordón por los agujeros del terminal. El cable a tierra o neutral del cordón eléctrico debe estar a la terminal neutral, que se encuentra en el centro del bloque terminal. Las puntas deben ser conectadas a los terminales exteriores. Coloque las arandelas y tuercas y ajústelas. Ensamble la placa de acceso del bloque Terminal. INSTALACION DEL CORDON DE 4 ALAMBRES o o o o o o o o o Retire la placa de acceso del bloque terminal que se encuentra en la parte de atrás de la cocina, removiendo los 2 tornillos. Ensamble el interruptor en el agujero del soporte. Inserte el cordón eléctrico al interruptor y ajuste. Deje suficiente espacio para conectar las terminales de cordón al bloque teminal fácilmente. Retire las 3 arandelas y tuercas de alambre del bloque terminal. Retire el sostén del marco de la cocina y la terminal, removiendo el tornillo y cortando como se indica en la página 14. Coloque el cordón por los agujeros del terminal. El cable a tierra o neutral del cordón eléctrico debe estar a la terminal neutral, que se encuentra en el centro del bloque terminal. Las puntas deben ser conectadas a los terminales exteriores. Coloque las arandelas y tuercas y ajústelas. Ensamble la placa de acceso del bloque terminal. NIVELANDO LA COCINA La cocina debe estar nivelada para que opere optimamente. Las cuatro patas niveladoras tienen tornillos para nivelar y se encuentran en las esquinas inferiores de la cocina. Gírelas en el sentido horario para subir la cocina o en sentido anti-horario para bajar la cocina hasta que esté nivelada. Use un nivel en la superficie para verificar que la cocina esté nivelada. 27 INSTALACION DEL SOPORTE PARA EVITAR QUE LA COCINE SE VOLTEE Para reducir el riesgo que la cocina se voltee o voltee debido al uso inapropiado o al poner demasiado peso sobre la puerta del horno, la cocina debe estar asegurada e instalada correctamente con el soporte para evitar que la cocina se voltee, el cual viene incluído con la cocina. o Coloque el soporte para evitar que la cocina se voltee en el piso, tal como se muestra en la página 15. El soporte puede ser instalado tanto en el lado derecho como en el izquierdo. o Marque en el piso, el lugar donde coincidirán los dos agujeros del soporte. o Use un taladro de 5/16” e inserte un ancla de plástico. o Asegure el soporte al piso usando los tornillos que incluímos. o Coloque la cocina en su sitio. NOTA: si la cocina se cambia de ubicación, el soporte deberá ser removido e instalado en el nuevo lugar. OPERANDO SU COCINA PANEL DE CONTROL 1. 2. 3. 4. 5. 6. 7. 8. Perilla selectora de función del horno Perilla de temperatura del horno Perilla de control de la hornilla delantera izquierda Perilla de control de la hornilla trasera izquierda Perilla de control de la hornilla trasera derecha Perilla de control de la hornilla delantera derecha Luz indicadora cuando el horno está encendido Luz indicadora cuando las hornillas están encendidas o Perilla selectora de función del horno Hay tres funciones – OVEN LIGHT, BAKE y BROIL. Para apagar los calentadores del horno gire el selector de función a la posición OFF. o Perilla de temperatura del horno 28 Gire la perilla en sentido horario para seleccionar la temperatura deseada hasta un máximo de 450ºF. Para apagar el horno, gire el control de temperatura la posición OFF. o Perilla de control de las hornillas La cocina cuenta con cuatro hornillas. Para operar las hornillas simplemente presione y gire la perilla ala posición deseada. Estos controles van desde baja a alta temperatura, teniendo una serie de posiciones numéricas. Para apagar la hornilla, gire la perilla de control a la posición OFF. o Luces indicadoras La luz del horno o la de las hornillas se encenderán independientemente cuando el horno o las hornillas respectivamente se enciendan. USANDO LAS HORNILLAS Su cocina está equipada con cuatro hornillas de dos tamaños diferentes. Tres de ellas tienen 6” pulgadas y una de ellas tiene 8” pulgadas de tamaño. Los controles de estas hornillas son fácilmente operables. Simplemente presione y gire la perilla a la posición deseada. Cuando la hornilla reciba energía, la luz indicadora TOP se encenderá, no importa la temperatura que haya elegido o cuantas hornillas haya encendido a la vez. El control tiene un rango variable que va desde LO (baja temperatura) a HI (alta temperatura) con una serie de posiciones numéricas entre la alta y la baja. El nivel de temperatura se incrementa al girar la perilla hacia la temperatura HI y se baja al girar la perilla hacia la temperatura LO. El punto sólido en la superficie de la cocina indica cual de las hornillas está siendo activada por cada perilla. IMPORTANTE: Para encender, siempre presione ligeramente la perilla de control y luego gírela. CONSEJOS PARA USAR LA COCINA Las características físicas de las ollas y sartenes influencian el desempeño de cualquier cocina. Por tanto, debe enfatizar la importancia de usar el equipo de cocina apropiado. o o o o o o Use equipo de cocina con fondos planos y tapas que ajusten bien, para conservar energía y acortar los tiempos de cocción. Solamente ciertos tipos de ollas de vidrio, vidrio/cerámica, cerámica, arcilla u otros esmaltados son recomendables para uso en esta cocina. Los fabricantes recomiendan que se usen temperaturas bajas a medianas cuando use ollas de vidrio. El tamaño de la olla debe ser adecuado para el tamaño de la hornilla. Una olla ligeramente más grande que la hornilla cubre todo el calentador y previene derrames y salpicaduras que podrían llegar a la hornilla y quemarse. Usar una olla más pequeña que la hornilla es un desperdicio de energía. Para evitar salpicaduras y maximizar la eficiencia, los fondos de las ollas deberán estar limpios y secos antes de calentar las hornillas. Limpie las salpicaduras en las hornillas con un trapo húmedo tan pronto como se hayan enfriado, para acortar el tiempo de limpieza. Asegúrese que las perillas de control estén en la posición OFF. Si una hornilla permanece roja por mucho tiempo, probablemente el fondo de la olla no sea lo suficientemente plano o sea muy pequeño para la hornilla. El uso prolongado de los utensilios incorrectos podría resultar en daño a la hornilla, la cocina, los cables y alambres, y las áreas que los rodean. Para prevenir el daño use el utensilio correcto, empiece la cocción en la posición HI y luego baje la temperatura para seguir cocinando. 29 o o Nunca deje en las hornillas calientes una olla vacía o una que se le evaporó el contenido. La olla podría sobrecalentarse y dañarse o dañar la hornilla y la cocina. Asegúrese de siempre dejar las perillas de control en la posición OFF y que las luces indicadoras estén apagadas cuando no esté cocinando. ADVERTENCIA Asegúrese que las manijas de las ollas no sobresalgan del borde de la cocina, para evitar voltearlas por accidente. Esto también dificultará que los niños alcancen las ollas y/o sartenes. USANDO EL HORNO Puede usar el horno para BAKE (hornear) y BROIL (asar). Por ese motivo, el horno tiene dos calentadores diferentes, los cuales son: - Calentador de BAKE 2100 W (calentador inferior) Calentador de BROIL 2000W (calentador superior) PRECAUCION: La puerta del horno se calienta mucho durante la operación. Mantenga a los niños alejados y lejos del alcance de la puerta. ADVERTENCIA: La puerta está caliente, use la manija para abrirla o cerrarla. TERMOSTATO DEL HORNO Esta perilla solo controla la temperatura de cocción y no enciende el horno. Gírela en sentido horario hasta alcanzar la temperatura deseada (desde WARM (tibio) hasta 450ºF. La luz indicadora de encendido se enciende cuando el calentador está funcionando. TABLA DE TEMPERATURAS PERILLA DE CONTROL WARM (tibio) 200 250 300 350 400 450 TABLA DE TEMPERATURAS TEMPERATURA EN ºF 150 200 250 300 350 400 450 TEMPERATURA EN ºC 65 93 121 149 177 204 232 PERILLA DE SELECTOR DE FUNCION Gire la perilla en sentido horario para que el horno caliente de acuerdo a alguna de las siguientes funciones: Luz del Horno 30 El horno está equipado con una luz que ilumina el horno para que pueda controlar visualmente los alimentos que está preparando. Al mover la perilla a la posición indicada, la luz del horno se encenderá. La luz del horno se mantiene encendida mientras cualquiera de las funciones esté en ON. Bake (hornear) En esta función, solamente el calentador inferior se enciende. El calor se distribuye por convección natural. El control de temperatura puede ir desde WARM (tibio) hasta 450ºF. Mientras esté en uso, la luz indicadora está encendida. La luz indicadora se mantendrá encendida mientras que el horno está en operación. Para hornear, siga los siguientes pasos: 1. Coloque la rejilla en la posición correcta antes de encender el horno. 2. Gire la perilla de control a la posición BAKE 3. Gire la perilla de control de temperatura a la deseada 4. El calentador se encenderá y apagará continuamente para mantener la temperatura deseada. Verifique si los alimentos están listos al tiempo que indique la receta. Cocine un poco más si es necesario. 5. Cuando termine de hornear, gire la perilla de función y la perilla de temperatura a la posición OFF, abra la puerta completamente y luego retire los alimentos. Para obtener mejores resultados, recuerde siempre que el aire caliente debe circular alrededor de los recipientes que estén dentro del horno para que el aire caliente sea uniforme y alcance todas las partes del horno. Por tanto, coloque los recipientes en el centro del horno y deje por lo menos 2” pulgadas de espacio entre los recipientes y el horno. Broil (asar) En esta función, solamente el calentador de arriba se encenderá. El calor redistribuye por radiación. Asegúrese que la puerta del horno esté cerrada. EL control de temperatura puede variar entre WARM (tibio) hasta 450ºF. Para asar, siga los siguientes pasos: Coloque la carne en la rejilla de asar y esta en la bandeja. Siempre use la rejilla para que la grasa caiga en la bandeja, de otra forma los jugos podrían encenderse. No ase sin usar la bandeja. 1. Coloque la bandeja en el segundo nivel contando desde arriba). 2. Gire el control de función a la posición BROIL. 3. Gire el control de temperatura a la temperatura deseada. 4. El calentador se encenderá y apagará continuamente para mantener la temperatura deseada. Para mejores resultados, el horno deberá ser precalentado por 5 minutos antes de colocar la comida que será asada. Déle vuelta a la comida cuando llegue a la mitad del tiempo de cocción. Asegúrese que la puerta del horno esté cerrada. 5. Cuando termine de asar, gire la perilla de función y la perilla de temperatura a la posición OFF, abra la puerta completamente y luego retire los alimentos. Recuerde que cuando el horno esté caliente, las superficies externas también estarán calientes. IMPORTANTE Siempre use guantes de cocina protectores cuando coloque o retire la bandeja de asar, las rejillas, recipientes u otros utensilios de cocina fuera del horno. 31 REJILLA DEL HORNO La rejilla está diseñada con un dispositivo que permite que, cuando colocada correctamente, la rejilla parará antes de ser sacada completamente del riel del horno y no se volteará cuando saque los alimentos del horno, o los coloque. Cuando coloque recipientes en la rejilla, hálela hasta el tope en el riel. Coloque el recipiente en la rejilla y luego empuje la rejilla dentro del horno. Para sacar la rejilla del horno, hálela hacia ud, levante el frente y hálelo. CUIDADO Y MANTENIMIENTO INFORMACION GENERAL • • • • • PRECAUCION: antes de empezar cualquier operación de limpieza y mantenimiento, desconecte la cocina artefacto del suministro eléctrico. Le aconsejamos que limpie la cocina cuando se encuentre fría, especialmente cuando vaya a limpiar las partes esmaltadas. Evite dejar substancias alcalinas o ácidas (jugo de limón, vinagre, etc.) en las superficies. Evite usar productos de limpieza con cloro o base ácida. El horno debe ser siempre limpiado después de cada uso, usando productos adecuados y recordando que al usarlos por 30 minutos en la temperatura más alta, elimina la mayoría de residuos reduciéndolos a cenizas. LIMPIANDO SU COCINA • • • • • • • Desconecte el suministro eléctrico A/C de la caja general o interruptor, verifique que la cocina esté apagada y que todas las hornillas estén apagadas y frías antes de mover nada. Luego retire todos las piezas incluyendo las rejillas. Limpie las superficies interiores con una solución de agua tibia y polvo de hornear. La solución deber ser aproximadamente 2 cucharadas de polvo de hornear por cada litro de agua. Limpie las rejillas con una solución de detergente suave. La parte externa de la cocina se debe limpiar con una solución de detergente suave y agua tibia. Exprima el exceso de agua de la esponja o trapo cuando limpie el área de las perillas de control, o cualquier parte eléctrica. Limpie la superficie con una solución de agua tibia y detergente suave. Enjuague bien y seque con un trapo limpio que sea suave. No use esponjas de metal o cepillo de metal en las superficies. LIMPIANDO LA SUPERFICIE DE LA UNIDAD Y LOS PLATILLOS REFLECTORES • • Desconecte el suministro eléctrico A/C de la caja general o interruptor, verifique que la cocina esté apagada y que todas las hornilla estén apagadas y frías antes de mover nada. Luego retire todas las piezas incluyendo las hornillas y platillos reflectores. Para retirar las hornillas y los platillos reflectores haga lo siguiente: o Levante ligeramente la hornilla por el lado opuesto a la conexión, lo justo para que sobresalga al platillo. o Hale la hornilla suavemente hasta que se desconecte del receptáculo. o Una vez retirada la hornilla, el platillo se puede levantar. 32 • • Limpie las hornillas y los platillos reflectores con una solución de detergente suave y agua tibia. Exprima el exceso de agua de la esponja o trapo cuando las limpie. Coloque nuevamente las hornillas y los platillos reflectores de la manera siguiente: o Alinee la abertura del platillo reflector y la conexión de la hornillas, mantenga la hornilla lo más nivelada posible con el Terminal colocado dentro del receptáculo, luego empuje la hornilla dentro del receptáculo. o Cuando la Terminal sea empujada dentro del receptáculo lo más adentro posible, presione el lado opuesto de la hornilla hasta que quede en su lugar. NOTA: No sumerja las hornillas en agua u otros líquidos. TAPA DE LA COCINA Ud. puede acceder el área debajo de la superficie de la cocina para efectos de limpieza, al levantar la tapa. Para hacerlo: • • • • • Sostenga la tapa por ambas esquinas delanteras y tire hacia arriba. Una vez que haya levantado, coloque la varilla de soporte en su lugar. Coloque la tapa sobre la varilla de soporte. Limpie con una solución de agua jabonosa. Use una esponja de metal en áreas muy manchadas. Para bajar la tapa, levante la tapa sosteniéndola de la parte delantera. Guarde la varilla de soporte en su lugar. Baje la tapa a su lugar. Mientras lo haga, asegúrese que la parte delantera de la tapa cubra la parte superior del panel de control. NOTA: no tire o suelte la tapa bruscamente. De hacerlo, podría herirse o causar daño a la cocina. GAVETA DE ALMACENAJE REMOVIBLE Para efectos de limpieza, puede remover la gaveta al halarlo hacia fuera hasta que ceda más, entonces levántelo. Nunca almacene ningún material inflamable en la gaveta. REEMPLAZANDO LA LUZ DEL HORNO Antes de empezar cualquier mantenimiento de las partes eléctricas, debe desconectar la cocina del suministro eléctrico. • • • • • Deje que el horno y los calentadores se enfríen. Desconecte el suministro eléctrico. Retire la cubierta protectora. Desenrosque y reemplace el bombillo con uno nuevo que sea adecuado para uso en altas temperaturas (300ºC – 570ºC) y que cuente con las mismas especificaciones: 250V 60Hz, 15W, E14. Coloque la cubierta protectora. NOTA: El bombillo de reemplazo del horno no está cubierto por la garantía. 33 PROBLEMAS CON SU COCINA ELECTRICA? Ud. Puede resolver muchos problemas comunes a los electrodomésticos fácilmente, ahorrándose el costo de una posible llamada al servicio técnico. Pruebe las sugerencias mencionadas abajo para ver si puede resolver el problema antes de llamar al servicio técnico. GUIA DE PROBLEMAS PROBLEMA CAUSA POSIBLE • Las hornillas no mantienen el hervor • Debe usar ollas y/o sartenes que o las frituras demoran mucho. tengan los fondos completamente planos. • Los fondos de lasillas y/o sartenes deben ser del tamaño de la hornilla que use. • Los alimentos tardan mucho en • Está usando ollas y/o sartenes cocinarse. inapropiadas. • Las hornillas no funcionan. • Puede tener un fusible quemado o el interruptor apagado. • La hornilla no está bien conectada al receptáculo. • No uso la perilla de control correctamente. • Los controles de temperatura no • Si es una perilla de control de giran. hornillas, presiónela antes de girarla. • Si es una perilla de control del horno, debe girarla en sentido horario. • La luz del horno no funciona. • El bombillo está suelto o está quemado. • El interruptor de encender la luz del horno está roto. • El horno no funciona. • Puede tener un fusible quemado o el interruptor apagado. • No usa la perilla de control correctamente. • Los alimentos no se asan • La perilla de control del horno no correctamente. está en BROIL. • La rejilla está en la posición incorrecta. • El recipiente no es apropiado para asar. • El termostato del horno está defectuoso. • Los alimentos no se hornean • La perilla de control del horno no correctamente. está en BAKE. • La rejilla está en la posición incorrecta. • El recipiente no es apropiado para asar. • El termostato del horno está defectuoso. 34 REGISTRATION INFORMATION Thank you for purchasing this fine Avanti products. Please fill out this form and return it within 100 days of purchase and receive these important benefits to the following address: Avanti Products, A Division of The Mackle Co., Inc. P.O. Box 520604 - Miami, Florida 33172 USA Protect your product: We will keep the model number and date of purchase of your new Avanti Products product on file to help you refer to this information in the event of an insurance claim such as fire or theft. Promote better products: We value your input. Your responses will help us develop products designed to best meet your future needs. ----------------------------------------------------------(detach here)---------------------------------------------------------Avanti Registration Form __________________________________ Name _____________________________________ Model # Serial # __________________________________ Address _____________________________________ Date Purchased Store/Dealer Name __________________________________ City State Zip ______________________________________ Occupation __________________________________ Area Code Phone Number As Your Primary Residence, Do You: Own Rent Did You Purchase An Additional Warranty: Extended Food Loss None Reason For Choosing This Avanti Product: Please indicate the most important factors that influenced your decision to purchase this product. Price Product Features Avanti Products Reputation Product Quality Salesperson Recommendation Friend/Relative Recommendation Warranty Other_______________________ Your Age: under 18 18-25 26-30 31-35 36-50 over 50 Marital Status: Married Single Is This Product Used In The: Home Business How Did You Learn About This Product: Advertising In Store Demo Personal Demo Other_______________________________ Comments____________________________ _____________________________________ _____________________________________ 35 PRINTED IN CHINA 36