1
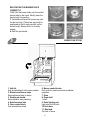
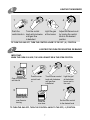
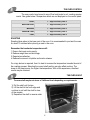
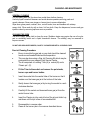
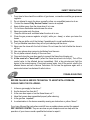
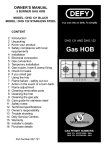
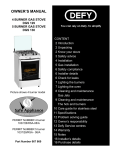
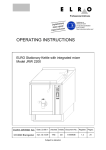
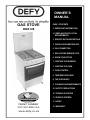
OWNER’S
MANUAL
PAGE / CONTENTS
GAS STOVE
2 IMPORTANT INFORMATION
OGS148
2 COMPLIANCE WITH LOCAL
REQUIREMENTS
3 SERVICE INSTALLER DETAILS
3 INSTALLATION BEFORE USE
4 GAS CONNECTION
6 RELOCATING BURNER CAPS
6 KNOW YOUR STOVE
7 LIGHTING THE BURNERS
7 LIGHTING THE OVEN
8 OVEN CONTROL
8 TEMPERATURE GUIDE
8 THE OVEN SHELF
9 CLEANING AND MAINTENANCE
10 SAFETY PRECAUTIONS
10 TROUBLE SHOOTING
11 SERVICE CENTRES
Safe Appliance
LP Gas Safety Association
11 NOTES
PERMIT NUMBER
1037-40/1-RSA-12-A
12 WARRANTY
www.defy.co.za
1
1
IMPORTANT INFORMATION
Important: Read these instructions for use carefully so as to familiarize yourself with
the appliance before connecting it to its gas container. Keep these instructions for
future reference.
Do not use the stove if it is damaged. Report the damage to your dealer, who will take the
necessary corrective action.
Please keep your sales invoice in a safe place. You may need it at a future date as proof of
purchase for warranty purposes.
The manufacturer of this product constantly strives for further improvement.
For this reason the specifications and design of the stove are subject to change
without notice.
2
COMPLIANCE WITH LOCAL REQUIREMENTS
FLEXIBLE HOSE - Not supplied.
Any hose that is used to connect the stove to the gas system shall comply with SANS 1156
-2 or BS 3212.
TEMPORARY INSTALLATION.
Flexible hose connection from the gas appliance to the cylinder can be made .
Ensure that pipe clamps are tightened correctly and are of good quality.
GAS CYLINDER - Not supplied.
For best results we recommend that gas cylinders with a minimum capacity of 19kg be
used.
REGULATOR - Not supplied.
A 2,8 kPa LPG gas regulator which complies with SANS 1237 must be used.
PERMANENT INSTALLATION.
The appliance may only be installed by a Qualified Gas Fitter who is registered with the
LPGSASA.
All registered Gas Fitters are issued with an identity card which carries their registration
number.
Make a note of this in the box provided on page 3
The Gas Fitter should also provide you with a written certificate after completion of the
work.
Failure to comply with the above will render the Warranty invalid.
2
Before the installer hands over the appliance be sure that you fully understand:
a) The position of the isolation or shut-off valve in the gas supply line to the appliance.
b) The requirements for safe operation of the appliance.
NOTE
This appliance is supplied ex-factory with jets and air settings for use with
Liquid Petroleum Gas ( LPG ) only.
Note: A stove without a flame failure device may only be used with a free standing
cylinder placed adjacent to but not closer than 300 mm to the stove.
RECORD INSTALLERS DETAILS HERE
INSTALLATION BEFORE USE
3
Unbox the stove and remove all packaging and protective wrapping.
Adhesive residue may be cleaned off using benzine or alcohol and then rinsed with water.
Please ensure that you dispose of the packaging in a responsible manner. Plastic bags
should be cut up to prevent children playing with them and accidentally suffocating.
Stand the stove on a solid flat and level floor capable of supporting it's weight without
flexing.
The stove should be located away from draught, direct
sunlight, cooling appliances and any
combustible materials such as curtains and plastic
containers.
The stove should have an air gap of at least 50mm.
around the back and sides for ventilation purposes and
a space of at least 850mm. above the cooking surface.
The gas pressure regulator should be accessible and
located near the stove.
3
850mm
50mm
50mm
50mm
4
GAS CONNECTION
GAS SUPPLY
The stove has been designed to operate on Liquid Petroleum Gas.
Connecting hardware, gas bottles, regulators and hoses are not supplied with the stove.
These must be purchased and must comply with local by-laws.
LIQUID PETROLEUM GAS
Installation using a 1/2" Flexible Pipe
Pressure regulator
to gas bottle.
2.8kPa Pressure
1/2" Thread
Inlet
elbow
Flexible 1/2" Pipe
2 washers
Installation using a plastic hose
Pressure regulator
to gas bottle.
2.8kPa Pressure
to hose
Plastic hose
2 hose clamps
GAS CONNECTION
Connect the gas hose, ensuring that no part of the gas hose touches the back
of the stove.
2 Washers
Flexible 1/2" Pipe
Plastic Hose
Correct gas connection
2 Hose clamps
Wrong gas connection
IMPORTANT
THE STOVE IS MANUFACTURED TO OPERATE ON LIQUID PETROLEUM GAS ( LPG)
ONLY.
4
Connecting the Gas bottle to the stove using a plastic hose
1
2
3
Fit the hose over
Tighten the hose Fit the other end of the hose
Connecting
the Gas bottle to
the stove using a to
flexible
pipe regulator
the inlet coupling
clamp
the pressure
and tighten the hose clamp
1
Loosen the nut and
remove the sealing ring and inlet coupling
Connecting the Gas bottle to the stove using a flexible pipe
1
2
Replace the sealing ring
and screw in the elbow
4
3
32
Place a washer
Using a washer,attach over the internal thread
one end of the pipe
and attach the other end
to the elbow
of the pipe to the
gas pressure regulator
AFTER CONNECTION CHECK FOR ANY GAS LEAKS
Open the gas regulator and using a paint brush, apply some soapy water to all the
couplings and connections.
The formation of bubbles will indicate a gas leak.
Leaking gas may also be identified by a characteristic smell.
If a leak is detected, do not attempt to light a burner.
Check and tighten all the connections once more. If a leak is still evident, turn the gas off
and call the nearest Defy Service Centre for assistance.
5
RELOCATING THE BURNER CAPS
CORRECTLY
1 & 2. Slot the burner body over the central
burner tube on the stove. Gently lower the
burner body into position.
3. Centralise and level the burner cap onto
the burner body. (The burner cap must be
positioned so that it rests centrally on the
burner body). Ensure that it is correctly
seated.
4. Refit the pot stands.
5
KNOW YOUR STOVE
1
3
2
4
6
5
11
7
8
9
10
1. Hob lid.
Acts as splashback in the open position.
2. Burners and burner caps.
Removable and easy to clean.
3. Double pot stands.
Removable for easy cleaning.
4. Stainless steel hob.
5. Oven control knob
Five temperature levels
6. Burner control knobs.
Push and turn action prevents accidental
operation.
7. Oven
8. Oven shelf
1 shelf.
9. Oven lighting port
Light oven at this point.
10 Oven door
11. Gas feed.
On back of stove.
6
6
LIGHTING THE BURNERS
1
2
3
Turn the control
Push the
control knob in knob anti-clockwise
until gas flow
is detected
4
Light the gas
at the burner
Adjust the flame to suit
by turning the control
knob to the desired
position
TO TURN THE GAS OFF, TURN THE CONTROL KNOB TO THE OFF ( 0 ) POSITION.
LIGHTING THE OVEN FOR ROASTING OR BAKING
7
IMPORTANT:
WHEN THE OVEN IS IN USE, THE HOB LID MUST BE IN THE OPEN POSITION
2
1
Open the oven door
and hob lid
3
Push the oven
control knob
in
4
Turn the oven control
knob anti-clockwise
until gas flow
is detected
5
Light the gas
at the bottom
burner port in
the oven
7
6
Ensure that the
oven flame is
burning
Close the
oven door
Set the oven control
to the desired level
TO TURN THE GAS OFF, TURN THE CONTROL KNOB TO THE OFF ( 0 ) POSITION.
7
8
THE OVEN CONTROL
The oven control may be set to any of five heat levels to suit cooking requirements. See guide below if temperature levels are not displayed on the control panel.
HIGH
= Approximately 290°C
MEDIUM HIGH
= Approximately 270°C
MEDIUM
= Approximately 250°C
MEDIUM LOW
= Approximately 220°C
LOW
= Approximately 180°C
ROASTING
Roasting takes place in the lower part of the oven. It is recommended to pre-heat the oven
for about 10 minutes before placing a roast in the oven.
Remember that moderate temperatures will:
1. Ensure that meat cooks evenly.
2. Reduce weight loss and shrinkage.
3. Require less attention.
4. Reduce the amount of splatter and smoke release.
If a crispy texture is required, then it is best to increase the temperature towards the end of
the roasting process. Selecting the correct shelf position can also affect cooking. The
closer to the heat source, the higher the temperature. With a little experience, excellent
results may be obtained.
9
THE OVEN SHELF
The oven shelf may be set at one of 3 different levels depending on requirements.
1) Pull the shelf until it stops.
2) Lift the shelf at the front edge and
continue to pull until the shelf is clear
of the runners.
3) Reposition the shelf in reverse order
8
10
CLEANING AND MAINTENANCE
GENERAL CLEANING
For your safety wait until the stove has cooled down before cleaning.
Use only liquid household cleaners and avoid abrasive powders,scouring pads and
caustic cleaners. Never use vinegar or lemon juice to remove blemishes.
Wipe down glass panels, cabinet, door, control knobs, trims and handles with a damp
soapy cloth. Rinse and dry with a clean, lint free cloth. Keep the dispersers, burners and gas
injectors clean by removing spills as soon as possible.
CLEANING THE OVEN
Use a hot, soapy, damp cloth to clean the oven. Stubborn stains may require the use of a nylon
pad or scrubbing brush and a liquid household cleaner. The shelf(s) may be removed to
improve access.
DO NOT USE ABRASIVE POWDERS, CAUSTIC CLEANERS OR METAL SCOURING PADS.
JET CLEANING KIT
Gas Jet Cleaning Procedure
•
Every six months the gas jets on your hob should be cleaned
to ensure continued efficient and safe operation.
•
This may be done using a Gas Jet Cleaning Kit which may be
purchased from your nearest Defy Service Centre.
•
The kit comprises of a sliding T-bar (A) a socket (B) and a
‘Classic pin’ (C).
•
Fit the T-bar to the socket and remove the pot stands,
burner caps and burner bodies.
1.
Insert the socket into the central tube of the burner so that it
locates over the brass gas jet at the bottom of the tube.
2.
Gently loosen the brass gas jet by turning the socket in a anticlockwise direction.
3.
Carefully lift the socket and loosened brass gas jet from the
central burner tube.
4.
Insert the Classic pin into central hole of the jet and slide it up
and down until the jet is free of accumulated dirt.
5.
6.
Re-assemble in reverse order.
Clean all the burner jets in the manner described above.
9
A
B
C
1
2
3
4
11
SAFETY PRECAUTIONS
1. From time to time check the condition of gas hoses, connections and the gas pressure
regulator.
2. Do not attempt to repair the stove yourself or allow an unqualified person to do so.
3. Contact the nearest Defy Service Centre if service is required.
4. Keep children away from the stove when it is in use.
5. Do not leave flammable materials near the stove.
6. Never pour water onto the stove.
7. Keep the kitchen well ventilated when the stove is in use.
8. Close the gas pressure regulator at night ( while you sleep ) or when you leave the
house.
9. Keep the gas bottle out of the kitchen if possible and in a well ventilated place.
10. Turn pot handles inwards so they will not protrude beyond the stove.
11. Never use the stove with the hob lid down. Do not lower the hob lid while the stove is
still hot.
12. Use oven gloves when removing hot dishes from the oven
13. Do not place a utensil directly on the oven floor.
14. Open and close the oven door gently to prevent the flame from blowing out.
15. In the event of a "burn back"- (when the flame burns back into the jet ) Turn off the
control valve to the affected burner immediately. Wait a few minutes and light the
burner in the normal manner. If burn-back occurs again, turn off the control valve to the
affected burner and call a Service Technician. Do not use the appliance again until a
service technician has declared it safe to do so.
12
TROUBLE SHOOTING
BEFORE CALLING A SERVICE TECHNICIAN TO ASSIST WITH A PROBLEM,
PLEASE CHECK THE FOLLOWING:
1.
2.
3.
4.
5.
6.
Is there a gas supply to the stove ?
Are the burners free from dirt ?
Is the oven door open or has the flame blown out ?
Have the burners been assembled properly after cleaning.
Is the gas flow impeded ?
Is contamination in the burner assembly causing an obstruction or yellow flame ?
If you have followed the instructions and still have a problem please contact the nearest
DEFY SERVICE CENTRE. They are as close as your telephone and can help with the
operation of your stove or send a qualified technician to repair it.
10
13
SERVICE CENTRES
Service Centres
If you have followed the instructions and still have a problem, contact the nearest
Defy Service Centre.
Service Centres are located in Bloemfontein, Cape Town, Durban, East London,
Johannesburg, Polokwane, Port Elizabeth and Pretoria.
Other areas are serviced by over 200 authorised Service Agents.
Consult your telephone directory for the nearest regional Defy Service Centre.
14
NOTES
11
15
WARRANTY
This certificate is issued by DEFY APPLIANCES (PTY) LIMITED Manufacturers of Defy and Ocean
products, hereinafter the Company, to the original purchaser only, of the appliance described on the
certificate and shall constitute the only warranty given in respect of this appliance.
The company warrants to the original purchaser that for a period of TWO YEARS from the date of
purchase, the appliance is free from defect under normal domestic use, both in workmanship and
material subject to the following conditions.
1 Repair or replacement of any part of this appliance, found by the Company to be defective, shall
be at the election of the Company.The Company reserves the right to effect such service through
any of its Service divisions or Authorised Service Dealers. The cost of such service shall be borne
by the Company in full, provided the appliance is located no further than 50km. from a Company
Service centre or an Authorised Service Dealer.Where the appliance is located beyond the 50km.
radius, the purchaser shall be liable for the standard travelling charges,as determined by the
Company.
CARRY IN SERVICE
Microwave ovens, Compact cookers and small appliances are repaired in our Service centres and
are not collected from the customers home. Faulty units should be delivered to the purchasing
dealer or to the nearest Company Service Centre for warranty repairs.
2
Vitreous enamelware, fuses and lamps are specifically excluded from these warranties. It is the
express condition of these warranties that the purchaser takes due care and attention in the use and
maintenance of the appliance. Abuse, misuse in conflict with the operating instructions,connection to
incorrect voltages and subjection to commercial use shall release the Company from its obligations.
3
This warranty shall become void and cease to operate if the appliance is dismantled by, or any
repairs to the appliance are effected by any persons not authorised by the Company, or if substitute
parts not approved by the Company are used in the appliance, or if the serial number has been
removed.
4
The Company shall not be responsible for damages resulting from fire, flood, civil disturbances
or any Act of God. The Company shall not, in terms of these warranties be responsible nor held
liable for any consequential loss or damage of any kind caused by or due to the failure or
malfunction of the appliance.
5
The Company shall not be responsible for transportation or other costs other than those
incurred within the provisions of Point 1 of this certificate.
6
These warranties shall not apply to the appliance if it is purchased or used beyond the borders
of the Republic of South Africa,Namibia, Botswana, Swaziland and Lesotho.
7Where service is requested under warranty and no fault or defect can be found by the Company, all
costs incurred will be for the purchaser's account.
8This Certificate as well as your invoice will serve as proof of purchase. For the purpose of warranty
it will be essential to produce this CertificateMand invoice. Failure to do so will render the purchaser
liable for service costs.
KEEP THIS CERTIFICATE AND SALES INVOICE. IT IS PROOF OF PURCHASE FOR
WARRANTY PURPOSES.
12