1
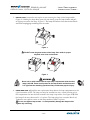
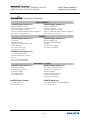
RPMS-D100U/UF,
CS50-D100U, CS70-D100U/UF
Lamp Replacement
- Instruction Sheet -
Introduction
Applies to RPMS-D100U/UF (38-GFX204-01, 38-GFX205-01, 38-GFX206-01, 38-GFX207-01),
CS70-D100U/UF (38-GFX052-xx, 38-GFX053-xx) and CS50-D100U (38-GFX054-xx).
RPMS-D100U/UF, CS50-D100U and CS70-D100U/UF units use two identical 100W UHP
(Ultra High Pressure) lamps and can be operated with both lamps ON (Dual Lamp Operation
mode) or with one lamp ON (Single Lamp Operation mode). The projector will automatically
switch modes to maintain continuous operation. Use the following information and
instructions when replacing the lamps in these projectors.
NOTE: Refer to the User’s Manual (54-017188-xxP) for more information on Lamp Operation
Modes.
Components Required
Lamp Replacement Kit #03-240088-xxP (kit includes 100W UHP lamp, instructions, lamp warranty claim form,
RMA form, service safety sheet)
Phillips #1 screwdriver
Safety and Warning Guidelines
Please read before proceeding with lamp replacement
•
•
Read the Lamp Replacement procedure in its entirety before proceeding.
Never stick hands into an empty lamp compartment while the projector is still
plugged into an AC outlet.
•
Use caution when handling lamps. Lamps, even those that have been through a
cool down period, are still hot due to the heat emitted from the other operational lamp.
•
Do not touch the glass surface of the lamp. Grip the lamp by the handle only.
Fingerprints left on the glass surface of a lamp can lead to an intense accumulation of
heat called “hotspots” that could potentially cause the lamp to explode. Wear clean,
lint-free cotton gloves when handling the lamp to prevent fingerprints.
Instructions
When should lamps be replaced?
Typically, aging lamps decrease slightly in their intensity. You can check the number of hours
each lamp has been in use by checking Lamp Hours in individual lamp submenus. From the
Lamp menu, you can also set a Lamp Limit (max 20,000 hours) and enable the projector to
send a lamp replacement, warning message when it’s powered on.
At anytime during operation, you can check the status of a lamp by checking the Lamp Strike
Status in individual lamp submenus — More, Lamp 1 or More, Lamp 2. You will see one of six
states: “Good”, “Cooling Fan #3 Failed”, “Cooling Fan #5 Failed, “Interlock Tripped”, “Failed
to Strike” and “Turned Off Unexpectedly”. A status of “failed to strike” or “turned off
unexpectedly” indicates a failure that requires further investigation and may or may not be
directly related to the lamp.
54-003766-01P (10/04)
1 of 6
RPMS-D100U/UF,
CS50-D100U, CS70-D100U/UF
Lamp Replacement
- Instruction Sheet -
If you have ruled out the cause being an aged lamp or another component in the projector, it
may indicate that your lamp has prematurely burned out or failed for some other reason (check
status LEDs and/or error codes through RS-232, if possible). Burned out lamps or lamps that
have failed due to some characteristic flaw should be replaced, as soon as possible.
In general, monitor the performance of your projector and replace lamps as needed.
About the Lamp Hot-Swap Feature
The projector is designed with the ability to remain operational during lamp replacement. You
can replace a single lamp without having to power down the projector. In this case, it is
strongly recommended that you switch to the single lamp mode for the lamp that you are not
replacing. For example, if you want to replace Lamp 1, switch to the Single, Lamp 2 mode of
operation. By switching modes, you cut power to the lamp that you want to replace, only after
the other lamp successfully turns on. It may take a minute for the lamp you just turned on to
reach full brightness, but your presentation will not be interrupted.
Once you have removed a lamp from the module, the lamp interlock remains “open”. As an
added safety feature, the projector will power down if you do not install another lamp (good or
bad) back into the module within two minutes from the time you removed the old lamp.
Can “live” lamps be replaced?
Live lamps (lamps that are still on) can be hot-swapped out of the projector. However, this is
not common practice and it is strongly recommended that you cut power to the lamp you are
about to replace, by switching Single Lamp modes, as described above.
If you still want to continue with replacing a “live” lamp it is important to remember that
when the lamp is removed the power supply for that side of the module is still active. Do not
stick your hands in the compartment!
NOTE: If you pull the only “live” lamp out in Single Lamp mode, the projector automatically
tries to turn the other lamp on. If this lamp was previously declared as a failed lamp, then the
projector automatically powers down.
To replace a lamp:
1. TURN PROJECTOR OFF: If your presentation allows, it is recommended that you power
down the projector prior to replacing a lamp. Press Power* to power down the projector. The
projector fans will continue to operate for a short cool-down period. It is recommended
that you wait approximately 5 minutes to allow lamps to cool before replacing.
WARNING
It is strongly recommended that you allow the lamp to cool before replacing –
approximately 5 minutes.
2 of 6
RPMS-D100U/UF,
CS50-D100U, CS70-D100U/UF
Lamp Replacement
- Instruction Sheet -
HOT SWAP ALTERNATIVE: If you choose to replace a lamp without disrupting the current
presentation, it is recommended that you switch to the Single Lamp mode for the lamp you are
not going to replace. Then proceed with Step 2.
2. OPEN LAMP COMPARTMENT: Loosen the two captive screws on the lamp door you want to
open. Swing the door open. (NOTE: Each lamp door is spring-loaded and needs to be held
open during lamp replacement.
NOTE: To access the lamp in a CS70,
remove the projector access panel - 7
screws.
Remove 7 screws.
NOTE: To access the lamp in a CS50,
remove the lamp access panel – 4 screws.
Figure 1.
3 of 6
RPMS-D100U/UF,
CS50-D100U, CS70-D100U/UF
Lamp Replacement
- Instruction Sheet -
3. REMOVE LAMP: Loosen the two captive screws securing the lamp in the lamp module.
(Figure 2.) Holding the lamp door open with one hand, grasp the lamp handle and pull
straight up to remove the lamp. (Figure 3.) The lamp disconnects from the terminal block
much like unplugging something from an outlet.
Figure 2.
DO NOT touch the glass surface of the lamp. Set it aside for proper
disposal once it has cooled down.
Figure 3.
WARNING
Never look or stick hands inside an open lamp compartment while the other
lamp is still ON. Power is still present in the lamp module and the heat and
U.V. light from the remaining operational lamp could cause physical injury.
4. INSERT NEW LAMP: a) Hold the new replacement lamp above the lamp compartment in the
right orientation. NOTE: The lamp can only be inserted one way. A small locating pin in
the compartment fits into the hole located in the lamp’s top surface. See Figure 4. b) Slide
the lamp all the way down until it is in place. (The lamp plugs into a terminal block.) c)
Tighten the two captive screws on the lamp module to hold it in place.
Do not over-tighten lamp screws – it could potentially damage the lamp module.
Tighten only until snug.
4 of 6
RPMS-D100U/UF,
CS50-D100U, CS70-D100U/UF
Lamp Replacement
- Instruction Sheet -
Figure 4.
5. CLOSE LAMP DOOR: Once the lamp is inserted, carefully close the spring-loaded lamp door
and lock it by tightening the two lamp door captive screws.
Watch your fingers! The lamp door is spring-loaded and will snap close. Use caution
when closing the lamp door.
6. TURN THE PROJECTOR ON (IF APPLICABLE) OR SWITCH BACK TO THE ORIGINAL LAMP
OPERATION MODE: Press Power* to turn the projector on. If you performed a hot-swap, use
the Lamp menu to return to the original lamp operation mode you were in.
7. RESET LAMP HOURS: Access the Lamp menu (item 5. in Main Menu) and select the
submenu for the lamp that you are replacing — More, Lamp 1 or More, Lamp 2. From the
submenu, select the Change Lamp option. Enter the new serial number in the Lamp S/N
text box. When the new number is recorded, the lamp timer will automatically reset to “0”
hours and begin to log time.
NOTES: 1) Once entered, the new lamp serial number is also automatically added to the
Lamp History submenu (read-only). 2) Lamp life data is required for warranty claims.
IMPORTANT
If a serial number is not entered, the lamp timer will not automatically reset
to “0” and inaccurate lamp hours will be kept and shown in the Status
menu. The lamp life limit may then expire prematurely.
5 of 6
RPMS-D100U/UF,
CS50-D100U, CS70-D100U/UF
Lamp Replacement
- Instruction Sheet -
Technical Support
NORTH AMERICA
CHRISTIE Digital Systems, Inc.
809 Wellington St. North
Kitchener, Ontario, Canada N2G 4Y7
Tel. 519-744-8005 (General)
Toll Free 1-800-221-8025 (Technical Support)
Fax 519-749-3302 (Service)
CHRISTIE Digital Systems, Inc.
10550 Camden Drive
Cypress, CA 90630
USA
Tel. 714-236-8610 (General)
Toll Free 1-800-221-8025 (Technical Support)
Fax 519-749-3302 (Service)
EUROPE
CHRISTIE Digital Systems, Inc.
View Point
200 Ashville Way
Wokingham, Berkshire RG41 2PL
United Kingdom
Tel. +44-118-977-8111
Fax +44-118-977-8112
CHRISTIE Digital Systems, Inc.
Willicher Damm 129
D-41061 Mönchengladbach
Germany
Tel. +49-2161-664540
Fax +49-2161-664546
CHRISTIE Digital Systems, Inc.
7, av Georges Pompidou
92593 Levallois-Perret Cedex
France
Tel. +33-(0)1-47-48-28-07
Fax +33-(0)1-47-48-26-06
ASIA-PACIFIC / OTHER
CHRISTIE Digital Systems, Inc.
627A Aljunied Road
# 05-02 Biz Tech Centre
Singapore 389842
Tel. 65-6877-8737
Fax 65-6877-8747
CHRISTIE Sales (Canada)
Tel. 1-800-265-2171
Fax 519-749-3136
CHRISTIE Digital Systems, Inc.
Rm. 1109-1116 Shartex Plaza
No. 88 Zun Yi South Road
Shanghai, 200336
People’s Republic of China
Tel. +86-21-6278-7708
Fax +86-21-6270-5816
CHRISTIE Sales (U.S.)
Tel. 1-800-407-7727 or 1-866-880-4462
Fax 714-503-3375
6 of 6


![CCM-LX [103-115108-01] QUICK SETUP GUIDE](http://vs1.manualzilla.com/store/data/005977333_1-ac67f3228bf0f13da08c247c088ce509-150x150.png)