1
=s)ilr
vffit
CHAilPlOll=
lnarcltolPRoDucrs
SPRJNKLER CONTROLLER
INSTALLATION
AND OPERATING GTIIDE
For Single Program Models H-4, DC-4, DC-6
Dual Program Models H-42, H-62, DC-42,
DC-62,27162
Champion Irdgation Products
1460 Naud Street, I-os Angeles, CA 90012
INSTALLATION
Where to Install Your Controller
Locate your controller indoors near a standard 120 VAC outlet. The
outlet should not be controlled by a switch or shde the same circuit
with a garage door opener, electric dryer, or other large appliance.
The location should be protected from moisture and tempemtures
exceeding 120F.
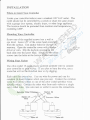
Mountin! Your Controller
Screw one of the supplied screws into a wall at
eye level. Leave 1/8" ofthe screw head extending
from the surface. Use anchor bolts for dry\tall or
masonry. Open tle conholler cover with a screwdriver or coin. Slip the keyhole opening on the
back side over the screw head. lnstall the two other
screws into the holes at the boftom of the controller.
Wirinq Your Valv€s
Use color-coded 18 gauge plastic jacketed sprinkler wire to comect
your controller to your valves. If you plan to bury the wire, use a
,oute that llill not be di:lurbed later on by digging.
wires.
Use one wire for power and one for
common (it doesn't matter which one you use). Connect the common
wires from all the valves to orle of the color coded sprinkler wires
(usually white). Connect the other wire frcm each valve to a single
color coded wire. Use wire nuts or soldff to secure the connections.
Each valve has two
42
Wiring Your Controller
Remove the controller cover. Slip the sprinkler wire through one ol
the large holes on the bottom of the controller. Attach the common
wire to the terminal marked "COM.' Attach the wire for Station #l
to the terminal marked
way.
"1".
Aftach the remaining wires the same
duard aft€r
prcgramming
Spdnkler Wre
Connectins the Transformer
Unplug the fansformd. Slip the two t ansformer wires through one
of the large holes at the bottom of the controller. Aftach one wire to
each of the terminals marked '24 VAC' Use one transformer per
contloller.
IMPORTANT: Aftel orosmmmine vour controller, remove and
discard the clear plastic battery gurd located in the battery slots.
SETTING A WATERING SCHEDI-,ILE
Move the slide switch to 'SET PROGRAM"
(On dual Program models, slide the switch to
'SET PROGRAM
The red program light
will !ql! illuminate)
A".
Se(fins the Current Time
p,"r,
ffi
n"n us"
@
change the display to the cuffent
on the left side indicates AM or
uno
[Xl
time.
PM.
to
f,gSgeer'
The dot
^M
The erample on the
right shav,r 9:45 AM
tffi
^tdf,€C€*'
Setting the Cu.rent Day of the Week
IDAY
tl
Press IWEEK] [hen use the arrow Keys
--IV ]
and I .A ] to move the day marker
(l) until it lines up with the cuffent day of
tJne week. 'Ihis example shows wednesda!
as the current dal .
$.de!'tsca'
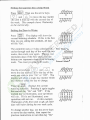
Settins the Davs to Water
pr"",
The display will show the
current watering schedule- If this is the first
time you are setting the schedule, all days
will be "On".
[]Ii]
d:la3e4.n
The controller uses a 14 day calendar that
.tErPae.r
cycles thrcugh each day of the week for two
weeks, then starts over again. The top row
represents days of the first week, and the
JdJlPt6.i
bottom row represents days of the following
sec".a
ieer<4
week. You must program both weeks.
f!-l
ll J to
and L
Use tie arrow tceys
move the day marLer I | lo the day of
$e
'
week you wish to tun "On" or "Off'. The
display will show a single day marker which
you move to select the day to change.
aDAYsl
Pressing I 6'tofi
I
FSss'ee*
sgqg^F€$
displays lhe current
watering schedule. Pressing it again toggles
the marked day "On" and "Off". Ifthe
marked day is illuminated. your sprinklers
will run. If it is not illuminated, your
In thk e\anple,
sprinklers will not
wednesdal of the frrst week is ofr, all other
doys will reater during the two week cJcle.
run.
To change another day, use the a{row keys
to move the day marker, then repeat the
previous insructions to hrrn that day "On"
ss{pts€$
or "Off". Follow these same instructions to
set the complete 14 day watering schedule.
In thh erahple, watet vr'ill come on Sun, Tue,
mu, Sat the frrst week, and Mon, wed., Fri the
second week.
sdsssef
Settins the Waterinp Sfart Times
salr ]ine I
r.z
Your controller can water once or twice per day.
Press the left button to set the first start time and
the right button to set the second start time.
a:a--:---l
Use L W
and] l\ ] to set tle desired start
time. The second start time is initially set to
"Off". If you wish to water twice a day, set a
-. fsr Rrl
second start trme usrng tne rlghtl rUE l
If
lsrARr-l
LTIME
]
TsraRrl
LnME
I
Gr^Rr-l
wish to cancel a sta( time, pressL nME
then both arrcw keys at the same time.
Dual Program Models only:
To set a second progmm, move the slide switch to
"SET PROGRAM B'. Follow the previous
instructions to set a second set of Watedng Days,
Start Times, and Station Watering Times. Note:
Do not overlap watering times on Program A & B.
s$8pcet
YOUR CONTROLLER IS NOW FULLY PROGRAMMED!
OPDRATING YOUR CONTROLLER
AI,"IOMATIC OPERATION
Move the slide switch to "AUTO & MANUAL RUN". The
controller will automatically water according to the progran(s) you've
set. [n Auto mode, stations run consecutively starting with Station #1.
flash
down
When $e controller is watering. the display will
tie aclive slation number on the left and count
$e run time on Lhe .iEhL mis eranplc shows
lJ tuhning wih 8 ninutes ,i'ateinq rinc
.,1.
... .
.d.5.".$.{.€:r
Stlion tT-Jfl
rcnainin2. .-i-#----=?
-
tdspddJ
MANUAL OPERATION
Move the slide switch to 'AUTO
& MANUAL RUN'
To Manually Start a Program:
nressffi
once to mmually start the programmed watering times.
Press the button again to stop watering and return the controller to
automatic operation.
{On dual program models. presslsi'6lrrl once to slan program A,
twice to sldn Program B. Pressllliilo \tol warering.)
To Manually Stad a Single Station:
Press the station number you wish to
start.
Press again
to stop.
OFF / RAIN
If do not want your controller to water, move the slide switch to
'OFF / RAIN'. Accurate clock time and program(s) are rerained.
To return to automatic watering, move the slide switch back to
,'AUTO
& MANUAL RUN'
SYSTEM RESET
A reset button is located under the controller cover at dle top left
corner. Use a pencil or pen to reach the bufton tbJough the small
access hole. Resetting the controller erases all prograrns. It is
sometimes necessary to use the reset after a power failure or initial
installation if the controller does not respond normally.
FUSES. BATTERIES & DEFAULT PROGRAM
Fuse: Your controller uses a I amp slow-blow fuse. The controllet
will blow a fuse if the spinller wires are shortql. Correct any wiring
problems before replacing the fuse. Always use the same firse tlpe
ard amp rating. (Never use a higher amp rating.)
Batteries: Batteries supplied with your controller maintain yout
program(s) and the correct time in the event of power failure.
Sprinklen will water when power is restorql. Undet normal
conditions, batteries should be replaced every 1-2 years. Any brand
of 1.5 volt batteries of the same size can be used. Battedes are
available at most hardware, drug and electronic stores.
Default Program: A default program built into your controller is
provided in the event of power and battery failure. The program will
water each station every day for 10 minutes starting at 5:00 AM.
SOLUTIONS TO COMMON PROBLEMS
PROBLEM
POSSIBLE CAUSES & SOLIJ"TIONS
Valve does not turn on
Wiring to valve broken.
Solenoid faulty - test valve with good one.
Power to controller is off - tsst outlet
Flow control on valve adjusted to off_
Program set for no watering time.
Excessive watet ptessure-
Fuse blows repeatedly
Short in wiring to valves
Can not set controller,
no response from any
buttons
Reset contrcller: Remove batteries,
unplug controller, then plug in again.
Wlen controller flashes 12:00, program,
then replace batteries. Repeat
Valve won't shut
off
All valves do not
turn on
On Dual Program
Models only: Program
B does not water
if
needed.
Valve needs cleaning or repair.
Controller is rundng on batteries only,
verify transformer is working.
Program set for no watering time.
Wiring to valves broken - check conmon.
Controller needs to be reset - see above.
Program B set to overlap watering times
of Program A. Set Program B to stan at
a diffe.ent time.
For more assistance call our customer seftice department atl
(800) 33-CHAMP or (213) 221-2100 from 8:00AM - 4:30pM pST.
Thank you for choosing CHAMPION. We wish you many years
reliable service
of
TWO YEAR LIMITED WARRANTY
Champion Irrigation Products warrants this product to be free
from defects in materials and workmanship for a period of two
years from the original purchase date. Champion will repair or
replacethis product (exclusive of batteries and transformer), free
of charge, if it is found to be defective when installed and used
in a Dohal manner during the walrarlty period. This warranty
does not apply to product that has been altered or damaged
through misuse or neglect. Champion is not responsible for
incidental or consequential damages which adse ftom the use or
failure of this product.
To exercise your warranty, return your controller and original sales
receipt to you. dealer.
Voltage Specification: Input: 120
VAC
Output: 24
VAC 0.3 Amp
CLASS B IRRIGATION CONTROLLER
This device generates and uses radio frequency energy and may cause
iDtederence to radio and television reception. It has been tested and
found to comply with FCC Class B specifications subpaft J, part 15,
which are designed to provide reasonable protection against such
interference in residential installations. lf you encounter interference,
you may be able to correct the problem by reorienting your antenna,
moving the controller, or putting the two devices on different outlet
circui$.
FCC TD: DDM 7ET
Revised 6/92