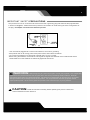
1
WALK TO FIT
MOTORIZED TREADMILL
OWNER'S MANUAL
MODEL#97670
E-mail: service@paradigmh w .com
1
IMPORTANT
SAFETY PRECAUTIONS
Basic precautions should always be followed, including the following safety instructions
when using this treadmill: Read all instructions before using this treadmill.
!
DANGER: To reduce the risk of electric shock, please read the following:
. Always unplug the treadmill from the electrical outlet immediately after using and before cleaning,
assembling, or servicing.
NOTE: Failure to follow these instructions may lead to personal injury and cause damage to the treadmill.
!
WARNING: To reduce the risk of burns, fire, electric shock or injury to any persons, please read
the following:
. Never leave the treadmill unattended when plugged in. Disconnect by turning off the master power switch, and
unplugging from the the outlet when not in use and before putting on or taking off parts.
. Use this appliance only for its intended use as described in this manual. Do not use attachments not
recommended by the manufacturer.
. Never operate this treadmill if it has a damaged cord or plug, or if it is not working properly. If it has been
dropped or damaged, or been exposed to water, return the appliance to a service center for examination and repair.
. Do not attempt any maintenance or adjustments other than those described in this manual. Should any
problems arise, discontinue use and consult a Paradigm Authorized Service Representative.
. Never operate the appliance with the air openings blocked. Keep the air openings free of lint, hair, and the like.
. Do not use the treadmill outdoors.
. Do not pull the treadmill by its power cord or use the cord as a handle.
. Keep children under the age of 16 and pets away from the equipment while in use. This machine is designed
for adults only.
. Do not operate where aerosol (spray) products are being used or where oxygen is being administered.
. Keep Dry - do not operate in a wet or moist conditions. Save these instructions.
. Do not operate the treadmill near a blanket. Excessive heating can occur and cause fire, electrical shock, or
injury to user.
. Keep electrical cord away from heated surfaces.
. Never insert any object into any opening.
2
IMPORTANT SAFETY PRECAUTIONS
. Keep the treadmill on a solid, level surface with sides at least eight feet from behind and two feet around. Be
sure the area around the treadmill remains clear during use and has adequate clearance, see illustration
below. To avoid damage to carpet or floor place the treadmill on a mat.
. To disconnect, turn all controls to the off position, then remove plug from outlet.
. This treadmill is for household use only.
. Only one person should be on the treadmill while in use.
. Wear comfortable and suitable clothing when using the treadmill. Do not use the treadmill barefoot, in only
socks or in sandals, always wear athletic shoes. Never wear loose clothing because it could run the risk of
getting caught in the treadmill.
. Always hold on to the handrails while using the treadmill.
. Always make sure the storage latch is in place when folding and moving the treadmill.
Note: It is the obligation of the owner to review and explain these safety precautions to all users of this
treadmill.
The maximum weight capacity for the following equipment is 350 lbs
!
WARNING: Connect the treadmill to a properly grounded outlet only.
See grounding
instructions. Electrical Grounding Instructions.
SAVE THESE INSTRUCTIONS
GROUNDING INSTRUCTIONS
. This product must be grounded. If it should malfunction or break down, grounding provides a path of least
resistance for electric current reducing the risk of electric shock. * This treadmill is equipped with a cord
having equipment grounding connector and a grounding plug. The plug must be plugged into an
appropriate outlet that is properly installed and grounded in accordance with all local codes
and ordinances.
!
DANGER: Improper connection of the treadmill grounding connector can result in the risk
of electric shock. Check with a qualified electrician, if you are in doubt as to whether the product is properly
grounded. Do not modify the plug provided with the treadmill. If it will not fit your outlet, have a properly
grounded outlet installed by a qualified electrician.
3
IMPORTANT SAFETY PRECAUTIONS
This product is for use on a nominal 120-volt circuit and has a grounding plug that looks like the plug illustrated
in sketch A in Figure 1. Make sure that the product is connected to an outlet having the same configuration as
the plug. No adapter should be used with this product.
Figure 1
. This unit must be plugged into a nominal 120-volt 60 hz, which has a grounding.
. Keep hands clear of all moving parts. Never place hands, feet under the treadmill.
. Do not use the treadmill on a carpet that is greater than 1/2 inch in height.
. Before using the treadmill, check that the running belt is aligned and centered on the treadmill bed and all
visible fasteners on the treadmill are sufficiently tightened and secure.
!
WARNING: Before beginning any exercise program consult your physician. This is especially
important for the persons who are over 35 years old or who have pre-existing health problems. Read all
instructions
before using any fitness equipment. We assume no responsibility for personal injury or property
!
damage sustained by or through the use of this product. Do not operate this exercise equipment without
properly fitted guards, As the moving parts can present a risk of serious injury to young children.
!
CAUTION: Read all instructions carefully before operating this product.
Owner's Manual for future reference
Retain this
4
TABLE OF CONTENTS
IMPORTANT SAFETY INSTRUCTIONS
1
WARRANTY
5
OVERVIEW DRAWING
6
PARTS LIST
7
ASSEMBLY INSTRUCTIONS
8
CAUTION
9
COMPUTER OPERATION
10
FOLDING UP AND SETTING DOWN THE TREADMILL
12
LUBRICATION AND RUNNING BELT ADJUSTMENT
13
CARE, MAINTENANCE & TROUBLE SHOOTING GUIDE
14
5
ONE YEAR LIMITED WARRANTY
Paradigm Health & Wellness, Inc. warrants to the original purchaser that this product is free from defects in material and
workmanship when used for the purpose intended, under the conditions that it has been installed and operated in according to
Paradigm’s Owner’s Manual. Paradigm’s obligation under this warranty is limited to replacing free of charge, any parts which
may prove to be defective under normal home use. This warranty does not include any damage caused by improper operation,
misuse or commercial application. From the date of purchase, the frame is warranted to be free from defects for 1 (one) year.
All parts and workmanship, including electronics and its console cases, upholstery, foam, ball bearings, pulleys, cables, shocks,
all tension mechanisms, wheels, pedals and hardware are to be free from defects for 90 days. This warranty is offered only to
the original owner and is not transferable. Proof of purchase is required.
6
OVERVIEW DRAWING
70
69
64
64
62
68
69
65
33
59
7
67
73
62
63
73
58
66
59
34
73
73
7
47
58
34
67
73
73
45
31
34
32
48
49
57
74
46
72
14
20
41
53
7
10
9
52
38
11
37
6
7
13
2
6
6
7
7
6
2
3
56
5
8
15
19
28
26
30
29
25
23
28
27
22
21
19
20
18
1
4
44
11
12
17
12
51
7
31
35
20
14
60
36
16
10
9
6
55
39
75
50
7
56
6
61
54
11
12
42
40
13
33
43
20
28
27
51
5
28
29
16
60
50
34
28
7
71
66
24
7
PARTS LIST
Most of the components of the following parts list have already been
assembled for your convenience.Please use the following list as a
reference for ordering parts only.
No.
1
2
3
4
5
6
7
8
9
10
11
12
13
14
15
16
17
18
19
20
21
22
23
24
25
26
27
28
29
30
31
32
33
34
35
Description
Main Frame
Bolt (M6X60mm)
Right Rear Cap
Left Rear Cap
Cover
Nylon Nut (M6)
Tapping Screw (M4x16mm)
Screw (M4x50mm)
Bolt (M6x40mm)
Spring Washer (M6)
Bolt (M4x12mm)
Nut (M4)
Wire Cap
Spacer Ø18xØ10.5x31mm
Motor Cover
End Cap (口25x50)
Bolt (M8x35mm)
Square End Cap (口20)
Nylon Washer (M8)
Nylon Nut (M8)
Safety Tube A
Bushing
Spring Knob
Safety Tube B
Bolt (M8x40mm)
Square End Cap (口25.4)
Wheel
Adjustable Pad
Bolt (M8x60mm)
Stabilizer Tube
Bolt (M10x100mm)
Stabilizer Knob
Sensor Cable
Nylon Nut (M10)
Power Cord
Qty.
No.
1
2
1
1
2
6
9
4
2
2
4
4
2
2
1
2
1
1
2
7
1
1
1
1
1
1
2
5
2
2
2
4
1
4
1
36
37
38
39
40
41
42
43
44
45
46
47
48
49
50
51
52
53
54
55
56
57
58
59
60
61
62
63
64
65
66
67
68
69
70
71
72
73
74
75
Description
Motor
Power Control Board
Wire Cap
Switch, AC Power
Fuse Box
Ring for Cable Power
Wire for Fuse Box
Earth Lead
Cable Switch/PCB
Belt
Front Roller
Running Belt
Running Deck
Bolt (M6x33mm)
Side Rail
Deck Bumper
Bolt (M8x45mm)
Motor Bracket
Bolt (M8x12mm)
Rear Roller
Screw (M4x8mm)
Stabilizer
End Cap for Handlebar
Foam Grip
Spacer Ø13.5xØ8.5x16mm
Spring Washer (M8)
Speed Button w/Wire
Short Knob
Mode Button w/Wire
Safety Tether Key
Bolt (M10x55mm)
Handlebar Knob
Handlebar
Computer Knob
Computer
Bracket for Sensor
Sensor
Washer (M10)
Washer Ø21xØ8.5x1.8t
Nut (M8)
Qty.
1
1
1
1
1
1
1
1
1
1
1
1
1
6
2
6
1
1
2
1
4
1
2
2
2
2
1
1
1
1
2
2
1
2
1
1
1
6
4
1
8
ASSEMBLY INSTRUCTIONS
Step A: Turn the Spring Knob (23) in a counterclockwise direction and then pull it to set down the Main Frame (1)
on the floor. Turn the Spring Knob (23) clockwise to secure the treadmill in the folding down position.
First remove four Stabilizer Knobs (32) and Washers (74) from the right and left sides of Stabilizer (57).
Then insert the both Stabilizer Tubes (30) into the tubes of Stabilizer (57) and secure them with four
Stabilizer Knobs (32) and Washers (74) that were removed.
Step B:
Pull the Short Knob (63), and then lift the Handlebar (68) all the way up. Tighten the Handlebar (68) to the
Stabilizer (57) with two Handlebar Knobs (67) and Washers (73).
Step C:
Connect the Mode Button Wire (64), Speed Button Wire (62), and Sensor Cable (33) to the wires that
come from the Computer (70). Attach the Computer (70) onto the Handlebar (68) with two Computer Knobs (69).
Install the Safety Tether Key (65) onto the Computer (70).
Step D:
There are five Adjustable Pads (28) on the bottom of both Stabilizer Tubes (30) and Stabilizer (57). You can adjust
the Adjustable Pad (28), if the floor is not level.
A
B
68
67
73
63
32
74
57
73
30
1
67
57
23
C
D
28
70
69
68
33
64
62 69
65
30
28
57 28
9
CAUTION
Before beginning a workout session ensure that the Safety Tether Key is properly inserted into the Computer Console and the
Safety Clip is securely attached to an article of your clothing. Always begin the treadmill standing on the side rails, not on
the running belt. Allow the treadmill to reach a speed of at least 0.4 m/h. before walking on the running belt.
Operating in Quick Start Mode
Ensure this treadmill is plugged into a nominal 120-volt 60 hz, which has a grounding plug.
Step 1: Power Up
Press the Master Power Switch located at the front of the treadmill to the ON position. The LCD console will
immediately run a self diagnostic display. After that it will display current system status.
Step 2: Begin Workout
Press the START button then "Speed" to begin operation.
As the running belt speed reaches 0.4 m/h, you can start walking on the treadmill. Adjust to desired speed using the
UP button. Press the DOWN button to decrease the speed. The LCD console will immediately display when you
adjust the speed.
10
COMPUTER OPERATION
Manual Process
Step 1: AC power on:
Segments test for 2 seconds (figure 1), the speed setting shows up after a long beep for 2 seconds (figure 2). The
monitor display then switches to CLOCK setting in 1 second. To set "Hour", first press MODE to enter setting. Then,
follow same process to set up "Minute". The monitor display will quit set up mode in 6 seconds if no button is being
pressed. After setting up is done, the monitor will display training mode that is allowed to preset each function target.
(figure 3)
Figure 1
Figure 2
Figure 3
Step 2: After training starts:
(1) If the Safety key is installed, press the START/STOP button to start the treadmill. (figure 4). The initial running
speed is 0.4 m/h, it can be changed by pressing the UP button with each increment (or decrement by the DOWN
button) of 0.1 m/h until the maximum speed of 4 m/h. If the button is pressed down for 1.5 seconds, the
increment and decrement will be doubled, and stop when the button is released. While the running speed is
adjusted, it is not able to have a loop function.
(2) In the STOP mode, press the MODE button to set up TIME (0:00~99:00), DISTANCE (0.00~99.90), and
CALORIES (0~9990). The blinking function is for presetting (figure 5). Press the SET button to set each target.
Press the RESET button to clear the function value to zero.
(3) In the STOP mode, press down the RESET button for 2 seconds to make all function values RESET.
11
COMPUTER OPERATION
Step 3: When the exercise has stopped, and all buttons have not been operated for over 4 minutes, the monitor display shows
the clock time and room temperature, this is the sleep mode. At this moment, other functions are off. (figure 6).
All previous preset data and training data are kept, and will show up when any buttons are pressed or the exercising
starts up again in the sleep mode.
Figure 6
Figure 5
Figure 4
Step 4:. When the safety key is not installed and pressing the START/STOP button has failed, the system will automatically
stop. If the safety key is not positioned during exercising the motor speed will slow down to 0.
Step 5: When the motor speed has exceeded 3m/h to the preset speed during exercising, press the STOP button and
check, the speed has to be slowed down to 0 in 30 seconds. If not, the monitor will show E1, an error sign as
reminder to the user. The monitor starts to beep continuously till the AC power is switched off manually and then the
motor will stop too. (figure 7)
Step 6: When the initial speed or preset speed has been started in 30 seconds and the motor's speed is under preset
speed 3 m/h, the system will stop. Once its starts for 15 seconds, if SPEED=0, the monitor will show blinking E-2
which is another error sign. The monitor starts to beep continuously till the AC power is switched off manually then the
motor will stop (figure 8).
Figure 7
Figure 8
12
FOLDING UP AND SETTING DOWN THE TREADMILL
Folding Up the Treadmill
Step A:
Turn the Spring Knob (23) in a counterclockwise direction and pull it to lift the Main Frame (1) all the way up until the
Spring Knob (23) "pops" down into the locked position and then turn the Spring Knob (23) in clockwise direction to
secure the treadmill in the folding up position. See illustration A.
Step B:
Release both Handlebar Knobs (67). Pull the Short Knob (63) and then push the Handlebar (68) all the way down
until the Short Knob (63) "pops" down into the locked position. Insert both Handlebar Knobs (67) back into the
Stabilizer (57). See illustrations B and B-1.
Step C:
The illustration C is the treadmill in the folding up position.
A
B
B -1
C
Setting Down the Treadmill
Turn the Spring Knob (23) in a counterclockwise direction and pull to set down on the Main Frame (1) on the floor. Turn the
Spring Knob (23) in a clockwise direction to secure the treadmill in the setting down position.
Pull the Short Knob (63) (as shown in illustration B-1), and then lift the Handlebar (68) all the way up until the Short Knob (63)
"pops" down into the locked position. Tighten the Handlebar (68) to the Stabilizer (57) with two Handlebar Knobs (67).
TO PREVENT INJURY PLEASE MAKE SURE YOU HAVE A FIRM HOLD WHEN LIFTING UP OR SETTING DOWN THE DECK.
The treadmill has already been spread with "Silicone Oil" in advance before leaving the manufacturing plant. Silicone oil is
without volatility and has gradually permeated through the running belt. There will be no need to re-spread the oil in normal
circumstances.
To maintain the running belt, we have included a small bottle of "Silicone Oil". "Silicone Oil" may be re-spread once the resistance
has been increased and the running belt starts rubbing against the running deck. To hold open the running belt from two sides,
apply the silicone oil with an even motion on the center of the running deck. Allow the silicone oil to 'set' for one minute before
using the treadmill.
Attention: Only use "Silicone Oil" lubricants for this equipment. In addition, do not add any other oil ingredient; otherwise the
treadmill will be damaged. Do not over- lubricate the walking board. Excess lubricant should be wiped off with a clean towel.
The running belt is adjusted at the factory; it may come loose during transportation and from use. After prolong use of running,
the belt will stretch out. If the running belt is shifting to the left, turn on the main power switch of treadmill and let the running belt
run at the speed of 2.5-3 m/h. Using the hex key provided, turn the left rear roller adjustment bolt 1/4 turn in the clockwise
direction. You should see the belt start to correct itself by moving back toward the center. Repeat the above procedure until the
running belt is centered. If the running belt is shifting to the right, turn on the main power switch of treadmill and let the running
belt run at the speed of 2.5-3 m/h. Using the hex key provided, turn the right rear roller adjustment bolt 1/4 turn in the clockwise
direction. You should see the belt start to correct itself by moving back toward the center. Repeat the above procedure until the
running belt is centered. If the running belt is slipping during use, turn off and unplugged the treadmill. Using the hex key
provided, turn both left and right rear roller adjustment bolts 1/4 turn in the clockwise direction for the same distance, turn on the
main power switch of treadmill and let the running belt run at the speed of 2.5-3 m/h. You should now walk on to the running belt
to determine if the running belt is still slipping. Repeat the above procedure until the running belt is not slipping.
14
CARE, MAINTENANCE &
TROUBLE SHOOTING GUIDE
WARNING: To prevent electrical shock, please turn off and unplugged the treadmill before cleaning or routine maintenance.
CLEANING
The treadmill can be cleaned with a soft cloth and mild detergent. Do not use abrasives or solvents. Be careful not to get excessive
moisture on the display panel as this might cause a electrical hazard or the electronics to fail.
Please keep the equipment, especially the console, out of direct sunlight to prevent screen damage.
STORAGE
Store the treadmill in a clean and dry environment. Ensure the master power switch is off and is at the off position and the power
plug is un-plugged from the electrical wall outlet.
TROUBLE SHOOTING GUIDE
Problem
Treadmill will not start.
Potential Cause
1. Not plugged in.
1. Plug into grounded outlet.
2. Safety tether key not installed.
2. Install safety tether key onto the monitor.
3. House circuit breaker tripped.
3. Reset or replace fuse.
4. Treadmill circuit breaker tripped
4. Lubricate treadmill deck and reset.
ON/OFF switch on OFF.
Running belt slips.
Running belt hesitates
when stepped on.
Corrections
5. Turn ON/Off switch to ON.
1. Running belt not tight enough.
1. Adjust running belt tension.
2. Drive belt not tight enough.
2. Adjust drive belt tension.
1. Not enough lubrication applied
1. Apply silicone lubricant.
onto the running deck.
2. Adjust running belt tension.
2. Running belt too tight.
Running belt is off centered.
Running belt tension not even across
the rear roller.
Center the running belt.