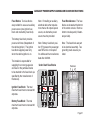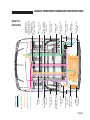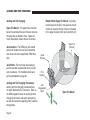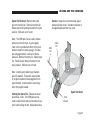
1
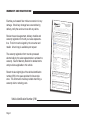
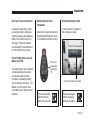
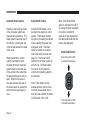
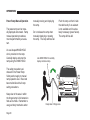
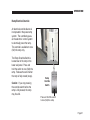
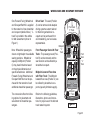
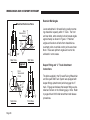
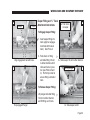
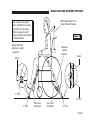
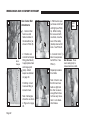
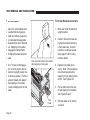
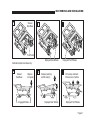
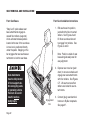
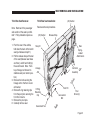
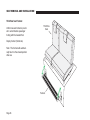
® ® 2008 - 2010 Chrysler Entervan® XT Foldout Lowered Floor Minivan Conversion Private Use 35477 Rev A Congratulations We at The Braun Corporation wish to express our fullest appreciation on your new purchase. With you in mind, our skilled craftsmen have designed and assembled the finest lowered floor vehicle available. This manual includes safety precautions, operating instructions, manual operating instructions, and instructions for maintenance and lubrication procedures. Your conversion is built for dependability, and will bring you years of pleasure and independence, as long as the maintenance is performed regularly and the vehicle is operated by an instructed person. Sincerely, THE BRAUN CORPORATION Ralph W. Braun Chief Executive Officer WARNING Ope ra Man tor' ua s l Read manual before operating. Failure to do so may result in serious bodily injury and/or property damage. Keep manual in vehicle. CONTENTS Warranty and Registration Instructions ................................................................ 2 Introduction ................................................................ 3 Operation Quick Reference Guide ....................... 4, 5 Features ................................................................. 6, 7 Safety Precautions .................................................... 8 Operation Terminology .......................................................... 9 Control System ..................................................... 9 Control Switches ............................................ 10-14 Ramp Access Sliding Door ........................... 14, 15 Kneel System ................................................ 16, 17 Ramp Safety .................................................. 22-24 Wheelchair and Occupant Restraint ................ 25-33 Seat Removal and Installation Front Seats (General Information) ................ 34, 35 Seat Base Rear Covers ...................................... 36 Seat Electrical Harnesses ............................. 37-39 Front Seat Removal ...................................... 40, 41 Front Seat Installation ................................... 42, 43 Third Row Seats ........................................... 44, 45 Third Row Seat Footrest ..................................... 46 Preventive Maintenance ................................... 48, 49 Power Ramp Operation ...................................... 18 Auxiliary Power Supply and Below Floor Obstructions ............................................. 50-53 Power Ramp Safety ........................................... 19 Jacking and Tire Changing ................................ 54-56 Power Ramp Manual Operation ......................... 20 Towing ...................................................................... 57 Ramp Electrical Override .................................... 21 Reporting Safety Defects ....................................... 58 Page 1 WARRANTY AND REGISTRATION ([DPLQH\RXUORZHUHGÁRRUPLQLYDQFRQYHUVLRQIRUDQ\ damage. Should any damage have occurred during delivery, notify the carrier at once with any claims. Review the service agreement, delivery checklist and warranty registration form with your sales representaWLYH7KHIRUPPXVWEHVLJQHGE\WKHFRQVXPHUDQG UHWDLOHU$KDUGFRS\LVDYDLODEOHXSRQUHTXHVW 7KHZDUUDQW\UHJLVWUDWLRQIRUPPXVWEHSURFHVVHG HOHFWURQLFDOO\E\WKHVDOHVUHSUHVHQWDWLYHWRDFWLYDWHWKH warranty. See the Warranty Booklet for detailed terms DQGSURYLVLRQVDSSOLFDEOHWRWKLVYHKLFOH 5HFRUGWKHODVWHLJKWGLJLWVRIWKHYHKLFOHLGHQWLÀFDWLRQ QXPEHU9,1LQWKHVSDFHSURYLGHGIRUIXWXUHUHIHUHQFH7KLVLQIRUPDWLRQPXVWEHSURYLGHGZKHQÀOLQJD warranty claim or ordering parts. 9HKLFOH,GHQWLÀFDWLRQ1XPEHU9,1 Page 2 M obilit y Con ve r sion Se r vice Agr e e m e n t Ve h icle D e live r y Ch e ck list W a r r a nt y Re gist r a t ion ® ® Cust om er Nam e Address Phone VI N ( last 8) Em ail Dat e of Purchase Cit y St at e Web Referral Code Zip TH E BRAUN CORPO RATI ON M OBI LI TY CON VERSI This agr eem ent ON SERV I CE is int ended t o AGREEM EN T clarify t he service vehicle. This a gr ee m responsib en t sha ll be e ilit ies t o t he Braun x e cu t e d a nd m obilit y conversio e le ct r onica lly n aft er t he init su bm it t e d t o List ed below is ial delivery of t Br a un w it h e t he ident ificat ion he a ch con ver sion of t he Braun aut Mobilit y Ret ailer sa le. horized selling who Mobilit y Ret ailer, m anuals and guidelinehas agreed t o service t he m and t he Braun obilit y conversio s. aut horized local n port ion of t his servicing vehicle per t he applicabl e Braun By signing below, service t he t he prim ary provider purchase r of t he m obilit y conversio of n service acknow for ledges t he adopt aut horized Braun t he m obilit y conversio ion of t he local Mobilit y Service n port ion of t his servicing Mobilit excellence Ret vehicle. All local y Ret ailer as ailer ( MSE- cert servicing ified ret ailers m ust in vehicle conversio Should t he owner be an of t he m obilit y ns) . conversio n require conversio n t o any service out side Braun aut horized t he local servicing in ident ifying a m obilit y conversio local servicing area, t hey m ay n ret ailer locat m obilit y ret ailer, t ake t he m obilit ww w.brauna bilit ed wit hin t he Unit t hey m ay eit her y y.com . ed St at es. I f t call 1- 800- THEhe owner needs LI FT, or check assist ance t he Braun w ebsit Not e: This agreem e at : ent only applies hand cont rols, t w ill be t he responsib o t he servicing of t he Braun m obilit y conversio Braun m obilit y n. Ancillary equipm conversio n warrant ilit y of t he m obilit y ret ailer t hat inst alled t hose ent , such as t ie y. I f t here are of t he m obilit y product s and will downs or issues relat ing vehicle owner t o cont act t he t o t he chassis not be covered vehicle t o t heir Braun aut horized and/ or conversio under t he local car dealer. n, it would be local servicing in t he best int erest Mobilit y Ret ailer list ed below before t aking t he Se lling M obilit y Re t a ile r w ill be t h e se r vicin g com pa ny Th e follow in g Se lling M obilit com pa ny t o pr y Ve hicle Ret ovide se r vice a ile r : Loca l Ser vicing M obilit y Ret a Nam e ile r Dealer # Address Nam e Cit y Dealer # Address St at e Zip Phone Cit y St at e Zip Phone Ret ailer Signat ure _______ _______ _______ _______ _______ _______ _______ _______ _______ _______ _______ _______ Ex t e r ior _______ _ Ext erior clean and dam age- free Addit iona l Spare t ire and j ack locat ion Review bot h OEM and Braun owner's Operat ion of rem m anuals ot e cont rol Explain t he Toyot a Service Exchange Magnet ic ent ry Program ( Toyot ( if applicabl e) I nform at ion a Chassis Only) Ext erior act ivat Explain recom m ion of power door, ended prevent kneeling and ram ive m aint enance service schedule Manual operat p and s ion of door and ram p from ext Explain procedur I nt erior erior es for warrant y repair work I nt e r ior I nform Cust om er of dealersh ip service hours Gauges and inst Advise Cust om rum ent at ion er t o record of all service receive and m aint ain a signed Locat ion of int erior w ork perform ed sw it ches t o operat feat ures e accessibl e Com plet e and ret urn warrant y regist rat ion t warrant y Manual operat o act ivat e ion of door and ram p from int erior List all aft erm arket Operat ion of t ieequipm ent . Use downs m odel num bers brand nam es and where possible Operat ion of roll & t um ble seat ing ( if applicabl e) Operat ion of seat belt s Locat ion of Braun cont roller I hereby acknowle dge t hat t he m obilit y devices and can operat applicabl e t o m e t his equipm ent y vehicle hav e . I have been collision. I hereby been dem onst rat advised t hat release and hold ed for m e, and dealers from any harm less t he Original wheelcha irs m ay not m aint I fully underst and ain t heir int egrit liabilit y associat Vehicle Manufact ed wit h inj ury y in t he event collision. I have urer, The Braun t o m y person and of a read and underst Corporat ion, and propert y as a result and t his ent ire t he inform at ion it s independ ent form , including I have provided of m y use of a all disclaim ers is correct . wheelcha ir during and t he Braun a fact ory Lim it ed Warrant y. All Cust om e r : of I acknowle dge t hat all it em s checked Sa les Con su lt m e. have been reviewed a nt : wit h All it em s checked have been reviewed _______ _______ wit h t he cust om _______ _______ er. _ _______ _______ _______ ___ _______ Cust om er Signat _______ _______ ure / Dat e _______ _______ _ _______ _______ ___ Consult ant Signat ure / Dat e The dealer agrees t o elect ronically aft er t he cust om subm it t his com er review t akes plet place. Addit ionally, ed Mobilit y Conversi on Service appropria t e signat Agreem ent t o ures affixed, for t he dealer agrees BraunAb ilit y im a period of six t o m aint ain a copy m ediat ely ( 6) years. of t his execut ed To ensure t hat docum ent , wit com plet ed records h t he are m aint ained det erm ine dealer by conform ance. The dealer agrees t he dealer, BraunAb ilit y shall com ply wit h t hese periodica lly audit t o cooperat e w t erm s m ay nullify t he applicabl e it h BraunAb ilit y any obligat ion records t o in providing copies t hat BraunAb ilit of t hese records. y m ay have t o I acknow ledge pay warrant y claim Failure t o t he above agreem s subm it t ed by ent . t he dealer. INTRODUCTION Braun®ORZHUHGÁRRUPLQLYDQ conversions are designed to provide years of pleasure and PRELOLW\LQGHSHQGHQFH)DPLOiarity with proper operation and maintenance procedures will help HQVXUHVDIHWURXEOHIUHHRSHUDtion. The Braun Corporation encourages wheelchair passengers and their attendant(s) to review the material contained in this manual with your sales representative, EHIRUHDWWHPSWLQJRSHUDWLRQ$Q\ TXHVWLRQVRUFRQFHUQVFDQEHDGdressed at that time. This manual addresses standard conversion features as well as options. Refer to the instructions DSSOLFDEOHIRU\RXUYHKLFOHDQG disregard information that does not apply. Contact the Customer Experience Group at 1-800-4880359 if any of this information is not understood. One of our Customer Experience Group representatives will direct you to a Braun authorized service center. The Operation Quick Reference Guide hanging on the mirror provides a condensed explanation of operation (shown at right). Read the guide and then insert it in this manual for future reference. 1RWH$Q2SHUDWLRQ4XLFN5HIHUence Guide (overview) section is provided on pages 4 and 5 of this manual also. Store this manual in the vehicle along with your OEM owner’s manual. If you experience an operation SUREOHPRUWKHUHLVDQ\VLJQRI ZHDUGDPDJHRURWKHUDEQRUPDO condition, contact your sales representative or call 1-800-488-0359. Operation Quick Reference Guide Page 3 OPERATION QUICK REFERENCE GUIDE Operation Overview 7KLVRYHUYLHZSURYLGHVDVLPSOLÀHGH[SODQDWLRQRI operation. Read the entire manual for complete details. Contact the Customer Experience Group at 1-800-488-0359 if any of this information is not understood. Interior mounted control switches display one of these graphics. or One-Touch Control Activation Power door, kneel and ramp functions are activated E\SUHVVLQJDQGUHOHDVLQJDFRQWUROVZLWFKSUHVVDQG UHOHDVHUHPRWHHQWU\WUDQVPLWWHUEXWWRQWZLFH Power Operation 3RZHUIXQFWLRQVDUHPDQDJHGE\WKHHOHFWURQLF FRQWUROV\VWHP7KHFRQWUROV\VWHPFDQEH activated OEM Remote using the Keyless Entry OEM remote Transmitter keyless entry transmitter Press and or one of the release this interior control switch two switches times (x2) detailed on pages 10-13. Page 4 Open Functions: When activating the Open functions, the power door opens, the kneel system lowers the rear of the vehicle and the ramp deploys. Close Functions: When activating the Close functions, the ramp stows, the kneel system raises the rear of the vehicle and the power door closes. Manual Operation The passenger side power sliding door and power UDPSFDQEHPDQXDOO\RSHUDWHG5HDGWKLVPDQXDO for further details. OPERATION QUICK REFERENCE GUIDE Operating Your Conversion Couldn’t Be Simpler . . . 2 And the sliding door opens 3 The rear suspension lowers A 4 The ramp deploys Allowing easy entrance! Just press any one RIWKHEXWWRQVOLNH WKHRQHSLFWXUHGDERYH or those shown on page 4 (press twice on the key transmitter). . . 1 Page 5 FEATURES Electronic Control System: The electronic control system provides simple one-touch activation of conversion power functions. For your convenience, WKHSRZHUIHDWXUHVFDQEH activated using the OEM remote keyless entry transmitter or one of the interior switches detailed on pages 10-13. XVDEOHZLGWK7KHSRZHUUDPS FDQEHPDQXDOO\RSHUDWHG Passenger Side Power Slide Door: The control system activates the passenger side power slide door for ramp access. The VOLGHGRRUDQGORZHUHGÁRRU FRQÀJXUDWLRQSURYLGHV clear vertical passageway. 1RWH7KHGULYHUVLGHVOLGLQJ door is lowered to provide clear passage also. Lowered Floor from Rear Axle to Firewall: This feature proYLGHVDGGLWLRQDOKHDGURRP ÁRRUWRFHLOLQJDWFHQWHURIYDQ and further reduces the slope RIWKHUDPS1RWH7KHÁRRU WRFHLOLQJKHLJKWLVUHGXFHGE\ ZLWK2(0LQWHULRU'9' rail system installed. Ramp: The fully automatic SRZHUUDPSSURYLGHV Page 6 Electromechanical Power Kneeling Rear Suspension: “Kneeling” is the lowering motion of the electromechanical rear suspension. The kneel feature reduces the slope of the ramp when deployed. Ground Clearance: The ORZHUHGÁRRUUHVXOWVLQUHGXFHG ground clearance. Be aware of limited ground clearance. Ground Effects: Exterior colormatched ground effect panels FRQFHDOWKHORZHUHGÁRRUDQG lowered sliding doors. Floor Track for Wheelchair and Occupant Securement in Midpoint Lowered Floor Area: Floor track provided in the midSRLQWORZHUHGÁRRUDUHD3RVLWLRQ &FDQEHXWLOL]HGIRUUHVWUDLQWRI wheelchair passenger(s). Wheelchair capacity at midpoint may KDYHOLPLWDWLRQVEDVHGRQWKHGLPHQVLRQVRIVSHFLÀFZKHHOFKDLUV Forward-Facing Wheelchair and Occupant Belt/Track System: One Forward-Facing Wheelchair and Occupant Belt Kit is supplied for the restraint of one wheelchair and occupant. The FEATURES EHOWNLWLVXVHGLQFRQMXQFWLRQ ZLWKWKHÁRRUWUDFN1RWH$GGLWLRQDOEHOWNLWVFDQEHSXUFKDVHG (option). Quick-Release Front Passenger Seat with Floor Track for Wheelchair and Occupant Securement: The passenger seat 3RVLWLRQ%LVHTXLSSHGZLWK ´VWHSUROOµTXLFNUHOHDVHVHDW EDVHDWWDFKPHQWVPDNLQJVHDW removal and installation proceGXUHVVLPSOH7KHVHDWFDQEH removed and the seat location FDQEHXWLOL]HGE\DZKHHOFKDLU RFFXSDQWÁRRUWUDFNSURYLGHG Driver Seat: For the wheelchair occupant who chooses to drive, WKLVVHDW3RVLWLRQ$FDQEH removed and adaptive driving systems custom tailored for the LQGLYLGXDOFDQEHSXUFKDVHGIURP DQGLQVWDOOHGE\\RXUORFDOPRELOLW\GHDOHU7KHGULYHUҋVVHDW LVHTXLSSHGZLWK´VWHSUROOµ TXLFNUHOHDVHVHDWEDVHDWWDFKPHQWVÁRRUWRFHLOLQJ KHDGURRPLVSURYLGHGDWERWK front seating positions. Auxiliary Power Supply for Dealer-Installed Power Seat or Electric Tie-Downs: This SRZHUVRXUFHLVDYDLODEOHWR accommodate adaptive driving systems custom tailored for the individual (purchased from DQGLQVWDOOHGE\\RXUORFDO PRELOLW\VDOHVUHSUHVHQWDWLYH See pages 50-53. Front Seat “L” Track Midpoint “L” Track B A C Front Seat “L” Track Midpoint “L” Track $YDLODEOH:KHHOFKDLU3RVLWLRQV Page 7 SAFETY PRECAUTIONS Safety Symbols SAFETY FIRST! Know That.... All information contained in this manual and supplements (if included), is provided for your safety. Familiarity with proper operation instructions as well as proper maintenance procedures are necessary to enVXUHVDIHWURXEOHIUHHRSHUDWLRQ Safety precautions are provided to identify potentially hazardous situations and provide instruction on how to avoid them. A D C B This symbol indicates important safety information regarding a potentially hazardous situation that could result in serious bodily injury and/or property damage. This symbol indicates important information regarding how to avoid a hazardous situation that could result in minor personal injury or property damage. Note:$GGLWLRQDOLQIRUPDWLRQSURYLGHGWRKHOSFODULI\RUGHWDLODVSHFLÀFVXEMHFW 7KHVHV\PEROVZLOODSSHDUWKURXJKRXWWKLVPDQXDODQGPD\DSSHDURQODEHOVSRVWHGRQ\RXUFRQYHUVLRQ Recognize the seriousness of this information. Page 8 OPERATION Before Operation Before utilizing conversion features, park the vehicle on a level surface away from vehicular WUDIÀF3ODFHWKHYHKLFOHWUDQVmission in Park and engage the SDUNLQJEUDNH&RQYHUVLRQSRZHU IXQFWLRQFRQWUROVZLWFKHVFDQEH activated only if the vehicle transPLVVLRQLVLQ3DUNRU1HXWUDO Terminology “Kneeling” is the lowering motion of the electromechanical rear suspension. The term “deploy” (unfold) indicates the lowering motion of the ramp to the deployed position. “Stow” (fold) is the raising motion of the ramp to the vertical (stowed) position. The terms “Open” and “Close” UHIHUWRVHTXHQFHVRISRZHU functions that will occur when DFWLYDWHGE\WKHHOHFWURQLFFRQtrol system. When activating the Open functions, the power door opens, the kneel system lowers the rear of the vehicle and the ramp deploys. When activating Close functions, the ramp stows, the kneel system raises the rear of the vehicle and the power door closes. Control System Conversion power functions DUHPDQDJHGE\WKHHOHFWURQLF control system. The control V\VWHPFDQEHDFWLYDWHGXVLQJ the remote keyless entry transmitter or any one of the controls addressed on pages 10-13. Do not attempt to interface aftermarket control systems. Braun Corporation Aftermarket Control Systems Policy: The Braun Corporation manufactures dedicated control systems for its products. These control V\VWHPVKDYHEHHQGHVLJQHG DQGWHVWHGIRUXVHLQFRQMXQFWLRQ ZLWKVSHFLÀF%UDXQSURGXFWV Braun control systems are the only control systems authorized for use with Braun products. Do not attempt to interface aftermarket control systems without authorization from The Braun Corporation. To do so may result LQVHULRXVERGLO\LQMXU\DQGRU property damage. Page 9 OPERATION Control Switches For your convenience, conversion SRZHUIHDWXUHVFDQEHDFWLYDWHG using the OEM remote keyless entry transmitter or one of the LQWHULRUFRQWUROVZLWFKHVLGHQWLÀHG on pages 11-13. The passenger power sliding door switches provided on the remote keyless entry transmitter and in the overhead console will unlock the passenger side slide door and activate the conversion power door, kneel and ramp functions. The power sliding door switches provided in the center console and on the wall panels to the front and rear of the passenger side sliding door (B-pillar and C-pillar respecWLYHO\DUHDFFHVVLEOHWRUHDU seat passengers including small children. These control switches Page 10 will activate conversion power functions only if the passenger side power slide door is unlocked and the overhead console Master /RFN2XWVZLWFKLVLQWKH21SRVLtion. Master Lock Out details are provided on page 13. Braun minivan conversions are designed with safety and simplicity in mind for ease of operation. ,IDSRZHUIXQFWLRQKDVEHHQ activated that was not intended, simply press a control switch to stop or reverse the function. If WKHGHVLUHGIXQFWLRQKDVQRWEHHQ activated, press the switch again. Conversion power function FRQWUROVZLWFKHVFDQEHDFWLYDWHG only if the vehicle transmission is LQ3DUNRU1HXWUDO Control Switches Switches that activate conversion SRZHUIXQFWLRQVDWDOOWLPHV .H\OHVV(QWU\7UDQVPLWWHU 2YHUKHDG&RQVROH3DVVHQJHU Power Sliding Door Switch $OO2WKHU6ZLWFKHV The passenger side power slide GRRUPXVWEHXQORFNHGDQGWKH 0DVWHU/RFN2XWVZLWFKPXVWEH LQWKH21SRVLWLRQEHIRUHSRZHU IXQFWLRQVFDQEHDFWLYDWHG OPERATION One-Touch Control Activation Conversion power door, kneel DQGUDPSIXQFWLRQVZLOOEHDFWLYDWHGE\SUHVVLQJDQGUHOHDVLQJ either control switch shown on this page. Press and release WKHUHPRWHHQWU\WUDQVPLWWHUEXWWRQWZLFHZLWKLQÀYHVHFRQGV Power Sliding Door Lock and Master Lock Out The keyless entry and overhead console switches will activate conversion power functions whether the passenger sliding door is locked or unlocked. The Master Lock Out switch does QRWSURKLELWXVHRIWKHVHFRQWURO switches. Remote Keyless Entry Transmitter Using the Chrysler remote entry transmitter eliminates the need for an additional remote control. Overhead Console Switch A control switch is located on the overhead console. Press and release this switch twice (x2) Press and release this switch Press and release switch twice (X2) ZLWKLQÀYHVHFRQGV Press and release switch displaying slide door graphic. Page 11 OPERATION Power Sliding Door Lock and Master Lock Out The passenger side power slidLQJGRRUPXVWEHXQORFNHGDQG the overhead console Master /RFN2XWVZLWFKPXVWEHLQWKH 21SRVLWLRQEHIRUHWKHWKUHH power sliding door switches* LGHQWLÀHGDWULJKWFDQDFWLYDWH conversion power functions. Center Console Switch* B-Pillar Switch* For front seat passengers, a switch is located in the center FRQVROHGDVKERDUG A switch is located on the wall panel ahead of the passenger slide door (B-Pillar). One-Touch Control Activation :KHQWKHDERYHFRQGLWLRQVDUH met - power door, kneel and UDPSIXQFWLRQVZLOOEHDFWLYDWHG E\SUHVVLQJDQGUHOHDVLQJDQ\RI WKHVSHFLÀHGFRQWUROVZLWFKHV Page 12 Press and release this switch Press and release this switch Press and release switch displaying slide door graphic. Press and release switch displaying slide door graphic. OPERATION C-Pillar Switch* A switch is located on the wall SDQHOEHKLQGWKHSDVVHQJHU slide door (C-Pillar). Power Sliding Door Master Lock Out Switch The Master Lock Out switch is located in the overhead console. If the Master Lock Out switch is in the OFF position, this OEM feature ZLOOGLVDEOHWKHWKUHHSRZHU sliding door switches* identiÀHGDWOHIW3UHVVWKHVZLWFK WRWKH21SRVLWLRQWRHQDEOH the control switches. 3UHVVVZLWFKWR21WR HQDEOHFRQWUROVZLWFKHV ON OFF Press switch to OFF to GLVDEOHFRQWUROVZLWFKHV Press and release this switch Press and release switch displaying slide door graphic. Press switch displaying this graphic. ON OFF Page 13 OPERATION Kneel On/Off Switch Ramp Access Sliding Door 7KH.QHHO2Q2IIVZLWFKLV located on the driver side of the FHQWHUFRQVROH7KH.QHHO2Q Off switch turns the kneel system on and off only. See page 16 for further details. Press and release the remote keyless entry transmitter or one of the interior control switches to activate the power sliding door (control switches detailed on pages 10-13). When a control switch is activated, the door will open and the Open seTXHQFHRIIXQFWLRQVZLOOFRQtinue (rear of vehicle kneels and ramp deploys). 3UHVVWKLVVZLWFKWR21 to activate kneel feature. Press this switch to OFF WRGLVDEOHNQHHOIHDWXUH Page 14 2QFHWKH2SHQVHTXHQFH of functions is complete, press and release a control switch to close the door. The door will close after the ramp stows and the vehicle raises (completing the Close VHTXHQFHRIIXQFWLRQV 1RWH,IDFRQWUROVZLWFKLVDFtivated while the power sliding door is opening or closing, the door will reverse direction. 1RWH,IWKHSRZHUGRRULV REVWUXFWHGZKLOHRSHQLQJRU closing, the door will reverse direction to the fully closed or fully open position, provided it PHHWVVXIÀFLHQWUHVLVWDQFH 1RWH,IWKHLQVLGHRURXWVLGH door handles are used while the power sliding door is activated, the power sliding door feature ZLOOEHFDQFHOOHG6LPSO\SUHVV a control switch and the door will open fully. The power door FDQDOVREHRSHQHGRUFORVHG manually as detailed at right. OPERATION Keep clear of the area in which the power door operates. Ensure door travel path LVFOHDU3HUVRQDOLQMXU\RU property damage may occur during power door operation. Be sure the door is fully closed DQGODWFKHGEHIRUHGULYLQJ Keep clear of area in which power door operates. Failure to do so may result in bodily injury and/or property damage. Power Door Manual Operation The passenger side power VOLGLQJGRRUFDQEHRSHUDWHG manually. Unlock the passenger sliding door. Open the slide door from inside or outside using the OEM door handles. Always open the door smoothly. Avoid using excessive force when opening and closing the door. 1RWH7KHUDPSREVWUXFWVDFcess to the inside door handle. 7KH2(0KDQGOHKDVEHHQ HTXLSSHGZLWKDQH[WHQVLRQ strap. Extension Strap Ramp Page 15 OPERATION Automatic Kneel System Kneel On/Off Feature Kneeling is the lowering motion of the conversion electromechanical rear suspension. The kneel system lowers the rear of the vehicle. Lowering the rear of the vehicle reduces the slope of the ramp. $.QHHO2Q2IIIHDWXUHLVLQFRUporated in the electronic control system. This feature provides the option of kneeling the vehicle when operating the power door and power ramp. The Kneel switch is located on the driver side of the center console (see SDJH7KH.QHHO2Q2II switch turns the kneel system on and off only. The Kneel switch PXVWEHLQWKH2QSRVLWLRQLQ order for the kneeling system to EHDFWLYDWHG When the electronic control system is activated to start the Open functions, the kneel system starts to lower the rear of the vehicle at the same time the power sliding door starts to open. When the Close functions are activated, the rear of the vehicle starts to raise at the VDPHWLPHWKHUDPSEHJLQVWR stow. Page 16 1RWH,IWKHYHKLFOHLVLQWKH kneeled position and the Close functions are activated, the vehicle will raise whether the Kneel 2Q2IIVZLWFKLV2QRU2II 1RWH,IWKH.QHHO2Q2II switch is switched from Off to 2QGXULQJWKH2SHQVHTXHQFH of functions or within 60 seconds of ramp deployment, the vehicle will kneel after the ramp is fully deployed. Kneel On/Off Switch 3UHVVWKLVVZLWFKWR21 to activate kneel feature. Press this switch to OFF WRGLVDEOHNQHHOIHDWXUH OPERATION 1RWH,IWKHYHKLFOHLVLQWKH kneeled position (with ramp deployed) and the transmission is disengaged from Park “P,” the ramp will stow and the vehicle will raise. 1RWH'RQRWOHDYH\RXUFRQYHUsion in the kneeled (lowered) position for extended periods of time. In the event the kneel system is not functioning properly, have the kneel system repaired immediately. Do not drive with the rear of the vehicle in the lowered position. Attempting to do so will result in an extremely rough and XQVWDEOHULGH Contact your sales representative or call 1-800-488-0359. One of our Customer Experience Group representatives will direct you to an authorized service center. Switch is located under driver side UHDUEHQFKVHDWYLHZHGIURPUHDU with seat in raised position). Kneel Electrical Override An electrical override feature is incorporated in the kneel system. 7KHRYHUULGHE\SDVVHVWKHHOHFtronic control system to electrically power the kneel actuator. 7KHRYHUULGHLVDYDLODEOHWRUDLVH the rear of the vehicle only. The Kneel Override Switch is located under the driver side UHDUEHQFKVHDW3UHVVDQGKROG the switch to release the kneel system (raise vehicle). Release the switch when the rear of the vehicle has raised fully. The kneel actuator motor will ratchet (make clicking sound). Kneel Override Switch Press and hold this switch to release kneel (raise vehicle). Page 17 OPERATION Power Ramp Operation 7KHSRZHUUDPSLVDFWLYDWHGE\ the electronic control system using any of the control switches LGHQWLÀHGRQSDJHV:KHQ a control switch is activated to start the Open functions, the ramp deploys after the power sliding door reaches the fully open position. When the Close functions are activated, the ramp VWRZIXQFWLRQEHJLQVLPPHGLDWHO\ (simultaneously with the kneel system). If a control switch is activated while the ramp is in motion (deploying or stowing), the ramp motor will stop running. Activating a control switch again will start the Close functions (ramp will stow, vehicle will raise and the door will close). Page 18 1RWH7KHSRZHUVOLGLQJGRRU must travel from the full closed position to the full open position in order for the ramp to deploy. DERYHJURXQGOHYHO7KH ramp continues to slowly lower WKHUHPDLQLQJGLVWDQFHE\WKH force of gravity. 1RWH,IWKHYHKLFOHWUDQVPLVVLRQ is disengaged from Park “P” while the ramp is deploying (in motion) or when the ramp is in the fully deployed position, the ramp will stow immediately. Forcing the Ramp: Allow the power ramp to deploy (unfold DQGORZHUIXOO\EHIRUHERDUGLQJ the ramp. Forcing the ramp out RUGRZQGXULQJWKHGHSOR\VWRZ IXQFWLRQVRUERDUGLQJRQWRWKH UDPSEHIRUHLWLVIXOO\GHSOR\HG may result in damage to the UDPSPRWRUDVVHPEO\DQGRU electronic controller. 1RWH,IWKHSRZHUUDPSLVREstructed while deploying or stowing, the ramp motor will stop runQLQJSURYLGHGLWPHHWVVXIÀFLHQW resistance. Press a control switch again and the ramp will stow and the door will close. 1RWH:KHQGHSOR\LQJWKHUDPS the ramp motor stops running when the ramp reaches the nearly horizontal position (approximately Allow ramp to deploy fully before boarding. Failure to do so may result in damage. OPERATION Power Ramp Safety WARNING %HFHUWDLQWKHUHLVDGHTXDWHFOHDUDQFHRXWVLGHWKH YHKLFOHEHIRUHGHSOR\LQJWKHSRZHUUDPS.HHSFOHDU of area in which the ramp operates. Be certain no SHUVRQRUREVWUXFWLRQLVZLWKLQWKHSDWKRIWKHUDPS when deploying or stowing the ramp. Keep clear of all power ramp moving parts. Do not attempt to grip or hold the ramp or ramp folding mechanism during operation. Provide adequate clearance outside of vehicle to accommodate ramp. Failure to do so may result in serious bodily injury and/or property damage. Keep clear of area in which ramp operates. .HHSERG\ parts and REVWUXFWLRQV clear of the area in which the ramp operates. Page 19 OPERATION Power Ramp Manual Operation 7KHSRZHUUDPSFDQEHPDQXally deployed and stowed. Ramp manual operation procedures PXVWEHSHUIRUPHGE\DQDVVLVtant. $QRYDOVKDSHG+$1'+2/' slot is provided on the ramp. Carefully deploy and stow the UDPSXVLQJWKH+$1'+2/' manually stowing and deploying the ramp. Do not release the ramp when manually deploying or stowing the ramp. The ramp will free-fall. Push the ramp out from inside the vehicle only if an assistant LVQRWDYDLODEOHDQGLWLVDEVRlutely necessary (power failure). The ramp will free-fall. 8VH+$1'+2/'WRFDUHIXOO\ deploy and stow ramp. The safety precautions addressed in the Power Ramp Safety section apply to manual ramp operation also. Read and EHFRPHIDPLOLDUZLWKDOOUDPS safety precautions. Keep clear of the area in which WKHKLQJHGUDPSELIROGH[WHQVLRQ IROGVDQGXQIROGV5HPHPEHUWR XVHJRRGERG\PHFKDQLFVZKHQ Page 20 Keep clear of hinge area. OPERATION Ramp Electrical Override An electrical override feature is incorporated in the power ramp V\VWHP7KHRYHUULGHE\SDVVes the electronic control system to electrically power the ramp. 7KHRYHUULGHLVDYDLODEOHWRVWRZ (fold) the ramp only. The Ramp Override Switch is located rear of the ramp in the lower wall panel. Press and hold the switch to stow (fold) the ramp. Release the switch when the ramp is fully stowed (stops). Caution: If you stop pressing WKHRYHUULGHVZLWFKEHIRUHWKH ramp is fully stowed, the ramp may free-fall. Ramp Override Switch Press and hold this switch to stow (fold) the ramp. Page 21 OPERATION Ramp Safety Wheelchair passengers and attendants (when apSOLFDEOHPXVWXVHEDVLFFRPPRQVHQVHDQGJRRG MXGJPHQWUHJDUGLQJUDPSVDIHW\(DFKZKHHOFKDLU SDVVHQJHUKDVDXQLTXHVHWRISK\VLFDODELOLWLHV FRPELQHGZLWKWKHSK\VLFDOFKDUDFWHULVWLFVRIKLVRU her wheelchair, that dictate the method in which he or she will enter and exit the conversion. ConseTXHQWO\WKHSURFHGXUHVIRUVDIHRSHUDWLRQRXWOLQHG in this manual are general in nature. Wheelchair atWHQGDQWVVKRXOGEHLQVWUXFWHGRQDQ\VSHFLDOQHHGV DQGRUSURFHGXUHVUHTXLUHGIRUVDIHWUDQVSRUWRI wheelchair passengers. Follow all safety instructions regarding torso reVWUDLQWVVWDELOLW\EDODQFHZHLJKWGLVWULEXWLRQDQG XVHRIDWWHQGDQWVDVVSHFLÀHGLQWKHRZQHUҋVPDQXDO VXSSOLHGZLWK\RXUZKHHOFKDLU'HWHUPLQHHVWDEOLVK DQGSUDFWLFHUDPSERDUGLQJDQGH[LWLQJSURFHGXUHV under the direction of your health care professional, your wheelchair representative, and your Braun VDOHVUHSUHVHQWDWLYHWRHQVXUH\RXUDELOLW\WRGRVR safely. Page 22 1HYHUERDUGWKHFRQYHUVLRQUDPSLI\RXRU\RXU attendant are intoxicated. The wheelchair should EHSRVLWLRQHGLQWKHFHQWHURIWKHUDPSDWDOOWLPHV <RXPXVWEHDEOHWRFOHDUO\YLHZWKHUDPSZKHQHYHU ERDUGLQJDQGH[LWLQJWKHYHKLFOH7KHZKHHOFKDLU SDVVHQJHUDQGRUDWWHQGDQWPXVWHQVXUHWKHUDPSLV IXOO\GHSOR\HGEHIRUHH[LWLQJWKHYHKLFOH ,WLVWKHUHVSRQVLELOity of the wheelchair operator to enter and exit the conversion on the ramp in the safest manner. WheelchairEquipped Occupant Seat Belts: Wheelchair passengers should position and EXFNOHWKHLUZKHHOFKDLUHTXLSSHGVHDW EHOWWRUVRUHVWUDLQW DVVSHFLÀHGE\WKH Position and fasten the wheelchairequipped occupant seat belt before loading onto the wheelchair ramp. Failure to do so may result in serious bodily injury and/or property damage. OPERATION PDQXIDFWXUHUEHIRUHORDGLQJ onto a wheelchair ramp. 'LIIHUHQWW\SHVRIGLVDELOLWLHVUHTXLUHGLIIHUHQWW\SHV of wheelchairs and different types of wheelchairHTXLSSHGRFFXSDQWUHVWUDLQW EHOWV\VWHPVWRUVRUHVWUDLQW ,WLVWKHUHVSRQVLELOLW\RIWKH wheelchair passenger to KDYHKLVRUKHUZKHHOFKDLUHTXLSSHGZLWKDQRFFXSDQW UHVWUDLQWVHDWEHOWXQGHUWKHGLUHFWLRQRIWKHLUKHDOWK care professional. Stabilizing Wheelchairs: Powered and manual ZKHHOFKDLUVDUHGHVLJQHGWRUHPDLQXSULJKWDQGVWDEOH during normal operation. All activities which involve movement in a wheelchair have an effect on the comELQHGFHQWHURIJUDYLW\RIWKHRFFXSDQWDQGZKHHOFKDLU Be aware of the conversion ramp slope (angle). The slope of the ramp has a direct effect on the center of gravity. Keep in mind your center of gravity and your DELOLW\WRPDLQWDLQVWDELOLW\DQGEDODQFH WARNING Be aware of ramp slope. 52217 Do not operate your wheelchair on the converVLRQUDPSZLWKRXWDVVLVWDQFHLI\RXDUHXQDEOHWR PDLQWDLQVWDELOLW\DQGEDODQFH &RXQWHUEDODQFH GHYLFHVDQWLWLSSHUVPD\EHDYDLODEOHIURP\RXU ZKHHOFKDLUUHSUHVHQWDWLYHWRHQKDQFHVWDELOLW\DQG EDODQFH Do not tilt your wheelchair without assistance. Operate the wheelchair at a slow and constant speed when on the ramp. Do not accelerate suddenly when on the ramp. Do not raise the front wheelchair wheels (pull wheelie) when on the conversion ramp. Page 23 OPERATION 7KHDLGRIDQDWWHQGDQWVWDELOL]LQJWKHZKHHOFKDLULV recommended for optimum safety. Wheelchair passengers who intend to enter and exit their conversion without the assistance of an attendant must determine the safest and most practical method and orienWDWLRQRIHQWHULQJDQGH[LWLQJEDVHGRQWKHSK\VLFDO characteristics of their personal wheelchair and his or KHUSK\VLFDOFDSDELOLWLHVWRPDLQWDLQVWDELOLW\ZKLOHWKH wheelchair is in motion on the ramp. Wheelchair Attendants: When assisting a wheelFKDLURFFXSDQWUHPHPEHUWRXVHJRRGERG\PHchanics. When the wheelchair is on the ramp, the attendant must grasp the push handles (or other) VHFXUHO\'HWDFKDEOHZKHHOFKDLUSDUWVVXFKDVDUPV RUOHJUHVWVPXVWQHYHUEHXVHGIRUKDQGKROGVRUOLIWLQJVXSSRUWV'RLQJVRFRXOGUHVXOWLQWKHGHWDFKDEOH SDUWVEHLQJLQDGYHUWHQWO\GHWDFKHGIURPWKHZKHHOFKDLUUHVXOWLQJLQSRVVLEOHLQMXU\WRWKHZKHHOFKDLU RFFXSDQWDQGRUWKHDWWHQGDQW Page 24 Wheelchair Orientation and Securement During Transport: The wheelchair and occupant must face WKHIURQWRIWKHYHKLFOHDQGPXVWEHVHFXUHGXVLQJ the Forward-Facing Wheelchair and Occupant Belt and Track System when riding in the conversion. See pages 25-33 for details. WHEELCHAIR AND OCCUPANT RESTRAINT One Forward-Facing Wheelchair and Occupant Belt Kit is supplied for the restraint of one wheelchair and occupant (details follow). “Ltrack” is provided in the vehicle IRUEHOWVHFXUHPHQWVKRZQLQ Figure 1). 1RWH:KHHOFKDLUSDVVHQJHUV VKRZQDWULJKWGHSLFWWKHDYDLODEOH seating positions. Wheelchair capacity at Midpoint (Position &PD\KDYHOLPLWDWLRQVEDVHG on the physical dimensions of VSHFLÀFZKHHOFKDLUV$GGLWLRQDO Forward-Facing Wheelchair and 2FFXSDQW%HOW.LWVPXVWEHSXUchased for the restraint of each additional wheelchair passenger. The conversion offers the following options for placement and securement of wheelchair passengers. Driver Seat: This seat (Position $FDQEHUHPRYHGDQGDGDSWLYH driving systems custom tailored for the driving wheelchair ocFXSDQWFDQEHSXUFKDVHGIURP DQGLQVWDOOHGE\\RXUORFDOVDOHV representative. Midpoint Front Passenger Seat with Floor “L” Track Track: The passenger seat (PosiWLRQ%FDQEHUHPRYHGDQGWKH VHDWORFDWLRQFDQEHXWLOL]HGE\D wheelchair occupant. Front Seat “L” Track B A C Front Seat “L” Track Midpoint Lowered Floor Area with Floor Track: The Midpoint ORZHUHGÁRRUDUHD3RVLWLRQ&FDQ EHXWLOL]HGE\ZKHHOFKDLURFFXpants (capacity limitations apply). Refer to the following guidelines, illustrations, photos and instrucWLRQVIRUSURSHUXVHRIWKHEHOWDQG track restraint system. Midpoint “L” Track Figure 1 Page 25 WHEELCHAIR AND OCCUPANT RESTRAINT No product developed to date can guarantee successful securement of the wheelchair, even at low speeds, in the event of an accident. The Braun Wheelchair and Occupant Belt/Track System does meet the most widely referenced Federal Motor Vehicle Safety Standards used for contemporary restraint equipment. However, this equipment does not ensure stability of the wheelchair in the event of an accident at any speed. Wheelchair Restraint: Four DGMXVWDEOHRYHUFHQWHUEXFNOH EHOWVDUHSURYLGHGIRUVHFXUHment of the wheelchair (two for the front and two for the rear). 7KHEHOWVDUHHTXLSSHGZLWK RQHNHHSHUÀWWLQJDWWDFKPHQW which installs in the vehiclemounted “L” track (details on pages 28 and 29). A hook is positioned on the opposite end RIWKHEHOWVIRUDWWDFKPHQWWR DVROLGIUDPHPHPEHURIWKH wheelchair. Do not attach EHOWVWRGHWDFKDEOHZKHHOFKDLU components such as armrests RUOHJUHVWV)URQWDQGUHDUEHOW WHQVLRQLVUHTXLUHG Refer to the illustrations, photos and instructions on pages 28-33 IRUEHOWRSHUDWLRQSURFHGXUHV Page 26 Over-Center Belts (four supplied) Lap Belt Extension (supplied) Lap Belt Extension (optional) 1RWH$QDGMXVWDEOH ODSEHOWH[WHQVLRQLV supplied. A rigid lap EHOWH[WHQVLRQLVDYDLODEOHDVDQRSWLRQ WHEELCHAIR AND OCCUPANT RESTRAINT Occupant Restraint:2QHDGMXVWDEOHODSEHOWH[WHQVLRQLVVXSSOLHGIRU securement of the wheelchair occuSDQW7KHH[WHQVLRQEHOWLVHTXLSSHG ZLWKDNHHSHUÀWWLQJDWWDFKPHQW which installs in the vehicle-mounted “L” track. A female receptacle is positioned on the opposite end of the extension for attachment to an OEM factory-installed upper torso lap and VKRXOGHUEHOW precautions. Connect the OEM lap DQGVKRXOGHUEHOWWRWKHODSEHOW extension. Position the upper torso VKRXOGHUEHOWDFURVVWKHFHQWHURI WKHVKRXOGHU3RVLWLRQWKHODSEHOW low across the front of the pelvis (near hip). See the illustrations on pages 30 and 31 and photos on page 33. 3RVLWLRQRIWKHODSEHOWEXFNOHDIWHU DGMXVWPHQWLVWREHORFDWHGQHDUKLS 1RWH7KHDGMXVWDEOHODSEHOWH[WHQ- SRVLWLRQ7KHEHOWLVWREHZRUQORZ sion is supplied with all conversions. DQGVQXJO\$GMXVWPHQWRIWKHODS EHOWH[WHQVLRQLVWREHPDGHDWDG$ULJLGFDEOHVW\OHODSEHOWH[WHQMXVWHUEXFNOH:KHHOFKDLURFFXSDQW VLRQLVDYDLODEOHDVDQRSWLRQQRQ DGMXVWDEOH6HHSKRWRVRQSDJH UHVWUDLQWVVKRXOGQRWEHKHOGDZD\ Attachment procedures are identical IURPWKHERG\E\ZKHHOFKDLUFRPSRIRUERWKW\SHVRIODSEHOWH[WHQVLRQV nents such as armrests or wheels. See the illustrations on pages 30 and 1RWH$PXOWLSLHFHFKHVWDQGZDLVW 31 and photos on page 33. EHOWDVVHPEO\LVDYDLODEOHDVDQRStion for occupant restraint when use Operate the OEM lap and shoulder RIWKH2(0ODSDQGVKRXOGHUEHOWLV EHOWDVLQVWUXFWHGLQ\RXU&KU\VOHU restricted. owner’s manual. Follow all safety Belt and Track Maintenance: ,QVSHFWEHOWDVVHPEOLHVIUHTXHQWO\ $Q\GHIHFWVVXFKDVEHOWFXWVIUD\ing or malfunctioning call for reSODFHPHQWRIWKHHQWLUHEHOWDVVHPEO\´/µWUDFNPXVWEHFOHDQDQGQRW ZRUQEHQWRURWKHUZLVHGDPDJHG SURKLELWLQJSURSHUEHOWDWWDFKPHQW If there is any sign of damage, wear, DEQRUPDOFRQGLWLRQRULPSURSHU RSHUDWLRQRIEHOWVEHOWKDUGZDUH (hooks, keepers, latch plate, receptacle), or track, discontinue use and replace components immediately. Follow all inspection and mainteQDQFHLQVWUXFWLRQVVXSSOLHGE\WKH EHOWPDQXIDFWXUHU6HYHUHFRQGLtions (weather, environment, heavy XVDJHHWFPD\UHTXLUHPRUH IUHTXHQWLQVSHFWLRQV([SRVXUHWR severe conditions will dramatically reduce the life of the system. Keep EHOWVFOHDURIVKDUSREMHFWV'RQRW DOWHUEHOWV Page 27 WHEELCHAIR AND OCCUPANT RESTRAINT Wheelchair Reference Plane Locate wheelchair in forward-facing position centerLQJZKHHOFKDLUVTXDUHO\ZLWKLQ´/µWUDFN7KHIURQW DQGUHDUEHOWVZKHQDWWDFKHGVKRXOGFUHDWHDQJOHV approximately as shown in Figure 2. Preferred DQJOHVDQGORFDWLRQVRIEHOWVIURPZKHHOFKDLUVHcurement points to vehicle anchor points are shown. 1RWH7KHVHDUHRSWLPXPDQJOHVDQGFDQQRWEH achieved in some cases. Rear Securement Points 30° 45° 12" 10° 10° Rear View Side View Figure 2 Keeper Fitting and “L” Track Attachment Instructions Front Securement Points 40° 60° 25° Side View Page 28 Restraint Belt Angles 12" 25° Front View 7KHEHOWVVXSSOLHGLQWKH)RUZDUG)DFLQJ:KHHOFKDLU DQG2FFXSDQW%HOW7UDFN6\VWHPDUHHTXLSSHGZLWK NHHSHUÀWWLQJVDWWDFKPHQWVZKLFKHQJDJHWKH´/µ WUDFN(QJDJHDQGUHOHDVHWKHNHHSHUÀWWLQJVDVGHWDLOHGDQGVKRZQRQWKHIROORZLQJSDJH1RWH5HIHU WRSDJHVDQGIRUEHOWDWWDFKPHQWDQGUHOHDVH procedures. WHEELCHAIR AND OCCUPANT RESTRAINT A Keeper “L” Track Keeper Fitting and “L” Track Attachment Instructions B a. Push down on keeper. To Engage Keeper Fitting: ,QVHUWNHHSHUÀWWLQJLQWR track (align two engagement feet with holes in track). See Photo A. Align engagement feet with holes. C 3XVKGRZQRQÀWWLQJ DQGVOLGHÀWWLQJVORW in either direction until it clicks and locks in position (see Photos B and &3XOOÀUPO\RQEHOWWR HQVXUHÀWWLQJLVORFNHGLQ track. b. 6OLGHNHHSHUVORWLQHLWKHUGLUHFWLRQ D a. Lift plunger. To Release Keeper Fitting: /LIWSOXQJHUDQGVOLGHÀWWLQJ VORWLQHLWKHUGLUHFWLRQ DQGOLIWÀWWLQJRXWRIWUDFN Fully-engaged Plunger b. Slide keeper and lift. Page 29 WHEELCHAIR AND OCCUPANT RESTRAINT Over-center Buckle Belt OEM Installed Upper Torso Lap and Shoulder Harness Figure 3 Keeper “L” Track Over-center Buckle Belt “L” Track Keeper Over-center Buckle Belt Page 30 Over-center Buckle Belt Lap Belt Extension (see note at right) Lap Belt Extensions: An DGMXVWDEOHODS EHOWH[WHQVLRQLV supplied (shown in Figures 3 and $ULJLGODSEHOW extension is availDEOHDVDQRSWLRQ (see page 26). WHEELCHAIR AND OCCUPANT RESTRAINT OEM Installed Upper Torso Lap and Shoulder Harness 1RWH*HQHULFVHDWSRVLWLRQ shown. Attachment procedures are identical for all positions. Photos on pages 32 and 33 depict securement of wheelchair in midpoint position. Figure 4 Keeper attachment details are provided on page 29. $GMXVWDEOH Lap Belt Extension Keeper Keeper “L” Track “L” Track “L” Track Over-center Buckle Belt Over-center Buckle Belt “L” Track Page 31 WHEELCHAIR AND OCCUPANT RESTRAINT Over-Center Belt Attachments E G 1. Connect chair hook to a solid IUDPHPHPEHURI the wheelchair (as shown in Photo E). Hook Keeper 2. Position and FRQQHFWEHOWNHHSHU ÀWWLQJDWWDFKPHQW to appropriate track anchorage point (slots). Attach keeper as detailed on page 29. 3XOOÀUPO\RQEHOW WRHQVXUHÀWWLQJLV locked in track. F Page 32 1RWH%HOWDQJOHV VKRXOGEHDVVKRZQ in Figure 2 on page 28. :LWKEXFNOHRSHQ SXOOORRVHHQGRIEHOW until tight (see Photo G). While holding the loose end with one hand, close the lever of the clamp EXFNOHGRZQXQWLOLW locks. See Photo H. 4. Connect Velcro™ WDEVWRNHHSH[FHVV EHOWRIIÁRRU6HH Photo I). H Velcro™ I 7DEV Belt Release: Press lever clamp (lock) to UHOHDVHWHQVLRQRQEHOW Repeat procedures IRUDOOEHOWV 1RWH&KHFNWRVHH that front and rear EHOWVDUHWLJKWDQG the chair is secure enough that it does not have any movement. Lock wheelFKDLUEUDNHV J WHEELCHAIR AND OCCUPANT RESTRAINT Lap and Shoulder Belt Attachments K 5HIHUWR3KRWRV.1 3RVLWLRQDQGFRQQHFWWKHDGMXVWDEOHODSEHOWH[WHQVLRQNHHSHUÀWWLQJ (attachment) to appropriate track anchorage point (slots). Attach keeper DVGHWDLOHGRQSDJH3XOOÀUPO\ RQEHOWWRHQVXUHÀWWLQJLVORFNHGLQ track. Extension Belt &RQQHFWWKHODSDQGVKRXOGHUEHOW WRWKHODSEHOWH[WHQVLRQLQVHUWODWFK plate in female receptacle). Position WKHXSSHUWRUVRVKRXOGHUEHOWDFURVV the center of the shoulder. Position WKHODSEHOWORZDFURVVWKHIURQWRIWKH SHOYLVQHDUKLS6HH3KRWRV.1 Extension Belt M Receptacle Chrysler Lap and Shoulder Belt Wheelchair occupant restraints VKRXOGQRWEHKHOGDZD\IURPWKH ERG\E\ZKHHOFKDLUFRPSRQHQWVVXFK as wheelchair armrests or wheels. Chrysler Lap and Shoulder Belt L Receptacle N Extension Belt Page 33 SEAT REMOVAL AND INSTALLATION Front Seats: In an effort to SURGXFHYHKLFOHVWKDWFDQEH FRQÀJXUHGWRPHHWDYDULHW\RI customer needs, the driver and SDVVHQJHUVHDWEDVHVKDYH EHHQGHVLJQHGVRWKH\PD\EH removed. This feature allows the owner and sales representative to determine the appropriate seating arrangement to accommodate owner needs. Park vehicle and turn engine off before removing or installing seats. Failure to do so may result in serious bodily injury and/or property damage. Page 34 Driver and passenger side front VHDWVDUHHTXLSSHGZLWK´VWHS UROOµTXLFNUHOHDVHVHDWEDVHDWtachments that engage recessed ÁRRUVWULNHUVVXSSRUWV5HPRYH and install “step & roll” seats as GHWDLOHGRQSDJHV1RWH Driver and passenger side front VHDWVDUHQRWLQWHUFKDQJHDEOH Power Seats: Front seats are HTXLSSHGZLWKHOHFWULFDOZLULQJ harnesses to accommodate opWLRQDOHTXLSPHQWVXFKDVKHDWHG VHDWVDLUEDJVHWFVHH+HDWHG 6HDWVDQG$GMXVWDEOH3HGDOV %HIRUHUHPRYLQJVHDWVEHFHUWDLQ all seat electrical harnesses are disconnected. When seats are removed, the seat electrical harness plug must EHFRQQHFWHGWRWKHUHFHSWDFOH provided at the top of the seat EDVH6HDWZLULQJKDUQHVV details are provided on pages 37-39. When positioning seats, it is \RXUUHVSRQVLELOLW\WRUHFRQQHFW all seat electrical harnesses. Failure to properly connect power seat electrical harnesses may result in power seat funcWLRQVEHLQJGLVDEOHGDQGRUWKH DLUEDJOLJKWLOOXPLQDWLQJ Disconnect seat wiring harness before removing seat. Failure to do so may result in property damage. SEAT REMOVAL AND INSTALLATION Heated Seats: The OEM heated seat option for front seats is interfaced in the driver seat electrical wiring harness. The passenger seat heated seat feature is disDEOHGLIWKHGULYHUVHDWLVUHPRYHG (“B” pillar harness disconnected). Connect front seat wiring harness plug to socket provided at top of seat base before removing front seat. Failure to do so may result in serious bodily injury and/or property damage. Adjustable Pedals: Like the heated seat option, the OEM DGMXVWDEOHSHGDOVIHDWXUHLVLQWHUfaced in the driver seat electrical wiring harness. When the driver VHDWLVUHPRYHGWKHDGMXVWDEOH EUDNHDQGDFFHOHUDWRUSHGDOIHDWXUHLVGLVDEOHG Floor Mats:7KHÁRRUPDWV supplied with this vehicle were VSHFLÀFDOO\GHVLJQHGIRUXVHRQ WKH2(0QRQPRGLÀHGYHKLFOH ÁRRULQFRQMXQFWLRQZLWK2(0 VHDWV7KHÁRRUPDWVDUHQRW FRPSDWLEOHIRUXVHZLWKFRQYHUVLRQIURQWVHDWEDVHVZLWKULVHU Contact your sales representative or call the Customer Experience Group at 1-800-488-0359 if any of this information is not understood. 'RQRWXVHDÁRRUPDWDWWKH front driver seat position when the conversion seat is installed. ,PSURSHUO\ÀWWHGDQGRUVHcured ÁRRUPDWVFDQSRWHQWLDOO\ interfere with the operation of WKHDFFHOHUDWRURUEUDNHSHGDOV resulting in an accident. Contact your sales representative or call the Customer Experience Group at 1-800-488-0359 if any of this information is not understood. Page 35 SEAT REMOVAL AND INSTALLATION Seat Base Rear Covers )URQWVHDWVDUHHTXLSSHGZLWK HDV\WRUHPRYHVHDWEDVHUHDU FRYHUV7KHFRYHUVPXVWEH removed when removing and installing seats. Engagement keys located at the ends and top of the covers align with seat EDVHVORWV6LPSO\SXOORXWRQ the ends of the covers and lift to remove them. Engage keys with slots and lock covers in position when reinstalling seats. Slots Seat Base Engagement Keys Caution: Do not contact and GDPDJHWKHVHDWEDVHHOHFWULcal harness when removing and LQVWDOOLQJVHDWEDVHUHDUFRYHUV 1RWH'ULYHUVLGHVHDWVKRZQ Slots Engagement Keys Page 36 Seat Base Rear Cover SEAT REMOVAL AND INSTALLATION A S Ba eat se r la Pil B- B-Pillar Receptacle C Seat Harness Plug Front Seat Wiring Harnesses and Receptacles An electrical harness receptacle is located to the rear of HDFKVHDWEDVHLQWKHZDOODW “B” pillar). See Figures A and C. The seat wiring harness plug connects to the receptacle socket (screw-on connector details on pages 38 and 39). %HIRUHUHPRYLQJVHDWVEHFHUtain seat wiring harnesses are disconnected. r B lla -Pi B S Ba eat se Seat Storage Receptacle D When seats are removed, the seat electrical harness plug PXVWEHFRQQHFWHGWRWKH receptacle provided in the seat EDVH6HH)LJXUHV%DQG' Page 37 SEAT REMOVAL AND INSTALLATION Disconnect seat wiring harness before removing seat. Failure to do so may result in property damage. Connect front seat wiring harness plug to socket provided at top of seat base before removing front seat. Failure to do so may result in serious bodily injury and/or property damage. Page 38 :KHQLQVWDOOLQJVHDWVEHFHUWDLQ seat wiring harnesses are reconnected. Failure to do so may reVXOWLQSRZHUVHDWIXQFWLRQVEHLQJ GLVDEOHGDQGRUWKHDLUEDJOLJKW illuminating. Screw-on Connectors Heated Seats and Adjustable Pedals: These OEM options are interfaced in the driver seat electrical wiring harness. Both RSWLRQVDUHGLVDEOHGLIWKHGULYHU seat is removed (“B” pillar harness disconnected). $ODEHOLVSRVWHGRQWKHVHDWZLULQJ KDUQHVVSOXJZKLFKLGHQWLÀHVWKH top of the connector (“TOP” decal 28891). Position the plug with the ´723µODEHOIDFLQJXSZKHQFRQnecting the plug to either receptacle socket. Use this feature as an alignment guide. Front seat wiring harnesses are HTXLSSHGZLWKDVFUHZRQFRQQHFtor (plug). Operate connectors as detailed here and on page 39. 1RWH$OLJQPHQWJURRYHVVORWV are provided in receptacle sockets. Receptacle sockets have a single wider alignment groove that is positioned at 12 o’clock (shown on page 39). Seat wiring harness SOXJVDUHHTXLSSHGZLWKPDWLQJ alignment guides (keys). SEAT REMOVAL AND INSTALLATION Turn this knurled grip. Receptacle (socket) Connect TOP 28891 Disconnect Screw-on Connectors To Connect: Align the seat KDUQHVVFRQQHFWRUE\SRVLWLRQing the plug with the “TOP” ODEHOIDFLQJXS$OLJQWKHVHDW harness connector alignment keys (guides) with the receptacle socket alignment slots (will only connect one way). Alignment Slot (at 12 o’clock) 4 1 9 5 15 22 10 16 28 23 33 29 37 34 Receptacle Socket Carefully insert the seat harness plug in the receptacle socket. Turn seat harness connector large diameter knurled grip clockwise fully (turn gripper nearest to socket). Alignment Key 1 5 4 9 15 22 10 16 To Disconnect: Turn seat harness connector large diameter knurled grip counterclockwise and disengage connectors. Position plug with ´723µODEHOXS Seat Wiring Harness Plug 28 23 29 34 33 37 Seat Harness Plug Page 39 SEAT REMOVAL AND INSTALLATION Front Seat Bases Front Seat Removal Instructions ´6WHSUROOµTXLFNUHOHDVHVHDW EDVHDWWDFKPHQWVHQJDJHUHFHVVHGÁRRUVWULNHUVVXSSRUWV A foot-activated release pedal is located at the rear of the seat EDVH6WHSSLQJRQWKHSHGDO disengages the attachments DQGGHSOR\VWKHVHDWEDVHUHDU wheels. 1. Move seat to full forward and upright position. 1RWH)RUHDVHRIGLVHQJDJHment, move the seat to the full IRUZDUGDQGXSULJKWSRVLWLRQEHfore removing seat(s). Push the VHDWEDFNIRUZDUGDQGXSZDUG while stepping on foot pedal (ensures full deployment of rear wheels). 2. Caution! Disconnect seat wirLQJKDUQHVVEHIRUHUHPRYLQJ DIURQWVHDWEDVH&RQQHFW KDUQHVVWRVHDWEDVHVRFNHW See pages 37-39 for wiring harness details. 3XVKVHDWEDFNIRUZDUGDQGXSZDUG while stepping on foot pedal. 3XOOXSDQGEDFNRQWKHUHDU of seat (deploy front wheels). See Figures E and F. Foot Pedal Page 40 3. Depress foot pedal (push GRZQ1RWH3XVKVHDWEDFN forward and upward while stepping on foot pedal (shown at left). See Figures A-D. 5ROOVHDWEDVHRXWRIYHKLFOH as shown. SEAT REMOVAL AND INSTALLATION A Stowed Seat Base E C E a Foot Pedal B Stowed Seat Base Depress foot pedal. Deployed Front Wheels Deployed Rear Wheels ,OOXVWUDWLRQVGHSLFWVHDWEDVHRQO\ D Depress pedal (a) DQGOLIWVHDWE F E 3XOOVHDWXSDQGEDFN Roll seat out of vehicle a Engaged Strikers Deployed Rear Wheels Deployed Front Wheels Page 41 SEAT REMOVAL AND INSTALLATION Front Seat Bases Front Seat Installation Instructions 5ROOVHDWEDVHLQWRSRVLWLRQ MXVWEHKLQGWKHÁRRUPRXQWHG strikers. See Figures A and %0RYHVHDWEDVHIRUZDUG to engage front strikers. See Figures C and D. ´6WHSUROOµTXLFNUHOHDVHVHDW EDVHDWWDFKPHQWVHQJDJHUHFHVVHGÁRRUVWULNHUVVXSSRUWV A foot-activated release pedal is ORFDWHGDWWKHUHDURIWKHVHDWEDVH $FURVVEDULVSRVLWLRQHGGLUHFWO\ under the pedal. Stepping on the EDUHQJDJHVWKHUHDUVHDWEDVHDWWDFKPHQWVWRORFNWKHVHDWEDVH Seat attachments must be fully latched LQÁRRUVXSSRUWVEHfore occupying seats or operating vehicle. Failure to do so will result in serious bodily injury. Page 42 1RWH3RVLWLRQRXWVLGHRIVHDW EDVHDORQJVLGHZDOOSDQHOIRU easy alignment. 'HSUHVVUHDUFURVVEDUSXVK down) to stow rear wheels and engage rear seat attachments ZLWKÁRRUVWULNHUV6HH)LJXUHV &)/LIWVHDWWRHQVXUHÁRRU strikers are locked in seat attachments. Engagement Bar 3. Connect (plug) seat electrical harness to B-pillar receptacle. See page 37. SEAT REMOVAL AND INSTALLATION A Roll seat into position. E C E a Floor Strikers B Roll seat into position. Engaged Front Strikers D Stowed (locked) Seat Base Engaged Strikers Engagement Bar Engage front strikers (a) and GHSUHVVHQJDJHPHQWEDUE F Stowed (locked) Seat Base E a Floor Strikers Engaged Front Strikers Engaged Strikers Page 43 SEAT REMOVAL AND INSTALLATION Third Row Seats Folding (tipping) Third Row Seats 7KLUGURZVSOLWEHQFKVHDWV KDYHEHHQPRGLÀHGGXULQJFRQYHUVLRQSURFHGXUHV6HDWEDFNVFDQEH IROGHGGRZQWRWKHÁDWSRVLWLRQDQG tipped forward to provide full access to UHDUÁRRUVWRUDJHFRPSDUWPHQWV7KH 6WRZҋQ*RVWRZLQÁRRUIHDWXUHLV QRWDYDLODEOH 6HDWEDFNVFDQEHIROGHGGRZQWR WKHÁDWSRVLWLRQDQGWLSSHGIRUZDUG 6HDWVPXVWEHUHWXUQHGWRWKHIXOO GHSOR\HGORFNHGSRVLWLRQEHIRUH driving. Seat removal is allowed for the driver side section of the seat (instructions on opposite page). The electronic FRQWUROPRGXOHDVVHPEO\LVPRXQWHG under the passenger side section of the seat. Removal of the passenger VLGHVHFWLRQRIWKHVHDWLVSURKLELWHG 1. From the rear of the vehicle, fold GRZQWKHEDFNRIWKHEHQFKVHDW (pull release strap #1). 2. Pull the release strap at the rear RIWKHVHDWEHWZHHQVHDWEDVH DQGÁRRUDQGOLIWDQGIROGWLS the seat forward. * Should removal of the passenger VLGHVHFWLRQRIWKHWKLUGURZVHDWEH imperative, call 1-800-488-0359. One of our Customer Experience Group representatives will direct you to a Braun authorized service center. To Unfold (rotate rearward) Third Row Seats Page 44 To Fold (tip forward) Third Row Seats Carefully (slowly) rotate and lower seat rearward to deployed position. Ensure the rear spring-loaded DWWDFKPHQWVHQJDJHÁRRUVWULNHUV 5DLVHWKHVHDWEDFNSXOOUHOHDVH strap #1) and attempt to move VHDWEDFNDQGIRUWK Caution: Use extra care when lowering passenger side section of seat. Do not slam seat down or allow seat to drop (free-fall). Doing so may result in damage to the electronic control module DVVHPEO\ Install seats as VSHFLÀHGEHIRUH occupying seats or operating vehicle. Failure to do so may result in serious bodily injury and/or property damage. SEAT REMOVAL AND INSTALLATION Third Row Seat Removal: Third Row Seat Installation: 1RWH5HPRYDORIWKHSDVVHQJHU VLGHVHFWLRQRIWKHVHDWLVSURKLEited*. Policy detailed on previous page. Reverse removal procedures. (60) Section 1. From the rear of the vehicle, Strap #1 IROGGRZQWKHEDFNRIWKHEHQFK seat (pull release strap #1). 2. Pull the release strap at the rear RIWKHVHDWEHWZHHQVHDWEDVH DQGÁRRUDQGOLIWDQGIROGWLS WKHVHDWIRUZDUG1RWH3XVK Linkage top of linkage rod forward to Arm VWDELOL]HVHDWRYHUFHQWHUSRVLtion). 5HPRYHWKHEROWVHFXULQJWKH OLQNDJHDUPWRWKHÁRRUPRXQWHGEUDFNHW E-Ring 4. Remove E-ring retaining clips Retaining from the pivot pins securing the Clip IURQWÁRRUPRXQWV 5. Remove the pivot pins. 6. Carefully remove seat. (40) Section Release Strap Rear SpringLoaded Attachments Controller $VVHPEO\ Pivot Pin Securement Bolt Floor Striker (4) 6HFXUHPHQW1XW Page 45 SEAT REMOVAL AND INSTALLATION Third Row Seat Footrest A third row seat footrest is provided to accommodate passenger IRRWLQJZLWKWKHORZHUHGÁRRU Third Row Seat Deploy footrest (fold down). 1RWH7KHIRRWUHVWZLOODXWRPDWLcally return to the stowed position after use. Footrest Page 46 BLANK FOR LAYOUT Page 47 PREVENTIVE MAINTENANCE Maintenance is necessary to HQVXUHVDIHDQGWURXEOHIUHH conversion operation. General preventive maintenance consisting of inspections of conversion systems along with cleaning and OXEULFDWLQJSURFHGXUHVVKRXOGEH DSDUWRI\RXUURXWLQHOXEULFDWLRQUHTXLUHPHQWVDUHPLQLPDO Keeping the passenger slide door lower track pan free of deEULVLFHDQGVQRZLVRQHRIWKH most effective preventive maintenance practices to exercise. Regular preventive maintenance procedures will increase service life, as well as enhancing safety. During routine inspections, operate all conversion systems and QRWHWKHIROORZLQJDVHTXLSSHG ,VWKHSRZHUVRXUFHDGHTXDWH or weak? Page 48 'RHVWKHHOHFWURQLFFRQWUROV\Vtem function properly? 'RWKHFRQWUROVZLWFKHVIXQFWLRQ properly? 'RHVWKHNQHHOIHDWXUHIXQFWLRQ properly? 'RHVWKHSRZHUGRRUIXQFWLRQ properly? 'RHVWKHUDPSGHSOR\DQGVWRZ properly? ,QVSHFWZKHHOFKDLUDQGRFFXSDQWUHVWUDLQWEHOWVEXFNOHVDQG hardware for damage, wear, DEQRUPDOFRQGLWLRQRULPSURSHU operation. 5DPSVDUHHTXLSSHGZLWKVHDOHG EHDULQJVDQG7HÁRQEXVKLQJV to decrease wear, provide smooth operation and extend the service OLIHRIWKHUDPS$´GULÀOPµVW\OH RIOLJKWRLOVKRXOGEHDSSOLHGWR WKHUDPSLQERDUGSLYRWSRLQWVWKH RXWERDUGUDPSH[WHQVLRQKLQJH and the third row seat footrest pivot points (goes on wet then GULHV/XEULFDQWVRIWKLVW\SHDUH DYDLODEOHWKDWGRQRWDWWUDFWGXVW RUGHEULV&OHDQFRPSRQHQWVDQG WKHVXUURXQGLQJDUHDEHIRUHDSSO\LQJOXEULFDQWV8VHRILPSURSHU OXEULFDQWVFDQDWWUDFWGLUWRURWKHU contaminants which could result in wear or damage to components. Inspect and clean as detailed IUHTXHQWO\DQGURXWLQHO\PLQLPXP four weeks or 100 cycle intervals). /XEULFDWHWKHUDPSDVVSHFLÀHG approximately every three months. 1RWH7KHVHLQWHUYDOVDUHD general guideline and will vary DFFRUGLQJWRIUHTXHQF\RIXVHDQG conditions. Exposure to severe conditions (weather, environment, KHDY\XVDJHHWFPD\UHTXLUHLQspection and maintenance proceGXUHVWREHSHUIRUPHGPRUHRIWHQ PREVENTIVE MAINTENANCE Preventive maintenance visual inVSHFWLRQVFOHDQLQJDQGOXEULFDWLRQ procedures do not take the place RIWKHSURFHGXUHVVSHFLÀHGLQ WKH0DLQWHQDQFHDQG/XEULFDWLRQ Schedule provided in the service manual. The procedures outlined LQWKH0DLQWHQDQFHDQG/XEULFDWLRQ6FKHGXOHPXVWEHSHUIRUPHG at the recommended scheduled LQWHUYDOVE\DQDXWKRUL]HG%UDXQ Corporation service representaWLYHZKRKDVDWWHQGHGDQGEHHQ FHUWLÀHGE\7KH%UDXQ&RUSRUDWLRQ Sales and Service School. If there is any sign of damage, ZHDUDEQRUPDOFRQGLWLRQRU improper operation, discontinue conversion use immediately. Contact your sales representative or call 1-800-488-0359. One of our Customer Experience Group representatives will direct you to a Braun authorized service center. Maintenance and lubrication procedures must be performed by authorized service personnel as VSHFLÀHGLQWKH applicable conversion service manual. Failure to do so may result in serious bodily injury and/or property damage. Page 49 AUXILIARY POWER SUPPLY AND BELOW FLOOR OBSTRUCTIONS 1RWH7KHWHFKQLFDOLQIRUPDWLRQ provided on pages 50-53 of this manual is service related. If you are having an electrical tie-down, power seat or other auxiliary electrical device installed in your conversion, this information should EHVXSSOLHGWRWKHWHFKQLFLDQ Otherwise, disregard this section. Do not connect auxiliary devices to vehicle battery. Doing so may result in damage to electrical system and/or electronic components. Page 50 Auxiliary Power Supply: Do not connect auxiliary devices directly WRWKHYHKLFOHEDWWHU\'RLQJVR may result in damage to electrical V\VWHPDQGRUHOHFWURQLFFRPSRnents. Refer to the illustration on page 53 to avoid contacting or damaging YLWDOFRPSRQHQWVXQGHUWKHÁRRU 7ZRIXVHEORFNVDUHSURYLGHG as an auxiliary power source for dealer-installed auxiliary electriFDOGHYLFHV)XVHEORFNGHWDLOV DQGVSHFLÀFDWLRQVDUHSURYLGHG RQSDJH7KHIXVHEORFNVDUH ORFDWHGDWWKHERWWRPRIWKHFHQWHU dash console. Below Floor Obstructions: :KHQLQVWDOOLQJDIWHUPDUNHWHTXLSPHQWLQDFRQYHUVLRQREVWUXFWLRQV EHORZWKHÁRRUPXVWEHDYRLGHG 2EVWUXFWLRQVLQFOXGHZLULQJIXHO V\VWHPEUDNHOLQHVHWF,QVWDOOHUV PXVWEHDZDUHRIWKHVHREVWUXFtions. 5LVNRIHOHFWULFDOÀUH Install and electrically terminate auxiliary electrical device as VSHFLÀHGE\GHYLFH manufacturer. AUXILIARY POWER SUPPLY AND BELOW FLOOR OBSTRUCTIONS 1RWH7KHIXVHEORFNVDUHSDUW RIDQHOHFWULFDODVVHPEO\7ZR grounding studs are also provided. Under Dash Fuse Blocks F4 30 F2 F3 30 OPEN F1 F1 F2 F3 F4 Fasteners OPEN 20 OPEN OPEN Ignition Fuse Block: The total maximum load must not exceed 40 amperes. 1RWH%DWWHU\IXVHEORFNSRVLtion (F3) powers the passenger VHDW6,5DQGLVQRWUHTXLUHG for vehicles with a manufacture date after 2-25-08. OPEN 7KHLQVWDOOHULVUHVSRQVLEOHIRU supplying the correct gauge wire and fuse for the particular device WREHDWWDFKHGWRWKHIXVHEORFNDV VSHFLÀHGE\WKHPDQXIDFWXUHURI the device). Fuse Block Access: The fuse EORFNVDUHORFDWHGDWWKHERWWRP of the center console. Remove ERWWRPFRQVROHSDQHOIDVWHQers per side). 29428 7KHEDWWHU\IXVHEORFNSURYLGHV power at all times (independent of the vehicle ignition). The ignition IXVHEORFNVXSSOLHVSRZHURQO\ when the vehicle ignition is on. 1RWH,ILQVWDOOLQJDQDX[LOLDU\ HOHFWULFDOGHYLFHWKDWUHTXLUHV more than a 40 ampere power source, an alternative power VRXUFHPXVWEHSURYLGHG 29429 Fuse Blocks: 7ZRIXVHEORFNV are provided for use as an auxiliary power source (one ignition fuse EORFNDQGRQHEDWWHU\IXVHEORFN Battery Fuse Block: The total maximum load must not exceed 40 amperes. Page 51 AUXILIARY POWER SUPPLY AND BELOW FLOOR OBSTRUCTIONS Below Floor Obstructions When installing an electrical tiedown, power seat or other auxiliary electrical device in a converVLRQREVWUXFWLRQVEHORZWKHÁRRU PXVWEHDYRLGHG2EVWUXFWLRQV LQFOXGHZLULQJIXHOV\VWHPEUDNH OLQHVHWF,QVWDOOHUVPXVWEH DZDUHRIWKHVHREVWUXFWLRQV Refer to the illustration on the following page when installing DIWHUPDUNHWHTXLSPHQWWRDYRLG contacting or damaging vital FRPSRQHQWVXQGHUWKHÁRRU 'ULOOLQJRUFXWWLQJLQWRVXFKREstructions may result in potential hazards as well as property damage. 1RWH6RPHZLULQJKDUQHVVHV VKRZQPD\QRWEHSUHVHQW Avoid all harness locations. Check for obstructions such as wires, gas lines, exhaust, etc. before drilling or FXWWLQJWKURXJKÁRRU Failure to do so may result in serious bodily injury and/or property damage. Page 52 5LVNRIHOHFWULFDOÀUH Install and electrically terminate auxiliary electrical device as VSHFLÀHGE\GHYLFH manufacturer. QuickTime™ TIFF are needed (Uncompressed) to and see a thisdecompressor picture. Rear A/C Lines Emergency Brake Cables OEM Charcoal Canister Charcoal Vapor Line Side Impact Sensor OEM Fuel Tank Braun Controller Side Impact Sensor Rear Heat Lines Side Impact Sensor Side Impact Sensor Fuel Fill Tube Passenger Receptacle Station Main Fuel Line Gateway Electrical Center (SIR Terminator, Gateway Module and Fuse Block) Driver Receptacle Station Brake Lines Heat & A/C Brake System Below Floor Obstructions Fuel System Braun Wiring OEM Wiring Color Key AUXILIARY POWER SUPPLY AND BELOW FLOOR OBSTRUCTIONS Page 53 JACKING AND TIRE CHANGING Jacking and Tire Changing Below Vehicle Spare Tire Mount: A pivoting EUDFNHWVHFXUHVWKHWLUHLQWKHVSDUHWLUHPRXQW $KLWFKSLQVHFXUHVWKHWRSRIWKHSLYRWEUDFNHW WRWKHXSSHUEUDFNHWFRWWHUSLQORFNVKLWFKSLQ Spare Tire Mount: The spare tire is mounted EHORZWKHYHKLFOHDWWKHUHDU5HPRYHDQGVWRZ WKHVSDUHWLUHDVGHWDLOHG1RWH6SDUHWLUH mount illustrations shown without tire shroud. Spare Tire (Stowed) Jack Location:7KH2(0MDFNMDFNKDQGOH and winch handle tools are stored inside the rear driver side wall compartment (OEM location). Upper Bracket Jack Points: )URQWDQGUHDUZKHHOMDFNLQJ SRLQWVKDYHEHHQUHSRVLWLRQHGGXULQJFRQYHUVLRQSURFHGXUHV7KHPRGLÀHGYHKLFOHMDFN points are depicted on page 56. Pivot Bracket Jacking and Tire Changing Procedures: Jack Jacking and tire changing procedures have Engagement QRWEHHQDIIHFWHGE\WKHFRQYHUVLRQ5HIHUWR 1RWFK OE WKH2(0VXSSOLHGPDQXDOIRUMDFNLQJDQGWLUH M changing instructions and safety precautions, as well as instructions regarding other roadside emergencies. Page 54 Spare Tire Mount JA CK JACKING AND TIRE CHANGING Spare Tire Removal: Remove the cotter pin from the hitch pin. Remove the hitch pin. 5RWDWHORZHUWKHSLYRWLQJEUDFNHWWRWKHRSHQ position. Slide tire out of mount. 1RWH7KH2(0MDFNFDQEHXVHGWRUHOLHYH SUHVVXUHRQWKHKLWFKSLQ$MDFNHQJDJHPHQWQRWFKLVSURYLGHGDWERWWRPRIWKHSLYRW EUDFNHWVKRZQRQSUHYLRXVSDJH3RVLWLRQ MDFNHQJDJHEUDFNHW-DFNXSWRUHOLHYH pressure. Remove the hitch pin. Slowly lower WLUH5RWDWHORZHUWKHSLYRWEUDFNHWWRWKH open position. Slide tire out of mount. Caution: .HHSFOHDURISLYRWEUDFNHWXSSHU EUDFNHWDQGWLUHPRXQW6XGGHQPRYHPHQWRI VWRUDJHEUDFNHWVDQGWLUHPD\RFFXU Hitch Pin Cotter Pin 1RWH8VHWKHMDFNKDQGOHWRSU\EUDFNHWV apart (if needed). Three slots are provided LQWKHSLYRWEUDFNHWIRUGLVHQJDJHPHQWIURP XSSHUEUDFNHW,QVHUWKDQGOHLQVORWDQGSU\ GRZQIURPXSSHUEUDFNHW Stowing the Spare Tire: Reverse removal SURFHGXUHV1RWH7KH2(0MDFNFDQEH XVHGWRUDLVHWKHWLUHDQGSLYRWEUDFNHWLQWRSRsition when storing the tire. Keep hands clear. Spare Tire Mount Pivot Bracket Page 55 JACKING AND TIRE CHANGING Jack Points: 5HSRVLWLRQHGMDFNLQJSRLQWVDUH GHSLFWHGEHORZ5HPRYHDQGVWRZWKHVSDUHWLUH as detailed on pages 54 and 55. Refer to the 2(0VXSSOLHGPDQXDOIRUMDFNLQJDQGWLUHFKDQJLQJ instructions and safety precautions. Jack Points Page 56 TOWING Towing with a Lowered Floor Conversion 8VHRIDORZHUHGÁRRUFRQYHUVLRQYHKLFOHIRU WRZLQJLVSURKLELWHG Transporting a Lowered Floor Conversion In case of service, The Braun Corporation UHFRPPHQGVWKDWORZHUHGÁRRUFRQYHUVLRQ YHKLFOHVEHWUDQVSRUWHGRQDWUDLOHUUDWKHU than towed with one set of wheels suspended and the other set of wheels remaining in road contact. Trailer Transport Page 57 REPORTING SAFETY DEFECTS Reporting Safety Defects to The Braun Corporation Reporting Safety Defects to the United States Government ,QDGGLWLRQWRQRWLI\LQJ1+76$ZHFHUWDLQO\ hope you will notify us. Please contact the Customer Experience Group at 1-800RUZULWH ,I\RXEHOLHYHWKDW\RXUYHKLFOHKDVDGHIHFWZKLFKFRXOG FDXVHDFUDVKRUFRXOGFDXVHLQMXU\RUGHDWK\RXVKRXOG LPPHGLDWHO\LQIRUPWKH1DWLRQDO+LJKZD\7UDIÀF6DIHW\ $GPLQLVWUDWLRQ1+76$LQDGGLWLRQWRQRWLI\LQJWKH%UDXQ Corporation. The Braun Corporation 631 West 11th Street P.O. Box 310 :LQDPDF,186$ ,I1+76$UHFHLYHVVLPLODUFRPSODLQWVLWPD\RSHQDQLQYHVWLJDWLRQDQGLILWÀQGVWKDWDVDIHW\GHIHFWH[LVWVLQDJURXSRI vehicles, it may order a recall and remedy campaign. HowHYHU1+76$FDQQRWEHFRPHLQYROYHGLQLQGLYLGXDOSUREOHPV EHWZHHQ\RX\RXUGHDOHURUWKH%UDXQ&RUSRUDWLRQ 7RFRQWDFW1+76$\RXPD\HLWKHUFDOOWKH$XWR6DIHW\+RWline toll-free at 1-800-424-9393 (or 366-0123 in Washington, '&DUHDRUZULWHWR 1+76$86'HSDUWPHQWRI7UDQVSRUWDWLRQ Washington, D.C. 20590 <RXFDQDOVRREWDLQRWKHULQIRUPDWLRQDERXWPRWRU vehicle safety from the Hotline. Page 58 "Providing Access to the World" ® Over 300 Braun Dealers Worldwide ® 35477 Rev A January 2011 Patent #6,825,628 Patent #7,798,761 Patent #7,551,995