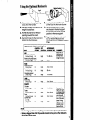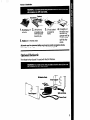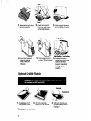
1
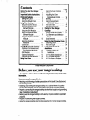
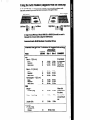
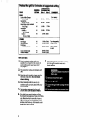
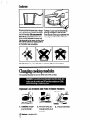
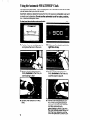
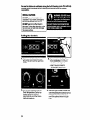
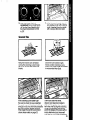
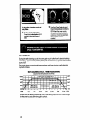
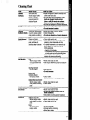
with Convertible
licrowave Ovens, Trash Compactors, Room Au Conditioners, Dehumldiflers. Automatic Washers. Clothes Dryers. Freezers, Relrigerator-Free2
Contents
Page
Before You Use Your Range/
cooktop
.
.
important Safety instructions
Parts and Features
Setting the Clock
Using the Minute Timer
Using Your Cook-top , . .
Using the Control Knobs
Using the Optional Coil
Element Module
Using the Grill Module .
Using the Optional Solid
Element Module
..
Using the Optional Griddle
Module..................
Using the Optional
Rotisserie
. . .
.
Cookware
. ..
Changing Cooktop Modules
Optional Coil Element and
Solid Element Modules
Grill Module
,
.
Optional Rotisserie . .
.
Optional Griddle Module .
Using Your Oven . ,
.
6
7
9
10
11
12
12
12
13
13
14
15
Using the Oven Controls
Baking..
Adjusting the Oven
Temperature Control
Broiling .
Using the Automatic
MEALTIMER*Clock .
The Oven Vent .
The Storage Drawer . .
Caring for Your Range/
cooktop
,
.
Control Panel and Knobs .
C;;;fsments
and Reflector
Page
15
15
Solid Ele&&ts’ : : : : : : : : : : : : : :
Using the Self-Cleaning Cycle
Cleaning Chart..
...
The Oven Light
.
if You Need Service or
Assistance
. .
I. Before Calling for
Assistance.
.
2. If You Need Assistance
..
3. If You Need Service
4. If You Have a Problem .
16
17
18
19
20
21
21
21
23
23
27
29
30
30
31
31
31
‘Tmk.
oi~b3
wnlnpool
c;orporanon
Before you use your rangehoktop
Read this Use 6 Care Guide and lhe Cooking Guide for important
information.
safety
You are personally responsible for:
Reading and following all safety precautions in this Use & Care Guide and
the Cooking Guide.
l installing
and leveling the range/cooktop in a cabinet where it is protected from the elements, and on a floor strong enough to support its weight.
l Properly connecting
the range/cooktop to electrical supply and grounding.
(See “Installation Instructions:‘)
l Making
sure the range/cooktop is not used by anyone unable to operate it
properly.
l Properly maintaining
the range/cooktop.
l Using the range/cooktop
only for jobs expected of a home range/cooktop.
l
2
IMPORTANT
SAFETY INSTRUCTIONS
I. DO NOT allow children to use or
6. KEEPpan handles turned in, but not
play with any part of the range, or
over another surface unit to avoid
leave them unattended near it.
burns, injury and to help prevent the
They could be burned or injured.
utensil from being pushed off the sur
face
units.
!. DO NOT store things children
might want above the range.
7. DO NOT use water on grease fires.
Children could be burned or
The fire will spread. Cover fire with
injured while climbing on it.
large lid or smother with baking
soda
or salt.
1. DO NOT allow anyone to touch
hot surface units or heating ele8. DO NOT wear loose or hanging garments Dark colored units and elements when using the range. They
ments can still be hot enough to
could ignite if they touch a hot surburn severely
face unit or heating element and
you could be burned.
1. KEEPchildren away from the
range when it is on. The cooktop
9. DO NOT heat unopened containers.
and oven walls, racks and door
They could explode. The hot contents could burn and container parcan get hot enough to cause
ticles could cause injury.
burns.
i. DO NOT use the range to heat a
10. When adding or removing
room. Persons in the room could
food, MAKE SUREto open the
be burned or injured, or a fire
oven door all the woy to
could start.
prevent burns.
l FOR YOUR SAFEW l
DO NOT STORE OR USE GASOLINE OR OTHER FLAMMABLE VAPORS AND LIQUIDS
IN THE VICINITY OF THIS OR ANY OTHER APPLIANCE. THEY COULD IGNITE
CAUSING EXPLOSION AND/OR FIRE.
- SAW THESE INSTRUCTIONS
-
Copy your Model and Seriz Numbers here
If you need service, or call with a question, have this information ready:
Model and Serial
Numbers [from plate just behind
the oven door).
2. Purchase date from sales slip.
Model Number
Copy this information in these
spaces. Keep this book, your
Serial Number
warranty and sales slip together in
the Literature Pac.
Purchase
Dute
There is no warranty registration
to return. Proof-of-purchase is all that
is required for in-warranty service.
Sewlce
Company/Phone
Number
1. Complete
-
Parts and features
OVEN
SELECTOR
Model RS575PXR
TEMPERATURE
CONTROL
SIGNAL
LIGHT
OPTIONAL
COIL ELEMENT
LIGHT
LIGHT
PLUG-IN
COIL ELEMENT
OVEN
LIGHT SWITCH
SURFACE UNIT
AND GRIDDLE
CONTROL KNOB
_
MODULE SIGNAL
LIGHT
OVEN
VENT
ONE-PIECE
CHROME
CONTROL
PANEL
LEFl REAR
SURFACE UNIT
CONTROL
GRILL
MODULE
\
AUTOMATIC
OVEN LIGHT
MODEL AND SERIAL
NUMBER pLATE
BROIL ELEMENT
\Y-u
OVEN RACK
GUIDE
OVEN DOOR
RIGHT REAR
SURFACE UNIT
CONTROL KNOB
RIGHT MdDULE
SIGNAL LIGHT
RIGHT FRONT
SURFACE UNIT
AND GRIDDLE
CONTROL KNOB
MINUTE
TIMER
‘SURFACE UNIT/
COOKTOP MODULE
INDICATOR
CLOCK
STOP
TIME
START TIME
Setting the Clock
Push In and turn the Minute Timer Knob to set the Clock
1. Push
in Minute Timer Knob and
turn clockwise until clock shows
the right time of day.
Using the Minute Timer
2. let the Minute Timer Knob pop
out. Turn counterclockwise
until
Minute Timer dial shows OFF.The
clock sefflng will change If you
push in the knob when turning.
The Minute Timer does not start or stop the oven. It works like a kitchen timer.
Set it in minutes up to an hour. You will hear a buzzer when the set time is up.
DO NOT PUSH IN THE KNOB when setting the Minute Timer
1. without
2. WHhoul pushing In, turn the knob
back to the setting you want.
When the time is up, a buzzer
will sound. To stop the buzzer, turn
the Minute Timer dial to OFF.
IN AND TURNING THE MINUTE TIMER KNOB CHANGES THE CLOCK
pushing In the Minute
Timer Knob, turn it until the time
showing in the window is longer
than you want.
PUSHING
SETTING.
5
I
II
Using your cooktop
Using the Control Knobs
Surface Unit Indicators
The solid dot in the surface unit
indicator shows which surface unit
is turned on by that knob. The box
shows that a module, such as a griddle, can be controlled by that knob.
Signal Lights
P
A module signal light will glow
whenever one or both control knobs
above the light are ON.
PUSH IN
kmto
semng.
Control knobs must be pushed in
before turning them to a setting.
They can be set anywhere between
HI and OFF.
Using the Optional Coil Element Module
Use only flat-bottomed utensils for best cooking results and to prevent damage
to the cooktop. Specialty items with rounded or ridged bottoms (woks, ridged
bottom canners or tea kettles) are not recommended.
Until you get used to the sefflngs, use the following as a guide. For best
results, start cooking at the high settings; then turn the control knob down to
continue cooking.
to
Use HI to start
Use MED-HI
Use MED
Use MED-LO
USE LO
ing; to bring
liquids to a
toholda
rapid boil; to
fry chicken
or pancakes.
for gravy,
puddings
and icing; to
cook large
amounts of
vegetables.
to keep food
cooking after
starting it
on a higher
setting.
keep food
warm until
ready to
serve. Set the
heat higher
or lower
within the LO
band to keep
food at the
temperature
you want.
foods cookboil.
CAWION: The me of the Hi sefflng for long periods of
tlme can damage odl elements and discolor chrome
mll~bowkSta~cooklngonHIandiumcenh4
downkoontlnueoooklng.
See the “Cooking
6
Guide” for Important
utensil information.
Using the Grill Module (supplied with the cooktop)
use front or back controls as you would for surface Units.
Use both controls if you want the front and back of the grill to heat.
For the Grill Module,
Lett Front
0
0
000
l
0
Letl Rear
00
A range hood (Whlrlpool
Model RH8330 or RH8336)
help get rld of smoke while using the Grill Module.
Appmximafe
should
be used to
Grill Module Cooking limes
reheat the grill for 5 mlnufes af suggesfed
CoIscRoL
SETTING
APPROXIMATE
CCCKlNGTlME
Side 1 S-2
sefflng.
COMMENTS
EF
Steak - 1” (2.5 cm)
Rare
Medlum
Well-done
HI
HI
HI
8 Mln.
11 fvlln.
12 Mln.
9 Min.
12 Mln.
13 Mln.
HI
HI
HI
10 Mln.
13 Min.
16 Mln.
7 Mln.
13 Mln.
16 Mln.
HI
HI
HI
8 Min.
9 Min.
10 Mln.
10 Mln.
12 Min.
13 Mln.
HI
15 Mln.
15 Min.
Fillets - 1 lb. [.5 kg]
A Min.
A Mln.
Lobster Tails
5 Min.
5 Mln.
Steak - 1Yz”(3.8 cm)
Rare
Medlum
Well-done
Hamburgers1” (2.5 cm)
Rare
Medlum
Well-done
To test steak
for doneness,
cut near
center with
sharp knlfe.
BH
Whole 2Y2 Ibs. (1 kg]
HICKEN
2Y2 Ibs. [1 kg)
Quarters or
Pieces
55 Mln. Total
When flsh
flakes easily
It is done.
Cook all fish
on alumlnum
foil.
Preheat the grill for 5 mlnutes at suggested sefflng#K)D
Loin or Rib Chops
Yff (1;Pcnl)
sparwlbs
2MIbsw.(l kg)
Ham Slice, fully cooked
1 lb (S kg]
Sausage
Pattles M” (1.3cm)
Links 10oz. (3 kg)
OTHERS
Hot Dogs
Sandwiches
Potatoes,
cut Into ms
ComontheCob
French Breocl
ooNTRoltsooKmeTlM2
sFmNe
sld.1
stde2
ooklm-
HI
15 Min.
12 Min.
few mlrwtes.
HI
10 Min. 10 Min.
Turn every
7 Mln.
HI
6 Mln.
HI
8 Min. 12 Mln.
HI
6 Mln. Total
HI
HI
8 Mln. Total
15 Mln. Total
Turnfrequently.
Wrap In toll.
HI
45 Mln. Total
Wrap tightly
In foil.
HI
HI
30 Min. Total
10 Mln. Total
Hints and tips:
1.
Food cooked on the grill can
spatter. It is important to clean all
parts after each use. See chart
on page 27.
2. The ceramic rocks will darken with
use.
3. Take the grill apart to clean and to
remove and store. Do not stack
when storing.
4. Most utensils safe for use on an
outdoor grill can be used with your
Grill Module.
5. The heating element for the grill
cleans itself. Do not put in water.
6.
Trim fats from meat before grilling
to prevent excessive smoke and flareups. Meats which normally have a
high fat content will produce more
smoke and flare-up. Fat meats cook
faster than lean meats.
7. If meat begins to cook too quickly,
turn the grill control knob to a
lower setting.
Using the Optional Solid Element Module
Use only flat-bottomed utensils for best results and to prevent damage to
the cooktop. Specialty items with rounded or ridged bottoms (woks, ridged
bottom canners or tea kettles) are not recommended. Solid elements are
made of heavy cast-iron to provide even cooking. These elements hold
heat longer than conventional type surface units. For best cooking results,
use a HI setting for a very short period; then use a LO setting to complete the
cooking. Turn the element OFF a few minutes before you are finished
cooking.
CAUTION: Elements stay hot for a long time. Do not leave pans on
hot elements when cooking is done. Burned food and damage to
the cooktop could
result.
NOTE: A protective limiter is built into each solid element. if pan bottoms are not fiat, if will sense uneven cooking temperatures and automatically reduce the heat sefflng. This will result in longer cooking
times. See Cookware on page 12.
Until you get used to the settings, use the following
as a guide:
Use HI to start
Use MED-HI
Use MED for
Use MED-LO
Use Lo to
cooking or to
brlng liquids
to a boil.
When cooking foods,
to hold a
rapld boil or
to start frying
chicken or
pancakes.
to continue
cooklng atter
starting at a
higher
setting.
turntoaD
or MED-LO
semng when
sizzle starts.
TumtoalO
or MED-LO
setting when
sizzle starts.
gravy, puddings and
icings or to
cook large
amounts ot
vegetables.
continue
cooking after
starting at a
higher setting, to keep
food warm or
to melt chocolate or
shortening.
TumtoaLO
semng to
flnlsh
cooklng.
Using the Optional Griddle Module
Before using the griddle for
the first time:
1. Wash, rinse and dry the griddle.
l Use warm sudsy water.
l DO NOT put griddle
in water.
l DO NOT use metal scouring
pads
or abrasive cleansers. They will
damage the griddle.
2. Lightly wipe with cooking oil to
season. You don’t have to grease
the griddle every time you use it.
However, oil or butter adds flavoring and aids browning.
1.
Lift and remove
the griddle
cover. Do not
replace it unffi the griddle
is cool.
2. Preheat for a
few minutes
(until butter
melts or water
beads on the
griddle).
Approximate
grlddle cooking
Preheat the griddle
FOOD
Sausage Patties
Bacon
Ham Slide
Hamburger
Fish Sticks
Hot Dogs
Buns
French Toast
Grilled Sandwiches
Pancakes
Eggs
10
3. Add food. Use 4. When cooking
is finished, turn
only nylon or
the griddle
plastic utenOFF.Leaving
oils. Metal
it ON will
can scratch the
damage the
non-stick finish.
griddle.
limes
for 10 minufes on Hf.
CONTROL
SETTING
!IMEPHI
lED
MEDHI
MEPHI
MED
MEPHI
MEDHI
MEDLO
APPROXIMATE
COOKING TIME
Side 2
Side 1
4 Min.
8 Mtn.
1-2 Min.
3 Min.
5-6 Min.
6 Min.
5 Min.
6 Min.
3-4 Min.
5 Min.
5 Min.
5 Min.
3 Min. Total
2-3 Min.
3 Min.
3 Min.
3 Min.
1%2 Min. l-2 Min.
1 Min.
3 Mtn.
II
Using the Optional Rotisserie
RPH
ic
I
L
=-+Jr
1.
5. Insert pointed end of the spit
all the way into the motor socket.
Put one fork on the spit pointing
away from the handle.
2. Push spit through the meat so the
weight is balanced.
3. Put the second fork on the spit
pointing toward the meat.
4. Push both forks into the meat and
tighten the thumbscrews.
6.
Put the handle end of the spit
into the slot in the front support
that matches the motor socket
position in the rear support.
7. Plug in the rotisserie motor and
turn on the Grill Module. See
chart below for suggested
cooking
times.
Approximate rotluerle cook@ tlmeS
APPROXIMATE
CONTROLSPIT
SETTING POSITION COOKINGTIME COMMENTS
FOOD
REEF
Rolled rib roast [rare)
3’h Ibs. (1.5kg.] HI
Rolled rump roast [tore)
3% Ibs(l.5 kg.)
HI
High
1 hr. 55 min.
High
2 hrs.
HI
High
3 hrs. f5 min.
HI
High
50 min.
HI
High
1 hr. 10 min.
HI
Hlgh
2 hrs. 30 min.
HI
High
1 hr. 45 min.
HI
High
2 hrs.45 min.
HI
High
2 hrs. 15 min.
HI
High
2 hrs.
Meat wfff~an
outer layer of
fat may fake
longer to cook.
PORK
Rolled loin roast
5 Ibs. (2 kg.)
Spareribs
1% Ibs. (I kg.)
Canadian bacon
2 Ibs. [I kQ.1
LAME
Rolled leg
5 Ibs. (2 kg.)
POULTRY
Chicken
2 Ibs. (1 kg.)
Turkey
6’h Ibs. (2.5 kg.)
Duck
3% Ibs. (1.5kg.)
Cornish hen
2- 1 lb.
(1 kg.] hens
Trusspoultry
tightly. Run splf
in at base of the
fall and dlagonally through
the cavify to fhe
fork of fhe wishbone. If wing
tips brown too
rapidly, cover
them with roll.
NOTE:
Use the high posltion for anythlng over two inches (5 cm.) In diameter.
l Turkeys bigger
than 8 to 10 pounds should not be put on the rotisserie.
Roast then in the oven.
l
!
I
I I
Pans should be the same size or larger
Flatness of a pan can be checked by
than the elements to prevent boilovers
placing an edge of a ruler across it.
and hot handles. Only use pans with
There should not be space between the
flat bottoms. Flat bottoms allow maxruler edge and the bottom of the pan.
imum contact between the pans and
the elements for fast, even cooking. Pans
with uneven bottoms or raised patterns
on the bottom are not suitable.
DO NOT USEtrivets, woks with skirts. or canners wtth concave
bottoms.
Changing cooktop modules
The Cooktop Modules will work on either side of the cooktop.
Optional Coil Element and Solid Element Modules
1. To remove,
lift slightly by the handle.
4. Replace
12
in reverse order.
2. With both hands, pull
module toward you to
unplug it.
3. Lift out and set aside.
Grill Module
1. TOremove,
off grills.
5. Replace
lift
2. Lift front end
of heating element and pull
toward you.
3. Lift out basket
of ceramic
rocks.
in reverse order.
4. Lift slightly at
the back and
remove the
grease well. Be
careful not to
spill fat drippings.
All parts must be cleaned after each use to avold excessive
flare-ups, fat spoilage and odors. See chart on poge 27.
Optional Rotisserie
The rotisserie has 4 parts. It is used with the Grill Module.
smoke,
Slots
1.
Remove the ariils from
the Grill Modile.
3. Slide support forward
to lock. Tilt top to level.
2. Insert rear support
tabs into slots at rear
of the Grill Module.
Hanglng
Hlgh Posltlon
4.
5. Slide support back
to lock. Tilt top to level.
Insert front support
tabs into slots at
front of the Grill
Module.
6.
Pins
low
Posltlon
Position the motor. ..
socket and pins rn me
holes in the Rear
Support. Use either
the high or low
position.
Optional Griddle Module
1. To remove, lift off
the griddle cover.
4. Replace
14
2. Lift front of griddle
slightly by the handle.
in reverse order.
3. With both hands, pull
griddle toward you to
unplug it.
Using your oven
Using the Oven Controls - Baking
1. Position the rack(s) properly
before turning on the oven. To
change rack positions, lift rack
at front and pull out.
Rack@) should be placed so
fhefopoffhefoodwillbecenfered In the oven. Always feave
atleasttHtozlnGhesf4-6cm)
befwe8nfheddesdfhepan
and the oven walls and other
pans. When ushg fhe lowesf
rackposiffon,afwaysuw,QffSef
rack. For more informafkm. see
fhe ‘Cooklng Guide:
Set Oven Temperature Control to
the baking temperature you want.
The Oven Signal Light will come on.
The oven is preheated when the
Oven Signal Light goes off.
4. Put food in the oven. Note: Oven
5. When baking is done, turn both
racks, wall and door will be
the Oven Temperature Control and
hot.
the Oven Selector to OFF.
During baking, the elements will
turn on and off to keep the oven
temperature at the setting. The
Oven Signal Light will turn on
and off with the elements.
The top element helps heat
during baking, but does not turn red.
15
Adjusting the Oven Temperature
Control
Does your oven seem hotter or colder than your old oven? The temperature of
your old oven may have shifted gradually without your noticing the change.
Your new oven is properly adjusted to provide accurate temperatures. But when
comparing to your old oven, the new design may give you different results.
If after using the oven for a period of time, you are not satisfied with the
temperature settings, they can be adjusted by following these steps:
1.
Pull the Oven Temperature Control
Knob straight off.
2. Loosen the lockina screw inside
the control knob. Foote the position of the notches.
3.
To lower the’temperature,
move
a notch closer to LO.Each notch
equals about 10°F(5°C).
4.
16
To raise the temp&ature,
move
a notch closer to HI. Each notch
equals about 10°F(SOC].
Tighten the locking screw and
replace the control knob.
Broiling
1.
Position the rack before turning
the oven on. See broil chart in
the “Cooking Guide” or a reliable
cookbook for recommended rack
positions.
3. Close the door to the Broil Stop
position, (open about 4 inches,
10.2 cm.). The door will stay open
by itself.
2. Put the broiler pan and food on
the rack.
4. Set the Oven Selector and the
Oven Temperature Control to
BROIL.
5. When broiling is done, turn both
the Oven Selector and the Oven
Temperature Control to OFF.
Custom Broil
l
l
If food is cooking too fast, turn the Oven Temperature Control counterclockwise until the Oven Signal Light goes off.
If you want the food to broil slower from the start, set the Oven Temperature Control between 150” and 325°F (65.5” and 162.7”C). The lower the
temperature, the slower the cooking.
The Oven Selector must be on BROIL for all broiling temperatures.
Using the Automatic MEALTIMER*
Clock
The automatic MEALTIMER*Clock is designed to turn the oven on and off at times
you set, even when you are not around
Automatic baking is ideal for foods which do not require a preheated oven such
as meats and casseroles. Do not use the automatic cycle tar cakes, cookies,
etc...undercooking
will result.
To start and stop baking automatically:
‘Tmk.
1. Position
2. Make sure the clock is set to the
right time of day.
3. Push in and turn the Start Time
Knob clockwlse to the time you
want baking to start.
4. Push in and turn the Stop Time
Knob clockwise to the time you
want the oven to shut off.
5 Set the Oven Selector on TIMED
BAKE.
6.
the oven rack(s) properly,
and place the food in the oven.
18
Set the Oven Temperature Control on the baking temperature
you want. The oven will now start
and stop automatically.
AAer baking is done or to stop
the oven before preset tlme, turn
both the Oven Selector and the
Oven Temperature Control to OFF.
To stari baking now and stop automatically:
1. Position
rack(s) properly, and place the food in the oven.
2. Make sure the clock is set to the right time of day.
3. Push in and turn the Stop Time Knob clockwise
to shut off.
to the time you want the oven
4. Set the Oven Selector on TIMED BAKE.
5. Set the Oven Temperature Control on the baking temperature you want.
6. Atter
baking Is done or to stop the oven before the preset time, turn both
the Oven Selector and the Oven Temperature Control to OFF.
The Oven Vent
The oven vent is located to the rear of
the right cooktop module. When the oven
is on, hot air and moisture escape from
the oven through this vent. Poor baking
can result if this vent is blocked. When
using the oven, do not use oversized
pans or other items that might block the
oven vent.
m
19
The Storage Drawer
The storage drawer is for storing pots and pans.
Removing the storage drawer
1. Pull drawer
straight out to the
first stop. Lift front and pull out to
the second stop.
Replacing
1. Fit ends
2. Lift back slightly and slide drawer
all the way out.
the storage drawer
of drawer slide rails into
the drawer guides on both sides
of opening.
2. Lift drawer front and push in until
metal stops on drawer slide ,
rails clear white stops on drawer
guides. Lift drawer front again
to clear second stop and slide
drawer closed.
Use & Care Guide storage
Store this booklet, along with your
“Cooking Guide:’ sales slip and
warranty in the Literature Pat, inside
the storage drawer.
Caring f br your rangehooktop
Control Panel and Knobs
1. Pull knobs
straight off.
2. Use warm soapy water and a soft cloth, or spray glass cleaner, to wipe the
control panel. Rinse and wipe dry
3. Wash control knobs in warm soapy water. Rinse well and dry
4. Push control knobs straight back on. Make sure they pointto off.
Coil Elements and Reflector Bowls
2. Lift the edge of the element,
opposite the receptacle, just
enough to clear the reflector bowl. I
3. Pull the coil element straight away
from the receptacle.
4. Lift out the reflector bowl, See
Cleaning Chart on page 27 for
cleaning instructions.
I
Replacing
3. Hold the coil element as level
as possible with the terminal just
started into the receptacle.
4. Push the coil element terminal into
the receptacle. When the terminal
is pushed into the receptacle as far
as it will go, the coil element will fit
into the reflector bowl.
CAUTION: Reflector bowls reflect heat back to the utensils on the
toll elements. They also help catch spills. When they are kept clean,
they reftect heat better and look new longer.
If a reftector bowl gets dlsoolored, some of the utensils may not be
hat enough, or some may be too large for the toll element. In either
Case, some of the heat that’s meant to go Into or around a utensil
goes down and heats the reflector bowl. This extra heat can discolor
lt. See “Cooklng Oulde” for further Information.
22
ents
Solld elements am not removable. After
each use, wipe off the elements with
a damp, soft cloth and soapy water.
Burned-on food may be removed with a
soapy scouring pad. The red spot in the
center of the elements will gradually
wash off. This is normal and will not affect
the operation of the elements.
IMPORTANT: AFCEREACHCLEANING.
HEAT ELEMENTSUNTIL DRY.
-----------,
I
To darken elements or to remove rust spots caused by improper drying, apply
a thin coat of salt-free oil to the CCCL elements, then heat for 3-5 minutes. If
elements have dark spots, the oil treatment will improve their appearance but
not eliminate the spots.
The stainless steel spillrings will gradually yellow from the heat of the
elements and pans. This is normal. The yellowing can be removed by using
stainless steel cleaner on the spillrings.
Using the Self-Cleaning Cycle
The self-cleaning cycle uses very high heat to burn away soil. Before you start,
make sure you understand exactly how to use the cycle safely.
Before You Start
1. Clean the shaded
areas by hand.
They do not get ho? enough during
the Self-Clean cycle for soil to
burn away. Use hot water and
detergent or a soapy steel-wool
Clean Frame Y fl’ioor
l
l
r
the frame around the oven,
the inside of the door,
especially the part outside the
oven seal.
DO NOT clean the ftberglass seal.
DO NOT move It or bend It. Poor
cleanlna and Door baklna will
2. Remove the broiler pan and any
pots or pans you may have stored
in the oven. They can’t stand the
high heat.
3. Wipe out any loose soil or
grease. This will help reduce
smoke during the cleaning cycle.
4. Put oven racks on the second
and fourth guides. During the SelfCleaning Cycle they will darken
and become harder to slide. See
tips on page25 If you want the
oven racks to remain shiny, clean
them by hand.
Chrome reflector bowls must not
be cleaned In the oven. They will
discolor.
Be sure the kitchen Is ventllated durlng the Self-Cleanlng cycle. Thls will help
normal smoke and heat odors to dlsappear from the room as quickly
as possible.
SPECIAL CAUTIONS:
DO NOT use commercial oven
cleaners in your oven. Damage to
the porcelain ffnlsh may occur.
DO NOT use foil or other liners in
the oven. Durlng the cleaning cycle
foil can burn or melt and damage
the oven surface.
I
Selting the Controls
1. Make
sure the Clock, Start and
Stop Times all have the right time
of day.
3. Set the Oven Selector and the
Oven Temperature Control on
CLEAN. The door will lock
automatically and the Clean
Light will come on.
24
2. Push in and turn the Stop Time
knob clockwlse 2 or 3 hours.
l Use 2 hours for light soil.
l Use 3 hours or more for
4. The Lock Light comes on when the
oven temperature exceeds normal
baking temperatures. The door
can’t be opened when this light
is on.
5. Atter the Clean Cycle is
completed, the Lock Light goes
off. Turn the Oven Selector and
the Oven Temperature Control
to OFF.
6. After
the oven is cool, wipe off
any residue or ash with a damp
cloth. If needed, touch up spots
with a soapy steel wool pad.
Special Tips
Keep the kitchen well ventilated
during the cleaning cycle to help
get rid of normal heat, odors and
smoke.
If the cleaning cycle doesn’t get
the oven as clean as you expected,
the cycle may not have been set long
enough or you may not have prepared
the oven properly. Set the cleaning
time longer the next time and hand
clean areas noted on page 23.
Clean the oven before it gets
heavily soiled. Cleaning a very
soiled oven takes longer and results
in more smoke than usual.
Oven racks lose their shine,
discolor and become harder to
slide on their guides when they are
left in the oven during the cleaning
cycle. To make them slide easier,
polish the edges of the racks with a
soapy steel-wool pad, rinse well
and wipe on a thin coat of salad oil.
25
To stop the cleaning
anv lime:
2. Turn the Oven Selector and
Oven Temperature Control to
OFF.When the oven cools,
the door will automatically
unlock so it can be opened.
VJA’;i;til the oven is
cycle at
1. Push in and
turn the Stop
Time Knob clockwlse until it
points to the right time of
day.
How It Works
During the self-cleaning cycle, the oven gets much hotter than it does for baking
or broiling...approximately
875°F (468°C). This heat breaks up grease and soil and
burns it off.
The graph shows approximate temperatures and times during a self-cleaning
cycle for 3 hours.
SELF-CLEANING CYCLE -THREE HOUR SEITING
(Approximate
Temperatk
and
limes)
1 OOO’F
530%
800’F
427°C
6007
314°C
400-F
204%
93%
2OO’F
START
K hr.
1 hr.
IVY
hn.
2
hn.
2K
hn.
3 hn.
3 K hn.
STOP
Notice that the heating stops when the 3-hour setting is up, but that it takes longer
for the oven to cool down enough to unlock.
26
II
Cleaning Chart
PART
WHAT TO USE
Exterior
Soft cloth and
warm soapy water.
Nylon or plastic
scouring pad for
stubborn spots.
Surfaces
HOW TO CLEAN
l
l
l
Coll Elements
No cleaning
Bowls
Solld Element
Module
l
Damp soft cloth;
soapy water; scouring
pad; salt-free oil;
stainless steel cleaner.
l
l
l
Grill
Warm soapy water
or soapy steel wool
pad.
Basket with
Ceramic Rocks
Hot soapy water.
Griddle Module
and Cover
or harsh
cleansers.
Clean after each use.
Scrub off burned-on food. Affer each
cleaning, heat elements until dry.
To darken elements or to remove rust
spots, apply thin coat of oil to the
COOL elements.
- Heat for 3-5 minutes.
- Oil treatment will improve appearance
of dark spots but not eliminate them.
ScNb
stainless steel spillrings with
cleaner to remove vellowina.
l
Soil burns off.
l
Do not Immerse.
l
l
l
Clean often.
Soak and swish in hot, soapy water.
Wash, rinse and dry well.
Clean often.
l
Do not Immerse
l
Wash, rinse and dry well.
l
Supports and Spit
Warm soapy water
and plastic scouring
pad.
Motor
Soft cloth; warm
soapy water.
Do not use abrasive
utensils.
Wash, rinse and dry well.
Use soapy steelwool pads for stubborn
areas.
l
Rotlsserle
In water.
l
l
l
Grease Wall and Frame
Warm soapy water
and plastic scouring
pad.
Warm soapy water.
Do not Immerse
Wash with other cooking
9 Clean frequently.
Automatic dishwasher
or warm, soapy water
and plastic scrubbir,g
nnd
Heating Element
Do not clean.
Do not allow tood contalnlng
acids
(such as vlnegar, tomato, lemon
juice or milk) to remain on ourtace.
Acids will remove the glossv flnlsh.
Do not use abraslve
0; ha&h cleansers.
l
l
Grill Module
and
9 Spatters or spills will burn off.
required.
l
Chrome
Reflector
Wipe off regularly when cooktop
lower oven are cool.
Do not use metal
harsh cleansers.
griddle.
scourtng
Wash, rinse and dry well.
Clean after each use.
l
Do not Immerse.
l
l
or
Use Dlastic scourina oads if needed.
l
l
pads
Unplug before cleaning.
Wipe clean often.
27
PART
WHAT TO USE
Broiler Pan
and Grld
Warm, soapy water
or steel wool pod.
Warm, soapy water
or bristle brush.
Worm, soapy water
or spray glass cleaner.
Self-Cleaning Oven
cycle; Warm, soapy
water or soapy steel
wool pods.
Control
Knobs
Control
Panel
Oven Racks
HOW TO CLEAN
l
Wash with other cooking
l
Do not place
l
Wash, rinse and dry well.
l
Do not soak.
utensils.
In Self-Cleanlng
Oven.
Wash, rinse and dry well.
Follow directions provided with cleaner.
. Leave in oven during Selt-Cleaning
cycle.
l Wash, rinse and
dry. Use soapy Steel
wool pads for stubborn oreos.
l
l
NOTE: The oven racks will discolor
and be harder to slide
when lett In the self-cleaning
cycle. If you want them to stay
shiny, remove them from the oven and clean by hand.
Oven Door
Glass
Selt-Cleanlng
Oven
28
Spray gloss cleaner;
Worm, soopy water or
plastic scrubbing pad.
For areas outside SelfCleaning area use
warm, soapy water or
soapy steel wool pods.
l
Make
Follow
l Wash.
* Follow
“Using
l
l
l
sure oven is cool.
directions provided with cleaner.
rinse and dry well with a soft cloth.
directions starting on page 23,
the Self-Cleaning Cycle:’
Do not use commercial
oven cleaners.
Do not use toil to line bottom of your
Self-Cleaning
Oven.
The Oven Light
I
The oven light will come on when you open the oven door. To turn the light
on when the oven door is closed, push the Oven Light switch on the console.
Push it again to turn off the light.
I
2. Remove the bulb cover in the
back of the oven by pulling out
and pushing the wire holder
to the side.
3. Remove the light bulb from its
socket. Replace the bulb with a
40-watt appliance bulb.
4. Replace the bulb cover and snap
the wire holder in place.
Turn the power back on at the
main power supply.
CAUMN:ThebuibcovermudbeInplaoewhenuslng
prokchthebuIb@ombraaklng.
theoven.Thecov
NOTE: The Oven light will not work during the sell-cleaning
1
c’ycle.
If you need service or assistance,
we suggest you follow these four steps:
1.Before calling
for assistance...
Performance problems often result
from little things you con find and fix
yourself without tools of any kind.
If cooking results are not what
you expected:
Oven
l Is the range
level?
l Are you using pans recommended
in the Cooking Guide?
l If baking,
hove you allowed lY2 to 2
inches (4-5 cm) on all sides of the
pans for air circulation?
l Hove you preheated
the oven asthe
recipe calls for?
l Are the pans the size called
for in the
recipe?
l Are you following
a tested recipe
from a reliable source?
If nothing operates:
Is the power supply cord plugged
into a live circuit with the propervoltage? (See lnstallotion Instructions.)
l Hove
you checked
your home’s
main fuses or circuit breaker box?
l
If the oven will not operate:
Is the Oven Selector turned to a setting (BAKE or BROIL, but not TIMED
BAKE]?
l 1s the Oven
Temperature Control
turned to a temperature setting?
l
If surface units or cook-top
modules will not operate:
l Hove
you checked
your home’s
main fuses or circuit breaker box?
l Are surface
units or module plugged in all the way?
l Do the control
knobs turn?
If surface unit control knob(s)
will not turn:
l Did you push in before trying to turn?
If the Self-Cleaning cycle
will not operate:
l Are the Oven
Selector and Oven
Temperature Control set on CLEAN?
l Does the Start Time Dial show the
correct time of day?
l Is the Stop Time Dial set ahead
to the
time you wont the cleaning cycle to
stop?
Coil Elements
Is the cooktop level?
l Are you using pans recommended
on page 6?
l Are the pans the size called
for in the
recipe?
l Do the cooking
utensils fit the surface units being used?
l Do
the cooking
utensils hove
smooth, flct bottoms?
l
Grill
Did you leave space between the
food items?
l Was the
grill preheated
for the
proper amount of time?
l Was food
partially frozen or very
cold before grilling? Cooking time
will be longer.
l
Solid Elements
Did you use a HIGH setting for a very
short time, then use Q LOW setting to
complete cooking.
l Are you using metal pans?
l Are
you using pans with flat
bottoms?
l
See the Cooking Guide for more informotion on cooking problems and
how to solve them.
30
2,
If you need assistance?..
Call Whlrlpool COOL-LINE@, renrlce
assistance telephone number. Dlal
tree from:
Contlnental U.S. . . (600) 253-1301
Mlchlgan . . . . . . . . (800) 632-2243
Alaska 0 Hawall . (800) 253-1121
and talk with one of our trained Consultants The Consultants can instruct
you in how to obtain satisfactory operation from your appliance or, if service is necessary,
recommend
a
qualified service company in your
area.
3.
If you need setice?..
Whirlpool
has
a nationwide
network of franchised
TECHCARE” Service
Companies.
TECH-CARE service technicians
are trained to fulfill the product warranty and provide after-warranty
service, anywhere in the United States.
To locate TECH-CARE service in your
area, call our CCCL-LINE service assistance telephone number (see Step
2) or look in your telephone directory
Yellow Pages under:
4.
If you have a
problem*...
Call our CCCL-LINE service assistance
telephone number (see Step 2) and
talk with one of our Consultants, or if
you prefer, write to:
Mr. Robert Stanley
Division Vice President
Whirlpool Corporation
2000 US-33, North
Benton Harbor, Ml 49022
‘If you must call or write, please provide: model number, serial number,
date of purchase, and a complete
description
of the problem. This
information
is needed in order to
better respond to your request for
assistance.
FSP 1sa registered trademark
of Whirlpool Corporat0n
for
quality parts Look for this
symbol of qualify whenever
FSP
you need a replacement
par
fof your Whirlpool appliance
8
0
FSP r~lacemenl
parts
WIII fit right and work right, because they are
made to the same exacting specifications
used to build every new Whirlpool appliance
Making your world a little easier.
Part No. 5040211/B16021
01985 Whirlpool Corporation
omatlc Washers. Clothes Dryers. Freezers. Relrlgerator-Freezers.
Printed in U.S.A.
Ice Makers, DIshwashers. Bu~ll-In Ovens and Surface Units, Ranges, M