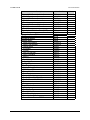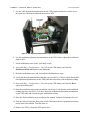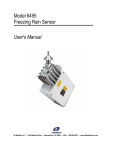
1
Automated Weather Observing System Maintenance Manual 3000-027 Rev. E All Weather Inc. • 1165 National Drive • Sacramento, CA 95834 • USA • 800.824.5873 • www.allweatherinc.com Copyright © 2011, All Weather, Inc. All Rights Reserved. The information contained herein is proprietary and is provided solely for the purpose of allowing customers to operate and/or service All Weather, Inc. manufactured equipment and is not to be released, reproduced, or used for any other purpose without written permission of All Weather, Inc. Throughout this manual, trademarked names might be used. Rather than put a trademark (™) symbol in every occurrence of a trademarked name, we state herein that we are using the names only in an editorial fashion and to the benefit of the trademark owner, and with no intention of infringement. All Weather, Inc. and the All Weather, Inc. logo are trademarks of All Weather, Inc. Disclaimer The information and specifications described in this manual are subject to change without notice. Latest Manual Version For the latest version of this manual, see the Product Manuals page under Reference on our web site at www.allweatherinc.com/. All Weather, Inc. 1165 National Drive Sacramento, CA 95834 Tel.: (916) 928-1000 Fax: (916) 928-1165 Contact Customer Service Phone support is available from 8:00am - 4:30pm PT, Monday through Friday. Call 916-928-1000 and ask for “Service.” Online support is available by filling out a request at www.allweatherinc.com/customer/support.html E-mail your support request to [email protected] AWOS 3000 MAINTENANCE Table of Contents 1. OVERVIEW................................................................................................................................................................................. 1 1.1 System Description............................................................................................................................................................... 1 1.2 System Performance Parameters ........................................................................................................................................ 1 1.3 Scheduled Maintenance ....................................................................................................................................................... 1 1.4 Site Preparation .................................................................................................................................................................... 2 1.5 Installation & Checkout Manual ............................................................................................................................................ 2 1.6 Operating Instructions .......................................................................................................................................................... 2 1.7 Training Program .................................................................................................................................................................. 2 1.8 AWOS Field Replaceable Units (FRUs) ............................................................................................................................... 2 2. MONTHLY PROCEDURES ........................................................................................................................................................ 7 2.1 Monthly Maintenance Tools and Supplies ............................................................................................................................ 7 2.2 General Maintenance ........................................................................................................................................................... 8 2.3 Specific Maintenance ........................................................................................................................................................... 8 2.4 Record AWOS Observations .............................................................................................................................................. 14 3. TRIANNUAL PROCEDURES................................................................................................................................................... 15 3.1 Triannual Maintenance Test Equipment ............................................................................................................................. 15 3.2 Triannual Maintenance Tools and Supplies ....................................................................................................................... 16 3.3 Perform Monthly Procedures .............................................................................................................................................. 16 3.4 Specific Triannual Maintenance ......................................................................................................................................... 16 4. ANNUAL SYSTEM REVALIDATION ....................................................................................................................................... 24 4.1 Annual Revalidation Test Equipment ................................................................................................................................. 24 4.2 Annual Revalidation Tools and Supplies ............................................................................................................................ 25 4.3 Perform Monthly and Triannual Procedures ....................................................................................................................... 25 4.4 Specific Annual Maintenance ............................................................................................................................................. 25 5. TROUBLESHOOTING GUIDE ................................................................................................................................................. 37 5.1 Central Data Processor (CDP) ........................................................................................................................................... 38 5.2 Temperature/Relative Humidity/Barometric Pressure Sensors .......................................................................................... 39 5.3 Wind Speed Sensors .......................................................................................................................................................... 40 5.4 Wind Direction Sensors ...................................................................................................................................................... 41 5.5 Visibility Sensor .................................................................................................................................................................. 42 5.6 Ceilometer .......................................................................................................................................................................... 43 5.7 Present Weather and Thunderstorm/Lightning Sensors .................................................................................................... 44 5.8 Freezing Rain Sensor ......................................................................................................................................................... 45 5.9 Data Networking ................................................................................................................................................................. 46 6. FORMS ..................................................................................................................................................................................... 47 1 O V E R V I E W Chapter Overview This manual provides instructions for inspecting and revalidating All Weather, Inc. (AWI) AWOS 3000 systems. It includes complete maintenance instructions, as well as forms for recording the results of monthly, triannual, and annual maintenance procedures. 1.1 System Description A full description of the AWOS 3000 can be found in the AWOS 3000 System User’s Manual (3000-001), which includes system drawings, descriptions of software operation and interfaces, and the available sensor and component configurations of an AWOS. This manual covers all AWOS systems. Please refer to the AWOS 3000 System User’s Manual (3000-001) for the configuration details for each AWOS model. 1.2 System Performance Parameters System performance parameters are given in the individual sensor and component manuals. Detailed specifications are provided for each component. An overall description of the AWOS system's performance parameters can be found in the AWOS 3000 System User’s Manual (3000-001). 1.3 Scheduled Maintenance Scheduled maintenance is performed on AWOS systems at three intervals: monthly, triannually, and annually. Records of these procedures, along with any adjustments or repairs made, are recorded on the maintenance forms at the back of this manual. 1.3.1 Data Recording Forms Three data recording forms are included with this manual — the Monthly Technical Performance Record, the Triannual Technical Performance Record, and the Annual Technical Performance Record. These forms are used during periodic maintenance, and include space to record the results of scheduled maintenance procedures. In addition to annual revalidation, the Annual Technical Performance Record is to be completed at system commissioning and after major repair work. These master forms should be copied and sufficient copies stored at a convenient location in each site's Facility Reference Data File (FRDF). 1 O V E R V I E W AWOS 3000 MAINTENANCE 1.4 Site Preparation Individual Site Preparation Manuals are available for each AWOS configuration. Site Preparation Manuals contain the instructions and drawings necessary for completing trenching, foundation construction, and other site preparation work required prior to installation of an AWOS. 1.5 Installation & Checkout Manual The AWOS 3000 Installation Manual (3000-017) provides complete installation and checkout procedures for all AWOS systems. 1.6 Operating Instructions Overall system operating instructions can be found in the AWOS 3000 System User’s Manual (3000-001). Operating instructions for individual sensors and components can be found in their respective manuals. The Operation chapter of each manual provides full instructions for using a component and for interpreting that instrument’s data. 1.7 Training Program AWOS technicians are fully qualified in electronic and electrical applications, and have comprehensive knowledge of the operations, testing, and maintenance of the AWOS to the board component level. They have the capabilities to evaluate and make recommendations for system component changes that would enhance the reliability or functionality of the AWOS. AWI provides a comprehensive training and certification program for all AWOS technicians to ensure thorough knowledge and competence in working with AWOS systems. The training is documented in the AWOS 3000 Maintenance Training Course (3000-044). 1.8 AWOS Field Replaceable Units (FRUs) When an AWOS component or sensor fails, consult the troubleshooting chart in Chapter Error! Reference source not found. to identify the Field-Replaceable Unit (FRU) to replace. If the problem persists or cannot be narrowed down from the troubleshooting chart, please contact All Weather, Inc. Customer Service. 2 O V E R V I E W AWOS 3000 MAINTENANCE Table 1 lists the lowest replaceable units (FRUs) for the AWOS 3000. When a sensor is replaced, the annual procedure for that sensor must be performed. 3 O V E R V I E W AWOS 3000 MAINTENANCE Table 1. AWOS FRUs Description Model/Part No. Option DATA COLLECTION PLATFORM PCB AWOS Data Collection Main Daughter Board DCP Firmware Sensor Interface Controller Ceilometer Interface Firmware Ultrasonic Wind Interface Firmware Freezing Rain Interface Firmware Power Supply Assembly Fuse 0.5 A Slow Blow Fuse 5 A Slow Blow Fuse 10 A Slow Blow AC Power PCB Assembly Data Link Radio Barometric Pressure Sensor* Quad Plate Pressure Port * M404804 M487094 M488290-00 M404806 M469075 M469076-00 M469066 M438210-00 M442060 M442070 M442071 M404802 20980-A 7190 M105037 The Model 7190 Barometric Pressure Sensor is installed on the Data Collection Platform. CENTRAL DATA PLATFORM CDP Monitor CPU Board Keyboard/Mouse DVD/CD Drive Power Supply Telephone Modem Microphone Data Link Radio Ground-to-Air Radio GPS Receiver 3000 M482179-00 M406186-00 M406187-00 M406190-00 M438222-00 M406159-00 20906 20980-A 1792 M406167-00 AWOS 3000 Software Installation CD M595814-00-060 UPS 20913-F UPS Batteries (3 required per UPS) Minuteman 37000007 SENSORS Wind Direction Sensor Tail Vane Potentiometer/Shaft Assembly Bearing Kit Heater Wind Speed Sensor Cup Assembly Photon Chopper Assembly Bearing Kit Heater 2020 T802000 T170522 M488140 20201 2030 T800303 T801600 M488141 20201 4 O V E R V I E W AWOS 3000 MAINTENANCE Description Model/Part No. Ultrasonic Wind Sensor (unheated) RS-422 Converter Ultrasonic Wind Sensor (heated) RS-422 Converter Fuse 4 A Ultrasonic Wind Sensor (high heat) RS-422 Converter Fuse 10 A Motor Aspirated Radiation Shield (MARS) Fan Temperature Sensor/RH Sensor Rain Gauge (unheated) Rain Gauge (heated) Visibility Sensor Emitter Head Assembly Detector Head Assembly Controller Board AC Interface Firmware Fuse 10 A Slow Blow Fuse 5 A Slow Blow Fuse 2 A Fuse 4 A Fuse 0.5 A Ambient Light Sensor Day/Night Detector Cloud Height Sensor Optical and Laser Module DAQ & Power PCB Blower, 110 V AC Power Supply Communication Cable Fuse 5 x 20 mm, 5 A, 250 V AC Fuse 5 x 20 mm, 10 A, 250 V AC Desiccant Battery Present Weather Sensor AC Interface Fuse 5 A Slow Blow Fuse 10 A Slow Blow Heater Power Supply Sensor Interface Controller Present Weather Firmware EPROM 5 2040 M438205-00 2040-H M438205-00 M442105-00 2040-HH M438205-00 M442106-00 8190 M444021 5190 6011-A 6021-A 8364-E M105061-00 M105060-00 M404811 M404802 M469058 M442071 M442070 M442046 M442048 M442057 M488171 M403326-00 8339-FAA M403434-01 M404848-02 83396-00 M438200-00 M491742-00 M442088-00 M442089-00 M028181-00 83395-00 6490 M404802 M442070 M442071 M438158 M404806 M469053 Option O V E R V I E W AWOS 3000 MAINTENANCE Description Model/Part No. Thunderstorm/Lightning Sensor AC Interface Sensor Interface Controller Firmware Power Supply Fuse 5 A Slow Blow Fuse 10 A Slow Blow Freezing Rain Sensor Communication Cable Option 6500 M404802 M404806 M469067 M438152 M442070 M442071 6495 M491740 MISCELLANEOUS EQUIPMENT Printer Printer Ribbon UHF/VHF Antenna 20910-A 20911 M489103 6 M O N T H L Y 2 P R O C E D U R E S Chapter Monthly Procedures AWOS monthly maintenance consists of a general system check and cleaning of sensor optics. Follow the procedures below, take any required corrective action, and record the results on the Monthly Technical Performance Record. The person performing the monthly maintenance procedures is not required to have any FAA certification. However, the monthly maintenance should be performed by an individual who has attended the User and Maintenance training given by AWI and documented in the AWOS 3000 Maintenance Training Course (3000-044). This training will familiarize the person with the basic mechanical and electrical orientation needed to perform monthly maintenance. 2.1 Monthly Maintenance Tools and Supplies The following list gives the tools and supplies required during monthly maintenance of the AWOS. Description Part/Model No. Assorted Hand Tools Clean Dry Cloth Water & Spray Bottle Lightweight Greaseless Oil isopropyl Alcohol RTV sealant n/a n/a n/a n/a Lint free n/a n/a (e.g., 3-in-1 or equivalent) n/a RTV 162 Business Card n/a Paint n/a Soap n/a Sandpaper or Emery Cloth n/a 7 Specifications 70%-100% n/a Business card, credit card, driver’s license, one U.S. dollar or equivalent in weight and size. White, outdoor enamel. Krylon and Rustoleum are two popular brands Mild – non-scented. Ivory brand soap bars work well. 120-150 grit suitable for removing surface rust or corrosion. M O N T H L Y P R O C E D U R E S AWOS 3000 MAINTENANCE 2.2 General Maintenance Verify that obstruction lights on the tower are checked. This is generally the responsibility of the airport operator, but since airport personnel will likely be performing the remaining maintenance, it is reasonable that airport personnel confirm the operation of the obstruction lights. The overall condition of the sensor site, including weed heights, things that might interfere with a sensor’s ability to perform properly, and the presence of items that may encroach on the siting criteria parameters should also be reviewed at this time. Inspect all mounting hardware and external surfaces and cable assemblies. If surfaces require cleaning, use mild soap and water. If surfaces are rusty, preserve them by sanding off the rust and applying paint. If any cables have developed stress cracks or exhibit other damage that appears to compromise the integrity of the outer protective sheath, report the problem immediately – do not attempt to service any electrical cable. 2.3 Specific Maintenance 2.3.1 Model 1190 Data Collection Platform 1. Verify that all cables are connected and in good condition. 2. Press the maintenance switch (SW3). 2.3.2 Model 7190 Dual Digital Barometer 1. Visually check the pressure port and clear any debris from within the plate area. 2.3.3 Model 2020 Wind Direction Sensor 1. Visually verify that the vane is moving freely. 2. Verify that the displayed values on the DCP are not static. A small breeze will be necessary. (This is an indication that the internals of the sensors are working properly and are communicating their values to the DCP appropriately.) 3. Verify that the sensor is clear of large debris, such as bird nests. 2.3.4 Model 2030 Wind Speed Sensor 1. Visually verify that the cups are moving freely. 2. Verify that the displayed values on the DCP are not static. A small breeze will be necessary. (This is an indication that the internals of the sensors are working properly and are communicating their values to the DCP appropriately.) 3. Verify that the sensor is clear of large debris, such as bird nests. 8 M O N T H L Y P R O C E D U R E S AWOS 3000 MAINTENANCE 2.3.5 Model 2040 Ultrasonic Wind Sensor 1. Verify that the displayed values on the DCP are not static. A small breeze will be necessary. (This is an indication that the internals of the sensors are working properly and are communicating their values to the DCP appropriately.) 2. Verify that the sensor is clear of large debris, such as bird nests. 2.3.6 Model 8190 MARS Maintenance of the MARS is generally limited to periodic cleaning and occasional repainting of exterior surfaces. 1. Check the 8190 air inlet (the narrow end of the MARS) for obstructions and debris. 2. Remove obstructions and debris as necessary. 3. Check the MARS for insect activity (cobwebs, hornet's nests, etc.), as well as birds' nests, and clean out any debris. 4. The exterior surfaces of the MARS should be free of dirt at all times to prevent internal heating of the probe. Clean the surfaces regularly with water and mild soap. Repaint the exterior surfaces as required Surfaces may be scuffed with sand paper to clean them and encourage better paint adhesion. 5. During regular maintenance, check the fan housing for signs of corrosion. Clean the housing and protective grate as necessary. Use only a damp cloth. Do not squirt water into the fan. 6. The inside of the enclosure may also need to be cleaned of excessive dirt drawn in by the fan. Use only a damp cloth. Do not use soap. 7. Check all cables for signs of wear or damage, especially in areas with high velocity winds. Check all mounting hardware for corrosion or looseness, and repair or replace as required. If any cables have developed stress cracks or exhibit other damage that appears to compromise the integrity of the outer protective sheath, report the problem immediately – do not attempt to service any electrical cable. 8. Check the fan for noise that could be a sign of worn bearings. 9. If the MARS fan is in need of repair, report the problem 10. Using a small light-weight object, such as a business card, credit card, driver’s license or one dollar bill, test to ensure the MARS fan is producing adequate air flow. Place the business card over the small end of the MARS (the air inlet). The card should be held in place by the suction produced by the fan. 11. If the MARS fan is in need of repair, report the problem. 9 M O N T H L Y P R O C E D U R E S AWOS 3000 MAINTENANCE 2.3.7 Model 6011 Rain Gauge 1. Remove the screen from the funnel of the rain gauge and gently tap the screen to free any dirt or debris. 2. Check the rain gauge funnel for insect activity (cobwebs, hornet's nests, etc.), as well as birds' nests, and clean out any debris. Be sure to check underneath the instrument as well. 3. Water and a damp cloth can be used to clean the rain gauge as needed. Do not use soap. 4. Never paint the rain gauge. If repairs are needed, report the problem. 5. Reinstall the screen. 2.3.8 Model 6021 Heated Rain and Snow Gauge 1. Remove the screen from the funnel of the rain gauge and gently tap the screen to free any dirt or debris. 2. Check the rain gauge funnel for insect activity (cobwebs, hornet's nests, etc.), as well as birds' nests, and clean out any debris. Be sure to check underneath the instrument as well. 3. Water and a damp cloth can be used to clean the rain gauge as needed. Do not use soap. 4. Never paint the rain gauge. 5. Reinstall the screen 6. If the ambient temperature is below 40°F, feel the rain gauge cover to check operation of the heaters. If they are working, the outer cover should be warm to the touch. 7. If repairs are needed, report the problem. 2.3.9 Model 8364-E Visibility Sensor 1. Clean the Visibility Sensor windows using a soft cloth and water. 2. Clean the Day/Night Sensor optics. 10 M O N T H L Y P R O C E D U R E S AWOS 3000 MAINTENANCE 2.3.10 Model 8339 Ceilometer CAUTION Use clean water and a soft cloth to clean the windows. Commercial cleaners containing ammonia will degrade the optical coating on the windows, resulting in degraded sensitivity (higher altitude clouds will no longer be detected). 1. Clean the transceiver windows at least once per month (more frequently if local conditions warrant), or when the status message so indicates. Note that a dirty window warning message may also appear during rain, snow, and fog conditions, whenever the internal electronics measure a certain level of window opacity. 2. Each time the windows are cleaned, check blower operation by covering the receiver window, shown in Figure 1, with a diffuse reflective object (such as a sheet of white paper) and verifying that the blower turns on. This may take up to 30 seconds. Figure 1. The right hand side is the receiver 11 M O N T H L Y P R O C E D U R E S AWOS 3000 MAINTENANCE 2.3.11 Model 6490 Present Weather Sensor 1. With a clean finger, touch the lenses in front of the disc-shaped heaters which are bonded to the upper and lower inside surface of lenses. The lens surfaces should be slightly warmer to the touch than the ambient temperature. 2. If the lens is not warm to the touch, the sensor must be repaired or replaced. 3. Clean the lenses by first spraying water on the lens and then wiping gently with a lint-free cloth to prevent scratching the glass optics. 2.3.12 Model 6500 Thunderstorm/Lightning Sensor 1. Check the antenna for dents, cracks, or punctures. 2. Remove all dirt and grease from surface areas using a soft cloth moistened with mild soap and water. 2.3.13 Model 6495 Freezing Rain Sensor The freezing rain sensor probe assembly will be hot if the sensor recently WARNING completed a deice cycle. Ensure that the probe assembly has cooled before cleaning the probe. While in the deice mode, the probe will radiate a significant amount of heat. This can be observed by placing a hand close to, but not on, the sensor probe. Always avoid direct contact of the probe with skin to avoid a potential burn hazard. CAUTION Do not touch the probe with bare hands, as oil residue from skin will affect the performance of the sensor. 1. Visually inspect the surface of the probe for contaminants such as dirt, oil, fingerprints, etc. 2. If any contaminants are present, clean the probe using isopropyl alcohol and a soft cotton cloth. 12 M O N T H L Y P R O C E D U R E S AWOS 3000 MAINTENANCE 2.3.14 Central Data Processor (CDP) 1. Check display operation. 2. Check keyboard operation. 3. Check printer operation as necessary. If the printer has been printing normally during the past hour, it is not necessary to perform this test. 4. Log in as an operator 5. Go to the File > Printer Setup menu 6. Click the “Print Test Page” button and verify that the test page was printed 7. Check the printer ribbon and replace as necessary. 8. Check the printer paper and replace as necessary. 9. Check microphone operation by recording a voice remark. Delete the remark when done. To delete a voice remark, record a short (approximately one second), empty remark over it, and set “enabled” to “off.” 10. Check dial-up telephone operation by dialing the CDP from an outside line. 11. Verify VHF radio operation by listening to the AWOS voice output over a remote receiver. 12. Check the system clock against a known standard. If the difference is greater than 10 seconds, report the problem. 13. Check speaker operation. 14. Check UPS operation by disconnecting the AWOS power cable. The AWOS should not shut down. 13 M O N T H L Y P R O C E D U R E S AWOS 3000 MAINTENANCE 2.4 Record AWOS Observations The final portion of the AWOS Monthly Technical Performance Record provides room to record AWOS readings and to note any irregularities. This provides a written snapshot in addition to the logs generated automatically. Time and Date Thunderstorm/Lightning Wind Direction Freezing Rain Wind Speed Temperature Visibility Dew Point Sky Condition (Clouds) Altimeter Setting Precipitation Note any "missing" parameters or any other obvious failures Present Weather 14 T R I A N N U A L 3 P R O C E D U R E S Chapter Triannual Procedures AWOS triannual maintenance is performed three times per year. Follow the procedures below, take any required corrective action, and record the results on the Triannual Technical Performance Record. Only an FAA authorized technician of record for the site may perform triannual procedures. 3.1 Triannual Maintenance Test Equipment The following list gives the test equipment required during triannual maintenance of the AWOS. This is in addition to that required for monthly procedures. Description Part/Model No. Visibility Calibrator M104744 2 pieces of opaque black foam Psychrometer* Psychrometric Calculator* Digital Temp/RH Sensor* Specifications n/a Model 5211 (Sling), Model 5230 (Assmann) or equivalent Model 5282-A or equivalent Rotronics HC2-S3 or equivalent Z003919 or equivalent Opaque black foam 1” to 4” inches thick., approximately 4” x 6” ±0.67° F (±0.37° C) °F ±0.67 °F (±0.37 °C), 1% RH ±0.0067 in Hg (±0.02%) Reference Pressure Sensor * Use either psychrometer & psychrometric calculator or Digital Temp/RH sensor. 15 T R I A N N U A L P R O C E D U R E S AWOS 3000 MAINTENANCE 3.2 Triannual Maintenance Tools and Supplies The following list gives the tools and supplies required during triannual maintenance of the AWOS. This is in addition to that required for monthly procedures. Description Part/Model No. Specifications n/a n/a 50', 16-3 or larger 4-1/2 digit Basic scientific calculator capable of performing square-roots and exponent math – FX260, FX300ES, EL-501, HP-10S, HP-11C, HP-15C, HP-32S, HP-35, TI-30, and TI-84 are all popular models Extension Cord Digital Voltmeter Scientific Calculator Hewlett Packard HP-35, Texas Instruments TI30 or equivalent 8339 Ceilometer Desiccant M028181-00 3.3 Perform Monthly Procedures As part of triannual maintenance, perform the monthly maintenance procedures detailed in the previous chapter. Only those procedures unique to triannual maintenance are provided in this chapter. 3.4 Specific Triannual Maintenance Constant vibration over time at certain sites such as oil platform sites may loosen the screws and bolts used to secure the sensors and controller boxes to mounting struts or poles. Check these screws and bolts as part of the triannual maintenance if the weather station is located at such a high-vibration location, and retighten them as necessary. 3.4.1 Model 1190 Data Collection Platform 1. Press the maintenance switch (SW3). 2. On the DCP display, navigate to the analog-to-digital reference voltage screen (“ADC Vref-” and “ADC Vref+”). Verify that ADC Vref- is in the range 0–5. Verify that ADC Vref+ is in the range 4090–4095. 16 T R I A N N U A L P R O C E D U R E S AWOS 3000 MAINTENANCE 3.4.2 Model 7190 Dual Digital Barometer The Model 7190 barometer is located in the top-right corner of the DCP. 1. Remove the quad plate pressure port drain plug (the Phillips screw on the underside of the bottom plate) using a Phillips screwdriver, and drain any accumulated moisture. 2. Remove both flexible tubes from the barometer inlets and blow gently into the tubes to clear any accumulated debris. 3. Replace the tubes and drain plug. When performing the pressure check below, the reference pressure sensor (Z002919 or equivalent) should be lifted up until it is at the same level as the 7190. If the wind is blowing, the reference sensor may deliver different readings, depending on which way it is facing and where it is located. The quad-plate pressure port on the bottom of the DCP enclosure minimizes the effect of wind on the 7190 pressure reading. If the reference sensor does not have a similar wind compensation port, you may not be able to get accurate readings on windy days. 4. Compare the output of the reference sensor to that of the 7190. The value of the sensors in the 7190 may differ from one another by up to 0.02 in Hg and still be within tolerance. Sensors used in AWOS systems must be adjusted, as necessary, to within ±0.005 in Hg of the reference sensor. Adjustments of more than 0.05 in Hg are not allowed. If either of the sensors in the 7190 differs from the reference sensor by more than 0.05 in Hg, replace the sensor. 5. Note the amount of deviation of each of the sensors in the 7190 from the reference; these will be used as the adjustment values. 6. At the CDP, insert the CD Key into the optical drive. Go to the Edit > Configuration menu, then to the Airport > General tab. 7. Enter the adjustment values in the BP Offset field. An offset will be “negative” if the sensor reading is greater than the reference pressure standard. 8. Remove the CD Key from the optical drive at the CDP. 3.4.3 Model 2020 Wind Direction Sensor No additional procedures. 3.4.4 Model 2030 Wind Speed Sensor No additional procedures. 3.4.5 Model 2040 Ultrasonic Wind Sensor No additional procedures. 17 T R I A N N U A L P R O C E D U R E S AWOS 3000 MAINTENANCE 3.4.6 Model 5190 Temperature/Relative Humidity Sensor Triannual maintenance of the Model 5190 Temperature/Relative Humidity Sensor consists of performing the monthly maintenance tasks, cleaning the dust filter, and checking the accuracy of the 5190 against readings made using a reference sensor or psychrometer, as explained below. While performing the accuracy check, keep these provisions in mind. For both temperature and dew point, it is important that the reference sensor be subject to the same conditions as the Model 5190. If the reference sensor is in the sun, near your body, or downwind from you, it is greatly affected. This will result in the reference sensor and the 5190 delivering very different results. Even if the reference sensor is removed from direct sun, reflected light (from snow or sand, for example) can affect the measurements. On cloudy, breezy days, there is usually no problem getting good reference readings. You only need to be sure to stay downwind of the MARS and the reference sensor. On sunny or calm days, it is often necessary to place the sensing element of the reference sensor inside the MARS intake. This ensures that both sensors are sampling the same air conditions. The reference sensor can be held in place in the MARS intake using a bungee cord, wire, string, or tape. The reference sensor should not touch the sides of the MARS tube or the 5190. The reference sensor must not block the MARS airflow. The reference sensor can take up to ten minutes to stabilize, as the sensor body may have absorbed or lost heat from contact with your body or from storage conditions. As you observe the readings, the two sensors may start out several degrees apart, but will slowly approach each other. Do not take any official reading until after the temperatures have settled. Differences in response time between the two sensors can also make field temperature comparisons difficult. As wind changes direction, it can change humidity and temperature. One sensor will always react faster than the other. Taking measurements in changing conditions is not recommended. Use of a sling psychrometer as a field reference sensor is strongly discouraged for anyone except an experienced meteorologist. Electronic temperature/relative humidity sensors and motor aspirated sensors are recommended for field use. Triannual Model 5190 Temperature/Relative Humidity Sensor Procedures 1. Position the reference sensor as described above. Allow a minimum of 20 minutes for the sensor to stabilize before proceeding. 2. Record the temperature and dew point temperatures from both the reference sensor and the AWOS at 1 minute intervals for 5 minutes (5 readings). 18 T R I A N N U A L P R O C E D U R E S AWOS 3000 MAINTENANCE 3. Compare the reference sensor temperature reading to the AWOS reading in each set. At least three sets must have readings within ±1°F (±0.56° C) of one another. If fewer than three sets are within this range, take a second round of readings (5 readings at 1-minute intervals). If this second round fails to yield at least three sets of readings within ±1°F (±0.56° C) of one another, the sensor must be replaced. 4. For each set of readings meeting the above requirement, subtract to find the difference between the two temperatures and square the result. 5. Take the average of the square root of the average of the squared results obtained in the previous step. If the result is within ±2°F (±1.1° C), the sensor passes. Otherwise, the sensor must be replaced. 6. Compare the reference sensor dew point reading to the AWOS reading in each set. At least three sets must have readings within ±0.5°F (±0.28°C) of one another. If fewer than three sets are within this range, take a second round of readings (5 readings at 1-minute intervals). If this second round fails to yield at least three sets of readings within ±0.5°F (±0.28°C) of one another, the sensor must be replaced. 7. For each set of readings meeting the above requirement, subtract to find the difference between the two dew point values and square the result. 8. Take the average of the square root of the average of the squared results obtained in the previous step. If the result is within ±3°F (±1.7° C), the sensor passes. Otherwise, the sensor must be replaced. 3.4.7 Model 8190 MARS 1. Remove the MARS fan fuse (F1) at the DCP and verify that the DCP indicates a fan failure. 2. Replace fuse F1. 3.4.8 Model 6011 Rain Gauge No additional procedures. 3.4.9 Model 6021 Heated Rain and Snow Gauge No additional procedures. 3.4.10 Model 8364-E Visibility Sensor The Visibility Sensor is calibrated during triannual maintenance. This must be performed when there is at least 7 miles visibility with calm wind conditions. The calibration paddle is traceable to Air Force Geophysics Laboratory reference transmissometers. Equivalent extinction coefficient values are printed on each paddle. 19 T R I A N N U A L P R O C E D U R E S AWOS 3000 MAINTENANCE 1. If the sun is shining directly or is being reflected into the emitters or detectors, note the original orientation of the Visibility Sensor, then loosen the crossmember mounting bolt and rotate the entire head assembly so that no direct or reflected sun shines into the emitters or detectors. 2. Press the # key on the DCP keypad repeatedly until the 8364-E calibration screen appears. Note: If more than a few minutes have elapsed since the maintenance switch was originally pressed, it may be necessary to press it again to enable access to the visibility calibration screens. Cal 8364E Vis Sensor 1 to Cont or # to Exit Figure 2. Visibility Calibration Screen 3. Enter the Cal I.D. # shown on the calibration paddle label. 4. A routine will be executed by the visibility controller to ensure proper operation prior to calibration measurements. You will be prompted to perform routine maintenance, such as removal of obstructions in the optical paths and cleaning of the sensor windows, during this routine. While you are performing the requested maintenance, the sensor will operate alternately in both modes to keep the optical emitters at thermal equilibrium. When you press a key to continue, as prompted, the controller may take up to one minute to respond. The sensor will then begin its calibration measurements. 5. The initial measurement takes five minutes. When the five minute interval is complete, you will be prompted to insert the calibration paddle. 6. Insert the calibration paddle. Hit the # key to continue. 7. After a second five minute measurement interval, you will be prompted to remove the calibration paddle and block the emitters (“COVER EMS”). 8. Remove the calibration paddle at this point and insert a piece of black foam over each emitter opening so that no emitted radiation will reach the detectors. Press the # key to continue. Note: If the emitters cannot be completely covered, the calibration procedure will not be able to reliably get within the required 3% accuracy. If this happens, the emitters may be disconnected at the controller instead of being covered. The emitters should be left disconnected until after the test is complete, at which time the Visibility Sensor should be turned off, the emitters reconnected, and the Visibility Sensor turned back on. It is safe to disconnect the emitters with power applied. 9. Following a further set of measurements, a new set of calibration coefficients are generated for the sensor. The new coefficients are stored in a protected EEPROM. This calibration method requires no fine adjustment of analog circuitry, nor opening of the emitter or detector heads. 20 T R I A N N U A L P R O C E D U R E S AWOS 3000 MAINTENANCE 10. Upon completion of the measurement cycle, the display will show the old and new calibration values. You will be given the option to accept or reject the new value. Press the # key to accept it. The value should only be rejected if the technician believes the value is bad due to a problem during calibration (the foam block falls from the emitter, for example). 11. If the difference between the old and new values is more than 3%, you must repeat the calibration process until the difference is less than 3%. In normal operation, when the sensor is calibrated on a regular basis (every 3–4 months), the calibration difference will rarely exceed 3%. If a long period has elapsed since the last calibration, the difference may exceed 3%. This is normal. 12. Record the old and new calibration values in an ongoing log for future reference. 13. Once the calibration value has been accepted, the visibility controller will return to normal measurement mode using the newly calculated calibration values. 14. If the calibration procedure is not followed correctly or there is a fault with the sensor, the calibration process will abort and the Visibility Sensor will return to normal operation. If this should happen, follow the troubleshooting procedures in the Model 8364-E User’s Manual should be followed to isolate the problem. 15. Once the Visibility Sensor has been operating for 10 minutes, verify there are no improper status errors reported at the DCP. 16. Verify that the entire head assembly and crossarm are back to the original position noted in Step 1, and then tighten the crossmember mounting bolt in the base of the crossmember so that it does not rotate. If a Day/Night sensor is installed, check its operation as follows. 1. During daytime, set the DCP’s LCD display to show Day/Night status. 2. Verify that the display shows the sensor is reading “day.” 3. Cover the lens with a black bag. Within 3–5 minutes, the output should switch to the “night” state. 4. Uncover the lens, and verify that the output switches back to the “day” state. 21 T R I A N N U A L P R O C E D U R E S AWOS 3000 MAINTENANCE 3.4.11 Model 8339 Ceilometer 1. Clear the Heater/Blower air intake and output nozzle of any impediments, such as spider webs, leaves, or other matter. 2. Check the status LEDs visible from outside the Ceilometer through the transmitter window. The red System Status LED alternates between on and fast blinking when the Ceilometer is operating normally. The green Battery Status LED is on when the DC power (battery) is good. The yellow Dirty Window LED is off when the window is clean. 3. Replace the desiccant package at each triannual maintenance visit. If the enclosure door is opened during maintenance or service at any time, replace the desiccant package (M028179-00) before closing the door for the final time. To preserve the desiccant material, the package is sealed within a plastic bag during shipment. Remove and discard the plastic bag. 3.4.12 Model 6490 Present Weather Sensor 1. Check the strength of the carrier signal by displaying the present weather status screen on the DCP display (press the * or # keys until the screen below is displayed). XnnnLnnnKnnnHnnnTnnn 2. The carrier raw data field (Xnnn) should be in the range of 405–420. If it needs to be adjusted, refer to the Model 6490 User’s Manual. 22 T R I A N N U A L P R O C E D U R E S AWOS 3000 MAINTENANCE The remaining tests should be performed when there is no precipitation and after the sensor has stabilized for at least 30 minutes. 3. The following values should be observed on the status screen. Lnnn - The one-minute low channel reading should read in the range of -30 to 50. Knnn - The one-minute particle channel reading should read in the range of 0 to 150. Hnnn - The one-minute high channel reading should read in the range of 40 to 120. Tnnn - Temperature should be representative of the ambient temperature, with a tolerance of ±5°C. The temperature probe is thermally connected to the electronics enclosure, so it generally reads warmer than the ambient temperature because of internal heating of the enclosure. If any of the values is outside the allowed range, report the problem. 4. Display the present weather data screen on the DCP display using the * and # keys. The present weather field (W___) should not contain any data (two underscores) if there is no precipitation falling. As long as there is no precipitation falling and the present weather field displays anything other than two underscores, report the problem. The status fields should all read zeros (S0000) if the sensor has been operating (and not reset by a power interruption) for at least 5 minutes. If the status fields are not all zeros, refer to the Model 6490 User’s Manual for an interpretation of the possible problem. 3.4.13 Model 6500 Thunderstorm/Lightning Sensor 1. Check the sealant around the antenna base and mounting bolts, and reapply as necessary (use RTV 162). 2. Check all hardware for corrosion and ensure that all bolts and connectors are tight. 3. Ensure that the cable connections are sound between the sensor and DCP. 3.4.14 Model 6495 Freezing Rain Sensor No additional procedures. 3.4.15 Central Data Processor (CDP) No additional procedures. 23 A N N U A L S Y S T E M 4 R E V A L I D A T I O N Chapter Annual System Revalidation Annual system revalidation is carried out yearly. These procedures are also required at commissioning and after major repair work— replacement of a sensor or any part of a sensor, or adjustment of any part of the sensor circuit (e.g., adjusting the carrier level on the present weather sensor). Follow the procedures below, take any required corrective action, and record the results on the Annual Technical Performance Record. Only an FAA authorized technician of record for the site may perform the annual system revalidation procedures. 4.1 Annual Revalidation Test Equipment The following list gives the test equipment required during annual revalidation of the AWOS. This is in addition to that required for monthly and triannual procedures. Description Part/Model No. Wind Direction Calibrator Wind Speed Calibrator Model 1249-A Model 1231 Integrity Check Chamber M105548-00 Specifications For Model 2020 vane for Model 2030 anemometer for 2040 Ultrasonic Wind Sensor Radio Test Equipment: Power Meter Forward/Reflected Power Tester Frequency Meter Modulation Meter Deviation Meter Bird Watt Meter Model 43 or equivalent Bird Watt Meter Model 43 w/ 10C (VHF) and 5D (UHF) elements or equivalent Aeroflex 3500 or equivalent Aeroflex 3500 or equivalent Aeroflex 3500 or equivalent 24 A N N U A L S Y S T E M R E V A L I D A T I O N AWOS 3000 MAINTENANCE 4.2 Annual Revalidation Tools and Supplies The following list gives the tools and supplies required during annual revalidation of the AWOS. This is in addition to that required for monthly and triannual procedures. Description Allen Wrench Scientific Calculator or Software Non-corrosive Lubricant Corrosion Protection Coating Part/Model No. Specifications n/a 1/16” Hewlett Packard HP-35, Basic scientific calculator or Texas Instruments TI-30 software capable of performing or equivalent; Microsoft square-roots and exponent Calculator, Excel or math equivalent Loctite Silver Grade anti-seize compound or equivalent M402010-00 corrosion block spray or equivalent 4.3 Perform Monthly and Triannual Procedures As part of annual maintenance, perform the monthly and triannual maintenance procedures detailed in the previous chapters. Only those procedures unique to annual maintenance are provided in this chapter. 4.4 Specific Annual Maintenance 4.4.1 Model 1190 Data Collection Platform 1. Press the maintenance switch (SW3). 4.4.2 Model 7190 Dual Digital Barometer 1. Using the barometric pressure value obtained with the reference pressure sensor during triannual maintenance, calculate the Altimeter Setting using the formula below: Alt. Setting (in Hg ) BP SE 1.313 10 5 5.25486 where : 0.1903 SE Sensor elevation above sea level in feet BP Barometric pressure in in Hg 2. Record the calculated altimeter setting and that reported by the AWOS. 3. If the difference between the calculated altimeter setting and that reported by the AWOS is more than 0.01 in Hg, please advise AWI Customer Service at 1(916)928-1000. 25 A N N U A L S Y S T E M R E V A L I D A T I O N AWOS 3000 MAINTENANCE 4.4.3 Model 2020 Wind Direction Sensor 1. Remove the sensor from the mounting bracket by loosening the clamp screw located at the base of the unit. Leave the sensor cable and, if present, the heater cable connected. These cables will ensure that, if the sensor is dropped, the device will not fall. 2. Clean the drain hole on the bottom of the sensor to ensure that debris does not prevent water from draining out of the sensor. 3. Spread non-corrosive lubricant on the clamp screw and reinstall the sensor. The sensor mounting hole should be aligned with the pin on the base of the mounting bracket. 4.4.3.1 Alignment The Model 1249-A Wind Direction Calibrator is required when aligning the sensor on both the stationary or foldover tower types. 1. Locate the direction benchmark determined in the initial site survey. It should be approximately 100 to 150 feet from the tower in one of the four cardinal points referenced to true north. Align the sensor using the procedure below for either the stationary or foldover tower. When the sensor is installed on a foldover tower, it will be necessary to raise and lower the tower several times during alignment. 2. Separate the two halves of the Model 1249-A Wind Direction Calibrator by pulling the two discs apart. 3. Slip the bottom half of the calibrator (containing the knurled knob) onto the stationary portion of the vane's housing near the rotating cap. Loosen the knob, if necessary, to do this; then tighten the knob until the unit is secured. 4. Hold the vane’s tail shaft and place the top half of the calibrator onto the shaft and sensor cap. Notice that the top half is recessed to accommodate the counter weight, and that there is a groove for the tail shaft and a cutout for the top of the vane cap. 5. Rotate the top plate until the four pins are aligned with the holes in the bottom plate. The bottom half of the calibrator may require adjusting if it is too high or too low on the vane housing. Loosen the knurled knob and position the bottom half as needed. Note that the next steps for aligning a sensor require two people when the sensor is on a stationary tower—one person on the ground to observe the DCP’s LCD display, and the other on the tower. 6. While observing the LCD display inside the DCP, loosen the knurled knob slightly and rotate the entire calibration unit (along with the sensor tail) until the DCP indicates 180°. (If the benchmark is located at East or West, rather than North or South, rotate the vane until the display reads 90 or 270.) Securely tighten the knurled knob to hold the vane in this position. 26 A N N U A L S Y S T E M R E V A L I D A T I O N AWOS 3000 MAINTENANCE 7. With the sensor locked in position, stand at the direction benchmark and verify that the tail of the vane is aligned with the vane body. If the vane is not aligned, loosen the mounting screw located at the bottom of the Unistrut, align the sensor (and base) with the benchmark, and tighten the mounting bolt. 8. Lift the top half of the calibrator and rotate it and the vane tail 90° to the next position. Verify that the DCP display agrees with the new direction. Continue rotating the sensor to each of the remaining cardinal directions and verify that the vane position and DCP display agree. If the DCP display does not match the vane position, replace the Model 2020 Wind Direction Sensor. 9. Remove the calibrator. 10. Rotate the vane slowly through a full 360°, noting the reading on the LCD display (if on a foldover tower, the tower can be in the lowered position during this procedure). As the vane is turned, the displayed values should change smoothly, with no sudden jumps or dropouts. Note, however, that there is a 10° deadband at North where the DCP reading shows a steady value of 359°–001° in the 355°–005° deadband. This behavior is normal near North, but in any other direction indicates a potentiometer failure. If the sensor fails any part of this test, report the problem. 11. Verify that the vane’s movement is free and smooth. If it is not, replace the bearings. The shaft should turn freely at all times. 12. Inspect all mounting hardware and cable assemblies for wear and damage. Replace as necessary. 13. Apply corrosion protection coating to the connector shell after the connector is attached and in place. Use a non-corrosive lubricant on all screws and fasteners whenever disassembly is required. The use of these lubricants will make future servicing easier. 14. If heaters are installed, verify they are working by holding your hand close to the heater. The heater is always on, and should be warm. 27 A N N U A L S Y S T E M R E V A L I D A T I O N AWOS 3000 MAINTENANCE 4.4.4 Model 2030 Wind Speed Sensor 1. Remove the anemometer cup assembly by loosening the two set screws on the cup assembly collar using a 1/16" Allen wrench. 2. Connect a Model 1231 run-up motor to the anemometer shaft and power the motor on. The DCP display should read between 79 and 81 knots. 3. Spin the shaft as fast as you can, using your thumb and middle finger. If the bearings are good, the shaft will spin for a minimum of 30 seconds. If the bearings feel rough or fail to spin for the 30-seconds, replace the bearings as described in the Model 2030 Sensor User’s Manual. 4. Replace the cup assembly. 5. Inspect the anemometer cups for damage, and replace if necessary. 6. Remove the sensor from the mounting bracket by loosening the clamp screw located at the base of the unit. Leave the sensor cable and, if present, the heater cable connected. These cables will ensure that, if the sensor is dropped, the device will not fall. 7. Clean the drain hole on the bottom of the sensor to ensure that debris does not prevent water from draining out of the sensor. 8. Use an anti-seize thread compound on the clamp screw and reinstall the sensor. The sensor mounting hole should be aligned with the pin on the base of the mounting bracket. 9. Inspect all mounting hardware and cable assemblies for wear and damage. Replace as necessary. 10. Apply corrosion protection coating to the connector shell with the connector attached and in place. Use a non-corrosive lubricant such as bee wax on all screws and fasteners. The use of these lubricants will make future servicing easier. 11. If heaters are installed, verify they are working by holding your hand close to the heater. The heater is always on, and should be warm. 28 A N N U A L S Y S T E M R E V A L I D A T I O N AWOS 3000 MAINTENANCE 4.4.5 Model 2040 Ultrasonic Wind Sensor During annual maintenance, perform a Field Zero Wind Check as described below. 1. Install the Integrity Check Chamber (ICC) by inserting the reflector cases and the two halves of the ICC onto the Model 2040. The ICC must be retained using the strips provided. 2. View the wind speed value displayed at the DCP. The value must not exceed 0 knots. If the wind speed exceeds 0 knots, report the problem. 3. The sensor’s alignment mark (the blue/white divide on the serial number label) must be aligned with the direction benchmark. Visually check the sensor’s alignment by either sighting along the sensor arms from the tower and verifying that the arms align with the benchmark, or have an assistant stand at the marker and check that the arms align with the benchmark. 4. If the alignment needs to be adjusted, loosen the sensor mount and turn the entire sensor until the arms are aligned exactly with the benchmark, then tighten the mount. 4.4.6 Model 5190 Temperature/Relative Humidity Sensor No additional procedures. 4.4.7 Model 8190 MARS No additional procedures. 4.4.8 Model 6021 Heated Rain and Snow Gauge 1. Place your hand close to the outlet orifices to detect whether heat is emanating from the two orifice heaters. If the outlets are warm, then the heater system is powered up. 2. Remove the outer cover by removing two 1/4" bolts. Unplug the 3-conductor Molex connector (P1) from the power distribution housing (J1) in order to completely separate the outer cover from the base. 3. Check the sensor level using the bubble level provided on the base. Adjust if necessary. 4. Inspect the interior of the gauge for physical lightning damage. 5. Remove any dirt or debris that may be present inside the sensor. 6. Note the precipitation quantity on the DCP's LCD display. Toggle the bucket assembly one cycle (2 tips). Again read the precipitation quantity on the LCD display. It must be 2 counts greater than before. If this count incrementation does not happen as described, examine the tipping bucket assembly, the counter, and the sensor cable connections between the sensor and the DCP. 29 A N N U A L S Y S T E M R E V A L I D A T I O N AWOS 3000 MAINTENANCE 7. Plug the 3-conductor Molex connector (P1) into the power distribution housing (J1). Replace the outer cover and bolts, coating the bolts with anti-seize compound. Replace the screen. 4.4.9 Model 8364-E Visibility Sensor No additional procedures. 4.4.10 Model 8339 Ceilometer No additional procedures. 4.4.11 Model 6490 Present Weather Sensor No additional procedures. 4.4.12 Model 6500 Thunderstorm/Lightning Sensor No additional procedures. 4.4.13 Model 6495 Freezing Rain Sensor No additional procedures. 30 A N N U A L S Y S T E M R E V A L I D A T I O N AWOS 3000 MAINTENANCE 4.4.14 Radio Annual Revalidation When VHF antenna cables are longer than 50 feet, tests must be repeated at the antenna end of the cable. UHF radio tests at the radio end are sufficient regardless of the length of the antenna cable. 4.4.14.1 Model 1792 Ground-to-Air VHF Radio Power Level 1. Remove AC power from the radio by turning the power switch on the radio’s front panel off. 2. Connect the power meter to the connector on the radio and terminate with the antenna or a dummy load. 3. Indicate the VHF radio output power level on the Annual Technical Performance Record. VSWR (at transmitter) If RF cables must be disconnected when switching between power level and VSWR tests, turn the radio off using the switch on the radio’s front panel. 1. Insert a VSWR or forward/reflected power tester. 2. Measure the VSWR and enter the value on the Annual Technical Performance Record. If you measure forward and reflected power, calculate the VSWR using the following equation. reflected power forward power VSWR reflected power 1 forward power 1 Sample Calculation: Reflected power = 0.02 W Forward power = 2.5 W reflected _ power forward _ power 0.02 1 0.008 1 0.0894 1.0894 2.5 VSWR 1.1964 reflected _ power 0.02 1 0.008 1 0.0894 0.9106 1 1 forward _ power 2.5 1 1 31 A N N U A L S Y S T E M R E V A L I D A T I O N AWOS 3000 MAINTENANCE Frequency CAUTION Use isolators or attenuators as needed to protect the test equipment. If RF cables must be disconnected when switching between frequency and modulation tests, turn the radio off using the switch on the radio’s front panel. 1. Log the assigned frequency on the Annual Technical Performance Record. 2. Insert a frequency meter. 3. The radio transmits for approximately 30 seconds, followed by an off time of five seconds. While the radio is transmitting, measure the frequency. 4. Record the frequency on the Annual Technical Performance Record. Modulation CAUTION Use isolators or attenuators as needed to protect the test equipment. If RF cables must be disconnected when switching between frequency and modulation tests, turn the radio off using the switch on the radio’s front panel. 1. Log in as an administrator on the CDP display and insert a AWOS Security Key CD. You will be able to access the menus once the optical drive light stops blinking, indicating that the AWOS Security Key CD has been read. 2. Connect a modulation meter to the VHF radio. Set the modulation meter to the instantaneous mode. 32 A N N U A L S Y S T E M R E V A L I D A T I O N AWOS 3000 MAINTENANCE 3. Access the Edit > Configuration > Voice tab on the CDP display and click the 300 Hz tone option in the Test panel. 4. Use the modulation adjustment potentiometer on the VHF radio to adjust the modulation depth to 90%. Modulation Adjustment Pot Figure 3. VHF Radio Modulation Adjustment Potentiometer 33 A N N U A L S Y S T E M R E V A L I D A T I O N AWOS 3000 MAINTENANCE 5. Use the VHF adjustment potentiometer on the CDP peripheral interface board to lower the signal level until the modulation decreases to 80%. Figure 4. VHF Adjustment Potentiometer on CDP Peripheral Interface Board 6. Use the modulation adjustment potentiometer on the VHF radio to adjust the modulation depth to 60%. 7. Set the modulation meter to the “peak hold” mode. 8. Access the Edit > Configuration > Voice tab on the CDP display and click the Modulated 300 Hz tone option in the Test panel. 9. Reset the modulation meter and wait until the modulated tone stops. 10. Verify that the peak modulation reading does not exceed 95%. If it does, adjust the modulation adjustment potentiometer on the VHF radio and recheck the peak modulation reading. 11. Access the Edit > Configuration > Voice tab on the CDP display and click the Word option in the Test panel. 12. Reset the modulation meter and wait until the words stop. Verify that the peak modulation reading does not exceed 95%. If it does, adjust the modulation adjustment potentiometer on the VHF radio and recheck the peak modulation reading. 13. Enter the final modulation meter reading on the Annual Technical Performance Record. 14. Turn the radio off using the front panel switch. Disconnect the test equipment and cables, and reconnect the antenna. Turn the radio on. 15. Remove the CD Key from the CDP optical drive. 34 A N N U A L S Y S T E M R E V A L I D A T I O N AWOS 3000 MAINTENANCE 4.4.14.2 Model 20980-A UHF Data Link Radio Perform the following procedures on both the DCP and CDP UHF radios. Power Level 1. Remove power from the UHF radio by disconnecting the DB9 connector. 2. Connect a power meter to the radio connector and terminate with the antenna or a dummy load. 3. Reconnect the DB9 connector to restore power to the UHF radio. 4. Measure the forward power on the power meter and record on the Annual Technical Performance Record. VSWR (at transmitter) If RF cables must be disconnected when switching between power level and VSWR tests, remove power from the radio by disconnecting the DB9 connector. 1. Insert a VSWR or forward/reflected power tester. 2. Measure the VSWR and enter the value on the Annual Technical Performance Record. If you measure forward and reflected power, calculate the VSWR using the following equation. reflected forward VSWR reflected 1 forward 1 power power power power Sample Calculation: Reflected power = 0.02 W Forward power = 1 W reflected _ power forward _ power 0.02 1 1 0.02 1 0.1414 1.1414 1.3293 VSWR reflected _ power 0.02 1 0.02 1 0.1414 0.8586 1 1 forward _ power 1 1 1 35 A N N U A L S Y S T E M R E V A L I D A T I O N AWOS 3000 MAINTENANCE Frequency CAUTION Use isolators or attenuators as needed to protect the test equipment. If RF cables must be disconnected when switching between VSWR and frequency tests, remove power from the radio by disconnecting the DB9 connector. 1. Log the assigned frequency on the Annual Technical Performance Record. 2. Insert a frequency meter. 3. Measure and log the frequency on the Annual Technical Performance Record. Deviation CAUTION Use isolators or attenuators as needed to protect the test equipment. If RF cables must be disconnected when switching between VSWR and frequency tests, remove power from the radio by disconnecting the DB9 connector. 1. Insert a deviation meter. 2. Enter the meter reading on the Annual Technical Performance Record. 3. Remove AC power from the radio, disconnect the test equipment and cables, reconnect the antenna, and restore AC power. 4.4.15 Central Data Processor (CDP) 1. Verify that no active alarms are present. 2. If active alarms are present, delete the alarms (after performing all annual procedures) and verify that the alarms do not recur. If alarms persist, report the problem to the Airport Manager. 36 T R O U B L E S H O O T I N G 5 G U I D E Chapter Troubleshooting Guide The following pages provide troubleshooting steps for the various AWOS 3000 sensors and major system components. 37 T R O U B L E S H O O T I N G G U I D E AWOS 3000 MAINTENANCE 5.1 Central Data Processor (CDP) Is CDP weather display running? Is CDP clock incrementing? Is UPS running (UPS lights and fan are on)? Is data from an individual sensor missing or incorrect? Examine link from that sensor to DCP Are all CDP display sensor data missing or incorrect? Is data display on DCP screen OK? Check DCP/ CDP UHF radio or RS-485 link Contact AWI Customer Service +1 (916)928-1000 Is there 12–16 V DC on DCP TB1 pins 5(+) and 6(–)? Replace DCP (P/N 2090) Is there 110–120 V AC at the AC interface board TB2 (output) pins 1 and 2? Replace DCP power supply (P/N M438210-00) Is there 110–120 V AC at the AC interface board TB1 (input) pins 1 and 2? Check AC interface board fuses and on/off switch Check AC power wiring and breakers Is UPS running (lights on, rack fan running)? Reload software Replace CPU assembly (P/N M406186-00) CPU fan is not running Are there lights on the interface board, modem, and radio or RS-485 adapter? Cycle UPS power off/on Replace CPU assembly (P/N M406186-00) No DC power Replace CPU assembly (P/N M406186-00) Contact AWI Customer Service +1 (916)928-1000 UPS not running Disconnect UPS batteries. Does UPS run without batteries? Replace UPS (P/N 20913-F) 38 Replace UPS batteries (12 V, 7.2 A·h) (Minuteman P/N 37000007) Contact AWI Customer Service +1 (916)928-1000 Contact AWI Customer Service +1 (916)928-1000 Contact AWI Customer Service +1 (916)928-1000 Contact AWI Customer Service +1 (916)928-1000 Contact AWI Customer Service +1 (916)928-1000 T R O U B L E S H O O T I N G G U I D E AWOS 3000 MAINTENANCE 5.2 Temperature/Relative Humidity/Barometric Pressure Sensors Are displayed temperature data bad? Are displayed relative humidity data bad? Are displayed pressure data bad? Is the voltage at DCP TB2-1 (referenced to TB2-4) consistent with the displayed value if calculated from °C = 100 × volts – 40 (volts = 0 – 1 V) Replace the 5190 temperature/RH probe Contact AWI Customer Service +1 (916)928-1000 Is the voltage at DCP TP11 (referenced to TB2-4) consistent with the displayed value if calculated from °C = 100 × volts – 40 (volts = 0 – 1 V) Replace the DCP main PC board (P/N M404804 ) Contact AWI Customer Service +1 (916)928-1000 Replace the DCP main computer daughter board (P/N M487094) Contact AWI Customer Service +1 (916)928-1000 Is the voltage at DCP TB2-1 (referenced to TB2-4) consistent with the displayed value if calculated from RH = volts × 100 Replace the 5190 temperature/RH probe Contact AWI Customer Service +1 (916)928-1000 Is the voltage at DCP TP3 (referenced to TB2-4) consistent with the displayed value if calculated from RH = volts × 100 Replace the DCP main PC board (P/N M404804 ) Contact AWI Customer Service +1 (916)928-1000 Replace the DCP main computer daughter board (P/N M487094) Contact AWI Customer Service +1 (916)928-1000 Are pressure data displayed at all? Disconnect DCP TB4 and remove all 11905 (P/N M404806) interface cards Is pressure data displayed > 0.05 inHg different from the reference sensor? Replace the 7190 pressure sensor Reconnect one interface card at a time to determine which one causes the problem — repair or replace the problem interface card Replace the 7190 pressure sensor 39 Contact AWI Customer Service +1 (916)928-1000 Contact AWI Customer Service +1 (916)928-1000 Contact AWI Customer Service +1 (916)928-1000 Are wind speed data bad? Set the DCP SW2 switch settings per the 1190 DCP User’s Manual Does the DCP display identify the wind sensor model correctly? Is the wind sensor the Model 2030 Anemometer? Are wind speed data missing? Is there 10–16 V DC on the wind speed sensor red/black wires? Check and replace wind speed sensor bearings per the 2030 User’s Manual 40 Replace the DCP main PC board (P/N M404804 ) Replace the DCP main computer daughter board (P/N M487094) Contact AWI Customer Service +1 (916)928-1000 Check the 2030 wind sensor and the associated cables for opens and shorts Contact AWI Customer Service +1 (916)928-1000 Contact AWI Customer Service +1 (916)928-1000 Contact AWI Customer Service +1 (916)928-1000 Contact AWI Customer Service +1 (916)928-1000 Replace the 11905-G wind speed interface board Reprogram the wind sensor per the 2040 User’s Manual Contact AWI Customer Service +1 (916)928-1000 Contact AWI Customer Service +1 (916)928-1000 Replace the DCP main PC board (P/N M404804 ) With DCP TB2 unplugged, is there 10–16 V DC at TB2-5 (referenced to TB2-8)? Replace the DCP main PC board (P/N M404804 ) Is there 1–2 V variablefrequency AC at DCP TP4 (referenced to TB2-7) when the wind blows? Contact AWI Customer Service +1 (916)928-1000 With DCP TB2 unplugged, is there 4–6 V DC at TB2-6 (referenced to TB2-7)? Is there more than 0.5 V variable-frequency AC at DCP TB2-6 (referenced to TB2-7) when the wind blows? Replace the RS-232/ RS-422 converter Contact AWI Customer Service +1 (916)928-1000 Disconnect the DB-9 connector from the wind speed RS-232/RS-422 converter and connect a laptop to the converter. Using a terminal emulator set to 9600-8-N-1, do you see text/numeric data once per second? Contact AWI Customer Service +1 (916)928-1000 Contact AWI Customer Service +1 (916)928-1000 Replace the 2040 wind speed sensor Are there 0.5–2.0 V AC pulses once per second on the wind speed sensor green/black wires? Replace the 2040 wind speed sensor Repair DC power wiring to sensor Does the wind speed sensor pass the annual zero- wind speed test? Contact AWI Customer Service +1 (916)928-1000 Is the wind sensor the Model 2040 Ultrasonic Wind Sensor? T R O U B L E S H O O T I N G G U I D E AWOS 3000 MAINTENANCE 5.3 Wind Speed Sensors Are wind direction data bad? Is the wind sensor physically aligned to True North? Contact AWI Customer Service +1 (916)928-1000 Align the wind direction sensor per the procedure in the User’s Manual Set the DCP SW2 switch settings per the 1190 DCP User’s Manual Does the DCP display identify the wind sensor model correctly? Contact AWI Customer Service +1 (916)928-1000 Is the wind sensor the Model 2020 Vane? Is the wind sensor the Model 2040 Ultrasonic Wind Sensor? With DCP TB3 disconnected, is there ~2.5 V DC at TP3-1? Is there 1.5–2.0 V DC at DCP TP3-1? Contact AWI Customer Service +1 (916)928-1000 Check wind direction sensor electrical alignment and bearings per the 2020 User’s Manual Reprogram the wind sensor per the 2040 User’s Manual 41 Replace the DCP main PC board (P/N M404804 ) Check the 2020 vane and the associated cables for opens and shorts With DCP TB3 disconnected, check the resistance between TB2-2(+) and TB2-3(-) Is it 900 k – 1.1 M ? Is there a varying DC voltage in the range of 0–1.7 V at DCP TP3-2 as the wind direction changes? Contact AWI Customer Service +1 (916)928-1000 Contact AWI Customer Service +1 (916)928-1000 Replace the DCP main PC board (P/N M404804 ) Check the 2020 vane and the associated cables for opens and shorts Replace the DCP main PC board (P/N M404804 ) Contact AWI Customer Service +1 (916)928-1000 Contact AWI Customer Service +1 (916)928-1000 Replace the DCP main computer daughter board (P/N M487094) Contact AWI Customer Service +1 (916)928-1000 Is there a varying DC voltage in the range of 0–1.7 V at DCP TP10 as the wind direction changes? Contact AWI Customer Service +1 (916)928-1000 T R O U B L E S H O O T I N G G U I D E AWOS 3000 MAINTENANCE 5.4 Wind Direction Sensors Are visibility data bad? Troubleshoot the visibility sensor per the procedure in the "Troubleshooting" section of the 8364-E User’s Manual. Repair as appropriate. Can the visibility sensor be calibrated (and the new calibration values accepted)? Contact AWI Customer Service +1 (916)928-1000 RS-485 communication problem Can the visibility sensor be placed in and out of test mode using the DCP? Contact AWI Customer Service +1 (916)928-1000 42 Replace the visibility controller (P/N M404811 ) Contact AWI Customer Service +1 (916)928-1000 Remove the visibility wires from DCP TB4-3 and TB4-4. Measure the voltage on the wires. Reconnect the wires. Was the voltage the exact same as measured on the previous step? Replace the wires running between the DCP and the visibility controller Contact AWI Customer Service +1 (916)928-1000 Remove the wires from the 8364-E visibility controller TB2. Measure the DC voltage between TB2-2(+) and TB2-1(-). Reconnect the wires. Was the voltage 0.2–1.0 V? Remove the visibility controller "RS-485 LOAD" jumper (and leave it off) and ensure the RS-485 wiring to the DCP is hooked up per the wiring diagrams at the end of the 1190 DCP User’s Manual RS-485 communication is OK and the sensor is OK Contact AWI Customer Service +1 (916)928-1000 Test and repair the continuity of the reference wire and the connection of ground and power line grounds for the DCP and visibility controller Remove the "reference" wire from visibility controller TB2-7. Measure the AC voltage between the end of the wire and TB2-7. Reconnect the wire. Was the voltage less than 2 V AC? Contact AWI Customer Service +1 (916)928-1000 Replace the visibility controller (P/N M404811 ) Contact AWI Customer Service +1 (916)928-1000 T R O U B L E S H O O T I N G G U I D E AWOS 3000 MAINTENANCE 5.5 Visibility Sensor Are ceilometer data bad? Replace the ceilometer power supply (P/N M438200-00) Check internal switch/ breaker CB1 and whether external AC power is present Do the yellow/brown wires on the ceilometer power supply have 90–240 V AC? Replace the ceilometer DAQ PC board (P/N M404848-02) 43 Contact AWI Customer Service +1 (916)928-1000 Contact AWI Customer Service +1 (916)928-1000 Contact AWI Customer Service +1 (916)928-1000 Replace the ceilometer DAQ PC board (P/N M404848-02) Is the red LED (in the center of the ceilometer and visible through the left-side window) blinking in a complex 30-second pattern? Do the yellow/brown wires on the ceilometer power supply have 90–240 V AC? Do the violet/yellow wires on the ceilometer power supply have 12–14 V DC? Is the green LED (in the center of the ceilometer and visible through the left-side window) on? Is the ceilometer status displayed at the DCP? Replace the ceilometer DAQ PC board (P/N M404848-02) Measure the voltage on the ceilometer DAQ board J7-2. Is it between -3 and -15 V? Contact AWI Customer Service +1 (916)928-1000 Replace the ceilometer communication cable (P/N M491742-00) Replace the DCP ceilometer serial interface board (P/N M404806) Contact AWI Customer Service +1 (916)928-1000 Contact AWI Customer Service +1 (916)928-1000 Contact AWI Customer Service +1 (916)928-1000 Contact AWI Customer Service +1 (916)928-1000 Contact AWI Customer Service +1 (916)928-1000 Replace the ceilometer DAQ PC board (P/N M404848-02) Check the aim of the LED in the dirty window and reprogram the ceilometer settings in the dirty window. Decode ceilometer status codes displayed on the DCP using the chart in the "Troubleshooting" section of the 8364-E User’s Manual. Replace indicated parts. Clean the ceilometer windows. Does the yellow LED remain on? In the DCP, disconnect the white wire from ceilometer serial interface board TB1-2. Using interface board TB1-3 as a reference (with the black and shield wire still connected), measure the DC voltage on the free white wire. Reconnect the white wire. Was the voltage between -3 and -15 V? Contact AWI Customer Service +1 (916)928-1000 Is the yellow LED (in the center of the ceilometer and visible through the left-side window) on? T R O U B L E S H O O T I N G G U I D E AWOS 3000 MAINTENANCE 5.6 Ceilometer Does the Present Weather sensor send status codes to the DCP display? Are Thunderstorm/ Lightning data bad? 44 Replace the wires running between the DCP and the Thunderstorm/Lightning sensor Contact AWI Customer Service +1 (916)928-1000 Test and repair the continuity of the reference wire and the power line and ground connections for the DCP, Present Weather controller, and Present Weather sensor Remove the Present Weather "reference" wire from the Present Weather interface card TB1-6 (red). Measure the AC voltage between the end of the wire and TB2-7. Reconnect the wire. Was the voltage less than 2 V AC? Contact AWI Customer Service +1 (916)928-1000 Remove the Thunderstorm/Lightning sensor "reference" wire from DCP Thunderstorm/ Lightning sensor interface card TB1-6 (red). Measure the AC voltage between the end of the wire and TB2-7. Reconnect the wire. Was the voltage less than 2 V AC? Contact AWI Customer Service +1 (916)928-1000 Replace the Thunderstorm/ Lightning sensor (P/N 6500) Replace the wires running between the DCP and the Present Weather controller Remove the Thunderstorm/Lightning sensor wires from DCP TB4-1 (white) and TB4-2 (black). Measure the voltage on the wires. Reconnect the wires. Was the voltage the exact same as measured in the previous step? Contact AWI Customer Service +1 (916)928-1000 Remove the wires from the DCP Thunderstorm/Lightning interface card TB1-4 (white) and TB1-5 (black). Measure the DC voltage between TB1-4(+) and TB1-5(-). Reconnect the wires. Was the voltage 0.2–1 V? Replace the Present Weather controller and associated sensor (P/N 6490 & M404806) Contact AWI Customer Service +1 (916)928-1000 Remove the Present Weather sesnsor wires from DCP TB4-1 (white) and TB4-2 (black). Measure the voltage on the wires. Reconnect the wires. Was the voltage exactly the same as measured in the previous step (0.2–1 V)? Review the status codes per the 6490 User’s Manual "AWOS Maintenance and Troubleshooting" section, and adjust or repair as needed Remove the wires from the Present Weather interface card TB1-4 (white) and TB1-5 (black). Measure the DC voltage between TB1-4(+) and TB15(-). Reconnect the wires. Was the voltage 0.2–1 V? Are Present Weather data bad? Replace the Thunderstorm/ Lightning sensor (P/N 6500) Contact AWI Customer Service +1 (916)928-1000 Replace the Present Weather controller and associated sensor (P/N 6490 & M404806) Contact AWI Customer Service +1 (916)928-1000 Contact AWI Customer Service +1 (916)928-1000 T R O U B L E S H O O T I N G G U I D E AWOS 3000 MAINTENANCE 5.7 Present Weather and Thunderstorm/Lightning Sensors Does the Freezing Rain sensor send status information to the DCP display? In the Freezing Rain sensor, unplug J2. Using the pin on the PC board the black wire was connected to as a reference, measure the voltage on the PC board pin the red wire was connected to. Reconnect J2. Was the voltage between -3 and -15 V? Contact AWI Customer Service +1 (916)928-1000 45 Contact AWI Customer Service +1 (916)928-1000 Contact AWI Customer Service +1 (916)928-1000 Replace the DCP Freezing Rain sensor communication cable (P/N M491740) Replace the DCP Freezing Rain sensor (P/N 6495) Replace the DCP Freezing Rain serial interface board (P/N M404806) Replace the DCP Freezing Rain serial interface board (P/N M404806) Replace the serial communication wires between the DCP and the Freezing Rain sensor Contact AWI Customer Service +1 (916)928-1000 In the DCP, disconnect the white wire from the Freezing Rain serial interface board TB1-1. Using the interface board TB1-3 as a reference (with the black and shield wire still connected), measure the DC voltage on TB1-1. Reconnect the white wire. Was the voltage between -3 and -15 V? In the Freezing Rain sensor, unplug J2. Using the connector's black wire as a reference, measure the DC voltage on the white wire. Reconnect J2. Was the voltage between -3 and -15 V? Review the status codes per the 1190 DCP User’s Manual (Screens 36–39), and adjust or repair as needed In the DCP disconnect the red wire from Freezing Rain serial interface board TB1-2. Using the interface board TB1-3 as a reference (with the black and shield wire still connected), measure the DC voltage on the free red wire. Reconnect the red wire. Was the voltage between -3 and -15 V? Are Freezing Rain data bad? Contact AWI Customer Service +1 (916)928-1000 Contact AWI Customer Service +1 (916)928-1000 T R O U B L E S H O O T I N G G U I D E AWOS 3000 MAINTENANCE 5.8 Freezing Rain Sensor Are WMSCR/ NADIN data missing? 46 Remove, test, and reconnect WMSCR router power and Ethernet connections Use a browser to connect AWOS Net URL. Are AWOS Net data missing? Confirm that VPN link is up and that there is a route to the VPN gateway Reprogram AWOS Net to match local network configuration Remove, test, and reconnect Ethernet to AWOS Net. Cycle power off/on to AWOS Net.. Reprogram WMSCR router Contact AWI Customer Service +1 (916)928-1000 Contact AWI Customer Service +1 (916)928-1000 Contact AWI Customer Service +1 (916)928-1000 Cycle power off/on to AWOS Net Contact AWI Customer Service +1 (916)928-1000 Reconnect RS-232 to AWOS Net Replace WMSCR router Repair data connection between AWOS Net and CDP Remove, test, and reconnect DC power to AWOS Net Replace AWOS Net Remove RS-232 from AWOS Net and hook to laptop terminal emulator program at 9600-8-N-1. Is periodic text/numeric data visible? Does AWOS Net display the wind dial at all (even with no data)? Hook display to local AWOS Net appliance. Are AWOS Net data missing? Contact AWI Customer Service +1 (916)928-1000 Are AWOS Net data missing? Replace ADAS router Reprogram ADAS router Remove, test, and reconnect ADAS router power and Ethernet connections Are ADAS data missing? Contact AWI Customer Service +1 (916)928-1000 T R O U B L E S H O O T I N G G U I D E AWOS 3000 MAINTENANCE 5.9 Data Networking 6 F O R M S Chapter Forms The following pages contain master forms for recording maintenance data. These master forms should be copied and sufficient copies stored at a convenient location in each site's Facility Reference Data File (FRDF). The Annual Technical Performance Record is to be completed at system commissioning, after major repair work, and during annual revalidation. 47 AWOS Monthly Technical Performance Record Site Name and Location ___________________________________ General Notify local users AWOS may be missing or unreliable during inspection DCP/Tower Press maintenance switch Remove debris from all sensors Check for mechanical damage Check for movement of wind speed and direction sensors (2020/2030) Check operation of MARS fan Check obstruction lights Sensors Check all sensor hardware and cables Clean Rain Gauge funnel Check Rain Gauge heaters (6021) Clean Visibility Sensor optics Clean Day/Night Sensor optics Clean Ceilometer optics Check Ceilometer blower Clean Present Weather Sensor lenses Clean Thunderstorm/Lightning Sensor surface Clean Freezing Rain Sensor probe Central Data Platform Check display operation Check keyboard and mouse operation Check printer operation, replace ribbon and paper as necessary Check system clock Check microphone by recording a voice remark Check dial-up by dialing the CDP from an outside line Check VHF by listening to AWOS voice output from a remote receiver Check speaker operation Check UPS operation Record AWOS Observations Time and Date Wind Direction Wind Speed Visibility Sky Condition (Clouds) Precipitation Present Weather Thunderstorm/Lightning Freezing Rain Temperature Dew Point Altimeter Setting Note any "missing" parameter or any other obvious failures: System Checked By: ____________________________ Date _______________ Completed _____ Pass (Y/N) _____ _____ _____ _____ _____ _____ Pass (Y/N) _____ _____ _____ _____ _____ _____ _____ _____ _____ _____ Pass (Y/N) _____ _____ _____ _____ _____ _____ _____ _____ _____ Data _________________ _________________ _________________ _________________ _________________ _________________ _________________ _________________ _________________ _________________ _________________ _________________ Date/Time: ___________________ AWOS Triannual Technical Performance Record Site Name and Location ___________________________________ Date _______________ General Notify local users AWOS may be missing or unreliable during inspection Complete AWOS Monthly Technical Performance Record Expected Measured DCP/Tower Drain and clean pressure port ADC Vref0–5 __________ ADC Vref+ 4090 – 4095 __________ AWOS wind direction seems reasonable ± 30º __________ AWOS wind speed seems reasonable ± 5 kts __________ BP1 (Reference Pressure) – (Sensor Pressure) ±0.005 in Hg __________ BP2 (Reference Pressure) – (Sensor Pressure) ±0.005 in Hg __________ (AWOS Temp) – (Measured Temp) ±2°F __________ (AWOS Dew Point) – (Measured Dew Point) ±3°F __________ DCP shows “MARS Fan Fail” with fuse F1 pulled Expected Measured Visibility Rotate sensor to avoid direct sun Calibration Difference ±3% __________ Rotate sensor back Day/Night Sensor changes state Cloud Height Sensor Inspect and clean blower intake and outlets System status LED (red) alternates between on and fast blink Battery Status LED (green) is on Dirty Window LED (yellow) is off Replace internal desiccant Expected Present Weather Sensor Heater check lens is warm Carrier raw data field (Xnnn) 405–420 Lnnn -30 to 50 Knnn 0 to 150 Hnnn 40 to 120 Tnnn ambient ±5°C Data field (W__) blank Status field (S0000) all zeros Thunderstorm/Lightning Sensor Check sealant Freezing Rain Sensor Check hardware and cables, clean as necessary System Checked By: ____________________________ Measured __________ __________ __________ __________ __________ __________ __________ Completed _____ _____ Pass (Y/N) _____ _____ _____ _____ _____ _____ _____ _____ _____ _____ Pass (Y/N) _____ _____ _____ _____ Pass (Y/N) _____ _____ _____ _____ _____ Pass (Y/N) _____ _____ _____ _____ _____ _____ _____ _____ Pass (Y/N) _____ Pass (Y/N) _____ Date/Time: ___________________ AWOS Annual Technical Performance Record Site Name and Location ___________________________________ Date _______________ General Notify local users AWOS may be missing or unreliable during inspection Complete AWOS Monthly Technical Performance Record Complete AWOS Triannual Technical Performance Record Expected DCP/Tower Model 2020/2030 Vane/Cup Wind direction align to benchmark Wind direction linearity 90º; ±3º, no dropouts or irregularities Wind direction linearity 180º ±3º, no dropouts or irregularities Wind direction linearity 270º ±3º, no dropouts or irregularities ±5% (DCP reading shows 359°–001° in 355°–005° deadband), Wind direction linearity 360º no dropouts or irregularities Wind speed 79 – 81 knots Wind vane and anemometer bearings turn freely Model 2040 Ultrasonic Wind Zero Wind Check 0 knots Measured __________ __________ __________ _____ _____ _____ __________ _____ Pass (Y/N) _____ Pass (Y/N) Check for level using built-in bubble level Expected _____ _____ _____ _____ __________ __________ Rain Gauge VHF Radio Completed _____ _____ _____ Pass (Y/N) Measured Perform the following at the VHF radio Output Power Level 2.5 W, ±1 W ________________ Reflected Power ________________ Initial: 2.0:1 max. VSWR Operating: 3.0:1 max. ________________ Frequency assigned: ________________ ±1.0 kHz ________________ Modulation 65–95% ________________ Perform the following at the VHF antenna when cable runs are longer than 50 ft Output Power Level 1.0 W, ±0.5 W ________________ Reflected Power ________________ Initial: 2.0:1 max. VSWR Operating: 3.0:1 max. ________________ _____ _____ _____ _____ _____ _____ _____ _____ Page 1 of 2 AWOS Annual Technical Performance Record (cont’d) DCP UHF Radio Power Level Reflected Power Expected 1 W, ±0.5 W Measured ________________ ________________ Initial: 2.0:1 max. Operating: 3.0:1 max. ________________ ________________ Assigned: Frequency ________________ ±1.5 kHz Deviation 2.4 – 3.8 kHz ________________ Expected Measured CDP UHF Radio Perform the following at the UHF radio Power Level 1 W, ±0.5 W ________________ Reflected Power ________________ Initial: 2.0:1 max. VSWR Operating: 3.0:1 max. ________________ ________________ Assigned: Frequency ________________ ±1.5 kHz Deviation 2.4 – 3.8 kHz ________________ Perform the following at the CDP UHF antenna when cable runs are longer than 50’ Power Level 0.2W, ±0.15W ________________ Reflected Power ________________ Initial: 2.0:1 max. VSWR Operating: 3.0:1 max. ________________ Pass (Y/N) _____ _____ VSWR CDP No active alarms/alarms cleared _____ _____ _____ Pass (Y/N) _____ _____ _____ _____ _____ _____ _____ _____ Pass (Y/N) _____ Comments/Notes: System Checked By: ____________________________ Date/Time: ___________________ Page 2 of 2 All Weather Inc. 1165 National Drive Sacramento, CA 95818 Fax: 916.928.1165 Phone: 916.928.1000 Toll Free: 800.824.5873 3000-027 Revision E May, 2011