1
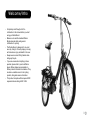
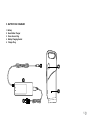
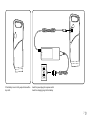
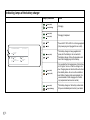
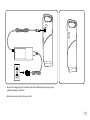
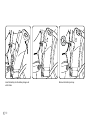
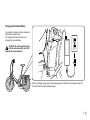
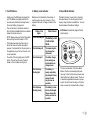
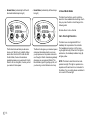
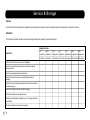
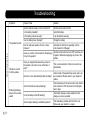
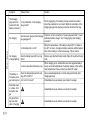
Dahon Boost
OWNER’S MANUAL
Contents
Welcome/Intro................................................................... 3
What’s it called................................................................. 4
Battery and Charger Operation....................................... 6
Before the first use.....................................................................6
Battery Hibernation Mode...........................................................6
Normal Charging........................................................................6
Charging with Installed battery................................................. 11
Battery Key Lock......................................................................12
Safety Precautions...................................................................12
Battery..................................................................................12
Battery Charger....................................................................12
Location for Charging...........................................................12
Range for Battery.....................................................................13
Things you can do to increase performance........................13
Battery Tips and Approximate Life........................................13
Battery Recycling.................................................................14
How it all works.............................................................. 14
Boost Technology.....................................................................14
Controller Unit..........................................................................14
1.On-Off Buttons.................................................................15
2.Battery Level Indicator......................................................15
3.Boost Mode Indicator.......................................................15
4.Boost Mode Button...........................................................16
5 & 6 Front Light Function....................................................16
General Operation....................................................................17
2
Using the Hub Gears................................................................17
Riding without Assistance.........................................................17
Checks before Riding...............................................................17
Service & Storage........................................................... 18
Service.....................................................................................18
Checklist...............................................................................18
Initial inspection after 2 months............................................19
From the second inspection on............................................19
Cleaning...................................................................................19
Storage.....................................................................................19
Long-Term Storage...................................................................19
Operation After Long-Term Storage.........................................19
Troubleshooting............................................................. 20
Specifications................................................................. 23
Motor Unit.................................................................................23
Battery......................................................................................23
Battery Charger........................................................................23
Warranty.......................................................................... 23
Dahon Five-Year Limited Warranty...........................................23
Lifetime Warranty Upgrade.......................................................23
Required Assembly at Time of Purchase.................................24
Making a Warranty Claim.........................................................24
Warrantee Exclusions...............................................................24
Welcome/Intro
• C
ompletely read through all of the
information in this manual before you start
using you Dahon Boost.
• Make sure to read the standard Dahon
Bicycle manual safety and general
information for cycling.
• The Dahon Boost is designed for on-road
use only. Using it off-road, jumping or racing
will risk serious injury and death to the user.
• Always wear a correct-fitting helmet when
riding any bicycle.
• If you are unsure about anything or have
question, please talk to your local Dahon
dealer. Dahon dealers are specialists in
Dahon product information and advice. They
are also a valuable source for all cycling
product, riding and service information.
• This product complies with European EPAC
requirements according to EN 15194
3
What’s it called
A. General
1. Assist Unit
2. Chainwheel and integrated
Torque sensor
3. Battery
4. Frame Latch
5. Handlepost
6. Handlebar Assembly
7. Front light
8.Rear light
9. Battery Hanger Unit
4
B. Handlebar Assembly
1. Controller Unit
2. 3-Speed Hub Gear shifter
3.Left-hand Brake Lever
4.Right-Hand Brake Lever
c.battery and charger
1. Battery
2. Boost Batter Charger
3. Power Source Plug
4. Battery Charging Socket
5. Charger Plug
5
Battery and Charger Operation
Charging can be done when the battery is on
the bike or removed from it. For details, refer to
“Normal Charging” and “Charging with installed
battery”. When not charging, always pull out
the charging plug from the battery and the
power plug from the outlet before storing the
battery charger.
Normal Charging
Press the off button on the controller unit.
CAUTION: Do not remove the battery
with the controller switch set to ON.
Ignoring this could cause electrical shock.
Before the First use
CAUTION: The Battery must be fully
charged before the first ride.
Please make sure you allow the battery to
complete a full charge cycle before installing it
on the bike. Please read though and follow all
of the safety precautions.
Battery Hibernation Mode
After 20 days of inactivity, the battery will place
itself in Hibernation Mode. This is to help save
loss of power and extend the life of the battery.
To resume normal battery function, you will
need to remove the battery from the bike and
perform one standard charge cycle. Once
standard charge cycle is complete, the battery
will be ready to use again.
Insert the battery lock key into the key hole of
the battery-hanger unit.
6
With the battery-lock key turned clockwise, pull
out the battery.
If the battery is wet or dirty, wipe it clean with a
dry cloth.
Insert the power plug into a power outlet.
Insert the charging plug into the battery
7
Not Lit
Not Lit
Indicating lamps of the battery charger
Not
Lit (solid)
Green
Not Lit (solid)
Orange
Green (solid)
Green (solid)
Lamp(s)
Illuminated
Orange
(solid)
Green (blinking)
Li-ion BATTERY CHARGER
SUNSTAR ENGINEERING INC.
Green (solid)
POWER ON
Green (blinking)
CHARGING
Orange (blinking)
ERROR
Green (solid)
CHARGING COMPLETE
Orange (solid)
STANDBY
Green (solid)
Green (solid)
Green (blinking)
Not Lit
Not Lit
Not Lit
Green
Not Lit (solid)
Green
Not
Lit (solid)
Not Lit
Green (solid)
Green
Not
Lit (solid)
Orange (solid)
Green
Orange(solid)
(solid)
Green
Not Lit (solid)
Green (solid)
Green (solid)
Green
Orange
(solid)
Not Lit (solid)
Green (blinking)
Green
Green (blinking)
(solid)
Green
(solid)
Green (solid)
Green
Green (solid)
(solid)
Orange
(solid)
Orange
(solid)
Green (blinking)
(solid)
Orange
Not
Lit (blinking)
Not Lit
Green
Green (solid)
(solid)
(solid)
Green
Not
Lit (blinking)
Orange
(blinking)
Green
(solid)
Green (solid)
Green
Green (solid)
(solid)
Green (solid)
Not Lit
Green (solid)
Green (solid)
Orange (solid)
Green (solid)
Orange
(solid)
Green (solid)
Green (solid)
Orange
(solid)
Green (solid)
Green (solid)
Orange (blinking)
Green
Orange(solid)
(blinking)
Green (solid)
Orange (solid)
Orange (blinking)
Green (solid)
Orange (blinking)
8
Status
Charging
Charging Completed.
Power of AC 100 to 240 V is not being supplied
(the power plug is not plugged into an outlet).
The battery charger is being supplied with
power, but the battery is not connected to
the battery charger. Follow the procedure and
insert the charging plug into the battery.
It is possible that the temperature of the battery
is too high or too low or that the voltage is too
low. Charging does not start and the unit enters
the standby status. As soon as the conditions
are fulfilled, charging starts automatically (it is
recommended to start charging after the battery temperature has become normal).
The battery charger or the battery is abnormal.
Stop use immediately and contact your dealer.
• Remove the charging plug from the battery when both indicating lamps change to green
indicating charging is completed.
• Remove the power plug from the power outlet.
9
Insert the battery into the battery-hanger unit
until it clicks.
10
Remove the battery lock key.
Charging with Installed Battery
It is possible to charge the battery installed on
the bicycle as shown below.
The charging method is the same as for
charging the removed battery.
CAUTION: Do not charge the battery
with the controller switch set to ON.
Ignoring this could cause fire.
When not charging, always pull out the charging plug from the battery and the power plug from
the outlet before storing the battery charger.
11
Your Dahon Boost comes standard with 2
battery lock keys; we suggest you keep
one in a safe place for emergencies. Dahon
Boost bike keys may be duplicated by a
qualified locksmith. Blank keys for the Dahon
Boost are available through your Authorized
Dahon Dealer. Please record the key number
for future reference and key replacement. If
your keys are ever lost or stolen, contact your
authorized Dahon dealer for replacement.
Safety Precautions
These safety precautions are provided for your
benefit to protect you and those around you.
Please read and follow them carefully to avoid
unnecessary injury, damage to the product, or
damage to other property.
Battery
• Do not throw the battery into a fire.
• Do not apply the battery to other
appliances.
• Use only the specified charger to charge
the battery.
• Do not disassemble or modify the battery.
• Do not connect positive and negative
terminals by using metallic objects.
• Keep the battery away from water. Pouring
water on the battery may result in a short
circuit and overheating of the battery.
• Do not submerge the battery. Soaking the
battery in water may cause irreparable
damage.
Battery Charger
12
• Do not disassemble or modify the battery
charger.
• Please use the battery charger with the
battery in the kit.
• Do not drop the battery charger.
• Do not bring the terminals of the charging
plug in contact with metal.
• If you notice a strange smell or smoke,
stop the charging procedure immediately!
Take your battery and charger to your
authorized Dahon dealer for service or
replacement.
• DO NOT CHARGE THE BATTERY FOR
LONGER THAN 24 HOURS!! This could
seriously reduce the life of the battery.
Location for Charging
Please perform charging at a location satisfying
the following conditions.
• A level and stable location
• A location not exposed to rain or water
• A location not exposed to direct sunlight
• A location with good ventilation and no
moisture
• A location out of the reach of children and
pets.
• A location with a temperature from 0°C to
45°C at the time of charging
Do not use (discharge) the battery while
charging.
Always perform charging in an environment
with a normal temperature (0ºC to 45ºC).
NOTE: As the battery temperature is higher
directly after riding, charging may not start, but
this is not a defect. Charging will also not start
when the temperature is too low (0ºC or lower).
When the temperature inside the battery is
not suitable, the orange charging standby
lamp continues to flash, and charging starts
when the temperature inside the battery is in
the range from 0ºC to 45ºC. For this reason,
charging may take time.
Range for Battery
Running distance on one charge varies
depending on rider’s weight, wind resistance,
outdoor temperature, terrain, etc. Riders can
expect to get up to 2 hours of battery life in
normal flat conditions.
Things you can do to increase
performance:
• Proper gear usage: Pedaling in the correct
gear for the terrain will help save energy for
both you and the battery.
• Tires: Always make sure the tires are at the
correct pressure as indicated on the sidewall. This will give lower rolling resistance
and better performance. If your tires start to
show excessive wear, replace them. New
tires always perform better!
• General Maintenance: Keeping the bicycle
correctly adjusted and lubricated is important. Worn or misaligned parts can add drag
and resistance which will reduce the range
of the battery
• Always
start in Eco or Normal mode:
Getting going always requires more energy
than anything else. Avoid using Turbo mode
to start or restart because this uses a lot of
battery and will shorten the range.
• Correctly charge and discharge your
battery: Please follow all of the direction for
charging and discharging. Once a battery
has been mistreated, you can’t fix it.
• Correctly store your Battery: Once again,
please follow all of the directions for storage.
• Always turn off the unit at the controller:
Never just remove the battery to turn it off
• Temperature: Both extreme high and low
temperatures can drain the battery more
quickly. So when it is really cold or hot, don’t
expect to go as far or as long.
• Wind: As with any cycling wind has a huge
effect on performance. Any headwind will
reduce the battery range. Strong headwinds
can be worse than even the steepest hill for
performance. Conversely, a good tailwind
will allow you to travel much further than
normal.
• Hills: Like wind, hills play in important part
in battery range. Going uphill for any length
of time will reduce the range. Down hill the
battery range will increase because the motor doesn’t have to work as hard. Also, try
coasting (stop pedaling) or for longer down
hills you can even turn the unit off to help
increase range.
• Road Conditions: Flat smooth roads will
allow the bike to roll faster and the battery
to last longer. Ridging on dirt, gravel, gravel,
sand, and grassy surface will greatly effect
battery life. So will bumpy or and rough
surface.
• Stop and Start: Since more energy is used
during initial acceleration, riding in conditions that force you to start and stop often
(i.e. city traffic) will cause the motor to use
more energy.
• Number of Battery Charges: Each time the
batter is charged, it will loose its capacity to
hold as much charge next time. These losses are very small during the life expectancy
of the battery, but they will affect range to a
degree.
• Luggage: Luggage is weight that needs to
be moved and this means the motor works
harder so range will decrease when you
carry luggage.
• Rider Weight: A heaver rider will cause the
motor to use more energy than with a lighter
rider.
Battery Tips and Approximate Life
The Dahon Boost is equipped with a lithiumion battery. If used and maintained properly
it should last approximately 500 charging
cycles. The battery should be replaced when
the riding distance with a full charge becomes
notably short (in cold areas, the possible riding
distance may be short even after charging).
Please contact your dealer to purchase a
replacement battery or to obtain warranty
service if covered under the limited warranty.
Some other ways to keep your battery
in good condition include:
• When the unit is not used for a long time,
charge the battery once a year. After
13
•
•
•
•
charging, use the battery until one red
indicating lamp for the remaining battery
charge is lit, and then store the battery
again.
It is recommended to store the battery
in a cool location (- 20°C to 20°C
recommended).
When the charging has been completed,
immediately disconnect the charging plug.
Do not recharge a battery immediately after
it has completed a charge. The battery
will not “charge twice”, and will likely be
damaged if you do so.
Use and drain the battery as much as
possible before charging.
Battery Recycling
At the end of a useful life, lithium-ion batteries
are recyclable. Laws governing proper disposal
and recycling of batteries vary according to
locality. Please consult your dealer for advice
about disposal or recycling according to your
local law. The battery or recycled must be
disposed of properly.
14
How it all works
Your Dahon Boost incorporates a state of
the art electric assist unit and some pretty
clever electronics. For performance, safety,
and enjoyment is important to completely
understand how these features operate. Even
experienced cyclists should make sure they
are familiar with the specific operations of the
Boost. Make sure you read, and understand
this part of the manual. If you do have any
questions or are at all unclear, please contact
your Authorized Dahon Dealer.
Controller Unit
Located on the left-hand side of the handlebar,
the controller looks like this:
Boost Technology
Boost technology provides a smooth and
powerful power-assisted ride based on your
pedaling force, speed, and gearing. The
system automatically knows how much power.
Once you turn the unit on, all you have to do
is start pedaling the system does the rest.
Through the controller unit, you can then
choose the level of assist you require based on
the conditions.
1. On-Off Buttons
2. Battery Level Indicator
3. Boost Level Indicator
4. Boost Level Button
5. Front Light On-Off Button
6. Front Light Indicator Lamp
1. On-Off Buttons
2. Battery Level Indicator
3. Boost Mode Indicator
• Gently press the ON button to activate the
unit. The Battery level lights will flash for
several seconds before becoming fixed at
the current battery charge level.
• The unit will start in the Normal mode, so
both the left and middle Boost level indicator
lamps should also come on.
• NOTE: Always keep your feet off the pedals
when setting the control-switch to “ON”.
• The Chainwheel has a built-in sensor to
detect the force with which the pedal is
pressed. It is important that the no load is on
the pedals when you first turn the unit on for
correct operation.
• To switch off the unit gently press the OFF
button. This will turn the unit off and all
lamps on the controller should go out.
Battery level is indicated by three lamps. It
functions when the unit is turned on. They
represent the level of charge currently in the
battery.
The Boost mode or ‘power level’ is shown by
three blue lamps. You can choose the boost
level by using the Boost Level Button. You can
choose between three Boost settings:
Status of the
Lights
What it Means
Three Red lamps lit
The Battery is full
or above twothirds
Two Red lamps lit
The remaining battery charge has
decreased
One Red lamp lit
The batter charge
is becoming low
and should be recharged soon
One Red lamp
flashing fast
The battery is
nearly completely
discharged. Please
charge the battery as soon as
possible.
One Red lamp
flashing slowly
The battery is completely discharged.
Please charge the
battery as soon as
possible.
• ECO Mode: (Indicated by single left hand
lamp being lit)
The most economical of the three Boost
Modes. The Eco mode will provide assistance up to 15kmh, but at lower power level
than the Normal or Boost modes. The level
of assistance gradual decreases as you approach 15 kmh. Good for using on the flat or
when you want to conserve battery charge.
15
• Normal Mode: (Indicated by both the lefthand and middle lamps being lit)
• Boost Mode: (Indicated by all three lamps
being lit)
4. Boost Mode Button
The Boost level button is used to switch between the three available Boost settings. Each
time you press the button it will change in the
following order:
Normal > Boost > Eco > Normal
5 & 6. Front Light Function
The Normal mode will also provide assistance up to 15kmh, but at a slightly higher
assist ration than the ECO mode. As with
the Eco Mode, the level of assistance
gradual decreases as you approach 15 kmh
Good for flat or rolling hills, or when you find
you need a bit more power.
16
The Boost mode gives you maximum power
and speed. Assistance starts as soon as
you put pressure on the pedals and continues through to 25kmh. Assistance gradually
decreases as you approach 25kmh. The
Boost Mode is great for getting up hills, or if
you have to go a short distance in a hurry.
The Boost uses an integrated LED front
headlamp that is operated at the controller.
The headlamp is turned on or off by pressing the light button (5). When the Front light is
switched on, the headlamp indicator lamp (6)
will glow yellow.
NOTE: The Boost is also fitted with an independent rear light. This light is operated via a
separate on/off switch and is not connected to
the battery. For your safety please remember to
turn on and off the rear light.
General Operation
Riding without Assistance
• When you first turn on the unit, make sure
there is no pressure on the pedals. Pressure or movement of the pedals affects the
torque setting and can cause the unit to
function incorrectly.
• The Boost operates according to the force
applied to the pedals. If there is no force on
the pedals for five minutes after the ON button has been pressed, the unit will turn off
to save battery charge.
• Do not ride through deep puddles or heavy
rain. If the assist unit is exposed to lots of
water or submerged, electric shock may
occur.
• Always park the bicycle on a level surface.
• Never lift the bicycle by the battery.
The Boost has been designed as a lightweight
folding bike. With the assist unit turned off it
can be ridden as a normal bicycle.
Checks before Riding
• Here are some things to check before you
start riding:
• Make sure the battery is installed correctly.
• Make sure to remove the battery lock key.
• Make sure the battery has sufficient charge.
• Perform all checks in the bicycle owners’
manual.
Using the Hub Gears
Your Boost is fitted with a 3-speed internal
geared rear hub. For general use and use
of the bicycle without the Assist unit active,
operation of these gears can be found in the
standard Dahon Owners Manual.
NOTE: Your Boost determines your overall
speed based on how fast you are pedaling.
All cut-off and assist level speeds are based
on using the bicycle in the third (high) gear at
the hub. Assistance cut-off speeds are greatly
reduced when in the first and second gears.
This is normal and allows usability for a variety
of riding styles and levels.
17
Service & Storage
Service
Your Dahon Boost will require the standard service requirements that are found in the bicycle manual. Please refer to instruction manual.
Checklist
The following checklist should be used for checking components specific to your Boost Bicycle:
Inspection term
Inspect for
Check if the assist unit is loosened or damaged.
Check if the assist function operates normally or produces
abnormal noise.
Check if grease leaks from the assist unit.
Check if the electric wiring is connected without slack or
damage.
Check if any cord is disconnected and each cord is mounted to
the frame properly.
Check if the battery lock key functions normally.
Check if the battery is mounted securely.
Check if each indication lamp lights up or if any lamp indicates
abnormality.
Check if the battery is running short quickly.
18
1st
inspection
2nd
inspection
3rd
inspection
4th
inspection
5th
inspection
6th
inspection
7th
inspection
2 months
6 months
12 months
18 months
24 months
30 months
36 months
Initial inspection after 2 months
• Approximately two months after your first
use, you should check to make sure everything is tight and secure.
• Inspect the bike and contact your dealer if
you find a problem.
From the second inspection on
• To ensure your Boost continues to function
correctly, you should have it inspected and
serviced every six months The responsibility
and expense for proper routine maintenance
of this bicycle is your own responsibility.
Cleaning
It is important to keep all of the wiring, plugs
and contact points clean and free form dirt,
water, oil. Some things to remember:
• After every ride it is good to give the bike a
wipe over. This makes removing any dirt,
grit much easier.
• After riding in the rain or on wet roads,
always clean and dry all components
immediately.
• Never spray water directly onto any part of
the bicycle as this may cause damage on
electric shock.
• Avoid using any chemicals or strong cleaning agents on the electrical components.
• Try using a dry, or slightly damp cloth to
clean dirt and grit away..
• Always be careful when cleaning around
wires and connectors. Damage can occur if
you pull or push wiring too vigorously.
Storage
It is important to store you bike correctly.
Please ensure:
• It is stored in a level and stable location.
• A location with good ventilation and no
moisture.
• A location not exposed to rain or direct
sunlight.
• It is also a good idea to cover the bicycle for
storage.
Operation After long-term Storage
After 20 days of inactivity, the battery will place
itself in Hibernation Mode. This is to help save
loss of power and extend the life of the battery.
To resume normal battery function, you will
need to remove the battery from the bike and
perform a standard charge cycle. Once complete, the battery will be ready to use again.
Long-term Storage
When your bike is to be stored for one month
or longer. Please make sure to:
• Make sure that only one red indicating lamp
lit remains. If there are more lamps lit use
the battery until only one light remains.
• Store the battery at a suitable temperature
(-20ºC to 20ºC recommended).
• Charge once a year. After charging, store
the battery again after using it until one red
indicating lamp for the remaining battery
charge is lit.
19
Troubleshooting
Symptom
When riding the bike
The pedals feel stiff.
Vibrations are felt
from the pedals
Flashing indicating
lamps of the controlswitch
20
Please Check
Solution
Are the indicator lamps on the controller lit?
Set the control-switch to ON
Is the battery installed?
Install the battery.
Is the battery locked securely?
Lock the battery securely.
Has the battery been charged?
Charge the battery
Has the unit been inactive for five or more
minutes?
Automatic off function is operating. Set the
control-switch to ON again.
Have you set the control-switch to ON applying
force to the pedals?
Set the control-switch once to OFF, and then set
it again to ON without applying any force to the
pedals.
Have you stopped the bike with your feet on
the pedals or does this occur at the time of
start?
This is a characteristic of the motor and not an
abnormality.
Does this occur while riding the bike normally?
A wire break of the pedal-force sensor (etc.) can
be considered. Please return to your dealer for
advice.
Are the left side two lamps flashing?
The temperature of the assist unit is high. Set the
control-switch to OFF and wait for the temperature to drop.
Is the red lamp on the left flashing?
The battery charge is nearly exhausted. Recharge as soon as possible.
Are the lamps flashing in a different pattern?
This indicates a problem with the Turbo unit.
Please ask your dealer for a repair.
When riding the bike
Symptom
Short Possible
Riding Distance
Please Check
Solution
Has the battery been charged?
Set the control-switch to ON
Has the battery been left unused for
a long time?
Perform charging. Even when a completely charged battery is
not used for a long time, the remaining charge may decrease
because of natural discharge.
Have you been riding under severe
conditions like uphill, bad roads, or
similar?
The riding distance is shorter according to the road conditions,
the gear position.
Riding up lots of hills Riding with
frequent starts and stops
Larger amount of battery power is consumed as the bicycle is
used under high load conditions.
Riding at high gear ratio
Select the optimum position of the gear shift and/or Assist mode
depending on uphill or downhill, head-wind or tail-wind, and your
physical condition.
Is the ambient air temperature low?
In winter or in cold areas, the battery becomes cold, the capacity
decreases because of the properties of the battery, and the riding
distance becomes shorter
Is the air temperature high?
When the battery is left at high temperatures, the remaining
charge may decrease.
Is there foreign matter or dirt on the
battery contacts?
Remove any attached foreign matter. Wipe off any dirt with a dry
cloth.
Has the battery been used for a long
time?
The battery may have reached the end of its life. Please replace
the battery.
Is the tire air pressure normal?
Use a bike pump to inflate the tires
Is the brake adjusted correctly?
Adjust the brake.
21
Symptom
Please Check
The charging
plug cannot be
Is the orientation of the charging
plug correct?
inserted into the
battery connector
When charging
No charging
No charging
(orange lighting)
The charging plug of the battery charger cannot be inserted
when the orientation is not correct. Match the orientation of the
charging plug and the charging connector and insert the plug.
Are the power plug and the charging
plug plugged in?
Check for correct connection of “power plug and outlet”, “power
cable and battery charger”, and “charging plug and charging
connector”.
Is the battery hot or cold?
When the temperature of the battery is high (45ºC or higher) or
low (0ºC or lower), charging standby is reached until the temperature of the battery is in the normal range. This is normal.
Has the battery been left for a long
time?
Remove any attached foreign matter. Wipe off any dirt with a dry
cloth.
In other cases than the above ones.
When charging is not started after some time (approximately 5
hours) at normal temperature, the battery charger or the battery
may be defective. Please contact your dealer for repair.
Does the temperature permit touchThe battery or
the battery char- ing (40ºC to 60ºC)?
ger becomes hot. Is it too hot to touch?
22
Solution
An increased temperature is normal during and directly after
charging and use.
Immediately stop use and ask your dealer for a repair.
Abnormal smell
or smoke from
the batter charger
Immediately stop use and ask your dealer for a repair.
No green flashing even after
start of charging
Immediately stop use and ask your dealer for a repair.
Specifications
Warranty
Motor Unit
Dahon Five-Year Limited Warranty
Lifetime Warranty Upgrade
Dahon warrants its bicycle frames, handleposts, and rigid forks to be free from defects in
materials and workmanship for a period of five
years. Dahon warrants the assist motor unit,
controller, and battery for a period of two years.
In addition, Dahon warrants all original parts
on the bicycle, excluding suspension forks and
rear shocks, for a period of one year from the
date of purchase. Suspension forks and rear
shocks shall be covered by the warranty of
their original manufacturers. This warranty is
limited to the repair or replacement of a defective frame, fork, or defective part and is the sole
remedy of the warranty.
The warranty on the frame, handlepost and
rigid fork may be upgraded to a lifetime warranty if the original owner fills out the online
registration card. The warranty is activated
when the bicycle is tuned and adjusted by a
professional mechanic before the owner’s first
ride. To activate your Dahon warranty and Lifetime Frame Warranty, please visit our On-line
Warranty Registration page:
www.dahon.com/registration.htm.
Registering your Dahon serves as proof of
original ownership for future warranty issues.
•
•
•
•
•
Type of Motor: DC Brushless.
Maximum Output: 250 W
Weight: 3,2kgs
Ambient Temperate for use: 0°C to 40°C
Ambient Temperate for storage: -5°C to
60°C
Battery
• Type of Battery: Rechargeable lithium ion
battery
• Rated output voltage: DC26.6 V
• Capacity: 5amp(133Wh)
• Weight: 1.40kgs
• Ambient Temperate for use: 0°C to 40°C
• Ambient Temperate for storage: -5°C to
60°C
Battery Charger
•
•
•
•
•
•
Type: Switching regulator.
Power supply: AC 100 to 240 V, 50/60 Hz
Power consumption: 64 W
Rated output voltage: DC29 V, 1.75 A
Ambient Temperate for use: 0°C to 45°C
Ambient Temperate for storage: -20°C to
60°C
This warranty applies only to the original owner
and is not transferable. This warranty only
covers bicycles and components purchased
through an authorized Dahon dealer and
are only valid within the country in which the
bicycle was purchased. The warranty does
not cover normal wear and tear, improper assembly or follow-up maintenance, installation
of parts or accessories not originally intended
or compatible with the bicycle as sold, damage
or failure due to accident, misuse or neglect, or
modification of the frame, fork or components.
*Exclusions from the Dahon Five-Year Limited Warranty also apply to the lifetime frame
warranty.
Exclusions
• For all city, road or trekking bikes, damage
resulting from commercial use, accident,
misuse, abuse, neglect or from anything
other than normal and ordinary use of the
product.
• For all mountain bikes, damage resulting from uses beyond cross-country and
marathon riding or from anything other than
normal and ordinary use of the product.
23
Required assembly when Purchased.
EXCLUSIONS
An Authorized Dahon Dealer is required to
assemble your Dahon brand electric vehicle,
without charge, at the time of purchase.
THE ABOVE WARRANTY, OR ANY IMPLIED
WARRANTY, DOES NOT COVER NORMAL
WEAR AND TEAR. ALL WARRANTIES ARE
VOID IF THE ELECTRIC VEHICLE IS USED
FOR OTHER THAN NORMAL ACTIVITIES,
INCLUDING, BUT NOT LIMITED TO, FAILING
TO FOLLOW THE OWNER’S MANUAL OR
USING THE ELECTRIC VEHICLE FOR COMMERCIAL ACTIVITIES OR IN COMPETITIVE
EVENTS, AND TRAINING FOR SUCH ACTIVITIES OR EVENTS. DAHON MAKES NO OTHER WARRANTIES, EXPRESS OR IMPLIED.
ALL IMPLIED WARRANTIES, INCLUDING
THE WARRANTIES OF MERCHANTABILITY
AND FITNESS FOR A PARTICULAR PURPOSE, ARE LIMITED IN DURATION TO THAT
OF THE EXPRESS WARRANTIES STATED
ABOVE.
Making a Warranty Claim
You must, at your own expense, deliver, mail or
ship the damaged part, a photo of the defective
part, and a description of the defect, together
with both the original bill of sale and this limited warranty statement as proof of warranty
coverage, to your place of purchase. A warranty registration card must be completed and
received by Dahon before a warranty claim
can be processed. The retailer from whom
you bought your bicycle will contact Dahon to
determine if the necessary repairs are covered
by the warranty.
NOTE: This warranty does not affect the statutory rights of the consumer. Where applicable,
local laws will take precedent over this contract.
24
Notes
25
Notes
26
Notes
27
Dahon California INC.
833 Meridian Street
Duarte CA 91010
1-800-442-3511
www.dahon.com
Dahon TW
8F-8, #6, Lane 609, Chung Hsin RD., Sec 5
San Chung, Taipei Hsien ROC 241, Taiwan
+886-2-2999-5623
© 2009 DAHON, BPSA
2009.09.EN