1
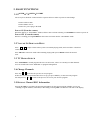
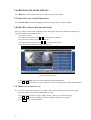
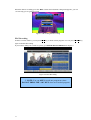
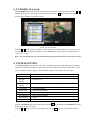
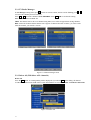
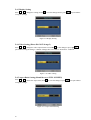
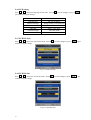
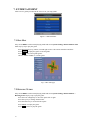
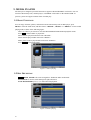
Digital HD Cable Receiver
TVS-5000C
Optional USB PVR
Operation Manual
Version 1.00-E
SAFETY INSTRUCTIONS
Read ALL the safety instructions before first use of your STB.
Power source
The STB power cord needs to be plugged into a working AC outlet.
Safety considerations
Position ALL leads so that they are not likely to be walked on or pinched by things placed on or against them.
Do not use the STB in wet or damp conditions. Do not allow the STB to get wet, i.e.
dripping or splashing, as this may be dangerous. Do not place water filled object, such as vases, on top
of the STB.
Make sure that no naked flame sources, such as candles, are placed on top of the STB.
Ventilation
Any slots and openings on the STB are for ventilation. DO NOT COVER OR BLOCK THEM as it
could lead to overheating.
NEVER let children push anything into the holes or slots on the case.
Servicing
There are no user serviceable parts in your STB. If service is needed:
CALL COAXIAL CABLE TV AT 734-1424 IF YOU HAVE ANY SERVICE ISSUES
Remote Control Battery Disposal
Please ensure batteries from the remote are disposed of safety.
SERIOUS WARNING!
NEVER power off when the STB is recording, file reading, or playing back a video.
It’s possible to damage the USB drive if your STB has an external USB drive attached.
.
The USB port of TVS-5000C can provide standard power to external USB drive.
DO NOT ADD ANY USB POWER ADAPTER TO STB!!!
INDEX
1. GETTING STARTED..................................................................................................................6
1.1 USE REMOTE CONTROLLER .....................................................................................................................6
1.2 REAR PANEL .............................................................................................................................................7
1.3 CONNECTING TO TV................................................................................................................................8
1.4 REMOTE CONTROLLER.............................................................................................................................8
2. BASIC FUNCTIONS...................................................................................................................9
2.1 POWER ON/POWER STANDBY ..................................................................................................................9
2.2 VOLUME UP/DOWN AND MUTE ...............................................................................................................9
2.3 TV /RADIO SWITCH .................................................................................................................................9
2.4 CHANGE CHANNELS .........................................................................................................................9
2.5 DISPLAY CHANNEL EPG INFORMATION ..........................................................................................9
2.6 PREVIOUS CHANNEL RECALL .......................................................................................................10
2.7 SWITCH LANGUAGE OF PROGRAMS .......................................................................................................10
2.8 EPG (ELECTRONIC PROGRAM GUIDE ) .................................................................................................10
2.9 TELETEXT ..............................................................................................................................................10
2.10 SUBTITLE (CLOSED CAPTIONING) .........................................................................................................11
2.11 FAVORITES............................................................................................................................................11
2.12 RECORDING (WILL ONLY WORK WHEN EXTERNAL USB DEVICE IS ATTACHED)...............................11
2.13 MUSIC/MOVIE/PVR PLAYBACK ............................................................................................................13
2.14 DEFAULT PASSWORD ...........................................................................................................................13
3. MAIN MENU.............................................................................................................................14
4. TV/RADIO..................................................................................................................................15
5. SYSTEM SETTING...................................................................................................................15
5.1 INSTALLATION .......................................................................................................................................16
5.1.1 NIT Search.........................................................................................................................................16
5.1.2 AUTO Search.....................................................................................................................................16
5.1.3 Manual Search ...................................................................................................................................16
5.2 CH MANAGER........................................................................................................................................16
5.2.1 TV/Radio Manager ............................................................................................................................17
5.2.2 Delete All ...........................................................................................................................................17
5.3 PARENTAL RATING.................................................................................................................................18
5.3.1 TV/Radio Lock ..................................................................................................................................18
5.3.2 Change PIN Code...............................................................................................................................18
5.4 ADVANCE SETTING.................................................................................................................................19
5.4.1 Language Setting................................................................................................................................19
5.4.2 Audio Setting .....................................................................................................................................19
5.4.3 Display Setting ...................................................................................................................................20
5.4.4 Video Setting .....................................................................................................................................20
5.4.5 Aspect Ratio Setting ..........................................................................................................................20
5.4.6 PVR setting ........................................................................................................................................21
5.4.7 PVR File Style ...................................................................................................................................21
5.4.8 PVR File Size.....................................................................................................................................21
4
5.4.9 Preferred Storage................................................................................................................................22
5.4.10 PVR File Delete ...............................................................................................................................22
5.4.11 Timeshift ..........................................................................................................................................22
5.4.12 Timeshift Length..............................................................................................................................23
5.4.13 Timeshift to Record .........................................................................................................................23
5.4.14 Zoom Mode......................................................................................................................................23
5.4.15 Factory Reset ...................................................................................................................................24
5.5 SYSTEM INFO .........................................................................................................................................24
5.6 SIGNAL TEST ..........................................................................................................................................24
5.7 CA SETTING ............................................................................................................................................25
5.7.1 Subscription right...............................................................................................................................25
5.7.2 Parental control ..................................................................................................................................25
5.7.3 Change CA PIN .................................................................................................................................26
5.7.4 CA message .......................................................................................................................................26
6. BOOK MANAGER....................................................................................................................26
7. ENTERTAINMENT..................................................................................................................27
7.1 BOX MAN ..............................................................................................................................................27
7.2 BURNING TETRIS....................................................................................................................................27
7.3 HIT RAT .................................................................................................................................................28
7.4 GO BANG ...............................................................................................................................................28
7.5 SODOKU ................................................................................................................................................29
8. HELP...........................................................................................................................................29
9. MEDIA PLAYER.......................................................................................................................30
9.1 BASIC FUNCTIONS..................................................................................................................................30
9.2 KEY DEFINITION ....................................................................................................................................30
10. APPENDIX A TECHNICAL SPECIFICATION....................................................32
11. APPENDIX B TROUBLESHOOTING....................................................................33
5
1.2
REAL PANEL
Figure 1-1-1 Rear panel of TVS-5000C
○1 RS232:RS232 port,this port is used for engine.
○2 LOOP:DO NOT USE!
○3 RF IN:Connect CABLE to this connector
○4 HDMI :High Definition Multimedia Interface
○5 ○6 ○7 YPbPr :YP P is the analog video signal carried by component video cable in
B R
consumer electronics. The green cable carries Y, the blue cable carries PB and the red cable
carries PR.
○8 Video :RCA Video port, the yellow cable carries the video;
○9 ○10 L,R :Left Audio port, the white cable carries the Left port; Right Audio port, the red
cable carries the right audio.
○11
○12
7
S/PDIF: S/PDIF output, this port can connect HIFI with STB.
USB: USB2.0 master port to connect External USB mass storage device
1.3 CONNECTING TO TV
Note: Before connect this Set Top Box (STB) to other devices, please SHUT DOWN all devices.
Connect the STB with the HDMI cable from the STB to the HDMI jack on the TV set;
Connect a coaxial cable to the set top box “RF IN” connector on its rear panel. ”RF IN” connector
Is the second one from the edge of STB. STB will not work if on wrong connector.
Plug the set top box’s power cord into the AC power socket on the wall. The
set top box starts in a normal state of “playback the program that it received”.
USB: USB master, connecting with External USB mass storage.
S/DIF: This port can connect HIFI with STB.
IF the STB does “NOT” show a picture – make SURE the TV is set to the proper input – it will be HDMI
1.4 REMOTE CONTROLLER
1. POWER: Turns the receiver power on/power standby.
2. MUTE: Mutes the current channel audio.
3. Numeric Key (0-9): You can change channel by input the channel
number directly.
4. FAV: Press to display the favorite List.
5. RECALL: Return previous program
6. TV/RADIO: In TV mode, toggle switch between TV and Radio.
In media mode, PLAY function.
7. MUSIC: Hot key to play compatible music from USB drive.
8. MOVIE: Hot key to play compatible movie from USB drive.
9. PVR: Hot key to play recorded programs from USB drive.
10. || : Play/Pause
11. 口:Stop
12. >> : Forward.
13. << : Backward.
14. |< : Previous
15 >|: Next.
16 INF (INFO): If you press the INF button once, the EPG data or
Recording information for the highlighted channel will display.
Pressing INF will remove the display. This works the the full screen
EPG also.
Figure 1-2
17. Pg Up: Page up.
Remote Control
18. Pg Dn: Page down.
19. REC (|<<): In TV mode, record current channel to the USB
device. In the media mode, previous track.
20. UP Arrow: Move Up in menu. Channel up.
21. LEFT Arrow: Move Left in menu. Decrease the audio output level.
22. DOWN Arrow: Move Down in menu. Channel down.
23. RIGHT Arrow: Move Right in menu. Increase the audio output level.
24 .QUIT: Close current active menu and go back to up menu..
25. MENU: Press to access the SYSTEM MENU.
26. EPG: The EPG menu of the current channel is displayed.
27. MAIL: Hot key to enter email menu. Messages from cable company ONLY!
28. TEXT: Hot key to enter Teletext menu. (Not used in USA)
29. SUBT: Used to turn Closed Captioning ON or OFF
30. TRACK: Sets the current channel audio to stereo/left-mono/right-mono.
31. LANG: Choice the program’s voice language (If SAP is available)
32. PTV: Reserved
33. MOSAIC: Reserved
34. FILE: Hot key to enter storage directory
35. EDIT: Reserved
36. TIMER: Reserved
37. HELP: Reserved
38. F1-F4: Function key, reference from menu
39. OK: Confirm key.
8
2. BASIC FUNCTIONS
2.1 POWER ON/POWER STANDBY
The set top box should be connected in the sequence below in order to protect it from damage.
Connect cable to STB
Connect STB to TV set
Connect AC power plug to the STB
Power ON (From the remote)
When the STB is in “STANDBY” mode (will show time on front of STB), press POWER on remote to power on.
Power OFF (From the remote)
When it is running, pressing POWER on the remote will enter into the “STANDBY" mode.
2.2 VOLUME UP/DOWN AND MUTE
Press ← or → to adjust volume when system is in normal playing mode; and it will show volume bar
on the screen;
Press MUTE to enter mute mode when normally playing and repress MUTE to back the normal
state.
2.3 TV /RADIO SWITCH
Press TV/RADIO to switch program when it is in full screen; There are currently no radio channels.
You can switch between TV and Radio via program management.
2.4 Change Channels
Press key ↑ or ↓ to switch to the previous or next program.
If there are favorite programs that have been set up, just press FAV key to enter Favorite program
list and press key ↑ or ↓ to switch to the previous or next of your favorite program.
2.5 DISPLAY Channel EPG Information
Pressing the INF key will show the program information for the current program whether you are just
watching a regular channel, in the EPG, or Recording. Pressing INF a second time will remove the display.
9
2.6 PREVIOUS CHANNEL RECALL
Press RECALL, with no other menus up, to return to the previous channel.
2.7 SWITCH LANGUAGE OF PROGRAMS.
Press LANGUAGE to switch the language audio of current program. (If SAP available)
2.8 EPG (ELECTRONIC PROGRAMS GUIDE)
Press key <EPG> on the remote controller to enter EPG page to know more about the programs to be
played. The EPG menu describe as above:
Area 1 shows video ;
Area 2 shows channel list, press ↑ or ↓ to switch between channels;
Area 3 shows key help to operate current menu.
Area 4 shows EPG event list, press ↑ or ↓ to switch between event,;
Area 5 shows time and date list with week and year;
Figure 2-2 Daily EPG menu
In area 4 press INFO to show the current detailed program information ;
Press ← or → to switch between Area 2 and Area 4. You can also just press in the channel number.
2.9 TELETEXT (Not used in USA)
If you want to watch teletext, please press <TEXT> on the remote controller to enter Teletext page.
Input three digits to go to corresponding page you want.
Press Up to go to the previous page; while press key <Down> to go to the next page.
Press ← or → to back for 100 pages; while press Right to advance for 100 pages.
Press QUIT key to exit from Teletext.
10
2.10 SUBTITLE (Closed Captioning)
When resetting STB, the defaulted is Closed Captioning is on. To change this, press the SUBT key and select
Either “OFF” or “CC”
Press ← or → key to choose whether to open CC, press
↑ or ↓ key move upward and
downward to choose CC, (CC will be where 'English' is in the pictures below).
Figure 2-3 CC Select/off
2.11 FAVORITES
Press FAV key to enter FAV menu. This will show channels that have been made a Favorite.
Note: There are no FAV settings in the Radio channel
2.12 RECORDING (Will only work when external USB device attached)
Test USB device with Timeshift recording FIRST. If no errors will work properly for recording.
There are three ways to record TV program. They are Real Time Recording, EPG Recording, and
Schedule Recording. **NOTE:YOU CAN ONLY RECORD ONE CHANNEL AT A TIME!**
Before you record a TV program, a pop-up caution message will appear if no USB device is attached.
Real Time Recording
In viewing mode press the REC button, you can record current TV program into selected device.
This is Real Time Recording. **NOTE:You can ONLY record the channel you are watching.**
During recording, it will show message “REC”. Press “口”, to stop recording.
Figure 2-4 Recording start and stop
To “Timeshift” record (pause live TV) you must have a USB device connected to the unit.
To start the “Timeshift” recording, just press the “Play/Pause” button to start the recording.
Pressing the “Play/Pause” button again will start playing from the time you started recording.
NOTE:It is best to try this BEFORE recording to see if USB device will work properly.
11
When the STB is recording, press the “REC” button and a duration setting menu appears, you can
set how long you are going to record.
Figure 2-5 Recording duration setting
EPG Recording
In EPG event list window, you can press RED key t o book current program. You can press the RED key
again to disable the booking.
If you want to manage the record list, please go to BOOK MANAGER Menu in chapter 6.
Figure 2-6 EPG Recording
** NOTE: You can ONLY record one program at a time.
DO NOT PRESS THE “OK” KEY when on a booked program.
12
2.13 MUSIC/MOVIE/PVR PLAYBACK – MUST have USB drive attached
Press the hot key of Music/Movie/PVR on the remote, the receiver will enter the Music/Movie/PVR
playback menu, in order to play the file which you want a menu will appear to guide you in choosing
the file directory and the media file on your USB drive
Move the cursor by using ← or → , ↑ or ↓ key, and press OK to confirm and enter the playback menu.
Figure 2-7 Playback menu
When menu is appeared on the screen, you press the MENU key or QUIT key to return to the
up-level menu.
If you press the QUIT key to return to the up-level menu.
In playback menu, the hot keys are “<” ,”>” ,“|<”, “>|”,”口” ,”||” are valid.
2.14 DEFAULT PASSWORD
The Access Password is default to 123456. REMEMBER YOUR NEW PASSWORD!
There is no way you can reset the password if you forget the new password!
13
3. MAIN MENU
The STB contains a facilitated user interface, this function is to make it easy to access all the device
functions.
Operation Steps: Press MENU, you can see this main menu.
Fig 3-1 Main Menu
When no menu is shown on the screen, you press the MENU key to display the main menu.
The focus (highlighted item) will stop in the first item until the user selects it.
When menu appears on the screen, you press the MENU key or QUIT key to return to the
up-level menu.
OK: When you press the key that will go to current sub-level menu item highlighted.
← → : The focus will move left or right.
↑ ↓ : The focus will move up or down.
QUIT : Close all menus.
The functions of the main menu are:
Channel List
SELECT TV CHANNELS
TV
Select TV channels
RADIO
Select Radio channels
EPG
View the Electronic Program Guide
Multimedia
Multimedia files playing menu, it include the Movie, Music,
Photos, PVR on currently attached USB drive
Chn Rec
Record current TV program which is playing
SETTING
CH Search, CH Edit, Language, Parameters, Audio Track,
Password, Default, STB upgrade
Hint: When you are in the Main Menu, press the QUIT or MENU button to quickly exit the Main Menu.
Press the QUIT button to return to the previous menu when you are in the sub-menu.
14
4. TV/RADIO (Not used)
The TV/RADIO channel menu allows you to browse all channels saved in the STB. Press the ↑ or ↓
button to select the TV menu option in the main menu. Press the OK button and the TV channel
browser will be displayed as shown in Figure
Figure 4-1 TV list menu
Press the ↑ or ↓ button to browse channels. When staying on a certain channel over 2 seconds, it will
switch to the selected program automatically. Press OK button to switch to the selected channel and
return to TV viewing.
Hint: You can quickly enter the TV channel menu by pressing the OK button on the remote control.
5. SYSTEM SETTING
The System Setting menu option provides all the installation and setup of the STB system, including
channel edit, language, parameters, audio track, password setting, restore default setting, and even the
system’s (STB’s) software upgrade. The SETTING function is described as the table below:
Installation
Search channel by All Search, Auto Search, Manual Search
CH Manage
Channel Edit, Blocking
Parental
Rating
Parental Lock
Advance
Setting
Video, Audio, CH Update, Time Zone, Language
System Info
System information.
Signal Test
Signal test information.
CA Setting
CA information settings.
Book Manager
Book confirm/ Book del
Entertainment
Games
Help
Will describe each sections function
Select the SETTING option in the main menu. Press theOK button and then the SETTING menu will
be displayed, as shown in Figure
Press the ↑ or ↓ button to select a menu option, and press the OK button to enter this menu option.
15
5.1
CHANNEL INSTALLATION (DO NOT USE UNLESS INSTRUCTED TO BY CABLE SUPPORT)
The Installation menu in the System Setting menu is used for searching channels. Select the Installation
menu option in the System Setting menu. Press the OK button and the Installation menu will be
displayed, as shown below. NOTE: Doing any of the below can leave STB with NO channels!
Figure 5-2 CH search menu
The Search mode includes NIT Search, Auto Search and Manual Search. Press ← or → to select the
installation mode. NOTE: If you see black bars – there is NO signal to STB.
5.1.1 NIT Search (Use this and change to frequency provided - 079000)
The NIT Search will find the NIT table in the network, then search all the valid channels set by provider.
This is the ONLY way for searching to restore channels.
5.1.2 AUTO Search (DO NOT USE)
The Auto Search allows you to set the first channel center frequency and the last channel center
frequency, as well as the frequency step between two channels. Then the STB decoder will scan all the
channels in the range by the step of the BW which you setting.
5.1.3 Manual Search (DO NOT USE)
WARNING: The Manual Search should be used for test purposes. Otherwise, the order of the channel
sorting will be different from the operator’s channel map. CALL 734-1424 if you have any questions
The operation of Manual Search is the same as the NIT search.
5.2 CH MANAGER
The CH Manager menu option provides management of the channels stored in STB, The CH Manager
function is described in the table below: NOTE: Doing any of the below can leave STB with NO channels!
TV
Favorite Set, Enable/Disable Channel
and Adjust Channel position
16
Radio
The operation and function is same as
TV
Delete all
Delete all channel in STB
5.2.1 TV/Radio Manager
In TV Manager setting menu, press OK button on remote control, the line will be flashing, press↑ or ↓
will move the channel position on the list.
Press ← or → will set the channel to FAV/SKIP/DEL status, press OK to confirm the setting.
FAV: Set the channel into FAV list.
SKIP: The channel can be show on channel listing table, but it will be skipped when surfing channels.
DEL: Delete the channel and the channel won’t appear on channel list table. If delete, you want to take
back the channel, you need do a rescan!
Figure 5-3 Channel manager menu
5.2.2 Delete All (Will delete ALL channels!)
Delete All
Press the OK button. A warning Dialog will be displayed, if you choose OK on the dialog, all channel
in STB will be deleted. The STB will not work until channels are rescanned. CALL 734-1424 for directions
Figure 5-4 Delete All
17
5.3 PARENTAL RATING
The CH Manage menu option provides management of the channels stored in STB, The CH Manage
function is described as the table below:
TV
Lock/Unlock the TV channel
Radio
Lock/Unlock the Radio channel
Change PIN code
Change the password of parental access
The default Access Password is 123456.
5.3.1 TV/Radio Lock
TV LOCK
Press button OK, the
will be displayed; this means the channel will be parental locked. Press
button OK again, the
will disappear, which means the current channel is unlocked. Press
button ↑ or ↓ to move the cursor.
Figure 5-5 Parent Lock
RADIO LOCK
Note: The Audio Channel Edit menu setting is the same as the TV channel edit.
5.3.2 Change PIN Code
Press OK to enter the Password menu option in the Parent Lock menu and the Password
dialog will be shown as Figure 5-6. The Password change option allows you to change the password
of the STB. REMEMBER THE NEW PASSWORD!
Figure 5-6 Change PIN Code
If you forget the new password – it can ONLY be reset during normal business hours.
18
Note that user(s) must remember the number if a change is made. Call your operator for help if you
forget the password.
Note that the access password will be restored to the default value of 123456 when running Restore
Default procedure.
5.4 ADVANCE SETTING
Select and press OK to enter the Parameter menu option in the SETTING menu and the Parameter
menu will be shown as:
Language Setting
Spanish/English/Chinese
Audio Setting
Select audio track mode among Mono, stereo, left,
right.
Display Setting
Transparency of menu setting.
Video Setting
TV mode. Ie 1080p/1080i
Aspect Ratio Setting
Aspect ration 16:9 / 4:3
PVR Setting
PVR file setting /Time-shift setting
Zoom Mode
Letter Box /Pan Scan/Full Screen
Factory Reset
Reset System of STB
5.4.1 Language Setting
Press ← or → to change the setting, Press OK to save the changes and or press QUIT to quit without
saving the settings. Language option: ‘English’, ‘Spanish’ and ‘Chinese’.
Figure 5-7 Language Setting
5.4.2 Audio Setting
Press ↑ or ↓ to select which one you want to set.
Press ← or → to change the setting, Press OK to save the changes or press QUIT to quit without
saving the changes.
Figure 5-8 Audio parameter change
19
5.4.3 Display Setting
Press ← or → to change the setting, Press OK to save the changes and or press QUIT to quit without
saving the settings.
Figure 5-9 Display Setting
5.4.4 Video Setting (Please DO NOT change!!)
Press ← or → to change the video output format. Press OK to save the change or press QUIT to
quit without saving the change. **NOTE: Changes here can render a “No Picture” condition.
Figure 5-10 Video setting
5.4.5 Aspect Ratio Setting (Should be set to FULL SCREEN)
Press ← or → to choose the aspect ratio, Press OK to save the changes or press QUIT to quit without
saving the changes.
Figure 5-11 Aspect ration Setting
20
5.4.6 PVR setting
Press ← or → to choose the language for the menu. Press OK to save the changes or press QUIT to
quit without saving the change.
PVR File Style
File style TS/PS
PVR File Size
File size 512M/1G
Preferred Storage
Storage setting. Usb1/usb2/card
PVR File Delete
Delete all PVR files.
Timeshift
Pause / Off / Auto
Timeshift Length
Auto/30m/1h/2h
Timeshift to Record
On / Off
5.4.7 PVR File Style
Press ← or → to choose the style for the menu. Press OK to save the changes or press QUIT to quit
without saving the change.
Fig 5-12 PVR File Style
5.4.8 PVR File Size
Press ← or → to choose the size for the menu. Press OK to save the changes or press QUIT to quit
without saving the change.
Fig 5-13 PVR File Size
21
5.4.9 Preferred Storage
Press ← or → to choose the storage for the menu. Press OK to save the changes or press QUIT to
quit without saving the change. NOTE: ONLY USE USB1
Fig 5-14 Preferred Storage
5.4.10 PVR File Delete
Press OK to delete all the PVR files or press QUIT to quit to PVR Setting.
Fig 5-15 PVR File Delete
5.4.11 Timeshift (Setting button for Timeshift)
Press ← or → to choose the Timeshift from the menu. Press OK to save the changes or press QUIT to
quit without saving the change.
Fig 5-16 Timeshift
22
5.4.12 Timeshift Length (Length of time it will record once started)
Press ← or → to choose the Timeshift Length for the menu. Press OK to save the changes or press
QUIT to quit without saving the change.
Fig 5-17 Timeshift Length
5.4.13 Timeshift to Record (To enable and disable Timeshift)
Press ← or → to choose the Timeshift to Record for the menu. Press OK to save the changes or press
QUIT to quit without saving the change.
Fig 5-18 Timeshift to Record
5.4.14 Zoom Mode (Aspect Ratio)
Press ← or → to choose the Zoom Mode for the menu. Press OK to save the changes or press QUIT
to quit without saving the change.
Figure 5-19 Zoom Mode
23
5.4.15 Factory Reset (Removes ALL settings, timer recording data, and channels)
In order to enter default menu, password verification is need. The default password is: 123456.
Press button OK to confirm. (STB will need to be set up again to function – CALL 734-1424)
NOTE: EVERYTHING will be cleared, be careful if you don’t intend to delete all the data!
5.5 SYSTEM INFO
Press QUIT to quit and return to System Setting menu.
Figure 5-20 System Info
5.6 SIGNAL TEST
Press QUIT to quit and return to System Setting menu.
Figure 5-21 Signal Test
24
5.7 CA SETTING
Select and press OK to enter the Parameter menu option in the CA SETTING menu and the Parameter
menu will be shown as:
Subscription right
View the subscription information of smart card
Parental control
Set the maturity rating of the smart card.
Change CA PIN
Change the PIN code of smart card.
About the CA
It shows the information of the CA
CA message
CA
5.7.1 Subscription Rights
Press the OK button, the Subscription Rights menu will be shown. From the menu, the user can learn the
subscription detail of smart card.
Figure 5-22 Subscription Rights menu
5.7.2 Parental Control (not supported on all channels)
This menu sets the maturity rating of the smart card. Press ← or → can set the maturity level.
Figure 5-23 Parental control
25
5.7.3 Change CA PIN
This menu changes the PIN code of smart card. The default password is: 1234.
Figure 5-24 Change CA PIN menu
5.7.4 CA message
This menu shows the email sent from CA system.
6. BOOK MANAGER (Manage Timer Recordings)
Press QUIT to quit and return to BOOK MANANGER menu. RED will delete the item highlight.
Figure 6-1 Book manager
26
7. ENTERTAINMENT
There are five games provided in the receiver for your enjoyment.
Figure 7-1 Entertainment
7.1 BOX MAN
Play: Press MENU under normal playing mode and select System Setting->Entertainment->Box
Man step by step to play the game.
Press direction keys Up, Down, Left and right to move the cartoon man here and there.
Press MENU to replay the game of current grade.
Press OK to play senior grade games.
Choose <EXIT GAME> to exit the game.
Fig 7-2 Box Man page
7.2 BURNING TETRIS
Play: Press MENU under normal playing mode and select System Setting->Entertainment ->
Burning Tetris step by step to play the game.
Press the Left or Right key to move the square left or right
Press the Up key to change the direction.
Press the Down key to accelerate the square.
Press MENU to replay the game.
Press OK to pause or play the game.
27
Fig 7-3 Burning Tetris page
Choose <EXIT GAME> to exit the game.
7.3 HIT RAT
Play: Press MENU under normal playing mode and select System Setting->Entertainment ->Hit Rat
step by step to play the game.
The direction keys compose 1,2,3,4,5,6,7,8,9 VS Top Left, Top Mid, Top Right, Mid Left, Mid
Right, Down Left, Down Mid, Down Right.
Choose <EXIT GAME> to exit the game.
Fig 7-4 Hit Rat page
7.4 GO BANG
Play: Press MENU under normal playing mode and select System Setting->Entertainment ->Go Bang
step by step to play the game.
The direction keys compose 1,2,3,4,5,6,7,8,9 VS Top Left, Top Mid, Top Right, Mid Left, Mid
Right, Down Left, Down Mid, Down Right.
Choose <EXIT GAME> to exit the game.
28
Fig 7-5 Go Bang
7.5 SUDOKU
Play: Press MENU under normal playing mode and select System Setting->Entertainment ->Sudoku
step by step to play the game.
The direction keys compose 1,2,3,4,5,6,7,8,9 VS Top Left, Top Mid, Top Right, Mid Left, Mid
Right, Down Left, Down Mid, Down Right.
Choose <EXIT GAME> to exit the game.
Fig 7-6 Sudoku
8. HELP
There four items about help information. These just describe the menu items.
29
9. MEDIA PLAYER
The Set top box integrates powerful functions to support USB and SD/MMC card reader. You can
connect USB memory stick, an MP3 player, or SD/MMC card reader via the attached USB. At
present, system can support common form of media play.
9.1 BASIC FUNCTIONS
You can enjoy all music, photos, and cinema. Insert USB memory stick or MP3 player, press
MENU to enter the main menu, and then choose <MOVIE>, <MUSIC> or <PHOTO> to enter media
playing mode as show in the following figure.
There are 4 hot key on remote to enter the MOVIE/MUSIC/PHOTO/PVR playback menu.
Press OK to choose folder or played file.
Movie must be played under menu item <MOVIE>.
Music must be played under menu item <MUSIC>.
Photo picture must be played under menu item <PHOTO>.
Press QUIT to exit media mode.
Figure 9-1 Movie playing
9.2 KEY DEFINITION
← , → , MUTE, ZOOM is the same as Digital TV definition under media mode.
LANGUAGE is used to switch among left, right, and stereo.
FAST BACKWARD: press (<<) to fast backward playback.
Figure 9-2 Music playing
30
FAST FORWARD: press LIST (>>) to fast forward playback.
NEXT TRACK: press TEXT (>>|) to go to the next track.
PREVIOUS TRACK: press LANG (|<<) to go to previous track.
REPEAT PLAYBACK MODE: Press REPEAT/SCAN to choose repeat playback mode.
SEQUENCE PLAYBACK: During PHOTO (JPEG and BMP) playback, press TV/RADIO (>) to
enter sequence playback mode.
Press Left Arrow or Right Arrow to rotate the photos under full screen browse.
Press ↑ or ↓ to view lens photo vertically or horizontally under full screen browse.
Press EXIT to exit full-screen browse
Figure 9-3 Photo playing
31
10. APPENDIX A TECHNICAL SPECIFICATION
TUNER
RF Input type: F-type connector
Input Impedance: 75 ohm
Min signals level: -15 dBmV
Max signals level: 20 dBmV
Input Frequency: 47~862MHz
Bandwidth: 6 / 7/ 8MHz
Catching Frequency: ± 150KHz
Input reflection: ≥8
Decoding: 16, 32, 64, 128, 256 QAM
~ 6.952 Mbaud
Support scope: 3.6
RF Loop through Type: F-type connector
Output impedance: 75Ω
PROCESSOR AND MEMORY
CPU: 300MHz MIPS chipset
Flash Memory: 4MB
Memory: DDRII 64MB
HDMI: HD digital display, multi format capable (1080P,1080I, 720P, 480P,
480I)
Y/Pb/Pr : Analog HD output
RCA: Analog SD output
SPDIF: Digital audio output
USB: High-Speed USB 2.0 Port
Front Panel: Standby/VOL+/- CH+/-,MENU,OK, LED/IR
AUDIO DECODING
Decoding: MPEG 1/2/3, AC3, AAC
Audio output: Stereo, mono, dual, SPDIF optical digital output, PCM, LPCM,
WMA, MPEG 1/2 layer 1/2
VIDEO DECODING
Transport Stream: ISO/IEC 13818-1 MPEG-2, H.264/MPEG-4 AVC
Profile Level: Up to H.264 HD, [email protected], Up to MPEG-2 HD, MP@HL
Aspect Ratio: 16:9 / 4:3 Letter-Box, Pan & Scan
Video Resolution: 1920x1080P/i, 1280x720p, 720x576p/i
Video Format: PAL, NTSC.
Video output standard: Output Scope
:1.0±0.05V Vp-p
GENERAL
Operating Temp. : -5-+45°C
Power consumption: 20 W Max.
Power supply : 110 VAC
Weight : 0.9 Kg
Dimension :255 mm (W) x 180mm (D) x 38mm (H)
32
11. APPENDIX B TROUBLESHOOTING
If you find a problem with the STB, please check the table below for an immediate solution.
PROBLEM
PROBABLE CAUSE
RESOLUTION
Power on STB, but no
display on TVscreen
Please check the connection to
your TV. A HDMI connection is
used for this HD STB.
Make sure the TV is set to the proper
Input. It will be HDMI, not a channel.
“No signal”
Is GREEN lock light on front?
Is the CABLE outlet active?
The single channel has problems
CABLE not active for location
The STB set-up is incorrect
There is no signal to STB
Connect to another CABLE outlet
Try another channel
“No access”
External USB Hard
disk or USB device
can’t be found
USB device can’t be
found by STB
The channel may not be one in
your purchased package
Did you power off the PVR
when it’s recording?
Did you power off the PVR
when it playing or file reading?
Did you power on and power off
frequently and quickly?
The USB device is not supported
by STB
Un-support disk partition
Make sure date of CABLE hookup correct
CALL 734-1424 for correct installation
procedure in the System Settings menu
Make sure the channel is one you are
paying for. If in doubt, CALL734-1424
to verify you package
NOTE: Do not power off when the USB
device is working. Do not power on
and power off the STB frequently and
quickly.
The USB can’t support a XD memory
stick, Some USB device can’t be found
because of compatibility problems.
The STB can only support
FAT16,FAT32 disk partition
TIPS:
Not all troubleshooting variables are listed on the table above.
If you refer to this troubleshooting guide but have no resolution to the problem
Please contact COAXIAL CABLE TV SUPPORT @ 734-14242 for technical support.
NO TOOLS are EVER required for connecting the STB: resulting damages are the customers responsibility!
33