1
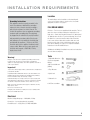
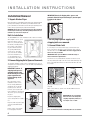
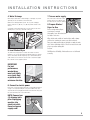
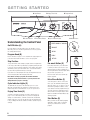
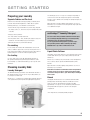
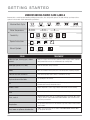
OW N E R’S M A N U A L
Model WCAM 1812
Combination Washer/Dryer
Contents
Technical Data............................................. 2
Installation Requirements............................. 3
Installation Instructions................................. 4
Important Safety Information......................... 6
About Your Washer/Dryer ............................. 7
Understanding the Control Panel................... 8
Fabric Care Labels..................................... 10
Stain Removal Chart.................................. 10
Guide to Wash & Dry Programs....................11
Guide to Wash Only Programs..................... 12
Operating Instructions................................. 13
Preparing Your Laundry............................... 13
Choosing Load Size.....................................13
Using the Laundry Aid Dispenser..................14
Using Your Washer/Dryer............................. 14
Troubleshooting.......................................... 14
Taking Care of Your Washer/Dryer................ 15
Common Laundry Problems........................ 17
Product Warranty........................................ 18
Service Contacts........................................ 18
Important! To get the best performance
from your washer/dryer, read all operating
instructions before using for the first time.
CUSTOMER CARE CENTER
800.898.1879
www.askousa.com
T E C H N I C A L D ATA
WHAT IS A COMBINATION
WASHER AND DRYER PRODUCT?
The ASKO combination washer and dryer product is a
“unique laundry solution” for households that can not
accommodate traditional laundry products. The large
capacity tub provides an impressive 15 lb (Full Load)
wash capacity or 7.5 lb (Half Load) drying capacity.
This laundry solution provides the customer with the
convenience of a 120V in-house laundry product that is
designed to wash and dry smaller loads of laundry on a
regular basis.
Our washer and dryer combination product utilizes a
condenser dryer technology (vent-less) allowing for
seamless wash to dry performance without the need
for special electrical requirements or an external vent.
These features make this product convenient for
multiple applications where traditional laundry solutions
(separate washer and dryer requiring 220V electrical)
will not operate. This product features a large 2.5
cubic foot drum (largest in its class) which features
more capacity for wash AND dry performance. Keep in
mind it uses a standard household current which limits
the wattage available for the dry performance, which
results in longer total cycle times (3-4 hours). The 1200
RPM spin provides the maximum moisture removal
to reduce the drying times along with the Heavy Stain
cycles that provides a 140 degree temperature boost
for improved stain removal.
2
CUSTOMER CARE CENTER 800.898.1879 www.askousa.com
Dimensions
A. Width: 23 ½” (597 mm)
B. Height: 33 ¼”- 34“ (845 - 864 mm)
C. Depth: 23 5/8” (600 mm)
D. Depth w/door open: 39” (991 mm)
Capacity
Large
Electrical Conn.
Voltage: 120 Volts, 15 Amp, 60Hz
Water Conn.
Inlet supply hose: Two 6’ (1.5 m) fill hoses, hot & cold
Supply pressure: 15 – 142 PSI
Outlet hose” 6.5’ (1.7 m) polypropylene hose, ¾” ID
Note: The manufacturer reserves the right to improve appliance
specifications without prior notice. For more information, see
the type plate on inner door facing of machine.
I N S TA L L AT I O N R E Q U I R E M E N T S
Location
Grounding Instructions
This appliance must be properly grounded. In the
event of breakdown or malfunction, grounding
reduces the risk of electric shock by providing a
path of least resistance for electric current. The
cord for this appliance has an equipment-grounding
conductor and a grounding plug. The plug must
be plugged into an outlet that is properly installed
and grounded in accordance with all local codes
and ordinances. Do not modify the electrical plug
provided with the appliance – if it does not fit the
electrical outlet, have a qualified electrician install
a proper outlet. Make sure the power supply and
electrical outlet support a 110/120V, 15 amp
single-phase circuit.
Warning!
Improper connection of the equipment-grounding conductor may
result in electric shock. If you are in doubt as to whether the
appliance is properly grounded, check with a qualified electrician or
service representative.
Important!
To prevent accidents, injury and fire, read instructions carefully before
you install the machine.
A qualified installer familiar with all local codes and ordinances for
plumbing and electricity should do the installation and grounding.
Incorrect installation may cause damage or injury.
Install washer/dryer on a strong, level floor in a protected, dry and
well-ventilated area with room for electrical cords and hoses behind
the machine. Temperature should be not less than 38° F (3° C)
Make sure power supply and outlet support a 110/120 V, 15 amp
single-phase circuit.
The washer/dryer can be installed as a freestanding unit
or in a recessed area, under a counter or in a closet with
appropriate clearance. See page 4.
FILL/DRAIN HOSES
Fill Hoses – Two hoses are supplied with the machine. The hot
water hose has a red stripe running the length of the hose.
Drain Hose – Drain outlet should be between 23” (60 cm) and
35” (90 cm) above the floor. To prevent siphoning, do not seal
the drain hose connection into the drain outlet. If machine
is not connected to a drain outlet, position drain hose and
bracket over the edge of sink or wash basin and secure in
place before draining. See page 5 for complete installation
instructions for the fill and drain hoses.
ASKO denies all liability if installation use and care instructions
are not followed completely.
Tools
1. Adjustable Wrenches
(if you use adjustable
fittings)
2 Open-ended Wrench
[10mm]
3. Tape Measure
4. Spirit Level
5. Channel Lock
6. 20 Torx screwdriver
Do not use an extension cord.
If integrity of the machine is in doubt, do not use it. Call Customer
Care Center at 800-898-1879.
Electrical
Machine Voltage/Amperage – 120V, 60Hz, 15 Amp
Connection – 3-prong plug (must be grounded)
Circuit/Protector – single phase, 15 AMP, 120V, 60Hz
3
CUSTOMER CARE CENTER 800.898.1879 www.askousa.com
I N S TA L L AT I O N I N S T R U C T I O N S
Installation/Removal
1. Unpack Washer/Dryer
Move the machine to its installation position. Remove the packing materials
carefully to avoid damage to the machine’s pre installed drain hose and
power cord. Make sure the machine is intact and report any damage to the
retail location you purchased your product from immediately.
IMPORTANT: Retain all shipping bolts, spacers and
grommets Reinstall to prevent damage if you transport
machine in the future.
Fig. 2
WARNING: Destroy the carton and plastic bags after unpacking
washer-dryer. Plastic bags and other packing material are not
children’s toys and can be dangerous.
Built-In Installation
The ASKO WCAM 1812 can be installed beneath a cabinet or worktop
with a height of 34-1/2“ ( 876
mm). There must be a gap of
about 1/2“ (12 mm) all around
the machine, including between
the rear edge of the machine
top panel and the back wall.
The opening width must be
at least 24-1/2“ (622 mm).
Space must also be available
for the inlet and drain hoses.
See the diagram above for
measurements and positions.
2. Remove Shipping Bolts/Spacers/Grommets
The machines shipping security consists of shipping bolts (4), spacers
and grommets on the back panel to secure the wash / dry drum during
shipping and delivery.
* Do not plug in power supply until
shipping bolts are removed.
3. Connect Water Inlet
If connecting to new or unused water pipes, run water until clear
before connecting to machine to remove any debris that could clog
the water valve screens. NOTE: Make sure water supply shut-off
valves are easily accessible.
IMPORTANT: Water pressure MUST be within the range of
values indicated in Specifications.
Two inlet hoses are provided with the machine. Hot water hose has
red stripe running the length of the hose. Insert washer/filter (Fig. 5A)
before connecting water inlet hose to valve. Check that other end of the
hose is tight
IMPORTANT: Remove all
shipping bolts/spacers/
grommets before using
the washer/dryer to allow
proper operation and
prevent damage to the
appliance.
Once the machine is in its
installation location, remove
the four locking 10mm bolts
and plastic spacers (Fig.1A).
If plastic spacers cannot be
removed, open rear panel (20
Fig. 1A
torx) screwdriver as shown in Fig
1B, remove spacers and replace
the panel.
Connect to faucet (Fig. 5A).
(Fig. 5B).
Connect to machine
NOTE: connect fill hoses, plastic end to machine AND metal end to
water faucet.
IMPORTANT: Do not over-tighten.
Excessive force can damage the
couplings. Tighten by hand; use a
tool only in case of a leak.
Keep bolts, shipping bolts,
spacers and grommets for future
use.
Plug holes with four plastic plugs
enclosed packed with manual
(Fig. 2)
Turn on water supply (Fig 5C).
Remove power cord restraints
before plugging in machine.
4
Flush out water lines before connecting the hoses to machine.
Fig. 1B
CUSTOMER CARE CENTER 800.898.1879 www.askousa.com
I N S TA L L AT I O N I N S T R U C T I O N S
4. Water Drainage
7. Turn on water supply.
Water may be drained into a sink, drainpipe or standpipe. To prevent
siphoning, do not seal drain hose into drain outlet.
Check for leaks at water faucet and
machine before proceeding. Be sure
the water taps are on before starting.
Wall or Floor Standpipe Drain System - The top of the standpipe
must be between 23” (60 cm) - 35” (90 cm) from the bottom of the
washer.
You should securely attach drain hose to keep water pressure from
allowing hose to come loose and leak on the floor.
A
8. Prepare Washer/
Dryer for Use
Before using washer/dryer,
read owner’s manual
thoroughly. Save all instructions
for future reference.
Wipe inside and outside of washer/dryer with a damp
cloth before running to remove any dust or debris.
MIN.
MAX 60 CM
.90
CM
5. Level Washer/Dryer
The front and rear legs may be screwed /unscrewed to level the
machine. To access legs, tilt machine backwards until it rests against
wall or other stable structure. Adjust legs up or down until washer is
stable and does not rock front-to-back or side-to-side when upright.
Once machine is level, tighten locknuts.
Run your empty washer/dryer through a complete wash
cycle before washing clothes. Check for water leaks and
proper operation during this
test run.
ASKO denies all liability if instructions are not followed
correctly.
IMPORTANT:
For best
performance,
washer/dryer
must rest solidly
on a sturdy floor
or platform, with
minimum vibration.
6. Connect to electric power
Plug power cord into grounded outlet only (see Grounding Instructions
on page 3 for complete details). Be sure power is OFF at fuse box/
circuit breaker before plugging in machine for the first time. Plug cord
into outlet and turn power on at circuit breaker.
NOTE: Remove four
(4) shipping bolts
prior to plugging
machine into
electrical outlet.
Do not cut power
supply cord!
5
CUSTOMER CARE CENTER 800.898.1879 www.askousa.com
INTRODUCTION
Thank you for choosing ASKO!
Important Safety Information
Your new ASKO washer/dryer uses less energy and space while
providing outstanding washing and drying performance. The ingenious
combination of style and technology will give you years of safe,
reliable service.
ASKO complied with the highest international safety
regulations when designing and manufacturing your washer/
dryer. For your safety, however, please carefully follow all
precautions within this manual in order to minimize any risk
of fire, electric shock, property damage, personal injury or loss
of life
Read Instructions Carefully
This manual includes instructions for installation, use and care of your
new ASKO washer/dryer combination. Take a few minutes to read
through these instructions – learning to properly use your machine
can save you time and money. The enclosed Quick Start Guide should
be kept near your machine for easy, convenient reference.
If you have questions or need assistance, call our Customer Care
Center at 800-898-1879.
Record Model and Serial Numbers
For future reference, write down your model number and serial
number, found inside the door of your machine.
• Read all instructions before using this appliance.
• Do not run washer/dryer while you are not at home.
• Do not wash or dry articles that have been previously cleaned,
washed, soaked or spotted with gasoline, dry cleaning solvents,
cooking oils or other flammable or explosive substances, because they
give off vapors that could ignite or explode.
• Do not allow children to play on or in washer / dryer. Supervise
children whenever appliance is in use.
• Before removing appliance from service or discarding appliance,
remove the door to washing/drying compartment.
• Do not reach into appliance while drum is moving.
Model _________________________
Serial __________________________
Date of Purchase _________________
• Do not install or store appliance where it will be exposed to the
weather.
• Do not tamper with controls.
• Do not attempt to repair or replace any part of the appliance unless
specifically recommended in the user instructions or in published
user-repair instructions that you understand and are qualified to carry
out. Call ASKO to locate a qualified repair technician near you.
• Do not add dry cleaning solvents, gasoline or other flammable or
explosive substances to the wash water. These substances give off
harmful vapors that can catch fire or explode.
• Do not heat-dry items containing foam rubber or similarly textured
rubber-like materials, fiberglass and wool (unless specified “washable”
on label).
• Do not heat-dry items that have been dry-cleaned.
• Do not place flammable substances around your washer/dryer
during operation.
• If a hot water system has not been used for 2 weeks or more, under
certain conditions, hydrogen gas may be produced. HYDROGEN GAS
IS EXPLOSIVE. To release any accumulated hydrogen, turn on all hot
water faucets and let the water flow from each for several minutes.
• In case of water break or rupture, turn off water faucets to relieve
pressure on hoses and valves and to minimize leakage.
• Have machine interior cleaned by qualified service personnel
periodically.
• When emergency service is required, unplug machine or turn off
power to washer at the circuit breaker/fuse box.
• Make sure drum is empty before loading washer.
• Do not dry feather or down bedding
6
CUSTOMER CARE CENTER 800.898.1879 www.askousa.com
About Your Washer/Dryer
Your New Appliance
Your ASKO washer / dryer is a front-loading machine with a quality
stainless steel tub, a vent-less condenser dry system, a 1200 RPM
maximum spin speed and 140 minute Dry Time knob. It features 4
wash temperatures, 9 wash programs and many other convenient
features such as:
Features
Fabric Care System
The gentle tumble action of your front-loading washer results in
cleaner clothes with less wear and tear – and you can put delicate
fabrics in the washing machine instead of hand-washing them. Tumble
action also uses less water and detergent than conventional washers.
In addition to the better wash action, your ASKO washer has an
internal heater to boost temperatures to 140°F (60°C) for improved
stain removal. After the clothes are clean, ASKO spins them dry at
speeds up to 1200 RPM, which saves time and energy in the dryer
and extends the life of your clothes. Your ASKO washer/dryer also has
a reversing tub to keep clothes moving freely, to speed drying and
reduce wrinkles.
ENERGY STAR® Rated
As the U.S.-government-backed, trusted symbol for energy efficiency,
the ENERGY STAR label identifies highly efficient products and
superior energy performance.
Load Management System
To keep your washer on an even keel, ASKO introduces the load
management system. The WCAM 1812 features a four shock absorber
suspension to reduce vibration when the washer spins. A castaluminum cradle supports the tank and evenly distributes the weight
of the clothes.
Easy to use controls
Your ASKO laundry appliance has easy-to-use controls with familiar
program names and convenient wash/dry options.
Coin trap
Your ASKO washer/dryer has a coin trap to keep small objects from
blocking the pump. A small door on the front of the washer allows you
to empty items, such as coins, to prevent the pump from jamming.
Water control system
The water system measures how much water is needed for each
load. You never have to select the water level, because the washer
automatically uses the right amount.
Quiet package
The ASKO washer/dryer features a package for quiet performance.
The top holds in noise; the washer’s drain pump is at the rear of the
machine to reduce sound; the suspension system reduces vibration
and minimizes noise.
Work top surface
The triple-layer DuraTech™ top locks in noise and provides a
convenient surface for folding clothes or other laundry tasks.
Complies with ADA accessibility guidelines
(Americans with Disabilities Act)
The ASKO washer/dryer fits easily into any standard American cabinet
opening. All ASKO units are ADA height-compliant for convenient
wheelchair access. For your convenience, your ASKO washer/dryer
has controls on the front, making them easy to reach.
Internal (vent-less) condenser
Your ASKO washer/dryer uses a condenser dryer, so doesn’t need a
vent to the outside like a traditional dryer. Instead, the washer/dryer
conveniently drains water through the drain hose. This makes it ideal
for installation in closets, older homes without vents, RVs and marine
applications.
Cool down program
Your ASKO dryer finishes with up to a 20-minute cool-down program
to reduce wrinkles and decrease wear and tear on clothes. When you
take your clothes out of the dryer, they are dry but not hot.
7
CUSTOMER CARE CENTER 800.898.1879 www.askousa.com
G E T T I N G S TA R T E D
G Start Button
E Prewash Button
F Extra Rinse Button
Understanding the Control Panel
On/Off Button (A)
Press this button to turn the main power to the machine on or off.
When the power is on and the Program Knob is on the Stop position,
the Start (G) button flashes.
D Drying Time Knob
B Program Knob
PRE-WASH / WASH
RINSE
SPIN
Program Knob (B)
DRY
Refer to the table on pages 11-12 to determine the right program for
your current wash load. Turn knob to select correct program.
STOP
Stop Position
To stop the machine after starting a program, turn the Program Knob
to the Stop position. When you interrupt a program by turning the dial
to Stop, the door lock remains engaged for a two-minute safety delay,
after which you may open the machine door. To restart the machine,
reposition the Program Knob and press Start (G).
If you wish to use the drying function only, turn Program Knob to dry
and set the drying time with the Drying Time Knob.
Note: Before starting a program, the machine will drain
any water already in the machine, so you may need to add
detergent before you press Start (G).
Cycle Indicator Lights (C)
The light indicates progress of the wash/dry cycle as it occurs.
When the Stop light glows, the program is complete. After a twominute delay, the door lock will release so you can open the door.
Drying Time Knob (D)
Set knob to the number of minutes you wish to dry the load. See
page 11 for recommended dry times. To prevent over-drying and
damage to sensitive fabrics, start with a shorter time and add time
until the load is dry. To use the dry function only, turn Program Knob
to dry, set Drying Time Knob to number of minutes desired and press
Start (G).
8
CUSTOMER CARE CENTER 800.898.1879 www.askousa.com
A On/Off Button
C Cycle Indicator Lights
Pre-wash Button (E)
(A)
(C)
For heavily soiled items, press this button
to run the pre-wash cycle. Be sure to put
detergent in the pre-wash compartment of (E)
the detergent drawer. The button glows while
the pre-wash cycle option is on.
Note: Pre-wash cannot be used with any
Delicate program.
Extra Rinse Button (F)
Select this option to add one or two extra
rinse cycles. The Extra Rinse Button glows
when the option is on. See pages 11-12 for
information regarding the number of rinse
(F)
cycles added to various programs when you
select this option. Recommended for those
with soft water or detergent allergies. Note:
Option not available with Quick Wash, Spin,
and Dry programs.
Start Button (G)
Once you have set the wash program,
drying time, and pre-wash or extra rinse
options, press this button to start the
program.
(G)
G E T T I N G S TA R T E D
Preparing your Laundry
Separate Fabrics and Pre-treat
Ensure the best wash/dry results by preparing your laundry before
you wash. Read and follow guidelines on fabric labels. Separate
laundry by fabric type, color and fabric care instructions.
• Fasten all hooks, zippers and buttons to prevent snags and pulls.
Pre-washing Cycle, use 1-2 teaspoons of detergent depending on
soil level of load. Low-suds detergents designed for front-loading
machines, such as ASKO’s own ecoVantage™ Laundry Detergent, are
recommended.
Adjust amounts for heavily or lightly soiled garments. Use more in
hard water; less in soft water. Pre-treated garments may require little
to no additional detergent.
• Tie strings, sashes, etc., and remove any non-washable trims, belts
or buckles.
• Empty pockets of garments.
ecoVantage™ Laundry Detergent
• Pre-treat stained or heavily soiled items.
For best results with your ASKO combination washer/dryer,
use ecoVantage HE (high efficiency), low-sudsing laundry
detergent. It’s the only laundry detergent that
has an oxygenated cleaning agent in a perfume & dyefree (sensitive) formula. Order ecoVantage by calling
800-898-1879 or go online at www.askousa.com.
• Put any delicate items – bras, shoulder pads, tights, hosiery, and
underwear – in mesh laundry bag to prevent tangles.
• Mend any torn items to prevent further damage.
Pre-washing
For excessively soiled clothes with embedded dirt, such as work
clothes or children’s play clothes, use the pre-wash option and / or
heavy stain program. Add the appropriate amount of HE* powdered
laundry detergent to section #1 of the detergent dispenser.
Pre-treating
Use a pre-wash spray or stick, HE* liquid laundry detergent or
HE* powdered laundry detergent water/paste mixture on stains
before washing. See Stain Removal Chart, pg. 10, for specific stain
treatments.
Choosing Laundry Aids
Laundry Detergent
The ASKO washer/dryer gets fabrics clean with smaller amounts of
HE* laundry detergent. If you are used to a top-loading washer, use
less detergent for wash loads.
Amount: Use 1 – 2 Tablespoons of (HE*) powdered laundry detergent,
or the equivalent amount of high efficient (HE) liquid detergent. For
Liquid Fabric Softener
Using fabric softener in the dispenser section (#3) helps items release
from the drum after the spin cycle, helping clothes dry faster and
wrinkle less.
Amount: Use 1-2 tablespoons per wash load of a bio-friendly brand.
These softeners dissolve quicker and minimize build-up in the
machine.
Adjust amounts for heavily or lightly soiled garments. Use more in
hard water; less in soft water.
Note: Never exceed the recommended amount of liquid fabric
softener and do not use fabric softener sheets. Doing either
could cause damage to fabrics, your washer/dryer and impair
wash results.
Bleach
Using liquid chlorine bleach is not recommended with the ASKO
laundry products washer/dryer. However, for difficult-to-remove
stains, use only non-chlorinated bleach (powder only). Mix
approximately 1-2 teaspoons of non-chlorinated powdered bleach
with powdered HE* detergent in section #2 of the detergent
compartment
* HE = high efficient, low sudsing laundry detergent.
9
CUSTOMER CARE CENTER 800.898.1879 www.askousa.com
G E T T I N G S TA R T E D
UNDERSTANDING FABRIC CARE LABELS
Garment labels contain important washing and drying instructions, often using small symbols. This table will help you interpret these
symbols for better wash results and machine performance.
Machine Wash Cycle
Normal/Cotton
Heavy Duty
Permanent Press/
wrinkle resistant
•••
Water Temperature
••
Hot (50oC/120oF)
Hand wash only
Delicate/Gentle
Warm (40oC/105oF)
Do not wash
Do not wring.
Hang dry, drip dry or dry flat
•
Cold/Cool (30oC/85oF)
Tumble Dry
Dry
Normal/Cotton Permit Press/
Heavy Duty
wrinkle resistant
Delicate/
Gentle
Do not
tumble dry
Do not
dry
Special Instructions
Line dry/ hang to dry
Drip dry
Dry flat
In the shade
Bleach Symbols
Any bleach
Only non-chlorine bleach
(when needed)
Do not bleach
STAIN
TREATMENT
Adhesive tape, chewing gum, rubber
cement
Apply Ice. Scrape off excess. Place stain face down on paper towels. Saturate
with prewash stain remover or nonflammable dry cleaning fluid.
Beverages (coffee, tea, soda)
Pretreat stain, Wash using cold water.
Blood
Rinse w/cold water. Rub or pretreat or soak with product containing enzymes.
Collar or cuff soil, cosmetics
Pretreat with prewash stain remover or rub with bar of soap.
Dye transfer on white fabric
Use packaged color remover.
Ink
Some inks may be impossible to remove. Washing may set some inks. Use
prewash stain remover, denatured alcohol.
Mildew, scorch
May be impossible. Soak in oxygen bleach and hot water before washing.
Mud
Brush off dry mud. Pretreat or soak with product containing enzymes.
Paint, varnish
WATER BASED: Rinse fabric in cool water while stain is wet. Wash. Once paint
is dry, it cannot be removed. OIL BASED AND VARNISH: Stain should never be
washed in your machine.
Perspiration
Use pre-wash stain remover or rub with bar soap. Rinse. Wash in hottest water
safe for fabric.
Rust, brown or yellow or discoloration
SPOTS: use rust remover safe for fabric. DISCOLORATION OF ENTIRE LOAD:
use phosphate detergent.
10
CUSTOMER CARE CENTER 800.898.1879 www.askousa.com
G E T T I N G S TA R T E D
WASH & DRY PROGRAMMING
PROGRAM
LOAD SIZE
MAIN WASH
RINSES
SPIN
DRY
REGULAR
HEAVY STAIN
HALF
65 MIN
30 MIN
7 MIN
120 MIN
WHITES
HALF
51 MIN
27 MIN
11 MIN
100 MIN
COLOR FAST
HALF
51 MIN
37 MIN
11 MIN
100 MIN
COLOR
HALF
42 MIN
37 MIN
11 MIN
100 MIN
SYNTHETICS
HEAVY STAIN
HALF
31 MIN
26 MIN
11 MIN
100 MIN
COLOR FAST
HALF
22 MIN
35 MIN
11 MIN
60 MIN
COLOR
HALF
20 MIN
45 MIN
11 MIN
60 MIN
DELICATES
WOOL/HAND WASH*
HALF
32 MIN
24 MIN
8 MIN
N/A
QUICK WASH
HALF
15 MIN
24 MIN
8 MIN
60 MIN
* When setting the dry time for the Wool/Hand-wash program the dryer will not go into dry automatically. For dry only loads follow the dry times noted above.
LOAD EXAMPLES - 7.5 LBS. (Half Load)
1. Denim load 5 items
1 Blouse
1 Dress
2 HOURS DRY TIME
Regular Program has a cool down of 20 minutes at the end of the dry
cycle.
3 Pair Blue Jeans
2. Bath towels 5 towels 48” x 29”
2 HOURS DRY TIME
Dry times will vary with load sizes, however these items are the
heaviest items to dry and are a good barometer.
3. Bedding 5 items
1 King Fitted Sheet
2 King Pillow Cases
2 Perma Press shirts or blouses
Dry Time can be set up to 140 minutes. The total time of dry will
depend on the size and type of load being washed and dried.
2 HOURS DRY TIME
(For best results wash and dry the flat and fitted sheets separately to
minimize tangling of the fabrics.)
CUSTOMER CARE CENTER 800.898.1879 www.askousa.com
Synthetics program has a cool down of 10 minutes at the end of the
dry cycle.
Wool/Hand wash has no dry capability. These garments should be
either hung to dry or laid flat on a clean, smooth surface.
* Load sizes and dry times are approximate. Your results might vary
based on fabric type and load size.
11
G E T T I N G S TA R T E D
WASH ONLY PROGRAMS
EXTRA RINSE BUTTON
PRE-WASH BUTTON
This button sets the program to add one or two rinse cycles. The
button will glow when this option is on. See the Wash Program table
below for an explanation of the number of rinse cycles added to each
program.
Be sure to put detergent in the pre-wash compartment of the
detergent drawer. The button glows while the pre-wash cycle option
is on.
For heavily soiled items, use the pre-wash cycle. Be sure to put
detergent in the pre-wash compartment of the detergent drawer. The
button glows while the pre-wash cycle option is on.
Three rinses are usually sufficient, but if you live in an area with very
soft water or you are allergic to detergent, you may want to use this
option.
Note: Pre-wash cannot be used with any Delicate program.
This option is only available in the Regular and Synthetics Cycles.
The table below defines each wash program in detail to help you determine which program is best for each type of load. Load size is for wash only!
PROGRAM
TEMP
SOIL
LEVEL
FABRICS
LOAD SIZE
(1)
OPTIONS AVAILABLE
PROGRAM DESCRIPTION
SPIN
SPEED
PREWASH
EXTRA RINSE
REGULAR
HEAVY STAIN
(2)
HOT
HEAVY
COTTON, LINENS
FULL
LONG MAIN WASH, 3
RINSES, DRAIN & SPIN
1200
YES
2
WHITES
HOT
HEAVY
COTTONS, LINENS,
BLENDS SYNTHETICS
FULL
MAIN WASH, 3 RINSES,
DRAIN & SPIN
1200
YES
2
WARM HEAVY
COTTONS, LINENS,
BLENDS SYNTHETICS
FULL
MAIN WASH, 3 RINSES,
DRAIN & SPIN
1200
YES
2
COLD
COTTONS, LINENS,
BLENDS SYNTHETICS
FULL
COTTONS, LINENS, BLENDS
SYNTHETICS
1200
YES
2
COLOR FAST
COLOR
LIGHT
SYNTHETICS
HEAVY STAIN
HOT
HEAVY
COTTONS, LINENS,
BLENDS SYNTHETICS
HALF
LONG MAIN WASH, 2
RINSES, DRAIN & SPIN
800
YES
1
COLOR FAST
WARM
LIGHT
COTTONS, LINENS,
BLENDS SYNTHETICS
HALF
MAIN WASH, 2 RINSES,
DRAIN & SPIN
800
YES
1
COLOR
COLD
LIGHT
COTTONS, LINENS,
BLENDS SYNTHETICS
HALF
MAIN WASH, 2 RINSES,
DRAIN & SPIN
800
YES
1
DELICATES
WOOL/HAND
WASH (3)
WARM
LIGHT
MACHINE-WASHABLE
WOOL AND SILK, NYLON
ONE-THIRD
HIGH-WATER LEVEL WASH, 3
RINSES, DRAIN, GENTLE SPIN
550
N/A
1
QUICK WASH
WARM
LIGHT
LIGHTLY SOILED,
NORMAL FABRIC
FULL
HIGH-WATER LEVEL WASH, 2
RINSES, DRAIN, GENTLE SPIN
1200
N/A
N/A
SPIN
N/A
N/A
COTTONS, LINENS,
BLENDS SYNTHETICS
FULL
DRAIN 7 INTENSIVE SPIN
1200
N/A
N/A
START BUTTON
NOTES:
After you have set the program, prewash or extra rinse option, press
this button to start the program.
(1) For an explanation of the recommended load sizes, see page 11.
(2) When you select the Heavy Stain program, the unit heats the water
to 140˚F for the main wash for improved stain removal performance.
(3) The Wool/Hand Wash program has an 550 rpm spin speed to
eliminate stress on delicate fabrics.
12
CUSTOMER CARE CENTER 800.898.1879 www.askousa.com
O P E R AT I O N I N S T R U C T I O N S
Load types and sizes
A different kind of machine
In some ways, using your ASKO washer/dryer is much different than
using traditional, separate laundry products. First, the load sizes will
be smaller, since both washing and drying occur in the same drum.
The wash cycle is about the same as a traditional washer, but drying
times will be longer. You will become accustomed to doing smaller,
more convenient loads of laundry instead of doing bulkier loads less
frequently.
Using the Detergent Dispenser Drawer
The dispenser drawer has 3 compartments, for (1) pre-wash, (2) main
wash and (3) fabric softener as shown (Fig. 9). The machine automatically
dispenses the detergent and softener at the proper times in the cycle.
To load the dispenser, simply pull out the drawer and add the appropriate
amounts of HE powdered detergent and liquid fabric softener into the
compartments noted above. Do not add detergent to the pre-wash
compartment unless you are using a program with a pre-wash cycle.
Otherwise, the machine may over-suds and spill onto the floor.
Choosing drying times and load sizes
2
1
Drying times depend on fabric dampness and the size and type of the
load. Jeans, towels and other thick fabrics take longer to dry.
For the condenser dryer to operate properly, items must be able to
tumble freely in the drum. If you overload the drum, your laundry will
not dry properly. In general, if your dry time is more than 140 minutes,
reduce the load size.
Tips for best results
Use a combination of small and large items to make a full load. Rather
than washing a single towel, sweater or pair of jeans, add a few
similar items to balance the load. Single, heavy items such as a terry
bathrobe may be washed separately.
3
Fig. 9
Cotton and linen fabrics should be washed in full loads while using the
“wash only” mode. When using the “wash / dry” mode, the capacity
should always be at half load or less.
Permanent press fabrics need more room to move freely during
washing; fill the machine half full for best results on permanent press
items.
Delicate fabrics, such as machine washable wool and silk, should be
washed in one-third sized loads for best results.
Fig. 9 A
Do not use the machine to wash torn, frayed or linens with raw hems.
If such items must be machine-washed, place in a mesh bag for
protection.
NOTE: When using a liquid detergent, insert the special container
supplied with the washer into the main wash compartment (Fig 9a).
Pour the manufacturer’s recommended dosage of HE liquid detergent
into the container (Fig 9b). Close detergent dispenser (fig 9c).
Do not wash whites and colored linens together. Do not machine-wash
rugs that could come apart and clog the pump of the machine.
Fig. 9 B
Turn colored and printed t-shirts and sweatshirts inside out before
washing to make them last longer. Always iron such items inside out.
After loading clothes and detergent
Protect delicate underwear, tights, stockings and other fragile
garments by putting in a mesh laundry pouch to wash and dry.
2. Close washer door securely
Overalls have straps with hooks that can damage your washing
machine and other garments during the wash/dry cycle. Minimize risk
by placing hooks in pockets and secure with safety pins.
4. Press Start
NOTE: You will become accustomed to the best methods the
more you use your new ASKO washer/dryer product. It would
be better to start with smaller loads and amounts of detergent
which you can adjust over time.
Fig. 9 C
1. Close detergent drawer
3. Set wash / dry programs
Fig. 9 D
13
CUSTOMER CARE CENTER 800.898.1879 www.askousa.com
O P E R AT I O N I N S T R U C T I O N S
Cleaning the Detergent Dispenser Drawer
When detergent builds up in and around the drawer, remove the
drawer by pressing on the plastic part of the softener compartment
marked “PUSH” (Fig. 10A). Place under running water for a few
minutes to remove buildup. Clean and wipe out the area around the
dispenser with a damp cloth before replacing the drawer.
Operation
Using Your Washer/Dryer
Operating your ASKO washer/dryer correctly affects your wash and
dry quality and extends the life of the machine. Before using the
washer/dryer, make sure you are familiar with the proper load sizes
(See Load Types and Sizes, pages 11-12).
Add detergent and fabric softener according to directions (see Using
the Laundry Aid Dispenser, page 13), then check to make sure that:
• Detergent drawer is completely closed
• Plug is securely in the electrical outlet
• Water supply is on
• Machine door is closed securely
To start the Wash / Dry Program:
Press On/Off button.
Set Wash Program Knob to the desired program for your current load
(see Guide to Wash Programs, pages 11-12).
Turn Drying Time Knob to desired number of minutes. (See Wash and
Dry Programs, page 11)
Select options for Pre-wash or Extra Rinse if desired.
Fig. 10A
Add appropriate amounts of HE detergent and fabric softener into
dispenser.
Press Start to begin the cycle.
Note: For more information on correct use of controls, see
Understanding the Control Panel, page 8.
To start the Wash only program:
(see wash only programs, page 12)
Follow steps above, leaving Drying Time Knob set to 0.
Tips
Do not use liquid detergent for pre-wash because the detergent will
wash out of the drawer. Use only (HE) powdered detergent in the prewash compartment.
Use low-suds high efficient (HE) detergent made for front-loading
washers. For HE detergents, use only 1 – 2 tablespoons. Too much
detergent can leave residue on your clothing and damage the washer/
dryer.
Do not use hand-washing detergent, as it may foam too much and
damage your machine.
Do not over use Fabric Softener. Use 1 to 2 tablespoons only!
Reduce the amount of detergent for cold water washing, as it
dissolves less easily in cold water.
Note: At end of program, door lock remains engaged for 2 minutes,
after which you can open the door.
To start the Dry only program:
(see wash only programs, page 12)
Turn Wash program knob to Dry position.
Set drying time knob to number of minutes of drying time desired.
Press Start.
Reset Program / Add Garment
To stop the machine after a program has started, turn Wash Program
Knob to Stop. To restart the program, reposition the Wash Program
Knob and
press Start.
TO ADD A GARMENT
Do not exceed recommended amounts of detergent and softener, as it
will result in poor washing, rinsing, and drying efficiency.
• TURN PROGRAM KNOB TO STOP
For (HE) liquid detergent use, refer to page 13.
• WAIT 2 MINS FOR THE SAFETY DOOR CATCH TO RELEASE
• ADD YOUR GARMENT (continued on next page)
• CLOSE DOOR SECURELY
14
CUSTOMER CARE CENTER 800.898.1879 www.askousa.com
O P E R AT I O N I N S T R U C T I O N S
• ADD ADDITIONAL DETERGENT AND FABRIC SOFTENER INTO
DISPENSER IF NEEDED.
Interior cleaning
• CLOSE DETERGENT COMPARTMENT
• RESET WASH PROGRAM KNOB TO DESIRED PROGRAM
• PRESS THE START BUTTON
Check detergent dispenser, add if needed. Do not attempt to force
open the door while the door lock is engaged. The door remains
locked for approx. two minutes after the wash/dry program finishes.
If you use a non-phosphate laundry detergent, you may need to clean
buildup and oils from the inside of the washer periodically, especially if
you live in an area with hard water. To remove buildup, run the washer
through a complete hot water cycle (Heavy Stain or White setting)
with no clothes, detergent or other laundry aids added. If desired,
add 2 cups of water conditioner or de-liming agent to the detergent
dispenser.
Use “Quick Wash” to wash loads of lightly soiled items in less time.
General care of the machine
Do not use dryer for clothes that have been cleaned with chemical
solvents or flammable cleaners. Dry only clothes that have been
washed in water.
Never use solvents or abrasives to clean the external parts of the washer/
dryer.
Do not use dryer for foam rubber or similar synthetic items. Do not
use for feather or down bedding.
Do not use fabric softener sheets. Use liquid fabric softener during
the wash cycle for best results for a complete wash/dry cycle.
Unplug the machine if you will be gone for a period of time or the
machine will not be used.
Clean the detergent drawer periodically (see Cleaning Dispenser, pg. 13).
Always unplug the machine during cleaning or maintenance.
After you remove your laundry,
leave door open for a few
minutes to allow air to circulate
inside the tub and avoid odors.
Do not use too much detergent or other laundry additives, as excessive
amounts could over-suds and damage your washer/dryer.
Before moving the washer/dryer to a new location, reattach shipping
bolts, spacers and grommets that were removed during installation (see
page 4).
Taking Care of your
Washer/Dryer
Exterior cleaning
Wipe the outside of your
machine with a damp, soapy
cloth. Do not use harsh
chemicals or abrasive items to clean plastic parts.
Water supply should be turned off when not in use.
FIG 12
Coin Trap cleaning
Clean the coin trap at least four
times a year. Be sure unit has
drained before opening trap
door.
• Place towel or pan under
trap door (Fig. 12) to catch any
water.
• Remove trap by turning it
slowly counterclockwise until
water appears. (Fig. 13).
FIG 13
• Empty water through coin trap.
Pull coin trap straight out and
clean.
• Replace coin trap and turn
clockwise until secure (Fig. 14).
Gently tug cap to confirm that
trap is secure.
FIG 14
15
CUSTOMER CARE CENTER 800.898.1879 www.askousa.com
TROUBLESHOOTING
Is using a ASKO combination washer/dryer
different than a traditional “stand-alone”
washer and dryer?
Check Coin Trap for obstructions, clean and reinstall. (page 5)
Yes. In a ASKO combination laundry product, you wash / dry in the same
tub. Cycle times will be longer and overall load sizes will be smaller.
Wash cycle times are similar, but because combination washer / dryer
products operate using a standard household electrical supply (120V vs.
230V), dry times are longer and capacity is reduced by 50% when using
the dry program. The overall convenience of this laundry solution far
outweighs the need to manage your laundry requirements with smaller,
more frequent laundry loads.
Washer/dryer vibrates and is noisy
Most issues with your washer/dryer can be
solved without a technician. Before calling
for service, check the following.
For your safety, door remains locked for approx. two minutes after
completion of a wash/dry program.
Machine Runs Too Long
Never overload the tub! The rule of thumb for efficient drying is a laundry
load that represents a half load (7.5 lbs) of the tub capacity (15 lbs).
Your machine is a combination washer/dryer and depending on load
size, fabric, and programs selected, could take as long as 4 1/2
hours to complete the program.
Important note: The dry capacity is one-half (50%) of the wash capacity.
Washer does not work/light is not on.
Press On/Off button
Make sure power supply is securely in electrical outlet
Make sure door is closed securely (press inward on door handle)
Check main power supply and/or house breaker/fuse
Indicator light is on but unit does not work
Make sure door is closed securely (press inward on door handle)
Press On/Off button firmly
Check Program Knob to be sure it is on a program
Press start button
Make sure power supply securely in electrical outlet
Washer does not fill with water
Make sure door is closed securely (press inward on door handle)
Load should be properly balanced for maximum water extraction
Use less detergent or low-suds detergent for front-loading washers
Ensure that shipping bolts, spacers and grommets have been removed
(page 4)
Check that fabrics in tub are not tangled
Make sure machine is level and installed on a secure floor / platform (page 5)
Door will not open
How can I improve drying performance?
Use 1-2 tablespoons of a liquid fabric softener with each load - softer
clothes separate more effectively to allow faster drying with less wrinkles.
Drying times vary based on the type of fabric (heavier fabrics retain more
moisture), the amount of moisture retained in the fabric after the wash
cycle (1200 RPM spin for regular fabrics vs. 800 for synthetic press
fabrics - 550 RPM spin for delicate fabrics) and the size of the laundry
load. DO NOT OVERLOAD THE TUB!
When you remove items after the dry cycle is complete, they may feel
slightly damp to the touch even though they are actually dry. This is a
normal performance characteristic of a condensing dryer product. Remove
items from tub, fluff clothing by shaking gently to allow any humidity to
dissipate before folding or hanging.
Make sure the cold water supply is turned on during the entire laundry (wash
/ dry) program. This product requires cold water to operate the dry program.
Dryer does not dry properly
Reduce load size (page 11)
Check Coin Trap for obstructions, clean and reinstall (page 15)
Check home water supply and pressure
Be sure you use a HE low suds detergent and the proper amount of
fabric softener.
Make sure water faucet to machine is open
Make sure cold water is supplied throughout dry cycle
Check for obstructions in water hoses
If the problem persists, call our Customer Care Center at
800.898.1879 for further assistance. When you call, have the
following information:
Clean inlet filters between valves and water hoses
Washer fills and drains continuously
Make sure drain hose is at correct height (pages 4-5)
If draining into sink, make sure drain hose outlet is not under water
Washer does not drain and spin
Make sure drain hose is in correct position (pages 4-5)
Check for kinks and/or obstructions in drain hose
Clean detergent dispenser, if encrusted with residue or clogged
16
CUSTOMER CARE CENTER 800.898.1879 www.askousa.com
1) Appliance model number
2) Serial number of the machine (located on the inner door facing)
3) Purchase date
Why are soap suds seeping from the
outside door seal or detergent dispenser?
This is referred to as “over-sudsing”. Using proper amounts (1-2
tablespoons) of a low-sudsing, HE “High-Efficiency” powder detergent
and fabric softener to prevent over-sudsing. Over time, over-sudsing
TROUBLESHOOTING
will create a build up in the drying chamber and fan blower with lint
particles, reducing overall drying efficiency, and possibly damaging
your product (page 9).
Liquid detergents (Non-HE) are not recommended because
they produce too much foam, but if you prefer to use a liquid
detergent, do not use more than 1 tablespoon of HE liquid
detergent.
Common Laundry Problems
Your ASKO Washer/Dryer can safely wash and dry most items. Read and
follow fabric care label instructions for best results. Some common laundry
problems can be remedied easily using the suggestions that follow.
Note: You are solely responsible for what you put into your ASKO
Washer/Dryer.
Graying or Yellowing
You may need slightly more detergent for heavily soiled or stained clothes
or if you have hard water.
Old stains may be hard to remove. Treat stains promptly and do not set
stains by drying or ironing fabrics until stains are completely removed.
Excessive wrinkling
Do not overfill machine. Wash synthetic fabrics items in half loads to
minimize wrinkling.
Use the correct wash program temperature setting for fabric type.
Synthetics press items in smaller loads. Do not mix with heavy items
such as towels or jeans.
Snags, tears, excessive wear
Empty all pockets and turn inside out before washing.
Fasten all hooks, snaps and zippers to avoid snags. Remove sharp
buckles.
Wash knits inside out.
Select the hottest temperature recommended for your fabric and wash load.
Do not wash items soiled with harsh chemicals (hair care products,
cleaning solutions, etc.) with towels or other items that can be damaged
by the chemicals.
Pre-wash heavily soiled or stained items.
Mend items before laundering.
Reduce size of load so that wet clothes have room to tumble freely.
Wash synthetics press items in smaller loads. Do not mix with heavy
items such as towels or jeans.
Be sure to use HE laundry detergent, not “soap.”
Install a water filter or use water conditioner weekly if water contains
excessive iron or manganese.
Lint or residue on clothes
Separate clothes that shed lint, such as terry cloth and chenille, from
clothes that attract lint, such as synthetics, corduroy, velveteen.
Use a low phosphate detergent to reduce residue that can appear to
be lint. Install a water softener if possible.
Use fabric softener only as directed, by adding to the softener
compartment of the dispenser drawer. Softeners mixed with detergents
in the wash cycle can leave a white residue (page 13).
To reduce piling, which can look like lint, turn cotton/polyester blend
fabrics inside out and use delicate cycle.
Excessive shrinkage / fabric damage
Where’s the lint filter?
We refer to this feature as a coin-trap. Its conveniently located on
the lower right side of the front panel for easy access. This important
feature prevents any items (coins, pins, etc) left in your pockets from
damaging the drain pump. This coin-trap should be cleaned at least 4
times each year (more often with heavy family use).
Wash & Dry load examples.
With traditional washer and dryer products, the dryer tub is twice
the size of the washer to allow for the clothes to tumble freely. With
your ASKO combination washer / dryer product, you wash and dry
in the same tub (2.5 cu. ft). If you wash a full load (15lbs), you need
to remove half (7.5 lbs) of the fabric before starting a dry program.
When you select the combination mode (wash to dry automatically),
load the tub to accommodate this half load requirement.
Denim load 5 items (half-load)
1 Blouse
1 Dress
3 Pair Blue Jeans
2 HOURS DRY TIME
Fading and discoloration ...use appropriate wash programs
Bath towels 5 towels 48” x 29”
2 HOURS DRY TIME
Wash in cool or cold water to retain dark or bright colors.
Dry times will vary with load sizes, however these items are the
heaviest items to dry and are a good barometer.
Follow garment care label instructions carefully. Make sure fabric is
washed and dried accordingly.
Some garments can be reshaped by ironing after washing and drying.
Separate dark items from light items. Dark clothes, especially cottons,
can bleed into wash water. White and light-colored clothes may absorb
these dyes.
Always empty pockets before washing.
Stains
Select Heavy Stain program for the appropriate fabric type (Normal or
Synthetics). Protein stains such as milk, egg, blood and soy should be
washed in cold water. Oily stains should be washed in the hottest water
safe for the fabric type.
CUSTOMER CARE CENTER 800.898.1879 www.askousa.com
Bedding 5 items
1 King Fitted Sheet
2 King Pillow Cases
2 Perma Press shirts or blouses
2 HOURS DRY TIME
(For best results wash and dry the flat and fitted sheets separately)
* load sizes are estimates. Your results might vary based on fabric type and load size.
17
PRODUCT WARRANTY
Model WCAM 1812
Complete the Warranty Registration Card that came with your
appliance and mail it to AM Appliance Group to validate your
appliance warranty. Report cosmetic damage to your dealer within
five days from date of purchase. Thoroughly check for cosmetic
damage after unpacking the unit.
WARRANTY FOR RESIDENTIAL
INSTALLATIONS:
For Single-Family Residential installations in the continental
U.S. and Canada (excluding Puerto Rico).
• Correct house plumbing, including drainage problems related to
improper installation.
• Clean or service air device in drain line.
2. Repair and/or replacement parts for failure of product if appliance
is used for other than residential use.
3. Damage resulting from accident, fire, floods, acts of God,
alteration, misuse, abuse, improper installation or installation not in
accordance with local electrical or plumbing codes.
4. Any shipping costs for parts during the limited warranty period.
5. Replacement parts or repair labor costs for units operated outside
the continental United States.
Three Year Full Warranty from date of
purchase.
6. Pickup and delivery. ASKO appliances are designed for repair in the
home.
AM Appliance group covers ASKO replacement parts and/or
repair labor to correct defect in materials or workmanship.
Service must be provided by an authorized ASKO service agent.
IN NO EVENT SHALL AM APPLIANCE GROUP
BE RESPONSIBLE FOR ANY INCIDENTAL OR
CONSEQUENTIAL DAMAGES.
Fourth and Fifth Year Limited Warranty
from date of purchase.
AM Appliance group covers ASKO replacement parts (labor costs
not included) for any defective solid-state controls, timers, motors,
or pumps Service must be provided by an authorized ASKO service
agent.
Lifetime Limited Warranty from date of
purchase.
AM Appliance group covers ASKO replacement parts (labor not
included) of the stainless steel tank if it fails to hold water due to a
manufacturing defect, such as rusting or cracking. Service must be
provided by an authorized ASKO service agent.
WARRANTY FOR NON-RESIDENTIAL
INSTALLATIONS:
For Non-Residential installations in the continental U.S. and Canada
(excluding Puerto Rico).
(Apartment, Time Share, Multi-Housing applications)
One-Year Full Warranty from date of
purchase
AM Appliance Group covers ASKO replacement parts and/or repair
labor to correct defect in materials or workmanship. Service must be
provided by an authorized ASKO service agent.
Exclusions to warranty. AM Appliance group will not pay for:
1. Service calls to:
• Correct improper installation of the appliance.
• Repair damage due to shipment, delivery, installation, misuse or
abuse.
• Instruct how to use the appliance.
• Replace house fuses or correct house wiring.
18
CUSTOMER CARE CENTER 800.898.1879 www.askousa.com
Some states will not allow the exclusion or limitation of incidental or
consequential damages, so this exclusion or limitation may not apply
to you. This warranty gives you specific legal rights and you may also
have other rights, which vary from state to state.
For warranty service, contact our Customer Care center at the number
below. Service will be provided during normal business hours. Should
you have a service problem that cannot be resolved locally, contact
AM Appliance Group at the numbers listed below. Before calling
for service or contacting AM Appliance Group regarding a warranty
issue, make a note of the model number, serial number and date of
purchase.
Write to us at:
AM Appliance Group
P. O. Box 851805
Richardson, Texas 75085-1805
www.askousa.com
Or call:
Customer Care Center at
800-898-1879
NOTES
19
CUSTOMER CARE CENTER 800.898.1879 www.askousa.com
CUSTOMER CARE CENTER
800.898.1879
w w w. a s k o u s a . c o m