1
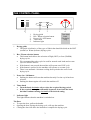
Owner’s
Manual
AUTODRY
CONTENTS
2
2
3
4
4
5
5
6
7
7
8
8
8
Introduction
Installation
The Control Panel
Loading
Step by step operating procedure
Drying Time
Drying Guide
Fabric Hints
Unsuitable Materials
Maintenance
Owner’s Responsibility
Trouble Shooting
Specifications
www.defy.co.za
1
INTRODUCTION
You are now the proud owner of one of the finest and most modern tumble dryers that
today’s technology can produce. You and your Autodry are going to make a great
team together. But first it will pay if you really get to know each other. This book will
tell you all you need to know about your machine, what it will do and how to do it.
Please read all the instructions carefully before operating the machine.
INSTALLATION
Floor Standing
• Remove all packaging.
• The tumble dryer should be placed in a well-ventilated area. If the Dryer is
operated in a confined space, moisture extracted from the clothing during the
drying process will condense on the walls.
• The rear of the Dryer must be free of any restrictions, especially round the fresh
air grille. Do not position the Dryer near any long curtains or drapes as these
could be drawn against the air intake grille. This would result in a much longer
drying time.
• Allow a 100 mm. Air gap at the rear of the Dryer for ventilation purposes.
The appliance must be earthed and the manufacturer and seller do not accept
responsibility for any damage due to incorrect electrical connection.
Electrical
• The dryer is designed to operate on a 230 volt, 50 Hz, 15 Amp, AC power supply.
• The power cord has a 15 Amp moulded plug attached.
• This plug should be pushed into a 15 Amp earthed wall.
• If the power cord should ever need replacing, use only a genuine cord available
from the nearest Defy Service Centre.
2
THE CONTROL PANEL
1
2
1.
2.
3.
4.
5.
3
Drying guide
Hot / Warm selection button
Power ON / OFF button
Timer knob
Indicator light
4
5
Turn timer
knob
Clockwise
only
1.
Drying guide
• The guide is indicative of the types of fabric that should be dried on the HOT
(normal) or Warm (delicate) drying cycles.
2.
Hot / Warm selection button
• This button knob allows the selection of High (HOT) or Low (WARM)
drying cycles.
• We recommend that a hot cycle be used for normal wash loads and a warm
cycle for delicate articles.
• If the button is not pressed the machine will operate on a HOT cycle.
• If the button is pressed in, the machine will operate on a warm cycle.
• There is an automatic 10 minute cooling down period at the end of each
drying cycle.
3.
Power On / Off button
• Pushing the button will start the machine but only if a time cycle has been
selected.
• Pushing the button again will switch the machine off.
4.
Timer knob
• Turn the knob clockwise only to select the required drying period.
• If the required setting is accidentally bypassed, do not turn the knob
back but continue turning clockwise to the desired setting.
5.
Indicator light
This light indicates that the machine is switched on.
The Door
• To open the door, pull on the handle.
• Opening the door, during the drying cycle, will stop the machine.
• Closing the door will allow the machine to complete the drying cycle.
3
LOADING
•
•
•
•
•
•
•
Do not overload the machine. We recommend loading the drum to the halfway
mark. The capacity of the machine is 5kg of spin dried articles.
Do not place dripping wet articles in the Dryer. As much water as possible should
be extracted from them before placing them in the drum.
Clothes should not be loaded in a tangled condition as this will prolong the drying
time. When loading, shake out each article and place it in the drum.
Mix small and large articles for faster more even drying.
It is recommended that synthetic whites and coloured articles are not mixed until
their colourfastness has been established.
Add a few hand towels to act as buffers when drying a very small load.
Blankets and other large items tend to retain a certain position in the drum. To
ensure thorough drying it may be necessary to remove these articles midway
during the drying cycle and reposition them before continuing.
STEP BY STEP OPERATING PROCEDURE
1.
2.
3.
4.
5.
Insert the electrical plug into the wall socket.
Open the door.
Load the clothes into the Dryer as per the previous recommendations.
Close the door. (The Dryer will not operate if the door is open.)
Select the desired heat setting and drying time using the timer knob. Refer to the
drying guide in this book NEVER turn the timer knob to the left. (Anticlockwise)
6. Push the ON / OFF button and the machine will commence with the selected
drying cycle. The machine has a reverse tumble action which reduces creasing,
tangling, knotting and subsequent ironing. This reverse tumble action also
ensures even smooth drying.
7. You may interrupt the cycle to add or remove clothes at any time by simply
pushing the ON / OFF button and then opening the door. The machine will restart
when the door is closed and the ON/OFF button is pushed once more.
8. At the end of the drying cycle there is a cooling down period of about 10 minutes.
This cooling cycle effectively minimises creasing.
9. At the end of the cycle the drum will stop rotating.
10. Push the ON / OFF button. Open the door and remove the dried articles. It is
recommended that this be done soon after the machine has stopped to minimise
creasing.
11. If you have completed the days drying, switch off at the wall socket and remove
the plug to prevent accidental operation.
4
DRYING TIME
•
•
•
No accurate drying time can be quoted as this depends on the makeup of the load,
the dryness required and the amount of moisture present in the articles when
placed in the machine.
Avoid over drying. All fabrics hold a certain amount of natural moisture. Over
drying can result in “hard” clothes, shrinkage and set creases.
Clothes removed from the Dryer when feeling slightly damp, will feel dry when
cooled
DRYING GUIDE
The following table is intended as a guide only. Personal experience will soon tell
what times are required for typical loads. normal load be placed in the drum
when drying these garments.
Fabric
Size of load
Heat selection
Time in minutes
Cotton, Linen and
Toweling
Full
Hot
120 – 150
Synthetics and
Delicates
Full
Warm
30 – 40
*Permanent press
Half
Hot
120 – 150
**Wool
Full
Warm
35 - 95
•
*Permanent press garments should be removed immediately after the drying
cycle is completed and put on a hanger to avoid creases. It is recommended
that half the normal load be placed in the drum when drying these garments.
•
**The drying of woolen garments is not recommended as shrinkage and
distortion may occur.
5
FABRIC HINTS
Always check garment care labels for the manufacturer’s recommendation
Blankets
• Extract most of the water from the blanket before drying.
• Place 2 to 3 towels in the Dryer and allow the Dryer to pre heat for 10 minutes on
a HOT setting.
• Switch to the WARM setting before placing the blanket in the Dryer.
• Remove the blanket while it is still slightly damp.
• Reshape and hang out to dry.
• When dry, brush to raise the nap and press the binding with a warm iron.
Cotton T-shirts and Knit underwear
• Dry only to a slightly damp stage. If these articles are allowed to tumble too long,
the knitted cotton may shrink. This may be corrected by re dampening or by
wearing the article.
Curtains and slip covers
• Remove from the Dryer while slightly damp.
• Iron and hang immediately.
Chenille and candlewick Bedspreads
• Dry only one bedspread at a time.
• Remove as much moisture as possible before placing the bedspread in the Dryer.
• Dry completely.
Lingerie
• Use the WARM setting.
• Remove soon after drying to minimize creasing.
• To avoid tangling, it is recommended that Nylon stockings are enclosed in a
Nylon mesh bag during drying.
Knitted synthetics
• Use the WARM setting.
• Use a dry towel as a buffer.
• As rubbing surfaces may cause small beads to form, it is advisable to turn these
articles inside out.
Corduroy
• Turn inside out.
• Remove while still damp and reshape.
Silks, Dacrons and nylons
• Place in the Dryer separately
• Do not over-dry
6
UNSUITABLE MATERIALS
The following items must NOT be placed in the Dryer as they pose a fire risk.
• Chemically impregnated fabrics such as mops or cleaning cloths saturated with
wax or inflammable solvents.
• Rubber backed articles, rubber boots, and tennis shoes.
• Clothes fitted with foam rubber pads.
• Garments treated with dry cleaning fluid or a combustible solution.
• Durable pleated items other than permanent press.
• Fibre-glass or leather items.
MAINTENANCE
Cleaning the Lint Filter
• The micromesh lint filter assembly is
located at the front of the door.
FILTER HOUSING
• The mesh should be cleaned after each
load to maintain optimum drying
LOCATING SPIGOT
efficiency.
FILTER MESH
• While holding the door closed with one
hand, insert two fingers of the other hand,
into the large central holes of the filter
assembly and pull it free of the
HOLD
locating spigot.
• Gently rub the filter mesh to loosen
and remove accumulated lint and
fluff.
• Locate the assembly in the door
surround and push on the central
button to clip the filter into place
PULL TO REMOVE
PUSH TO INSTALL
over the locating spigot.
Cleaning the rear Air Intake Grille
• The air intake grille, at the bottom rear of the machine, should be cleaned
regularly to maintain optimum drying performance.
• Remove any obstructions and dust the grille off with a soft brush.
Cleaning the cabinet
• The surfaces of the Dryer need very little attention.
• Periodically wipe the inside of the drum and then the outer cabinet with a damp
cloth.
ON NO ACCOUNT USE BENZENE OR OTHER SOLVENTS TO CLEAN
ANY PART OF THE MACHINE.
A DAMP CLOTH WILL NORMALLY SUFFICE OR IF DESIRED
7
OWNER’S RESPONSIBILITY
Since the following are not factory faults, they are the owner’s responsibility.
• Damage to exterior finish.
• Breakage of components
• Damage through improper use or installation of the appliance.
• Damage caused by moving the appliance.
TROUBLE SHOOTING
If you experience a problem with the machine, please check the following before
calling a Service technician. It may seem obvious …..but you may be charged for
a service call, even during the warranty period, if no fault is found.
1.
2.
Check that the cord is plugged in and that the wall switch is on.
Check that there is power to the wall socket by testing the socket with a small
electric appliance such as a kettle in the socket.
3. Check if a house fuse has blown or a circuit breaker has tripped out.
4. Check that the laundry is evenly distributed round the drum.
5. Check that the machine is not over loaded.
6. Check that the dryer door is firmly closed.
7. Check that the timer is not set to ‘0’.
8. Check that the ON / OFF button is pushed in.
9. Check that the lint filter has been cleaned.
10. Check that the air intake grille at the rear of the machine has not been obstructed
by a foreign object.
DO NOT ATTEMPT REPAIRS YOURSELF
SPECIFICATIONS
Dimensions
Height 850 mm
Width 600 mm
Depth 560 mm
Voltage 230V. 50Hz
Heater 1 x 1900W
Motor 275W
Net Weight 35Kg
Capacity 5kg of dry material
The Manufacturer strives for continuous improvements. For this reason, the text and
illustrations in this book are subject to change without notice.
Part Number 063 566
8


![8KG HEAT PUMP DRYER [Met DTD 315]](http://vs1.manualzilla.com/store/data/005851733_1-4b2b64d3b006b4e2563952fefa7cfd52-150x150.png)