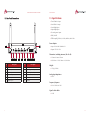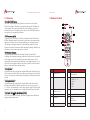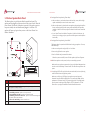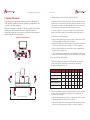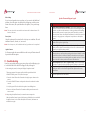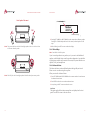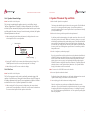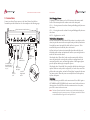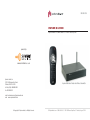
1
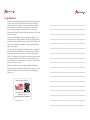
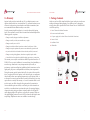
888.880.8992 OWNER’S GUIDE Aperion Intimus 4T Summit Wireless 5.1 Home Theater System powered by: www.summitwireless.com AperionAudio, Audio,Inc. Inc Aperion 18151SW SWBoones BoonesFerry FerryRoad Road 18151 Portland,OR OR97224 97213USA USA Portland, toll-free(USA): (USA):888.880.8992 888.880.8992 toll-free fax:503.598.8831 503.598.8831 fax: email:[email protected] [email protected] email: web: www. www.aperionaudio.com web: aperionaudio.com © Copyright 2011 Aperion Audio, Inc. All Rights Reserved. Intimus 4T Summit Wireless System ® Aperion Audio Home Theater One Wireless Transmitter Installation Guide START HERE © AperionAudio.com | 888-880-8992 | 18151 SW Boones Ferry Road | Portland, Oregon 97224 Congratulations! Thank you for purchasing the Intimus 4T Summit Wireless Home Theater System. You are one of the first in the world to experience the high quality audio and easy setup of truly wireless home theater! While we did our absolute best to eliminate every possible wire, the realities of power had to be considered. So please make sure to plug in your speakers and the Home Theater One Wireless Transmitter to a wall outlet when you get going! Once you've read through this guide and placed your speakers, your Home Theater One Wireless Transmitter is ready to deliver high quality multi-channel audio from Blu-ray players, cable or satellite TV boxes, and game consoles, through an uncompressed, uninterrupted digital signal, right to your speakers. Just turn on the power and your Aperion Audio speakers, coupled with the patented Summit SpeakerFinder™ technology, determine all of the speaker locations and audio channels in your room. Using patented MyZone™ technology, the remote gives you total control over your room by setting the audio sweet-spot with correct volume and phase at the touch of a button! So no matter where you sit, MyZone™ tailors a custom sweet-spot for you, every time. We hope you enjoy the new and wonderful world of wireless home theater! If you have any questions at all, don't hesitate to give us a call at 888-880-8992 and one of our Home Theater Gurus will be happy to help you out. ______________________________________________________________________________ ______________________________________________________________________________ ______________________________________________________________________________ ______________________________________________________________________________ ______________________________________________________________________________ ______________________________________________________________________________ ______________________________________________________________________________ ______________________________________________________________________________ ______________________________________________________________________________ ______________________________________________________________________________ ______________________________________________________________________________ ______________________________________________________________________________ Watch the setup on YouTube! ______________________________________________________________________________ ______________________________________________________________________________ ______________________________________________________________________________ Scan the QR code above with your smartphone, or go to: www.aperionaudio.com/SummitSetup ______________________________________________________________________________ ______________________________________________________________________________ ______________________________________________________________________________ Owner’s Guide Notes Contents ______________________________________________________________________________ 1. Package Contents. . . . . . . . . . . . . . . . . . . . . . . . . . . . . . . . . . . . . . . . . . 1 ______________________________________________________________________________ ______________________________________________________________________________ ______________________________________________________________________________ ______________________________________________________________________________ ______________________________________________________________________________ 2. Home Theater One Wireless Transmitter Features . . . . . . . . . . . . . . . . . 2 3. Home Theater One Wireless Transmitter Connections and Indicators. . . 3 4. Remote Control . . . . . . . . . . . . . . . . . . . . . . . . . . . . . . . . . . . . . . . . . . . 5 5. Wireless Speaker Back Panel . . . . . . . . . . . . . . . . . . . . . . . . . . . . . . . . . 6 6. Installation and Setup . . . . . . . . . . . . . . . . . . . . . . . . . . . . . . . . . . . . . . 7 7. Speaker Placement . . . . . . . . . . . . . . . . . . . . . . . . . . . . . . . . . . . . . . . . 8 8. Speaker Placement Tips and Hints . . . . . . . . . . . . . . . . . . . . . . . . . . . . 11 ______________________________________________________________________________ ______________________________________________________________________________ ______________________________________________________________________________ ______________________________________________________________________________ ______________________________________________________________________________ 9. Connections . . . . . . . . . . . . . . . . . . . . . . . . . . . . . . . . . . . . . . . . . . . . 12 9.1 Example 1: HDMI . . . . . . . . . . . . . . . . . . . . . . . . . . . . . . . . . . . 13 9.2 Example 2: Non-HDMI Video Source . . . . . . . . . . . . . . . . . . . . . 14 9.3 Home Theater One Wireless Transmitter Power Connection . . . . 15 10. Using the System . . . . . . . . . . . . . . . . . . . . . . . . . . . . . . . . . . . . . . . . . 16 10.1 Powering On and Off . . . . . . . . . . . . . . . . . . . . . . . . . . . . . . . . . 16 10.2 Front Panel Display. . . . . . . . . . . . . . . . . . . . . . . . . . . . . . . . . . . 16 ______________________________________________________________________________ 10.3 Selecting a Source . . . . . . . . . . . . . . . . . . . . . . . . . . . . . . . . . . . 16 ______________________________________________________________________________ 10.4 Changing Volume . . . . . . . . . . . . . . . . . . . . . . . . . . . . . . . . . . . . 17 ______________________________________________________________________________ ______________________________________________________________________________ 10.5 MyZone Optimization . . . . . . . . . . . . . . . . . . . . . . . . . . . . . . . . 17 10.6 Menu . . . . . . . . . . . . . . . . . . . . . . . . . . . . . . . . . . . . . . . . . . . . . 17 11. Troubleshooting . . . . . . . . . . . . . . . . . . . . . . . . . . . . . . . . . . . . . . . . . . 20 ______________________________________________________________________________ ______________________________________________________________________________ ______________________________________________________________________________ i Home Theater One Wireless Transmitter 12. Glossary. . . . . . . . . . . . . . . . . . . . . . . . . . . . . . . . . . . . . . . . . . . . . . . . 24 12.1 ASSOCIATE Button . . . . . . . . . . . . . . . . . . . . . . . . . . . . . . . . . . . 24 12.2 Frequency Agility . . . . . . . . . . . . . . . . . . . . . . . . . . . . . . . . . . . . 24 12.3 Speaker Mapping . . . . . . . . . . . . . . . . . . . . . . . . . . . . . . . . . . . . 24 12.4 MyZone™ . . . . . . . . . . . . . . . . . . . . . . . . . . . . . . . . . . . . . . . . . 24 12.5 SpeakerFinder™ . . . . . . . . . . . . . . . . . . . . . . . . . . . . . . . . . . . . . 24 12.6 Linear Pulse-Code Modulation (LPCM) . . . . . . . . . . . . . . . . . . . . 24 13. Specifications: . . . . . . . . . . . . . . . . . . . . . . . . . . . . . . . . . . . . . . . . . . . 25 14. Regulatory Statement. . . . . . . . . . . . . . . . . . . . . . . . . . . . . . . . . . . . . . 26 Owner’s Guide 17. Contact Information Our team of Home Theater Gurus is ready to help you with any question you might have, from setup and configuration of your system to a great Blu-Ray to show off to your friends. If you need to get in touch with us for any reason, we make it easy Email: [email protected] Phone: 888-880-8992 web: www.aperionaudio.com Our Mailing Address: Aperion Audio 15. Important Safety Information . . . . . . . . . . . . . . . . . . . . . . . . . . . . . . . . 27 18151 SW Boones Ferry Road Portland, OR 97224 16. Warranty . . . . . . . . . . . . . . . . . . . . . . . . . . . . . . . . . . . . . . . . . . . . . . . 28 USA 17. Contact Information. . . . . . . . . . . . . . . . . . . . . . . . . . . . . . . . . . . . . . . 29 © 2011Aperion Audio, Inc. Manufactured under license from Dolby Laboratories. Dolby, Pro Logic, and the double-D symbol are trademarks of Dolby Laboratories. Manufactured under license under U.S. Patent Nos: 5,956,674; 5,974,380: 6.226,616; 6,487,535; 7,212,872; 7,333,929; 7,392,195; 7,272,567 & other U.S and worldwide patents issued and pending. DTS-HD, the Symbol, & DTS-HD and the Symbol together are registered trademarks of DTS, Inc.Product includes software. © DTS, Inc. All Rights Reserved. LEGAL NOTICES EVERY EFFORT HAS BEEN MADE TO ENSURE THAT THE INFORMATION IN THIS DOCUMENT IS COMPLETE AND ACCURATE AT THE TIME OF PRINTING; HOWEVER, THE INFORMATION CONTAINED IN THIS DOCUMENT IS SUBJECT TO CHANGE. ©2011 Aperion Audio, Inc. ALL RIGHTS RESERVED APERION AUDIO, INC. CANNOT BE RESPONSIBLE FOR UNAUTHORIZED USE OF EQUIPMENT AND WILL NOT MAKE ALLOWANCE OR CREDIT FOR UNAUTHORIZED USE OR ACCESS. Document Rev: B ii 29 Home Theater One Wireless Transmitter Owner’s Guide 16. Warranty 1. Package Contents Aperion Audio provides a transferable ten (10) year limited warranty on our speaker cabinets and drivers; a transferable one (1) year limited warranty on our electronics in subwoofers, powered speakers and wireless transmitters; and a non-transferable lifetime limited warranty on our cables. Make sure you have all the items listed below. Inspect each piece to make sure nothing was damaged during shipping. If you think any item is damaged or missing, please call an Aperion Audio Home Theater Guru at 1-888-880-8992 so that we may help. No other warranty, implied or otherwise, is created or honored by Aperion Audio. These warranties cover all defects in material and workmanship with the following specific exceptions: • Damage caused by improper installation or adjustment 1. Home Theater One Wireless Transmitter 2. Remote control (with batteries) 3. AC power supply (for the Home Theater One Wireless Transmitter) • Damage caused by accident, unreasonable use, or neglect 4. Owner’s Guide • Damage caused by an act of God 5. Installation Guide • Damage from failure to follow instructions contained in the Owner’s Guide 6. HDMI cable • Damage from repairs performed by someone not authorized by Aperion Audio • Any unit on which the serial number has been effaced, modified, or removed 1 2 • Damage occurring during shipment, other than arranged by Aperion Audio 3 • Units which have been altered or modified in design, appearance or construction This warranty covers only the actual defects within the products themselves. IT DOES NOT cover costs of installation in (or removal from) a fixed installation, or normal set-up, claims based on any misrepresentation by the seller, or performance variations resulting from installation related circumstances such as signal quality, AC power or incompatibilities with other system components. During the warranty period, Aperion Audio will, at its option, either repair the defect, or replace the defective product, or the defective parts, or components thereof with the then current product/component in use by Aperion Audio, at no charge to the owner for parts and labor covered by this warranty. If necessary repairs are not covered by this warranty, or if a unit is examined which is not in need of repair, you will be charged for the repairs and/or the examination. 4 5 6 If non-warranted repairs are needed, we will notify you of the estimated cost and ask for your authorization to perform said repairs. You must pay shipping charges incurred in getting your product to Aperion Audio. We will pay the return shipping charges if the repairs are covered by the warranty. Please save the original shipping cartons as the unit MUST be returned in the original carton and packing. (Replacement cartons are available at a modest charge). 28 1 Home Theater One Wireless Transmitter Home Theater One Wireless Transmitter 2. Home Theater One Wireless Transmitter Features 2.• Summit Home Theater One Wireless Transmitter Features Wireless Technology: • Uncompressed digital wireless surround sound • Summit Wireless Technology: • Speaker Finder -digital automatic speaker detection Uncompressed wireless surround soundand positioning MyZone Finder 1-button optimization • Speaker - automatic speaker detection and positioning • Supported Processing: • MyZone 1-button optimization HDMI version 1.4a with 3D, deep color and x.v.Color •• Supported Processing: DTS-HD Master Audio • HDMI version 1.4a with 3D, deep color and x.v.Color High Resolution • DTS-HD Master Audio Audio Owner’s Guide 15. Important Safety Information • Read and follow all instructions, warnings and cautions when connecting the Home Theater One Wireless Transmitter and speakers. Keep these instructions for future reference. • Do not install near any heat sources such as radiators, heat registers, stoves, or other apparatus (including amplifiers) that produce heat. • Protect all power cords from being walked on or pinched, particularly at plugs, convenience receptacles, and the point where they exit from the Home Theater One Wireless Transmitter and speakers. • DTS DTS-HD High Resolution Audio Dolby TrueHD • DTS • Only use attachments/accessories specified by the Home Theater One Wireless • Dolby Digital TrueHDPlus • Dolby Digital Plus • Refer all servicing to qualified service personnel. Servicing is required when the • Dolby Pro Logic IIx Digital •• Connections: Dolby Pro Logic IIx Three HDMI Inputs and 1 HDMI Output •• Connections: Two Digital Optical/1 Coaxial) • Three HDMIInputs Inputs(1and 1 HDMI Output Audio InputsCoaxial) • Two Stereo Digital Analog Inputs (1 Optical/1 • Two Stereo Audio configurations Inputs • Supports up toAnalog 7.1 speaker • Supports up to 7.1 speaker configurations Transmitter. Home Theater One Wireless Transmitter or speakers have been damaged in any way, such as the power-supply cord or plug is damaged, liquid has been spilled, objects have fallen into them, they have been exposed to rain or moisture, do not operate normally, or have been dropped. WARNING RISK OF ELECTRIC SHOCK. DO NOT OPEN. WARNING: Do Not Open! Risk of Electrical Shock. Voltages in this equipment are hazardous to life. No user-serviceable parts inside. Refer all servicing to qualified service personnel. • This product is intended to be operated only from the AC voltages listed on the back panel of the Home Theater One Wireless Transmitter and speakers. Operation from voltages other than those indicated might cause irreversible damage to the product and void the product's warranty. The use of AC plug adapters is cautioned because it can allow the product to be plugged into voltages in which the product was not designed to operate. If the product is equipped with a detachable power cord, use only the type provided with your product or by your local distributor and/or retailer. If you are unsure of the correct operational voltage, please contact your local distributor and/or retailer. • Only use attachments/accessories specified by the manufacturer. 2 2 27 Home Theater One Wireless Transmitter 3.2 Panel Connections 14.Rear Regulatory Statement The United States Federal Communication Commission has established certain rules governing the use of electronic equipment. 14.1 FCC Certification This device complies with Part 15 of the FCC Rules. Owner’s Guide 3. Home Theater One Wireless Transmitter Connections and Indicators These sections can help you identify the connections and indicators for the Home Theater One Wireless Transmitter, remote control, and wireless speakers. 3.1 Front Panel Display Operation is subject to the following two conditions: The front panel displays a wide variety of system information. During normal operation, the following appears on the front panel display. (1) This device may not cause harmful interference, and (2) This device must accept any interference received, including interference that may cause undesired operation. This device has been tested and found to comply with the limits for a CLASS B digital device, pursuant to Part 15 of the FCC rules. These limits are designed to 12 1 provide reasonable protection against harmful interference when the equipment is operated in a residential installation. This equipment generates, uses, and radiates radio frequency energy and if not installed and used in accordance with the instruction guide, may cause harmful interference to radio communications. Ant 1 Aux 2 2 3 HDMI Out 4 HDMI 1 5 HDMI 2 HDMI 3 Coaxial Optical USB DC + 12V 6 7 8 9 10 11 CAUTION: Any changes or modifications not expressly approved by the party responsible for compliance could void the user’s authority to operate the Item Description Item Description equipment. 1 3 Ant 2 Aux 1 Antenna 1 7 HDMI Input 3 HDMI Output 10 USB Connector (for firmware update) 22 11 Item 3 Description 1 Input Source 2 Detected Speaker Map 3 Input Signal or Surround Mode This radio is compliant with FCC RF Exposure requirements for mobile devices. 2 Aux 1 Input 8 Coaxial Digital Audio Input Users are cautioned to maintain 20 cm from the transmitter to ensure 3 Aux 2 Input 9 Optical Digital Audio Input compliance. 4 5 6 426 CAUTION: Any changes or modifications expressly approved by HDMI Input 1 11 not Power Connector (DC, +12V) the party responsible for compliance could void the user’s authority to HDMI Input 2 12 Antenna 2 operate the equipment. 3 Owner’s Guide Home Theater One Wireless Transmitter Owner’s Guide 13. Specifications 13. Specifications • Three HDMI 1.4 inputs 3.2 Rear Panel Connections • One ThreeHDMI HDMI1.4 1.4output inputs • Coaxial digital One HDMI 1.4input output • Optical Coaxial digital input • Two analog stereo inputs Optical digital input • Dolby TrueHD Two analog stereo inputs • DTS Audio DolbyMaster TrueHD • Audio sampling: 32 KHz, 44.1 KHz, 48 KHz, and 96 KHz DTS Master Audio • Audio sampling: 32 KHz, 44.1 KHz, 48 KHz, and 96 KHz Power Adapter: 12 1 Ant 1 Ant 2 Aux 1 Aux 2 HDMI Out HDMI 1 HDMI 2 HDMI 3 Coaxial Optical USB DC + 12V 2 3 4 5 6 7 8 9 10 11 Item Description Item Description 1 Antenna 1 7 HDMI Input 3 2 Aux 1 Input 8 Coaxial Digital Audio Input 3 Aux 2 Input 9 Optical Digital Audio Input 4 HDMI Output 10 USB Connector (for firmware update) 5 HDMI Input 1 11 Power Connector (DC, +12V) 6 HDMI Input 2 12 Antenna 2 Power Adapter: • Input: AC 100-240V 50/60Hz 0.5A • Output: 12V 1.25A Input: ACDC 100-240V 50/60Hz 0.5A • Output: DC 12V 1.25A Dimensions (excluding antennas) (W x H x D): Dimensions (W x H x D): • 213 mm x (excluding 44 mm x 167antennas) mm • 8-3/8 inches 1-11/16 213 mm x 44xmm x 167inches mm x 6-9/16 inches • 8-3/8 inches x 1-11/16 inches x 6-9/16 inches Weight: Weight: • 1.17 kg (2.58 lbs.) • 1.17 kg (2.58 lbs.) Analog Input Impedance: Analog • 100 kInput Impedance: • 100 k Frequency Response: Frequency Response: • 20 Hz - 20 kHz/±0.5 dB • 20 Hz - 20 kHz/±0.5 dB Signal to Noise Ratio: Signal • -95 to dB Noise Ratio: • -95 dB 25 4 25 25 Home Theater One Wireless Transmitter 12. Glossary Owner’s Guide 4. Remote Control 12.1 ASSOCIATE Button The ASSOCIATE Button puts the speaker in associate mode so the Home Theater One Wireless Transmitter can determine what speaker should be the anchor speaker. This operates much like the Associate button on a wireless keyboard or mouse on computer systems. Only use the ASSOCIATE button on one speaker in a room during initial setup. 1 MY ZONE 11 4 To operate in the U-NII band 5 GHz radio channels, the Home Theater One Wireless Transmitter must be able to detect several forms of government radar signatures, and when detected, automatically change to an unused channel. This automatic changing of channels is called Frequency Agility. The Home Theater One Wireless Transmitter will also automatically change channels if any interference-not just radar-is detected on a channel. ENTER 5 MY ZONE 7 VOL- MUTE VOL+ SOURCE OPT 8 AUX 1 HDMI 1 2 3 AUX 2 COAX The Home Theater One Wireless Transmitter includes SpeakerFinder™ technology. This patented technology enables the system to locate each speaker with extreme accuracy. The map that is generated with this data is used to automatically set the audio channel (Left Front, Center, Right Surround, etc.), set the volume of each speaker based on the listener’s position, and set the audio delay for each speaker based on that position. 9 Item 1 Description MyZone Sensor Item 12.6 Linear Pulse-Code Modulation (LPCM) LPCM is a form of audio encoding. This format is supported over HDMI and supports multi-channel sound. 24 Description 7 Volume Up, Mute, & Volume Down Buttons 2 MyZone Indicator 8 Source Buttons: HDMI 1, 2, or 3 Optical Coax Aux 1 Aux 2 3 A, B, C, and D Function Buttons (not used) 9 Number Buttons (not used) 4 Menu Button 10 Power On/Off Button 5 Exit Button 11 6 Surround Mode Button 12 12.5 SpeakerFinder™ A patented technology integrated into Summit Wireless that automatically determines the location of all of the speakers in the room to an accuracy of +/- 2 inches. This information is used to set the proper signal (Left-Front, RightSurround, etc.) for each speaker and set delay and volume based on distance. 12 6 12.3 Speaker Mapping A patented technology integrated into Summit Wireless that quickly and easily sets the audio sweet spot. MyZone uses ultrasonic technology to precisely find the user’s location, then sets the volume level and delay of each speaker for that location. POWER 3 12.2 Frequency Agility 12.4 MyZone™ 10 2 Up, Down, Left, and Right Arrow Buttons Enter Button MyZone button (see page 16) 5 Home Theater One Wireless Transmitter 5. Wireless Speaker Back Panel Owner’s Guide 8. Pressing MyZone keeps showing “Please Retry.” The following shows a typical Aperion Wireless speaker back panel. The speakers must be plugged-in and powered on for the system to work. When the Home Theater One Wireless Transmitter is powered off, the speakers go into a low-power standby state and should remain plugged in at all times. The speakers will "power up" again when you turn on the Home Theater One Wireless Transmitter. 1 a. Make sure there are no obstacles between the front-left, center, and front-right speaker and the MyZone sensor in the remote control. b. Make sure the remote is pointed at the center speaker when pressing the MyZone button, and keep it pointed at the center speaker until the MyZone operation completes. If there are still issues, replace the batteries in the remote control and try again. c. If your Home Theater One Wireless Transmitter is in the back of the room, for instance if you are using a projector, you will need a IR repeater to use the MyZone functionality. 9. Pressing MyZone keeps showing “Unavailable.” This happens when the system had a difficult time locating your speakers. To correct, follow these steps: 1. Make sure each speaker can physically “see” each other. 2 2. Remove the grill from the center speaker. 3. Run the “Refresh Map” command in the Menu. When the system successfully locates all of the speakers, MyZone will operate. 10. Added new speakers to the system, but they are not making any sound. 3 4 WARNING RISK OF ELECTRIC SHOCK. DO NOT OPEN. WARNING: Do Not Open! Risk of Electrical Shock. Voltages in this equipment are hazardous to life. No user-serviceable parts inside. Refer all servicing to qualified service personnel. Item 6 Description 1 ASSOCIATE Button (for initial setup only). 2 Service Port - Warning: Do not plug anything into this port. Doing so will cause damage to the speaker. For factory use only! 3 Status LEDs: 1. One Blinking Green LED – Speaker is in low-power mode. 2. One Fast-Blinking Green LED – Speaker is in ASSOCIATE mode. 3. One Blinking Green and One Solid Green – Speaker is on and communicating with the Home Theater One Transmitter. 4. Yellow and/or Red Flashing – Indicates network issues. 4 AC Power Connection Make sure the new speakers are powered on, then use the Refresh Map menu item (see the section “Refresh Map” for more details). This will add new speakers to the system. 11. I am playing a DVD or Blu-ray disc that has surround sound, but I am only hearing audio out the left front and right front speakers. Make sure your Blu-ray or DVD player is properly setup to send surround information out of the HDMI or digital ports. For systems using HDMI, the best performance is "Bitstream" mode. For systems using optical or coax digital, make sure the system is sending out Dolby Digital or DTS, not "downmix" or "PCM." Please refer to your player's installation manual for detailed instructions. 23 Home Theater One Wireless Transmitter 3. Remove the speaker grill from the center speaker. It can be reinstalled after the system has been successfully set up. 4. Use the Refresh Map menu item (see the section “Refresh Map” for more details). 5. The map shows my proper speaker setup, but the input signal display shows "No Sig" and I can't hear anything. When the display shows "No Sig", that means it is not receiving any audio data from your player. Check the following: Owner’s Guide 6. Installation and Setup Follow these instructions to initially setup and use the Home Theater One Wireless Transmitter, remote control, and your Aperion wireless speakers. Check out our video to see the setup in action at: http://www.aperionaudio.com/SummitSetup 1. Place Your Speakers 1. That the Home Theater One is set to the right source. Press the button on the remote control for the input you want to use. a. Arrange your speakers as shown in the “Speaker Placement” section. 2. Your audio device is turned on. c. The speakers must all be able to “see” each other and point toward the center of the room. Do not place them behind furniture, plants, or other objects (this includes the subwoofer). 3. Your audio device is currently playing music. 6. The speaker assignments are backwards. The left sound is coming from the right speaker. This happens if the center speaker is placed upside down. Make sure the center speaker is right-side up and then run the Refresh Map menu item (see the section “Refresh Map” for more details). 7. After the system starts up, when I select Refresh Map, or I do a MyZone, I hear faint “clicks.” The MyZone and SpeakerFinder sensors use ultrasonic technology. When these sensors are active, a faint click may be heard. b. Make sure the center speaker is centered above or below the television screen. 2. Connect Power and Sources to the Home Theater One Wireless Transmitter. Note: Refer to the section “Connections” for detailed connection information. a. Plug in all speakers to power outlets. b. Plug in the Home Theater One Wireless Transmitter using the supplied power adapter. c. Connect your audio and video sources to the Home Theater One Wireless Transmitter. d. If using HDMI, also connect the HDMI Out to one of the television’s HDMI inputs for video pass-through. 3. Add Batteries to Remote Control. Note: Refer to the section “Remote Control” for additional information. a. Remove remote control battery bay cover. b. Insert four “AAA” batteries,+ and - polarities correctly oriented. c. Replace the battery bay cover. 4. Power Up. a. Press POWER on the remote control. b. Press the ASSOCIATE button on the speaker closest to the subwoofer for three seconds; only do this on one speaker and do not use the subwoofer. The green light on the speaker will blink faster. This only needs to be done on the first poweron. c. Press ENTER on the remote. The system will now auto set-up. d. The display shows “Getting Started” until complete. 22 7 Home Theater One Wireless Transmitter 7. Speaker Placement Owner’s Guide 3. The display Map shows a different number of speakers than I have. To get the best audio reproduction from surround-sound encoded material, Dolby and DTS recommend you place the speakers in a configuration as close as possible to the following diagram. Make sure each speaker can directly “see” the other speakers in the room and that they are pointed toward the center of the room. This enables the SpeakerFinder technology in your system to create the most accurate speaker map; delivering the best surround-sound. Speaker Placement Diagram All speakers must be powered on when the Home Theater One Wireless Transmitter is started. If they are not powered on, they will not produce sound. Also, if there are obstructions in front of the speaker, the system might not be able to find it with the SpeakerFinder sensors. The system shows only the speakers it can find. For instance, if you have a 7.1 system (seven speakers and a subwoofer), but the system can only find five speakers and a subwoofer, the display shows “Map 5.1”. To correct these issues, follow these steps: 1. Make sure all the speakers are powered on. If a speaker is powered on, you’ll see a blinking green light on the back panel of each speaker. 2. Make sure each speaker has a clear, direct path to the other speakers in the system. Make sure no furniture, plants, pets, or people are in front of the speakers. 3 3. Remove the speaker grill from the center speaker. It can be reinstalled after the system has been successfully set up. 3 2 4. Use the Refresh Map menu item (see the section “Refresh Map” for more details on how to re-run the SpeakerFinder process and create a new map of the system). 1 4. The front panel display shows MAP INV. 4 This front panel display means the system has an invalid map. The system will produce sound with any configuration of speakers, however, the following configurations will give the best results: Item 1.0 Front Speakers 5 5 7 Center Speaker 2.0 2.1 3.0 3.1 5.1 7.1 Surround Speakers Surround Back Speakers Subwoofer 6 6 Other layouts still produce sound, but they show MAP INV. If you have a supported map type, but are seeing MAP INV, there might have been a mapping error. To correct this, follow these steps: Used For 7.1 Speaker Setup Only 1. Make sure all the speakers are powered on. If a speaker is powered on, you’ll see a blinking green light on the back panel of each speaker. 2. Make sure each speaker has a clear, direct path to the other speakers in the system. Make sure no furniture, plants, pets, or people are in front of the speakers. 8 21 Home Theater One Wireless Transmitter Owner’s Guide Refresh Map If you’ve moved speakers to new positions, or if you want to add additional speakers, select this option. Any audio that is playing stops, and the system restarts. After restart, the system identifies new speakers, if any, and remaps them. Note: This menu item is the same under the main menu and the advanced menu. The function is the same. Speaker Placement Diagram Legend Item 1 Home Theater One Wireless Transmitter—Place where connections can easily be routed to the television and other devices such as DVD players, game consoles, etc. Make sure the antennas are in the up position and that nothing obstructs the IR sensor on the system’s front panel. Note that if you need to place the Home Theater One Wireless Transmitter in the back of the room (for instance, if using a projector) an IR repeater is required to use the MyZone feature. 2 Center Speaker—Place centered, directly above or below the television screen. Make sure the speaker is right-side up. 3 Left- and Right-Front Speakers—Refer to the Front Speaker Placement diagram (below) and then place as shown making sure there are no obstructions and a direct line-of-sight to the other speakers. 4 Subwoofer—Note that the subwoofer delivers the smoothest bass response when placed near a wall away from openings such as doors or hallways. For best results with MyZone, the Subwoofer should be located closest to the speaker who's associate button was used during initial setup. Make sure there is a direct line-of-site with the other speakers to the front of the subwoofer. 5 Surround Speakers for 5.1 and 7.1 Speaker Setups—Place as shown making sure there is a direct line-of-site with other speakers without any obstructions. 6 Rear Surround Speakers for 7.1 Speaker Setups Only—Place as shown making sure there is a direct line-of-sight with other speakers without any obstructions. 7 Listener Location—Set using the MyZone button on the remote control (see MyZone Optimization for more details). Factory Reset Using this option puts the system back to its factory-new condition. All saved information (source, volume, etc.) are erased. Note: After a factory reset, the “Installation and Setup” procedure must be completed. Update Firmware If a Firmware update becomes available from the factory, full instructions will be provided with that update. 11. Troubleshooting If you have any trouble setting up your system, please try the following or give us a call at 888.880.8992 and we'll be happy to talk you through it. 1. After starting the system, the front panel displays "No speakers found". This message appears if the system could not find the speaker that had its ASSOCIATE button pressed. To fix, follow these steps: Description 1. Power the Home Theater One Transmitter off using the power button on the remote. 2. Press the ASSOCIATE button on the speaker closest to the subwoofer for three seconds. 3. Verify the green LED on the back of the speaker is now flashing faster. 4. Power on the Home Theater One Transmitter with the power button on the remote control. 2. After pressing the MyZone button, the remote becomes unresponsive. When the MyZone button is pressed, the buttons are disabled for six seconds while the MyZone sensor is active. When the MyZone LED turns off, the buttons are available for use again. 20 9 Home Theater One Wireless Transmitter Owner’s Guide Front Speaker Placement OK Current Speaker OK Current Level Setting 2. Pressing LEFT ARROW or RIGHT ARROW on the remote selects different speakers. Pressing UP or DOWN adjusts the level of the currently selected speaker in 1 dB steps. Note: The system works best with the left and right speakers either even with or in front of the center channel speaker. 3. When finished, press EXIT to return to the main display. 10.6.3 Refresh Map Note: Enter MENU to find this option. If you’ve moved speakers to new positions, or if you want to add additional speakers, select Refresh Map to reset the speaker configuration. Any audio that is playing stops, and the system restarts. After restart, the system identifies new speakers, if any, and remaps them. 10.6.4 Advanced Menu The Advanced Menu contains additional options that typically aren’t used. Please exercise care when using these options. When you enter the Advanced Menu: Note: DO NOT place the left and right speakers behind the front plane center speaker. 1. Press LEFT ARROW and RIGHT ARROW on the remote control to choose between the advanced menu items. 2. Press ENTER to select the current advanced menu item. 3. At any time, press EXIT to return to the main screen. Last Status This option replays the last status message that was displayed on the front panel. Press EXIT to return to the main screen. 10 19 Home Theater One Wireless Transmitter Owner’s Guide 8. Speaker Placement Tips and Hints 10.6.1 Speaker Volume Settings Note: Enter MENU to find this option. 1. Where should I place the front speakers? The first step in optimizing the speaker system is to run MyZone (refer to "MyZone Optimization" for details). For almost all situations, this is all that is needed. MyZone automatically adjusts speaker volume based on your location and the speaker's location. However, if more fine tuning is desired, the Speaker Volume adjustments can be used. 1. When entering the Speaker Volume adjustments, the display shows the current selected speaker and it's current adjustment. Current Speaker The front speakers should be placed in front of the center speaker. This will allow the center to "see" the front speakers during startup. If you still have problems, try removing the speaker grill on the center speaker. After the system starts successfully, you may reinstall the grill. 2. What can be done to get the best speaker location performance? For the best speaker location mapping, each speaker must have a direct view of all of the other speakers in the system. Make sure no furniture, plants, pets, or people are blocking the path between the speakers during setup. It is also important that the center speaker is centered directly above or below the television and placed with the correct side up. Finally, make sure the fronts of the speakers are pointed toward the center of the room. Following these steps will ensure an accurate map and the best possible sound. 3. How do I configure my subwoofer properly? Current Level Setting 2. Pressing LEFT or RIGHT on the remote selects different speakers. Pressing UP or DOWN adjusts the level of the currently selected speaker in 1 dB steps. 3. When finished, press EXIT to return to the main display. 10.6.2 Test Tone Note: Enter MENU to find this option. The Test Tone generator can be used to confirm the automatic setup of the speakers. It can also be used, along with a Sound Pressure Level (SPL) meter to do further adjustment to the sound. For most optimization, MyZone is all that is needed. Refer to refer to “MyZone Optimization” for details. 1. When entering the Test Tone generator, the display shows the current selected speaker and its current adjustment. A white noise, static-like sound is emitted from the current selected speaker. All other speakers remain silent. 18 Due to the way MyZone works, the speaker closest to the subwoofer should have its ASSOCIATE button pressed during first-time setup. If a different speaker was used and the volume of the subwoofer is inconsistent when using the MyZone feature, perform a factory reset (see page 9), and go through initial setup again using the ASSOCIATE button on the speaker closest to the subwoofer. To manually adjust the subwoofer volume, use the "Speaker Volume" Menu item. (See "Speaker Volume Settings” in the Menu section for more details). Note: Do not use the ASSOCIATE button on the subwoofer. 4. How can I adjust the subwoofer volume? To adjust the volume of the subwoofer, use the Speaker Volume menu item (see the "Speaker Volume Settings" in the Menu section for more details). 5. I set everything up, but the locations aren't working correctly. Please be certain that your speakers are not hidden behind furniture or other obstructions. They need to maintain line of sight with each other. Also, try removing the speaker grilles while running through system setup, or "refreshing" the speaker map. This can help improve speaker detection. You can replace the speaker grilles after setup completes. 11 Home Theater One Wireless Transmitter 9. Connections Owner’s Guide 10.4 Changing Volume Connect your Home Theater sources to the Home Theater One Wireless Transmitter inputs that fit them best. See the examples on the following pages. Place Antennae in Vertical Position To change the current volume, use the VOL buttons on the remote control. You’ll see the status update in the volume section of the front panel: VOL+ — Pressing increases the volume. Pressing and holding quickly increases the volume. VOL - — Pressing decreases the volume. Pressing and holding quickly decreases the volume. MUTE — Toggles mute on and off. Ant 1 Ant 2 Aux 1 Aux 2 HDMI Out HDMI 1 HDMI 2 HDMI 3 Coaxial Optical USB Firmware Update Port Additional HDMI INPUTS Two Stereo MiniPlug Audio INPUTS for iPods, CD Players, etc.. HDMI OUTPUT to TV HDMI INPUT from Disc Player Coaxial Digital Audio INPUT Optical Digital Audio INPUT DC + 12V 10.5 MyZone Optimization MyZone custom tailors the sound from all the speakers to your location in the room. Just point the remote at the center speaker and press the MyZone button. You might hear some faint rapid clicks while MyZone is in process. This is normal and the process should only take a few seconds. MyZone finds your location and automatically adjusts the audio delay and individual speaker volume and optimizes the audio to your seating location to make it the best seat in the house. If the display shows "Please Retry," make sure the remote and the MyZone sensor are pointed at the center speaker, and there is nothing between the remote and front-left, center, and front-right speakers. If this happens, please press the MyZone button again to repeat the process. If the display shows "Unavailable," the system had a difficult time locating your speakers. Make sure each speaker can physically "see" each other, remove the grill from the center speaker, and run the "Refresh Map" command in the menu (see Menu section). When the system successfully locates all of the speakers, MyZone will operate. 10.6 Menu To enter the menu, press MENU on the remote control. Press MENU again or LEFT ARROW and RIGHT ARROW on the remote control to choose between the menu items. Press ENTER to select the current menu item. At any time, press EXIT to return to the main screen. Note: The Home Theater One Wireless Transmitter uses SpeakerFinder technology to automatically set up the system at power-up. The options provided in the menus are for additional fine tuning, and are not required for use. 12 17 Home Theater One Wireless Transmitter 10. Using the System Owner’s Guide 9.1 Example 1: HDMI These sections explain how to use the features of the Home Theater One Wireless Transmitter. 10.1 Powering On and Off After you're finished with the initial setup (see section 6 “Installation and Setup” for details), you simply need to press the POWER button on the remote control to turn the Home Theater One Wireless Transmitter on and off. The Home Theater One Wireless Transmitter remembers the previous configuration and quickly starts up with the press of the POWER button. When the Home Theater One Wireless Transmitter is powered off, the speakers automatically go into a low-power standby state. When connecting a source with an HDMI output, it is recommended that the HDMI connection is used for both audio and video. This ensures the highest quality audio and video is used. Also, attach an HDMI cable between the television and the HDMI Out connection for video pass-through. 10.2 Front Panel Display During normal operation, the following information appears on the front panel: Ant 1 Ant 2 Aux 1 Aux 2 HDMI Out HDMI 1 HDMI 2 HDMI 3 Coaxial Optical USB DC + 12V Detected Speaker Map Detected Speaker Map Input Source Input Source To Television From Blu-Ray Player Input Signal or Surround Mode Input Signal or Surround Mode TV 10.3 Selecting a Source To change the current input source, press the corresponding button on the remote control. You’ll see the choice reflected on the front panel display: Source Remote Button Front Panel Display HDMI 1 Input HDMI 1 HDMI1 HDMI 2 Input HDMI 2 HDMI2 HDMI 3 Input HDMI 3 HDMI3 Digital Optical Input OPT Optical Digital Coaxial Input COAX Coax Stereo Analog Input 1 AUX1 Aux1 Stereo Analog Input 2 AUX2 Aux2 Blu-Ray 16 16 13 Home Theater One Wireless Transmitter 9.2 Example 2: Non-HDMI Video Source Owner’s Guide 9.3 Home Theater One Wireless Transmitter Power Connection Ant 1 Ant 2 Aux 1 Aux 2 HDMI Out HDMI 1 HDMI 2 HDMI 3 Coaxial Optical USB DC + 12V Audio Cable Ant 1 VCR If digital audio source, use optical connection Component, Composite or S-Video Cable 14 Ant 2 Aux 1 Aux 2 HDMI Out HDMI 1 HDMI 2 HDMI 3 Coaxial Optical USB DC + 12V TV 15