1
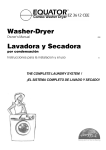
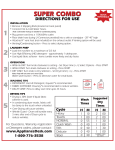
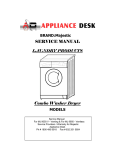
BEER COOLER
Model No. BCR 500
OWNER’S MANUAL
To ensure proper use of this appliance and your safety, please read the
following instructions completely before operating this appliance.
TABLE OF CONTENTS
Warranty Information ________________________________________ 3 - 4
Names of the Parts ____________________________________________ 5
Important Safety Instructions ________________________________ ____ 6
Installation Instructions ________________________________________ 7
Before Using Your Beer Cooler___________________________________ 7
Installation of Your Beer Cooler ________________________________ 7 - 8
Electrical Connection __________________________________________ 8
Installation Instructions for Beer Keg ___________________________ 9 - 12
Dispensing of Beer ____________________________________________ 13
Operating Your Beer Cooler _____________________________________ 13
Setting the Temperature ________________________________________ 13
Automatic Defrosting __________________________________________ 13
Converting to an All Refrigerator________________________________ __14
Changing the Reversible Door________________________________ ____ 15
Care and Maintenance__________________________________________ 16
Troubleshooting Guide ________________________________ _________ 17
2
WARRANTY INFORMATION
Your appliance is protected by this warranty under
normal, personal, family or household use for One Year
in the USA and Canada.
WARRANTY
Equator Advanced Appliances undertakes to the consumer-owner to repair or, at our option,
to replace any part of this product which proves to be defective in workmanship or material
under normal personal, family or household use, in the USA and Canada, for a period of one
year from the date of original purchase. During this period, we will provide all labor and parts
necessary to correct such defect, free of charge, if the appliance has been installed and
operated in accordance with the Equator Advanced Appliances’ written instructions with the
appliance. Ready access to the appliance, for service, is the responsibility of the consumerowner.
EXCLUSIONS
In no event shall the Equator Advanced Appliances be liable for incidental or consequential
damages or for damages resulting from external causes such as abuse, misuse, incorrect
voltage or acts God. This warranty does not cover service calls which do not involve
defective workmanship or materials covered by this warranty. Accordingly, diagnosis and
repair costs for a service call which does not involve defective workmanship or materials will
be the responsibility of the consumer-owner.
Specifically, the following work is not covered under warranty and does not constitute
warranty work:
§
§
§
Installation – e.g. improper hook -up of CO 2 cylinder or beer keg or leveling
Maintenance – e.g. keeping the unit clean
Damage – e.g. re placing broken parts
Most work is covered. The defining factor is, has the machine malfunctioned (Equator
Advanced Appliances is responsible) or has the customer omitted or done something to
cause machine to malfunction (customer is responsible). Some States do not allow the
exclusion or limitation of incidental or consequential damages, so the above limitation or
exclusion may not apply to you.
3
WARRANTY SERVICE
This warranty is given by:
Equator Advanced Appliances
2801 W Sam Houston Parkway N, Ste. 125
Houston, TX 77043-1611
Tel: 713-464-3422
Fax: 713 -464-2151
Toll Free: 800-935 -1955
Website: www.EquatorAppliances.com
Service under this warranty must be obtained in the following way:
Call an Authorized Service Agent (obtain number of nearest agent from your dealer or
by calling 1-800 -776 -3538). Under normal circumstances, Service will be provided
during regular business hours (9:00 a.m. to 5:00 p.m. weekdays).
GENERAL
Since it is responsibility of the consumer-owner to establish the warranty period by verifying
the original purchase date, the Equator Advanced Appliances recommends that a receipt,
delivery slip or some other appropriate payment record be kept for that purpose. Remember
to send in your Warranty Registration Card so that a proof of your purchase exists with the
Equator Advanced Appliances.
You can also register online at www.appliancedesk.com/warranty. This warranty gives
you specific legal rights, and you may also have other rights which vary from State to State.
Customer Comments are welcome by emailing us at [email protected]
SERVICE & SUPPORT
Service:
1-800-776-3538
[email protected]
Parts & Accessories:
1-888-483-9627
[email protected]
Website:
www.appliancedesk.com
4
NAMES OF THE PARTS
MODEL NO.: BCR500
1
2
3
4
5
6
7
8
9
10
11
12
13
14
Beer Tower
Plastic Gasket
Safety Guard Rail
Drip Tray
Adjustable Thermostat
CO 2 Regulator
CO 2 Gas Cylinder
CO 2 Gas Cylinder Support
Evaporator
Reversible Door
Beer Keg (not included)
Metal Plate
Metal Gasket(2)
Casters with Lock (4)
5
IMPORTANT SAFETY INSTRUCTIONS
~ WARNING~
•
•
•
•
•
•
•
•
To reduce the risk of fire, electrical shock,
or injury when using your Beer Cooler,
follow these basic precautions:
Read all instructions before using the unit.
DANGER or WARNING: Risk of child entrapment.
To avoid the possibility of child entrapment, please take the following precautions
before throwing out the appliance.
- Remove all doors from the unit.
- Leave the shelves in place so that children may not easily climb inside.
Before you throw away your old unit: Take off the doors. Leave the shelves in
place so that children may not easily climb inside.
Never allow children to operate, play with, or crawl inside the unit.
Refrigerants: All refrigeration products contain refrigerants, which under the
guidelines of federal law must be removed before disposal of product. It is the
consumer’s responsibility to comply with federal and local regulations when
disposing of this product.
Never clean unit parts with flammable fluids. The fumes can create a fire hazard or
explosion.
Do not store or use gasoline or any other flammable vapors and liquids in the vicinity
of this or any other unit. The fumes can create a fire hazard or explosion.
-Save these instructions-
6
INSTALLATION INSTRUCTIONS
Ø
Before Using Your Beer Cooler
• Remove the exterior and interior packing.
• Check to be sure you have all of the following parts:
• Instruction manual
• 1 Safety Guard Rail
• 1 Drip Tray (2 Pieces)
• 1 CO2 Cylinder Support
• 1 CO2 Regulator (Box)
• 1 CO2 Empty Cylinder (Box)
• 1 CO2 Air Line Hose (Red)
• 1 Beer Keg Coupler (Box)
• 1 Beer Tower
• 1 Pull Handle (Beer Tower Faucet)
• 1 m etal wrench
• 4 Plugs: For Guard Rail Holes
• 1 Metal Plate For Cabinet Bottom
• 2 Steel wire shelves
• 1 Steel Clamp for Red Hose
• 4 Casters with lock
•
•
Ø
Before connecting the Beer Cooler to the power source, let it stand upright for approximately
2 hours. This will reduce the possibility of a malfunction in the cooling system from handling
during transportation.
Clean the interior surface with lukewarm water using a soft cloth.
Installing Your Beer Cooler
• This appliance is designed to be free standing only, and should not be recessed or built-in.
• Place your Beer Cooler on a floor that is strong enough to support the Beer Cooler when it is
fully loaded.
• Allow 3 inches of space between the back and sides of the Beer Cooler, which allows the
proper air circulation to cool the compressor.
• Locate the Beer Cooler away from direct sunlight and sources of heat (stove, heater, radiator,
etc.). Direct sunlight may affect the acrylic coating and heat sources may increase electrical
consumption. Extreme cold ambient temperatures may also cause the Beer Cooler not to
perform properly. This unit is not designed for outside installation (ie garages, porches etc.)
• Avoid locating the Beer Cooler in moist areas.
• Plug the Beer Cooler into an exclusive, properly installed-grounded wall outlet. Do not under
any circumstances cut or remove the third (ground) prong from the power cord. Any questions
concerning power and or grounding should be directed toward a certified electrician or an
authorized service center.
• After plugging the appliance into a wall outlet, allow the unit to cool down for 2 -3 hours before
placing any contents in the Beer Cooler compartment.
7
Ø
Electrical Connection
~Warning ~
Improper use of the grounded plug can result in the risk of electrical shock. If the power cord is
damaged, have it replaced by an authorized service center.
This Beer Cooler should be properly grounded for your safety. The power cord of this Beer Cooler is
equipped with a three-prong plug which mates with standard three prong wall outlets to minimize the
possibility of electrical shock.
Do not under any circumstances cut or remove the third ground prong from the power cord supplied.
Use of extension cords is not recommended.
This Beer Cooler requires a standard 115/120-volt, 60Hz electrical outlet with three-prong ground.
The cord should be secured behind the Beer Cooler and not left exposed or dangling to prevent
accidental injury.
Never unplug the Beer Cooler by pulling the power cord. Always grip the plug firmly and pull straight
out from the receptacle.
Warning
CO2 GAS CAN BE DANGEROUS
WARNING: CO 2 cylinders contain high-pressure compressed gas which can be hazardous if not
handled properly. Make sure you READ and UNDERSTAND the following procedures for CO2
cylinders BEFORE INSTALLATION.
1. ALWAYS connect the CO2 cylinder to a regulator. Failure to do so could result in explosion
with possible injury when the cylinder valve is opened.
2. NEVER connect the CO 2 cylinder directly to the product container.
3. ALWAYS follow correct procedures when cylinders are changed.
4. ALWAYS secure the cylinder in an upright position.
5. NEVER drop or throw a CO2 cylinder.
6. ALWAYS keep a C O2 cylinder away from heat. Store extra cylinders in a cool place
(preferably 70°F). Securely fasten with a chain in an upright position when storing.
7. ALWAYS ventilate and leave the area immediately if CO 2 leakage has occurred.
8. ALWAYS check the D.O.T. test date on the cylinder neck before installation. If over five (5)
years, do not use, return cylinder to gas supplier.
9. NEVER connect a product container unless there are two (2) safety’s in the pressure system:
a. One at or on the C O2 regulator
b. One at or on the product coupler or in the pressure gas line.
8
INSTALLATION INSTRUCTIONS FOR BEER KEG
Installation Diagram
Installing the Casters
•
Install the four casters with lock provided into the unit’s bottom (four screw holes pre -supplied)
The two metal gaskets are us ed for the front two Casters .
CASTER
(I) Before Installation
(II) Installation with Casters
9
Installing the CO2 Cylinder Support
• Install the metal support provided onto the 4 studs located on the exterior back wall. Align the
holes in the support with the studs and push down firmly. (See Figure 1)
Installing the CO2 Cylinder
• Install your fully charged cylinder into the support stand.
Installing the CO2 Regulator
• Attach the CO 2 regulator to the cylinder by turning the regulator nut onto cylinder valve, making
sure washer is securely inserted into connecting nut. Tighten snug using an adjustable wrench
(not supplied) and assure there are no leaks. (See Figure 2)
Installing the CO2 Air Line Outside Cabinet
• Remove plug located at the exterior back (top left hand corner).
• Save it for later use if you decide to convert unit to an all refrigerator.
• Insert the open end of the air line (red) line the cabinet through the uncovered hole.
(See Figure 4)
Installing the CO2 Air Line Hose To Regulator
• Attach the open end of the red hose to the hose barb connection on the regulator
• Secure hose by using one clamp provided. Use pliers/screwdriver to tighten clamp to prevent
leaks. (See Figure 3)
Installing the Beer Tower
• Remove the top plug by twisting and pulling out, saving it for later use if you decide to convert unit
to an all refrigerator unit.
• Unravel the beer line (clear hose) from the tower and insert the beer line and wing nut through the
uncovered hole on top.
• Lock the beer tower assembly to the top and make sure to position the beer faucet so it is aligned
with the cabinet front (6 o’clock position). You accomplish this by aligning the bottom of the beer
tower to the 3 grooves on the top cabinet and tighten by hand clockwise to properly lock.
Installing the Protective Metal Plate
• This plate should always be installed when the keg is in place to protect against unnecessary
damage to the floor of the cabinet.
Fig. 1
Fig. 2
10
Fig. 3
Installing the Bee r Keg
• Position the beer keg directly in front of the open door. Using keg handles only, carefully lift the
beer keg. (See Figure 5)
• To place the beer keg inside the cabinet, brace your knees behind the beer keg. Lift the front of
the keg just enough so the front edge of the keg is resting on the front edge of the Beer Cooler
bottom cabinet. (See Figure 6)
• Grasp the keg handles and slide it all the way into the cabinet.
Fig. 4
Fig. 5
Fig. 6
Installing the Keg Coupler
• Insert the keg coupler provided into the locking neck of the beer keg and turn it clockwise to lock
into position, making sure the keg coupler is in the closed position. (See Figure 7)
Installing the CO2 Air Line Hose
• Attach the end of the air line (red) hose provided to the hose connection on the keg coupler.
Secure hose by using the clamps and make sure there are no leaks.
Connecting the beer tower to coupler
• Make sure the washer is properly inserted into the wing nut.
• Place wing nut into the top of the coupler turning until tight.
How to Tap a Keg of Beer
• Make sure the beer tower faucet is in the closed position.
• Pull tapping handle out and press downward until it locks into position. (See Figure 8) The keg is
now tapped .
Opening the CO2 Cylinder Main Valve
• Before doing that, make sure the secondary shut-off valve is closed, as shown in figure 9. To
open the main CO2 cylinder valve, slowly turn the main valve counter-clockwise until fully open.
• Notice the needle on the gauge start to climb.
Adjusting the CO 2 Regulator
• The gauge monitors low internal keg pressure and should be adjusted to read between 10 -12 psi.
(See Figure 10)
• In order to do that:
1. Release adjustment lock nut marked 2.
2. Using a flat screwdriver, turn regul ator screw marked 3. If increased low pressure is sought,
rotate screw clockwise. By rotating it counter clockwise, low pressure will be decreased when
the required operating pressure is attained, retighten lock nut 2.
3. Open secondary shut off valve to let CO2 flow into the keg.
11
Ø Spanner Faucet Wrench
Spanner faucet wrench provided for either removing or tightening
connection
Ø Plastic Faucet Lever
Attach the black plastic lever (pull handle) provided on the top of the
faucet tightening it by hand clockwise until the end, holding in the silver
snug underneath so it does not move.
If there is still a small drip from the faucet, you may have tightened the
plastic lever too much and may need to unscrew silver snug counter clockwise (as shown) one turn. That should correct the problem if exists.
12
DISPENSING OF BEER
•
•
•
•
•
Keep beer keg refrigerated at all times.
Never allow beer lines to dry out.
Use clean beer glassware before pouring.
Hold glass at a 45° angle when 2/3 full, start to straighten glass as the glass fills.
Always make sure the faucet handle is pushed all the way back.
Note: Keg sizes that can be used in your beer dispenser
1/2 barrel
59 Liters
15.5 gals
1984 oz.
1/4 barrel
30 Liters
7.8 gals.
992 oz.
1/6 barrel
20 Liters
5.2 gals.
661 oz.
1/8 barrel
15 Liters
4.0 gals.
496 oz.
164/12 -oz. Glass
82/12-oz. Glass
55/ 12-oz. Glass
41/ 12-oz. Glass
Note: Our Beer dispenser accepts almost all, Brand Name ½ kegs. However C oors’ kegs do not fit in
our unit.
OPERATING YOUR BEER COOLER
Ø Setting The Temperature
To start, turn the temperature control knob to the maximum setting (6). Allow
the unit to run for 3 hours at the maximum setting. After 3 hours, adjust the
temperature control to the desired setting. The range of temperature control is
from position "1" the warmest to "6" the coldest Temperature range of the
thermostat goes from 36°F to 45°F (2.2ºC to 7.2 ºC)..
Optimum temperature for serving Draft beer is between 34° F – 38°F (1.1ºC –
3.3ºC) and that is a key factor to consider in storing and dispensing Draft beer.
Setting thermostat knob position between “4” and “5” should be appropriate for optimal beer serving
temperature.
To turn off the Beer Cooler, rotate the control knob to the “OFF” position.
Note: Keep an accurate thermometer handy and adjust temperature control setting as necessary or
according to your needs.
Automatic Defrosting
There is no need to defrost the Beer Cooler. Defrost water collects and passes thru the drain outlet in
the rear wall into a tray located above the compressor, where it evaporates.
NOTE: If the unit is unplugged, power lost, or turned off; you must wait 3 to 5
minutes before restarting the unit. If you attempt to restart before this time delay,
the Beer Cooler may not start.
13
Ø Converting To An “All Refrigerator”
1.
2.
3.
4.
5.
6.
7.
8.
9.
10.
11.
12.
13.
14.
Turn off the control knob to the “OFF” position.
Close the main valve on the CO 2 cylinder.
Close the secondary shut-off valve on the regulator pipe.
Close the connection between the beer keg and the keg coupler.
Drain any remaining beer from the lines.
Disconnect the beer line and CO2 air line from the keg coupler
Remove the beer keg.
Remove the keg coupler.
Disconnect the air line from the CO2 cylinder.
Remove the CO2 air line from cabinet plug
Replace the air line rear cabinet plug
Remove the beer tower. Also pull the beer line thru the top of the cabinet
Replace the top cabinet plug
Adjust temperature as desired.
14
CHANGING THE REVERSIBLE DOOR
This Beer Cooler has the capability of either opening the door from the left or right side. The unit is
delivered to you with the door opening from the left side. Should you desire to reverse the opening
direction, please follow below instructions.
Caution: To avoid personal injury to yourself and/or property, we ecommend that someone
assist you during the door reversal process.
15
CARE AND MAINTENANCE
Ø
•
•
•
•
•
Ø
•
•
Cleaning Your Beer Cooler
Turn the temperature control to "OFF", unplug the Beer Cooler , and remove the contents.
Wash the inside surfaces with a warm water and baking soda solution. The solution should be
about 2 tablespoons of baking soda to a quart of water.
Wash the shelves and stand with a mild detergent s olution.
Wring excess water out of the sponge or cloth when cleaning area of the controls, or any
electrical parts.
Wash the outside cabinet with warm water and mild liquid detergent. Rinse well and wipe dry
with a clean soft cloth.
Vacation Time
Short vacations: Leave the Beer Cooler operating during vacations of less than three weeks.
Long vacations: If the appliance will not be used for several months, remove all contents and
unplug the power cord. Clean and dry the interior thoroughly. To prevent odor and mold growth,
leave the door open slightly: blocking it open if necessary.
Ø Moving Your Beer Cooler
• Remove all the contents.
• Securely tape down all loose items inside your Beer Cooler.
• Tape the door shut.
• Be sure the Beer Cooler stays secure in the upright position during transportation. Also protect
outside of Beer Cooler with a blanket, or similar item.
16
TROUBLESHOOTING GUIDE
You can solve many common Beer Cooler problems easily, saving you the cost of a possible service
call. Try the suggestions below to see if you can solve the problem before calling the servicer.
PROBLEM
Beer Cooler does not operate.
Turns on and off frequently.
Vibrations.
The Beer Cooler seems to make too much noise.
The door will not close properly.
POSSIBLE CAUSE
Not plugged in.
The circuit breaker tripped or blown fuse.
The room temperature is hotter than normal.
The door is open too often.
The door is not closed completely.
The temperature control is not set correctly.
The door gasket does not seal properly.
The Beer Cooler does not have the correct
clearances.
Check to assure that the Beer Cooler is level.
The rattling noise may come from the flow of the
refrigerant, which is normal.
As each cycle ends, you may hear gurgling
sounds caused by the flow of refrigerant in your
Beer Cooler .
Contraction and expansion of the inside walls
may cause popping and crackling noises.
The Beer Cooler is not level.
The Beer Cooler is not level.
The door was reversed and not properly installed.
The gasket is dirty.
The shelves or stand are out of position.
17
Equator Advanced Appliances
2801 W Sam Houston Pkwy N, Suite 125
Houston, Texas 77043-1611
Phone (713) 464-3422 • Fax (713) 464-2151
www.EquatorAppliances.com
SERVICE & SUPPORT:
[email protected]
(800) 776-3538
www.ApplianceDesk.com
All rights reserved.
Manual subject to change without notice
18