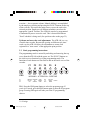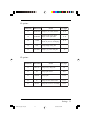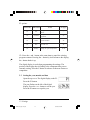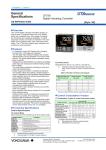
1
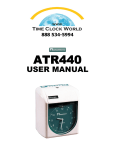
ATR 440 User's Manual atr440 A5 paper size.p65 1 8/21/02, 8:16 AM For more information on Acroprint products Acroprint offers a complete line of standard Time Recorders, state-of-the-art Electronic Time Recorders, Document Time Stamps, Watchmen’s Systems, and Time & Attendance Systems. Time For Business . . . . . 5640 Departure Drive Raleigh, NC 27616-1841 919.872.5800 800.334.7190 fax: 919.850.0720 email: [email protected] Visit our Web Site: www.acroprint.com Register online at www.acroprint.com ©2002 Acroprint Time Recorder Company. All rights reserved. 2 atr440 A5 paper size.p65 2 8/21/02, 8:16 AM Table of Contents 1. Introduction ........................................................4 2. Setup ...................................................................5 3. Settings ...............................................................7 4. Special functions ..............................................27 5. 6. 7. 8. 9. 10. Connecting an external signal ........................29 Replacing the ribbon cartridge .......................30 Removing & installing the case ......................31 Troubleshooting ...............................................32 General specifications .....................................33 Manufacturer's warranty ..................................34 1.1 Product overview ......................................................................... 4 2.1 Unpacking and inspection ........................................................... 5 2.2 Voltage selector and battery switch ............................................. 5 2.3 Installation ................................................................................... 6 2.4 Wall mounting ............................................................................. 6 3.1 Basic terms .................................................................................. 7 3.2 Basic programming instructions ................................................ 10 3.3 Setting the year, month, and date ............................................... 12 3.4 Setting the time of day, digital display, and the print format......................................................................................... 13 3.5 Selecting the time card type, minute format, and day of week language ........................................................................... 14 3.6 Setting Daylight Saving Time (must be set each year) .............. 17 3.7 Setting a pay period ending date ................................................ 19 3.8 Setting the day change time ....................................................... 20 3.9 Setting signal duration ............................................................... 20 3.10 Setting signals ............................................................................ 21 3.11 Setting two color ribbon control ................................................ 22 3.12 Setting auto across the card shifting .......................................... 24 4.1 Setting the across the card adjustment ....................................... 27 4.2 Setting up/down adjustment ...................................................... 27 4.3 Synchronizing the minute and second ....................................... 28 4.4 Seconds reset - allows you to synchronize to the second .......... 28 Table of Contents atr440 A5 paper size.p65 3 8/21/02, 8:16 AM 3 1. Introduction 1.1 Product overview The ATR 440 is a cross shift time recorder that offers numerous features for your business. It is a six column electronic time recorder. The day progresses across the time card, and the pay period down the time card. Card positioning can be set to semi or fully automatic. When you use auto across the card shifting, the clock automatically punches across the card. The ATR 440 uses standard 3-3/8" wide time cards. It accommodates a large variety of time cards, including those for weekly, biweekly, semimonthly or monthly pay periods. Printing adjustments may be made in .005" increments across the card and .002" increments down the card. The ATR 440 offers a full operational battery backup in case of an power outage. Your employees can continue to punch over 200 times while the power is off. A large analog dial plus a digital display makes it easy to tell time. Additional features include: Automatic date, day, month change Selectable hours (1-12 or 0-23) and choice of minutes, tenths, twentieths or hundredths of an hour Daylight Saving Time adjustment Select Day of Week to print in English, Italian, German, French, Spanish, Japanese, or numbered day. Two color printing feature with up to 18 changes may be used to highlight late or early punches, overtime, etc. Signal control allows up to 42 signals on selected day(s) to be set. Signal duration may be set from 1 to 99 seconds. A built in tone generator sounds a melody that is ideal for office use. Select the time when the Day Change will occur. Acroprint Time for Business 4 Introduction atr440 A5 paper size.p65 4 8/21/02, 8:16 AM 2. Setup 2.1 Unpacking and inspection Open the shipping carton and carefully remove the contents: ATR 440 ATR 440 User's Manual 2 extra fuses 2 keys 1 mounting template 1 2 3 4 5 6 7 2.2 Top cover Front housing Back cover Clock face Digital display Two color ribbon cartridge Print head Voltage selector and battery switch The voltage selector (115/230VAC) switch is located on the bottom near the front. The ATR 440 allows the user to select the voltage that will power the clock. The clock will automatically adjust for either 50 or 60 hertz. Before applying power, slide the switch to the appropriate line voltage. The 230VAC operation may require a line plug adaptor, not supplied. Check with your local electrical supply house. The battery switch is located on the bottom left of the clock. When in the ON position, it allows for the full operation of the ATR 440 when the AC power is off. Slide the battery switch to the ON position when installing the recorder. Setup atr440 A5 paper size.p65 5 8/21/02, 8:16 AM 5 2.3 Installation The ATR 440 can be installed in any normal office environment. No special wiring is needed. However, we recommend installing the ATR 440 on a separate power circuit. We do not recommend using a power strip. Always follow basic safety precautions when using this product to reduce risk of injury, fire, or electric shock. Caution: Read and understand all instructions in the ATR 440 User's Manual before installing and operating this time recorder. Do not install the ATR 440 in areas where it may be exposed to direct sunlight or high temperatures, such as near a heater. Do not install the ATR 440 where it may be exposed to excessive dust or to high humidity, resulting in condensation. Do not use this product near water or when you are wet. If the product comes in contact with any liquids, unplug the line cord immediately. Do not plug the product back in until it has been thoroughly dried. Securely install the time recorder on a stable, level surface, or if wall mounting the ATR 440, follow the mounting instructions to install it securely on the wall. Place the time recorder where no one can step or trip over the cord. Do not place objects on the cord that may cause damage or abrasion. If this product does not operate normally, please see the Troubleshooting section of this manual. 2.4 Wall mounting Place the top screw approximately 44 to 46" above the floor. Using the enclosed mounting template, install the other two screws as indicated. Hook the unit on the screws through the holes on the back cover. 6 Setup atr440 A5 paper size.p65 6 8/21/02, 8:16 AM 3. Settings 3.1 Basic terms The Acroprint ATR 440 has incorporated many state-of-the-art features in this electronic time recorder. We've included the following terms to help you understand how these features are used. Battery switch This switch is located on the bottom of the recorder. The battery is supplied to allow the recorder to function and to print during power outages. This switch allows for the battery to be turned off when in storage or during shipment. This will assure a fully charged battery when installed. Make sure the battery switch is turned on when in use. Cross shift time recorder There are several types of cross shift machines on the market today. The ATR 440 is an across the card time recorder. The day progresses across the card. See cross shift time cards. Starting with the morning "In" punch on the left side of the card, and moving laterally to the right as the day progresses (Lunch Out, Lunch In, Out End of Day, In Overtime and Out Overtime) for a total of 6 moves. The week progresses down the card; Monday will automatically be positioned below Sunday, etc. Cross shift time cards The ATR 440 accommodates several types of popular time cards. (See chart on page 15.) This recorder is designed to handle 3-3/8" wide time cards with six columns across the card. The type of pay period determines the positions down the card. For example, 7 spaces for weekly, 14 for biweekly, and 16 spaces for biweekly or semimonthly pay periods. Daylight Saving Time (DST) The ATR 440 allows for automatic daylight saving time adjustment to occur. You must select the date and time for the start and stop of Daylight Saving Time each year. The recorder will not automatically update DST each year. Day change This adjustment allows you to select the time of day that the day/date will advance to the next day. This is particularly useful if Settings atr440 A5 paper size.p65 7 8/21/02, 8:16 AM 7 you have employees scheduled across the traditional midnight day change or a shift starting on one day and ending on the next. Pay period ending date The pay period ending date is selected so that the first day of the pay period prints at the top of the time card and the last day of the pay period prints at the bottom of the appropriate time card. Programming The ATR 440 incorporates many programmable features allowing the user to select formats best suited for their needs. Basic programming is accomplished by using the across the card position buttons (IN-OUT) located on the top of the recorder. When the top cover is opened, the recorder enters the programming mode. By using the PRO button on the top of the recorder, you may select a program mode P1, P2, or P3. The combination of Program Mode and Function Buttons, F1-F5 (IN-OUT) allows you to access various portions of the program. You can refer to the label on the inside top cover or the diagram on page 10 of this manual for further description. Selectable print/display format The selectable print format allows you to select the type of hour shown on the digital display. Whatever display format is selected, the print format will be the same. You can select type of hours, 12-hour format or 24-hour format. In the 12-hour format AM or PM will be shown on the upper right of the display. When selecting the 12-hour format, the printed minutes are underscored denoting PM hours. Example: At two fifteen in the afternoon, the recorder would print 02:15. In the 24-hour format the registration would be 14:15. You may also select the portion of hours the recorder will print: minutes, twentieths or hundredths. (See chart on page 16.) Selectable portions of the hour You may also select how a portion of an hour will print; the options are standard minutes, tenths, twentieths or hundredths of an hour. The digital display will always show por8 Settings atr440 A5 paper size.p65 8 8/21/02, 8:16 AM tions of an hour in minutes regardless of selection. (See chart on page 16.) Selectable day/date imprint The ATR 440 allows you to choose to print the day of week or the date of month. You may also select not to have either the day or date print. Then only the hour and minute would print. If selecting the day, you may also select one of six languages or numeric printing of the day (D1, D2, etc). (See the chart on page 17.) Signal/signal duration Signals are used to audibly denote starting and stopping shift or break times. The ATR 440 is equipped with a programmable signal control with calendar and duration settings. You may select up to 42 signals with a variable duration of 1 to 99 seconds, on selected days. The recorder also includes an audible tone generator that sounds a melody. This built-in tone is ideal for an office environment. For a louder sound, an external signal (bell or horn) may be connected to the recorder. A relay will be required. Please consult your local electrician. Time card type By selecting the time card type, the ATR will automatically adjust spacing. Please select only card type numbers 02, 12, 13, 14, 15 or 16 for use with the ATR 440. Other card type numbers 01, 03, 04, 05, 06, 07, 08, 09, 10, 11, and 17 although displayed, may not work correctly with this model. See page 15 of this manual. Two color ribbon The ATR 440 features a two color ribbon program. This allows you to set schedules and indicate by printing in red when employees arrive late or leave early. This two color feature makes auditing time cards quick and easy. Across the card shifting/automatic across the card shifting Moving laterally across the card, each punch period IN morning, OUT lunch, IN from lunch, OUT end of day, IN overtime, and OUT Settings atr440 A5 paper size.p65 9 8/21/02, 8:16 AM 9 overtime has a separate column. Manual shifting is accomplished by the employee selecting and pressing the IN/OUT buttons on the top of the recorder. This causes the print to move across the card to the selected position. Employees on different schedules can select the appropriate "punch" location. The ATR 440 can also be programmed to automatically move across the card. This is best utilized when a "fixed" schedule is being used. (See position codes on the page 25). Up/down and across the card adjustments The ATR 440 is a very versatile time recorder. Because the spacing on different style time cards vary, the ATR 440 allows for adjustments to assure each registration is "near center" of the appropriate print position. 3.2 Basic programming instructions The programming mode is entered by unlocking and removing the top cover from the ATR 440 with the power on. The IN/OUT buttons on the clock serve as function keys in the programming mode. The functions of each button are listed below and on the inside cover of the recorder. F1 F3 F4 F5 E IN OUT IN OUT IN OUT MORNING AFTERNOON OVERTIME PRO P1 P2 P3 F2 YR/MO/DT TD/HR/MN CARD DAY CH SD SIGNAL N/A ACROSS SYNC DST TC SEC PAY END IN/OUT DOWN CL + - ENTER PRO: Press the PRO(gram) button to select the program group. If you're in P1 mode, press the PRO button again to enter the P2 program group. Pressing PRO again will take you to the P3 programming choices. 10 Settings atr440 A5 paper size.p65 10 8/21/02, 8:16 AM P1 options: Function Ke y Abbre viation Se ction Se e page s F1 YR/MO/DT Setting the year, month, and date 12- 13 F2 TD/HR/MN Setting the time of day, digital display, and the print format 13- 14 F3 CARD Selecting the time card type, minute format, day of week, and language 14- 17 F4 DST F5 PAY END 17- 18 Setting Daylight Saving Time Setting a pay period ending date 19 P2 options: Function Ke y Abbre viation F1 DAY CH F2 SD F3 SIGNAL F4 TC F5 IN/OUT Se ction Se e page s Setting the day change time 20 Setting signal duration 20- 21 Setting signals 21- 22 Setting two color ribbon control 22- 24 Setting auto across the card shifting 24- 26 Settings 11 atr440 A5 paper size.p65 11 8/21/02, 8:16 AM P3 options: Function Ke y Abbre viation F1 N/A F2 ACRO SS F3 SYNC F4 SEC F5 DO WN Se ction Se e page s Setting is not functional with this model. Setting the across the card adjustment 27 Synchoronization 28 Seconds reset 28 Setting the up/down adjustment 27- 28 CL: Press the + and - button at the same time to cancel the existing program contents. Pressing the + button by itself advances the display, the - button backs it up. The digital display is used when programming the settings. The portion of the display that is flashing is the component that you are currently setting. Press the E button to advance to the next feature or component. 3.3 Setting the year, month, and date Open the top cover. The digital display reads P1. Press the F1 button. The year flashes on the left of the digital display. Press the + or - button to set the year. Press the E button to accept the year. 12 Settings atr440 A5 paper size.p65 12 8/21/02, 8:16 AM The month flashes next. Press the + or - button to change the month as needed. When correct, press the E button to accept the month. The date flashes next. Press the + or - button to change the date as needed. Press the E button to accept the date and advance to the next setting. The day of the week flashes next. Press the + or - button to change the day of the week as necessary. When correct, press the E button to accept the day. Make sure you set the day of the week correctly or the clock may not print correctly. The digital display will turn off. You have the option to close the clock's top cover or to perform more settings at this point. To change more settings, choose the correct program mode (P1 P3) and function key. You will remain in the P1 program mode until you press the PRO button to advance to another programming mode. 3.4 Setting the time of day, digital display, and the print format You may set the digital display to show the time in 12-hour format or in 24-hour format. Setting the display also selects the format the ATR 440 will print. In the 12-hour format, the display will show AM or PM on the top of the display. The print registration will indicate PM hours with the minutes underscored. Example: At two fifteen in the afternoon, the recorder would print 02:15. In the 24-hour format the registration would be 14:15. Open the top cover. The digital display reads P1. Settings 13 atr440 A5 paper size.p65 13 8/21/02, 8:16 AM Press the F2 button. Either 12 or 24 will be flashing on the left hand side of the display. Press the + or - button to change the time display. Press the E button to accept the time display format. The hour flashes next. Press the + or - button to change the hour as needed. When correct, press the E button to accept the hour. The minute flashes next. Press the + or - button to change the minute. Press the E button to accept the minute. The digital display will turn off. The top cover may be closed at this point, or additional settings can be programmed. Press a function key to program another setting in the P1 programming group. Press the PRO button and a function key to program a setting in the P2 or P3 programming groups. 3.5 Selecting the time card type, minute format, and day of week language The ATR 440 works with several different types of time cards. Time cards normally match your organization's pay period. Time cards may be for weekly, biweekly, semimonthly, or monthly pay periods. It is very important to set the clock and spacing for the type of time card you will be using since it affects the printing position on the card. The chart on the following page is a sampling of popular time cards that we have tested with the ATR 440 and their correct settings. The ATR 440 can be programmed for different spacing standards. The pitch is the amount of space between lines of type. It is measured from the bottom of one line to the bottom of the next line. 14 Settings atr440 A5 paper size.p65 14 8/21/02, 8:16 AM Settings 15 atr440 A5 paper size.p65 15 8/21/02, 8:16 AM MO BW SM WK = = = = (STR) (STR) ATR414 6001 FP5208 N4607A N4608A 85110 85111 85230 85231 85330 85331 1212 2222 2786 5503 5525 Card # BW WK WK BW SM WK WK BW BW SM SM WK BW WK MO WK Pay Period Monthly pay period Biweekly pay period Semimonthly monthly pay period Weekly pay period Acroprint (ACI) (CTR) Acroprint Time Cards 14 7 7 14 16 7 7 14 14 16 16 7 14 7 16 7 Lifts Metric 0.279 0.279 0.279 0.279 0.279 0.279 0.279 0.279 0.279 0.279 0.277 0.277 0.277 0.240 0.240 Spacing 6 mm 7 mm 7 mm 7 mm 6 mm 7 mm 7 mm 7 mm 7 mm 6 mm 6 mm 7 mm 7 mm 7 mm 6 mm 6 mm Pitch 14 16 16 12 02 16 16 12 12 02 02 16 13 16 02 15 Card Type Number* Down the Across Card the card Spacing** Spacing** 50 55 55 50 52 48 50 50 52 50 50 48 52 50 50 50 50 50 52 50 52 50 52 50 47 50 52 50 50 50 51 48 **The initial value for up/down the card and across the card spacing is 50. See Sections 4.1 and 4.2 to adjust the spacing values. * Card Type numbers 01, 03, 04, 05, 06, 07, 08, 09, 10, 11, and 17 are not applicable to this model and may cause the time recorder to malfunction if used. 7¼ 5½ 5½ 7 7 5½ 5½ 7 7 7 7 5½ 7 5½ 7 5½ Card Height ATR 440 Time Card Specification Chart Open the top cover. The digital display reads P1. Press the F3 button. The card type number flashes on the left-hand side of the display. Please select only card type numbers 02, 12, 13, 14, 15, or 16 from the Time Card Specification Chart on page 15 for use with the ATR 440 . If you cannot find the time card you are using, we suggest you pick a similar card with the same pay period, lifts, and spacing. Press the + or - button to change the card value and press the E button to enter the card value. Note: You must set both the card type and a previous pay period ending date (see Section 3.7). The recorder must then be allowed to advance to the day the week starts under its own power. You cannot manually advance the recorder to that date. If you do manually advance the recorder, the second week will print back up at the top of the card, the same as if was a weekly card, instead of continuing down the card. After selecting the card type number, the next character set will flash, allowing you to select how time or portions of the hour will print on your time cards. Selected from 01-04 with 01 printing time in minutes, 02 in hundredths, 03 in twentieths, and 04 in tenths of an hour. If 12-hour print format was selected, then the pm portion of the hour will be underscored. Refer to the following chart for time equivalents between the different methods used for portions of an hour. (01) 00 01 02 03 04 05 06 07 08 09 ~ 29 30 31 32 33 34 35 ~ 54 55 56 57 58 59 Mi nutes (02) 1/100 00 02 03 05 07 08 10 12 13 15 ~ 48 50 52 53 55 57 58 ~ 90 92 93 95 97 98 hour (03) 1/20 hour 00 00 00 05 05 05 10 10 10 15 ~ 45 50 50 50 55 55 55 ~ 90 90 90 95 95 95 (04) 1/10 hour 00 00 00 00 00 00 01 01 01 01 ~ 04 05 05 05 05 05 05 ~ 09 09 09 09 09 09 16 Settings atr440 A5 paper size.p65 16 8/21/02, 8:16 AM Press the + or - button to change the portion of an hour indication; press the E button to accept it and advance to the day of the week indicator. The day/date language code flashes next. This setting controls how the day or date prints on a time card. See the chart below. Imprint day of week No day/date Date English Italian German French Spanish Japanese Numeric Code 00 01 02 03 04 05 06 07 08 Example Blank (prints time only) 01, 02, ~31 SU, MO, ~SA DO, LU, ~SA SO, MO, ~SA DI, LU, ~SA DO, LU, ~SA D7, D1, D2, ~D6 Press the + or - button to change the day of the week indicator. Then press the E button to accept the setting. The digital display will turn off. You may close the top cover or choose to program another setting. 3.6 Setting Daylight Saving Time (must be set each year) The clock may be set to Daylight Saving Time. You must set both the starting and ending dates for Daylight Saving Time. The clock will then automatically advance forward one hour on the first date you set, and revert backwards one hour on the second date you set. Any hour between midnight and 9:00 am may be chosen as the time for the clock to advance forward or to revert backwards. Daylight Saving Time is not automatically updated each year. You will need to reset it each calendar year. Settings 17 atr440 A5 paper size.p65 17 8/21/02, 8:16 AM Open the top cover. The digital display reads P1. Press the F4 button. The digital display shows a 1 as the left-most character, representing the first or starting date of daylight savings time. The hour, next to the 1 on the left-hand side of the display, flashes. Press the + or - button to change when the time change takes place. Currently, the U.S. standard is 2:00 am on the first Sunday in April and the last Sunday in October. To accept the hour, press the E button. The month flashes next. Press the + or - button to change the starting month. Press the E button to accept the month. The day of the month will flash next. Press the + or - button to change the day. Press the E button to accept the month. You will now start setting the Daylight Savings Time end date. The digital display now shows a 2 as the left-most character. This represents the second setting or ending date. The hour on the left-hand side of the display flashes. Press the + or - button to change to the hour which you want the time change to take place. To accept the hour, press the E button. The month flashes next. Press the + or - button to change the ending month. Press the E button to accept the month. The day of the month will flash next. Press the + or - button to change the day. Press the E button to accept the month. The display will turn off. You may close the top cover or choose to program another setting. 18 Settings atr440 A5 paper size.p65 18 8/21/02, 8:16 AM 3.7 Setting a pay period ending date The ATR 440 is designed so that the last day of your pay period prints on the bottom row of your time card. On initial setup, be sure to select the previous pay period and not the current pay period ending date. This will assure that when you start using the ATR 440, registrations print in the correct row of your time recorder. For semimonthly and monthly pay periods, select the 31st as the pay ending date. Since monthly time cards normally have 32 rows, you must select one row on the card as a blank row. Check your time card for the blank row position. Make sure that you chose the appropriate card type number in Section 3.4. To change the pay ending date for a monthly pay period, open the top cover. The digital display reads P1. Press the F5 button. The pay ending date flashes. For semimonthly and monthly pay periods, leave this set at 31. Press the + or - button to change the pay ending date to the correct date and press the E button. The blank row number flashes next. Press the + or - button to change the blank row to the correct row number. Then press the E button. Next, the day of the week will blink. This is the day of the week a weekly or biweekly pay period should end on. Time for this day should print on the last row of the time card. Press the + or button to change the day of the week. When the day is correct, press the E button. The display will turn off. You may either close the top cover at this point or continue setting the clock. Settings 19 atr440 A5 paper size.p65 19 8/21/02, 8:16 AM 3.8 Setting the day change time Currently, the day change time is set to 00:00 or midnight. The day change time is the time a new day begins. The day of the week indicator and the date shown on the digital display always changes at midnight. The day change time only affects where the time will print on the time card. Open the top cover. The digital display reads P1. Press the PRO button, the display will read P2. Press the F1 button. Press the + or - button to change the day change time. The hours flash first. Once the hour of the change is set, press the E button to accept it. The minutes will flash next. Press the + or - button to change the minutes. Press the E button when the minutes have been set. The display will turn off. You may either close the top cover at this point or continue setting the clock. 3.9 Setting signal duration The default length for a signal is five seconds; however, the signal may last up to 99 seconds. The length of the signal may be changed as needed. Open the top cover. The digital display reads P1. Press the PRO button, the display will read P2. Press the F2 button. The length of the signal flashes on the display. Use the + or button to change the duration in seconds of the signal. Press the E button to accept the signal duration setting. 20 Settings atr440 A5 paper size.p65 20 8/21/02, 8:16 AM The display will turn off. You may either close the top cover or choose to continue setting the clock. 3.10 Setting signals A total of 42 audible or visual signals can be set for any given time on any given day of the week. ATR 440 features an internal tone generator that sounds a melody ideal for office environments. This melody is activated when program times are scheduled. If external signal(s) are required, the addition of a relay (not supplied) will be necessary. Please consult your local electrician. Open the top cover. The digital display reads P1. Press the PRO button, the display will read P2. Press the F3 button. The two smaller characters on the left represent the signal set you are working with. Since a total of 42 signals can be set, the number will be 00 through 42. For the first signal set the display shows 01 66 66, with the 01 indicating the first signal program. The hour the signal should be activated is flashing. Set the hour by pressing the + or button, then press the E button. The minute the signal should be activated flashes next. Set the minutes by pressing the + or - button, then press the E button to accept the setting. Selecting the day of the week for the signal is next. The day SU flashes on the display. Choose Sunday if the signal should sound each day. Use the + or - button to change the day. Pressing the + key adds the day, making the signal operational on that day, and pressing the - button cancels the signal for that day. Press the E Settings 21 atr440 A5 paper size.p65 21 8/21/02, 8:16 AM button when you have finished setting the signal. The display will show the number 02 66 66 at this point, indicating you have finished setting the first signal and are now ready to set the second signal. If you want to set another signal, set both the hour and the minute just as you did for the first signal. Then set the day of the week by using the + and - buttons. Press the E button when you are finished. The display will then read 03 66 66. You then have the option of setting a third signal or closing the top cover. Up to 42 signals may be set this way. Confirming signal settings To change or confirm signal settings, open the top cover. The digital display reads P1. Press the PRO button, the display now reads P2. Press the F3 button. The data for the first signal setting is displayed. To confirm the signal setting, press the F3 button to move to the next signal. Press the F3 button until you get to the signal setting that you want to change. Then press the + and button at the same time to delete the data and enter the correct signal time. You may cancel the signal by pressing the + and button at the same time. Do not enter a new signal time if you want to cancel the signal. Press the E button to save the signal setting. When the next signal number appears, you know the signal setting has been saved. You may then close the top cover. 3.11 Setting two color ribbon control The ATR 440 comes with a two color ribbon. This two color printing feature may be used to highlight early or late punches or overtime, etc. Up to 18 changes may be programmed. You may define certain periods of the day in which the ATR 440 will print in "RED" to indicate a 22 Settings atr440 A5 paper size.p65 22 8/21/02, 8:16 AM nonscheduled punch. An example would be all employees punches in between 7:30 am and 8:00 am would print in "BLUE" (or scheduled punching). Employees punches between 8:01 am and 11:59 am would print in "RED" (either a late in or an early out lunch). Punches between 12:00 noon and 1:00 pm would print in "BLUE" (on-time lunch). Punches between 1:01 pm and 4:59 pm would print in "RED" (late return from lunch or early out for the day). Punches between 5:00 pm and 5:30 pm would indicate on-time exit punches. Punches after 5:31 pm would print in "RED" indicating possible overtime. Punches are divided into two groups. The nonscheduled punches (the odd group) will print in red ink and the scheduled punches (the even group) in blue ink. You may determine whether it is an odd group or an even group by the number flashing on the left of the display. You will set the time that the color change should take place at. Open the top cover. The digital display reads P1. Press the PRO button, the display will read P2. Press the F4 button. The hour of the first color change flashes. Note that 01 appears on the left of the display. This indicates you are setting the first color change. Since one is an odd number, this is part of the odd group and punches will be printed in red. Press the + or - button to change the hour as necessary. Press the E button to accept the hour. The minutes will flash next. Press the + or button to set the minutes. Press the E button to accept the minutes. The day of the week will flash next. Choose Sunday if the two color ribbon setting should apply to each day. Use the + or button to change the day. Pressing the + key adds the day, making the two color ribbon feature operational on that day, and Settings 23 atr440 A5 paper size.p65 23 8/21/02, 8:16 AM pressing the - button cancels the two color ribbon feature for that day. Press the E button to register the setting. When the number 02 66 66 appears on the display, the registration is complete. The 02 indicates you are now setting the second color change. If you want to set another color change, set both the hour and the minute the same way you did for the first color change. Then set the day of the week by using the + or - buttons. To register the setting, press the E button. When the next program number 03 66 66 appears, indicating the third color change setting, you may choose to set another color change or to close the top cover. Confirming the two color ribbon control Open the top cover. The digital display reads P1. Press the PRO button. The display will read P2. Press the F4 button. The display shows the data for the first group you entered. To confirm the first two color ribbon control setting, press the F4 button to move to the second group. Press the function button until you reach the specific group you want to change. Then press the + and - button at the same time to delete the data and enter the correct time for the color change. Press the E button to register the change. When the next program number appears, the setting has been registered. 3.12 Setting auto across the card shifting Automatic across the card shifting is a feature that allows the ATR 440 to automatically move across the card. This eliminates the employees from having to manually position the card. This feature may be adopted where fixed schedules are used. Position codes 11 through 16 24 Settings atr440 A5 paper size.p65 24 8/21/02, 8:16 AM are used to identify which "column" the clock will print in. Up to 18 different shifts can be set and operated at any time or on any given day of the week. Before auto-shift times can be entered, a position code must be entered. Position Codes: 11 Morning 13 Afternoon 15 Overtime IN IN IN 12 Morning 14 Afternoon 16 Overtime OUT OUT OUT Open the top cover. The digital display reads P1. Press the PRO button, the display will read P2. Press the F5 button. First, you need to program what time the shift starts. To program the IN you will need to make sure the position code is set correctly. For example, to program the Morning In, the position code needs to be set to 11. The position code is indicated by the two flashing characters on the left of the display. Use the + or buttons to change the position code and then press the E button. The hour the auto-shift change should take place flashes next. Press the + or - button to change the hour. When finished, press the E button to accept the hour setting. The minute the auto-shift change should take place at flashes next. If necessary, press the + or - button to change the minute. Press the E button to accept the minute setting. The day of the week will flash. Choose Sunday if the auto-shift setting should apply to each day. Use the + or - button to change the day. Pressing the + key adds the day, making the auto-shift feature operational on that day, and pressing the - button cancels the auto-shift feature for that day. Press the E button when done to register the auto-shift setting. When the next program number appears, the registration is complete. Settings 25 atr440 A5 paper size.p65 25 8/21/02, 8:16 AM Next, you need to program the OUT. You will need to change the position code to the correct position code. Use the + or - buttons to change the position code. Press the E button to accept the position code. The hour the auto-shift change should take place flashes next. Press the + or - button to change the hour. When finished, press the E button to accept the hour setting. The minute the auto-shift change should take place at flashes next. If necessary, press the + or - button to change the minute. Press the E button to accept the minute setting. The day of the week will flash. Choose Sunday if the auto-shift setting should apply to each day. Use the + or - button to change the day. Press the E button when complete to register the autoshift setting. When the next program number appears, the registration is complete. You may either close the top cover at this time or continue to set auto-shift schedules or other settings. Confirming or changing the IN/OUT auto-shift times Open the top cover. The digital display reads P1. Press the PRO button, the display will read P2. Press the F5 button. The display will show the time and date you entered for the first programmed group. The position code is the two characters on the left on the display. To confirm the first auto-shift setting, press the F5 button to move to the next setting. Continue moving through the settings by using the F5 button until you locate a setting you want to change. Press the + and - button at the same time to delete the information entered for that setting. Then enter the correct time for the auto-shift. Close the top cover when you have finished confirming auto-shift settings. 26 Settings atr440 A5 paper size.p65 26 8/21/02, 8:16 AM 4. Special functions 4.1 Setting the across the card adjustment If the ATR 440 does not print in the center of each column across the card, the printing location may be adjusted. See the time card adjustment chart on page 15 for suggested spacing settings for selected time cards. Open the top cover. The digital display reads P1. Press the PRO button twice. The display should now read P3. Press the F2 button. Use the + or - button to move the printing location by the desired value. The initial value or amount the printing will move across the card is 50. Increase the value to move the printing to the right. Decrease the value to move the printing to the left. Increasing the value by 1 moves the print 0.005" to the right. Decreasing the value by 1 moves the print 0.005" to the left. Press the E button to accept the value and register the setting. 4.2 Setting up/down adjustment If the ATR 440 does not print in the center of the row down the card, the printing location may be adjusted. See the time card adjustment chart on page 15 for suggested spacing settings for selected time cards. Open the top cover. The digital display reads P1. Press the PRO button twice. The display should now read P3. Press the F5 button. Use the + or - button to move the printing location by the desired value. The initial value or amount the printing will move up or down is 50. Increase the value to move Special functions 27 atr440 A5 paper size.p65 27 8/21/02, 8:16 AM the printing upwards. Decrease the value to move the printing downwards. Increasing the value by 1 moves the print 0.002" upwards. Decreasing the value by 1 moves the print 0.002" downwards. Press the E button to accept the value and register the setting. 4.3 Synchronizing the minute and second The ATR 440 allows for easy time synchronization with other devices such as another clock or signaling device. To synchronize the ATR 440, open the top cover. The digital display reads P1. Press the PRO button twice. The display should now read P3. Press the F3 button to advance the clock one minute at a time. The clock will begin at 00 seconds. Each time the F3 button is pressed, the clock advances one minute. 4.4 Seconds reset - allows you to synchronize to the second Open the top cover. The digital display reads P1. Press the PRO button twice. The display should now read P3. Press the F4 button to reset the seconds back to 0. The clock will automatically restart. 28 Special functions atr440 A5 paper size.p65 28 8/21/02, 8:16 AM 5. Connecting an external signal External signals will be activated at the times programmed in section 3.10, Setting Signals. If external signal(s) are required, the addition of a relay (not supplied) will be necessary. Please consult your local electrician. On the back rear of the ATR 440 is a door to access the internal relay contacts. When the access door is removed, you will see two terminal screws. The screws are for low voltage (Class 2) contacts for the internal relay. At programmed signal time, the internal contacts close completing the circuit. The relay contacts are "dry" and supply no voltage. Voltage applied to these contacts must not exceed 30 Volts. An external relay must be used in order to activate signaling devices. Please note that the external relay is not supplied or offered by Acroprint. Signal Input Voltage 125 VAC ATR 440 Internal Relay 30 Volts (Class 2) External Relay 125 VAC External Signal Replacing the fuse 1) Remove the front and rear covers (see Section 7). 2) There are two fuses on the front board and one fuse on the rear board in black holders marked "FUSE 5X20". 3) Note: Both the front and rear circuit boards each have a fuse marked F1. On the front board, one fuse is marked .5A, the other is marked 1A. The F1 or .5A fuse is for the AC power supply. It's for everything except the signal control. The F2 or 1A fuse is dedicated to the signal control line. The fuse on the rear board, F1, is a 2.5 Amp fuse for the signal control. 4) Pull the fuse holder from the board. Remove the fuse from its holder and check to see if it is burned out. 5) Replace the burned out fuse and snap it back into its holder. 6) Place the fuse holder back onto the board. 7) Reinstall the front and rear covers. Connecting an external signal 29 atr440 A5 paper size.p65 29 8/21/02, 8:16 AM 6. Replacing the ribbon cartridge 1) Insert the key in the keyhole. (Figure 1) 2) Turn the key clockwise. (Figure 1) 3) Remove the top cover. (Figure 2) 4) Hold the ribbon cartridge with your thumb pressing at A and your first and middle finger pressing B. 5) Pull the ribbon cartridge up in the direction of C. (Figure 3) 6) Insert a new cartridge between the print head and the guide plate and turn the knob clockwise. 7) Connect the joints in the cartridge with the slots in the ribbon base. Push the cartridge head until it clicks into place. 8) Turn the knob clockwise to remove any slack in the ribbon. 9) Connect the hooks in the top cover (A, B) with the hooks in the case (C, D). Insert the top cover into place. (Figure 4) 10) Insert the key and turn it counterclockwise to lock the top cover in place. 30 Replacing the ribbon cartridge atr440 A5 paper size.p65 30 8/21/02, 8:16 AM 7. Removing & installing the case To remove the case: 1) 2) 3) 4) Open the top cover by inserting the key into the keyhole and turning it clockwise. Use a Phillips (+) screwdriver to remove 2 screws (A and B in Figure 5). Lie the time recorder on its back. Use a Phillips (+) screwdriver to remove 2 screws (Figure 6). To remove the back cover: 1) 2) 3) 4) 5) 6) Use a small slotted (-) screw driver to remove the plastic rivet (A). Remove the display PC board. (Figure 7) Use a Phillips (+) screwdriver to remove 2 screws. (B in Figure 7) Turn the time recorder around. Use a Phillips (+) screw driver to remove screws C and D. (Figure 8) Remove the back cover by pulling it towards you. To reinstall the back cover, reverse the steps above. Removing and installing the case 31 atr440 A5 paper size.p65 31 8/21/02, 8:16 AM 8. Troubleshooting The time recorder does not accept the time card: Power failure or disconnected power cord when the battery is not charged. The time card sensor malfunctions. Please contact the dealer from whom you purchased the time recorder. A long "beep" is heard without printing: The card was inserted backwards. Try inserting the card the other way round. If the time recorder does not return to normal, please contact the dealer. The printing position is wrong: The pay period ending date, etc. was set incorrectly. Please check to make sure all settings are correct. Light printing: The ribbon is worn out. Please replace the ribbon cassette. The ribbon cassette is not installed correctly; please install it again. Printed time does not agree with the clock displayed time: Disconnect the power and plug the clock back in. If the digital display reads EC0, the movement has malfunctioned. Please contact the dealer. The time recorder does not maintain correct time: Unplug the clock. Press the RESET button located near the center on the back of the time recorder for five seconds or longer. If it does not work, please contact the dealer. Error Code List EC0: Clock movement error EC1: Motor error (across the card motion) EC2: Motor error (up/down motion) EC3: Time card detector sensor error 32 Troubleshooting atr440 A5 paper size.p65 32 8/21/02, 8:16 AM 9. General specifications Power supply: 115/230 VAC (as designated), 50/60 Hz, single phase. Power consumption: Normal 2W (Max 30W) Standard time signal: Quartz oscillation Time accuracy: ± 3 seconds per week Battery backup: Full operation of all functions in case of a power failure, and memory backup for subsequent 36 months Usage environment: Temperature: 32°F - 104°F (0°C - 40°C) Humidity: 40% - 80% Dimensions: 7-1/2" wide x 8-1/4" tall x 5-1/8" deep 190mm wide x 210mm tall x 130mm deep Shipping Weight: approximately 7 lbs. (3 kg.) WARNING This equipment has been tested and found to comply with the limits for a Class A digital device, pursuant to Part 15 of FCC Rules. These limits are designed to provide reasonable protection against harmful interference when the equipment is operated in a commercial environment. This equipment generates, uses, and can radiate radio frequency energy and, if not installed and used in accordance with the instruction manual, may cause harmful interference to radio communications. Operation of this equipment in a residential area is likely to cause harmful interference in which case the user will be required to correct the interference at his or her own expense. Caution: Changes or modifications not expressly approved by the party responsible for compliance could void the user's authority to operate the equipment. General specifications 33 atr440 A5 paper size.p65 33 8/21/02, 8:16 AM 10. Manufacturer's warranty Should you have any questions concerning your warranty information or supplies, please contact the dealer or store where you purchased the equipment. This product is guaranteed to the original purchaser for a period of one (1) year from original purchase date against defective materials and workmanship when used under normal operating conditions. The repair or replacement of any defective component or part and any necessary adjustments will be made free of charge provided that the machine is shipped prepaid to the factory service center shown below, securely packaged and shipped in the original shipping container. This warranty applies to Acroprint products purchased and retained in the U.S.A. The guarantee is not applicable if the device has been subject to misuse, abuse, negligence, accidents, power surges and lightning. The guarantee is not applicable if the serial number has been altered, defaced or removed or if the device has been tampered with or taken apart by other than authorized service personnel. Please return the warranty card to Acroprint to register your product. Or, if you would like to register online, please contact us at www.acroprint.com. For your reference, fill out the information below and keep it in a safe place. Model Number ___________________________ ATR 440 Serial Number ____________________________ Date Purchased __________________________ Purchased From __________________________ Location _________________________________ Telephone Number _______________________ Acroprint Time Recorder 5640 Departure Drive Raleigh, NC 27616-1841 919.872.5800 IN USA 800.334.7190 34 Manufacturer's warranty atr440 A5 paper size.p65 34 8/21/02, 8:16 AM Mail or Fax Today at 919.850.0720 Product Registration Card ATR 440 Model No. Serial No. First name Last name Title Company name Address City State Zip Daytime phone with area code Tear-off Purchased from Purchase date So that we may serve you better, please indicate your primary business activity. (01) Manufacturing (07) Hotel/Motel (02) Wholesale (08) Banking/Financial (03) Retail (09) Medical/Dental (04) Government (10) Construction (05) University/School (11) Other (06) Restaurant Number of Employees using product (20) 1 - 10 (21) 11 - 25 (22) 26 - 49 (23) (24) (25) 50 - 75 76 - 100 100+ Annual Sales in dollars (30) Under $ 100,000 (31) $ 100,000 - 250,000 (32) $ 250,000 - 500,000 (33) (34) (35) $ 500,000 - 1,000,000 $ 1 million to 5 million $ 5 million and over Do you use Microsoft Windows? (40) Yes (41) No Are you interested in receiving information on any other Acroprint products (check all that apply): (50) Manual Time Clocks (54) Human Resources Software (51) Electronic Time Clocks (55) Data Collection Terminals (52) Time Stamps (56) Biometrics (53) Time & Attendance Software atr440 A5 paper size.p65 35 8/21/02, 8:16 AM 5640 Departure Drive Raleigh, NC 27616 919.872.5800 IN USA 800.334.7190 www.acroprint.com P/N 06-0296-000 Rev. B atr440 A5 paper size.p65 36 8/21/02, 8:16 AM