1
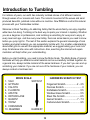
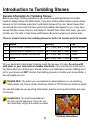
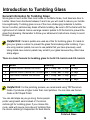
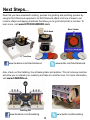
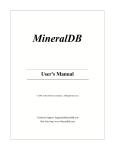
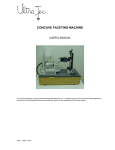
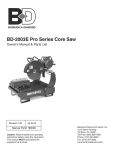
tumble Bee
Tumbling Instructions
TB-12
TB-22
TB-14
SAFETY GUIDELINES
1) Read this entire manual before first operating your Tumble-Bee.
2) Do not use your Tumble-Bee in wet conditions or around flammable
gases or liquids. The Tumble-Bee is built to work in clean, dry, room
temperature conditions only.
3) Do not leave children unattended with the Tumble-Bee. Always make
sure to have a responsible adult supervising children at all times.
4) Do not abuse your cord. Carrying a tool by the cord or yanking the
cord to disconnect from a receptacle may cause your cord to break.
Keep all cords away from heat, oil and sharp edges at all times.
5) Never overload the Tumble-Bee. This not only puts strain on the
motor but won’t give you the results intended. Use appropriate quantities that don’t exceed the tumbler’s capacity.
6) Turn your Tumble-Bee motor off for servicing before removing the
black motor cover.
7) When emptying and cleaning your barrel, never pour the slurry
down the drain. The slurry hardens like a rock and can clog your drain.
Table of Contents
Machine Details................................................................................ 4
Operating Instructions............................................................ 5 , 6 , 7
Care & Maintenance..................................................................... 7 , 8
Trouble Shooting............................................................................. 9
Introduction to Tumbling.............................................................. 1 0
Introduction to Tumbling Rocks.............................................. 11
Introduction to Tumbling Glass............................................... 12
Introduction to Tumbling Brass & Metals................................ 13
Warranty Information..................................................................... 14
What’s Next?................................................................................... 15
3
Machine Details
What you see below is everything you will find with your Tumble-Bee. Tumbling material
and abrasives can be found at your local rock shop or online. If you need extra parts for
your Tumble-Bee, you can order on our website at www.tumble-bee.com. For speciality
parts, e-mail [email protected] for further assistance.
1
2
3
5
6
7
9
8
10
13
11
12
14
PART #
1
2
3
4
4
5
6
7
8
9
10
11
12
13
14
15
16
17
18
19
20
21
21
20
19
Description
Plastic Housing
Motor Cover
On/Off Switch
Thumb Screws
Bearings
Drive Shaft
Support Shaft
Drive Pulley
Motor Pulley
Fan
Motor
Thermal Overload Protection
Timing Belt
Oil
Pulley Wrench
2 lb. Barrel
4 lb. Barrel
Inner Lid
Outer Lid
Washer
Barrel Nut
18
17
16
15
4
2 barrels for TB-22
1 barrel for TB-12
1 barrel for TB-14
Operating Instructions
1) Location: Your Tumble-Bee will be operating all 24 hours of the day so choose a
convenient location for your tumbler with an electrical outlet nearby. We recommend a
location at room temperature on a flat, clean surface with at least 6” clearance around
the motor to provide proper ventilation. Be sure not to put your Tumble-Bee with other
valuables as a spill could happen.
Helpful Hint: Place your Tumble-Bee in a large pan so if the barrel spills open while
tumbling, your material is in one place.
2) Open the Barrel: To open the barrel, simply
unscrew the black barrel nut turning counterclockwise and remove the black washer. Next,
remove the silver outer lid by inserting the black
washer inbetween the silver outer lid and barrel,
moving the washer in an up and down motion.
This will allow the silver outer lid to pop off.
Remove the inner lid by lifting it by the center bolt.
Pry open lid
using washer
3) Add your Material: Once you have figured
out what material you will be tumbling, add 1/2
(minimum) to 2/3 (maximum) of that material to
your barrel. Do not overfill the maximum. Add
clean water to the barrel, just enough to barely
cover the top layer of your material.
About 2”
bottom to
top of water
2 lb. barrel
About 5”
bottom to
top of water
4 lb. barrel
Helpful Hint: Do not add too much water to your barrels or your material will not
tumble effectively.
4) Add your Abrasive: The abrasives you use depends on the material you are
tumbling. Be sure to get the right abrasives for your material at your local rock shop.
Follow the instructions on the abrasives for the correct quantity to add to the tumbler or
refer back to pages 11,12,13 for average tablespoon quantities.
Overloading: The max tumbling weight including the barrels, material and water
is 6 lbs.,10 oz. Overloading will cause motor to overheat.
5
Operating Instructions
5) Close the Barrel: Wipe the inner lid of your barrel clean with a damp cloth so the
inner and outer lids go back on a clean surface. Place the inner lid back in the barrel so
there’s a snug fit. Place the silver outer lid on top of the inner lid so that the center bolt is
sticking out of the middle and the edge of the lid is flush with the side of the barrel. Place
the black washer on top and screw on the black barrel nut, turning clockwise. Make sure
this is very tight so it won’t spin loose. Spin your barrel around to test for any leaks.
6) Time to Tumble: It’s time to start tumbling.
If this is your first time tumbling with the TumbleBee, manually rotate the drive shaft and support
Nut groove
shaft. Oil the motor bearings before tumbling
rests over
for the first time. A few drops is all you need but
barrel guide
be sure to clean up any excess. If you are not sure
where the motor bearings are, refer to the image
on page 7. Please note, when turned on it is
normal for your tumbler to be hot to the touch and
make noise. Place your barrel on the two shafts
and make sure the groove in the black knurled nut
rests over the barrel guide. Plug your Tumble-Bee
into an outlet and turn your tumbler on using the on/off switch. Your barrel should be
rotating at this point. If it’s not, you can manually spin the barrel as a kick start. Follow
the directions on your abrasives to know how long to tumble with each grit.
Helpful Hint: If this is your first time with the Tumble-Bee, keep a close eye on
your tumbler to make sure everything is working properly. In general, you should
check your tumbler once a day to make sure there is no spill and to make sure your
material is coming along properly.
7) Changing the Abrasive: Open the barrel and pour
your tumbling material in a bucket or strainer and rinse it
with clean water. Inspect your material. Rough edges
should start to wear down and a polish should start
appearing with each step used in the abrasive sequence.
Put the inspected material back in your barrel with the
correct abrasive and close your barrel.
6
Operating Instructions
Helpful Hint: Keep a log of your tumbling progress. By doing so, it can be a
useful reference for when you tumble similar material in the future.
8) Restart Tumbling: Before you start tumbling with the next abrasive, clean and oil
the bearings. Simply wipe your bearings with a clean cloth to collect any dust that may
build-up while tumbling. Then oil your bearings, about a few drops should suffice. Do this
every time you change abrasives to keep your Tumble-Bee tumbling properly. Once you
have cleaned and oiled the bearings, turn your power switch on and start tumbling.
Care & Maintenance
The Tumble-Bee is manufactured to operate 24 hours a day, 7 days a week.
With proper care and maintenance, your tumbler will tumble for years.
Barrel Exterior & Interior: Your barrels may form a dust while tumbling. It is important to keep the outside and inside of your barrel clean to protect the rubber and to keep
a clean unit. Simply wipe the outside and inside of your barrel with a wet, soapy cloth
in-between grit changes. Rinse the soap off with clean water. These barrels aren’t suitable for a dishwasher or harsh cleaning solvents.
Bearings: Before you start your very first tumble with the Tumble-Bee, oil your four
bearings. After that, oil every time you change your grit. The oil that comes with the
Tumble-Bee is a motor oil so you will need to oil your bearings more frequently. Also,
clean your bearings with a clean cloth to pick-up any dust that may build-up while tumbling in-between grit changes.
Helpful Hint: You can use store
bought 10W30 motor oil. Do not use
spray on lubricants.
OIL
7
Care & Maintenance
Motor: The black motor cover is designed to push on and pull off so don’t carry your
Tumble-Bee by the black motor cover. Every time you re-align either pulley or belt,
tighten the black thumb screws which tightens the motor, turning clockwise. Always do
this to prevent motor problems.
3 Thumb Screws
Safety Note: After continuous use, the Tumble-Bee motor may become hot. If the
motor over-heats, it is protected with a thermal overload device so the unit will automatically shut off. If this happens, let the motor completely cool off. The motor will
restart on its own. Overheating is often a sign of exceeding weight limits.
Belt: The non-slip timing belt on your tumbler is an industry leading design. It comes
pre-aligned but if you need to adjust it, simply adjust both pulleys that hold the belt using
the silver hex wrench that came with your Tumble-Bee. Once both pulleys are adjusted
and your belt is straight and tight, make sure your pulley is tight by turning your hex
wrench clockwise. Misaligning the pulley will result in belt failure. Be sure not to overtighten your belt or this can result in a motor bearing failure.
Adjust drive
pulley here
Adjust motor
pulley here
Helpful Hint: Depending on the tightness of your belt, the tumbler will spin at
59-60RPM.
8
Trouble Shooting
If you have questions regarding your Tumble-Bee, check on this page to see if we can
answer them. If your question is not on here and you need further assistance, please
e-mail [email protected].
My barrel isn’t moving on the shafts.
If your barrel isn’t moving, take the barrel off the shafts and make sure the support shaft is spinning freely.
This is the main cause of rotation problems. Clean and oil the support shaft until it spins properly. If it is,
put the barrel back on the shafts and spin the barrel manually, giving your tumbler a “kick- start.” If it is still
not moving, the material you are tumbling is too heavy. Remove some of the material so your barrels rotate
properly. Remember not to exceed the capacity limit of 2/3 full.
My belt won’t spin.
This can be caused by the motor position being to far to the right causing too much tension on the belt.
Loosen the black thumbscrews and move the motor so the belt is loose. If the motor still doesn’t spin, then
test the motor without the belt. If it’s still not spinning, then the motor should be replaced.
My inner lid won’t seal correctly.
Be sure to wipe the inner lid and the edge of your barrel clean so material isn’t getting in the way of sealing
the inner lid. Your inner lid should sit correctly on the barrel.
My motor and belt spin but the drive shaft doesn’t.
You need to tighten the drive pulley. To do this, tighten the set screw that is on the drive pulley with the
allen wrench you received with your Tumble-Bee.
My belt is loose.
Adjust the motor following the instructions on page 8. There needs to be adequate tension but don’t tighten
the belt too tight or the motor won’t spin.
My barrel leaked.
This could stem from two reasons. Either the lids weren’t sealed properly or there was a gas build-up in
your barrel. Depending on the material you are tumbling, a chemical reaction could occur and form a gas
inside your barrel. This gas can fill up inside the barrel and cause the lid to pop off, thus spilling the insides.
Make a good habit of checking your material daily so you can relieve that gas build up when you open the
barrel for inspection.
My tumbler is noisy.
In general, tumbling is a noisy process and our non-slip timing belt design will be slightly louder than the
less efficient O-ring design. However, the tumbler noise (buzz) can be somewhat dampened by adjusting
the tension on the timing belt. You can loosen the motor thumbscrews and put some slack onto the belt,
but make sure not to do too much or else the belt will not properly fit into the grooved pulleys. Also, always
make sure everything is properly lubricated.
9
Introduction to Tumbling
For millions of years, our earth has naturally tumbled stones of all different material
through waves of our oceans and rivers. The natural movement of the waves and sand
produced beautiful, polished rocks without a machine. Now YOU can control this natural
process with your Tumble-Bee tumbler.
Welcome to Rock Tumbling. An addicting hobby that the whole family can enjoy together
while have fun doing. Tumbling is the best way to spark your interest in lapidary. Whether
you are a beginner or professional, rock tumbling is something for everyone to enjoy at
every level and age. Just like every new hobby, there are some basics you need to know
before you jump right in. The rest of this section explains the general knowledge of rock
tumbling and what material you can successfully tumble with. For a better understanding
about what grits to use with the appropriate material, we suggest asking your local rock
shop. All abrasive kits come with instructions. Also, searching the internet and experimentation will help further your understanding.
Before you start tumbling, you need to know the Mohs Scale. The Mohs Scale of mineral
hardness will help you determine what material can be successfully tumbled together. As
a general rule, always tumble material of the same hardness. If you don’t you can end up
scratching your material. If you are not sure of the hardness of your material, you can
always conduct a hardness test.
MOHS SCALE
1. TALC
SOFTEST
2. GYPSUM
3. CALCITE
4. FLUORITE
5. APATITE
6. ORTHOCLASE
7. QUARTZ
8. TOPAZ
9. CORUNDUM
10. DIAMOND
HARDEST
HARDNESS SCRATCH TEST
Fingernail Scratch..................2 - 2.5
Pennies Scratch.............................3
Knifeblade Scratch......................5.5
Window Glass Scratch................5.5
Steel File Scratch........................6.5
Garnet Scratch.......................7 - 7.5
Carborundum Scratch.................9.5
10
Introduction to Tumbling Stones
General Information for Tumbling Stones:
Before you begin tumbling gemstones, you must know what gemstones to tumble
together. Always follow the Mohs Scale. If you are tumbling softer stones (usually those
below 6 on the hardness scale) don’t add harder stones to the mix. Select stones that
are around the same size that have colors and patterns that appeal to you. If you have
stones that have deep cracks or are fractured, discard them. More than likely, your rock
tumbler won’t be able to help these misfit stones. Be sure to check your stones daily.
There is a basic formula for tumbling stones for both 2 lb. barrels and 4 lb. barrels:
Step Media
1
Coarse Silicon Carbide Grit 60/90
2
Medium Silicon Carbide Grit 120/220
3
Fine Silicon Carbide Grit 500/600
4
Polish
Quantity
Time
2lb. = 3 tbsp / 4lb. = 6 tbsp 1 week minimum
2lb. = 3 tbsp / 4lb. = 6 tbsp 1 week
2lb. = 3 tbsp / 4lb. = 6 tbsp 1 week
2lb. = 3 tbsp / 4lb. = 6 tbsp 5-7 days
Fill your barrel with clean water to barely reach the top layer of rocks. Do not overfill
with water or your rocks will not tumble effectively. If you see that grit is left-over in
the barrel when you remove your stones, reduce your tablespoon amount. Adding more
grit to your stones will NOT shorten the tumbling process or tumble your stones faster, it
will just waste your grit.
Helpful Hint: The polish you use depends on what material you are polishing.
Most people use Cerium Oxide, Aluminum Oxide or TXP Aluminum Oxide for polish.
You can add steps as you go along. Remember, practice and experimentation are keys
to success.
Helpful Hint: You must have patience!
Do not rush the sequence. If you do, you
will most likely not get the results you want.
11
Polished Gemstones
Introduction to Tumbling Glass
General Information for Tumbling Glass:
Since glass is much softer than most rocks on the Mohs Scale, it will take less time to
tumble. Glass has a hardness between 5 and 6 so you will need to reduce your tumble
time significantly. Tumbling glass is one of the more challenging materials to tumble.
Since it is softer, particles may break off while tumbling. Be sure to fill the barrel with the
right amount of material. Some use large ceramic pellets to fill the barrel to prevent the
glass from breaking. Remember to follow your abrasive kit instructions closely to avoid
broken glass.
Helpful Hint: Ceramic pellets are used as a filler for tumbling glass. It’s made to
give your glass a cushion to prevent the glass from breaking while tumbling. If you
are using ceramic pellets, be sure to use pellets that you have previously used.
Using brand new ceramic pellets may scratch your glass because they often have
sharp edges.
There is a basic formula for tumbling glass for both 2 lb. barrels and 4 lb. barrels:
Step Media
1
Coarse Silicon Carbide Grit 60/90
2
Medium Silicon Carbide Grit 120/220
3
Fine Silicon Carbide Grit 500/600
4
Polish
Quantity
Time
2lb. = 3 tbsp / 4lb. = 6 tbsp 4-5 days
2lb. = 3 tbsp / 4lb. = 6 tbsp 2-3 days
2lb. = 3 tbsp / 4lb. = 6 tbsp 3 days
2lb. = 2 tbsp / 4lb. = 4 tbsp 4-7 days
Helpful Hint: For the polishing process, we recommend using TXP Aluminum
Oxide. It produces a higher luster than most polishes. You can also use Cerium
Oxide or #61 Rapid Polish.
You can add steps as you go along. Some people
prefer using beach sand instead of the silicon
carbide grit for tumbling glass. If you choose this
route, sand will require more days of tumbling than
the silicon carbide grit. Experiment for best results.
Polished Glass
12
Introduction to Tumbling Brass & Metal
General Information for Tumbling Brass & Metals:
Many people polish their jewelry, coins, cartridge cases and remove burrs from bullet
casings with their tumbler. Polishing your metal items will give you a high-polish finish
without the loss of your metal. There are many different techniques for tumbling brass
and metal.
Helpful Hint: If you are polishing valuable jewelry, it’s a good idea to ask a professional jeweler permission to tumble. Some jewelry can be ruined using the tumbler.
NEVER tumble jewelry that has gems or stones.
There is a basic formula for polishing jewelry and metals for both 2 lb. barrels and
4 lb. barrels:
Media
Stainless Steel Shot
Clean Water, Chlorine Free
Burnishing Soap/Mild Dishwashing Detergent
Quantity
Approx. 1 lb.
Time
Tumble media w/
jewelry for 15-30
Cover jewelry & steel shot mins. Tumble
longer if needed.
1-2 drops
Helpful Hint: Once you are done tumbling with your stainless steel shot, dry completely and store. You can re-use your stainless steel shot more than once.
This process will brighten your rings, earrings, chains, sterling silver, gold, precious
metals and other pieces of jewelry you have.
Helpful Hint: Some people tumble loaded
ammo. Please note that this is a dangerous
process and is not recommended. Tumbling
loaded ammo can break down the powder
that may cause extreme pressure problems.
Polished Bullet Casings
13
One Year Limited Warranty
Your Tumble-Bee is warranted by Reentel International Inc. to be
free from defect for the one full year from the date of your purchase.
What does this warranty cover?
This warranty covers the motor, barrels and belt of your Tumble-Bee.
What doesn’t this warranty cover?
This warranty doesn’t cover problems resulting from any abuse,
misuse, intentional damage, incorrect usage, failure to adequately take
care of your Tumble-Bee or improperly following the instructions. It also
doesn’t cover rusty motors, as this is a result from water getting into
the motor which should never occur if used properly.
Who is covered under this warranty?
This warranty covers the original purchaser of the equipment. This
warranty is nontransferable.
What is the warranty period?
This warranty is in force for one full year from the date of your purchase. Please retain this book for your records.
Who should I contact if I need warranty service?
Contact [email protected] directly and we will provide you a
solution for your problem. Shipping to us will be at your expense. If
your problem is determined to be under warranty, we will pay for return
shipping.
Manufactured by:
Reentel International Inc., 808 Burr Oak Dr., Westmont IL. 60559, USA
REV 10/05/2012
Next Steps...
Now that you have mastered tumbling, quicken the grinding and polishing process by
using Hi-Tech Diamond equipment. Hi-Tech Diamond offers a full line of saws to cut
rocks to shape and lapping machines that allow you to grind and polish in minutes. To
learn more, visit www.HITECHDIAMOND.com.
All-U-Need
Slant Cabber
6” Trim Saw
www.facebook.com/hitechdiamond
www.twitter.com/hitechdiamond
Also, check out the CabKing, the ultimate grinder and polisher. This all inclusive machine
will allow you to unleash your creativity and take it to another level. For more information,
visit www.CABKING.us.
CabKing 6V3
www.facebook.com/thecabking
www.twitter.com/thecabking
15
tumble Bee
Phone: (347)-6-TUMBLE
E-mail: [email protected]
Website: www.tumble-bee.com
www.facebook.com/TheTumbleBee
www.twitter.com/The_Tumble_Bee
Printed in the
USA