1
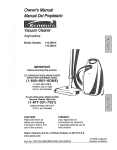
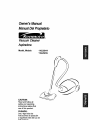
Owner's Manual
ManualDe/Propietafio
Vacuum Cleaner
Aspiradora
Model, Modelo
116.25914
116.25915
CAUTION:
Read and follow all
safety and operating
instructionsbefore first
use of this product.
CUIDADO:
Lea y siga todas las
instruccionesde operaci6n
y seguridadantes del uso de
este producto.
Before Using Your New
Vacuum Cleaner ....................
2
Kenmore Vacuum Cleaner Warranty
Important Safety Instructions .........
Parts and Features .................
Assembly Instructions
.............
Power-Mate Jr." Storage ..............
. .. 2
3
4-5
6-7
7
Operating Instructions ...............
8
How to Start ........................
8
Vacuuming Tips ....................
10
Suggested Pile Height Settings ........
11
Attachments .......................
11
Attachment Use Table ...............
12
Performance Features .............
12-14
How Your Vacuum Cleaner Works .......
14
Canister Care ......................
Bag Changing .....................
Cleaning Exterior and Attachments .....
Motor Safety Filter Changing ..........
Exhaust Filter Changing ..............
15
15
15
16
17
Power-Mate* Care ..................
Dirt Sensor ........................
17
18
Belt Changing and Agitator Cleaning .. 18-19
Light Bulb Changing .................
20
AgitatorServicing ...................
20
Troubleshooting
....................
Requesting Assistance
Or Service ..................
21
Back Cover
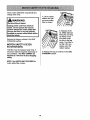
Please read this guide. It will help you assemble and operate your new Kenmore vacuum
cleaner in the safest and most effective way.
For more information about vacuum cleaner care and operation, call your nearest Sears store.
You will need the complete model and serial numbers when requesting information. Your vacuum cleaner's model and sedal numbers are located on the Model and Serial Number Plate.
Use the space below to record the model number and serial number of your new Kenmore
vacuum cleaner.
Model No.
Serial No.
Date of Purchase
Keep this book and your sales check (receipt) in a safe place for future reference.
LIMITED ONEYEARWARRANTY
ON KENMORE
VACUUM CLEANER
This warranty is for one year from the date of purchase, and includes only private household
vacuum cleaner use. During the warranty year, when this vacuum cleaner is operated and
maintained according to the owner's manual instructions, Sears will repair any defects in
material or workmanship free of charge.
This warranty excludes vacuum bags, belts, light bulbs, and filters, which are expendable parts
and become worn during normal use.
For warranty service,
the United States.
return this vacuum cleaner to the nearest Sears Service Center in
This warranty applies only while this product is in use in the United States. This warranty gives
you specific legal rights, and you may also have other rights which vary from state to state.
Sears, Roebuck and Co., D/817 WA, Hoffman
Estates, IL 60179
A WARNING
Your safety is important to us. To reduce the risk of fire electrical shock,
injury to persons or damage when usin.g your vacuum cleaner, follow basic
safety precautions
including the following:
Read all instructions in this manual before
assembling or using your vacuum cleaner.
Use your vacuum cleaner only as
described in this manual. Use only with
Sears recommended attachments.
Disconnect electrical supply before
servicing or cleaning out brush area.
Failure to do so could result in electrical
shock or brush suddenly starting.
Do not leave vacuum cleaner when
plugged in. Unplug from outlet when not in
use and before servicing.
To reduce the risk of electrical shock - Do
not use outdoors or on wet surfaces.
Do not allow to be used as a toy. Close
attention is necessary when used by or
near children.
Do not use with damaged cord or plug. If
vacuum cleaner is not working as it should,
has been dropped, damaged, left outdoors,
or dropped into water, return it to a Sears
Service Center.
Do not pull or carry by cord, use cord as a
handle, close door on cord, or pull cord
around sharp edges or comers. Do not run
vacuum cleaner over cord. Keep cord away
from heated surfaces.
Do not unplug by pulling on cord. To
unplug, grasp the plug, not the cord.
Do not handle plug or vacuum cleaner with
wet hands.
Do not put any objects into openings.
Do not use with any opening blocked; keep
free of dust, lint, hair and anything that may
reduce air flow.
Keep hair, loose clothing,fingers, and all
_arts of body away from openings and
moving parts.
SAVE THESE
Turn off all controls before unplugging.
Use extra care when cleaning on stairs. Do
not put on chairs, tables, etc. Keep on
foor.
Do not use vacuum cleaner to pick up
flammable or combustible liquids (gasoline,
cleaning fluids, perfumes, etc.), or use in
areas where they may be present. The
fumes from these substances can create a
fire hazard or explosion.
Do not pick up anything that is burning or
smoking, such as cigarettes, matches, or
hot ashes.
Do not use vacuum cleaner without dust
bag and/or filters in place.
Always change the dust bag after
vacuuming carpet cleaners or freshener,
powders and fine dust. These products clog
the bag, reduce airflow and can cause the
bag to burst. Failure to change bag could
cause permanent damage to the cleaner.
Do not use the vacuum cleaner to pick up
sharp hard objects, small toys, pins, paper
clips, etc. They may damage the cleaner or
dust bag.
Do not operate vacuum cleaner without the
exhaust filter or exhaust filter door in place
(If applicable).
The hose contains electrical wires. Do not
use when damaged, cot, or punctured.
Replace if cut or worn. Do not pick up
sharp objects.
Always tum oft and unplug the vacuum
cleaner before connecting or disconnecting
either hose, Handi-Mata Jr,® (if applicable),
or nozzle.
Hold plug when rewinding onto cord reel.
Do not allow plug to whip when rewinding.
You are responsible for making sure that
your vacuum cleaner is not used by anyone
unable to operate it properly.
INSTRUCTIONS
Proper assembly and safe use of your vacuum cleaner are your responsibilities.
Your vacuum cleaner is intended for Household
use. Read this Owner's Manual
carefully for important use and safety information. This guide contains safety
statements under warning and caution symbols.
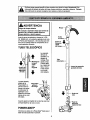
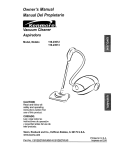
It is important to know your vacuum cleaner's
use. Review these before using your cleaner.
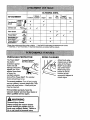
Item
Headlight
Bulb
Belt
parts and features to ensure its proper and safe
Part No.
In U.S.
Part No.
In Canada
20-5240
2040600
20-5218
20-40118
Power-Mate ®
Quick
Release
Button
Telescoping
Wand
Wand Length
Adjust Button
Flange
Belt
Wand Quick
Release Pedal
(Not Shown)
Protector/Belt
Reset Button
Pile
Height Pedal.
Handle
Release PedaJ
Cleaner
(Not Shown)
Power-Mate ®
Model/Serial
Number
(On Bottom)
4
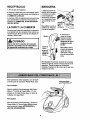
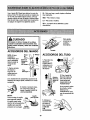
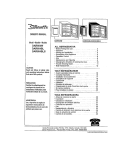
HOSE
ATTACHMENTS
Electronic Touch Con_ol
Crevice
Tool -_---_
_7
_'ush-----_
_
Handle
_
Po_r-Ma_
't
Combination ',
Brush-_
I
_
p.__
i_FabHc
, _-_
L
_
Jr. 8
Dusting
Brush
Brush
---I
Hose Swivel
CANISTER
Item
Part No.
Part No.
In U.S.
In Canada
Dust Bag
20-50557
20-50404
Exhaust Filter
20-86889
2040324
Motor Safety Filter
20-86883
2040321
Cord
Rewind
Power-Mate Jr.•
Storage cover
Exhaust Filter Cover
Tool Storage Cover
Cord
Canister
Hood
Bag
DustBag
Motor Safety Filter
(Behind Dust Bag)
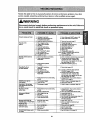
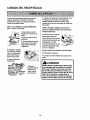
Please pay special attention to these hazard alert boxes, and follow any instructions
given. WARNING statements alert you to such dangers as fire, electric shock, burns
and personal injury. CAUTION statements alert you to such dangers as personal
injury and/o_ property damage.
A
WARNING
Electrical
Shock Hazard
DO NOT plug into electrical supply until
assembly is complete. Failure to do so
could result in electrical shock or
injury.
Lock
Before assembling vacuum cleaner, check
the PACKING LIST on the cover of the separate Repair Parts List. Use this list to vedfy
that you have received all the components
of your new Kenmore vacuum cleaner.
Quick
Handle
Release
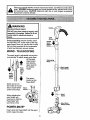
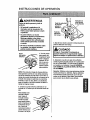
WAND - TELESCOPING
The wand length is adjustable and requires
no assembly. To adjust, simply push down
on the wand
and slide the
upper wand to
adjust button
"
!_
,__
Telescoping
Wand-----,.-._
Keep
height.
the desired
Hand
AdjustButton
Above
Wand
Length
Adjust
This
Tab
Button
,_
allows you to turn
the handle to the left
side to reach farther
under low furniture.
The swivel,
located on the
Power-Mate ®,
Wand
When adjusting the
wand length you
may have to hold the
Power-Mate ®with
your hand or foot.
Button
WandQu_k
POWER-MATE ®
Insert wand into Power-Mate* until the wand
button snaps into place.
e_asePedel
I
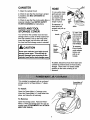
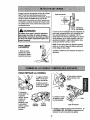
CANISTER
HOSE
1. Open the canister hood.
t. Line up the hose
latch tab and notch
in canister hood
and insert hose
into canister until it
2. Check to see that the dust bag is properly installed. See BAG CHANGING for
instructions.
3. Check to see that the motor safety filter is
properly installed. See MOTOR SAFETY
FILTER CHANGING for instructions.
HOOD AND TOOL
STORAGE COVER
It is normal for the canister
snaps in place.
To remove: Lift
hose latch tab
Hose
Latch
Tab
Noah
upward and pull up
on hose.
m
2. Insert handle into wand
until lock but-
hood and tool
storage cover to come off when opened further than needed. Line up the hinge slots,
insert the hinges into the slots, and close
the hood and tool storage cover to reinstall.
Lock
CAUTION
Handle
Quick
Never open canister hood with the tool
storage cover open. This will help to
prevent damage from occurring to the
canister hood and/or tool storage cover.
Release_
To store: Disconnect
ton snaps in
place. Be
sure hose is
not twisted.
To remove:
Press handle
quick release
button and
pull up on
handle.
hose from wand and
canister to prevent stress on hose during
storage. Store hose in a loosely coiled
position so the hose covedng is not
stressed.
This canister is equipped with an on-board
storage area for a Power-Mate Jr. ®attachment.
Power-Mate Jr.a
Storage Cover
To Install:
Open the Power-Mate Jr. e storage cover.
Insert the Power-Mate Jr. e, press down into
place, and close the lid securely.
To Remove:
Open the storage cover. Remove PowerMate Jr. ° from the storage area and use as
needed (see A'I-rACHMENTS and A'I-rACHMENT USE TABLE).
7
OPERATING INSTRUCTIONS
WARNING
Personal
Hazard
Injury
and Product
Pile
Height
Damage
,f
Pedei _
• DO NOT plug in if switch is in ON
position. Personal injury or
damage could result.
Pedal _
• The cord moves rapidly when
rewinding. Keep children away
and provide a clear path when
rewinding the cord to prevent
personal injury.
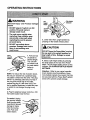
3. Lower wand from upright position by
pressing on the handle release pedal.
DO NOT use outlets above
counters. Damage from cord to
items in surrounding area
could occur.
Cord
CAUTION
DO NOT leave the Power-Mate ®running
in one spot in the upright position for
any length of time. Damage to carpet
may occur.
1. Pull cord out
of canister to
desired length.
The cord will
not rewind until
the cord rewind
button is
4. Select a pile height setting by pressing
the small pedal on the rear of the PowerMate ®.The pile height setting shows on the
indicator. See SUGGESTED PILE HEIGHT
SE'R'INGS.
pushed.
Attention:
Refer to your carpet manufacturers cleaning recommendations. Some
more delicate carpets may require that they
be vacuumed with the Power-Mate ®agitator
turned off to prevent carpet damage.
NOTE: To reduce the risk of electric shock,
this vacuum cleaner has a polarized plug;
one blade is wider than the other. This plug
will fit in a polarized outlet only one way. If
the plug does not fit fully in the outlet,
reverse the plug. If it still does not fit, contact a qualified electrician to install the proper outlet. Do not change the plug in any
way.
2. Plug the polarized power cord into a 120
Volt outlet located near the floor.
To rewind: Unplug
the vacuum cleaner.
Hold the plug while
rewinding to prevent
damage or injury
from the moving
cord. Push cord
rewind button.
8
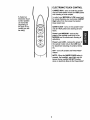
ELECTRONIC TOUCH CONTROL
CARPET
HIGH - turns on both the canister
and the Power-Mate ® motors for HIGH power
and cleaning of most carpets.
5. Select an
Electronic Touch
In order to get MEDIUM or LOW power level
for carpet cleaning, you must press CARPET
High button first, then press the desired
lower power level.
Control position
on the handle
depending on
the type of vacuuming you will
be doing.
BARE FLOOR - turns on the canister motor
C =aJu="_'_
only for HIGH power and cleaning of bare
floors.
PO_R CONTROL
I
LOW
I
Power Level MEDIUM
v
{_FLOO_)
I
RFF
- reduces the
power of the canister motor only to the
MEDIUM level for attachment cleaning of
upholstery.
Power Level LOW - reducesthe power of
the canister motoronly to the LOW level
for attachment cleaning of curtains, blinds,
etc.
)
OFF - turns off canister and Power-Mate ®
motors.
NOTE - When the BARE FLOOR button is
pressed, the headlight, wand light and dirt
sensor (some models) DO NOT function
since no electricity flows to the Power-Mate °.
9
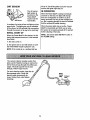
Suggested
sweeping
pattem.
Carpeted stairs
need to be
vacuumed
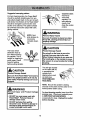
For best cleaning action, the Power-Mata ®
should be pushed straight away from you
and pulled straight back. At the end of each
pull stroke, the direction of the Power-Mate ®
should be changed to point into the next
section to be cleaned. This pattern should
be continued across the carpet with slow,
gliding motions.
regulady. For
best cleaning
results, fully
close the suction
control.
WARNING
"_
NOTE: Fast,
jerky strokes do
not provide
complete cleaning.
Personal Injury Hazard
Use care if canister is placed on stairs.
It may fall, causing personal injury or
property damage.
CAUTION
The hose swivel
allows the hose to
Product Damage Hazard
Do not pull on the hose to move the
canister from one stair to the next.
When finished cleaning in one area use
the handle grip on the canister to move
the vacuum to a new location for further
cleaning.
turn without moving
the canister. This is
helpful for cleaning in
small areas. Check
hose for twisting
before pulling canister.
The stair grip located
on the caster will aid
CAUTION
in preventing the
canister from
slipping when used
on stairs (see
PERFORMANCE
FEATURES).
NOTE: Be sure the canister is resting
securely on the stairs and the caster is in a
locked position before using.
IWARNING
Personal
Hazard
Injury
and Product
Damage
For best cleaning results, keep the airflow
passage open. Check each assembly area
in HOWYOUR VACUUM WORKS
DO NOT run over power cord with
Power-Mate ®. Personal injury or
damage could result.
occasionally for clogs. Unplug from outlet
before checking.
DO NOT pull plug from wall by
the power cord. If there is damage to
the cord or plug, personal injury or
property damage could result.
10
For best deep down cleaning, use the XLO
setting. However, you may need to raise the
height to make some jobs easier, such as
scatter rugs and some deep pile carpets,
and to prevent the vacuum cleaner from
shutting off. Suggested settings are:
HI - Shag, deep pile, or scatter rugs.
MED - Medium to deep pile.
LO - Low to medium pile.
XLO - Most carpets and bare floors.
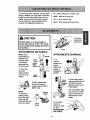
CAUTION
To remove,
,
_
and lift out.
press
latch
Latch
ATTACHMENTS ON HANDLE
ATTACHMENTS ON WANDS
NOTE: If the
Power-Mate ®is
attached, turn
vacuum
clean-
er off before
removing handie from wand.
Lock
1.To
remove
wands from
PowerMate e, lock
wands in
A
II
Handle
Quick
R_Jease--,-
i
1. Press handle quick
release button
and pull up on
handle.
straight-up
position.
i
Upper
i
m
2. Slide attachments
firmly on handle as
needed. See AI-rACHMENT USE.
NOTE:
2. Press wand quick
release pedal with foot
and pull the wands
straight up and out of
Power-Mate e.
The Power-Mate e plug
and cord do not have
to be removed to use
attachments on the
wands.
Dusting
To assemble
insert the fabric
brush into the
dusting brush,
dusting brush and
press into place.
ma
Wand
Quick
Release
Pedal
Brush
__
3. Put attachments on
wands as needed. See
ATTACHMENT
USE TABLE.
Fabric
Brush
11
_"
CLEANING AREA
A'I-rACHMENT
Combination
brush
Between
Furniture*Cushions*
brush
Fabric
Dusting
brush I__
I/
I/
V'
l/
I/
Crevice tool
BaRB
Drapes*
Stairs
Rears
Carpeted
-"ioors/Rugs Walls
i/
v'
v'
Floor brush
P°wer-Mate®
Handi-Mate
Jr.®
(Some Models)v'*
i/
Power-Mate Jr2
v'
(Some Models) *_
*Nways clean attachments beforeusingon fabrics. ** Use BARE FLOOR settingon ElectronicTouch Control.
*** Handi-Mate Jr.2 end Power-Mate Jr.= attachmentinsb'uctJons
are includedwith the produc_s.
OVERLOAD PROTECTOR
The Power-Mate ®
has built-in
Overload
EDGE CLEANER
Protector/
Active brush edge
cleaners are on both
sides of the PowerMate ®. Guide either
side of the Power-
protection against
motor and belt
damage should the
agitator jam. If the
agitator slows down
or stops, the
overload protector
shuts off the Power-Mate °. The canister
motor will continue to run,
Mate" along baseboards or next to
furniture to help
remove dirt trapped at
carpet edges.
To correct problem: Turn off and unplug
vacuum cleaner, remove obstruction, then
press belt reset button. A ball point pen
may be required.
If the problem persists, have the
vacuum cleaner serviced by a Sears or
other qualified service agenL
kWARNING
Personal Injury Hazard
Always unplug the vacuum cleaner
before cleaning the agitator area as
brush may suddenly restart. Failure to
do so can result in personal injury.
12
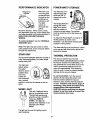
PERFORMANCE
Performance
Indicator
becomes
INDICATOR
When
POWER-MATE ®STORAGE
the unit
The wand has a "U"
is running with
normal air flow,
the light on the
performance
indicator is off.
blocked.
shaped flange that
slides into the =U"
shaped slot on the
canister
The light
comes on
whenever the
airflow
If that occurs, check
...lB._
V
The flange allows the
wands and PowerMate®to be stored
with the canister to
conserve storage space. The canister
must be stored on end for this feature to
be used.
the disposable dust bag, motor safety filter
and other possible clog locations shown in
HOW YOUR VACUUM CLEANER
WORKS.
To correct problem:
SHOOTING table.
A
All,,
m
To attach the Power-Mate ®, it must be in
the fiat position as shown in the
illustration. Use the handle release pedal
to place it in this position.
See the TROUBLE-
Note: The light may also come on when
using attachments,
due to reduced airflow
through the attachment.
The wand will slip out of the slot as it is lifted
up for use and will slide into the slot as it is
lowered for storage.
STAIR GRIP
THERMAL PROTECTOR
During normal operation while the canister is
in the horizontal position, the caster wheel
rotates freely 360 °.
This vacuum cleaner has a thermal
protector which automatically trips to protect
the vacuum cleaner from overheating. If a
clog prevents the normal flow of air to the
motor, the thermal protector turns the
motor off automatically. This allows the
motor to cool in order to prevent possible
damage to the vacuum cleaner.
The Stair Grip
feature allows
the caster
wheel to lock in
position when
the unit is
rotated 25"
from horizontal
into a vertical
To correct problem: Turn the vacuum
cleaner off and unplug the power cord
from the outlet to allow the vacuum
cleaner to cool and the thermal protector
to reset. Check for and remove dogs, if
necessary. Also check and replace any
clogged filters. Wait approximately
thirty (30) minutes and plug the vacuum
cleaner in and turn back on to see if the
motor protector has reset.
position in order for the canister to rest on
stairs.
WAND LIGHT
This unit is equipped with a
light on the extension wand.
This light will operate only
when the unit is in CARPET
mode (see HOW TO
START). The light will
operate when attached or not
attached to the PowerMate@.
The light can be used for lighting hard to
reach locations.
13
DIRT SENSOR
dirt on it, dirt will be picked up by the vacuum
and the red lights might stay on.
IN OPERATION
The dirt sensor
light system is
mounted on the
Power-Mate ®
nozzle near the
reset button.
When the Power-Mate" is being moved back
and forth on the floor, the lights will change
from one configuration to another as dirt is
being vacuumed. As long as the rod lights are
on, dirt is passing through the wand to indicate
that the surface still needs cleaning.
It consists of a series of two rod lights and two
green lights. The lights give you an indication
of the amount of dirt particles that are passing
through the sensor on its way to the dust bag.
When the green lights stay on as the PowerMate ® is moved back and forth over an area,
the sensor is not seeing enough dirt to warrant
further cleaning of that area.
INITIAL START UP
NOTE: Dirt sensor lights DO NOT function in
the FLOOR setting.
When the Power-Mate ° is first started, the following light sequence occurs in a two second
time frame:
t. Two reds come on.
2. Two greens are on and will remain on until
the Power-Mate ®nozzle is placed in use.
NOTE: If the nozzle is on a surface that has
The vacuum cleaner creates suction that
picks up dirL Rapidly moving air carries the
dirt to the dust bag through the airflow passages. The dust bag lets the air pass
through, while it traps the dirt.
For best cleaning results, keep the airflow passage open. Check the
starTed areas occasionally for
clogs. Unplug from outlet before
checking.
Motor
Safety
Filter
14
Exhaust
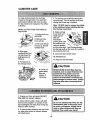
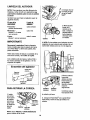
CANISTER CARE
For best cleaning results, the dust bag
should be changed often. The electronic
performance indicator will come on when
the bag needs to be changed or the airflow
is blocked.
7. The red bag mount will flip forward after
removing bag. This will prevent the lid from
closing until a new bag is installed.
Note:
DO NOT bend or crease the middle
of the cardboard when installing the bag
into the bag mount slots.
NOTE: See PARTS AND FEATURES for
Bag Number.
8. Rotate red bag
mount down and
1. Unplug cord from
wall outlet.
install bag into
slots per
instructions
2. Remove hose
from canister.
pushing down until _
3. Pull hood release
out and up, then lift
canister hood.
m
the cardboard tab
locks into position
and the holes align. Tuck the bag securely
into the bag cavity so that none of it is able to
be pinched by the hood.
4. Disengage
cardboard tab from
9. Close and latch canister hood.
red bag mount by
pulling away and
lifting up.
10. Reinstsllhose.
11. Plug cord into wall outlet.
5. Pull bag out of
the red bag mount.
CAUTION
6. Check the
NEVER REUSE A DUST BAG.Very fine
materials, such as carpet freshener, face
powder, fine dust, plaster, soot, new
carpet lint, etc. can clog the bag and
cause it to burst before it is full and may
cause damage to vacuum motor. Change
bag more often when vacuuming these
materials.
motor safety
filter and
replace, if
necessary.
Mount
1. Unplug cord from wall outlet. DO NOT
drip water on vacuum cleaner.
CAUTION
2. Clean exterior using a clean, soft cloth
that has been dipped in a solution of mild
liquid detergent and water, then wrung dry.
Wipe dry after cleaning.
Do not use attachments if they are wet.
Attachments used in dirty areas, such
as under a refrigerator, should not be
used on other surfaces until they are
washed. They could leave marks.
3. To reduce static electdcity and dust buildup, wipe outer surface of vacuum cleaner
and attachments.
15
Check motor safety filter occasionally
change when dirty.
and
1. Lift the rubber
retainer and pull
out motor safety
filter as shown.
IbWARNING
Electrical Shock Hazard
Unplug power cord from electrical
outleL Do not operate the vacuum
cleaner without the motor safety filter.
Be sure the filter is dry and properly
installed to prevent motor failure andlor
electrical shock.
2. Replace the filter, white side out,
facing the dust bag,
by sliding it back
into place under
the ribs in the bag
cavity. Tuck filter in
so that it fits com-
Remove the bag as outlined in the BAG
CHANGING section.
MOTOR SAFETY
ELECTROSTATIC
FILTER
pletely under the
rubber retainer.
This filter must be replaced when dirty. It
should be replaced regularly depending on
use conditions. The filter CANNOT be
washed
ability.
3. Replace the bag as outlined in the BAG
CHANGING section.
as it will lose its dust trapping
NOTE: See PARTS AND FEATURES
Rubber
Retainer
r/ // //
for
motor safety filter number.
16
IbWARNING
3. Remove the
exhaust filter
Fire and/or Electrical Shock Hazard
using the recess
as shown.
Do not operate with a clogged exhaust
filter or without the exhaust filter or
exhaust filter cover installed.
4. Replace the
exhaust filter
EXHAUST FILTER
HEPA
The exhaust filter cartridge must be
replaced when dirty. Replace the filter when
the entire surface area is covered evenly.
The filter CANNOT be washed as it will
lose its dust trapping
Filter
ability.
NOTE: See PARTS AND FEATURES
exhaust filter number.
Place the new
filter into the
canister with
the foam seal
towards the
cartridge.
canister.
for
5. Replace the
exhaust filter
1. Slide latch
upward to
release the
exhaust filter
cover from slot
in canister.
cover by placing
the two tabs on
the fi]ter cover
into the slots on
the canister and
rotate into place.
__Fslter
6. Slide latch
downward to
lock the exhaust
filter cover into
2. Pull out and
up on filter cover
to remove from
canister.
place.
POWER-MATE® CARE
Always follow all safety precautions when
cleaning and servicing the Power-Mate ® .
WARNING
Electrical
Hazard
Shock Or Personal Injury
Disconnect electrical supply before ser;vicing or cleaning the unit. Failure to do
so could result in electrical shock or
personal injury from cleaner suddenly
starting.
17
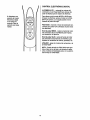
Although the dirt sensor feature in your
Kenmore Power-Mate ®is designed for years of
trouble free use, the passage of dirt through
the air passage system can coat the lens
causing the green light to come on and stay
on - never switching to red. When this happens
the lens must be cleaned.
Cross Section View
.fp_ox.
3 N inches
_
Ring
or 90 mm
CAUTION
the illustration, the two dirt sensor elements
are located on the inside of the swivel, approximately 3½ inches/90 mm down, (note the
arrows). Each element should be cleaned periodically. To reach the sensor elements, use a
small brush such as a bottle brush. Brush
each sensor element several times to remove
dust and dirt.
Never use water or any cleaning
solution when cleaning the lenses. The
residue of the water or cleaners will
accelerate the recoating of the lenses
and make cleaning necessary sooner.
TO CLEAN
THE LENSES
NOTE: Looking down inside the swivel you will
see a ring. The sensor elements are located
just slightly below this ring.
1. Remove the
wand by pressing
the quick release
pedal and lifting
up on the wand.
3. Reinstall the wands after cleaning the sensors.
2. As indicated by
TO REMOVE BELT
4. To remove cover,
grasp the sides and pull
out.
1. Turn PowerMate ® upside
down.
\
2. Unscrew the
two (2) PowerMate ® cover
screws.
3. Turn PowerMate ® right
side up. Press
handle release
5. Lift agitator
assembly out
and remove
worn belt.
pedal and
lower the
swivel. Lift
rear latches
6. Check and
clean end cap
areas. See
Side
ear
Latch
Latches
Base
End Cap
AGITATOR ASSEMBLY for picture of
complete agitator assembly.
up.
t8
TO CLEAN AGITATOR:
NOTE: In order to keep cleaning efficiency
high and to prevent damage to your vacuum
cleaner, the agitator must be cleaned every
time the belt is changed.
2. Place agitator
assembly back into
Power-Mate ® .
The agitator must also be cleaned according to the following schedule:
Vacuum Use
Clean Aqitator
HEAVY
every week
-
3. Line up
front of cover
and base.
Rest cover
(used daily)
MODERATE
-
every month
on front edge
of base as
shown.
(used 2-3 times/week)
LIGHT -
every 2 months
Cover
Base
(used 1 time/week)
IMPORTANT
4. NOTE: On dirt sensor models be sure
Disconnect
that the board is upright and the wires are
tucked back as shown.
vacuum cleaner from
electrical outlet. Check and remove hair,
string and lint build-up frequenUy in the
Power-Mate ® agitator and end cap areas.
Remove any dirt or debris in the belt path
area or in the brush roller area.
Carefully remove any string or debris
located on the agitator, or end caps.
Agitator Assembly
5. Rotate cover
back. Press
cover firmly until
side and rear
tabs snap into
place.
Brush Unit
Make sure there
is no gap
between the
cover and base.
TO REPLACE BELT
Side
Rear
Latch
Latches
5. Turn Power-Mate®upsidedown and
replace two (2) cover screws.
1. Install new
belt over motor
drive, then
over belt pulley.
Motor
Drive
Pulley
Agitator
End Cap
NOTE: See PARTS AND FEATURES
belt number.
for
19
Review this table to find do-it-yourself
service needed, should be performed
solutions for minor performance problems. Any other
by a Sears or other qualified service agent.
WARNING
Disconnect
electrical supply before performing maintenance
do so could result in electrical shock or personal injury.
Vacuum deaner won't start.
1. Unplugged at wall ouget.
2. Tripped drcuit breaker_o_m fuse
to the unit. Failure to
1. Rug in firmly, push ON/OFF switc_ to ON.
2. Reset circuit breaker or replace fus_
at household service par_.
3. Loose hose eieoffica[ connec_on&
Poorjo_ of dirt
piok-up.
Vacuum cleaner starts but
shutsoff.
1.
2,
3.
4.
.5.
6.
7.
$.
9.
10.
Fullor doggeddustbag.
Clogged airflowpassages.
Dirty_ers.
Wrongplteheightset_n_
Wrongpov_r le,_elselected.
Holein hos_
WornPower-Mate
Q agitator.
Wornor broken
Clrty agitatoror endcapp.
Canisterhoodopen.
1.
2.
3.
4.
5.
6.
7.
8 & 9.
Changebag, (page15).
Clearairflowpassages,(page 14).
Changefilters,(page 16-17).
AolustsetUog,(page11).
Adjustcon_ol,(page 9).
Replacehose.
Changeagitator. (page20).
See BELTCHANGINGANDAGITATOR
CLEANING,(pages18-19).
13. Close andlatchhood.
1. Hose orhoodeiec_ica_connec_ons.
2. _pped overloadprotectorin
Powar-Mate
t,
3.
3, Reconnecthoseends,(page7).
Tr_ped
_oad pmtoctor
1. Check connec_ens,reconnecthoseends, (page7
2. Removeany itemsthatmay be caught
or jammed,then reset_ff deaner starts
andstopsagain, dean agitatorandendcaps,
then reset,(pages12,18-19},
3. Resetthermal protector(page 13).
in canist_.
Power.Mate ®will not
run when attached.
1. Power-Mate"c_ec_ons
unplugged.
2. Worn or brokenbe3.
3. Dirtyagitatoror endcaps
4. Trippedovedoagprotectorin
Poy_Jv_te'.
1. Rug in firmly,(pages6-7).
5. WrongE_ecb_icTouchConradset_ng
selected.
2 & 3. See BELTCHANGINGAND AGITATOR
CLEANING,(pages18-19).
4. Removeany items that maybe caught
orjammed,Ihenreset. If deaner star'=
andstopsagain,dean agitatorandendcaps,
Men reset,(pages12, 18-19).
5. CP,
angeBec_onicTouchContT_seleclJon
to
CARPETHIGH,(page9).
Constantgreen lighton
in dirt sensor.
1. Dirtpassageisdogged.
2. Lensesare dirt,_
1, CP,
eckforclogsin airpassages,(page14).
3. Cleanlenses,(page18).
Any, some, or all red ltghts
in dirt sensor burn andnever
turn green.
1. Dirtpassage isdogged.
1. Checkfordogs inair passages,(page14).
No green or red dirt
sensor lights,
1. V_-ongElec_onicTouchConfrolset_og
selected.
2. Nopowerto sensorboard.
1. ChangeElect'onicToush
Co,"Wulselec_ento
CARPETHIGH, (page9).
2, Taketoyour nearestSearsServicecanter.
PertonnanceIndicator
activates.
1.
2.
3.
4.
1.
2.
3.
4.
Vacuum cleaner picks up
moveabfonJgs-or-Power-Mate®
pushes too hard.
1. Wrongpileheightset_ng.
3. Suc_ontoos_ong.
1. Adjustseffing,(page 10).
2. Selectfow_rpoweron_cTouch
Con_ol(page9).
Lightvmn'twork.
1. Bumedoutlightbelb.
1. Changelight belb, (page20).
Cord_n't
1. Dirtypowercord.
2. Cord_mrned.
1. Cleanthe gewe_cord.
2. Pullout cordand_d.
1. Wr_ngvacuumingpattern.
1. SeeVACUUMINGTIPS, (page10).
rewind.
Vacuum cleaner leavesmarks
on
Fullor doggeddust bag.
Dirly_e_.
B_ocked
einlow passage.
Certainattachmenttod._
21
Change bag,(page15).
Changefilte,-s,(page 16-17).
Oear dockagefromeirnowpassage,(page 14).
l_s is normal.Lightshould gooff
whentool is removed.
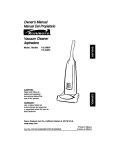
Antes de usar su aspiradora nueva ..... 1
Garantia de la aspiradora de Kenmore .. 1
Instrucciones importantes de
seguridad ............................
Piezas y caracteHsticas ...............
Instrucciones
de
2
3-4
ensamblamiento
...............
5-6
Almacenaje del Power-Mate Jr.® .......
6
Instrucciones de operati6n
...........
7
Para comenzar .......................
7
Sugersncias para aspirar ...............
9
Sugerencias sobre el ajuste de nivel de
pelo de la alfombra ...................
10
Accasorios ..........................
10
Uso de los accasodos .................
11
Caracter_stJcasde rendimiento ........
11-13
Funcionamiento de su aspiradora ........
Cuidado del recept_culo ..............
Cambiode la bolsa ...................
14
14
Limpieza del exterior y de los accasodos... 14
Cambio del filtro de seguddad del motor ... 15
Cambio del filtro de escape .............
16
Cuidado de la Power-Mate ° ............
Detector de _erra .....................
Cambiode la correay limpieza
del agitador ......................
Cambiode la bombilla .................
16
17
17-18
19
Cuidadodel agitador ..................
Reconocimiento de problemas .........
Informaci6n de
assistancia o servicio
.....
19
20
PosteriorCubierta
13
Potfavorlea _ta guia que le ayudaraa assemblary operar su aspiradoranueva de Kenmoreen una manera
mrs segumy effectiva.
Paramas informacidn acercadel cuidadoy operael6nde esta aspirador, Ilame a su_enda Sears mas carcana.
Cuandoprequntepor informael6nustednecisitardel n_merocompletode sede y modelode la aspiradomque
est_ Iocadoen la placa de los nemerosde modeloy sede.
Use el espaelode abajopara registrarel n_merode modeloy sede para su nuevaaspiradora de Kenmore.
N_merode Modelo
N_mero de Sede
Fecha de Compra
Matenga este libro y su reciboen u lugar seguro para referendas futuras.
GARANTfA UMITADA DE UN AI;IO DE LA ASPIRADORA KENMORE
Esta garant{a es por un aSo desde la fecha de compra,e incluyesolamenteel uso de la aspiradoraen hogares
privados.Duranteel a_o de garant[a,cuandola aspiradoraes operaday mantenidade acuerdoal manualde
instrucelones
del dueSo,Sears reparardcualquierdefectoen materiales o fabdcaci6n libre de cargo.
Esta garantJaexcluyelas bolsasde colecci6n,con'eas,lamparillas,y filtrca, las cuelesson partes gastablesque
se deteriorancon el uso normal.
Para el servicio de garantJa,retorne esta aspirsdora el Centro de Servicio Sears m:;s cercano en los
Estados Unidos.
Esta garantfa se aplicasolamente mienS'aseste producto estden usaen los Estados Unidos. Esta garantiale
da a ustedderechoslegalesespecificos,y ustedpuedetener tambi_notrosderechoslos cualesvadan de
estadoa estado.
Sears, Roebuck and Co., D/817 WA, Hoffinan Estates, IL 60179
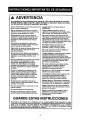
A ADVERTENCIA
Su seguridad es muy importante para nosotros. Para reducir el riesgo de incendio,
choque el_ctrico lesi6n corporal o da_os al utilizar su aspiradora, active de acuerdo
con precauc ones b_s cos de seguridad, entre elias:
Lea las ins_ucciones en este manual antes do
armar o usar su aspiradora.
Apague todos los cont]'olesantes do
desenchufar.
Use su aspiradora 0nicamente en la forma
descrita en este manual. Use _nicamente con
accesodos recomendados por Sears.
Desconecte el cordbn eldctrico antes de
componer o limpiar el drea del cepillo. De Io
contrado, el cepillo podHa arrancar de form
imprevista o podria producirse un choque
electrico.
Tenga cuidado especial al utilizar la
aspiradora en escalones. No la coloque sobre
sUlas, mesas, etc. Mantdngala on el piso.
No use la aspiradora para aspirar Uquidos
inflamables o combustibles (gasolina, liquidos
para limpieza, perfumes, etc.) ni la use en
lugares donde 6stos podr_an estar presentes.
Los vapores de estas sustancias pueden crear
un peligro de incendio o explosi6n.
No abandone la espiradora cuando est_
conectada. Descon6cteta cuando no la estd
usando y antes de dade servicio.
No levante ninguna cosa que so est6
quemando o emitiendo humo, como
cigarrillos, ceriltos o cenizas calientes.
Para reducir el riesgo de choque eI_ctrico, no
use su aspiradora al airs libre ni sobre
superficies mojadas.
No use la aspiradorasin tenet instaladala
bolsa para polvoy!o los filtros.
No permita que sea utilizada como juguete.
Se requiem tener mayor cuidado cuando sea
utilizada en la proximidad de ni_os o por
ni_os.
Cambie siempre la bolsa para polvo despu6s
de aspirar limpiadoresde alfombraso
desodorantes,talcosy polvosfinos. Estos
productosatascan la bolsa, reducenel flujo de
aire y pueden causar que _.stase rompa. Si
no cambia la bolsapodrfa ocasionardar_o
permanentea la aspiradora.
No use la aspiradorasi el cord6no el enchufe
estd dafiado. Si la aspiradorano estd
funcionandoadecuadamente o si se ha
dejado caer, estd da_ada, se ha dejado
expuesta a la intemperieo so ha dejado caer
en agua, devudlvalaa un Centro de servicio
de Sears.
No use la aspiradorapara levantarobjetos
agudos,juguetes pequeSos,alfileres,
sujetapapeles,etc. Podrfan daSar la
aspiradorao la bolsa para polvo.
No hale ni transportela aspiradoraporel
cord6n; no use el cord6n como mango;no
cierre puertas sobreel cord6n; no halo el
cord6nsobre rebordes agudosni esquinas.
No pase la aspiradora sobre el cord6n.
Mantenga el cord6n alejado de superficies
calientes.
No opere sin el filtro de escape ni la cubierta
del filtro de escape instalados.
La manguera contiene cables elL=ctricos.No
la use cuandoestd dar_ada,cortada,o
perforada.Reemplace si est_ cortada o
desgastada.No levante objetosafilados.
No desconecte la aspiradora tirando del
cord6n el_ctrico.Para desconectada, hale el
enchufe, no el cord6n.
Siempre apagud y desconectela aspiradora
antes de conectar o desconectarla manguera,
Handi-MateJr.® (si aplicabie), o la boquilla.
Sujete el enchufecon la mano al enmllar el
cord6n el6ctrico.Para desconectada,hale on
enchufe, no el cord6n.
No toque la aspiradora ni el enchufe con las
manos mojadas.
No coloque objetos en las aberturas.
Usted es responsablede asegurar que su
aspiradorano sea utJlizadapot ninguna
persona que no pueda manejarla
carrectamente.
No utilice la aspiradora si alguna abertura
estd bloqueada; mant6ngala libre de polvo,
GUARDE
ESTAS INSTRUCClONES
El armada y usa seguro de su aspiradora son su responsab idad Esta aspiradora ha sido
diseSada exclusivamente para uso dom6stJco.La aspiradora deberd a macenarse en un lugar
seco yen el interior. Lea este Manual del probietario detendamente pues contiene
informaci,6n importante sobre seguddad _y uso. l£sta quia contiene in_ormaci6n sobre
segudoaa debajo de simbolos de aoverUenclacuidado.
2
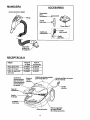
Esimportante
conocer las piezas y caracterisf_cas
de su aspiradora para asegurarsu uso adecuadoy seguro.
Examinelas antes de usar su aspiradora.
O_eto
PiezaN °.
en EUA
Pieza N°.
en Canad_
Bombilla de _ml
20-5240
20-40600
Co_ea
20-5218
20-40118
Bot6n de
liberaci6n
r_pida del
mango
Tube
telesc6pico
.<__
Control
.o
de extension
adjustable
del tube
Reb°rde'_l
/_Luz
Power-Mate
Correa
Pedal de liberaci6n
r_pida del tube
(No se muestra_._
NiJmoros de serie del
modelo Power-Mate e
de pelo de la alfombra
sebrecargas
Bot6n de
restauraci6n "Reset"
Pedal de selecci6n
de nivel de pelo
de la alfombra
Pedal de
Iiboraci6n
Limpiador de orillas
(No se muestra)
Detector
de tierra
MANGUERA
Control
electr6nico
ACCESORIOS
digital
Herramienta
para
hendiduras-_
_m
p_os
_
_
_
t
Power-Mate
Jr."
!a.-c mo
Cepillo para
combinaci6n
-_
:
_
:
|_
para sacudir
para _elas
I......
Dispositivo
giratoHo de
RECEPTACULO
Objeto
Pieza N=.
en EUA
Part N'.
en Canad=;
Bolsa para polvo
20-50557
20-50404
Filtro de escape
20-86889
20-40324
Filtro de seguridad
del motor
20-86883
20-40321
Cubierta de
almacenamiento
para accesorios
(Almacenamiento
para accesorios
en denb_)
Bot6n de
cordon
el_cb'ico
Cubierta de almacenamiento
para Power-Mate Jr."
J
_
Cubierta del filtro de escape
(No es muesCra)
el_ctrico
Tapa del
PesUIIo
de la tapa
de la bolsa
Bolsa para polvo
4
Filb'o de seguridad
del motor (Det_s
de la bolsa para polvo)
IA
informaci6nle alertar_ del peligrode fuego,choqueselectricos,quemadas y lesiones. Cuidado:
Pot
ponga
especial
atenci6n
a_stos
recuadrescon
alertade
de propiedad.
riesgo. Advertencia: Este
Estefavor
informationle
alertarade
peligros
comolesiones
y da_os
ADVERTENCIA
Peligro de choque elL_ctrico
No conecte la aspiradora hasta que termine de
armada. De Io contTariopodda causar un
choque el_ctrico o lesi6n corporal.
I
Bot6n
de cierre-_-
Antes de armar la aspiradora, chequeela LISTA
DE EMBALAJE en la cubiertaseparadade la Lista
de Partespara Reparation. Use esta Ustapara vedficar que ha recibidotodasles compenentesde su
nuevaaspiradoraKenmore.
TUBO TELESCOPICO
La extensiOn
-
Control de
extensi6n
adjustable _
del tubo
i_
ajustal_e y no
requeireel
montaje.Para
ajustar, empuje hacia abajo
en el botOndel
tuboy mueva
el
tubosuperide!tuboes
or a la posiciOndedeada
telesc6pico
_- Conb'ol de extension
ajustable del tubo
I
I
I
b
La parte giratoria,
situadaen el
Power-Mate',le
permitemoverel
mango a la izquierda para pasar la
aspiradoraa una
extensionmds larga
debajo de los muebles bajes.
--
Cuando ajuste la Iongitudde ]a vara hayque tener
el Power-Mateecon la mano o el pie.
Botdn
del
tubo
liberaci6n
r_pida del tubo
POWER-MATE®
Introduzcalostubosen la Power-Mateehasta que el
bot6ndel tuboquede_jo en positiOn.
5
I
I
RECEPTACULO
MANGUERA
1. Abra la tapa del recept_culo.
1. Alineela pestaSa de
sujed6n de la manguera
y la ranure de la cubierta del recept_culo e
introduzcala manguera
en el recept_culohasta
que quede fija an posici6n.
2. Examinela bolsapara polvoeste instaladocorrectamante. Consultelas ins_uccionesde instalacibnen
la CAMBIO DE LA BOLSA.
3. Examineel filtrode seguridaddel motor este instalado correctamante.Consultelas instrucdonesde
instalacibn en CAMBIO DEL FILTRO DE SEGURIDAD DEL MOTOR.
Para retirar:.Levante el
pestillo de la manguera
y tire de la manguera.
LA TAPAY LA CUBIERTA
Es normal que la tapa del recept_culose desprenda
al set abierta m_,sde Io necesario.Paracolocarnuevamentela tapa, alineelas ranurasde la bisagra,insdrtelasy cierrela tapa.
sujeci6n
de la
msnguera
2. Inf_x:iuzcael
mangoen el tubo
hastaque el botbn
quede en posicidn.
Asegt_resede que la
manguera no est_
torcide.
CUIDADO
Nunca debe abrir la capucha del contenedor
estando la tapa abierta. As| se evitar_ dafios a
la capucha del contenedor ylo a la tapa.
Bot6n de
cierre
Bot6n _de
liberacJ6n
r_pida del
m
Para retira_. Oprima
el botdn de liberad6n
rdpidadel mango
para liberarel mango
y tire del mango hacia
arTiba.
Para Guarder: Paraprevenir la pred_n de la mangua
miantras se guarda,desunala mangua del tubo de la
aspiradora. Guarde la magua en una posici_n
enrollada y flojamente de tel manere que la tapa de la
mangua no se estire.
Est_ aspiradora esta equipada con almac_n
a bordo para el accesorio Power-Mate Jr.®.
Almacenamiento
para Power-Mate Jr.e
Para instalar:
Abra la cubierta de almacenaje del PowerMate Jr. ®.InserLe el Power-Mate Jr. ®,presi6nelo en su lugar hacia abajo, y cierre la
cubierta con seguridad.
Para quitar:.
Abra la cubierta de almacenaje. Levante el
Power-Mate Jr. ® de su lugar utilicelo como
sea necesario (vdase ACCESORIOS y
USO DE ACCESORIOS).
6
INSTRUCCIONES
DE OPERATION
kADVERTENCIA
Indicador
Pedal de selecci6_
de nivel de
pelode la
Peligro de lesi6n personal y da_o al
_roducto
NO enchufe la aspiradora si el
interruptor estz_en la posici6n ON.
Podria causar lesi6n personal o da6o
al producto.
Pedal de
liberaci6n
del mango-----=-
El cord6n el_ctrico se mueve
r_pidamente durante el enrollamiento.
Mantenga alejados a los ni_os y
asegure espacio libre suficiente para
evitar lesiones personales al enmllar
el cord6n.
3. Baje el tubo desdela posici6n verticalpisandoel
_edalde liberacidndel mango.
NO use los enchufes Iocalizados sobre
los muebles. Los objetos cercanos
poddan resultar dafiados,
Bot6n
de
nivel de pelo
de la alfombra
IbCUIDADO
NO deje la Power-Mate"funcionando en
posicibn vertical en un lugar durante ningt_n
espacio de tiempo: se puede da_ar la alfombra.
1. "13re
del cord6n
para sacado del
recept_culo hasta
tenerla Iongitud
deseada.El cord6n no se enroIlar_ hastaque
oprima el botbn
para enrollado.
4. Selecdone una alturade pelo de la affombra
usandoel pedal pequefioubicadoen la parte posterior de la Power-Matee. El nivelde pelo la alfombra
se muesltaen et indicador.ConsulteSUGERENCIAS SOBRE EL AJUSTE DE NIVEL DE PELO DE
LA ALFOMBRA.
Atenci6n: Refi_rasealas recomendadonesdel fabricantepara limpiar sualfombra,AJgunasalfornbras
m_s delicadaspuedenrequerirel uso de la aspiradora conel agitadorP_ver-Mate° desconectado
para prevenirque la alfombrasea dafiada.
NOTA:Para reducir el riesgode choqueel6ctrico,
esta aspiradomcuentacon una davija polarizada,
unode los contactoses m_s anchoque el otto.La
clavijas61opuede intmducirsede una manera en et
enchufe.Si la davija no cabe bienen el enchufe,
invidrtala.Si at_nno cabe, Ilamea un electr;cista
para que instaleun enchufecorrecto.No altere la
clavijade ningunamanera.
2. Conecteel cord6neldctricopoladzado en un
enchufede 120 vol'dosque se encuentrecercadel
piso,
Para enrollar: desconectela aspiradora.Sujeteel
enchufemientras
enrollael cordon
paraimpedirdafioo
lesi6ncorporalpot el
movimientodel cord6n.Opnma el
controlpara bot6n el
cord6nel_-'lricocon
la manoo conel pie.
7
/
CONTROL ELECTRONICO DIGITAL
ALFOMBRA ALTO - enciendelos motores del
contenedory de la Power-Mate
® para obteneralto
poderde limpiezapara la mayor[ade alfombras.
5.Seleccione una
posicidn de Control
Electrbnico Digital
en el mango de
acuerdoal tipode
aspirado que desee
realizar.
P_
Para obtenernivelde poder MEDIO 0 BAJO para
nmpieza de alfombras,aprieteel botdnde ALFOMBRAALTOprimero,yen seguidaapriete el nivel
deseadode podermdsbajo.
CONTROL
PISO RASO - endende el motorde] contenedor_nicamentepara poderALTO y limpieza de pisos rasos
(sin alfombras).
v
[
Nivel de poder MEDIO - reducela fuer7_adel motor
del contenedors610al nivelMEDIO para limpieza,
con accesorios,de tapiceda.
nJ-_
i
Nivel de poder BAJO - reducela fuerT_a
del motor
del contenedorexclusivamenteal nivelBAJO para
limpiezaconaccesoriosde cor'dnas,persianas,etc.
APAGADO - apaga los motoresdel contenedor y de
la Power-Mate®.
NOTA- Cuando e_botSnde PISO PASO est_ apretado,el farol, la luz del tuboy el indicadorde pelvo
(unosmodelos) no funcionan porqueno la electricidad no fluyeal Power-Mate
®.
8
Estilodelimpieza
sugerido.
Paraobtener
la mejoracci6nde limpieza se reco-
Los escalones alfombrados requierentimpiaza ped&:lica.Cierre
per completoel control
de aspirad6npara
Iograrlos mejores
resultadosde limpieza.
Mantenga el paso de
aire abiertopara
Iograr los mejorea
resultados de
limpieza.
miendaempujarla Power-Mate®en direccibn directamenteopuestaa ustedy jalada en linea recta.A]
final de cadapasada de regreso,cambie la direcci6n de la Power-Mate®hada la siguientesecci6na
limpiar. ContinUeasf a travdsde toda la alfombrade
una manera lenta y deslizante.
NOTA:las pasadas rdpidasy jalonadasno Iogran
una limpiezacompleta.
kADVERTENCIA
Peligm de lesi6n personal
Tenga cuidado si coloca el recept_culo sobre
escalones. Si se cae, podHa causar lesi6n
personal o dafio a la propiedad.
[] dispositJvogiratodo
de la manguerapermite que dstagire sin necesidadde mover el
receptdculo.Estoes
muy _tJlpara limpiaren
b'eas pequefas. Aseg_rese de que la manguera no est6 torcida
antes dejalar el recept_culo.
A
dlt ADVERTEN ClA
Peligro de lesibn personal y dafio al
producto
No jale de la manguera para mover la
aspiradora de un escal6n al siguiente.
Cuando termine de limpiar una =trea use la
manija en la aspiradora para moverla a
otto lugar para continuar la limpieza.
SOST_N PAPA LA
ESCALEPA El sostdn
CUIDADO
Peligm de lesi6n personal y dafio al
pmducto
para la escalera esta
situadoen el cuerpo y
ayudard a evitar que la
aspiradorase deslice
cuando se estd
Tenga cuidado si el Power-Mate* y la manguera
se dejan en posici6n vertical pues peuden
caerse f_cilmente. Si se voltean peude haber
dafio de propiedad.
utilizadoen las escaleras (v_ase
CARACTERISTICAS del
FUNClONAMIENTO)
IbADVERTENCIA
NOTA: Aseg_rese que la aspiradora
est_ descansando con seguddad sobre
las escaleras y el echador est_ en la
pesicibn bloqueada antes de usarla.
Paligro de lesi6n personal y da_o al
)roducto
No atropelle el cord6n el6ctrico con la
Power-Mate®. Hay un peligro de
lesi6n corporal o unos dafios de
posesiones.
Examinede vez en cuandocada una de las _,reas
de uni6nen FUNClONAMIENTODE SU
ASPIRADOPA para asegurarsede que no estdn
bloqueadas.Desconecte la aspiradora antes de
revisar.
No tire del cord6n el_ctrico de la pared
para desenchufario. Si hay danos en
el cord6n el6ctrico o el enchufe, hay
un peligro de lesi6n corporal o unos
dafios de posesiones.
9
Useelajuste
XLO(bajo) para obtenerla mejorlimpieza a fondo. Pot otra parte, quiz_s se requiemelevar el nivelpara facilitaralgunastareas, comopot
ejemplocuandose trata de tapetesy algunasalfombins de pelo largo,y para impedirque la aspiradora
se apague.Se sugierenlos siguiantesajustes:
HI - Pelomuy largoy suelto,tapetes, alfombras
muy acojinadas.
MED - Pelo mediano a largo.
LO - Pelo cortoa median_
XLO - La mayoda de las alfombras y pisos
descubiertos.
IbCUIDADO
Para quitar,
NO instale ni retire el mango ni los tubos
cuando la aspimdora est=_encendida. Esto
podria causar chispas y da_ar los contactos
el&ctdcos.
_
Pesti//o
ACCESORIOS DEL MANGO
NOTA:Si IJene
instaladala
Power-Mate®,apague la aspiradora
antes de quitarel
mangode los
tubos.
1. Optima el bot6n
de bloqueoy
luegotire del
mangopara quitado del tuba
pestillo y
levantarse.
resionar el
ACCESORIOS DEL TUBO
Bot6n de
liberaci6n
dpAmangO--,.
rapide
7
1. Pararetirarlos
tubosde la
POWER-MATE°,
colSquelosen la
posici6n vertical
de bloqueo.
_._
telescopio--
Pedal de
liberaci6n
' r_pida del
tubo
Si su modelo _ene la caractedsf_ca
opcionalde la
liberacibndel mangor_pida,insb'talade un modo
semejante.
2. Pise d pedal de
liberaciSnr_pidadd
tuboy tire del tubo
hacia ardbapara
desprandedode la
POWER-MATE®.
No es necesarior_=tirar
el enchufe y cordbn
el_ctrico de la
POWER-MATEe para
usar los accosoriosdel
tubo.
2. Deslice el accesododeseado con flrmeza sobre el
mang_ Consulte la USO DE
LOS ACCESORIOS
NOTA:
CepiHo
Para montar el cepillo _
para sacudir
para sacudir inserte
/" Lj)'_
\
el cepillo para telas
=_--_=__'_._
dentro de la boquilla del "_
_,_
cepillo para sacudir
\
presione en su lugar.
CepMo
para telas
3. Coloqueel
accosoriodeseado sobreel
tubo.Consulte
la USO DE
LOS
ACCESOPJOS.
t0
AREA A LIMPIAR
Entre
ACCESORIO
Meu_e_
Pisos
Pisos
Cortinas" Escalones
descubierto_
dfornbradodParedes
Alfombras
cojines*
C:piJ o?.r,
=a it
Cepillo para
B
combinaci6n Cepillo
para telas I_J
Herramienta
para hendiduras _
=/
v'
V'
v'
v'
Cepillo para pisos
Power'Mate®
Handi-Mate Jr._
(AJgunos modelos) *_
_'
Power-Mate
(AJgunos
modelos)
Jr."
*="
is
• Siemprefimpielos accesoriosantes de usarsdaretelas. _*Usar la opc_n BARE FLOOR de el control elect_nico.
*** La Hand-Male Jr."y la Power-Ma_Jr.* induyensusprop_as
instrucdonespara usode accesodos,
PROTECTOR CONTRA
SOBRECARGAS
LIMPIADOR DE
ORILLAS
La Power-Mate®
Activelos ospillos limpiadores de odllasa cada lado
de la Power-Mate®.Pase la
Power-Mate®juntoalas
paredeso junto a los mueblespara ayudara eliminar
la f_erraacumuladaen las
orillas de la aJfombra.
Protector
contra
cuentaConprotec- sobrecargasBot6n de
ci6n incorporada
conb-'adar_odel
motor y la correa
en caso de .tascamiento del agitador. Si el agitador
funciona m_s
despado o para,
el protector de sobrecarga para la Power-Mate®.
El motor del recept_culo continuar_fundonando.
Para resolver el problem." Apague la aspiradora,
quite el residuo y apriete el bot_ para encender de
nuevo.
Para restablecer: Oprimael bot6ndel protector
contrasobrecarga.
ADVERTENCIA
Peligro de lesiones personales
Desconecte siempre la aspiradora antes de
limpiar las m'eas de la agitador pues dstos
podHan arrancar de manera imprevista. El ho
hacerlo, podria resultar en lesiones personales.
tt
l/
TAPAY ALMACENAMIENTO
PARA POWER-MATE®
INDICADOR DE RENDIMIENTO
Indicador de
rendimiento
La luz se enciende
en cualquiermomento que se bloquee el tlujo de aire,
cuandola bolsase
Ilene o cuandosea
necesariocambiarel
filtro de seguddad
del recept_culo.
El tubotiene un reborde en formade =U"se
deslizadenb'oen una
ranuraen forma de =U"
de la aspiradora.
La ranurapermite almacenarlos tubosy la
Power-Mate con el
tubo para economizar
el espado requeddo
para su almacenamiento_Parausaresta caractedstica es necesadoalmacenarel recept_culoen forrna
vertical.
NOTA: Es posible
que la luz tambidnse encienda cuandou_lice
ciertos accesodosdebidoa que el flujo de aim se reduce al pasar porel accesoda
NOTA:La luz puede no encendercuando el control
de aspiraci6n se fija en la veloddadbaja.
El tubose sale de la ranuraal set levantadopara
usarloy se deslizadenlrode dsta al bajado para ak
macenado.
Consulte el solucionador de problemas.
La Power-Mate® debe estar en la posiciSn liana
como se ve en et diagrama. Use el mangodel
pedal de liberaciSnpara movedaa esta posiciSn.
SOSTI N PARA LA ESCALERA
Duranta la operaci6nnormal de la aspiradora
mientras que est_ en la posicibnhorizontal,lea
ruedas del cuerpo giren libremente360 °.
PROTECTOR TERMAL
La caracterfstica
Esta aspiradoratJeneun protectortermelque se
ajusta autom_ficamentepara proteger a la
aspiradora del sobrecalentamiento_
El protactor
termal apaga el motorautom_,licamente
para
permitJrque el motorse enffie a fin de evitar
posiblesdaSosa la aspiradora.
del Sost_n para
la Escalera
permite que las
ruedas del
cuerpo se ftaben
en posicibn
cuando la unidad
Para restablecer: Apague la aspiradora y desenchufeel corddn del tomacorriente para permitJr
que la aspiradora se enffie.Busque y saque las
obstrucciones, si es necesario. Examine tarnbi_n
y reemplace cualquier filtro obstruido. Espere
aproximadamente 50 minutos y enchufe la aspiradora y volt_ela para ver si el protector del
motor se ha reajustado. En algunos casos, la
unidad puede volver a arrancar sQbitamente,NO
LA DEJE desatendida.
gira 25 ° de una posiciSnhorizontala vertical
para que la aspiradora descanse con seguridad
sobre las escaleras.
LUZ DELTUBO
Esta unidad se equipa de una
luz en el tubo de extensibn.
Esta luz funcionard solamente
cuando la unidad es modo de
la ALFOMBRA (v6ase PARA
COMENZAR) La luz
funcionard cuando est_ unida
o no a la Power-Mate®.
La luz se puede utilizar para la iluminar
lugares dificiles de alcanzar.
12
DETECTOR DE TIERRA
Detector de tierra
El sistema
indicador del
detector de tierra
estd montadoen la
boquillade la
Power-Mate®,cerca
del botdnde
restablecimiento.
Consisteen una sere de dos indic.adores
luminosos
rojosy dos verdes. Las lucesindicanla canlJdadde
particulasde IJerraque es_n pasandoa b'avds del
detectoral set transpottadashaciala bolsapara
polvo.
NOTA:Si la boquillaest_ sobreuna supertideque
tieneterra, _ta ser_aspiradapot la aspiradoray
posiblementese queden encendidosalgunosde los
indicadoresrojos.
EN OPERACl6N
Cuandodeslizala Power-Mate®por el piso,los
indicadores cambiande una aotra conflguradSn
seg_nsi la aspiradorarecogemuchao poca tJerra.Si
unoo vadosindicadoresrojospermanecen
encendidos, signiflcaque la aspiradorasigue
levantadotierra,dstasiguepasandoa trav_sdel tubo,
y que necesitaconlinuaraspirandola supe_cie.
Cuando se queda encendidoel indicadorverde
mientras desliza la Power-Mate®so/oreunazona
deterrninada, significa que e{ detector no est_
detectando IJerray que la zona ya es_ lipia.
ARRANQUE INICIAL
La primera yes que arrancala Power-Mate®ocurre
siguienteen un pefiodo de 2 segundos:
NORA: Las luces del detector de tierra no fundonan
cuandose selecciona el ajuste para pisos
descubiertos FLOOR.
t. Los dos indicadoresrojos se encienden.
2. Dos indicadores verdesestdencendidosy
permaneceencendidohastae! momento en que
corniencea usarla Power-Mate
®.
La aspiradoracreasucdbn o aspiraddnque levanta
la tierra.La _erra es impulsadaa ITav_sde las v{as
/J
de flujo aire hastala bolsapot una rdpidacocriente
J//'de aire. La bolsa para polvopermiteel flujode aire, /iJ
pero af_'apala tJerra.
////
Pard Iograrlos mejoresresultadosde limpieza, ,/_7
mantengaabiertaslas vfas de aire.Examine ./,_/
peribdicamentelas _reas indicadascon
,,_7
astedscospara asegurarsede que no
,/_'
est_n bloqueadas. Desconectedel
/_
receptdculode revisado._//f
_'_
Fil_mde
segu_dad
delmotor
13
Filttode
CUIDADO DEL RECEPTACULO
7. Examiney limpieel fil_'ode seguridaddel motor.
El montajerojode la bolsase indinardhacia
adelante despudsde que retirela bolsa. Esto
impedirdque la tapase cierreantes deinstalaruna
bolsanueva.
La bolsa debe cambiarseseguidopara Iograrlos
mejoresresultadosde limpieza. El indicador
electrdnicodela bolsao de mangueraenciende
cuandose necesitacambiar.
NOTA:Vdase PIEZAS y CARACTERJSTICAS
para el n_mero de la botsa.
NOTA: NO doble ni pliegue el centre del
cart6n al instalar la bolsa en las ranuras del
montaje de la bolsa.
1. Desconecteel cord6n
el_ctTicode la davija de la
pared.
8. Gim haciaabajoel soporte
para la bolsarojay para
insertarla boiseen les ranuras
2. Quite la manguerade la
aspimdora.
empujehaciaabajohestaque
lasleng6etasde cartdn
3. "13redel pes_llode la tapa
haelafuera y hacia ardba;
luegolevantela tapa del
mcept_culo.
encierrenseguramenteen las
posideaes apml:_adascome
se ve en el diagrama.
4. Destrabela pestar_a
de cartSndel montaje
rojo de la bolsaempujando hacia afuera y
tirando hacia ardba.
9. Bajela cubiertadelreceptdoJIo
y derre el pes_ll_
10. Reinstalela manguera.
tl. Conecteel cord6nel_ctrico en la davija de la
pared.
5. Saque la bolsadel
montajemjo.
Filtro de
seguHdad/
CUIDADO
NUNCA REUTIUCE UNA BOLSA PARAPOLVO.
Los materiales muy finos, tales como desodorantee para alfombras, talco facial, polvo fino,
_'eso,hollfn, peluea de alfombras nuevas,etc.,
)ueden atascar la bolsa y causar que se rompa
lntes de qua est_ Ilena y puede da_ar el
motor de la aspiradora. Cambie la bolsa rods
seguido cuando aspire este tipo de mateHales.
6. Revisey
carnbieel flltrode
seguddaddel
motor,cuando
sea necssatio.
rojo
t4
1.Desconecte
elcord6n
el6cbico
de la davija de la
pared. NO choree agua sobre la aspiradora.
CUIDADO
2. Limpieel exteriorcon un tTaposuavey limpio, que
ha sidoexpdmidodespuds de remojaren una soludbn de agua y detergenteliquidoligero.Seque el
exteriorcon untTaposeco despu_sde limpiar.
3. Limpie la super'fiaeexteriordel recept_culoy de
los accesoriospara reducirla electricidad est_tJcay
la acumulaelbnde polvo.
Examineel fllb'ode seguridaddel motorde vez en
cuandoy cambiocuandoestdsuelo.
Para quitarla bolsa,siga las instrucciones
en
CAMBIO DE LA BOLSA.
kADVERTENCIA
Dispositivo de
retenci6n de goma
Peligro de choque el_ctrico
Desenchufe el cordbn de la corriente elSctrica.
No opere la aspiradora sin el flltro de seguridad del motor. Aseg_urese de que el filtro est_
seco • instalado adecuadamente para impedir
que el motor falle ylo que se produzca un
choque el_ctrico.
2. Reemplaceel
filtm conla
superfieleblancaen
sucampode vista
porcorredodebajo
de las costJllas
en la
cavidedde la bolsa.
Meta elfil_'opara
que quepa por
cunpletodebajodel
dispositJvo
de
retenci6nde goma.
FILTRO DE SEGURIDAD DEL
MOTOR
ELECTROSTATICO
EstefillTose tJeneque cambiarcuandoestdsucio.
Debe cambiarseperi6dicamenteseg0nlas
condicionesde us_ El filtro no se puede lavar
pues perdeda su capacidad para atrapar altrapar
polvo.
1. Levante el disposi_vo de retenddn de
go_a y saqueel filtro
de seguridadcomose
ve en el diagrama.
Dispositivo de
retenciOn de goma
%
3. Vdase CAMBIO DE LA BOLSA para carnbiar
la bolsa.
NOTA:Vdase PIEZAS y CARACTERISTICAS
para el n0mem del fil_o de seguridad del motor.
15
IbADVERTENCIA
3. Remover el fllb'o
de escape usando la
palanca como se
nuestra.
Peligro de cheque el6ctHco
No opera con un filtro de escape bloqueado o
sin el flltro de escape o la cubierta del filtro de
escape instalados.
4. Reemplace el
cartucho del filtro
FILTRO DE ESCAPE
HEPA
del escape.
Coloque el flltro
nuevoen la
Este certuchodel flltro escapetiene que cambiar
estdsucio. Cambie el filtro cuandoel _,rea
superficialest6 cubiertaper completo.El flltro no
se puede laver pues perderia su capacidad para
atrapar altrapar polvo.
escape
aspiradora.
NOTA:Vdase PIEZAS y CARACTER[STICAS
para el nt_merodel filtro de escape.
1. Deslizar el
arriba para liberar
la cubierta del filtro
de escape de la
ranura en la
pestillohacia
aspiradora.
aspiradora con el
lade de esponja
en direcci6n a la
5. Montela
cubiertadel filtm
...
de escape
colocandolas
doslengSetas en
la cubiertadel
filtro en las
ranurasde la
_-_'_
I I:_ _/!
I
_
Cubierta
del _/_o
Pestillo
aspiradery gire
en sulugar.
2. Jalar hacia
afuera y arriba en
la cubierta del filb'o
para rernoverlode
la aspiradora.
,_X
_/__I/f IIi_J
_
6. Deslizar
el abajo
pestillo
hacia
Cubierta para cerrar la
"/de filb'o cubierta
delflltro
I_'_'-_Pestill°deescapeensulugar.
CUIDADO DE LA POWER-MATE®
Siempre deberdn seguirse todas las precauclones de seguridad al limpiar y dar servicio a
la Power-Mates,
ADVERTENCIA
Peligro de cheque el_'trico o lesibn corporal
Descouecte la unidad antes de Iimpiarla o darle
uervicio. De Io contrario podda producirse un
cheque elSctrico o causer lesibn corporal si la
aspiradora arranca de manera imprevista.
16
Aunque
la funci6nde detecd0n de tJerrade la PowerMate®de Kenmoreest_ diseSadapara brindar
muchosa_osde fundonamientointerrumpido,el paso
de tierraa travdsdel sistemade lasv[as de =ire
puedecausaruna escamaen la lente,haciendoque
se endenda y contJn0eencendidoel indicadorverde,
sin cambiarnuncaa rojo.Cuandoesta suceda,tJene
que limpiarla lente.
CUIDADO
*--U
1. Retire lostubos
oprimiendoel ped=i
de liberaci6nrapiday
levantandolos tubos.
I"_
3 '/=pulgadas _
o 90 mm
Anillo
3_
2. Come se ve en el diagramalos dosindicadoresde
polvoestancolocadosdentrode la ar_culad6ngiratoria,aproximadamente3 ½ pulgadaso 90 mm
abajo,Observelas flechas). Para Ilegara loseiementosdel detector,usa un cepillopegu_o, comopor
ejemplopara botellas.Cepillecada detectorvarias
vecespara eliminarla tJerray el pdvo.
No utilice nunca agua ni soluci6n limpiadora
para limpiar las lentes. El residuo del agua o
del limpiador causar_ que las lentes se cubran
de tierra m_s r-_lpido
, requiriendo limpieza con
mayor fi'ecuencia.
LAS LENTES
Corte transversal
NOTA:Si mira hada dentrodel disposilJvo
giratono
podrdvet un anillo.El elementodetectorestdjustamentedebajode dichoanillo.
j
/
3. _vlJelvaa instalarlos tubosdespudsde limpiarlos
detectores.
PARA RETIRAR LA CORREA
\
4. Paraquitarla cubierta,
agarrelos ladosy tire
afuera.
t. Coloquela PowerMate'_con la parte
inferiorhada arriba.
2. Quite losdos (2)
tornillosen la cubierta
de la Power-Mate
®.
Power-Mate- en
la posici6n
vertical. Apriete
el pedaldel
3. Co4oqueI_,
mangode
liberaci6ny baje
la ar_culad6n
giratoria. Levante
los pestillos
traseros
5. Levantela unidad
del agitadory quite
la correagastada.
Pestillos
laterales
Pestillos
traseros
Tapa del extremo
6. Examiney limpielas dreas de tapa del extrem_ En
la ENSEMBLE DEL AGITADORse proporcionauna
ilustraci6nde todoel ensambledel agitador.
t7
LIMPIEZA DEL AGITADOR
2. Coloqueotra vez
la unidaddel agitadot en la P_werMate®.
NOTA: Para mantener una alta eficiencia de
limpieza y evitar el da_o a la aspiradora, hay
aue limDiar el aaitador cada vez aue se cambia
la co_ea.
Tambi6n hay que limpiar el agitador segt)n el
siguiente horario:
aa_ador
Frecgente (usada dirariamente)
Moderado (usada 2 o 3 veces
pot semana)
cada semana
cada mes
Ligero cada 2 meses
(usada 1 vez por semana)
Cubierfa
IMPORTANTE
Base
3. Alineela parte
fTontalde la
cubiertacon la
base. Coloquela
cubiertasobreel
bordedelantero
de la base como
se muesb'a.
4. NOTA:En los modeloscon el indicadorde polvo,
aseg,_resede que la planchaastd ver_caly los cotdorieseslbn metJdoscomese ve en el diagrama.
Desconecte la aspiradora. Examine_'ecuentemente el cepilloy las _'eas de soportedel mismo
de la Power-Mate® y eliminetodocabello,hitoy
pelusaacumulada.
Retire todo indicio de basura o suciedad de la
zona de la correa y del rodillo del cepillo.
Con cuidado quite las tapas y quite el hilo o
los restos ubicados en el agitador, o en los
soportes del cepillo.
Ensamble del agitador
Polea para
CC rrE
Tapadel
=_._:_
Unidad
deJ
agitador
PARA RETIRAR LA CORREA
1. Instale
una correa
nueva sobre
el impulsor
del motory
luego sobre
la rueda dentada del
cepillo.
Pestillos
laterales
Pestillos
traseros
5. Rote la cubierta
haciaarras.
Aprietecon poca
fuer-zahastaque
las leng0etas
lateralesy baseras
enderren
seguramente.
Cercibreseque no
hay espacioenb'e
la cubierta y la base.
5. Coloquela Power-Mate® conla parte inferior
hacia arribay insertelosdos (2) tomillosen la
cubierta.
del motor
para
correa
Agitador
Tapa del
ex/Temo
NOTA: V_ase PIEZAS y CARACTER|STICAS
para el nt)mem de la correa.
18
Empuje hacia
adentro y gire
1.Quitelacubierta
de la Power*Mate® como se
describe en la secci6nCAMBIO DE LA CORREAY
UMPIEZA DEL AGITADOR.
Empuje hacia
adenCro y gire
2. EmpujehaciaadentTo
y gire la bornbillaen et
senUdosontmdoal de
las agujasdel reloj,
luegoUrehacia afuera
para saca£
3. Empuje hacia adentro
y gire en el senUdocontradoal de las agujas
del relojpara reemplacer. La bcxnbillano debe
set m_s de 15 vaUos(
130 voltJos/).
4. Reinsta]ela cubiertade la Power-Mate® comose
describeen la secci6nCAMBIO DE LA CORREAY
UMPIEZA DEL AGITADOR.
NOTA: V_ase PIEZAS y CARACTER|STICAS
para el n_merode la bombilla.
PARA CAMBIAR MAZO DEL
AGITADOR
ADVERTENCIA
1. ReUrela cubierta,correay ensambtedel agitador
de la Power-Mate
® Consulte"Para retirar la correa" bajoCAMBIO DE LA CORREAY UMPIEZ.A
DEL AGITADOR.
2. Reemplaceel agitador.
3. Cambiela correa,el ensambledel agitador,la cubiertade la Power-Mate
®,la bombillay la cubiertade
la bombilla.Consulte"Para cambiar la correa" bajo
CAMBIO DE LA CORREAY UMPIEZA DEL
AGITADOR.
PARA REVISAR LA UNIDAD DEL
AGITADOR
tados los cepillos a[
nivel de las barras
de soporte en la
base, cambie la
Cuando estdn gasunidad del agitadot.
__
Barra de soporte
de la base
19
Consulte este tabla para encontrarsoluciones que usted mismo puede realizar cuando tenga problemas
menores de rendimiento. Cualquier servicio que necesite aparte de otros descritos en este manual f_enen
que ser hechos pot un Centre de servicio de Sears.
XkAD VER TENCIA ,,e,,g,ooquo
Desconecte la aspiradora antes de darle servicio o limpiarla. De Io contrario podda producirse un
choque el_ctrico o causar lesi6n corporal.
La aspirado_a no arranca.
1,
Estd descone_ada.
2.
Co_sc_rcuitosbotadoo fuell_ quemade
eft el tabloro de se_do de ham.s_denc_
ConrJnorP_.s
el6ctficas de lo mangueta
sue_as.
3.
No aspira
s_dJsfactodarnente.
t,
23.
4.
5.
6.
7.
&
9.
10.
La a_plrodona arrarmo,
peru se apaga.
La Power-Mate®no fun¢iona
cuandoes_instalada,
5dsa para pdvo lena o atascada.
Vias de flujode abe atasc_des.
F]lbossuoo_
A)usteloc_rreclo de n_f de pelode
la elfombm.
incorrectas_ec_on de ni_d de poder.
Mangue_ rot_
Ag_dor de haPow_hate ®P._gastade_
Cortes desgastadeo rot_.
Agitado(o tapas del e_l_emode _le sudo_
Tap_ delreceptaculoabha_a.
1. Cone_ones d6c_cas de hamanguerao
de b tapa.
2. Fmt_x conba s_xecargas de ha
Pov_r-Mate®botad(_
1
Protectorde sc_mca_s botodo
e_ el recepldculo.
1.
2.
3,
4,
Co_e_o_es de la Fov_r_Q,_e€ desconectades.
Cotmadesgastadaoro_.
Aghade_otapasdelexbemosde_'kesuclo_
Proteclorconkasotxeca_asdela
PowerJ_a_e®botado,
5. Selecc_ equivocadadel controlele_-delco
1. Conecte bien, optimaselector de encen_do/
apagade a haposen ON.
2. RestaUezcael coTtaclrcuitos
o cambie el
fu_l_
3. 'v_ehraa €onectar losex_
de hamanguera,
(p_girm 6).
1.
2.
3.
4.
Cambie habolsa, (p_gina 14).
Umpie hasvlas de flujode abe, (_gina t3).
Cambie el fllUos,(l_gina 15-16).
Ajuste d Kr_el,(p_gina 10).
5.
Ajuste el coifs01,(pdgina 8).
6. Cambie hamanguerlL
7. Cambhahaag_tad_, (pdgloa 19).
IS.& 9, Co.suite CAMBIO DE LA CORRF.._y LIMRF.ZA
DE__AG[TADOR,{p_ginas t7-18).
10. Cien_ebien la tapa.
1. Examine Isd;cotP_monesel_c_c_s, vueh4a1;
ecta_ los e_'emos de hamanguera, (p,_r4s 6).
2. Redo oJa_quier
objeto atoradoo atascade,
lue_ restablezca.Si ha_mdera
amancaperu
se vuelve a apagar, 5r_pieel agbedo_y los
tapas del exbem_ de _te, haegores_t_.zc_,
(l_ginas 11, 17-18).
3. Resta_zca protect= termel (p_tgina12).
1. Co_ecte ble_, (pdglrBs5-6).
2&3.
Co_sulteCAMBiODELACORREAYLIMPIEZA
DB_ AGITADOP_(pdginas17-18).
4. ReSrecualquierobjetoatomdooatascade,
luego restablezca.Si haas;_radoraarran_ dem
se vudve a apagar, limpie el aghadory los
tapas del extremosde _ste, luegoresta_ezc=a,
(p_as
tl, 17-18).
5. FTeelonarCarpet High e_ el con_ elec_ico.
Lo_g_na8).
Indicado_ verde encem_do
con_nu mnente en el detector
de fiend.
1. La ela de paso de _erra o habalsa
de pd_o esta bloqueade.
2. Lente suda.
1. Detennlne s_est_n _loqueadas las vJasde aim,
(p6gina t3).
2. Umpie has_ltes. (p_girm_7).
A}gunosotodoslosindicade_.s
rojos del detector de derra
enc4mdidos y nunca c=mbian a
verde.
1. Hayun@ajetoab'apadequees_vibrap_lo
eft d area de halentp.
t.
Noseenclende_losindicadores
verde o rojo de dete_
de f_ena
1. Selec_Z_equP_o=adedelcontrolehactT_nico.
1. Pres_onarCarpetHighe_elco_rolelecf_ico,
(p_gloa 9).
2. AcudeelCentfodeServiciodeSearsmdscsr
_ano.
2. Nohayst_isbodee_e_giaaltab._Odetect(x.
Elindicadorrendemiento
funci_a
1.
2.
3,
&
Laasplnadoralevantatapetes--o--o- es difiol empujar a
Pm_r4Aate e,
Laluznoflm_ona.
1. Ajusteinconectodeni_depelodelaelfombm.
2. Asp#aci_ demashadopo(ente.
[] cord_ no sa=enrdl&
t. Cor_ ei_c_ico sucio.
2. Cord_ atascade.
1. Limpie el cordde ek_c_co.
2. "i_redelcord_ y despu_ e_r_lel_
Lasspimdoradejamarcas
e_ la alT_mb_a.
1. Est_delimpiezainco_ecta.
1. COnsulteSUGERENCIASPARAASRRAR,
(p_gina 8).
t.
Bolsapampolvo_naoatascad_
RlVo_suc_.
V_as de fli_o de abe atascadas_
Cier_s ao:esodes.
Bomb_hafundide.
20
1.
73.
4.
[:>eterminesiest_nhaoqueadaslasvlasdeaire,
(p6gina t3).
Ca_nbielabolsa,(p_gina14).
CambieelfirPo_(p_gloa15-16).
Desbloqueehasvlas de fiujode _
(pdgina13).
Esto e_snormal B indicadordebe set n_nel
cuando ia herramientaest_ quitada.
1, Ajusteelelyel,(p_gina9).
2. setecelonarnivelde poderbajo e_ el co_o_
electr_ico, (p_a
9).
1. Cambiehabo_bl]a,(p_gloa19).
21
Your Home
For repair - in your home - of all major brand appliances,
lawn and garden equipment, or heating and cooling systems,
no matter who made it, no matter who sold it!
For the replacement parts, accessories and
owner's manuals that you need to do-it-yourself.
For Sears professional installation
of home appliances
and items like garage door openers and water heaters.
1-800-4-MY-HOME
®
Anytime, day or night
(1-800-469-4663)
(U.S.A. and Canada)
www.sears.com
www.sears.ca
Our Home
For repair of carry-in products
like vacuums,
lawn equipment,
and electronics, call or go on-line for the nearest
Sears Parts and Repair Center.
1-800-488-1222
il i!ii
Anytime, day or night (U.S.A. only)
iii
=
......
To purchase a protection
or maintenance agreement (Canada)
1-800-827-6655
(U.S.A.)
Para pedir servicio de reparaci_n
a domicilio,y para ordenar piezas:
1-888-SU-HOG/_'_ s"
(1-888-784-6427)
agreement (U. S .A.)
on a product serviced by Sears:
1-800-361-6665
(Canada)
Au Canada pour service en fran_ais:
1-800-LE-FOYER Mc
(1-800-533-6937)
www.sears.ce
© Sears, Roebuckand Co.
® Registered Trademark I TMTrademark I sMService Mark of Sears, Roebuck and Co.
® Mama Registrada / "_uMama de Fdbrica / SMMarca de Servicio de Sears, Roebuc_ and Co.
MCMarque de commerce / MDMarque d_posde de Sears, Roebuck and Co.