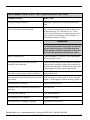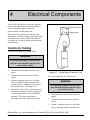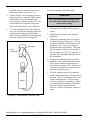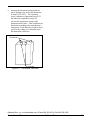
1
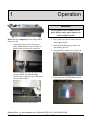
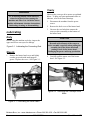
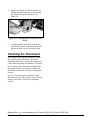
Snack Master®
Multi-Purpose Fryer
Operator’s Manual
Belshaw Bros., Inc.
814 44th Street Northwest, Suite 103
Auburn, WA 98001 USA
Phone: (206) 322-5474 • Fax: (206) 322-5425
E-mail: [email protected] • http://www.belshaw.com
If you accept the machine from the shipping
company, you are, in effect, saying that the
machine is in good condition, and you must
pay for the machine. The freight company has
accepted the responsibility for the safe delivery
of our machines. For your protection, inspect
the machine to see that no parts are bent,
scratched, or otherwise damaged. If any damage
has occurred in shipping, file a freight claim with
the shipping company immediately.
EQUIPMENT RECORD
Please provide the information below when you correspond with us about your machine.
Purchased by _____________________________________________________________________
Installed by ______________________________________________________________________
Date of Installation ________________________________________________________________
Model number ___________________________________________________________________
Serial number
092308
MN-1012EN
Belshaw Bros., Inc.
814 44th Street Northwest, Suite 103
Auburn, WA 98001 USA
Phone: (206) 322-5474 • Fax: (206) 322-5425
E-mail: [email protected] • http://www.belshaw.com
Contents
Contents
1
Operation
1
2
Cleaning
4
Cleaning the Conveyor and the Kettle
Removing the Shortening
Washing
Rinsing
Drying
5
5
6
7
8
3
9
Maintenance
Daily
9
Belshaw Bros., Inc. www.belshaw.com • Phone 206-322-5474 • Fax 206-322-5425
Snack Master OM
MN-xxxxEN
iii
Preface
The Snack Master fryer is designed to
automatically fry fresh cut tortilla chip and other
frozen snack food products utilizing a fully
submerging conveyor.
The Snack Master fryer is designed to be used on
a flat, stationary table or countertop. A specially
designed table come as an option with the full
fryer system. The operator must work safely at
all times and read this manual and follow its
instructions and warnings.
The Snack Master produces only 71.5 dB(A) of
equivalent A-weighted sound pressure at
workstations. This has been determined during a
dry run of the machine, using a Bruel & Kjaer
sound level meter, type 2236.
Study the instructions and warnings in this
manual carefully. A thorough understanding of
how to install, maintain, and safely operate the
Snack Master will prevent production delays and
injuries.
•
Hot shortening can cause serious burns.
Make sure that the system and the
shortening are cool before attempting
any adjustment, repair, disassembly, or
cleaning.
•
To avoid electrocution or other injury,
unplug the machine before attempting
any adjustment, repair, disassembly, or
cleaning.
•
To avoid damaging the machine, never
use force to assemble, disassemble,
operate, clean, or maintain it.
•
Be careful never to get shortening,
water, or other materials on the floor. If
anything does get spilled on the floor,
clean the area immediately. Materials on
the floor can cause people to slip or fall,
resulting in serious injury or loss of life.
•
To prevent unintentional startup and
possible fire, unplug the machine if there
is a local power outage. When the
power is restored, it is safe to plug the
machine in again.
To use the Snack Master fryer safely, heed the
following warnings and all other warnings that
appear in this manual:
•
Make sure the machine is secured to the
work surface. Doing so will prevent the
machine from moving or falling, which
could cause serious injury.
•
To avoid electrocution, make sure that
all electrical cords are not frayed or
cracked and that they do not pass
through any water or shortening.
•
Never let water and hot shortening come
in contact. Moisture causes hot
shortening to spatter, which may cause
serious burns.
•
Make sure that all electrical cords are
routed so that no one will trip over them.
•
Do not overfill the kettle with
shortening. If shortening overflows the
kettle, it could cause serious burns or
could cause someone to slip on the floor
and be seriously injured.
Belshaw Bros., Inc. • www.belshaw.com • Phone 206-322-5474 • Fax 206-322-5425
iv
MN-xxxxEN
Snack Master OM
1
Operation
WARNING
Do not operate fryer without cover on
place. Doing so may expose operator to
steam and pinch points
Read each step completely before doing what it
tells you to do.
1. If necessary, place lower conveyor in
kettle. Ensure that the conveyor drive is
placed in the conveyor drive sprocket.
Place the upper conveyor on top of lower
conveyor. Make sure that the upper
conveyor drive sprocket ride on the lower
conveyor drive chain.
2. Plug in the fryer power cord or turn on
main supply breaker.
3. Insure that the Emergency Stop is not
activated by pull out.
4. Check that the control power switch on
the back of the fryer heater head is on.
5. Press the green SYSTEM button on the
control box to ready fryer.
Put cover and infeed chute in place
Belshaw Bros., Inc. www.belshaw.com • Phone 206-322-5474 • Fax 206-322-5425
Snack Master OM
MN-xxxxEN
1
6. Set the temperature to the desired
temperature turning the temperature dial
above 200°F/93°C.
conveyor.
7. Turn HEAT selector switch to on the
control box to the on position. The lamp
in the selector switch is on to indicate
that the fryer heat has been turned The
pilot light on top of the heater head cycles
on when the elements are on and heating
the shortening
NOTE
The proper shortening level may change
based on the product being fried
•
Pre-melt shortening in a pan on the stove
and carefully pour it into the kettle.
•
Use the optional EZ Melt to melt
shortening and transfer it to the kettle.
See your EZ Melt manual.
WARNING
Hot shortening causes severe burns.
•
8. When the shortening reaches the correct
temperature, verify the shortening level.
Shortening expands as it increases in
temperature. This means that unless the
shortening is at frying temperature when
you put it in the kettle, you should put it
in gradually. Let the shortening in the
kettle heat up before you add more.
Proper shortening level is checked using
the level indicators on the lower
Put solid shortening into the kettle,
packing it tightly around the elements
and bulbs.
WARNING
Air spaces can cause the shortening to
overheat and catch on fire.
8.
Wait for the shortening to reach the desired
temperature. When it does, the pilot light on
the top of the heater head will go out. DO
NOT run the conveyor until all the
shortening has melted.
9.
Choose the appropriate fry time for your
product using the fry time control knob on
Belshaw Bros., Inc. • www.belshaw.com • Phone 206-322-5474 • Fax 206-322-5425
2
MN-xxxxEN
Snack Master OM
the control box
.
hood. Place a food bin at the at feed to catch
product as it comes out the outfeed conveyor.
10. . Turn on the conveyor drive using the
selector switch on the control box.
Note: If the conveyor becomes jammed, a
warning buzzer will sound about a minute
later and stop when the conveyor is turned
off. The conveyor drive is impedanceprotected so it will not burn out due to
jamming.
WARNING
If the conveyor becomes jammed:
1. Turn off the conveyor drive and the
heater.
2. Allow the system to cool down.
HOT SHORTENING IS DANGEROUS.
3. Determine the cause of the jamming.
4. Clear it.
5. Restart the system.
11. Continue adding shortening to the kettle to
maintain the proper shortening level (see
step 2). There are two ways to do this:
•
Melt some shortening in a pan on the
stove and carefully pour it into the kettle.
•
If you are using the optional EZ Melt,
transfer more shortening from it. See
your EZ Melt manual.
12.
To cook product, drop on infeed chute.
Beware of steam exiting out from under the
Belshaw Bros., Inc. www.belshaw.com • Phone 206-322-5474 • Fax 206-322-5425
Snack Master OM
MN-xxxxEN
3
2
Cleaning
WARNING
Thoroughly clean and dry the floor if
shortening, water, or other materials are
spilled. Materials spilled on the floor can
cause serious injury or loss of life.
WARNING
To avoid electrocuting yourself or
damaging the machine, never allow water,
steam, shortening, cleaning solution, or any
other liquid to enter the heater.
Belshaw Bros., Inc. • www.belshaw.com • Phone 206-322-5474 • Fax 206-322-5425
4
MN-xxxxEN
Snack Master OM
Cleaning the Conveyor and
the Kettle
There are four basic steps to cleaning the
conveyor and the fryer kettle: removing the
shortening, washing, rinsing, and drying. You
must perform all four steps and perform them in
the order listed.
Removing the Shortening
WARNING
main drive shaft coupling from the
conveyor drive coupling. The lower
conveyor weighs 60 pounds/27.2KG. to
prevent injury it is recommended that
two people are used to lift the lower
conveyor. Slide one piece of wood under
the conveyor and lay it across the top of
the kettle. Lift the other end of the
conveyor and do the same with the other
piece of wood. The conveyor will now
be resting on the two pieces of wood.
Let the shortening drain off of the
conveyor and into the kettle
To avoid being burned or electrocuted,
disconnect the machine from the power
source before cleaning the fryer.
1.
Disconnect the machine from the power
source.
2.
Let the shortening cool to 100°F/38°C.
3.
Remove the conveyor assembly as follows:
a. Obtain two pieces of wood, at least 1” x
1” x 15” (2.5 cm x 2.5 cm x 38 cm).
b. Remove cover from fryer.
WARNING
To prevent injury it is recommended that
two people are used for lifting the upper
and lower conveyors
c. Lift upper conveyor assembly from the
lower conveyor. The upper conveyor
weighs 36 pound/16.3 KG. To prevent
injury it is recommend that two people
are used lift the upper conveyor. Turn
slightly clockwise and rest on lower
conveyor to allow excess shortening to
drain off the conveyor and into the
kettle. After shortening has drained off
remove completely.
c. Lift the lowerr conveyor and pull it away
from the heater head to disengage the
Belshaw Bros., Inc. www.belshaw.com • Phone 206-322-5474 • Fax 206-322-5425
Snack Master OM
MN-xxxxEN
5
WARNING
WARNING
All parts must be dried thoroughly.
Moisture causes hot shortening to spatter,
which may cause serious injury.
4.
9.
Do not allow the shortening to overflow the
buckets. Shortening will get on the floor,
and if the shortening is not cool enough,
you may be burned.
After the shortening has drained off of the
conveyor assembly, set the conveyor
assembly aside.
Check again to see that the shortening in the
kettle has cooled to 100°F/38°C.
10. Remove the shortening from the kettle using
one of these methods:
•
Using the drain valve, drain shortening
into optional EZ-Melt Shortening filter.
•
Using the drain valve, drain shortening
into metal bucket. The method will
require some means to remove
impurities from the shortening
•
Using a small saucepan or a metal
pitcher, scoop as much of the shortening
as you can into one or more large metal
buckets. Then lift the kettle out of the
fryer case and carefully pour the rest of
the shortening into a metal bucket. Be
careful not to disturb the sediment that
has accumulated in the bottom of the
kettle.
WARNING
Thoroughly clean and dry the floor if
shortening is spilled. Shortening on the
floor can cause serious injury or loss of life.
11. Return the kettle to the fryer case, if you
have removed it.
12. Tilt the heater assembly down.
13. Brush off any carbon that has accumulated
on the heating element. Accumulated
carbon can cause corrosion and ineffective
heating.
14. Tilt the heater head assembly back, raising
the heating element out of the kettle.
15. Lift the kettle out of the fryer case. Remove
and dispose of the remaining shortening and
the accumulated sediment. Dry the outside
of the kettle.
16. Put the kettle back in the fryer case.
17. Tilt the heater head assembly down.
19. Install the conveyor assembly.
WARNING
Do not use plastic buckets for shortening
storage. If the shortening is not cool
enough, the buckets will melt; possibly
causing you to be burned, and causing
shortening to get on the floor.
Washing
1.
Pour hot water into the kettle, up to the
normal level of the shortening. Add about
2 oz/59 ml of trisodium phosphate or other
appropriate cleaner.
2.
Connect the machine to the power source.
Heat the solution to 200°F/93°C. Turn on
the conveyor. Keep the solution at this
temperature for 15-20 minutes.
Belshaw Bros., Inc. • www.belshaw.com • Phone 206-322-5474 • Fax 206-322-5425
6
MN-xxxxEN
Snack Master OM
3.
Turn off the conveyor and scrub the soiled
parts while the solution is under heat. Do
not use any abrasive cleaners or scrapers.
4.
Turn off the heater and disconnect the
machine from the power source. Allow the
cleaning solution to cool to 100°F/38°C.
5.
Remove the conveyors and tilt the heater
head back as you did before.
6.
Remove the cleaning solution from the
kettle using one of these methods:
•
•
Using the drain, valve drain the cleaning
solution into metal buckets When the
cleaning solution has stopped draining,
carefully carry the buckets to the sink
and slowly pour the solution into the
sink.
Using a small saucepan or a metal
pitcher, scoop as much of the cleaning
solution as you can into one or more
large metal buckets. Then lift the kettle
out of the fryer case and carefully pour
the rest of the cleaning solution into a
metal bucket. Carefully carry the
buckets to the sink and slowly pour the
solution into the sink.
WARNING
Do not use plastic buckets. If the cleaning
solution is not cool enough, the buckets will
melt; possibly causing you to be burned,
and causing cleaning solution to get on the
floor.
WARNING
Do not allow the cleaning solution to
overflow the buckets. Cleaning solution
will get on the floor, and if the solution is
not cool enough, you may be burned.
WARNING
Thoroughly clean and dry the floor if
cleaning solution is spilled. Liquid on the
floor can cause serious injury or loss of life.
7.
Lift the kettle out of the fryer case.
8.
Rinse the kettle thoroughly and dry it on the
outside.
9.
Install the kettle, tilt the heater head
assembly down, and install the conveyor
assembly as before.
Rinsing
1.
Pour clean water into the kettle, up to the
normal level of the shortening.
2.
Connect the machine to the power source.
Heat the water to 200°F/93°C.
3.
Run the conveyor for 5-10 minutes.
4.
Turn off the heater and disconnect the
machine from the power source. Allow the
water to cool to 100°F/38°C.
5.
Lift the conveyor assembly out of the fryer
case. Tilt the heater head assembly back.
6.
Remove the water from the kettle using one
of these methods:
•
Using the drain valve, drain the cleaning
solution into metal buckets. When the
water has stopped draining, carefully
carry the buckets to the sink and slowly
pour the water into the sink.
•
Using a small saucepan or a metal
pitcher, scoop as much of the water as
you can into one or more large metal
buckets. Then lift the kettle out of the
fryer case and carefully pour the rest of
the water into a metal bucket. Carefully
carry the buckets to the sink and slowly
pour the water into the sink.
Belshaw Bros., Inc. www.belshaw.com • Phone 206-322-5474 • Fax 206-322-5425
Snack Master OM
MN-xxxxEN
7
4.
WARNING
If your kettle has the optional drain
assembly, close the drain valve.
Do not use plastic buckets. If the water is
not cool enough, the buckets will melt;
possibly causing you to be burned, and
causing water to get on the floor.
WARNING
Do not allow the water to overflow the
buckets. Water will get on the floor, and if
the water is not cool enough, you may be
burned.
WARNING
Thoroughly clean and dry the floor if water
is spilled. Water on the floor can cause
serious injury or loss of life.
Drying
1.
Thoroughly dry all parts, including the
conveyor, the heating element(s), the inside
of the kettle, and the drain.
WARNING
All parts must be dried thoroughly.
Failure to dry the kettle, conveyor, and all
parts of the Donut Robot completely will
cause spattering or an eruption.
Shortening will spatter or overflow the
fryer and may result in fire, injury, or
death.
2.
Assemble the Snack Master as before.
3.
Make sure no water is in the drain or drain
tube.
Belshaw Bros., Inc. • www.belshaw.com • Phone 206-322-5474 • Fax 206-322-5425
8
MN-xxxxEN
Snack Master OM
3
Maintenance
WARNING
To avoid being burned, electrocuted, or
otherwise injured, always unplug the
machine and allow it to cool down before
making adjustments, clearing obstructions,
lubricating, cleaning, or disassembling.
Daily
Before using the machine each day, inspect the
upper and lower conveyors for damage.
Belshaw Bros., Inc. www.belshaw.com • Phone 206-322-5474 • Fax 206-322-5425
Snack Master OM
MN-xxxxEN
9
Snack Master®
Multi-Purpose Fryer
Technical Supplement
Belshaw Bros., Inc.
814 44th Street Northwest, Suite 103
Auburn, WA 98001 USA
Phone: (206) 322-5474 • Fax: (206) 322-5425
E-mail: [email protected] • http://www.belshaw.com
If you accept the machine from the shipping
company, you are, in effect, saying that the
machine is in good condition, and you must
pay for the machine. The freight company has
accepted the responsibility for the safe delivery
of our machines. For your protection, inspect
the machine to see that no parts are bent,
scratched, or otherwise damaged. If any damage
has occurred in shipping, file a freight claim with
the shipping company immediately.
EQUIPMENT RECORD
Please provide the information below when you correspond with us about your machine.
Purchased by _____________________________________________________________________
Installed by ______________________________________________________________________
Date of Installation ________________________________________________________________
Model number ___________________________________________________________________
Serial number
0205
MN-1013EN
Belshaw Bros., Inc.
814 44th Street Northwest, Suite 103
Auburn, WA 98001 USA
Phone: (206) 322-5474 • Fax: (206) 322-5425
E-mail: [email protected] • http://www.belshaw.com
Contents
1
Installation
1
Unpacking the Fryer
Initial Cleaning
Assembling the Fryer
Leveling and Securing the Fryer
Moving the Fryer
2
2
2
4
4
2
Maintenance
5
Lubricating
Checking the Thermostat
6
7
3
8
Troubleshooting
Snack Master
4
8
Electrical Components
15
Continuity Testing
5
15
Appendix
20
Belshaw Bros., Inc. • www.belshaw.com • Phone 206-322-5474 • Fax 206-322-5425
Snack Master TS
MN-xxxxEN
iii
Preface
This technical supplement to the Snack Master
Operator’s Manual contains much information
that users and service persons may find helpful:
•
Detailed maintenance procedures for the
Snack Master
•
Detailed troubleshooting guides for the
Snack Master
•
Parts lists and assembly drawings of the
Mark II
•
Wiring diagrams of the Snack Master
•
Instructions on the testing and
calibration of electrical components
•
Information to make your donut
production easier
Remember that this is a supplement, not the
official operator’s manual. You use this
supplement at your own risk. While we have
made every effort to inform you of how to
behave safely, Belshaw denies any liability for
the use of the information contained herein.
Belshaw Bros., Inc. • www.belshaw.com • Phone 206-322-5474 • Fax 206-322-5425
iv
MN-1013EN
Snack Master TS
1
Installation
To help familiarize you with the major parts of
your Snack Master®, please study the
photographs below.
Figure 1-1. Donut Robot Mark II.
Belshaw Bros., Inc. • www.belshaw.com • Phone 206-322-5474 • Fax 206-322-5425
Snack Master TS
MN-xxxxEN
1
Figure 1-1. Donut Robot Mark II.
Unpacking the Fryer
The Snack Master may come with a optional
table and EZ Melt Shortening Filter.To unpack
the equipement, first transport all the pieces to
the work area.:
WARNING
Never let water and hot shortening come in
contact. Moisture causes hot shortening to
spatter, which may cause serious injury.
Prior to use, make sure any parts you have
washed are dry.
After cleaning, assemble the fryer and cutter as
explained below.
1.
Remove all crating and packing material
from the equipment.
2.
Remove the cover and the conveyors from
the fryer.
Assembling the Fryer
3.
Disconnect the control box power cord
1.
5.
Remove the clevis pins that hold the heater
head in place, and lift the heater head out of
the fryer.
If the optional table is used, place the table
in place and level.
2.
Place the fryer case the table or on a flat,
stationary surface.
6.
Coil the power cord and carry the heater
head to the workstation.
2.
Screw the fryer’s legs in as far as they will
go.
7.
Move the fryer case and kettle to the
workstation.
3.
Set the kettle into the fryer case. The end of
the kettle that has the locating pin must be
placed at the outfeed end of the fryer case.
The lip of the kettle should fit securely over
the edge of the case.
4.
Install the heater head assembly as follows:
Initial Cleaning
Thoroughly clean your Snack Master before
using it. Remove all packing materials. Use
household dishwashing detergent. Do not use
strong alkali cleaners such as lye, soda ash, or
trisodium phosphate. Thoroughly dry and
lubricate parts to prevent rusting.
a. Align the holes in the heater head end
caps with the holes in the heater head
mounting brackets.
b. Slide the clevis pins through the holes so
that the pinheads are on the outsides.
Refer to the Cleaning section in the Operator's
Manual for detailed cleaning instructions.
c. Insert the hairpin clips into the holes in
the clevis pins.
5.
WARNING
To avoid electrocution or damaging the
machine, never allow water, steam,
cleaning solution, or other liquid to enter
the cutter head or heater head assemblies.
Lower the heater head assembly into
position so the thermostat bulb bracket rests
on or very near the bottom of the kettle.
6. Install the lower conveyor assembly as
follows:
a. Hold the conveyor at an angle and slide
the conveyor drive coupling over the
main drive shaft coupling. The conveyor
Belshaw Bros., Inc. • www.belshaw.com • Phone 206-322-5474 • Fax 206-322-5425
2
MN-1013EN
Snack Master TS
coupling has a notch in it. Turn the
conveyor coupling until the head of the
socket head screw in the drive coupling
can slide into this notch.
Figure 1-1
b. Set the upper conveyor on to the lower
conveyor so that the upper conveyor
drive sprocket engages with the drive
chain on the lower conveyor.
Figure 1-2..
7. Be sure your power source matches the
specifications on the data plate. Connect the
machine to the power source.
8. Turn on the conveyor only and check to see
that it operates smoothly. The power switch
for the conveyor drive is on the control box
at the fryer infeed.
Belshaw Bros., Inc. • www.belshaw.com • Phone 206-322-5474 • Fax 206-322-5425
Snack Master TS
MN-xxxxEN
3
Leveling and Securing the
Fryer
Check to see if the fryer is level. If it is not,
adjust the heights of the legs. Be sure that all six
legs rest on the work surface when the fryer is
level.
Bolt the fryer to the work surface as follows:
1.
Moving the Fryer
If you ever want to move the fryer to a different
workstation, follow this procedure:
1.
Turn off the machine and disconnect it from
the power source. Unplug the cutter head
power cord.
2.
Allow the machine and the shortening to
cool.
There are brackets on the ends of the fryer
case. Each has a hole in it. Mark the
locations of the holes on the work surface.
2.
Drill holes through the work surface.
3.
Insert bolts through the holes.
4.
Tighten nuts onto the bolts to ensure that the
Snack Master will not move.
WARNING
Do not touch hot shortening. It can cause
serious burns.
3.
Remove the shortening from the fryer as
explained in “Removing the Shortening” in
Section 3.
4.
To avoid dropping the machine or getting
shortening on the floor wipe excess
shortening off of the fryer and the conveyor.
WARNING
Thoroughly clean and dry the floor if
shortening is spilled. Materials on the floor
can cause people to slip or fall, resulting in
serious injury or loss of life.
5.
Set aside the conveyors.
6.
Remove the clevis pins that hold the heater
head in place. Remove the heater head from
the fryer.
7.
To prevent tripping, coil the power cord.
Move the heater head to the new
workstation.
10. Move the fryer to its new location.
11. Install the heater head.
12. Move and install the conveyors.
16. Level and secure the fryer.
Belshaw Bros., Inc. • www.belshaw.com • Phone 206-322-5474 • Fax 206-322-5425
4
MN-1013EN
Snack Master TS
2
Maintenance
Belshaw Bros., Inc. • www.belshaw.com • Phone 206-322-5474 • Fax 206-322-5425
Snack Master TS
MN-xxxxEN
5
Yearly
WARNING
To avoid being burned, electrocuted, or
otherwise injured, always unplug the
machine and allow it to cool down before
making adjustments, clearing obstructions,
lubricating, cleaning, or disassembling.
Lubricate the conveyor drive motor as explained
below. To help you better understand where to
lubricate, refer to the Parts Drawings.
1.
Disconnect the machine from the power
source.
2.
Remove the back cover of the heater head.
3.
Unscrew the two bolts that connect the
conveyor drive assembly to the bottom of
the heater head.
Lubricating
Daily
CAUTION
Before using the machine each day, inspect the
upper and lower conveyors for damage.
Be gentle with all parts of the conveyor
drive assembly, especially when pulling the
assembly out of the heater head and
putting it back in the heater head..
Damaging the parts could stop production.
Figure 2-1. Lubricating the Connecting Rod.
Weekly
1.
Remove the heater head cover and lightly
coat the gear teeth with multi-purpose
grease. Replace the cover. See Figure 2-1.
4.
Carefully pull the motor out of the heater
head. See Figure 2-3.
Figure 2-3. Removing the Conveyor Drive
Motor.
Figure 2-1. Lubricating the Drive Gears.
Belshaw Bros., Inc. • www.belshaw.com • Phone 206-322-5474 • Fax 206-322-5425
6
MN-1013EN
Snack Master TS
5.
Apply 4 to 6 drops of SAE 30 machine oil
through the lubricating hole in the bearing
cap until the felt pad is saturated. See
Figure 2-4.
Figure 2-4. Lubricating the Conveyor Drive
Motor.
6.
Carefully put the motor back in the heater
head, bolt the motor to the heater head, and
replace the back cover of the heater head.
Checking the Thermostat
If the quality of your product decreases, check
the accuracy of the thermostat. Heat some
shortening in the fryer, measure the temperature
of the shortening using a thermometer you know
to be accurate, and compare this reading to the
thermostat setting If you need to calibrate the
thermostat, consult the “Electrical Components”
section.
If you ever want to test the continuity of the
thermostat or any of the switches on your Snack
Master, refer to the “Electrical Components”
section.
Belshaw Bros., Inc. • www.belshaw.com • Phone 206-322-5474 • Fax 206-322-5425
Snack Master TS
MN-xxxxEN
7
3
Troubleshooting
This section is designed as an aid in
troubleshooting with the Snack Master®. It is
not a substitute for a qualified technician. You
may encounter a problem with your machine that
is not covered in this section, or you may try the
remedies suggested here and find that they do not
solve the problem. If this happens, call your
dealer or another qualified technician. Also, call
your dealer if you need a replacement part.
If your dealer cannot help you, please call
Belshaw Bros. When you call, please specify the
following:
To avoid down time, call to see whether a loaner
machine is available while your machine is being
serviced.
CAUTION
If you perform repairs yourself or have
them performed by anyone other than a
service technician authorized by Belshaw
Bros., you do so at your own risk.
•
The model name of the machine.
Snack Master
•
The serial number of the machine.
•
The voltage, phase, and cycle of the
machine.
Following is a troubleshooting chart to help
identify and solve problems with the Snack
Master.
If your machine needs to be repaired, consult
your dealer or another local, qualified technician.
If they cannot repair your machine, Belshaw can
provide factory service. First call Belshaw for a
return goods authorization. Then send your
machine to the Belshaw factory, freight prepaid,
with instructions for service, your phone number,
and the name of the person to contact when a
cost estimate is calculated. In most cases, the
machine can be shipped back, freight collect,
within five days. Ship the machine to:
WARNING
To avoid being burned, electrocuted, or
otherwise injured, unplug the machine and
allow it to cool before disassembling,
repairing, or wiring.
Belshaw Bros., Inc.
814 44th Street NW, Suite 103
Auburn, WA 98001 USA
Belshaw Bros., Inc. • www.belshaw.com • Phone 206-322-5474 • Fax 206-322-5425
8
MN-1013EN
Snack Master TS
THE PRODUCT IS UNDERCOOKED.
Possible Causes
What To Do
The shortening is not hot enough.
Increase the temperature setting.
The conveyor is moving too quickly.
Decrease the speed of the conveyor, using the
conveyor speed knob located on the control box.”
The thermostat reads inaccurately.
Calibrate the thermostat.
THE PRODUCT IS OVERCOOKED.
Possible Causes
What To Do
The shortening is too hot.
Decrease the temperature setting.
The conveyor is moving too slowly.
Increase the speed of the conveyor, using the
conveyor speed knob located on the control box
The thermostat reads inaccurately.
Calibrate the thermostat.
Belshaw Bros., Inc. • www.belshaw.com • Phone 206-322-5474 • Fax 206-322-5425
Snack Master TS
MN-xxxxEN
9
PRODUCT DOES NOT MOVE THROUGH CONVEYOR.
Possible Causes
What To Do
Product is to small for spacing between
conveyors.
Add shorten to insure contact with both upper and
lower conveyor.
Product is to large for spacing between
conveyors
Use smaller product
The shortening level is too low.
Add shortening to reach the proper level.
WARNING
Before doing any of the following, turn off the
machine and allow the shortening to cool.
The fryer is not level.
Level the fryer.
Belshaw Bros., Inc. • www.belshaw.com • Phone 206-322-5474 • Fax 206-322-5425
10
MN-1013EN
Snack Master TS
THE HEATING ELEMENT FAILS TO MAINTAIN THE PROPER
TEMPERATURE.
Possible Causes
What To Do
The input voltage is incorrect.
Supply the correct power as specified on the data
plate.
Sediment has accumulated around the
thermostat bulb.
WARNING
To avoid being burned or otherwise injured, turn
off the machine and allow the shortening to cool.
Clean to remove the sediment. (Clean the Donut
Robot regularly and thoroughly.)
The thermostat has been calibrated incorrectly.
Recalibrate the thermostat.
The thermostat is defective.
WARNING
To avoid being burned, electrocuted, or otherwise
injured, turn off the machine, allow the
shortening to cool, and disconnect the machine
from the power source.
Replace the thermostat.
Belshaw Bros., Inc. • www.belshaw.com • Phone 206-322-5474 • Fax 206-322-5425
Snack Master TS
MN-xxxxEN
11
THE CONVEYOR IS JAMMED.
Possible Causes
What To Do
WARNING
To avoid being burned or otherwise injured,
before doing any of the following, turn off the
machine and allow the shortening to cool.
Cooked food particles are wedged between a
chain opening and a sprocket tooth.
Clean to remove the food particles. Clean the Snack
Master regularly and thoroughly.
The conveyor drive shaft and the drive motor
shaft are out of alignment.
Remove the cover of the drive assembly. Loosen the
four mounting spacers so the drive assembly can be
moved. Align the motor shaft with the conveyor
shaft. When they are aligned, tighten the mounting
spacers. Replace the cover.
THE MOTOR OVERHEATS.
Possible Causes
What To Do
The power requirements of the machine do not
match the power source.
Supply the correct power as specified on the data
plate.
WARNING
To avoid being burned, electrocuted, or otherwise
injured, before doing the following, turn off the
machine, allow the shortening to cool, and
disconnect the machine from the power source.
The motor is binding.
Repair or replace the motor.
The motor is defective.
Repair or replace the motor.
Belshaw Bros., Inc. • www.belshaw.com • Phone 206-322-5474 • Fax 206-322-5425
12
MN-1013EN
Snack Master TS
THE ELEMENT WILL NOT HEAT, AND THE CONVEYOR WILL NOT RUN.
Possible Causes
What To Do
The power cord is not plugged in, or the outlet
has no power.
Connect the machine to a good power source.
WARNING
To avoid being burned, electrocuted, or otherwise
injured, before doing any of the following, turn
off the machine, allow the shortening to cool, and
disconnect the machine from the power source.
The power cord is defective.
Replace the power cord.
THE ELEMENT WILL NOT HEAT, BUT THE CONVEYOR RUNS.
Possible Causes
What To Do
The high temperature limit control switch has
been tripped.
Push the red reset button on the back panel of the
heater head.
The thermostat has been calibrated incorrectly.
Recalibrate the thermostat.
WARNING
To avoid being burned, electrocuted, or otherwise
injured, before doing any of the following, turn
off the machine, allow the shortening to cool, and
disconnect the machine from the power source.
The high temperature limit control is defective.
Replace the high temperature limit control.
The thermostat is defective.
Replace the thermostat.
The contactor for the heating is defective.
Replace the contactor.
The connections to the contactor are bad.
Rewire the connections to the contactor.
Belshaw Bros., Inc. • www.belshaw.com • Phone 206-322-5474 • Fax 206-322-5425
Snack Master TS
MN-xxxxEN
13
THE ELEMENT HEATS, BUT THE CONVEYOR WILL NOT RUN.
Possible Causes
What To Do
The input voltage is incorrect.
Supply the correct power as specified on the data
plate.
The circuit breaker has been tripped.
Reset it by moving the white switch on the back of
the heater head to “off” and then to “on.” If the
conveyor still will not run, see that the power source
agrees with the specifications on the data plate. If
the problem persists, see below.
WARNING
To avoid being burned, electrocuted, or otherwise
injured, before doing any of the following, turn
off the machine, allow the shortening to cool, and
disconnect the machine from the power source.
There is a short circuit.
Find it and repair it. (First see “The circuit breaker
has been tripped” above.)
The wiring harness in the conveyor drive
assembly is not connected.
Check the connection of the pin connector from the
conveyor drive assembly to the socket connector in
the heater head enclosure. Make sure the pins in the
pin housing are securely seated in the housing.
The conveyor drive power switch is defective.
Replace the switch.
The nylon brake dog is binding on the conveyor
brake motor.
If the brake dog is worn, replace it. If it is too tight,
loosen it. If the spring is weak or missing, replace it.
The brake motor is defective.
Replace the brake motor.
An internal wire is interfering with the nylon
brake dog.
Move the wire.
The conveyor is jammed.
Clear the obstruction.
The couplings are not engaged.
Engage the couplings.
The conveyor drive coupling is slipping.
Tighten the two set screws.
Belshaw Bros., Inc. • www.belshaw.com • Phone 206-322-5474 • Fax 206-322-5425
14
MN-1013EN
Snack Master TS
4
Electrical Components
This section explains how to test the continuity
of electrical components in the Snack Master®.
These include the toggle switches, the
microswitches, and the thermostat.
switch terminals
toggle switch
The section also contains a document by the
Robertshaw Controls Company, the maker of the
thermostat we use in the Donut Robot Mark II.
It explains how to check, adjust, and recalibrate
the thermostat.
Continuity Testing
+
To test the continuity of a toggle switch:
WARNING
battery
To avoid the possibility of electric shock,
disconnect the machine from the power
source before testing.
1.
Disconnect the machine from the power
source.
2.
Disconnect the terminal wires from the
switch.
3.
Obtain a continuity tester or a volt-ohm
meter. If neither of these instruments is
available, make a continuity tester using a
battery and a bulb. (See Figure 4-1.)
4.
Connect the wires of the continuity tester to
the switch terminals, as shown in Figure C1, and test the switch in the ON and OFF
positions. The switch should show
continuity only when in the ON position.
_
Figure 4-1. Toggle Switch Continuity Test.
To test the continuity of a microswitch:
WARNING
To avoid the possibility of electric shock,
disconnect the machine from the power
source before testing.
1.
Disconnect the machine from the power
supply.
2.
Disconnect the terminal wires from the
switch.
3.
Obtain a continuity tester or a volt-ohm
meter. If neither of these instruments is
Belshaw Bros., Inc. • www.belshaw.com • Phone 206-322-5474 • Fax 206-322-5425
Snack Master TS
MN-xxxxEN
15
available, make a continuity tester using a
battery and a bulb. (See Figure 4-2.)
4.
To test the continuity of the thermostat:
WARNING
Connect one wire of the continuity tester to
the microswitch’s common (COM) terminal
and the other wire to the normally open
(NO) terminal, as shown in Figure 4-2. The
switch should show continuity only when
the microswitch actuator arm is depressed.
5.
To test the normally closed (NC) terminal,
move the wire from the normally open (NO)
terminal to the normally closed terminal.
Now the switch should show continuity only
when the actuator arm is not depressed.
NC NO
To avoid the possibility of electric shock,
disconnect the machine from the power
source before testing.
1.
Disconnect the machine from the power
supply.
2.
Disconnect the terminal wires from the
thermostat.
3.
Connect the continuity tester across the B
terminals indicated in Figure 4-3. This set
of contacts should be closed whenever the
thermostat is on. To test, start with the
thermostat in the OFF position. Then turn
the thermostat up until you hear a distinct
click (at about the 175°F/79°C setting). At
this time, there should be continuity across
the B terminals.
4.
Connect the continuity tester across the A
terminals. Start with the thermostat in the
OFF position and turn the thermostat up
until you hear a distinct click. If there is no
continuity (the indicator or light does not
come on), proceed to step 5.
5.
With the continuity tester still connected,
turn the thermostat knob to OFF and remove
the knob. There is an adjusting screw in the
center of the knob stem. Turn it counterclockwise until there is continuity. If there
is no continuity (the indicator or light does
not come on), then the thermostat is
defective. If there is continuity, proceed to
step 6.
microswitch
switch
terminals
COM
+
battery
−
Figure 5-2. Microswitch Continuity Test.
Belshaw Bros., Inc. • www.belshaw.com • Phone 206-322-5474 • Fax 206-322-5425
16
MN-1013EN
Snack Master TS
6.
Immerse the thermostat sensing bulb in a
pan of boiling water and set the thermostat
at about 212°F/100°C. The continuity
tester’s indicator or light should go off. If
the indicator or light does not go off,
increase the temperature setting of the
thermostat until it does. Then recalibrate the
thermostat according to the manufacturer’s
instructions. If the indicator or light will not
go off at any setting or recalibration, then
the thermostat is defective.
“B” terminals
“A” terminals
Figure 5-3. Thermostat Terminals.
Belshaw Bros., Inc. • www.belshaw.com • Phone 206-322-5474 • Fax 206-322-5425
Snack Master TS
MN-xxxxEN
17
5
Appendix
See Parts List Drawing Insert Page.
Belshaw Bros., Inc. • www.belshaw.com • Phone 206-322-5474 • Fax 206-322-5425
20
MN-xxEN
Snack Master TS