1
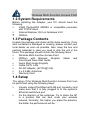
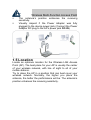
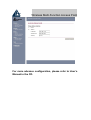
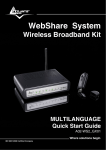
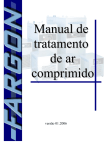
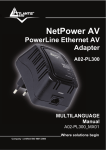
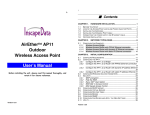
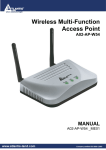
Wireless Multi-Function
Access Point
A02-AP-W54
Quick Start Guide
A02-AP-W54_GE01
Wireless Multi-Function Access Point
ENGLISH
This product is covered by Atlantis Land 3 years Fast-Swap
warranty. For more detailed informations please refer to the
web site www.atlantis-land.com.
For more detailed instructions on configuring and using the
Switch , please refer to the online manual.
ITALIANO
Questo prodotto è coperto da garanzia Atlantis Land
Fast-Swap della durata di 3 anni. Per maggiori dettagli in
merito o per accedere alla documentazione completa in
Italiano fare riferimento al CDRom o al
sito
www.atlantis-land.com.
FRANCAIS
Ce produit est couvert par une garantie Atlantis Land
Fast-Swap
de 3 ans.
Pour des informations plus
détaillées,
référez-vous
svp
au
site
Web
www.atlantis-land.com.
Le manuel complet en Francais est disponible dans le
CDRom ou sur le WEB.
DEUTSCH
Dieses Produkt ist durch die Atlantis Land 3 Jahre
Fast-Swap Garantie gedeckt. Für weitere Informationen,
beziehen
Sie
sich
bitte
auf
Web
Site
www.atlantis-land.com.
ESPAÑOL
Este producto està cubierto de garantía Atlantis Land
Fast-Swap por 3 años. Para una información más
detallada, se refiera por favor al Web site
www.atlantis-land.com.
Wireless Multi-Function Access Point
R
R
Reeegggiiisssttteeerrryyyooouurrrppprroooddduuucctt!!!
w
w
w
m
ww
ww
w..aaatttlllaaannntttiiisss--llaaannnddd...cccooom
m
Registration on the web site www.atlantis-land.com
within 15 days from the purchase of the product
dismiss the customer from showing a valid proof of
purchase (Sale Receipt or Invoice) in case of the
request of intervention. For further information we
invite you to look at our web site at the section
WARRANTY.
Wireless Multi-Function Access Point
Congratulations on your purchase of this IEEE 802.11g
Wireless Multi-Function Access Point.
For more detailed instructions on configuring and using the
Wireless Multi-Function Access Point, please refer to the
online manual.
1.1 An Overview
The device for a total freedom of movement without losing
the connection. Easy to be installed and fast and flexible,
with Wireless Multi-Function Access Point there is no more
obligation for a fixed working place: you can easily work or
navigate for fun from your own garden or in different rooms
of your office, always in wireless connection.
The Roaming function gives you a complete freedom of
movement and two or more Wireless Multi-Function Access
Point can serve wireless also large headquarters.
A pair of Wireless Multi-Function APs operating under
Bridge mode to act as the bridge that connect two Ethernet
networks or Ethernet enabled clients together. Repeat Mode
is able to extend the effective range and coverage of the
wireless network.
Thanks to advanced security functions which are integrated
and thanks to the troughput of the protocol IEE802.11G you
are going to have a fast and flexible wireless net, hacker
safe.
The chipsets fully support Wi-Fi Protected Access (WPA)
and the IEEE 802.11i draft security standards in hardware
and high-speed encryption engines with no performance
degradation.
Last, but not least, this product implements Intersil Nitro
GT™ capabilities to deliver up to a 3x improvement in
throughput for 802.11g clients operating in mixed-mode
wireless networks, and up to 50 percent greater throughput
performance in 802.11g only networks.
Wireless Multi-Function Access Point
1.2 System Requirements
Before installing the Adapter, your PC should meet the
following:
Intel® Pentium®III 600Mhz or compatible processor
with TCP/IP stack
Iinternet Explorer V6.0 on Netscape V6.0
CDRom
1.3 Package Contents
Unpack the package and check all the items carefully. If any
item contained is damaged or missing, please contact your
local dealer as soon as possible. Also, keep the box and
packing materials in case you need to ship the unit in the
future. The package should contain the following items:
Wireless Multi-Function Access Point
CDRom with Manuals (English, Italian and
French)and Quck Start Guide
Quick Start Guide (English)
Cable CAT5 LAN
AC-DC Adapter (5V DC@1,2A)
2 x 2.2 dBi Antennas
Warranty Card
1.4 Setup
The setup of the Wireless Multi-Function Access Point can
be performed using the following steps:
Visually inspect the Ethernet RJ45 port connector and
make sure that it is fully plugged in to the system’s
Ethernet switch/hub port.
Fix the direction of the antennas. Try to place the AP
in a position that can best cover your wireless
network. Normally, the higher you place the antenna,
the better the performance will be.
Wireless Multi-Function Access Point
The antenna’s position enhances the receiving
sensitivity.
Visually inspect if the Power Adapter was fully
plugged to the device power jack (Connect the Power
Adapter DC plug to the AP’s power jack DC-IN).
1.5 Location
Locate an optimum location for the Wireless LAN Access
Point (AP). The best place for your AP is usually the center
of your wireless network, with line of sight to all of your
mobile stations.
Try to place the AP in a position that can best cover your
wireless network. Normally, the higher you place the
antenna, the better the performance will be. The antenna’s
position enhances the receiving sensitivity.
Wireless Multi-Function Access Point
1.6 Using Wireless Access Point
1.6.1 The Front LEDs
The table below shows the LED Indicator of the Wireless
Multi-Function Access Point.
LED
Meaning
POWER
LAN
WLAN
This indicator lights green when the
Access Point receives power. Otherwise, it
turns off.
The indicator lights green when the LAN
port is connected to a 100Mbps Ethernet
station, the indicator blinks green while
transmitting or receiving data on the
100Mbps Ethernet network.
The indicator always blinks green while the
wireless AP is always broadcasting
packets.
1.6.2 The Rear Ports
The figure below shows the rear panel of the Wireless MultiFunction Access Point.
Wireless Multi-Function Access Point
Port
Reverse
SMA
Connectors
LAN
Meaning
There are two antennas in the rear
panel, when you need to connect
extended
Antenna,
connect
to
Antenna 2 for the extended antenna.
When you are using one antenna
model, connect the extended antenna
directly to the antenna screw in the
rear panel.
Ethernet uplink port with 10/100Mbps
Fast Ethernet connections, connect
this port to switch/hub.
Reset
The Reset function is to reset the
setting back to factory default setting,
once you press the “RESET” button
within 10 seconds, the LED of the
WLAN will turn off. And when the
Access Point is ready, the WLAN LED
will start blinking.
And the other function is when the AP
is locked, press the reset button to
unlock it.
POWER
(DC-IN)
Connect the Power Adapter DC plug
to the AP’s power jack.
1.7 TCP/IP
The Wireless Multi-Function Access Point
can be
configured with your Web browser. The web browser is
included as a standard application in the following operation
systems,
UNIX,
Linux,
Mac
OS,
Windows
95/98/NT/2000/Me, and etc. The product provides a very
easy and user-friendly interface for configuration.
Wireless Multi-Function Access Point
1.7.1 IP Adress
This section describes the configuration required by LANattached PCs that communicate with the Wireless MultiFunction Access Point, either to configure the device or for
network access. These PCs must have an Ethernet
interface (or wireless adapter) installed properly, be
connected to the Wireless Multi-Function Access Point
either directly or through an external repeater hub or by
wireless, and have TCP/IP installed and configured to
obtain an IP address through a DHCP server or a fixed IP
address that must be in the same subnet of the Wireless
Multi-Function Access Point. The default IP address of the
Wireless Multi-Function Access Point is 192.168.1.100 and
subnet mask is 255.255.255.0.
Please follow the steps below for PC’s network environment
installation. First of all, please check your PC’s network
components. The TCP/IP protocol stack and Ethernet
network adapter must be installed. If not, please refer to MS
Windows related manuals.
1.8 Default Settings
Before configurating this Wireless Multi-Function Access
Point, you need to know the following default settings.
User:
Password:
IP address (192.168.1.100)
Subnet Mask(255.255.255.0)
Wireless: Access Point
SSSID: default
Channel:6
Wireless Multi-Function Access Point
1.9 Accessing the Access Point Web
Configurator
Before you configure this device, note that when the AP is
configured through an Ethernet connection, make sure the
manager PC must be set on same the IP network.
Open Internet Explorer 5.0 or above Web browser.
Enter IP address http://192.168.1.100 (the factory-default
IP address setting) to the address location.
Click OK.
The screen will show the station summary of the AP when
you login to the AP.
There is no need to enter any password when
you first login the AP, the default setting is without
password. When there is a screen needs to enter
the Network password, it means that there is a
password settle, type in the password you
entered before.
Type a name or leave the username dialog box
empty to login, the system will check only the
password that was set in the system before.
1.9.1 Navigating
Configurator
the
Access
Point
Web
There are six main functions included in the left side of the
main screen: Network, Security, Status, Clients, Tools and
Configuration. Point the selections in the left side of the
menu screen.
Wireless Multi-Function Access Point
For more advance configuration, please refer to User’s
Manual in the CD.
Atlantis Land S.p.A.
Viale De Gasperi, 122
Mazzo di Rho – MI – Italy
[email protected]
[email protected]