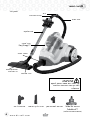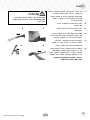
1
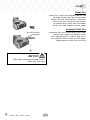
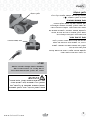
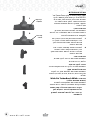
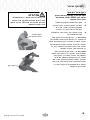
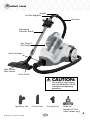
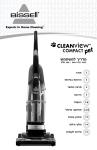
מדריך למשתמש דגם 220 – 240 30Z8 ,23A7וולט 2 תודה 3 הוראות בטיחות 4 מראה המוצר 5 הרכבה 8-6 הפעלה 12-9 תחזוקה וטיפול 13 פתרון בעיות 14 חלקי חילוף 15 שירות לקוחות אנו מודים לכם על שקניתם שואב אבק של BISSELL אנו שמחים שרכשתם שואב אבק של .BISSELLכל מה שידוע לנו על טיפול ברצפות נכלל בתכנון ובייצור של מערכת הניקיון עתירת הטכנולוגיה הזאת לבית. מיכל האבק של השואב שלכם בנוי היטב ,ואנו מגבים אותו באחריות מוגבלת של שנה .כמו כן אנו עומדים מאחוריו עם מחלקת שירות לצרכן בעלת ידע וייעודית ,כך שאם אי פעם תיתקלו בבעיות ,תקבלו סיוע מהיר ומתחשב. BISSELL הסבא רבא שלי המציא את מטאטא הרצפות בשנת .1876היום, היא חברה עולמית מובילה בתכנון ,ייצור ושירות של מוצרים איכותיים לבית כמו שואב האבק של BISSELLעם מיכל האיסוף. שוב תודה ,מכולנו כאן ב.BISSELL- מארק ג' .ביסל יו"ר ומנכ"ל w w w. b i s s e l l . c o m 2 הוראות בטיחות חשובות בעת שימוש במכשיר חשמלי ,יש להקפיד על אמצעי זהירות בסיסיים ,ובכלל זה: יש לקרוא את כל ההוראות לפני תחילת השימוש בשואב אבק עם מיכל איסוף. אזהרה :לצמצום סכנת שרפה ,התחשמלות או פציעה: ■ ■ ■ ■ ■ ■ ■ ■ ■ ■ ■ ■ ■ ■ ■ ■ יש לנתק את המכשיר משקע החשמל כשאינו בשימוש מיועד אך ורק לשימוש ביתי. מיועד רק ללכלוך יבש. אין להשאיר את המכשיר מחובר לחשמל. אין להשתמש במכשיר אם הכבל או התקע ניזוקו. אם פתיל הזינה ניזוק ,כדי להימנע מסכנה ,החלפתו תיעשה ע"י היצרן ,ע"י סוכן השירות שלו או ע"י אדם מוסמך אחר. אם המכשיר אינו פועל כראוי ,אם נשמט ,ניזוק, הושאר מחוץ לבית ,או נפל למים ,יש להחזירו למרכז שירות. אין לגעת במכשיר בידיים רטובות. אין למשוך או לשאת את המכשיר מכבל החשמל, אין להשתמש בכבל כידית ,אין לסגור את הדלת על הכבל או למשוך את הכבל מסביב לפינות או קצוות חדים ,אין לדרוס את הכבל בשואב או לחשוף את כבל החשמל למשטחים מחוממים. אין למשוך את הכבל כדי לנתק את השואב מהחשמל .כדי לנתק את השואב מהחשמל ,אחזו בתקע והוציאו אותו מהשקע. אין לדרוס את הכבל עם שואב האבק. אין לגעת בתקע או במכשיר בידיים רטובות. אין לחשוף שיער ,בגדים רפויים ,אצבעות או חלקי גוף לפתחים או לחלקים נעים. אין לשאוב חפצים חמים או בוערים כגון סיגריות, גפרורים או אפר לוחש. אין לשאוב חומרים דליקים או בעירים (נוזל למצית, דלק ,קרוסן ,וכו') ואין להשתמש בנוכחות נוזלים או אדים נפיצים. אין להשתמש בשואב בשטח סגור מלא באדים שמקורם בצבע שמן ,מדלל ,חומרים למניעת עש, אבק דליק ,או אדים נפיצים או רעילים אחרים. 3 ■ ■ ■ ■ ■ ■ ■ ■ ■ ■ ■ ■ ■ ■ מכשיר זה אינו מיועד לשימוש על ידי אנשים (ובכלל זה ילדים) בעלי יכולות פיזיות ,סנסוריות או מנטליות מוגבלות ,או על ידי אנשים חסרי ניסיון וידע ,אלא אם משגיח עליהם אדם אחראי על בטיחותם או מנחה אותם כיצד להשתמש במכשיר. יש להשגיח על ילדים על מנת לוודא שאינם משחקים עם המכשיר. יש להוציא את התקע מהשקע לפני ניקוי המכשיר ולפני שמבצעים בו פעולות תחזוקה. אם חוט החשמל ניזוק ,כדי למנוע סיכון יש להחליפו אצל היצרן או במרכז השירות. אין לשאוב חומרים רעילים (מלבין ,אמוניה ,נוזל לפתיחת סתימות ,דלק וכדומה). אין להשתמש במכשיר למטרה אחרת מלבד זו המתוארת במדריך למשתמש. יש להשתמש רק באביזרים מומלצים על ידי היצרן. אין להשתמש כשאחד הפתחים חסום .יש לנקות מאבק ,מוך ,שערות או כל דבר אחר שעלול להפחית את זרימת האוויר. יש להחזיק את המכשיר על משטח ישר. יש לכבות את כל המתגים לפני ניתוק המכשיר מהחשמל. יש לפעול במשנה זהירות בעת ניקוי מדרגות. למכשיר זה בידוד כפול .יש להשתמש בחלקי חילוף זהים בלבד. אין להשתמש בשואב ללא מיכל איסוף או שקית אבק וכאשר המסננים אינם במקומם. בעת שימוש במכשיר בסביבת ילדים יש להקדיש תשומת לב מירבית. שמרו הוראות אלה לשימוש עתידי דגם זה מיועד לשימוש ביתי בלבד. חשוב המכשיר נועד לשימוש במתח 220-240וולט בתדר 50/60הרץ בלבד. w w w. b i s s e l l . c o m מראה המוצר תופסן כבל ידית וסת זרימת אוויר צינור גמיש מוט טלסקופי מיכל איסוף ™Easy Empty מחבר הצינור בורר מברשת מברשתלרצפות רב תכליתית זהירות: אין לחבר את שואב האבק לשקע לפני קריאת ההנחיות והוראות ההפעלה. מברשת Wide Pet ™TurboBrush (בדגמים מסוימים בלבד) מברשת לשאיבת אבק אביזר לניקוי חריצים מברשת לריפוד w w w. b i s s e l l . c o m 4 הרכבה .1 כדי לחבר את הצינור לשואב האבק ,הכניסו את מחבר הצינור לתוך פתח השאיבה שבחלקה התחתון של חזית שואב האבק. דחפו עד לשמיעת צליל נקישה המעיד על מצב נעילה. .2 חברו את המוט הטלסקופי לידית של הצינור. .3 חברו את מברשת הרצפות למוט הטלסקופי. .4 חברו את תפס האביזרים לחלקו העליון של המוט הטלסקופי .שימו את האביזרים בתפס האביזרים ,כדי לשמור עליהם. .5 להארכת המוט הטלסקופי ,לחצו על כפתור השחרור השחור ואחר כך משכו את תחתית המוט עד לאורך הרצוי. .6 בתום הרכבת השואב ,תוכלו לאחסן אותו על ידי הכנסת תפס האחסון (שממוקם בחלקה האחורי של מברשת הרצפה) לתוך חריץ האחסון שבחלקו האחורי של השואב. אזהרה: עטיפות ניילון יכולות להיות מסוכנות. למניעת סכנת חנק ,הרחיקו מתינוקות ומילדים. 1 3 2 4 הערה :בבואכם לאחסן את השואב, קצרו את המוט הטלסקופי. 5 w w w. b i s s e l l . c o m הפעלה כבל חשמל כבל החשמל ממוקם בחלקו האחורי של השואב. משכו בעדינות את כבל החשמל .חפשו את הקו הצהוב .הפסיקו למשוך את כבל החשמל כשתראו את הקו הצהוב .ישנו גם קו אדום, שמצביע על קצה הכבל הניתן לשימוש .אין למשוך את כבל החשמל מעבר לקו האדום. כבל נגלל אוטומטית שואב האבק שלכם מצויד בכבל נגלל אוטומטית. כאשר אתם מסיימים לנקות ,לחצו על מתג הכיבוי ואחזו בתקע כדי לנתקו מהשקע .אחזו בתקע ולחצו על לחצן הגלילה האוטומטית כדי לגלול את הכבל בחזרה באופן אוטומטי. לחצן לגלילת כבל אוטומטית זהירות: היזהרו שלא להיפצע שכן הכבל נגלל במהירות רבה מאד. w w w. b i s s e l l . c o m 6 הפעלה לחצן הפעלה הפעילו או כבו את השואב בלחיצה קלה כלפי מטה על לחצן ההפעלה ( ). לחצן הפעלה וסת עוצמת שאיבה וסת עוצמת השאיבה נמצא בחלקו האחורי של שואב האבק .לשאיבה בעוצמה מקסימלית סובבו את הוסת לעבר הנקודות הגדולות יותר. להפחתת עוצמת השאיבה ,לשאיבת שטחים עם כמות לכלוך מועטה או אריגים עדינים ,סובבו את הוסת כלפי הנקודות הקטנות יותר. וסת זרימת אוויר וסת עוצמת שאיבה הסיתו את וסת זרימת האוויר אחורה ,לעבר הידית ,כדי לפתוח אותו .פתיחתו של הוסת תקטין את עוצמת השאיבה ותאפשר לשאוב אבק מאריגים עדינים. לעוצמת שאיבה מלאה ,הסיתו את הוסת קדימה כדי לסגור את וסת זרימת האוויר. עצה: השתמשו בווסת עוצמת השאיבה ובווסת זרימת האוויר כדי להפחית את זרימת האוויר לפי הצורך בעת שימוש באביזרים. זהירות: לפני השימוש בשואב האבק ,וודאו שמיכל האיסוף וכל המסננים (לפני המנוע ואחרי המנוע) נמצאים במקומם .אין להפעיל את שואב האבק בהיעדר מיכל איסוף ומסננים. 7 w w w. b i s s e l l . c o m הפעלה אביזרים מיוחדים שואב האבק מולטי ציקלון PowerForceשל BISSELLאינו רק שואב אבק עוצמתי לניקוי שטיחים ומרבדים .בעזרת אחד האביזרים המיוחדים אפשר להפוך אותו לשואב רב שימושי ,שמנקה רצפות חשופות ושטחים מעל לרצפה. מברשת רצפה: השתמשו בה לשאיבת שטיחים ,מרבדים ורצפות חשופות .הראש המסתובב יכול להיכנס למקומות צרים ומתחת לארונות. .1 לשאיבת שטיחים ומרבדים ,העבירו את בורר המברשת למצב שטיח .פעולה זו תגרום לנסיגת המברשות פנימה לתוך מברשת הרצפה. .2 לשאיבת רצפות חשופות ,העבירו את בורר המברשת למצב רצפה חשופה. פעולה זו תגרום ליציאת המברשות מתוך מברשת הרצפה. מברשת 1 למעלה 2 מברשת למטה מברשת ריפוד: השתמשו במברשת הריפוד לניקוי מסכים, וילונות ,כריות ואריגים. אביזר לניקוי חריצים: השתמשו באביזר לניקוי חריצים במקומות צרים. מברשת לשאיבת אבק: השתמשו במברשת לשאיבת אבק כדי לנקות אבק מרהיטים ,תריסים ,ספרים ,מנורות ,מדפים ופנלים. מברשת ™Wide Pet TurborBrush Wide (דגמים מסוימים בלבד): השתמשו במברשת המסתובבת לשאיבת שטחים קטנים ושטוחים ,לדוגמה כריות ומיטות. הערה :דחפו בעדינות כלפי מטה ומשכו אליכם בתנועת גריפה .הפעלת לחץ רב מידי יכול לגרום למברשת להפסיק להסתובב. w w w. b i s s e l l . c o m 8 תחזוקה וטיפול ריקון מיכל האיסוף רוקנו את מכיל האיסוף כשרמת האבק מגיעה לקו "( "FULLמלא) שמשורטט בצידי מיכל האיסוף. .1 נתקו את השואב מהשקע החשמלי. .2 לחצו על הלחצן לשחרור מיכל האיסוף שממוקם בחלקה האחורי של ידית הנשיאה והרימו אותה כדי להסירו. .3 בחרו שיטת ריקון .שיטה מס' 2מומלצת לסובלים מאלרגיות. שיטה מס' - 1החזיקו את מיכל איסוף מעל פח אשפה .כדי לפתוח את הפתח התחתון של המיכל ,לחצו על כפתור הריקון שבתחתית חלקו האחורי של מיכל האיסוף .לאחר שרוקנתם את המיכל ,סגרו את הפתח .צליל נקישה יעיד על כך שהפתח ננעל בחזרה למקומו. שיטה מס' - 2שימו שקית פלסטיק מעל תחתית מיכל האיסוף .כדי לפתוח את הפתח התחתון של המיכל ,לחצו דרך השקית על כפתור הריקון שבחלקו התחתון של מיכל האיסוף .המתינו לשקיעת האבק ,הסירו את שקית הפלסטיק וזרקו אותה לפח .סגרו את הפתח וודאו שנשמע צליל נקישה שיעיד כי ננעל בחזרה למקומו. 9 אזהרה: כדי להפחית את סכנת ההתחשמלות, לפני ביצוע פעולות תחזוקה או בדיקות לפתרון בעיות כבו את מתג הכיבוי ונתקו את התקע מהשקע. לחצן לשחרור מיכל האיסוף לחצן ריקון w w w. b i s s e l l . c o m תחזוקה וטיפול ניקוי הציקלון הפנימי והמסך המסננים מגנים על המנוע מפני לכלוך וחלקיקי אבק .השתמשו רק במסננים חלופיים של BISSELLבשואב האבק .PowerForce Multi Cyclonic .1 נתקו את השואב מהשקע החשמלי. .2 הוציאו מהשואב את מיכל האיסוף. 3 .3הסירו את חלקו העליון של מיכל האיסוף. לשם כך ,אחזו בידית הנשיאה וסובבו נגד כיוון השעון ומשכו למעלה והחוצה את מיכל האיסוף. .4אחזו בתחתית הציקלון וסובבו בכיוון השעון כדי לשחררו .משכו ישר למטה כדי להוציאו .השתמשו במטלית כדי להסיר אבק ושאריות לכלוך. .5משכו את המסננת ישר למטה כדי להוציאה .השתמשו במטלית או במברשת רכה כדי לנקותה ולהסיר ממנה אבק ושאריות לכלוך. 4 .6ניתן לנקות את המיכל גם עם מטלית לחה. לפני הרכבתו בחזרה ,וודאו שהמיכל יבש לגמרי. .7כדי להרכיב מחדש ,החזיקו בידית הנשיאה והחזירו את המסננת לחלקו העליון של מיכל האיסוף .וודאו שיישרתם את החריץ שבחלק העליון עם הבליטה שבשוליה השטוחים של המסננת .כעת החזירו את הציקלון הפנימי לתוך המסננת .לשם כך התאימו את החריצים שבחלקו העליון של הציקלון הפנימי עם הבליטות שבתוך המסננת וסובבו נגד כיוון השעון כדי לנעול אותו בחזרה למקומו. 5 .8כדי להחזיר את החלק העליון על מיכל האיסוף החזיקו בידית הנשיאה וסובבו אותה בכיוון השעון כדי לנעול אותה בחזרה למקומה .כשנעול ,וודאו שהלחצן לשחרור מיכל האיסוף נמצא בקו אחד עם לחצן הריקון. w w w. b i s s e l l . c o m 10 תחזוקה וטיפול ניקוי המסנן שלפני המנוע המסנן שלפני המנוע מגן על המנוע מפני לכלוך וחלקיקי אבק .השתמשו רק במסננים חלופיים של BISSELLבשואב האבק .PowerForce Multi Cyclonic כבו את השואב .נתקו את השואב מהשקע החשמלי. .1 .2 .3 הוציאו מהשואב את מיכל האיסוף. שימו לב: מוצר זה מיועד לשימוש ביתי בלבד ואינו מיועד לשימוש מסחרי או תעשייתי .שאיבת אבק ממוצרים כגון גבס ,בטון או אפר תזיק למנוע ותבטל את האחריות. המסנן שלפני המנוע ממוקם מאחורי המכסה המתויג "( "FILTERמסנן) בחלקו המרכזי של השואב. כדי לפתוח את המכסה ,לחצו כלפי מעלה על הלשונית שבתחתית המכסה ומשכו אותו החוצה כדי להסירו. .4 להוצאת מגש המסנן משכו את לשונית המגש כלפי מעלה .הסירו את המסנן שלפני המנוע והניחו אותו בצד .דפקו בעדינות את המגש על פח האשפה כדי להסיר את הלכלוך והפסולת שהצטברו. 3 מסנן לפני המנוע 4 .5 אפשר לשטוף את המסנן שלפני המנוע במים קרים עם חומר ניקוי עדין .שטפו את המסנן ויבשו אותו היטב באוויר לפני שאתם מחזירים אותו בחזרה לתוך המגש. מגש מסנן .6 החזירו את המגש לתוך השואב אבק והשיבו למקומו את מכסה המסנן על ידי הכנסת הלשוניות שבחלקו העליון ודחיפה מטה עד לשמיעת צליל נקישה המעיד על נעילתו במקומו. עצה: להשגת ביצועים מקסימאליים, בדקו את המסננים לעיתים קרובות ונקו או החליפו אותם לפי הצורך. החלפת מסנן *HEPAשלאחר המנוע מסנן HEPAלאחר המנוע מסייע בתהליך הסינון כדי להחזיר אוויר נקי לחדר .השתמשו רק במסננים חלופיים של BISSELLבשואב האבק .PowerForce Multi Cyclonic כבו את השואב .נתקו את השואב מהשקע החשמלי. .1 המסנן שלאחר המנוע ממוקם מאחורי המכסה .2 המתויג "( "FILTERמסנן) שבחלקו האחורי של השואב .לפתיחת המכסה ,לחצו כלפי מטה על הלשונית של המכסה ומשכו החוצה כדי להסירו. אזהרה: אין להפעיל את השואב עם מסננים לחים או רטובים או כשהמסננים אינם במקומם. 2 .3 להסרת מסנן HEPAשלאחר המנוע* אחזו בידית שעל המסנן ומשכו אותה החוצה. 3 מסנן HEPA *המסנן ,לא השואב בכללותו ,עומד בתקן .IEST-RP-CC001.5 HEPA 11 אחרי מנוע* w w w. b i s s e l l . c o m תחזוקה וטיפול החלפת מסנן (המשך) .4החליפו את מסנן *HEPAשלאחר המנוע במסנן חדש. הערה :המסנן שלאחר המנוע הוא מסנן קפלים HEPAלבן .מסנן זה אינו רחיץ ויש להחליפו כשהוא מתלכלך. .5כדי להשיב למקומו את מכסה המסנן הכניסו את שתי הלשוניות למקומן בתחתית מכסה המסנן. אחר כך לחצו מטה את הלשונית שעל המכסה ולחצו אותו בחזרה לתוך השואב .שחררו את הלשונית שעל המכסה כדי לנעול אותו במקום. שימו לב: מוצר זה מיועד לשימוש ביתי בלבד ואינו מיועד לשימוש מסחרי או תעשייתי .שאיבת אבק ממוצרים כגון גבס ,בטון או אפר תזיק למנוע ותבטל את האחריות. מברשת ™Wide Pet TurboBrush (דגמים מסוימים בלבד) יש לבדוק בקביעות את המברשת Wide Pet TurboBrushולוודא שאין בה חסימות ושלא הצטבר לכלוך סביב המברשת. .1 נתקו את השואב מהשקע החשמלי. .2אם יש חסימה או אם ניתן לראות לכלוך, סובבו את הצווארון שמסביב לצוואר של מברשת Wide Pet TurboBrushנגד כיוון השעון כדי להוציא את המסגרת ולנקות את החסימות. .3כדי לנקות את הלכלוך מהמברשת ,הוציאו את המברשת מרצועת ההנעה ונקו את הלכלוך. .4החזירו למקומה את רצועת ההנעה על המברשת .הציבו את קצוות המברשת לתוך החריצים שבצדדים .מקמו בחזרה את המסגרת וסובבו את הצווארון בכיוון השעון למצב נעילה. מגן תרמי שואב האבק שברשותכם כולל מגן תרמי פנימי שנועד להגן עליו מפני התחממות יתר .אם מופעל המגן התרמי ,מנוע השואב מפסיק לפעול .אם זה קורה: .1 כבו את השואב ( )Oונתקו משקע החשמל. .2רוקנו את מיכל האיסוף ,בדקו שהמסננים ומעברי האוויר אינם חסומים כתוצאה מהצטברות לכלוך. .3המגן התרמי מתאפס אוטומטית לאחר כשעה. אם המגן התרמי לא התאפס ,פנו אל שירותי הלקוחות של .BISSELL *המסנן ,לא השואב בכללותו ,עומד בתקן .IEST-RP-CC001.5 HEPA w w w. b i s s e l l . c o m 12 פתרון בעיות השואב אינו פועל סיבות אפשריות .1השואב אינו מחובר לחשמל .2לחצן ההפעלה אינו לחוץ .3המגן התרמי הופעל אזהרה: כדי להפחית את סכנת ההתחשמלות ,לפני ביצוע פעולות תחזוקה או בדיקות לפתרון בעיות כבו את השואב ונתקו את התקע מהשקע. פתרונות .1בדקו את התקע .2לחצו על לחצן ההפעלה .3אפשרו לשואב להתקרר למשך שעה אחת ,ראו עמוד 12 השואב אינו פועל או שעוצמת השאיבה נמוכה סיבות אפשריות .1האביזרים ,הצינור ו/או המוט הטלסקופי חסומים .2המסננים מלוכלכים .3מיכל האיסוף מלא .4הצינור אינו מחובר היטב לפתח השאיבה .5קיים סדק או חור בצינור הגמיש .6וסת זרימת אוויר או וסת עוצמת השאיבה פתרונות .1הסירו כל חלק וודאו שאינם חסומים .2בדקו ונקו או החליפו מסננים לפני מנוע ואחרי המנוע .3רוקנו את מיכל האיסוף .4וודאו שמחבר הצינור נעול לתוך פתח השאיבה .5בדקו את הצינור והחליפו אותו במידת הצורך .6שנו לסגור או למקסימום פתוחים או במצב מינימאלי אבק נראה לעין בורח מהשואב סיבות אפשריות .1מיכל האיסוף מל א .2המסננים חסרים או שאינם מותקנים כראוי .3המסננים מלוכלכים .4הצינור הגמיש חסום .5הצינור אינו מחובר היטב לפתח השאיבה .6קיים סדק או חור בצינור הגמיש פתרונות .1רוקנו את מיכל האיסוף .2בדקו שהמסננים לפני מנוע ואחרי מנוע הותקנו כראוי .3בדקו ונקו או החליפו מסננים לפני מנוע ואחרי המנוע .4הסירו את הצינור ובדקו חסימות .5וודאו שמחבר הצינור נעול לתוך פתח השאיבה .6בדקו את הצינור והחליפו אותו במידת הצורך פעולות תחזוקה או שירות אחרות שאינן נכללות במדריך זה יבוצעו על ידי אנשי שירות מוסמכים. אנו מודים לכם על בחירתכם במוצר של 13 .BISSELL w w w. b i s s e l l . c o m חלקי חילוף פריט 1 2 3 4 5 6 7 8 9 10 11 מק"ט 2 03-1578 203-1579 203-1536 203-1583 203-1581 203-1580 203-1582 203-1575 203-1569 203-1557 203-1290 שם חלק צינור מוט טלסקופי מברשת רצפות רב תכליתית מחזיק אביזרים מברשת ריפוד אביזר לניקוי חריצים מברשת אבק מכלול ציקלון פנימי מסנן לפני מנוע מסנן HEPAאחרי מנוע* מברשת חיות מחמד Wide Pet TurboBrush 1 2 3 4 5 6 7 8 9 10 11 *המסנן ,לא השואב בכללותו ,עומד בתקן .IEST-RP-CC001.5 HEPA w w w. b i s s e l l . c o m 14 שירות לקוחות של BISSELL אם נחוץ לך שירות למוצר של BISSELLשברשותך: התקשר אל שירות הלקוחות של BISSELLלמספרים שמופיעים למטה ואנו נמסור לך את פרטי מרכז שירות הלקוחות המורשה של BISSELLבאזורך .לשאלות בנושא אחריות ולחלקי חילוף ,התקשרו אל המספרים שלמטה. פניות בישראל: ראשון -חמישי 17:00 - 08:00 אלקטרה מוצרי צריכה 1951בע"מ רח' ספיר 1 אזור תעשייה חדש ראשון לציון 75704 ישראל טלפון039633030 : פניות מהמזרח התיכון ואפריקה: ראשון -חמישי 18:00 - 09:00 BISSELL Middle East FZE PO Box 61286 Office 017, Technopark Building Jebel Ali Free Zone Dubai United Arab Emirates טלפון971-4-881-8597 : או בקרו באתר של - BISSELL www.bissell.com בעת פנייה אל ,BISSELLהכינו מראש את מספר הדגם של שואב האבק. נא רשמו את מספר הדגם שלכם___________________ : נא רשמו את תאריך הרכישה שלכם___________________ : ©2012 BISSELL Homecare, Inc Grand Rapids, Michigan כל הזכויות שמורות .הודפס בסין מק"ט 110-4585 גרסה 5/12 בקרו באתר שלנו בכתובתwww.bissell.com : w w w. b i s s e l l . c o m תוקף תעודה זו מותנה בצירוף חשבונית קנייה מקורית היצרןBISSELL : היבואן:אלקטרה מוצרי צריכה ( )1951בע"מ מרח' שמעון ישראלי ,3 א.ת חדש ראשל"צ ,טל.03-9633030 : סוג המכשיר :שואב אבק BISSELL דגם30Z8 : אנו אחראים בזאת לפעולתו התקינה של המכשיר לתקופה של שנה מתאריך האספקה. אחריות זו לא תחול במקרים הבאים: .1קלקול הנובע מהפעלה שלא לפי הוראות השימוש. .2קלקול עקב אספקת חשמל לא סדירה. .3שבר מכל סיבה שהיא. .4תקלה שנגרמה כתוצאה מגורמים חיצוניים :שריפה ,גשם ,ברק וכד'. .5נעשה שימוש במכשיר למטרות מסחריות. .6החלפת שקיות אבק ,מסננים ורפידות אינה כלולה באחריות. האחריות האמורה תקפה בתנאי ששואב האבק יובא לתיקון בצירוף תעודה זו, כשהיא חתומה ע"י הסוחר ובצרוף חשבונית הקניה ,למעבדות המפורטות על הכריכה האחורית של חוברת זו. כל טיפול או תיקון שלא באמצעות המעבדות האמורות יגרום לביטולה של אחריות זו. פרטים למילוי על ידי הסוחר שם הקונה________________________: תאריך המכירה____________________: חתימת הסוחר____________________: שם וכתובת הסוחר_________________: תחנות שירות ברחבי הארץ טל0 8-6378368 : סלון ששון ,א.ת חדש .1אילת טל08-8525104 : חשמל קמי ,מרכז מסחרי ב' חנות 24 .2אשדוד טל08-6271410: מאור הנגב ,96רח' יאיר 27 .3באר שבע 08-6274563 טל04-6326088 : אחים איטח ,הנשיא 53 .4חדרה טל04-8671507: שירות רם ,רח' ביאליק 9 .5חיפה 04-8620162 04-8227227 סניף נווה שאנן ,רח' טרומפלדור 29 04-8720642 סניף קריות ,שד' ההסתדרות 279 טל04-9832011 : שרות רם האלונים 97 .6טבעון טל04-6720991 : המקלט ,רח' הגלבוע 5 .7טבריה טל02-6241741 : שירות כל ,רח' הגידם 1 .8ירושלים טל08-9465678 : חשמל אדיר ,רח' עמק האלה ,80 .9מודיעין טל09-7603355 : שי קור המעבדה ,דוד אלעזר 6 .10כפר סבא טל09-8337733 : בר מנחם נחום ,רח' רמז 15 .11נתניה טל04-6522357 : חשמל דושניצקי ,שד' ארלוזרוב 6 .12עפולה .13קרית ביאליק ס.א.פ ,רח' החרושת ,28א.ת קרית ביאליק טל04-8764559 : טל04-6903674 : .14קריית שמונה שירות רם סחר ,רח' רסקו 44 טל03-9666105 : .15ראשון לציון השחזות ראשון ,רח' עין הקורא 11 טל03-7511145 : אלקטרו ברק ,רח' התקווה 25 .16רמת גן טל03-5477745 : .17רמת השרון מעבדות השרון ,ויצמן 1פינת סוקולוב טל09-7603387 : טל אור ,רח' עקיבא 1 .18רעננה טל03-5371015 : אלקטרו מור ,רח' לה גרדיה 22 .19תל אביב טל03-6830191 : אליאס ,רח' העליה 20 .20תל אביב .21תל אביבי .רובין מכשירי גילוח בע"מ ,רח' טל3-6872161 : יסוד המעלה 8 USER'S GUIDE 23A7, 30Z8 SERIES 220-240V 2 Thank You 3 Safety Instructions 4 Product View 5 Assembly 6-8 9-12 Operations Maintenance and Care 13 Troubleshooting 14 Replacement Parts 15 Consumer Care Thanks for buying a BISSELL Vacuum We’re glad you purchased a BISSELL vacuum. Everything we know about floor care went into the design and construction of this complete, high-tech home cleaning system. Your BISSELL canister vacuum is well made, and we back it with a limited one year warranty. We also stand behind it with a knowledgeable, dedicated Consumer Services department, so, should you ever have a problem, you’ll receive fast, considerate assistance. My great-grandfather invented the floor sweeper in 1876. Today, BISSELL is a global leader in the design, manufacture, and service of high quality homecare products like your BISSELL canister vacuum. Thanks again, from all of us at BISSELL. Mark J. Bissell Chairman & CEO w w w. b i s s e l l . c o m 2 IMPORTANT SAFETY INSTRUCTIONS When using an electrical appliance, basic precautions should be observed, including the following: Read all instructions before using your CANISTER VACUUM. WARNING: To reduce the risk of fire, electric shock, or injury: ■Unplug from outlet when not in use ■Use indoors only. ■For dry pick up only. ■Do not leave machine when it is plugged in. ■Do not use with damaged cord or plug. ■If appliance is not working as it should, has been dropped, damaged, left outdoors, or dropped into water, return it to a service agent. ■Do not handle unit with wet hands. ■Do not pull or carry by cord, use cord as a handle, close door on cord, pull cord around sharp corners or edges, run appliance over cord, or expose cord to heated surfaces. ■Do not unplug by pulling on cord. unplug by grasping plug. ■Do not run appliance over cord. ■Do not handle plug or appliance with wet hands. ■Do not expose hair, loose clothing, fingers or body parts to openings or moving parts. ■Do not pick up hot or burning objects such as cigarettes, matches, or hot ashes. ■Do not pick up flammable or combustible materials (lighter fluid, petrol, kerosene, etc.) or use in the presence of explosive liquids or vapour. ■Do not use appliance in an enclosed space filled with vapours given off by oil base paint, paint thinner, some moth proofing substances, flammable dust, or other explosive or toxic vapours. ■Not intended for use by persons (including children) with reduced physical, sensory or mental capabilities, or lack of experience and knowledge, unless they have been given supervision or instruction concerning use of the appliance by a person responsible for their safety. 3 w w w. b i s s e l l . c o m ■Children should be supervised to ensure that they do not play with the appliance. ■Remove plug from electrical outlet before cleaning or maintaining the appliance. ■If the supply cord is damaged, it must be replaced by the manufacturer or its service agent in order to avoid a hazard. ■Do not pick up toxic material (chlorine bleach, ammonia, drain cleaner, petrol, etc.). ■Do not use for any purpose other than described in this User’s Guide. ■Use only manufacturer’s recommended attachments. ■Do not use with any opening blocked; keep free of dust, lint, hair, and anything that may reduce air flow. ■Keep appliance on a level surface. ■Turn off all controls before unplugging. ■Be extra careful when cleaning stairs. ■This appliance is provided with double insulation. Use only identical replacement parts. ■Do not use without the dirt cup or a dust bag and filters in place. ■Pay close attention when working around children. SAVE THESE INSTRUCTIONS FOR FUTURE USE This model is for household use only. IMPORTANT FOR OPERATION ON A 220-240 VOLT A.C. 50 Hz POWER SUPPLY ONLY. If your appliance is fitted with a nonrewireable BS 1363 plug it must not be used unless a 13 amp (ASTA approved to BS 1362) fuse is fitted in the carrier contained in the plug. (Spares may be obtained from your BISSELL supplier). If for any reason the plug is cut off, it must be disposed of, as it is an electric shock hazard should it be inserted into a mains socket. Product view Handle Air Flow Regulator Flex Hose Telescoping Extension Wand Easy Empty™ Dirt Cotainer Hose Connector Multi-Surface Floor Nozzle Brush Switch CAUTION: Do not plug in your vacuum until you are familiar with all instructions and operating procedures. Upholstery Tool w w w. b i s s e l l . c o m Crevice Tool Dusting Brush Wide Pet TurboBrush™ Tool (select models only) 4 Assembly 1. Connect the hose to the vacuum by inserting the hose connector into the suction opening on the bottom front of the vacuum. Push in until it clicks into the locked position. WARNING: Plastic film can be dangerous. To avoid danger of suffocation, keep away from babies and children. 2. Connect the telescoping extension wand to the handle end of the hose. 3. Connect the floor nozzle foot onto the telescoping extension wand. 2. 1. 4. Attach the tool holder onto the top portion of the extension wand. Place the tools onto the tool holder for storage. 5. To extend the telescoping extension wand, push the black release button and then pull the bottom of the wand to the desired length. 6. Once assembled, you can store your vacuum by inserting the storage clip (located on the back of the floor nozzle) into the storage slot on the rear of the vacuum. NOTE: Shorten the length of the telescoping extension wand for storage. 5 w w w. b i s s e l l . c o m 3. 4. Operations Power cord The power cord is located at the rear of the vacuum. Gently pull out the power cord, watching for the yellow line. Stop pulling the power cord once the yellow line is visible. There is also a red line, which indicates the end of the usable cord. Do not pull the power cord out beyond the red line. Automatic Cord Rewind Button Automatic cord rewind Your vacuum is equipped with an automatic cord rewind. When cleaning is finished, press the power button OFF ( ) and grasp the plug to disconnect from the electrical outlet. Hold the plug and press the automatic cord rewind button to rewind the cord automatically. CAUTION: Be careful to avoid injury as cord retracts very quickly. w w w. b i s s e l l . c o m 6 Operations Power button Power Button Turn the power ON or OFF by pressing lightly downward on the power button ( ). Variable suction power control The variable suction power control is located on the back of the vacuum. Turn the control toward the larger dots for maximum suction. Turn the control toward the smaller dots to minimize suction for lightly soiled areas or delicate fabrics. Air flow regulator Open the air flow regulator by sliding the regulator back towards the handle to an open position. This will reduce the suction power for vacuuming delicate fabrics. Variable Suction Control For full suction power, close the air flow regulator by sliding the regulator forward to the closed position. Tip: Use the variable suction power control and the air flow regulator to reduce air flow as needed when using the tools. caution: Before using your vacuum, make sure that the dirt container and all filters (pre-motor and post-motor) are in place. Do not operate your vacuum without the dirt container and filters. 7 w w w. b i s s e l l . c o m Operations Special tools Your BISSELL PowerForce Multi cyclonic is not only a powerful carpet and rug vacuum cleaner, it’s also a versatile bare floor and above floor vacuum cleaner when you select one of the special tools. Floor nozzle: Use to vacuum carpets, rugs and bare floors. Swivel head turns to get into tight spaces and fits under cabinets. 1. To vacuum carpets and rugs, push the brush switch to the carpet position . This will pull the brushes up into the floor nozzle. 1. 2. Brush Up Brush Down 2. To vacuum bare floors, push the brush switch to the bare floor position . This will extend the brushes down from the floor nozzle. Upholstery tool: Use the upholstery tool to clean curtains, draperies, cushions and fabrics. Crevice tool: Use the crevice tool in tight, narrow spaces. Dusting brush: Use the dusting brush to dust furniture, blinds, books, lamps, shelves and baseboards. Wide Pet TurborBrush™ Tool (Select Models Only): Use rotating brush action for small, flat areas such as cushions and beds. NOTE: Press down gently and pull toward you in a raking motion. Too mush pressure will cause the brush to stop rotating. w w w. b i s s e l l . c o m 8 Maintenance and care Emptying the dirt container Empty the dirt container as soon as the dirt reaches the “FULL” lines on the sides of the dirt container. 1. Unplug the vacuum from the electrical outlet. 2. Press the dirt container release button located on the back of the carry handle and lift up to remove. WARNING: To reduce the risk of electric shock, turn power switch OFF and disconnect plug from electrical outlet before performing maintenance or troubleshooting checks. 3. Choose an emptying method. Method #2 is recommended for allergy sufferers. Method #1 – Hold the dirt container over a trash can and push the emptying button located on the back bottom of the dirt container to open the bottom door. Close the door after the dirt empties and make sure it clicks back into the locked position. Method #2 – Place a plastic bag over the bottom of the dirt container. Push the emptying button, located on the back bottom of the dirt container, through the plastic to open the bottom door. After the dust settles, remove the plastic bag to discard. Close the door and make Emptying sure it clicks back into the locked Button position. 9 w w w. b i s s e l l . c o m Dirt Container Release Button Maintenance and care Cleaning the inner cyclone & screen Filters protect the motor from dirt and dust particles. Use only BISSELL replacement filters in your PowerForce Multi Cyclonic 1. Unplug the vacuum from the electrical outlet. 2. Remove the dirt container from the vacuum. 3. 3. Remove the top portion of the dirt container by grasping the carry handle and turning counter clockwise and pulling up and out of the dirt container. 4. Remove the inner cyclone by grasping the bottom of the cyclone and turning clockwise to unlock. Pull straight down to remove. Clean with a cloth to remove dust and debris 5. Remove the screen by pulling straight down. Clean with a cloth or a soft brush to remove dust and debris. 4. 6. The tank may also be wiped clean with a damp cloth. Make sure the tank is completely dry before reassembling. 7. To reassemble, hold the carry handle and place the screen back onto the top portion of the dirt container. Be sure to align the notch on the top with the insert on the flat edge of the screen. Then place the inner cyclone back into the screen by aligning the notches at the top of the inner cyclone with the inserts inside the screen and turning counter clockwise to lock into place. 5. 8. Place the top portion back onto the dirt container by grasping the carry handle and turning clockwise to lock into place. Be sure that the dirt container release button is aligned with the emptying button when locked into place. w w w. b i s s e l l . c o m 10 Maintenance and care Cleaning the pre-motor filter The pre-motor filter protects the motor from dirt and dust particles. Use only BISSELL replacement filters in your PowerForce Multi Cyclonic. 1. Turn the power OFF. Unplug the vacuum from the electrical outlet. 2. Remove the dirt container from the vacuum. NOTICE: This product is intended for household use only and not for commercial or industrial use. Vacuuming of dust from products like plaster, concrete or ashes will damage the motor and void the warranty. 3. 3. The pre-motor filter is located behind the door labeled “FILTER” on the main body of the vacuum. Open the door by pushing up on the tab at the bottom of the door and pulling out to remove. 4. Remove the filter tray by pulling up on the tab of the tray. Remove the pre-motor filter and set aside. Tap the tray gently over a trash can to remove any dirt or debris. 5. The pre-motor filter can be washed in cold water with a mild detergent. Rinse well and air dry thoroughly before placing back into the tray. 4. Pre-Motor Filter Filter Tray 6. Place the tray back into the vacuum and replace the filter door by inserting the tabs at the top of the door and pushing down until it clicks into the locked position. Tip: For maximum cleaning performance, check the filters often and clean or replace if necessary. Replacing the Post-motor HEPA media filter* The post-motor HEPA media filter* assists in the filtration process to return clean air to the room. Use only BISSELL replacement filters in your PowerForce Multi Cyclonic. 1. Turn the power OFF. Unplug the vacuum from the electrical outlet. 2. The post-motor filter is located behind the door labeled “FILTER” on the rear of the vacuum. Open the door by pushing down on the tab of the door and pulling out to remove. 3. Remove the post-motor HEPA media filter* by grasping the handle on the filter and pulling out to remove. WARNING: Do not operate cleaner with damp or wet filters or without all filters in place. 2. Post-Motor HEPA Media Filter* *The filter media, not the vacuum as a whole, complies with the IEST-RP-CC001.5 HEPA Standard 11 w w w. b i s s e l l . c o m 3. Maintenance and care Replacing the media filter (cont) 4. Replace the post-motor HEPA media filter* with a new filter. NOTE: The post-motor filter is a white, pleated HEPA media filter*. This filter is NOT washable and must be replaced when it becomes dirty. WARNING: Do not operate cleaner with damp or wet filters or without all filters in place. 5. Replace the filter door by inserting the two tabs at the bottom of the filter door. Then push down on the tab on the door and push it back into the vacuum. Release the tab on the door to lock into place. Wide Pet TurboBrush™ Tool (select models only) The Wide Pet TurboBrush™ Tool should be checked regularly for clogs or debris wrapping around the brush. 1. Unplug the vacuum from electrical outlet. 2. If a clog is present or debris is visible, turn the collar on the neck of the Wide Pet TurboBrush™ Tool counterclockwise to the unlocked position to remove the faceplate and clear any obstructions. 3. To clean debris from the brush, remove the brush from the drive belt and clean debris. 4. Reposition the drive belt on the brush. Place the ends of the brush in the slots on the sides. Reposition the faceplate and turn the collar clockwise to the locked position. Thermal protector An internal thremal protector has been designed into your vacuum to protect it from overheating. When the thermal protector activates, the vacuum motor will stop operating. If this happens: 1. Turn the vacuum OFF (O) and unplug from electrical outlet. 2. Empty dirt container, check filters and air passages for dirt accumulation. 3. The thermal protector automatically resets after approximately 1 hour. If the thermal protector does not reset, call BISSELL Consumer Services. w w w. b i s s e l l . c o m *The filter media, not the vacuum as a whole, complies with the IEST-RP-CC001.5 HEPA Standard 12 Troubleshooting WARNING: To reduce the risk of electric shock, turn power OFF and disconnect plug from electrical outlet before performing maintenance or troubleshooting. Vacuum cleaner won’t run Possible causes Remedies 1. Vacuum cleaner is not plugged in 1. Check electrical plug 2. Power button is not pressed down 2. Press power button down 3. Thermal protector activated 3. Allow vacuum to cool for 1 hour, see page 12 Vacuum cleaner won’t pick up or low suction Possible causes Remedies 1. Tools, hose and/or telescoping extension wands are blocked 1. Remove each part and check for blockages 2. Filters are dirty 2. Check and clean or replace pre-motor and post-motor filters 3. Dirt container is full 3. Empty dirt container 4. Hose not securely attached to suction opening 4. Make sure hose connector is locked into suction opening 5. Crack or hole in flex hose 5. Check hose and replace if needed 6. Air flow regulator or variable suction power 6. Change to closed or maximum setting control is set to open or minimum setting Visible dust escaping from vacuum Possible causes Remedies 1. Dirt container is full 1. Empty dirt container 2. Filters missing or installed incorrectly 2. Check pre-motor and post-motor filter for correct installation 3. Filters are dirty 3. Check and clean or replace pre-motor and post-motor filters 4. Flex hose is blocked 4. Remove hose and check for blockages 5. Hose not securely attached to suction opening 5. Make sure hose connector is locked into suction opening 6. Crack or hole in flex hose 6. Check hose and replace if needed Other maintenance or service not included in the manual should be performed by an authorized service representative. Thank you for selecting a BISSELL product. Please do not return this product to the store. 13 w w w. b i s s e l l . c o m Replacement parts Item Part No. 1 2 3 4 5 6 7 8 9 10 11 203-1578 203-1579 203-1536 203-1583 203-1581 203-1580 203-1582 203-1575 203-1569 203-1557 203-1290 Part Name Hose Telescoping Extension Wand Multi-Surface Floor Nozzle Tool Holder Upholstery Tool Crevice Tool Dusting Brush Inner Cyclonic Assembly Pre-Motor Filter Post Motor HEPA Media Filter* Wide Pet TurboBrush™ Tool 1 2 3 4 5 6 7 8 9 10 11 *The filter media, not the vacuum as a whole, complies with the IEST-RP-CC001.5 HEPA Standard w w w. b i s s e l l . c o m 14 BISSELL consumer care If your BISSELL product should require service: Call BISSELL Consumer Care at the numbers below and we will give you the location of a BISSELL Authorized Service Center in your area. For all other countries, contact your local in country distributor for questions, service, or repair. If you have questions about your warranty or need replacement parts please contact the numbers below. For Israel inquiries: Sunday - Thursday 8 am - 5 pm For Middle East & Africa inquiries: Sunday - Thursday 9 am - 6 pm Electra Consumer Prod. 1951 Ltd. 1, Sapir St. New Industrial Zone Rishon Le Zion 75704 Israel Telephone: 039633030 BISSELL Middle East FZE PO Box 61286 Office 017, Technopark Building Jebel Ali Free Zone Dubai United Arab Emirates Telephone: 971-4-881-8597 Or visit the BISSELL website - www.bissell.com When contacting BISSELL, have model number of cleaner available. Please record your Model Number: ___________________ Please record your Purchase Date: ___________________ 15 ©2012 BISSELL Homecare, Inc Grand Rapids, Michigan All rights reserved. Printed in China Part Number 110-4585 Rev 5/12 Visit our website at: www.bissell.com w w w. b i s s e l l . c o m