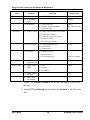
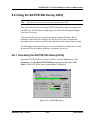
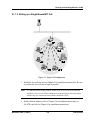
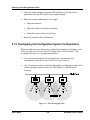
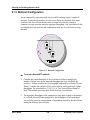
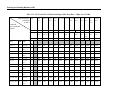
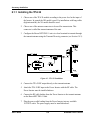
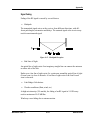
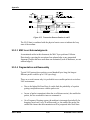
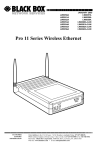
1
BreezeNET PRO.11 Series User’s Guide Revision A (Software Version 4.4.) July, 1999 Cat. No. 213033 Front Matter © 1999 by BreezeCOM Ltd. All rights reserved. No part of this publication may be reproduced in any material form without the written permission of the copyright owner. No part of this publication may be reproduced in any material form without the written permission of the copyright owner. Trade Names BreezeNET and BreezeLINK are trade names of BreezeCOM Ltd. Other brand and product names are registered trademarks or trademarks of their respective companies. User’s Guide ii BreezeNET PRO.11 Series Front Matter Statement of Conditions The information contained in this user's guide is subject to change without notice. BreezeCOM Ltd. shall not be liable for errors contained herein or for incidental or consequential damages in connection with the furnishing, performance, or use of this user's guide or equipment supplied with it. Warranty In the following warranty text, “the Company” shall mean: - BreezeCOM Inc., for products located in the USA. - BreezeCOM Ltd., for products located outside the USA. This BreezeNET product is warranted against defects in material and workmanship for a period of one year. During this warranty period the Company will, at its option, either repair or replace products that prove to be defective. For warranty service or repair, the product must be returned to a service facility designated by the Company. Authorization to return products must be obtained prior to shipment. The buyer shall pay all shipping charges to the Company and the Company shall pay shipping charges to return the product to the buyer. The Company warrants that the firmware designed by it for use with the unit will execute its programming instructions when properly installed on the unit. The Company does not warrant that the operation of the unit or firmware will be uninterrupted or error-free. Limitation of Warranty THE FOREGOING WARRANTY SHALL NOT APPLY TO DEFECTS RESULTING FROM IMPROPER OR INADEQUATE MAINTENANCE BY THE BUYER, BUYER SUPPLIED INTERFACING, UNAUTHORIZED MODIFICATION OR MISUSE, OPERATION OUTSIDE OF THE ENVIRONMENTAL SPECIFICATIONS FOR THE PRODUCT, OR IMPROPER SITE PREPARATION OR MAINTENANCE. NO OTHER WARRANTY IS EXPRESSED OR IMPLIED. THE COMPANY SPECIFICALLY DISCLAIMS THE IMPLIED WARRANTIES OF MERCHANTABILITY AND FITNESS FOR ANY PARTICULAR PURPOSE. BREEZECOM SHALL NOT BE LIABLE TO ANY PERSON FOR ANY SPECIAL OR INDIRECT DAMAGES, INCLUDING, BUT NOT LIMITED TO, LOSS OF PROFITS OR REVENUES, LOSS OF USE OR DAMAGE TO ANY ASSOCIATED EQUIPMENT, COST OF CAPITAL, COST OF SUBSTITUTE PRODUCTS, FACILITIES OR SERVICES, DOWNTIME COSTS OR CLAIMS RESULTING FROM ANY CAUSE WHATSOEVER ARISING FROM OR IN ANY WAY CONNECTED WITH THE MANUFACTURE, SALE, HANDLING, SERVICE, REPAIR, MAINTENANCE OR USE OF THE PRODUCTS. IN NO EVENT SHALL THE COMPANY’S LIABILITY EXCEED THE PURCHASE PRICE DENOTED ON THE INVOICE. Electronic Emission Notices This device complies with Part 15 of the FCC rules, ETSI 300-328, UL, UL/C, TUV/GS, and CE. Operation is subject to the following two conditions: 1. This device may not cause harmful interference. 2. This device must accept any interference received, including interference that may cause undesired operation. FCC Radio Frequency Interference Statement This equipment has been tested and found to comply with the limits for a class A digital device, pursuant to Part 15 of the FCC rules. These limits are designed to provide reasonable protection against harmful interference when the equipment is operated in a commercial environment. This equipment generates, uses, and can radiate radio frequency energy and, if not installed and used in accordance with the instruction manual, may cause harmful interference to radio communications. Operation of this equipment in a residential area is likely to cause harmful interference in which case the user will be required to correct the interference at his own expense. Information to User Any changes or modifications of equipment not expressly approved by the manufacturer could void the user’s authority to operate the equipment and the company’s warranty. BreezeNET PRO.11 Series iii User’s Guide Front Matter Contacting BreezeCOM Technical Support Should you need assistance beyond the scope of this guide, please contact your local BreezeCOM reseller or distributor. If they cannot solve your problem, feel free to contact the BreezeCOM Technical Support Department. The support representatives can assist you in solving any problems that cannot be solved by your reseller. When requesting support, please have the following items available: • Configuration of the system, including models of the BreezeCOM equipment used • BreezeNET firmware version currently in use • Antenna type and cable lengths • Site information such as possible radio path problems (like trees, machines, and buildings) • Distance between devices • Configuration, statistic counters, and error messages as seen on the monitor • Description of problems encountered To contact BreezeCOM Technical Support, refer to the BreezeCOM web site: http://www.breezecom.com/ContactUs/brzcnt.htm User’s Guide iv BreezeNET PRO.11 Series Table of Contents TABLE OF CONTENTS 1. INTRODUCTION ..................................................................................................... 1-1 1.1 Scope of the User’s Guide ............................................................................................ 1-1 1.2 BreezeNET PRO.11 Series Features ............................................................................ 1-2 1.3 BreezeNET PRO.11 Series Product Line ..................................................................... 1-3 1.3.1 The BreezeNET PRO.11 Access Point.............................................................. 1-4 1.3.2 The BreezeNET PRO.11 Single Station Adapter .............................................. 1-6 1.3.3 The BreezeNET PRO.11 Four Port Station Adapter ......................................... 1-7 1.3.4 The BreezeNET PRO.11 Workgroup Bridge .................................................... 1-9 1.3.5 The BreezeNET PRO.11 SA-PCR Card.......................................................... 1-11 1.3.6 The BreezeNET PRO.11 Extended Range Access Point and Bridge.............. 1-12 1.4 BreezeNET PRO.11 Functional Description.............................................................. 1-13 1.4.1 Quick Review of Ethernet ............................................................................... 1-13 1.4.2 Startup Procedure............................................................................................. 1-13 1.4.3 AP-10 Access Point ......................................................................................... 1-13 1.4.4 SA-10 Station Adapter..................................................................................... 1-14 1.4.5 SA-40 Station Adapter..................................................................................... 1-14 1.4.6 WB-10 Wireless Bridge................................................................................... 1-14 1.4.7 SA-PCR Station Adapter ................................................................................. 1-15 2. BASIC INSTALLATION .......................................................................................... 2-1 2.1 Basic Installation Checklist .......................................................................................... 2-1 2.2 Check the Packing List ................................................................................................. 2-1 2.3 Position the Unit ........................................................................................................... 2-2 2.3.1 Additional Considerations When Positioning the Access Point........................ 2-3 2.4 Connect the Unit to the Power Supply ......................................................................... 2-4 2.5 Connect the Unit to the Ethernet Port........................................................................... 2-4 2.6 Check Unit Functionality via the LED indicators ........................................................ 2-5 2.6.1 Station (SA-10, SA-40) and Bridge (WB-10) LEDs ......................................... 2-5 2.6.2 Access Point LEDs ............................................................................................ 2-6 2.6.3 Verifying the Ethernet Connection .................................................................... 2-6 BreezeNET PRO.11 Series v User’s Guide Table of Contents 3. USING THE LOCAL TERMINAL FOR UNIT SETUP AND MANAGEMENT ......... 3-1 3.1 Getting Started with the Local Terminal ...................................................................... 3-1 3.2 Configuration Screens .................................................................................................. 3-2 3.3 Main Menu ................................................................................................................... 3-5 3.4 System Configuration Menu......................................................................................... 3-5 3.4.1 Station Status ..................................................................................................... 3-6 3.4.2 IP and SNMP Parameters .................................................................................. 3-7 3.4.3 Wireless LAN (WLAN) Parameters.................................................................. 3-7 3.4.4 Bridging ........................................................................................................... 3-11 3.4.5 Station Control................................................................................................. 3-12 3.4.6 Security (Authentication Feature).................................................................... 3-13 3.5 Advanced Settings Menu............................................................................................ 3-14 3.5.1 Translation Mode............................................................................................. 3-14 3.5.2 Performance ..................................................................................................... 3-15 3.5.3 Radio................................................................................................................ 3-16 3.5.4 Rate .................................................................................................................. 3-16 3.5.5 AP Redundancy Support.................................................................................. 3-16 3.5.6 Maintenance..................................................................................................... 3-17 3.6 Site Survey Menu ....................................................................................................... 3-17 3.6.1 System Counters .............................................................................................. 3-18 3.6.2 Survey Software............................................................................................... 3-25 3.6.3 Using the Site Survey Software ....................................................................... 3-25 3.6.4 Event Log......................................................................................................... 3-28 3.6.5 Display Neighboring AP’s............................................................................... 3-28 3.7 Access Control Menu ................................................................................................. 3-29 4. SA-PCR PRO.11 PC CARD INSTALLATION, SETUP, AND MANAGEMENT ..... 4-1 4.1 Packing List .................................................................................................................. 4-1 4.2 Before You Begin......................................................................................................... 4-1 4.3 Installing the SA-PCR Card ......................................................................................... 4-2 4.3.1 Installing the SA-PCR Drivers .......................................................................... 4-3 4.3.2 Checking the LED Indicators .......................................................................... 4-10 4.3.3 Initial Configuration ........................................................................................ 4-11 4.4 Installing the SA-PCR Utilities .................................................................................. 4-11 4.4.1 Uninstalling SA-PCR Utilities......................................................................... 4-12 4.5 Using the SA-PCR Configuration Utility................................................................... 4-13 4.5.1 Station Status Tab ............................................................................................ 4-14 4.5.2 WLAN Parameters Tab ................................................................................... 4-15 4.5.3 Station Control Tab.......................................................................................... 4-16 User’s Guide vi BreezeNET PRO.11 Series Table of Contents 4.5.4 Configuration Access Tab ............................................................................... 4-17 4.5.5 Power Management Tab .................................................................................. 4-19 4.5.6 Security Tab..................................................................................................... 4-20 4.5.7 Maintenance Tab ............................................................................................. 4-23 4.5.8 Radio Tab......................................................................................................... 4-24 4.5.9 Performance Tab.............................................................................................. 4-25 4.5.10 Resetting the SA-PCR Card........................................................................... 4-26 4.6 Using the SA-PCR Site Survey Utility....................................................................... 4-27 4.6.1 Accessing the SA-PCR Site Survey Utility ..................................................... 4-27 4.6.2 SA-PCR Site Survey Main Window................................................................ 4-28 4.6.3 Performing a Site Survey with the SA-PCR.................................................... 4-31 4.7 Using the Upgrade Kit Program ................................................................................. 4-32 4.8 Installation Troubleshooting....................................................................................... 4-37 4.9 Installing the SA-PCR Drivers in ODI Systems......................................................... 4-38 5. PLANNING AND INSTALLING WIRELESS LANS................................................ 5-1 5.1 System Configurations ................................................................................................. 5-1 5.1.1 Single Cell Configuration .................................................................................. 5-2 5.1.2 Overlapping Cell Configuration System Configurations................................... 5-6 5.1.3 Multicell Configuration ..................................................................................... 5-8 5.1.4 Multi-Hop Configuration (Relay)...................................................................... 5-9 5.2 Indoor Installation Considerations.............................................................................. 5-11 5.2.1 Site Selection Factors ...................................................................................... 5-11 5.2.2 Antennas for Indoor Applications ................................................................... 5-13 5.2.3 Construction Materials..................................................................................... 5-14 5.2.4 Cell Size........................................................................................................... 5-15 5.3 Outdoor Installation Considerations........................................................................... 5-16 5.3.1 Site Selection Factors ...................................................................................... 5-16 5.3.2 Rooftop Installation ......................................................................................... 5-17 5.3.3 Antennas for Outdoor Applications................................................................. 5-18 5.3.4 Antenna Seal.................................................................................................... 5-20 5.3.5 Cell Size........................................................................................................... 5-20 5.3.6 Link Distance................................................................................................... 5-20 5.3.7 Using Outdoor Range Tables........................................................................... 5-21 5.3.8 FCC Outdoor Range Tables (USA) ................................................................. 5-21 5.3.9 ETSI Outdoor Range Tables (Europe/Rest-of-World) – D Models, DL Models.......... 5-23 5.3.10 ETSI Outdoor Range Tables (Europe/Rest-of-World) – DE Models ..................... 5-24 5.3.11 Non-Regulated Outdoor Range Tables – D Models...................................... 5-25 5.3.12 Extending the range using the TPA-24 and LNA-10 .................................... 5-27 5.4 Available Antennas and Antenna Kits........................................................................ 5-31 BreezeNET PRO.11 Series vii User’s Guide Table of Contents 5.5 Precautions ................................................................................................................. 5-33 5.5.1 Transmit Antenna ............................................................................................ 5-33 5.5.2 Spurious Radio Frequency Emissions ............................................................. 5-33 5.5.3 Lightning Protection ........................................................................................ 5-34 5.5.4 Rain Proofing................................................................................................... 5-34 6. ACCESSORY INSTALLATION .............................................................................. 6-1 6.1 TPA 24 Transmit Power Amplifier (Booster) .............................................................. 6-1 6.1.1 Installing the TPA 24......................................................................................... 6-2 6.2 LNA 10 Low Noise Receive Amplifier........................................................................ 6-3 6.2.1 Installing the LNA 10 ........................................................................................ 6-3 6.3 RFS 122 Radio Frequency Splitter............................................................................... 6-4 6.3.1 Installing the RFS 122 ....................................................................................... 6-5 6.4 AL 1 Lightning Arrestor............................................................................................... 6-5 6.5 AMP 2440 Bi-Directional Amplifier............................................................................ 6-6 6.5.1 Installing the AMP 2440 bi-directional amplifier.............................................. 6-8 7. UPGRADE PROCEDURE ...................................................................................... 7-1 8. SYSTEM TROUBLESHOOTING ............................................................................ 8-1 8.1 Troubleshooting Guide ................................................................................................. 8-1 8.2 Checking Counters ....................................................................................................... 8-5 8.2.1 WLAN Counters ................................................................................................ 8-5 8.2.2 Ethernet Counters .............................................................................................. 8-5 9. APPENDIX .............................................................................................................. 9-1 9.1 Supported MIBs and Traps........................................................................................... 9-1 9.1.1 Supported MIBs................................................................................................. 9-1 9.1.2 Supported Traps................................................................................................. 9-2 9.2 Technical Specifications............................................................................................... 9-3 9.2.1 Specifications for BreezeNET PRO.11 Units.................................................... 9-3 9.2.2 Specifications for TPA 24 Transmit Power Amplifier ...................................... 9-6 9.2.3 Specifications for LNA 10 Low Noise Receive Amplifier................................ 9-7 9.2.4 Specifications for RFS 122 Radio Frequency Splitter....................................... 9-8 9.2.5 Specifications for AL 1 Lightning Arrestor....................................................... 9-8 9.2.6 Specifications for AMP 2440 Bi-Directional Power Amplifier ........................ 9-9 9.3 Wireless LAN Concepts ............................................................................................. 9-10 9.4 Radio Signal Propagation ........................................................................................... 9-17 9.4.1 Introduction...................................................................................................... 9-17 9.4.2 RF Terms and Definitions ............................................................................... 9-18 9.5 IEEE 802.11 Technical Tutorial................................................................................. 9-25 User’s Guide viii BreezeNET PRO.11 Series Table of Contents 9.5.1 Architecture Components ................................................................................ 9-25 9.5.2 IEEE 802.11 Layers Description ..................................................................... 9-27 9.5.3 The MAC Layer............................................................................................... 9-27 9.5.4 How Does a Station Join an Existing Cell....................................................... 9-33 9.5.5 Roaming........................................................................................................... 9-34 9.5.6 Keeping Synchronization................................................................................. 9-35 9.5.7 Security ............................................................................................................ 9-35 9.5.8 Frame Types .................................................................................................... 9-37 9.5.9 Frame Formats ................................................................................................. 9-38 9.5.10 Most Common Frame Formats ...................................................................... 9-43 9.5.11 Point Coordination Function (PCF)............................................................... 9-45 9.5.12 Ad-Hoc Networks .......................................................................................... 9-45 BreezeNET PRO.11 Series ix User’s Guide Table of Figures TABLE OF FIGURES Figure 1-1. AP-10 PRO.11 with Two Built-in Omni-Directional Antennas..................... 1-4 Figure 1-2. SA-10 PRO.11 with Two Integrated Omni-Directional Antennas ................. 1-6 Figure 1-3. SA-40 PRO.11 with Two Integrated Omni-Directional Antennas ................. 1-7 Figure 1-4. WB-10D PRO.11 with Two External Antenna Connector Ports.................... 1-9 Figure 1-5. The SA-PCR PRO.11 PC Card..................................................................... 1-11 Figure 3-1. Main Menu...................................................................................................... 3-5 Figure 3-2. System Configuration Menu........................................................................... 3-5 Figure 3-3. Advanced Settings Menu .............................................................................. 3-14 Figure 3-4. Site Survey Menu.......................................................................................... 3-17 Figure 3-5. Display Rx Packets per Frequency ............................................................... 3-23 Figure 3-6. Transmit Statistics......................................................................................... 3-26 Figure 3-7. Receive Statistics .......................................................................................... 3-27 Figure 3-8. RSSI to dBm Graph ...................................................................................... 3-27 Figure 3-9. Access Control Menu.................................................................................... 3-29 Figure 4-1. System Properties Window – Windows 95B.................................................. 4-5 Figure 4-2. New Hardware Found Window ...................................................................... 4-6 Figure 4-3. SA-PCR LAN Adapter Properties Window ................................................... 4-8 Figure 4-4. Windows NT Diagnostics Window ................................................................ 4-9 Figure 4-5. BreezeCOM SA-PCR Utilities Setup ........................................................... 4-11 Figure 4-6. BreezeCOM SA-PCR Utilities - Folder Selection Window ......................... 4-12 Figure 4-7. BreezeCOM SA-PCR Utilities Setup Complete Window ............................ 4-12 Figure 4-8. SA-PCR Configuration Utility Main Window - Station Status Tab............. 4-13 Figure 4-9. WLAN Parameters Tab ................................................................................ 4-15 Figure 4-10. Station Control Tab..................................................................................... 4-16 Figure 4-11. Configuration Access Tab .......................................................................... 4-17 Figure 4-12. Power Management Tab ............................................................................. 4-19 Figure 4-13. The Security Tab......................................................................................... 4-21 Figure 4-14. Maintenance Tab......................................................................................... 4-23 Figure 4-15. Radio Tab.................................................................................................... 4-24 Figure 4-16. Performance Tab......................................................................................... 4-25 Figure 4-17. SA-PCR Site Survey................................................................................... 4-27 Figure 4-18. Connection Quality Graph .......................................................................... 4-29 BreezeNET PRO.11 Series x User’s Guide Table of Figures Figure 4-19. Survey Log.................................................................................................. 4-29 Figure 4-20. Upgrade Kit Program Introductory Window .............................................. 4-32 Figure 4-21. Upgrade Kit Program Welcome Window................................................... 4-33 Figure 4-22. Upgrade Kit Program Step 1....................................................................... 4-33 Figure 4-23. Upgrade Kit Program Step 2....................................................................... 4-34 Figure 4-24. Password Dialog Box.................................................................................. 4-34 Figure 4-25. Upgrade Program Step 3............................................................................. 4-35 Figure 4-26. Upgrade Program Step 4............................................................................. 4-35 Figure 4-27. Utilities Directory ....................................................................................... 4-36 Figure 4-28. Upgrade Program Step 5............................................................................. 4-36 Figure 5-1. Point-to-Point Configuration/Connecting Remote Offices to Main Office Network............ 5-2 Figure 5-2. Wireless Bridging Between Two or More Wireless LAN Segments ............. 5-4 Figure 5-3. Single Cell Configuration ............................................................................... 5-5 Figure 5-4. Three Overlapping Cells................................................................................. 5-6 Figure 5-5. Multicell Configuration .................................................................................. 5-8 Figure 5-6. Multi-Hop Configuration.............................................................................. 5-10 Figure 5-7. Advanced Multihop Configuration............................................................... 5-10 Figure 5-8. BreezeNET LAN in a typical office environment ........................................ 5-11 Figure 6-1. TPA 24 Installation......................................................................................... 6-2 Figure 6-2. LNA 10 Connections Diagram ....................................................................... 6-4 Figure 6-3. RFS-122 Connection Diagram........................................................................ 6-5 Figure 6-4. AL-1 Connection Block Diagram................................................................... 6-6 Figure 6-5. AMP 2440 Functional Block Diagram ........................................................... 6-6 Figure 6-6. AMP 2440 Installation and Mounting ............................................................ 6-8 Figure 6-7. AMP 2440 Installation Details ....................................................................... 6-9 Figure 9-1. Wired LAN Topology................................................................................... 9-11 Figure 9-2. The Basic Wireless LAN Cell ...................................................................... 9-12 Figure 9-3. Wireless LAN Connectivity.......................................................................... 9-13 Figure 9-4. Roaming Through Overlapping Cells........................................................... 9-14 Figure 9-5. The Common Coverage Area of a Multi-cell Structure................................ 9-15 Figure 9-6. Typical Radio System.................................................................................... 9-17 Figure 9-7. Attenuation of an RF signal .......................................................................... 9-18 Figure 9-8. Side View...................................................................................................... 9-20 Figure 9-9. Top View ...................................................................................................... 9-20 Figure 9-10. Radiation Pattern of Directional Antenna................................................... 9-21 Figure 9-11. Multipath Reception ................................................................................... 9-23 BreezeNET PRO.11 Series xi User’s Guide Table of Figures Figure 9-12. Figure 9-13. Figure 9-14. Figure 9-15. Figure 9-16. Figure 9-17. Figure 9-18. Figure 9-19. Figure 9-20. Figure 9-21. Figure 9-22. User’s Guide Fresnel Zone ............................................................................................... 9-24 Fresnel Zone Clear of Obstacles ................................................................. 9-25 Typical 802.11 LAN ................................................................................... 9-26 Transaction Between Stations A and B ...................................................... 9-30 Frame Fragmentation.................................................................................. 9-31 Access Mechanism ..................................................................................... 9-33 MAC Frame Format.................................................................................... 9-39 Frame Control Field.................................................................................... 9-39 RTS Frame Format ..................................................................................... 9-43 CTS Frame.................................................................................................. 9-44 ACK Frame Format .................................................................................... 9-44 xii BreezeNET PRO.11 Series Introduction 1. INTRODUCTION This chapter outlines the scope of this User’s Guide, presents the members of the BreezeNET PRO.11 series, describes the benefits of BreezeNET PRO.11 wireless LANs and lists the product specifications. 1.1 Scope of the User’s Guide This User’s Guide provides instructions for planning and setting up your wireless LAN, provides details of how to install each unit, and how to install antennas and accessories. This User’s Guide contains the following chapters: ⇒ Chapter 1 Introduction – Explains how to use this guide and presents the members of the BreezeNET PRO.11 series. ⇒ Chapter 2 Basic Installation – Details how to install BreezeNET PRO.11 series units. ⇒ Chapter 3 Device Setup and Management – Describes how to use the local terminal to setup, configure, and manage BreezeNET PRO.11 series units. ⇒ Chapter 4 SA-PCR PRO.11 PC Card Installation, Setup, and Management - Describes how to install the SA-PCR card, and how to setup and manage the card using the SA-PCR utilities. ⇒ Chapter 5 Planning and Installing Wireless LANs – Provides guidelines and restrictions regarding antenna selection and installation, and includes outdoor antenna range tables. ⇒ Chapter 6 Accessory Installation – Introduces some of the accessories available for specific installations, and describes how to install them. ⇒ Chapter 7 Upgrade Procedure – Explains how to perform upgrades for BreezeNET PRO.11 series units using a TFTP application. ⇒ Chapter 8 System Troubleshooting – Contains a troubleshooting guide that provides answers to some of the more common problems which may occur when installing and using BreezeNET PRO.11 series products. BreezeNET PRO.11 Series 1-1 User’s Guide Introduction ⇒ Chapter 9 Appendix –Lists MIBs and traps supported by BreezeNET PRO.11 series products, lists product and attachment specifications, provides an overview of the concepts related to wireless LANs, discusses the concepts and applications of radio signal propagation relevant to wireless LANs, and introduces the new 802.11 standard. ⇒ Index 1.2 BreezeNET PRO.11 Series Features The following is a partial list of the BreezeNET PRO.11 series features: User’s Guide • IEEE 802.11 Compliant – All BreezeNET PRO.11 series units are fully compliant with the final IEEE 802.11 specification for wireless LANs, and thus support interoperability with other IEEE 802.11 compliant vendors. • Fully integrated product family – One high-performance Access Point for all products in the series. • Increased Throughput – A 3 Mbps modem, with up to 2 Mbps data throughput. • Translation Bridging – Support for both translation and transparent bridging as defined in the IEEE 802.1h and RFC 1042 standards. • Seamless Roaming– Network connection is maintained while roaming between overlapping coverage areas. Transmission and reception can be continued while moving at high speeds with no data packet loss or duplication. • Load Sharing – Traffic is equally distributed among all Access Points in the area. • Redundancy – In co-located cell environments, upon failure of an Access Point, stations will switch to other available Access Points. • LED Display – Power, Network Activity, and WLAN Load or Signal Quality LEDs indicate the current status of the unit. • Upgrading – Simple, quick, and free software upgrades via TFTP. • Future-proof Investment – All items in the PRO.11 Series line can be freely and quickly upgraded with flash updates. • SA-PCR Card – The SA-PCR PRO.11 PC card is extremely compact and does not extend beyond your PC. It comes with two retractable antennas, or two connectors to which antennas may be connected. Multi-rate support for 1, 2, and 3 Mbps guarantees efficient use of the medium. Throughput is up to 2 Mbps – the highest rate on the market! 1-2 BreezeNET PRO.11 Series Introduction ∗ Configuration Utility – This user-friendly application helps you quickly setup stations containing SA-PCR Card. You can save the configuration to a file and import the file to other stations for fast installation. ∗ Site Survey Utility – This user-friendly application records the signal strength received by the SA-PCR Card at different locations, giving a clear image of existing coverage. The gathered data indicates whether to add, remove, or move Access Points. 1.3 BreezeNET PRO.11 Series Product Line The BreezeNET PRO.11 series product line consists of: Product Name Available Types Antenna Type Access Point AP-10 PRO.11 AP-10D PRO.11 AP-10DL PRO.11 Internal External External Single Station Adapter SA-10 PRO.11 SA-10D PRO.11 SA-10DL PRO.11 Internal External External Four Port Station Adapter SA-40 PRO.11 SA-40D PRO.11 SA-40DL PRO.11 Internal External External Workgroup Bridge WB-10 PRO.11 WB-10D PRO.11 WB-10DL PRO.11 Internal External External PCMCIA PC Card Station Adapter Card SA-PCR PRO.11 SA-PCD PRO.11 Internal External Extended Range Access Point AP-10DE External Extended Range Bridge WB-10DE External Note: The WB-10DE and AP-10DE are not compatible with the BreezeNET PRO.11 series. Units in the BreezeNET PRO.11 series are not compatible with units in the BreezeNET PRO series. BreezeNET PRO.11 Series 1-3 User’s Guide Introduction 1.3.1 The BreezeNET PRO.11 Access Point The BreezeNET PRO.11 Access Point is fully compliant with the IEEE 802.11 Wireless LAN standard. The Access Point is a wireless hub that provides access for wireless workstations into wired Ethernet LANs. It also contains the wireless relaying function that enables workstations equipped with a Station Adapter (Station Adapter, Bridge, and SA-PCR) to communicate with one another inside the cell coverage area (even if they are not in direct line of sight) via the Access Point. Any two wireless stations in two different cells can communicate through their Access Points. The BreezeNET Access Point can support various data rates simultaneously: at 3 Mbps, 2 Mbps or 1 Mbps. Figure 1-1. AP-10 PRO.11 with Two Built-in Omni-Directional Antennas Mobile workstations, such as laptops and hand-held devices, can roam between Access Points that belong to the same Extended Service Set (ESS). In an Extended Service Set, all Access Points have the same ESSID. When the access points are set up so that their coverage areas overlap, users can roam seamlessly from cell to cell. This means that there is no interruption of network connection when moving from one coverage area to the other through the overlap area. The roaming is completely transparent to the user and the applications. The Station Adapters decide when a User’s Guide 1-4 BreezeNET PRO.11 Series Introduction mobile user becomes disassociated from one access point and associated with another. This process is fully transparent, requires no user intervention and involves no loss of data packets. Multiple Access Points can be positioned in locations where heavy network traffic is expected; this creates a multicell and increases the aggregate throughput capacity in areas where it is needed most. The system implements a Load Balancing algorithm to divide the stations equally between the available co-located Access Points. The Access Point contains an embedded SNMP agent, enabling effective management by BreezeVIEW or any standard SNMP management station. Software upgrades can be downloaded by TFTP protocol via the wired LAN or wireless LAN. The Access Point is available in three models: • AP-10 PRO.11 with two integrated omni-directional antennas. • AP-10D PRO.11 for use with external high-gain antenna(s). • AP-10DL PRO.11 for use in Europe with high gain antenna under the ETSI standard. BreezeNET PRO.11 Series 1-5 User’s Guide Introduction 1.3.2 The BreezeNET PRO.11 Single Station Adapter The BreezeNET PRO.11 Single Station Adapter is a wireless LAN station adapter that converts any device equipped with an Ethernet interface into a wireless LAN station. The Single Station Adapter is transparent to the device’s hardware, software, and network operating system. This enables plug-and-play installation. Figure 1-2. SA-10 PRO.11 with Two Integrated Omni-Directional Antennas The Single Station Adapter enables its workstation to communicate with any other wireless station in the same cell coverage area, and to access all network resources such as file servers, wired stations, printers and shared databases via the Access Point. Any two wireless stations in two different cells can communicate through their Access Points. Workstations that can be connected to the wireless LAN include PCs, X-Terminals, and any other device that supports Ethernet. The unit is transparent to the workgroup devices’ hardware, software, and network operating system. The Single Station Adapter contains an embedded SNMP agent that enables effective management. Software upgrades are downloaded by TFTP via the Ethernet port or via the wireless LAN and Access Point. User’s Guide 1-6 BreezeNET PRO.11 Series Introduction Network connection is maintained while roaming between overlapping coverage areas. Transmission and reception can be continued while moving at high speed with no data packet loss or duplication. The Single Station Adapter is available in three models: • SA-10 PRO.11 with two integrated 2dbi omni-directional antennas. • SA-10D PRO.11 for use with external antenna(s). • SA-10DL PRO.11 for use in Europe with high gain antenna under the ETSI standard. 1.3.3 The BreezeNET PRO.11 Four Port Station Adapter The BreezeNET PRO.11 Four-Port Work group Adapter is a wireless LAN adapter that connects a workgroup of up to four Ethernet-equipped workstations to the wireless LAN. The Four Port Station Adapter is transparent to the workgroup devices’ hardware and software, allowing plug-and-play installation. Figure 1-3. SA-40 PRO.11 with Two Integrated Omni-Directional Antennas BreezeNET PRO.11 Series 1-7 User’s Guide Introduction The Four Port Station Adapter enables connected workstations to communicate with other wireless stations in the same cell coverage area, and to access all network resources such as file servers, wired stations, printers and shared databases via the Access Point. The Four Port Station Adapter also allows highly efficient and fast wired communication among the four connected workstations. Workstations that can be connected to the wireless LAN include PCs, X-Terminals and any other device that supports Ethernet. The unit is transparent to the workgroup devices’ hardware, software, and network operating system. The BreezeNET Four Port Station Adapter contains an embedded SNMP agent and software downloading capabilities which allow it to be effectively managed. Software upgrades are downloaded by TFTP protocol via the Ethernet ports or via the Wireless LAN and Access Point. Network connection is maintained while roaming between overlapping coverage areas. Transmission and reception can be continued while moving at high speed with no data packet loss or duplication. The Four Port Station Adapter is available in three models: User’s Guide • SA-40 PRO.11 with two integrated omni-directional antennas. • SA-40D PRO.11 for use with external antenna(s). • SA-40DL PRO.11 for use in Europe with high gain antenna under the ETSI standard. 1-8 BreezeNET PRO.11 Series Introduction 1.3.4 The BreezeNET PRO.11 Workgroup Bridge The BreezeNET Workgroup Bridge is a high-speed, wide-range wireless LAN bridge that provides connectivity to remote Ethernet networks. Figure 1-4. WB-10D PRO.11 with Two External Antenna Connector Ports The Workgroup Bridge communicates with the Access Points of the remote LANs, effectively creating an extended wireless network spanning sites situated up to 6 miles apart (in Europe, this range is limited by ETSI regulations to 2.5 Km; in deregulated regions, this range can be up to 60 Km). In this way a central Ethernet LAN may be connected with one or more branch office LANs. In addition, an island consisting of a Workgroup Bridge together with an Access Point can work as a relay. Transmissions from the central LAN and from the remote LAN are relayed via the island located between them. This configuration effectively doubles the bridge range. Workstations that can be connected to the wireless LAN include PCs, X-Terminals and any other device that supports Ethernet. The unit is transparent to the workgroup devices’ hardware, software, and network operating system. BreezeNET PRO.11 Series 1-9 User’s Guide Introduction The BreezeNET Workgroup Bridge contains an embedded SNMP agent and software downloading capabilities enabling effective management. Software upgrades are downloaded using TFTP protocol via the Ethernet ports or via the wireless LAN and Access Point. The Workgroup Bridge is available in three models: User’s Guide • WB-10 PRO.11 with two integrated 2dbi omni-directional antennas. • WB-10D PRO.11 with two external antenna connector ports. • WB-10DL PRO.11 for use in Europe with high gain antenna under the ETSI standard. 1-10 BreezeNET PRO.11 Series Introduction 1.3.5 The BreezeNET PRO.11 SA-PCR Card The PC Card provides the portable computer user with continuous connectivity and complete mobility, allowing seamless roaming throughout the wireless LAN campus. Figure 1-5. The SA-PCR PRO.11 PC Card The BreezeNET PRO.11 SA-PCR card converts any portable computer (including notebooks, laptops, penbased and handheld computers) containing a PCMCIA Release 2.1 type II slot into a wireless LAN workstation. The SA-PCR card can communicate with any other wireless station in its cell coverage area. Furthermore, any two wireless stations in two different cells can communicate through their Access Points. The SA-PCR card can access all network resources such as file servers, other wired stations, printers and shared databases via the BreezeNET Access Point. Network connection is maintained while roaming between overlapping cell coverage areas. Transmission and reception can be continued while moving at high speed with no data packet loss or duplication. BreezeNET PRO.11 Series 1-11 User’s Guide Introduction The SA-PCR Card is available in two models: • SA-PCR PRO.11 with two integrated omni-directional retractable antennas. • SA-PCD PRO.11 with two external antenna connector ports. 1.3.6 The BreezeNET PRO.11 Extended Range Access Point and Bridge Note: This product complies with European ETSI 300-328 and should only be used in countries which implement this standard. The BreezeNET PRO.11 WB-10DE is a high-speed, wide-range wireless LAN bridge that provides connectivity to remote Ethernet networks. The WB-10DE communicates with the BreezeNET AP-10DE Access Points of the remote LANs, effectively creating an extended wireless network spanning sites situated up to 5 Km apart. In this manner, a central Ethernet LAN may be connected with one or more branch office LANs. The WB-10DE and AP-10DE products comply with European ETSI standard 300-328. They should not be used in countries where FCC standards are applicable. The WB-10DE and AP-10DE can be used as a point-to-point or a point-tomultipoint solution. Note: The WB-10DE and AP-10DE are not compatible with the BreezeNET PRO.11 series. The SA-10 PRO.11, SA-PCR PRO.11, SA-40 PRO.11, AP10 PRO.11 and WB-10 PRO.11 units cannot communicate with the AP-10DE or the WB-10DE. The BreezeNET AP-10DE and WB-10 DE contain an embedded SNMP agent and software downloading capabilities enabling effective management. Software upgrades are downloaded using TFTP protocol via the Ethernet ports or via the wireless LAN and Access Point. The BreezeNET DE Access Point and Bridge are available for use with external antenna connector ports. User’s Guide 1-12 BreezeNET PRO.11 Series Introduction 1.4 BreezeNET PRO.11 Functional Description BreezeNET PRO.11 units add wireless functionality to existing Ethernet LANs. 1.4.1 Quick Review of Ethernet Standard Ethernet LAN stations are wired to a common bus. When one of the stations sends a message, it assigns a destination address to the message and sends the message on the bus. All stations on the bus “hear” the message, but only the station with the matching address processes the message. 1.4.2 Startup Procedure When wireless units (other than the AP-10) start up, they scan the frequencies for an AP-10. If an active AP-10 is in range, the units synchronize with it. The addresses associated with the units are registered in the AP-10 (the registration process is different for each unit type). From then on, the units can send and receive messages to and from the wired LAN. 1.4.3 AP-10 Access Point The AP-10 Access Point is connected to a wired Ethernet LAN, and it keeps a list of known stations on its wireless side. When an AP-10 “hears” a message that is destined for a wireless station, the AP-10 forwards the message wirelessly to the station. If the message has a destination address that the AP-10 does not recognize, the AP-10 ignores the message. The AP-10 continuously “listens” for wireless messages as well. When the AP-10 “hears” a wireless message destined for another wireless unit, it relays the message directly to the wireless unit without forwarding the message to the wired LAN. When the AP-10 “hears” a wireless message the destination of which is not on the wireless LAN, it forwards the message to the wired LAN. Messages cannot be sent directly between wireless stations without an AP-10 to relay the message. BreezeNET PRO.11 Series 1-13 User’s Guide Introduction 1.4.4 SA-10 Station Adapter The SA-10 station adapter is connected to a station’s network card. When the station sends a message, the SA-10 wirelessly forwards it to the AP-10. And when the AP-10 receives a message destined for the station, it wirelessly forwards the message to the SA-10. The first time the station sends a message, the station’s address is registered in the AP-10. The AP-10 keeps only the first address for each SA-10, so the SA-10 will not work properly if connected to more than one station. 1.4.5 SA-40 Station Adapter The SA-40 station adapter has four connectors for up to four stations, and features operation identical to that of the SA-10. As each station connected to the SA-40 sends its first message, each address is registered in the AP-10. The AP-10 only keeps up to four addresses for each SA-40, so the SA-40 will not operate properly if connected to more than four stations. 1.4.6 WB-10 Wireless Bridge As opposed to the SA-10 and SA-40 that connect directly to stations, the WB-10 wireless bridge connects to a wired Ethernet LAN (hub). When a station on the WB-10’s LAN sends a message that is not destined for a local station, the WB-10 wirelessly forwards the message to the AP-10. When the AP-10 receives a message destined for a station on the WB-10s LAN, the AP-10 wirelessly forwards it to the WB-10. In this way, the WB-10 and AP-10 work together like a standard network bridge. The first time each station on the WB-10’s LAN sends a message, the station’s address is registered in the WB-10 and the AP-10. The WB-10 and AP-10 can hold all the addresses necessary to support an entire LAN connected to a WB-10. User’s Guide 1-14 BreezeNET PRO.11 Series Introduction 1.4.7 SA-PCR Station Adapter The SA-PCR station adapter is inserted into the station’s PCMCIA slot and features identical operation to that of the SA-10. As opposed to the SA-10 and SA-40 station adapters that connect to the station’s network card, the SA-PCR is the station’s network card. The SA-10 and SA-40 can be used with stations of any operating system as long as the station sends legal Ethernet messages, but the SA-PCR requires a driver that is compatible with the station’s operating system. BreezeNET PRO.11 Series 1-15 User’s Guide Basic Installation 2. BASIC INSTALLATION This chapter describes physical installation of the BreezeNET PRO.11 series units described in Chapter 1, with the exception of the SA-PCR card. Installation of the SA-PCR PRO.11 PC card is described in Chapter 4. The BreezeNET PRO.11 series features plug-and-play operation, i.e., the unit starts operating immediately after physical installation with a set of default operation parameters. A local terminal can be connected to the unit to perform systemspecific parameter setting. The use of a local terminal and the configuration parameters are described in Chapter 3. In addition, all products in the PRO.11 series contain an SNMP agent and can be configured from a remote location via the network. This is described in the Appendix. 2.1 Basic Installation Checklist Standard installation involves the following steps: • Check the packing list • Position the unit and the antenna in the best location • Connect the power supply to the unit • Connect the Ethernet port to the unit • Check unit functionality using the LED indicators 2.2 Check the Packing List When you first open the package, verify that the unit is complete with the following components: • The unit, complete with two omni-directional antennas or RF connectors for use with external antennas (D models). • Quick Installation Guide/Card. • 5V DC power supply transformer. BreezeNET PRO.11 Series 2-1 User’s Guide Basic Installation • Mounting bracket for wall or ceiling installations and torque key for antenna connectors (supplied with D models). The AP-10 PRO.11 and AP-10DE Access Points come with the following additional components: • The BreezeNET PRO.11 series User’s Guide. • A monitor connector cable for connecting the units to a monitor in order to perform Local Terminal Management functions (see Section 3.1). • Proprietary MIB disk for performing remote unit configuration and monitoring via SNMP (see the Appendix). Open the packaging carefully and make sure that none of the items listed above are missing. Do not discard packaging materials. If, for any reason, the unit is returned, it must be shipped in its original package. 2.3 Position the Unit BreezeNET PRO.11 wireless LAN products are robust, trouble-free units, designed to operate efficiently under a wide range of conditions. The following guidelines are provided to help you position the units to ensure optimum coverage and operation of the wireless LAN. 0HWDO)XUQLWXUH Position the units clear of metal furniture and away from moving objects such as metal fans or doors. 0LFURZDYH2YHQV For best performance, position the units clear of radiation sources that emit in the 2.4 GHz frequency band, such as microwave ovens. $QWHQQDV For models with integrated antennas, make sure the antennas are extended upward vertically in relation to the floor. For models with external antennas, connect the User’s Guide 2-2 BreezeNET PRO.11 Series Basic Installation external antennas and RF cable. For information regarding external antenna installation, refer to Section 5.3. +HDW6RXUFHV Keep the units well away from sources of heat, such as radiators and airconditioners. 2.3.1 Additional Considerations When Positioning the Access Point When positioning the AP-10 PRO.11 and AP-10DE Access Points, take into account the following additional considerations. +HLJKW Install the Access Point at least 1.5m above the floor, clear of any high office partitions or tall pieces of furniture in the coverage area. The Access Point can be placed on a high shelf, or can be attached to the ceiling or a wall using a mounting bracket. &HQWUDO/RFDWLRQ Install the Access Point in a central location in the intended coverage area. Good positions are: • In the center of a large room • In the center of a corridor • At the intersection of two corridors Many modern buildings have partitions constructed of metal or containing metal components. We recommend that you install the Access Points on the corridor ceilings. The radio waves propagated by the BreezeNET PRO.11 LAN are reflected along the metal partitions and enter the offices through the doors or glass sections. BreezeNET PRO.11 Series 2-3 User’s Guide Basic Installation 2.4 Connect the Unit to the Power Supply The unit operates on a power input of 5VDC, (1200mA , 1500mA peak) supplied by the power transformer included with the unit. • Plug the output jack of the power transformer into the DC input socket on the unit. This socket may be located on the rear or side panel of the unit. • Connect the supplied power transformer to a power outlet - 110/ 220VAC. 2.5 Connect the Unit to the Ethernet Port • Connect one end of a an Ethernet 10BaseT cable (not supplied) to the RJ-45 port on the rear panel of the unit (marked UTP). • Connect the other end of the connector cable to the Ethernet outlet: • When connecting an SA-10 or SA-40 to a PC, use a straight cable. • When connecting an AP-10 or WB-10 to a LAN, use a straight cable. • When connecting an AP-10 or WB-10 to a PC, use a crossed cable. • When connecting an AP-10 to a WB-10, use a crossed cable. User’s Guide 2-4 BreezeNET PRO.11 Series Basic Installation 2.6 Check Unit Functionality via the LED indicators Verify that the unit is functioning correctly via the front panel LEDs. The following tables describe the front panel LEDs for stations (SA-10, SA-40) and bridges (WB10), and for Access Points. 2.6.1 Station (SA-10, SA-40) and Bridge (WB-10) LEDs Name Description Functionality PWR Power supply WLNK WLAN Link ETHR Ethernet activity On – After successful power up Off – Power off On – Unit is synchronized or associated with an AP Off – Unit is not synchronized or associated with an AP On – Reception on Ethernet port Off – No reception on Ethernet port QLT Quality of reception QLT QLT QLT QLT BreezeNET PRO.11 Series 2-5 very low quality reception or not synchronized with Access Point less than -81 dBm low quality reception (usually enabling 1 Mbps traffic) from -81 to -77 dBm medium quality reception (usually enabling 2 Mbps traffic) from -77 to -65 dBm high quality reception (usually enabling 3 Mbps traffic) greater than -65 dBm User’s Guide Basic Installation 2.6.2 Access Point LEDs Name Description Functionality PWR power supply INFR radio interference ETHR Ethernet activity On – After successful power up Off – Power off Off – No interference Blinking – Interference Present On – Reception of data from Ethernet LAN that is forwarded to WLAN (in reject unknown mode) Off – No reception of data from Ethernet LAN that is forwarded to WLAN LOAD WLAN load Number of associated stations no stations 1-8 stations 9-16 stations 17 or more stations 2.6.3 Verifying the Ethernet Connection Once you have connected the unit to an Ethernet outlet, verify that the ETHR LED on the front panel is blinking. The ETHR LED should blink whenever the unit receives LAN traffic. At the other end of the Ethernet link, verify that the LINK indicator is ON. On APs, the LINK indicator is located on the attached hub port; on station adapters, the LINK indicator is located on the NIC. User’s Guide 2-6 BreezeNET PRO.11 Series Using the Local Terminal for Unit Setup and Management 3. USING THE LOCAL TERMINAL FOR UNIT SETUP AND MANAGEMENT BreezeNET PRO.11 series units feature plug-and-play operation; the unit starts operating immediately following physical installation with a set of default parameters. System-specific configuration of the unit to meet specific requirements can be done via a local terminal (ASCII ANSI terminal or PC) connected to the unit. This chapter explains how to use the local terminal to configure and manage the BreezeNET PRO.11 series units described in Chapter 1, with the exception of the SA-PCR card. Configuration and management of the SA-PCR card is described in Chapter 4. 3.1 Getting Started with the Local Terminal 1. Use the Monitor cable supplied with the Access Point. Connect one end of the cable to the MON jack on the rear panel of the unit and the other end to the COM port of the terminal. 2. Run a terminal emulation program (such as HyperTerminal). 3. Set the communication parameters to the following: Baud Rate: 9600 Data Bits: 8 Stop Bits: 1 Parity: None Flow Control: None Connector: Connected COM port. 4. Click Enter. The main menu (see Figure 3-1) is displayed. BreezeNET PRO.11 Series 3-1 User’s Guide Using the Local Terminal for Unit Setup and Management ⇒To use Local Terminal Management: 1. Click an option number to open/activate the option. You may need to press Enter in some cases. 2. Press Esc to exit a menu or option. 3. Reset the unit after making configuration changes. 3.2 Configuration Screens Listed below are the menus, sub-menus, and parameters/options in the terminal program that the Installer can edit. Default values are listed where applicable. Numbers in the table below indicate how to reach each option. For example, to reach the 1.2.1 IP Address option, start at the main menu and press 1, then 2, and then 1. Menu 1. System Sub-Menu Sub-Menu Default Values 1.1. Station Status Configuration 1.2. IP and SNMP Parameters 1.3. Wireless LAN (WLAN) Parameters User’s Guide 1.2.1 IP Address 1.2.2 Subnet Mask 1.2.3 Default Gateway Address 1.2.4 SNMP Traps 1.2.A Display Current Values Enabled 1.3.1 Hopping Sequence (only for AP) 1.3.2 Hopping Set (only for AP) 1.3.3 ESS ID 1.3.4 Max. Data Rate 1.3.5 Transmit Antenna 1.3.6 Mobility 1.3.7 Load Sharing 1.3.8 Preferred AP (not available for APs) 1.3.A Display Current Values 3-2 1 1 ESSID1 3Mbps Use 2 Antennas* Low Disabled** BreezeNET PRO.11 Series Using the Local Terminal for Unit Setup and Management Menu Sub-Menu 1.4. Bridging 1.5. Station Control 1.6. Security 2. Advanced Settings Sub-Menu 1.4.1 LAN to WLAN Bridging Mode (AP only) 1.4.2 Intelligent Bridging Period (AP only) 1.4.3 IP Filtering 1.4.4 Tunneling 1.4.5 Broadcast Relaying 1.4.6 Unicast Relaying Default Values Reject Unknown 15 sec Disabled Both Enabled Enabled Enabled 1.5.1 Reset Unit 1.5.2 Load Defaults 1.6.1 Authentication Algorithm 1.6.2 Default Key ID 1.6.3 Pre-authentication 1.6.4 Privacy Option Implemented 1.6.A WEP Key #1 1.6.B WEP Key #2 1.6.C WEP Key #3 1.6.D WEP Key #4 2.1. Translation Mode Open system Disabled Enabled 2.3. Performance 2.3.1 Dwell Time 2.3.2 RTS Threshold 2.3.5 Max. Multicast Rate 2.3.6 Power Save Support 2.3.7 DTIM Period 2.3.8 IP Stack 2.3.9 Acknowledge Delay 2.3.A P.S. Broadcast Reservation Percentage 128 msec 120 bytes 1 Mbps Disabled 4 Enabled Regular 30 2.4. Radio 2.4.1 Hopping Standard 2.4.2 Display Site Proprietary Sequence 2.4.3 Power level US FCC BreezeNET PRO.11 Series 3-3 High User’s Guide Using the Local Terminal for Unit Setup and Management Menu Sub-Menu 2.5. Rate Sub-Menu Default Values 2.5.1 Multi-Rate Support Enabled 2.6. AP Redundancy Support 2.7. Maintenance 3. Site Survey Disabled Enabled (not available in APs) 2.7.1 Auto Calibration 2.7.2 Wait for Association Address 2.7.3 Japan Call Sign 3.1. System Counters 3.1.1 Display Ethernet and WLAN Counters 3.1.2 Display Rate Counters 3.1.3 Display Rx packets per frequency 3.1.4 Reset All Counters 3.1.5 Power Saving Counters 3.2. Survey Software 3.2.1 Operation mode(RX/TX) 3.2.2 Start Statistics 3.2.3 Stop Statistics 3.3. Event Log 3.3.1 Display Event Log 3.3.2 Erase Event Log 3.3.3 Event storage policy RX only From level warning up 3.4. Display Neighboring APs 4. Access Control 4.1. Change Access Rights 4.1.0 User 4.1.1 Installer 4.1.2 Technician 4.2. Change Installer Password Installer "User" 4.S Show Current Access Right * Option 1.3.5 Transmit Antenna has the default value Use #2 for the SA-40 unit only. ** Option 1.3.7 Load Sharing has the default value Enabled for the AP-10 unit only. User’s Guide 3-4 BreezeNET PRO.11 Series Using the Local Terminal for Unit Setup and Management 3.3 Main Menu Unit Mode Product Name Ordering BreezeNET PRO.11 Series (AP-10 DL) Official Version : Date: 26 May 1999 4.4.1 Version No. 15:10:33 BreezeNET Monitor ================= 1 - System Configuration 2 - Advanced Settings 3 - Site Survey 4 - Access Control Select option > Figure 3-1. Main Menu 3.4 System Configuration Menu BreezeNET PRO.11 Series (AP-10 DL) Official Version : Date: 26 May 1999 4.4.1 15:10:33 BreezeNET Monitor ================= 1 - Station Status 2 - IP and SNMP Parameters 3 - Wireless LAN Parameters 4 - Bridging 5 - Station Control 6 - Security Select option > Figure 3-2. System Configuration Menu BreezeNET PRO.11 Series 3-5 User’s Guide Using the Local Terminal for Unit Setup and Management 3.4.1 Station Status Station Status is a read-only sub-menu that displays the current values of the following parameters: User’s Guide • Unit's Mode – Identifies the unit’s function. For example, if the unit is an Access Point, AP-10 appears in this field. If the unit is a Station Adapter i.e., SA-10, SA-40 or a WB-10, SA-10, SA-40 or WB-10 appears in this field. • Unit's HW Address – Displays the unit’s unique MAC address. • Unit's WLAN Address (SA or WB) – The address associated with the unit. For the SA-10, this is the address of the PC. For the SA-40 and WB-10, this is the MAC address of the unit. This field does not appear when the unit is an AP. • Station Status (SA or WB) – Current status of the station. This field does not appear when the unit is an AP. There are three options: ∗ Scanning – The station is searching for an AP with which to associate. ∗ Sync Waiting for Address – The station is synchronized with an AP but has not yet learned its WLAN MAC address (this option is relevant only to the SA-10). The AP does not forward packets to the station when it is in this mode. ∗ Associated – The station is associated with an AP and has adopted the attached PC MAC address (for SA-10) or uses the unit’s H/W address (SA-40 and WB-10), and is receiving packets from the LAN. • AP Address (Station Only) – For stations, this parameter indicates an address of the AP with which the unit is currently associated. • Total Number of Associations since last reset (Station Only) – For stations, this indicates the total number of associations and disassociations with various APs. This is usually an indication of roaming. • Current Number of Associations (AP Only) – Total number of stations currently associated with an AP. 3-6 BreezeNET PRO.11 Series Using the Local Terminal for Unit Setup and Management • Maximum number of Associations since last reset (AP Only) – Maximum number of stations that were associated with an AP since the last reset. • Current Number of Authentications (AP Only) – Total number of stations currently authenticated with an AP. A station may be concurrently authenticated with several APs, but is associated with only one AP at a time. • Maximum number of Authentications since last reset (AP Only) – Maximum number of stations that were authenticated with an AP since the last reset. 3.4.2 IP and SNMP Parameters All BreezeNET PRO.11 units contain IP host software. This software can be used for testing the unit for SNMP management functions and for downloading software upgrades using the TFTP protocol. • IP Address – IP address of the unit. • Subnet Mask – Subnet mask of the unit. • Default Gateway Address – Gateway address of the unit. • SNMP Traps – Type 0 to disable SNMP trap sending. Type 1 to enable SNMP trap sending. When an event occurs, a trap is sent to the defined host address (see the Appendix for a list of traps). You can configure the host address to which the traps are sent through SNMP management. • Display Current Values – Type A to displays information concerning the current status of all IP-related items. 3.4.3 Wireless LAN (WLAN) Parameters The WLAN Parameters menu contains the following options: • Hopping Sequence (AP Only) – Hopping sequence of the unit. A hopping sequence is a pre-defined series of channels (frequencies) that are used in a specific, pseudo-random order as defined in the sequence. The unit “hops” from BreezeNET PRO.11 Series 3-7 User’s Guide Using the Local Terminal for Unit Setup and Management frequency to frequency according to the selected sequence. When more than one AP is co-located in the same area (even if they are not part of the same network) it is recommended to assign a different hopping sequence to each AP. Hopping sequences are grouped in three hopping sets (see the following parameter). When setting up multiple APs in the same site, always choose hopping sequences from the same hopping set. This reduces the possibility of collisions on the WLAN. This parameter is set only for the BreezeNET PRO.11 Access Point. It is not accessible from any other BreezeNET PRO.11 unit. During the association process, all other stations learn the hopping sequence from the Access Point. Different co-located WLAN segments should use different hopping sequences. • Hopping Set (AP Only) – Hopping set (between 1 and 3) of the unit. Hopping sequences are grouped in several hopping sets. Always use the same hopping set per site. The number of hopping sequences per set is different for each hopping standard according to the following table: Table 3-1. Hopping Sequences Hopping Standard User’s Guide Number of Sequences per Hopping Set Netherlands 5 Europe ETSI 26 France 11 US FCC 26 Japan 4 Australia 20 Israel 11 Canada 10 Europe ETSI (DE Model) 10 Korea 4 Spain 9 3-8 BreezeNET PRO.11 Series Using the Local Terminal for Unit Setup and Management • ESSID –The ESSID (up to 32 printable ASCII characters) of the unit is a string used to identify a WLAN. This ID prevents the unintentional merging of two co-located WLANs. A station can only associate with an AP that has the same ESSID. Use different ESSIDs to segment the WLAN network and add security. Note: The ESSID parameter is case-sensitive. • Maximum Data Rate – Maximum data rate of the unit. BreezeNET PRO.11 units operate at 1 Mbps, 2 Mbps or 3 Mbps. The unit adaptively selects the highest possible rate for transmission. Under certain conditions (compatibility reasons or for range/speed trade-off) you may decide to limit the use of higher rates. • Transmit Antenna – Which antennas are used for transmission. During reception, a BreezeNET PRO.11 unit dynamically selects the antenna where reception is optimal. In contrast, the unit selects the antenna from which it will transmit before transmission. It usually uses the antenna last used for successful transmission. In models with external antennas, sometimes only a single antenna is used. In this case, Transmit Antenna should be configured to transmit only from that single antenna. Similarly, models using a booster or an LNA use only a single antenna for transmission. There are three possibilities for configuration: • ∗ Use Two Antennas ∗ Use Antenna No. 1 only ∗ Use Antenna No. 2. only Mobility – BreezeNET PRO.11 stations optimize their roaming algorithms according to the mobility mode parameter. For example, a stationary station is more tolerant of bad propagation conditions. It assumes that this is a temporary situation and is not caused by the station changing position. Initiating a roaming procedure in such a case would be counter-productive. BreezeNET PRO.11 Series 3-9 User’s Guide Using the Local Terminal for Unit Setup and Management In general, wireless stations can be used in one of three mobility modes: • ∗ High (Mobility) – Type 2 for stations that may move at speeds of over 30 km per hour. ∗ Medium (Mobility) – Type 1 for stations that may move at speeds of over 10 km per hour, but not over 30 km per hour. ∗ Low (Mobility) -Type 0 for stations that will not move at speeds of over 10 km per hour. Stationary is the default value, and in almost all cases this is the best choice. Load Sharing – Type 1 to enable Load Sharing. When installing a Wireless LAN network in a high-traffic environment, you can increase the aggregate throughput by installing multiple APs to create colocated cells. Load Sharing allows the wireless stations to distribute themselves evenly among the APs to best divide the load between the APs. Note: When working in Load Sharing mode, both the APs and the units should be configured to Load Sharing Enabled. • Preferred AP MAC (Ethernet) address of the preferred AP – You can configure a station to prefer a specific AP unit. When the station powers up, it will associate with the preferred AP even if the signal from that AP is lower than the signal from other APs. The station will roam to another AP only if it stops receiving beacons from the preferred AP. • Display Current Values – This read-only status screen displays current WLAN parameters. Press any key to return to the WLAN Parameters menu. User’s Guide 3-10 BreezeNET PRO.11 Series Using the Local Terminal for Unit Setup and Management 3.4.4 Bridging The Bridging menu contains the following options: • LAN to WLAN Bridging Mode (AP Only) – The options are: Note: ∗ Reject Unknown – Type 0 to allow transmission of packets only to stations that the AP knows to exist in the Wireless LAN (behind the Wireless Bridge). ∗ Forward Unknown – Type 1 to allow transmission of all packets except those sent to stations that the AP recognizes as being on its wired Ethernet side. ∗ Intelligent Bridging Period – Intelligent bridging enables smooth roaming of WB-10 units. When intelligent bridging is enabled, the AP goes into a special bridging mode for a fixed amount of time whenever a wireless bridge (WB) roams into its area. This mode causes the AP to forward packets destined for the stations behind the WB-10 even though they are known or were learned from the wired side (except that no learning of the wired LAN will take place). Afterwards, the AP will switch back to Reject Unknown bridging mode. This procedure prevents packets destined for stations behind the bridge from getting lost. The value of this parameter is the length of time in seconds that the AP will remain in special mode. When connecting very large networks, it is recommended to set this parameter to Forward Unknown. • IP Filtering – Whether IP filtering is enabled for the unit. Enable IP Filtering to filter out any other protocol (such as IPX) if you want that only IP traffic will pass through the WLAN. • Tunneling – Whether the unit performs tunneling. Enable Appletalk tunneling if the network contains a mix of Ethertalk1 (ET1) and Ethertalk2 (ET2) stations to ensure smooth communications. Enable IPX tunneling if IPX protocol is running over your network. Be sure to set all units to the same tunneling setting. BreezeNET PRO.11 Series 3-11 User’s Guide Using the Local Terminal for Unit Setup and Management • Broadcast Relaying (AP Only) – Whether the unit performs broadcast relaying. When Broadcast Relaying is enabled, Broadcast packets originating in WLAN devices are transmitted by the AP back to the WLAN devices, as well as to the LAN. If it is disabled, these packets are sent only to the local wired LAN and are not sent back to the WLAN. Disable Broadcast Relaying only if you know that all Broadcast messages from the WLAN will be destined to the wired LAN. • Unicast Relaying – Whether the unit performs Unicast relaying. When Unicast Relaying is enabled, Unicast packets originating in WLAN devices can be transmitted back to the WLAN devices. If this parameter is disabled, these packets are not sent to the WLAN even if they are intended for devices on the WLAN. Disable Unicast Relaying only if you know that all Unicast messages from the WLAN will be destined to the local wired LAN. 3.4.5 Station Control The Station Control menu contains the following options: User’s Guide • Reset Unit – Type 1 to reset the BreezeNET PRO.11 unit and apply any changes made to the system parameters. • Load Defaults – When this option is implemented, system parameters revert back to the original factory default settings. There are two options: ∗ Load Full Factory Defaults – All parameters revert to defaults except for Japan Call Sign (if applicable) and Hopping Standard. ∗ Load Partial – All parameters revert to defaults, except for Japan Call Sign (if applicable), IP Address, Subnet Mask, Default Gateway, Hopping Sequence, Hopping Set, ESSID, Transmit Diversity, Long Range, Preferred AP, IP Filtering, Hopping Standard, Power Level, Auto Calibration, Encapsulation, WEP Attributes, Authentication Algorithm, Pre-authentication, WEP Default Keys, Ethernet Disable, Trap Host Addresses. 3-12 BreezeNET PRO.11 Series Using the Local Terminal for Unit Setup and Management 3.4.6 Security (Authentication Feature) Wired Equivalent Privacy (WEP) is an authentication algorithm which protects authorized Wireless LAN users against eavesdropping. The definition of WEP is defined in the 802.11 standard. Refer to Section 9.5.2 in the Appendix of this guide for further information. WEP, also referred to as the Privacy option, must be ordered specifically and is not supported by default. The security mechanism involves configuration of the following parameters: • Authentication Algorithm – This module operates in two modes: 0-Open System (default): no authentication. or 1-Shared Key authentication (for systems that have the privacy option implemented). • Default Key ID – The key to be used for the encryption of transmitted messages. • Pre-authentication – Set this parameter to Enabled when there is a great deal of roaming between the AP’s. Pre-authentication must be activated on both the AP’s and the stations. • Privacy Option Implemented – Yes if Shared Key authentication is supported, No if Shared Key authentication is not supported. • WEP Key# 1-4 – The four encryption keys must be set before you can use the Shared Key Authentication mode. The encryption keys you enter for the AP, must match those defined in the stations. Each key is a combination of 10 Hex digits. Note: It is recommended to change the encryption keys periodically, to enhance system security. BreezeNET PRO.11 Series 3-13 User’s Guide Using the Local Terminal for Unit Setup and Management 3.5 Advanced Settings Menu BreezeNET PRO.11 Series (AP-10 D) Official Version : Date: 26 May 1999 4.4.1 15:10:33 Advanced Settings menu ====================== 1 - Translation Mode 2 - Roaming 3 - Performance 4 - Radio 5 - Rate 6 - AP Redundancy Support 7 - Maintenance Select option > Figure 3-3. Advanced Settings Menu Modification of most of the parameters in the Advanced Settings menu is limited to certified BreezeCOM engineers only. 3.5.1 Translation Mode The translation mode determines how the unit handles 802.3 packets. The translation mode is either enabled (default) or disabled. User’s Guide 3-14 BreezeNET PRO.11 Series Using the Local Terminal for Unit Setup and Management 3.5.2 Performance The Performance menu determines the unit performance: • Dwell Time (AP Only) – The time spent on a radio channel before hopping to the next channel in the sequence. • RTS Threshold – Minimum packet size to require an RTS. For packets with a size below RTS Threshold value, an RTS is not sent and the packet is transmitted directly to the WLAN. • Max Multicast Rate – Multicast and Broadcast transmissions are not acknowledged, therefore the chance of error increases. By default, the unit will always transmit broadcasts, multicasts and control frames in the minimum possible rate, 1Mbps. • Power Save Support – If you enable Power Save Support on one of the WLAN stations (SA-PCR only), you must also configure the AP unit. Power Save Support is influenced by two parameters: ∗ DTIM interval on the AP side – Determines at which interval the AP will send its broadcast traffic (default 4 beacons). ∗ Listen interval on the SA-PCR side – Determines when the station will “wake up” to listen to unicast packets which are destined to it (default value: 4 beacons). • DTIM Period – Determines at which interval the AP will send its broadcast traffic to all the stations in the cell, both stations that are in power save mode and to stations that are not in power save mode (normal mode). When stations that are in power save mode “wake up” to receive broadcast frames, they can also poll the AP for the unicast frames if there are any stored in the AP’s buffer. Default value is 4 beacons (approximately every 1 second). • IP Stack – By default this parameter is disabled, to check connectivity. Any changes to this parameter will be returned to the default value whenever the unit resets. • Acknowledge Delay – Enlarges the range of system but can only be enabled for links above 20kms. It must be enabled on both sides. The values are Long or Regular (default) and can be configured by an Installer or Technician. BreezeNET PRO.11 Series 3-15 User’s Guide Using the Local Terminal for Unit Setup and Management • P.S. Broadcast Reservation Percentage – Determines the buffer space reserved for broadcast frames in percentages. Default value is 30% ( Auto storing - no reservation). Allowed range is 0%-30%. Note: 3.5.3 It is recommended to leave it at default setting. Radio The Radio menu contains the following parameters: • Hopping Standard – The Hopping Standard is a set of rules regarding the radio transmission standard allowed in each country. Units will work together only if set to the same hopping standard. Use this parameter to set the unit’s hopping standard to that of the relevant country. • Power level – Output power level at which the unit is transmitting. There are two possibilities, Low (4dBm) or High (17 dBm) at the antenna connector. 3.5.4 Rate • Multi-Rate Support – When this parameter is enabled, the unit will automatically switch to the best transmission rate at any given time. When the parameter is disabled, the unit will always stay at the maximum rate configured in the WLAN Parameters menu. 3.5.5 AP Redundancy Support When the AP identifies that the Ethernet link has been discontinued over a defined period of time, it then stops transmitting and forces the stations associated with it to associate with another AP. The default mode for the AP Redundancy Support parameter is disabled (the AP continues transmitting even when the ETH link is discontinued). This can only be configured by a Technician. It is recommended to use this parameter only when more than one AP is connected to the same distribution system and this AP is configured to the same ESSID. User’s Guide 3-16 BreezeNET PRO.11 Series Using the Local Terminal for Unit Setup and Management 3.5.6 Maintenance The Installer has access to modify the following parameter of the Maintenance menu: • Auto Calibration – When the unit is started, it performs an internal self-test. A part of this test is automatic calibration of the DC Offset and deviation pattern. Auto Calibration is not supported in the “DE” models, and therefore, must be disabled for “DE” units. • Japan Call Sign – The Japan Call Sign is part of the Japanese standard, defined according to local regulations. The Japanese Ministry of Communications supplies an activation code for the units; this code is set in the factory for each unit. 3.6 Site Survey Menu BreezeNET PRO.11 Series (SA-10 DL) Official Version: 4.4.1 Date: 26 May 1999 15:10:33 Site Survey menu ================ 1 - System Counters 2 - Survey Software 3 - Event Log 4 - Display Neighboring AP’s Select option > Figure 3-4. Site Survey Menu The Site Survey menu allows performing a site survey that helps you position your units and align the antennas of the units, as well as perform troubleshooting. BreezeNET PRO.11 Series 3-17 User’s Guide Using the Local Terminal for Unit Setup and Management 3.6.1 System Counters The System counters are a simple yet efficient tool for monitoring, interpreting and analyzing the Wireless LAN performance. The counters contain statistics concerning Wireless and Ethernet frames. The sub-menu contains the following options: • Display Ethernet and WLAN Counters – Choose this option to display the current value of the Ethernet and Wireless counters. Refer to Sections 3.6.1.1 and 3.6.1.2 for a detailed description of the counters. • Display Rate Counters – Displays contents of packets at each rate. The AP displays counters per station. • Display Rx Packets per Frequency – Histogram of the number of frames received on each channel. • Reset Counters – Choose this option to reset all counters. After choosing this option you will be requested to type 1 for confirmation or 0 to cancel the reset. • Power Saving Counters – Displays the power saving counters per station, the number of transmitted frames and the number of discarded frames. This applies only to AP’s. 3.6.1.1 Ethernet Counters Ethernet counters display statistics about the unit’s Ethernet port activity. The unit receives Ethernet frames from its UTP port and forwards them to its internal bridge, which decides whether or not to transmit them to the Wireless LAN. The units have a smart hardware filter mechanism which filters most of the frames on the LAN, and hardware filtered frames are not counted. On the other side, frames which where received from the wireless LAN and some frames generated by the unit (answers to SNMP queries and pings which reached to the unit via the UTP port), will be transmitted to the UTP port. User’s Guide 3-18 BreezeNET PRO.11 Series Using the Local Terminal for Unit Setup and Management Available counters: • Total Received Frames – Indicated the total number of frames that have been received from the Ethernet port. This counter includes both bad and good frames. • Received Bad Frames – The number of frames with errors received from the UTP port. A large number of received bad frames indicates a problem in the UTP connection such as a bad UTP cable or hub port. • Received good frames – The number of good frames (i.e. frames with no errors) received from the UTP port. • Forwarded to the bridge – The number of received frames that were forwarded to the unit’s internal bridge. This counter should be equal to the number of good frames unless the internal bridge is overloaded. • Missed Frames – Frames that the unit recognized but failed to read due to internal bridge overload. This counter should equal zero unless the internal bridge is overloaded. • Transmitted to Ethernet – The number of frames transmitted by the unit to the UTP port. i.e., frames that have been received from the Wireless side, and frames generated by the unit itself. 3.6.1.2 Wireless LAN Counters Wireless counters display statistics about the unit’s Wireless LAN activity. Transmission to the wireless media includes data frames received from the UTP ports, as well as self generated control and management frames. When a data frame is transmitted, the unit will wait for an acknowledge from the receiving side. If an acknowledge is not received, the unit will retransmit the frame until it gets an acknowledge (there are no retransmissions for control frames). If the unit has retransmitted a frame for the maximum number of retransmissions it will stop retransmitting the frame and drop this frame. BreezeNET PRO.11 Series 3-19 User’s Guide Using the Local Terminal for Unit Setup and Management Available counters: • Total Transmitted Frames – The number of frames transmitted to the wireless media. The count includes the first transmission of data frames (without retransmissions), and also the number of control and management frames. Note: User’s Guide An AP continuously transmits a control frame called beacon in every frequency to which it hops, in order to publish its existence and keep its associated stations synchronized. Thus, the total transmitted frames counter will get high values even if the AP-10 is not connected to an active LAN. • Total Transmitted Frames (Bridge) – The total number of data frames transmitted to the wireless media (i.e. frames that were received form the UTP port and forwarded to the internal bridge which decided to transmit them to the wireless media). • Frames Dropped (too many retries) – The number of frames which have been dropped since they were retransmitted for the maximum number of allowed retransmissions and were not acknowledged. • Total Transmitted Fragments – The total number of transmitted frames. The count includes data, control and management frames and also the number of retransmissions of data frames (for example, if the same data frame is retransmitted ten times, the count will increase ten times). • Total Retransmitted Fragments – The total number of retransmissions of data frames (for example, if the same data frame is retransmitted ten times then the count will increase ten times). In a point-to-point application, this counter should relatively correspond to the number of bad fragments received on the other side. • Total Tx Errors – The number of transmit errors that have occurred. Currently this counter also includes normal situations where a fragment has not been transmitted because the dwell time has elapsed. 3-20 BreezeNET PRO.11 Series Using the Local Terminal for Unit Setup and Management • Internally Discarded – The number of frames that the AP discarded due to a buffer overflow. Frame discard will occur mainly when the wireless conditions are bad, the unit is busy re-transmitting frames, and is not able to handle new frames. • Power Saving Aged – Total number of buffered frames that were aged out. This counter counts the number of frames dropped by the AP because a station did not poll those frames for a long period of time. • Power Saving Free Entries – The current number of free buffers (one frame each) available for power save management. These buffers hold messages for stations that are currently in Power Save mode. • Total Received Frames – The number of frames received from the wireless media. The count includes data and control frames (including beacons received from AP’s). • Total Received Data Frames – The number of data frames received from the wireless media. • Total Received Fragments – The total number of frames received, including data, control and duplicate data frames (see duplicates and dwell timeouts parameter below). • Bad Fragments Received – The number of frames received from the WLAN with errors. • Duplicates and Dwell timeouts – When a unit receives a frame it sends an acknowledge for it. If the acknowledge is lost, it receives a copy of the same frame. Although duplicate frames are counted, only the first copy of the frame is forwarded to the UTP port. BreezeNET PRO.11 Series 3-21 User’s Guide Using the Local Terminal for Unit Setup and Management 3.6.1.3 Display Rate Counters 00-20-D6-12-88-4E: Data tx on rates 1Mb: 23; 2Mb: 67; 3Mb: 462; Ret: 30 00-20-D6-12-25-13: Data tx on rates 1Mb: 250; 2Mb: 550; 3Mb: 0; Ret: 29 The rate counters display the number of frames transmitted in each data-rate since the last reset. As displayed, the rate counters show the number of frames transmitted at 1Mbps, 2Mbps, 3Mbps, and the number of Re-Transmitted frames (Ret). The counters display the rate of packets transmitted for the first time only (without retransmissions). Note: Counters for APs are displayed for all associated stations, indicated by their MAC address. Rate counters for stations are displayed with no indication of MAC address. Checking the rate counters is the best way to determine which data-rate is the optimal data-rate for the unit. It is recommended to restrict the Maximum Data Rate for each unit according to the Rate counters (see also Section 3.4.3). The Ret counter displays the number of frames that had to be retransmitted, however it does not count the number of retransmissions that actually accrued. User’s Guide 3-22 BreezeNET PRO.11 Series Using the Local Terminal for Unit Setup and Management 3.6.1.4 Using the Rx Packets per Frequency Histogram Use the Display Rx Packets per Frequency option to see a histogram of the number of frames received on each channel. BreezeNET PRO.11 Series (SA-10) Official Version: 4.4.1 Date: 26 May 1999 15:10:33 Max = 187 Min = 112 # # # # # ## ####### ######### ###### ####### ################ ####### #################################################### ####### ## ######################################################### ######## ############################################################################# ^ ^ ^ ^ ^ ^ ^ 2 +10 +20 +30 +40 +50 +60 ^ 70 Hit any key to return > Figure 3-5. Display Rx Packets per Frequency Each point of the histogram line corresponds to a frequency. The base frequency appears at the far left, and gradations are marked in steps of ten along the line. A hash (#) represents each packet received on a given frequency. The Max and Min values indicate the highest and lowest number of frames received across all frequencies. This graph is very useful for tracking interference. Frequencies with small numbers of packets received probably have more interference than other frequencies. BreezeNET PRO.11 Series 3-23 User’s Guide Using the Local Terminal for Unit Setup and Management 3.6.1.5 Reset All Counters This option allows you to reset the system counters, Ethernet counters, WLAN counters, and Rate counters. • Click 1 to reset all counters. • Click 0 to cancel request. 3.6.1.6 Power Saving Counters These counters apply only to APs. User’s Guide • PS stations – Number of associated stations currently working in Power Save mode. • Internally Discarded – Number of frames that were discarded because of aging. • Table – Valid only when Power Save mode is enabled. ∗ Station ID – Current number of buffered frames per station. ∗ Aged – Number of buffered frames that were aged out from buffer per station. ∗ Send – Number of buffered frames that were sent to a specific station. ∗ Queue – Number of frames that could not be stored in the buffer. 3-24 BreezeNET PRO.11 Series Using the Local Terminal for Unit Setup and Management 3.6.2 Survey Software The Survey Software menu enables you to align antennas and to assess the radio signal quality of a point-to-point link. The sub-menu includes the following options: • Operation Mode – When running a Site Survey, set the units on either side of the link to either receive (option 1) or transmit (option 2) packets (one unit should be set to transmit and the other to receive). • Start Statistics – Type 2 and then press any digit to start Site Survey. • Stop Statistics – Type 3 and then press any key to stop update of Site Survey statistics. 3.6.3 Using the Site Survey Software 1. Roughly align the antennas on either side of the link before starting the Site Survey procedure. 2. Verify that the Ethernet cables are disconnected from both units. 3. Type 1 to access the Operation mode screen. Set the units on either side of the link to either receive (option 1) or transmit (option 2) packets (one unit should be set to transmit and the other to receive). 4. Start the survey by selecting option (2) in the Survey Software menu in both units. When performing a site survey from a station to an AP (transmitting from the station to the AP), always begin with the station (select option (2) on the station). 5. On the transmit side, a screen appears displaying a table with the number of packets and the frequency at which each packet was transmitted. This list is updated continuously. Select option (3) to stop sending packets. BreezeNET PRO.11 Series 3-25 User’s Guide Using the Local Terminal for Unit Setup and Management BreezeNET PRO.11 Series (SA-10 DL) Official Version: 4.4.1 Date: 26 May 1999 15:10:33 # Tx Packets Channel 0 37 1 10 2 7 3 30 4 28 5 44 6 35 7 12 8 48 9 76 10 42 Hit any key to return > Figure 3-6. Transmit Statistics 6. On the receive side of the link, the screen displays a table showing the packet number received, the frequency at which each packet was transmitted, the Received Signal Strength Indicator (RSSI) for each antenna and the antenna that was selected for reception (refer to Figure 3-7). Use only the RSSI reading from the selected antenna. User’s Guide 3-26 BreezeNET PRO.11 Series Using the Local Terminal for Unit Setup and Management Figure 3-7. Receive Statistics 7. The RSSI is given in arbitrary units. Use the graph in Figure 3-8 to correlate RSSI to dBm. 566,9VG%P 566,9DOXH 5)/HYHO>GEP@ Figure 3-8. RSSI to dBm Graph BreezeNET PRO.11 Series 3-27 User’s Guide Using the Local Terminal for Unit Setup and Management 8. Re-align the antennas until the maximum received signal strength is attained. As you align the antennas, the RSSI (received signal strength indicator) continually increases until it reaches a certain level after which the RSSI begins to decrease. This is the maximum attainable RSSI level indicating optimum receive antenna alignment. 9. Switch the functions of either side of the link (set the transmit unit to receive and the receive unit to transmit) and repeat the procedure to check the link from the opposite direction. 3.6.4 Event Log • Display Event Log – The error messages that the unit displayed since the last Load Full Factory Defaults reset or since the log was erased by Erase Event Log. The Event log stores events in four levels of error notifications: MSG (Message), WRN (Warning), ERR (Error), and FTL (Fatal). • Erase Event Log – Erases the event log. • Event Storage Policy – Defines severity policy for storage level of the event log. There are four levels of storage policy: 0 – Store all events (beginning at message level). 1 – Store all events from warning level up. 2 – Store all events from error level up. 3 – Store fatal events only. 3.6.5 Display Neighboring AP’s Displays neighboring AP’s on the same ESS for both the AP and the station units. User’s Guide 3-28 BreezeNET PRO.11 Series Using the Local Terminal for Unit Setup and Management 3.7 Access Control Menu Access Control functions enable the System Administrator or Installer to limit access to Local Terminal Maintenance setup and configuration menus. BreezeNET PRO.11 Series (SA-10) Official Version: 4.4.1 Date: 26 May 1999 15:10:33 Access Control menu =================== 1 - Change Access Rights 2 - Change Installer Password S - Show Current Access Right Select option > 1 Figure 3-9. Access Control Menu The Access Control menu includes the following options: • Change Access Rights – This screen determines the level of access rights to the BreezeNET PRO.11 unit’s setup and configuration menus. When the unit is first installed, the default access right is Installer, and the default password is “user”: • User – The Local Terminal Management menus are read-only for a user who does not possess the correct password. The ESSID and security parameters are hidden by asterisks (*) at this level. • Installer – The installer has access to configure all required parameters in the system configuration menu, as well as some of the advanced settings. Access is password-protected. After configuration, the installer should change access rights to option (0), User. The installer can also change the installer password (see next parameter). BreezeNET PRO.11 Series 3-29 User’s Guide Using the Local Terminal for Unit Setup and Management • User’s Guide Technician – Only a Certified BreezeCOM Engineer possessing the correct password can select this option to configure all the parameters and settings. • Change Installer Password – Type in the new password according to the directions on screen. This screen changes the installer password to prevent unauthorized persons from making any changes in system configuration and setup. The password is limited to eight printable ASCII characters. This option is not available at User level. • Show Current Access Right – This read-only screen presents the current access right configuration. 3-30 BreezeNET PRO.11 Series SA-PCR PRO.11 PC Card Installation, Setup, and Management 4. SA-PCR PRO.11 PC CARD INSTALLATION, SETUP, AND MANAGEMENT This chapter describes how to install the SA-PCR card and its associated firmware, drivers and utilities. The SA-PCR Configuration and SA-PCR Site Survey utilities, which are used to setup and manage the card, are also described in this chapter. 4.1 Packing List The SA-PCR PRO.11 package should come with the following items: • SA-PCR PRO.11 PC card. • Drivers diskette • Utilities diskette • Installation and User’s Guide. 4.2 Before You Begin Before installing, do the following: • Verify that the AP you are going to use is an AP-10 PRO.11. The SA-PCR PRO.11 will work with any AP that is compliant to the 802.11 standard. It is advisable to turn on the AP before installing the SA-PCR, enabling you to use the SA-PCR LEDs to check the status of the SA-PCR when installation is complete refer to Section 4.3.2, for further information about the LEDs. • When installing on Windows 95/98, verify that you have the Windows CD with you, or that the Windows CAB files are installed on your local hard disk in a directory whose name does not exceed 8 letters. When the CAB files are on the disk, they are usually found in C:\Windows\Options\Cabs. • When installing on Windows NT, verify that you have the Windows NT CD with you, or that the Windows NT distribution files are installed on your local BreezeNET PRO.11 Series 4-1 User’s Guide SA-PCR PRO.11 PC Card Installation, Setup, and Management hard disk. During installation, enter the path of the distribution files whenever a message appears asking for them. • It is highly recommended that you remove all PCMCIA cards from the notebook prior to installing the SA-PCR card. This will help to avoid conflicts during installation. If you have another network card installed (e.g., an Ethernet card), you must remove it prior to installing the SA-PCR card. 4.3 Installing the SA-PCR Card Installing the SA-PCR PRO.11 card consists of the following installation steps: • Installing the card in a PCMCIA slot • Installing the SA-PCR drivers and utilities Section 4.3.3 provides instructions on performing initial configuration of the SA-PCR card. Section 4.5 provides installation troubleshooting information. Note: User’s Guide If you are installing the card under Windows 95 or Windows 98 systems, there are two installation options. You can install the drivers and utilities separately, or you can use the Upgrade kit program to install all components in one session. The Upgrade kit program is described in Section 4.7. 4-2 BreezeNET PRO.11 Series SA-PCR PRO.11 PC Card Installation, Setup, and Management 4.3.1 Installing the SA-PCR Drivers The SA-PCR card can be installed to operate under a wide range of PC operating systems. The following table lists the supported operating systems, together with the page number in the user's guide which describes the relevant installation procedure. Skip to the page that describes the relevant procedure. If you are installing the SA-PCR under: Refer to: Windows 98 page 4-3 Windows 95A page 4-6 Windows 95B page 4-6 Windows NT page 4-8 ODI (DOS) page 4-38 Installing the SA-PCR Drivers in Windows 98 1. Insert the SA-PCR card in a free PCMCIA slot. Windows detects the unit and displays the New Hardware Found window. 2. When the Add New Hardware Wizard window appears, click Next. 3. Select the Search for best driver option and click Next. 4. Insert the BreezeCOM drivers diskette, select the Floppy disk drives option and click Next. 5. The installation wizard notifies you that the driver for the BreezeNET Wireless LAN PC card has been located. Click Next. 6. A window appears notifying you that the driver for the BreezeNET Wireless LAN PC card has been installed. Click Finish. 7. Restart the computer. BreezeNET PRO.11 Series 4-3 User’s Guide SA-PCR PRO.11 PC Card Installation, Setup, and Management Uninstalling the SA-PCR Drivers in Windows 98 1. From the Windows Start menu, select Settings, and then select Control Panel. Double click on the Network icon, click the Configuration tab, select BreezeNET Wireless LAN PC card, and click Remove. A message appears asking whether you want to restart the computer; click No. 2. Insert the BreezeCOM Drivers diskette. From the Windows Start menu, select Run, and type a:\DrvClean. 3. When notified that the SA-PCR driver has been deleted, click Setup. 4. Restart the computer. User’s Guide 4-4 BreezeNET PRO.11 Series SA-PCR PRO.11 PC Card Installation, Setup, and Management Installing the SA-PCR Drivers in Windows 95 Check which version of the Windows 95 operating system your PC is running: 1. From the Windows 95 desktop, right-click the My Computer icon and select Properties. The System Properties window opens. Figure 4-1. System Properties Window – Windows 95B 2. Click the General tab. The letter indicating the type of operating system (a or b) is displayed under the System heading. 3. If you are running the Windows 95A operating system, refer to the For Windows 95A section on the next page. If you are running Windows 95B operating system, refer to the For Windows 95B section on page 4-6. BreezeNET PRO.11 Series 4-5 User’s Guide SA-PCR PRO.11 PC Card Installation, Setup, and Management For Windows 95A 1. Insert the SA-PCR card in the PCMCIA slot on your computer. Windows 95 detects the unit and displays the New Hardware Found window. Figure 4-2. New Hardware Found Window 2. Select the driver from disk provided by hardware manufacturer option and click OK. 3. When prompted for the location of the driver, insert the BreezeCOM drivers diskette, type A:\ and click OK. The necessary files are copied from the diskette. 4. When the Please insert disk labeled Windows 95 CD-ROM appears, insert the Windows 95 CD and click OK. If the Windows 95 CAB files are located on your local hard disk, you can point to that directory (usually found in \Windows\Options\Cabs). 5. If this is the first time a network card has been installed on this PC, a network setup window may appear. It is not necessary to fill out this window for the purposes of this installation. 6. Restart the computer. User’s Guide 4-6 BreezeNET PRO.11 Series SA-PCR PRO.11 PC Card Installation, Setup, and Management For Windows 95B 1. Insert the SA-PCR slot in the PCMCIA slot on your computer. Windows 95 detects the unit, briefly displays the New Hardware Found window, and then displays the Update Device Driver Wizard window. 2. Insert the BreezeCOM drivers diskette and click Next. When Windows 95 notifies it has found the driver, click Finish. 3. If the Windows 95 CAB files are not found automatically, the message Please insert disk labeled Windows 95 CD-ROM appears. Click OK. 4. If the file BRZCOM.VXD is not found, direct the window to drive A:\ and click OK. 5. If no other windows appear, the installation is complete. If the Please insert disk labeled Windows 95 CD-ROM appears, click OK, enter the path of the Windows 95 CAB files, and click OK. Installation is now complete. 6. Restart the computer. Uninstalling SA-PCR Drivers in Windows 95 1. From the Windows Start menu, select Settings - Control Panel. Double click on the PC Card icon, select BreezeCOM Wireless LAN PC Card and click Stop. Close all active applications. A message appears asking whether you want to restart the computer; click No. 2. From the Windows Start menu, select Settings, and then select Control Panel. Double click on the Network icon, click the Configuration tab, select BreezeNET Wireless LAN PC card , and click Remove. 3. Insert the BreezeCOM Drivers diskette. From the Windows Start menu, select Run, and type a:\DrvClean. 4. When notified that the SA-PCR driver has been deleted, click Setup. 5. Restart the computer. BreezeNET PRO.11 Series 4-7 User’s Guide SA-PCR PRO.11 PC Card Installation, Setup, and Management Installing the SA-PCR Drivers in Windows NT 1. Press the Windows Start button, select Settings, and then select Control Panel. Double-click on the Network icon. 2. If the message The Windows NT Networking is not installed. Do you want to install it now?, continue with step 2a. If this message does not appear, continue with step 2b. a. Click Yes and choose Wired to the network. When a list of supported network adapters appears, click Have Disk. b. Click on the Adapters tab, click Add, and then click Have Disk. 3. Insert the BreezeCOM drivers diskette, enter the location of the diskette (e.g., A:\) and click OK. 4. From the list choose BreezeNET Wireless LAN PC card and click OK. The SA-PCR LAN Adapter Properties window appears. Figure 4-3. SA-PCR LAN Adapter Properties Window 5. The default settings are memory range D0000h to D3FFFh, IRQ 11. In the following steps we will verify that these default settings are acceptable for your machine. Note: User’s Guide If the SA-PCR Configuration utility is already installed, you can access it directly by pressing Advanced. 4-8 BreezeNET PRO.11 Series SA-PCR PRO.11 PC Card Installation, Setup, and Management 6. Click the Windows Start button and select Run. Type WINMSD and click OK. The Windows NT Diagnostics window appears. Figure 4-4. Windows NT Diagnostics Window 7. Click IRQ and verify that IRQ 11 is not taken. If it is, find a free IRQ. For example, in Figure 4-4 IRQ 5 is free. 8. Click Memory and verify that memory from D0000h to D3FFFh is not taken. If it is, find another free memory location, such as E0000h. 9. Return to the SA-PCR LAN Adapter Properties window. If the default values for Memory Address and Interrupt are acceptable, click OK. Otherwise, enter new values and click OK. 10. Click Close to close each installation window. 11. If configuration windows for other network components (such as Protocol) appear, enter the requirements according to the instructions of your network administrator. 12. Restart Windows NT. BreezeNET PRO.11 Series 4-9 User’s Guide SA-PCR PRO.11 PC Card Installation, Setup, and Management Uninstalling SA-PCR Drivers in Windows NT 1. From the Windows Start menu, select Settings, and then select Control Panel. Double click on the Network icon, click the Configuration tab, select BreezeNET Wireless LAN PC card, and click Remove. 2. Insert the BreezeCOM Drivers diskette. From the Windows Start menu, select Run, and type a:\DrvClean. 3. When notified that the SA-PCR driver has been deleted, click Setup. 4. Restart the computer. 4.3.2 Checking the LED Indicators Verify correct operation of the SA-PCR using the following LED indicators table: Table 4-1. SA-PCR Card LED Indications Color Yellow Description Link Status Meaning Blink – Scanning Solid –Associated Green Data Traffic Blink – According to traffic The LED indicators are useful only if there is an active AP in the area. The LED indicators can be used to verify correct firmware download procedure; the LEDs turn on and off quickly, one LED being ON while the other is OFF. User’s Guide 4-10 BreezeNET PRO.11 Series SA-PCR PRO.11 PC Card Installation, Setup, and Management 4.3.3 Initial Configuration If your wireless network uses a non-default ESSID, enter the proper ESSID as follows: 1. Start the SA-PCR Configuration utility as described in Section 4.5. From the Windows Start menu, select Programs - BreezeCOM Utilities, and then Configure. 2. Edit the ESSID parameter. Click the WLAN Parameters tab and enter the ESSID that matches the AP unit. 3. Restart the computer. 4.4 Installing the SA-PCR Utilities If a previous version of the SA-PCR utilities is installed, uninstall it before reinstalling the new version (as described in Section 4.4.1). ⇒To install the SA-PCR utilities: 1. Insert the BreezeCOM Utilities diskette. 2. From the Windows Start menu, select Run. Type A:\setup, and click OK. 3. When the notification dialog box appears; click Setup. Figure 4-5. BreezeCOM SA-PCR Utilities Setup 4. In the BreezeCOM SA-PCR Utilities window, choose a location for the installation, and click OK. BreezeNET PRO.11 Series 4-11 User’s Guide SA-PCR PRO.11 PC Card Installation, Setup, and Management Figure 4-6. BreezeCOM SA-PCR Utilities - Folder Selection Window 5. When the BreezeCOM SA-PCR Utilities Setup Complete window appears, click OK. Icons for the utilities are added to the Windows Programs menu, and an SA-PCR Configure icon is added to the Control Panel. Figure 4-7. BreezeCOM SA-PCR Utilities Setup Complete Window 4.4.1 Uninstalling SA-PCR Utilities 1. From the Windows Start menu, select Programs - BreezeCOM Utilities and then select Uninstall. 2. You can also uninstall the SA-PCR utilities by using Windows Add/Remove Programs feature. User’s Guide 4-12 BreezeNET PRO.11 Series SA-PCR PRO.11 PC Card Installation, Setup, and Management 4.5 Using the SA-PCR Configuration Utility This section describes how to use the SA-PCR Configuration utility to configure and manage your SA-PCR card. Access the SA-PCR Configuration utility as follows: click the Start button, select Programs, select the BreezeCOM Utilities program group and choose Configure. The SA-PCR Configuration main window is displayed as follows, with the Station Status tab selected. Figure 4-8. SA-PCR Configuration Utility Main Window - Station Status Tab The SA-PCR Configuration window contains several tabs, as described in the following sections. BreezeNET PRO.11 Series 4-13 User’s Guide SA-PCR PRO.11 PC Card Installation, Setup, and Management In addition, the Configuration windows contain the following buttons: • OK – Implements any changes you made and closes the window. • Undo – Causes the window to display currently active values. This is useful if you started changing values and you want to start again from the current values. • Cancel – Closes the window without implementing any changes you made. • Apply – Implements any changes you made but leaves the window open. 4.5.1 Station Status Tab The Station Status tab of the SA-PCR Configuration utility displays information regarding the card and the card’s status. The Station Status tab contains the following parameters: User’s Guide • Network Type – In the current version, the value of this parameter should be always set to Infrastructure. • Firmware Version – Displays the version of unit’s current firmware (internally installed software). The first two numbers of the firmware and driver versions should be identical. The remaining numbers (if any) indicate the minor version. The final letter indicates the hardware version. • Driver Version – Displays the version of unit’s current driver. • MAC Address – Displays the unit’s unique IEEE MAC address. • BSS Address – The MAC address of the AP with which the unit is currently associated. • Station Status – Current status of the unit. There are three options: ∗ Scanning – The unit is searching for an AP with which to associate. ∗ Associated – The unit is associated with an AP and has adopted the attached PC MAC address. 4-14 BreezeNET PRO.11 Series SA-PCR PRO.11 PC Card Installation, Setup, and Management • Wep enabled – Wired Equivalent Privacy (WEP) is an authentication algorithm which protects authorized Wireless LAN users against eavesdropping. The definition of WEP is well defined in the 802.11 standard. Note: Parameter changes take effect only after reset. 4.5.2 WLAN Parameters Tab The WLAN Parameters tab of the SA-PCR Configuration utility lets you view and edit basic Wireless LAN parameters of the card. Figure 4-9. WLAN Parameters Tab The WLAN Parameters tab contains the following parameters: • ESSID – An ASCII string of up to 32 characters used to identify a WLAN that prevents the unintentional merging of two co-located WLANs. It is essential that the ESSID is set to the same value in all stations and Access Points in the extended WLAN. The ESSID field is case-sensitive. • Maximum Data Rate – By default, the unit adaptively selects the highest possible rate for transmission. Under certain conditions (for range/speed trade- BreezeNET PRO.11 Series 4-15 User’s Guide SA-PCR PRO.11 PC Card Installation, Setup, and Management off) you may decide not to use the higher rates. Possible values are 1, 2, or 3 Mbps. • Transmit Antenna – By default, the unit dynamically selects the antenna where reception and transmission is optimal. If your model has an external antenna and uses only a single antenna, set Transmit Antenna to transmit only from that single antenna. Antenna number one is the antenna nearest the yellow LED. • Load Sharing – When installing a Wireless LAN network in a high-traffic environment, you can increase the aggregate throughput by installing multiple APs to create co-located cells. Enable Load Sharing to cause your stations to equally divide their traffic between the available APs. Note: Parameter changes take effect only after reset. 4.5.3 Station Control Tab The Station Control tab of the SA-PCR Configuration utility allows you to return the card to default configuration values, and export/import configuration files. Figure 4-10. Station Control Tab User’s Guide 4-16 BreezeNET PRO.11 Series SA-PCR PRO.11 PC Card Installation, Setup, and Management The Station Control tab contains the Default button which returns all parameters to factory default values. As a time saving feature, you can configure one unit and then save the configuration as a file (with a .BRZ extension). You can later import the configuration file to other units. • Import – Imports a configuration file to this unit, and overwrites all previous settings. • Export – Exports the current configuration of this unit to a file. Note: Parameter changes take effect only after reset. 4.5.4 Configuration Access Tab The Configuration Access tab of the SA-PCR Configuration utility lets you login to the card as User, Installer, or Technician, and lets you change the password. Figure 4-11. Configuration Access Tab BreezeNET PRO.11 Series 4-17 User’s Guide SA-PCR PRO.11 PC Card Installation, Setup, and Management The Configuration Access tab displays the current mode (User, Installer, or Technician) in the Present Mode box. This mode determines the security access to system parameters. Users can view some of the window tabs, but cannot modify parameters. Installers can view all of the tabs and can modify some of the values. Technician access rights are reserved for certified BreezeCOM technicians. When the Configuration utility opens, it will begin at the same mode that was active when it closed. If security is an issue, change the access mode to User before you close the utility. The first time the utility is opened, it is set to Installer access mode. The default password for Installer mode is User, however you can change this password If security considerations play an important role in the construction of your WLAN. ⇒ To change the Configuration Access mode: 1. Select the radio button next to the desired mode. 2. Type in the password. No password is necessary to lower the access right level. 3. Click Set mode. The name of the new mode appears in the Present Mode box. ⇒ To change the password for Installer Configuration Access mode: 1. Look at the Present Mode box to verify that you are in Installer mode. 2. Click Change Password. 3. In the Change Password dialog box, type in the new password twice and click OK. The BreezeNET Monitor changes your password. Note: User’s Guide If you change the Installer password do not forget it, or you will be unable to change the unit's access rights. 4-18 BreezeNET PRO.11 Series SA-PCR PRO.11 PC Card Installation, Setup, and Management 4.5.5 Power Management Tab The Power Management tab of the SA-PCR Configuration utility allows you to enable/disable Power Save mode and to configure Power Save mode parameters. Power Save mode is intended for laptops or hand-held computers, in order to conserve battery energy. When Power Save mode is enabled, the unit “sleeps” most of the time and “wakes up” occasionally to transmit/receive to/from the AP. This will extend the battery life span of a laptop installed with the SA-PCR. Figure 4-12. Power Management Tab Note: Expect a degradation in performance of the entire cell, even if only the AP and one station are set to Power Save mode. BreezeNET PRO.11 Series 4-19 User’s Guide SA-PCR PRO.11 PC Card Installation, Setup, and Management The Power Management tab includes the following parameters: • Power Management Mode – Enable Power Save mode by clicking the Powersave option; disable by clicking the Normal option (default). • Listen Interval Settings –Specifies how often the station is to “wake up” in order to transmit or receive data (unicast packets). This parameter enables performance optimization on a per station basis. In contrast, the DTIM period (that is set in the AP only) defines the time period for all stations in the cell to “wake up” in order to receive broadcasts. Note: If the Power Save mode is enabled on one of the WLAN's SA-PCR stations, you must also enable the Power Save mode on the AP through the BreezeNET monitor. Refer to Section 3.5.2 for further information. 4.5.6 Security Tab The Security tab of the SA-PCR Configuration utility allows you to set the security parameters of the station. User’s Guide 4-20 BreezeNET PRO.11 Series SA-PCR PRO.11 PC Card Installation, Setup, and Management Figure 4-13. The Security Tab The station in which the SA-PCR card is installed can use one of the following authentication algorithms (as defined in the 802.11 standard). • Open System – any station in the WLAN can associate with an AP and receive and transmit data (null authentication). • Shared Key – only stations using a shared key encryption identified by the AP are allowed to associate with it. You can only select this option if the card was ordered with the Privacy option or if you enabled the WEP feature during the upgrade procedure (as described in Section 4.4.1). The option which was ordered is displayed in a read only field at the top of the dialog box. To see whether the WEP option was enabled during installation, select the Station Status tab described in Section 4.5.1. Values: BreezeNET PRO.11 Series Unknown Card is not inserted. Implemented Shared Key authentication is enabled. Not Implemented Shared Key authentication is disabled. Only open system authentication is available in this mode. 4-21 User’s Guide SA-PCR PRO.11 PC Card Installation, Setup, and Management If you selected the Shared Key algorithm, proceed to set the following parameters: • Default Key ID – Sets the default key for encryption in the Authentication process. This is the encryption key that will be used for transmissions between the station and the AP. • WEP Key – Define the encryption keys used for transmissions between the station and the AP. Specify each key by clicking the appropriate WEP Key row (First, Second, Third or Fourth) and entering 10 Hex digits (5 pairs of characters) for each of the 4 keys. To configure security parameters in ODI/DOS environment, use the brzsetup application. Note: The default Key ID you enter for the SA-PCR must match the Key ID defined in the AP. Section 3.4.6 describes the procedure for setting the encryption keys for BreezeNET APs. It is recommended to change the encryption keys periodically, to enhance system security. User’s Guide 4-22 BreezeNET PRO.11 Series SA-PCR PRO.11 PC Card Installation, Setup, and Management 4.5.7 Maintenance Tab The Maintenance tab of the SA-PCR Configuration utility allows you to cause the unit to verify firmware/driver compatibility, and set how the unit handles 802.3 packets. This tab is not visible when in User login mode. When in Installer login mode, you can see the parameters. When in Technician login mode, can edit the parameters. Figure 4-14. Maintenance Tab The Maintenance tab contains the following parameters: • Version Information – Windows drivers are divided into three files: Brzcom.vxd, Brzwlanw.sys, and Brzwlan.inf. The version number of all these files must be identical. Control information of these files is displayed. The Configuration utility file is called BrzConfig.exe. The first two numbers of the Configuration utility version must match the first two numbers of the drivers. • Disable Appletalk tunneling – allows you to disable (default) or enable Appletalk tunneling if the network contains a mix of Ethertalk 1 (ET 1) and BreezeNET PRO.11 Series 4-23 User’s Guide SA-PCR PRO.11 PC Card Installation, Setup, and Management Ethertalk 2 (ET 2) stations to ensure smooth communications. Ensure that all units are set to the same tunneling settings. • icon on the Show control on taskbar – Check this box to display the Windows taskbar. When this option is enabled, you can double click the icon to display the SA-PCR Configuration utility at any time. 4.5.8 Radio Tab The Radio tab of the SA-PCR Configuration utility allows you to set the power level of the unit and choose a hopping standard. This tab is not visible when in User login mode. When in Installer login mode, you can see the parameters. When in Technician login mode, the parameters can be edited. Figure 4-15. Radio Tab User’s Guide 4-24 BreezeNET PRO.11 Series SA-PCR PRO.11 PC Card Installation, Setup, and Management The Radio tab contains the following parameters: • Power Level – Level of power at which the unit is operating. There are two possibilities, Low or High. • Default Radio Status – For on the radio receives in regular mode, when off the radio does not work at startup (e.g. when traveling in planes). • Hopping Standard –A set of rules regarding the radio transmission standard allowed in each country. Units will work together only if set to the same hopping standard. Use this parameter to set the unit’s hopping standard to that of the relevant country. Proprietary hopping standards can also be implemented. Refer to Section 3.5.3. 4.5.9 Performance Tab The Performance tab of the SA-PCR Configuration utility allows you to fine-tune performance and roaming parameters. This tab is not visible when in User login mode. When in Installer login mode, you can see the parameters. When in Technician login mode, the parameters can be edited. Only major parameters are described below. Note: All fields in this dialog box are read only. Figure 4-16. Performance Tab BreezeNET PRO.11 Series 4-25 User’s Guide SA-PCR PRO.11 PC Card Installation, Setup, and Management The Performance tab contains the following parameter: • Rts threshold (bytes) – Minimum packet size to require an RTS (Request To Send). For packets smaller than this threshold, an RTS is not sent and the packet is transmitted directly to the WLAN. 4.5.10 Resetting the SA-PCR Card It is necessary to reset the SA-PCR card after making configuration changes via the SA-PCR Configuration utility. Perform this procedure as follows: 1. Close the Configuration and Site Survey utilities and then do one of the following: 2. Restart the computer, OR Stop the PC card then eject and reinsert the card, OR Stop and refresh the driver as follows: 3. Right-click the My Computer icon on the desktop, choose Properties, and go to the Device Manager tab. Select Network Adapters - BreezeNET WLAN PC Card, and click Refresh. User’s Guide 4-26 BreezeNET PRO.11 Series SA-PCR PRO.11 PC Card Installation, Setup, and Management 4.6 Using the SA-PCR Site Survey Utility Note: This utility can not be used in systems installed under ODI. This section describes how to use the SA-PCR Site Survey utility to manage your SA-PCR card. The Site Survey utility keeps you informed of the signal strength your unit is receiving. You can run a Site Survey to compare reception at various locations. This is extremely useful when first setting up the wireless LAN, since you can easily determine where reception is good or bad, and where many Access Points overlap. The following sections describe how to access the Site Survey utility, how to read the main Site Survey window, and how to perform a site survey. 4.6.1 Accessing the SA-PCR Site Survey Utility Open the SA-PCR Site Survey utility as follows: click the Start button, select Programs, select the BreezeCOM Utilities program group and choose Site Survey. The SA-PCR Site Survey main window is displayed. Figure 4-17. SA-PCR Site Survey BreezeNET PRO.11 Series 4-27 User’s Guide SA-PCR PRO.11 PC Card Installation, Setup, and Management 4.6.2 SA-PCR Site Survey Main Window The Site Survey main window contains the following sections: • Associated AP – This section, located at the top of the window, displays various parameters regarding the Access Point with which the unit is currently associated. • Alias – The alias you have assigned to the AP that the SA-PCR is currently associated with. To assign aliases to AP units, click the Alias button. If no alias has been assigned to the AP, this field displays “no alias”. • AP Address – The IEEE MAC address of the AP. • Signal Strength – The strength of the signal from the AP in dBm. The table below maps the signal strength indicators to dBm ranges: Signal dBm User’s Guide Poor less than -74 Fair Good Very Good -74 to -69 -68 to -61 greater than -61 • Signal Bar – The signal bar is a graphical representation of the signal strength. The longer the bar, the stronger the signal. As signal strength drops, the bar changes from green, to yellow, to red • Neighbor APs – This section, located at the bottom of the window, displays nearby APs (up to 4)from which the station is receiving a signal. For each AP, the following parameters are displayed: • Alias – The alias you have assigned to the AP. To assign aliases to AP units, click the Alias button. If no alias has been assigned to the AP, this field displays “no alias”. • AP Address – The IEEE MAC address of the AP. • Signal – A miniature signal bar indicating the current signal strength from the AP. When you hold the cursor over the line, the exact value appears. 4-28 BreezeNET PRO.11 Series SA-PCR PRO.11 PC Card Installation, Setup, and Management The following buttons appear on the right side of the Site Survey window. Several of the buttons are used in the course of performing a Site Survey as described in Section 4.6.3. • Record – Records the signal strength of the current location in the Survey Log, as well as all neighboring APs. In the Record window, you can add the name of the location and a remark. You can view the Survey Log by clicking Survey Log. • Alias – Lets you assign alias names to APs. In the Alias window, enter the AP address and the desired alias. For convenience, you can drag and drop the address of the associated AP from the main window into the Alias window. For neighbor APs, you should use Ctrl-C to copy the AP Address from the main window. • Iconize – Closes the Site Survey window and opens the Connection Quality Graph that indicates current signal strength of the associated AP at a glance. The Graph can be moved anywhere on the screen, and will always appear on top of other applications. Hold the cursor over the X to see the signal strength in units. Click the X to close the Graph and open the Site Survey window. Figure 4-18. Connection Quality Graph • Survey Log – Opens the Survey Log at the bottom of the main window. The Survey Log displays the information recorded using the Record button. Click Clear Log to clear the Survey Log. Click Delete Last to delete the last recorded reading. Figure 4-19. Survey Log BreezeNET PRO.11 Series 4-29 User’s Guide SA-PCR PRO.11 PC Card Installation, Setup, and Management Menu Bar – The menu bar at the top of the window contains four menus – Edit, View, Report and Help. These menus contain sub-menus which correspond in most cases to the buttons at the side of the window. • Edit Menu – three sub-menus, Record, Alias and Exit. • View Menu – has two sub-menus Survey Log and Iconize. • Report Menu – two sub-menus Preview and Print (do not have corresponding buttons on side of window). • Preview – enables you to preview a site survey report before proceeding further. • Print – Opens a Site Survey report showing the information in the Survey Log, including neighboring APs. You can print the file by clicking the Printer button, or save the file by clicking the Diskette button. You can save the file as text, or as a QRP file viewable using this application. • Help Menu – contains two sub-menus, About and Getting Started (do not have corresponding buttons on side of window). About – contains standard Windows format information about the application. Getting Started – provides basic information to enable you to begin working. User’s Guide 4-30 BreezeNET PRO.11 Series SA-PCR PRO.11 PC Card Installation, Setup, and Management 4.6.3 Performing a Site Survey with the SA-PCR You can run a Site Survey to compare reception at various locations. This is extremely useful when first setting up the wireless LAN, since you can easily determine where reception is good or bad, and where many Access Points overlap. ⇒ To run a Site Survey: 1. Open the Site Survey utility. 2. Click Survey Log to expand the bottom of the Site Survey window. 3. Bring the station to a new location. 4. Click Record. Type in the name of the location and a remark, and click OK. The signal details of the current location appear in the Survey Log at the bottom of the window. 5. Repeat steps 2 and 3 with other locations. The recorded readings should give you a good idea of where reception is good or bad, and where many APs overlap unnecessarily. 6. When you are done recording, click Print. A site survey report appears containing information about each recorded location including signal strength of associated AP and of neighbor APs. You can print the file by clicking the Print button, or save the file by clicking the Diskette button. You can save the file as text, or as a QRP file which can be viewed using this application only. BreezeNET PRO.11 Series 4-31 User’s Guide SA-PCR PRO.11 PC Card Installation, Setup, and Management 4.7 Using the Upgrade Kit Program The Upgrade kit program is an application that allows you to upgrade previous versions of the firmware, drivers and utilities of the SAPCR, if installing on a machine that had a previous version installed. The Upgrade kit can be obtained from the BreezeCOM Web site. In addition, under Windows 95/98 you can use this program as another way to install the firmware, driver and utilities. Note: Upgrading causes your system to lose all configuration parameters that were set previously. Upgrade Procedure for Windows 95/98 1. Run the UPGR4402.EXE program from the diskette. The following dialog box is displayed. Figure 4-20. Upgrade Kit Program Introductory Window 2. Click Setup. The following dialog box is displayed. User’s Guide 4-32 BreezeNET PRO.11 Series SA-PCR PRO.11 PC Card Installation, Setup, and Management Figure 4-21. Upgrade Kit Program Welcome Window 3. Click Next. The following dialog box is displayed. Figure 4-22. Upgrade Kit Program Step 1 4. Form the Country drop down list, select the standard applicable to your country and click Next. You do not need to select the country if you are installing the application in the following countries: USA/FCC, Europe/ETSI, Japan. 5. If the card is already installed, stop the card as follows: from the Control Panel, double click the PCMCIA Card icon, select the BreezeCOM card and click Stop. Remove the SA-PCR card from the slot. Wait for about 15 seconds and then reinsert. Click Next. BreezeNET PRO.11 Series 4-33 User’s Guide SA-PCR PRO.11 PC Card Installation, Setup, and Management Figure 4-23. Upgrade Kit Program Step 2 6. The MAC address of the PC and the hardware version of the SA-PCR card are displayed in read only field. If you purchased the SA-PCR without the Wired Equivalent Privacy (WEP) feature and you wish to enable this feature, contact your BreezeCOM representative. OR Double click the WEP field value (set to NO by default). The following dialog box is displayed. Figure 4-24. Password Dialog Box Enter the password supplied by BreezeCOM and click OK to return to the Upgrade Program Step 2 dialog box. Note: User’s Guide The password for enabling the WEP feature can only be obtained from BreezeCOM. 4-34 BreezeNET PRO.11 Series SA-PCR PRO.11 PC Card Installation, Setup, and Management 7. Follow the on screen instructions and check the card LEDs as described in Section 4.3.2. Click Next. The following dialog box is displayed. Figure 4-25. Upgrade Program Step 3 8. When downloading the firmware has completed, the following dialog box is displayed. Figure 4-26. Upgrade Program Step 4 9. At this point, the Upgrade program installs the SA-PCR utilities. Specify the directory in which the program installs the utilities. BreezeNET PRO.11 Series 4-35 User’s Guide SA-PCR PRO.11 PC Card Installation, Setup, and Management Figure 4-27. Utilities Directory 10. Continue to follow the on-screen prompts until the following dialog box is displayed. Figure 4-28. Upgrade Program Step 5 11. Restart the computer when prompted. When the computer is restarted the new hardware wizard is entered automatically and the new drivers are installed and shortcuts are updated. Upgrade Procedure for Windows NT, DOS/ODI Follow these instructions in order to upgrade SA-PCR cards installed in machines running Windows NT or DOS/ODI. 1. Upgrade the firmware in a Windows 95/98 machine, using the Upgrade kit program. 2. Remove the old drivers and utilities from your Windows NT or DOS/ODI machine. 3. Download new drivers and utilities from the BreezeCOM Web site according to your country (http://www.breezecom.com/TechSupport/techsupp2.html). 4. Use the drivers and utilities that you have downloaded to install the new versions of the drivers and utilities. User’s Guide 4-36 BreezeNET PRO.11 Series SA-PCR PRO.11 PC Card Installation, Setup, and Management 4.8 Installation Troubleshooting The following are some problems that may occur while installing the SA-PCR card, and some recommended solutions to these problems. Should you encounter problems during installation which are not listed in this section, contact BreezeCOM technical support. 3UREOHP&DUGGRHVQRWIXQFWLRQSURSHUO\ 1. Check Device Manager for conflicts with any other devices and drivers. 2. Right click My Computer, Properties and then the Device Manager tab. 3. Click Network Adapters to verify status of BreezeCOM PC card wireless LAN adapter – an exclamation mark next to the card indicates a conflict. 3UREOHP7KHUHLVD5HVRXUFH&RQIOLFWSHUIRUPWKHIROORZLQJ 1. Double click the BreezeCOM Wireless LAN Adapter. 2. Select the Resources tab. 3. In the event that the conflicting resources are listed in the conflicting device list, edit the Memory range and Interrupt to values that do not cause conflicts. 3UREOHP 7KHUHLVQRUHVRXUFHFRQIOLFWEXWWKHFDUGVWLOOIDLOVWRZRUNWKHUHPD\EHD FRQIOLFWZLWK'26GULYHUVQRWUHFRJQL]HGE\:LQGRZV 1. Look for device drivers or lines containing device or call commands in either the autoexec.bat or config.sys files. 2. Disable the conflicting drivers and devices and uninstall and reinstall the card. BreezeNET PRO.11 Series 4-37 User’s Guide SA-PCR PRO.11 PC Card Installation, Setup, and Management 4.9 Installing the SA-PCR Drivers in ODI Systems The ODI driver supports Novell VLM and NETX clients, Novell TCPIP, Lantastic v.6 (with ODINSUP), Microsoft Windows 3.11 (with ODINSUP). The following files are supplied for the DOS ODI environment: brzwlan.com ODI driver file, generic version brzwlanf.com ODI driver file for Falcon 310 (supplied only on request) brzwlan.ini Default configuration file brzsetup.exe Site survey utility net.cfg Sample ODI16 configuration file Brzwlan.ins Installation information for Novell client (DOS and Windows) 1. The ODI driver gets its resources from the Card & Socket Services. Verify that the PC you are using is installed with Card & Socket Services software. 2. Copy all files from the DOSODI directory on the driver to the NetWare client directory. (In case you already have a NET.CFG file that you want to keep, copy and paste the BRZWLAN section from the sample NET.CFG file supplied by BreezeCOM, into your existing file. 3. In order to login to a NetWare server you should run the following files (make sure that the NET.CFG and the BRZWLAN.INI files are located in the directory from which you run the following files: • LSL.COM (supplied by Novell) • BRZWLAN.COM • IPXODI.COM (supplied by Novell) • VLM.EXE (supplied by Novell) 4. After running the BRZWLAN file, the yellow LED on the card should blink several times and then remain lit. User’s Guide 4-38 BreezeNET PRO.11 Series SA-PCR PRO.11 PC Card Installation, Setup, and Management Configuration Notes 1. To configure the SA-PCR, use the brzsetup.exe configuration utility. 2. A sample net.cfg file is provided; you may edit this to configure the parameters for IRQ and MEM. 3. For DOS versions 3.30 to 6.20, LASTDRIVE=E by default. If the user only has drive C, letters D and E will be available for Novell network drives. To make all letters available for the network, add LASTDRIVE=Z to the config.sys file. 4. The units can only work with AP-10 PRO. 11 (which have 802.11 software version 4.3 or later). 5. To see the version of the SA-PCR, ensure that the card is inserted and run the Site Survey utility. 6. For configuration of the NDIS2 stack using ODINSUP, refer to the ODINSUP documentation. Running the Configuration Utility 1. Change to the NetWare client directory. 2. Type brzsetup and press Enter. 3. Enter the ESS ID as defined in the AP (if using default ESS ID, do not change). 4. Reset/restart the computer. Note: Default ESSID is ESSID1 in capital letters. BreezeNET PRO.11 Series 4-39 User’s Guide SA-PCR PRO.11 PC Card Installation, Setup, and Management Troubleshooting ODI Installation The following paragraphs provide information that can help in the event of problems encountered in the ODI drivers installation. User’s Guide • It is important to note which net.cfg and brzwlan.ini is used. After installation of new Novell client, two copies of brzwlan.ini, brzwlan.com and net.cfg files may exist, one in the Windows directory and another in the directory where the Novell client is installed. • If Card Services fails to provide correct memory and IRQ automatically – edit net.cfg and use IRQ and MEM parameters. • If the driver did not display a message Testing Device, this indicates that Card Services failed to recognize the card or to provide the required information to the driver. Check the Card Services information configuration. • The driver reports an error in allocating IRQ or memory. The Card Services failed to provide the required resources to the driver, or there are no resources available. Reboot without EMM386 or other programs that may take up the adapter memory region. Change the IRQ or MEM parameters in net.cfg to force the driver to request specific resources. • The driver reports errors in net.cfg or brzwlan.ini. The files are corrupt or you are not in the correct directory. • The yellow LED blinks and turns off after several seconds. The AP is configured with incorrect parameters. Check the AP configuration. The built in antennas are not pulled out or the external antenna is not attached to the PC card. • The yellow LED does blink and is not lit. The driver is not receiving interrupts. Try to change IRQ – wrong firmware version or card initialization error. 4-40 BreezeNET PRO.11 Series Planning and Installing Wireless LANS 5. PLANNING AND INSTALLING WIRELESS LANS All products in the BreezeNET PRO.11 series are available in several models: standard, D, and DE. The standard model is equipped with two integrated 2 dBi omni-directional antennas and is suitable for indoor, short-to-medium range installations. The D and DE models are equipped with two customized female connectors for use with a range of external antennas. This chapter describes various possible system configurations, lists points to consider when performing indoor and outdoor installations, presents guidelines and restrictions regarding external antenna installation, and also describes antennas that are recommened to work with BreezeNET PRO.11 units. 5.1 System Configurations This chapter describes various wireless LAN configurations, and how to set them up: • Single Cell Configuration – The wireless LAN consists of an Access Point and the wireless workstations associated with it. • Overlapping Cell Configuration – The wireless LAN consists of two or more adjacent Access Points whose coverage slightly overlaps. • Multicell Configuration – The wireless LAN consists of several Access Points installed in the same location. This creates a common coverage area that increases aggregate throughput. • Multi-Hop Configuration – The wireless LAN contains AP-WB pairs that extend the range of the wireless LAN. Many wireless LANs contain several of these configurations at different points in system. The Single Cell configuration is the most basic, and the other configurations build upon it. BreezeNET PRO.11 Series 5-1 User’s Guide Planning and Installing Wireless LANS 5.1.1 Single Cell Configuration A basic BreezeNET cell consists of an Access Point and the wireless workstations associated with it. You can convert most workstations (e.g., PCs and X-Terminals) that are equipped with an Ethernet network interface card (NIC) to wireless workstations by connecting a BreezeNET SA-10 PRO.11 station adapter. You can convert most laptop computers with a PCMCIA slot into a wireless mobile station by using the SA-PCR PRO.11 PCMCIA card. There are three types of Single Cell configurations: • Point-to-Point • Point-to-Multipoint • Mobile Applications Each configuration is explained in the following sections. 5.1.1.1 Point-to-Point Figure 5-1. Point-to-Point Configuration/ Connecting Remote Offices to Main Office Network User’s Guide 5-2 BreezeNET PRO.11 Series Planning and Installing Wireless LANS Point-to-Point installations require directional antennas at either end of the link. To select the best antenna for a specific application, consider the following factors: • Distance between sites • Required throughput • Clearance between sites • Cable length. Refer to Section 5.3.7 to determine the best combination of antennas for your application. 5.1.1.2 Point-to-Multipoint Point-to-Multipoint applications consist of one or more APs at the central site and several remote stations and bridges (SA-10, SA-40, WB-10). In this configuration, use an Omni-6 antenna with the Access Point because of its 360° radiation pattern. In the United States, the Omni-7.2 antenna (which also has a 360° radiation pattern but has a wider range) can also be used. The Omni-7.2 antenna comes with a 20ft. low loss cable and a mast mount bracket for rooftop installations. The remote units should use directional antennas aimed in the direction of the AP’s antenna(s). 5.1.1.3 Mobile Applications In mobile applications, station orientation changes continuously. In order to maintain connectivity throughout the entire coverage area, most mobile applications require omni-directional antennas for both Access Points and wireless stations. In a motor vehicle, for example, you can install an SA-10 in the cabin, and mount the antennas (in most cases an Omni-6) on the roof. BreezeNET PRO.11 Series 5-3 User’s Guide Planning and Installing Wireless LANS 5.1.1.4 Extending the LAN with WLAN Bridging Figure 5-2 demonstrates how the WB-10 can be used to extend a regular network with a wireless link. The WB-10 PRO.11 also enables connectivity between a wireless LAN and individual workstations or workgroups located outside the LAN. The WB-10 PRO.11 enables these wireless stations in its coverage area to communicate with the wireless LAN and to gain access to its network resources such as file servers, printers and shared databases. Figure 5-2. Wireless Bridging Between Two or More Wireless LAN Segments User’s Guide 5-4 BreezeNET PRO.11 Series Planning and Installing Wireless LANS 5.1.1.5 Setting up a Single BreezeNET Cell Figure 5-3. Single Cell Configuration 1. Install the Access Point (refer to Chapter 2 for installation instructions). Be sure to position the Access Point as high as possible. Note: It is not necessary at this point to connect the Access Point to an Ethernet backbone, since Access Points continuously transmit signals (beacon frames) whether they are connected to an Ethernet backbone or not. 2. Install a Station Adapter (refer to Chapter 2 for installation instructions) or SA-PCR card (refer to Chapter 4 for installation instructions). BreezeNET PRO.11 Series 5-5 User’s Guide Planning and Installing Wireless LANS 3. Check the Station Adapter front panel LED indicators, or the Site Survey application of the SA-PCR card to check signal strength. 4. Make any necessary adjustments, for example: • Adjust the antennas • Adjust the location of the Station Adapter • Adjust the location of the Access Point 5. Proceed to setup the other workstations. 5.1.2 Overlapping Cell Configuration System Configurations When two adjacent Access Points are positioned close enough to each other, a part of the coverage area of Access Point #1 overlaps that of Access Point #2. This overlapping area has two very important attributes: • Any workstation situated in the overlapping area can associate and communicate with either Access Point #1 or Access Point #2. • Any workstation can move seamlessly through the overlapping coverage areas without losing its network connection. This attribute is called Seamless Roaming. Figure 5-4. Three Overlapping Cells User’s Guide 5-6 BreezeNET PRO.11 Series Planning and Installing Wireless LANS ⇒ To set up overlapping BreezeNET cells: 1. Install an Access Point (refer to Chapter 2 for installation instructions). Be sure to position the Access Point at the highest point possible. 2. Install the second Access Point so that the two are positioned closer together than the prescribed distance (as listed in Section 5.2.4). 3. To allow roaming, configure all Access Points and stations adapters to the same ESSID. 4. To improve collocation and performance, configure all Access Points to different hopping sequences of the same hopping set. 5. Install a Station Adapter or SA-PCR card on a workstation. 6. Position the wireless workstation at approximately equal distances from the two Access Points. 7. Temporarily disconnect the first Access Point from the power supply. Verify radio signal reception from the first Access Point. View the LED indicators of the front panel of the Station Adapter, or the Site Survey application of the SAPCR card, to check signal strength of the first Access Point. 8. Disconnect the second Access Point from the power supply and re-connect the first Access Point. View the LED indicators of the front panel of the station adapter, or the Site Survey application of the SA-PCR card, to check signal strength of the second Access Point. 9. If necessary, adjust the distance between the Access Points so the coverage areas overlap. 10. Continue setting up overlapping cells until the required area is covered. Note: It is not necessary at this point to connect the Access Points to an Ethernet backbone, since Access Points continuously transmit signals (beacon frames) whether they are connected to an Ethernet backbone or not. BreezeNET PRO.11 Series 5-7 User’s Guide Planning and Installing Wireless LANS 5.1.3 Multicell Configuration Areas congested by many users and a heavy traffic load may require a multicell structure. In a multicell structure, several Access Points are installed in the same location. Each Access Point has the same coverage area, thereby creating a common coverage area that increases aggregate throughput. Any workstation in the overlapping area can associate and communicate with any Access Point covering that area. Figure 5-5. Multicell Configuration ⇒ To set up a BreezeNET multicell: 1. Calculate the required number of Access Points as follows: multiply the number of active users by the required throughput per user, and divide the result by 1.5Mbps (which is the net throughput supported by collocated Access Points). Consider the example of five active stations, each requiring 0.5 Mbps throughput. The calculation is (5*.5)/1.5=1.6. Two Access Points should be used. This method is accurate only for the first few Access Points. 2. The aggregate throughput of the common coverage area is equal to the number of co-located Access Points multiplied by the throughput of each individual Access Point, minus a certain amount of degradation caused by the interference among the different Access Points. User’s Guide 5-8 BreezeNET PRO.11 Series Planning and Installing Wireless LANS 3. Install several Access Points in the same location a few meters from each other so they cover the same area. Be sure to position the Access Points at the highest points possible. 4. To allow roaming and redundancy, configure all Access Points and stations adapters to the same ESSID. 5. To improve collocation and performance, configure all Access Points to different hopping sequences of the same hopping set. 6. Install Station Adapters or SA-PCR cards on workstations. 7. Make sure that the Load Sharing option is activated. Stations will automatically associate with an Access Point that is less loaded and provides better signal quality. Note: It is not necessary at this point to connect the Access Points to an Ethernet backbone, since Access Points continuously transmit signals (beacon frames) whether they are connected to an Ethernet backbone or not. 5.1.4 Multi-Hop Configuration (Relay) When you need to connect two sites and no line-of-sight exist between them, an AP-WB pair can be positioned at a third location where line-of-sight exists with each of the original locations. This third location then acts as a relay point. In areas where a wired LAN backbone is not available, another AP can be added to the AP-WB relay to distribute a wireless backbone. In this manner, the range of a wireless system can be extended. ⇒ To set up a BreezeNET multi-hop cell: 1. Install an AP at the main office (refer to Chapter 2 for installation instructions). 2. Install a WB at the remote site. 3. Install an AP-WB pair in a high location that has a clear line of sight to both the main office and the remote site. Many AP-WB pairs can form a chain. BreezeNET PRO.11 Series 5-9 User’s Guide Planning and Installing Wireless LANS 4. When an AP and WB communicate over the wireless LAN, set them both to the same ESSID. For example, set the AP of the main office and the WB of the first AP-WB relay pair to the same ESSID. Also, set the AP of the last AP-WB relay and the WB of the remote site to the same ESSID; this ESSID should be different from the first ESSID. 5. Another option is to use one ESSID, and to set the Preferred AP parameter of each WB to its paired AP (refer to Section 3.4.3). This option allows stations to roam between the sites. 6. As usual, make sure that the hopping sequence of the Access Points is different. Figure 5-6. Multi-Hop Configuration 7. If desired, an additional AP may be added at the main office and remote site, and between each AP-WB pair to provide wireless LANs at those points (see Figure 5-7). Figure 5-7. Advanced Multihop Configuration 8. Install Station Adapters or SA-PCR cards on workstations (refer to Chapter 2). User’s Guide 5-10 BreezeNET PRO.11 Series Planning and Installing Wireless LANS 5.2 Indoor Installation Considerations This section describes various considerations that must be taken into account when planning an indoor installation. This includes site selection, antenna diversity, antenna polarization, construction materials and cell size. Figure 5-8. BreezeNET LAN in a typical office environment 5.2.1 Site Selection Factors BreezeNET PRO.11 wireless LAN products are robust, trouble-free units, designed to operate efficiently under a wide range of conditions. The following guidelines are provided to help you position the units to ensure optimum coverage and operation of the wireless LAN. 0HWDO)XUQLWXUH Position the units clear of metal furniture and away from moving objects such as metal fans or doors. 0LFURZDYH2YHQV For best performance, position the units clear of radiation sources that emit in the 2.4 GHz frequency band, such as microwave ovens. BreezeNET PRO.11 Series 5-11 User’s Guide Planning and Installing Wireless LANS $QWHQQDV Make sure the antennas are extended upward vertically in relation to the floor. For models with external antennas, connect the external antennas and RF cable. +HDW6RXUFHV Keep the units well away from sources of heat, such as radiators and airconditioners 5.2.1.1 Site Selection for Access Points When positioning Access Points, take into account the following additional considerations. +HLJKW Install the Access Point at least 1.5m above the floor, clear of any high office partitions or tall pieces of furniture in the coverage area. The Access Point can be placed on a high shelf, or can be attached to the ceiling or a wall using a mounting bracket. &HQWUDO/RFDWLRQ Install the Access Point in a central location in the intended coverage area. Good positions are: • In the center of a large room. • In the center of a corridor. • At the intersection of two corridors. Many modern buildings have partitions constructed of metal or containing metal components. We recommend that you install the Access Points on the corridor ceilings. The radio waves propagated by the BreezeNET PRO.11 LAN are reflected along the metal partitions and enter the offices through the doors or glass sections. User’s Guide 5-12 BreezeNET PRO.11 Series Planning and Installing Wireless LANS 5.2.2 Antennas for Indoor Applications For most indoor applications, the best choice is the standard unit equipped with its integrated 2dBi antennas. The units are small, easy to install and cover a large area. In some installations, it is required to install the unit and antenna separately. In such instances, use the AP-10D with the omni-6 antenna kit (6dbi omni-directional antenna with 3 meter RG-58 cable). In the USA (FCC regulated) and in nonregulated countries, the omni-6 comes with a shorter antenna cable, extending the coverage area. The Uni-8.5 is also useful in indoor applications. It is very small and easily wallmounted, but its radiation pattern is limited (75°). BreezeCOM recommends that, for indoor applications, you use two antennas per unit to utilize the diversity gain of the system. 5.2.2.1 Antenna Diversity In applications where no multipath propagation is expected, a single antenna is sufficient to ensure good performance levels. However, in cases where multipath propagation exists, BreezeCOM recommends that two antennas be used. This takes advantage of space diversity capabilities. By using two antennas per unit, the system can select the best antenna on a per-packet basis (every several milliseconds). Multipath propagation is to be expected when there are potential reflectors between the main and remote sites. These reflectors may be buildings or moving objects such as airplanes and motor vehicles. If this is the case, the radio signal does not travel in a straight line, but is reflected or deflected off of the object, creating multiple propagation paths. When installing a single antenna, modify the transmit diversity option to either antenna 1 or antenna 2, according to the antenna being used (refer to Section 3.4.3). BreezeNET PRO.11 Series 5-13 User’s Guide Planning and Installing Wireless LANS 5.2.2.2 Antenna Polarization Antenna polarization must be the same at either end of the link. In most applications, the preferred orientation is vertical polarization. Above-ground propagation of the signal is better when it is polarized vertically. To verify antenna polarization, refer to the assembly instructions supplied with the antenna set. 5.2.3 Construction Materials A cell’s coverage area is affected by the construction materials of the walls, partitions, ceilings, floors and the furnishings of the cell. Due to their intrinsic nature, these materials may cause radio signal loss: • Metal objects reflect radio signals. They do not let the signals pass through. • Wood, glass, plastic and brick reflect part of the radio signals and allow part of the radio signals to pass through. • Water and objects with high moisture content absorb a large part of the radio signals. Use the following table as a guideline to predict the effects of different materials. Table 5-1. Signal Loss Chart Obstruction Additional Loss (dB) Effective Range Approx. Range Open Space 0dB 100% 1000ft. (300m) Window (non-metallic tint) 3dB 70% 700ft. (215m) Window (metallic tint) 5-8dB 50% 500ft. (150m) Light Wall (dry wall) 5-8dB 50% 500ft. (150m) Medium Wall (wood) 10dB 30% 300ft. (100m) Heavy Wall (solid core 6”) 15-20dB 15% 150ft. (50m) Very Heavy Wall (solid core 12”) 20-25dB 10% 100ft. (30m) Floor/Ceiling (solid core) 15-20dB 15% 150ft. (50m) Floor/Ceiling (heavy solid core) 20-25dB 10% 100ft. (30m) Note: Take stairwells and elevator shafts into consideration when positioning Access Points. There is no way to quantify the loss associated with these obstructions, however they do have an effect on the signal. User’s Guide 5-14 BreezeNET PRO.11 Series Planning and Installing Wireless LANS 5.2.4 Cell Size Cell size is determined by the maximum possible distance between the Access Point and the Station Adapter. This distance varies according to the building floor plan and the nature of that environment. There are several general categories: 2SHQ,QGRRU$UHDV Open office areas with no partitioning and no obstacles between the Access Point and the BreezeNET workstation. The suggested maximum distance between Access Point and workstation: Standard AP-10 PRO.11 200m (600 ft.) 6HPL2SHQ,QGRRU$UHDV Open-plan offices partitioned into individual workspaces, factory floor areas, warehouses, etc. The suggested maximum distance between Access Point and workstation: Standard AP-10 PRO.11 100m (300 ft.) &ORVHG,QGRRU$UHDV A floor divided into individual offices by concrete, masonry or sheet-rock walls. A house is also a closed indoor area. The suggested maximum distance between Access Point and workstation: Standard AP-10 PRO.11 BreezeNET PRO.11 Series 50m (150 ft.) 5-15 User’s Guide Planning and Installing Wireless LANS 5.3 Outdoor Installation Considerations This chapter describes various considerations to take into account when planning an outdoor installation including site selection, antenna alignment, antenna diversity, antenna polarization, antenna seal, and cell size. 5.3.1 Site Selection Factors When selecting a location for external antennas, remember to take into consideration the following guidelines: • Minimum distance between sites • Maximum height above the ground • Maximum line of sight clearance • Maximum separation between antennas (diversity option) 3DWKRI&OHDUHVW3URSDJDWLRQ A propagation path is the path that signals traverse between the antennas of any two bridges. The “line” between two antenna sites is an imaginary straight line, which may be drawn between the two antennas. Any obstacles in the path of the “line” degrade the propagation path. The best propagation path is, therefore, a clear line of sight with good clearance between the “line” and any physical obstacle. 3K\VLFDO2EVWDFOHV Any physical object in the path between two bridges can cause signal attenuation. Common obstructions are buildings and trees. If a bridge’s antenna is installed indoors, the walls and/or windows between the two sites are physical obstructions. If the antenna is positioned outdoors, any buildings or other physical structure such as trees, mountains or other natural geographic features higher than the antenna and situated in the path between the two sites can constitute obstructions. User’s Guide 5-16 BreezeNET PRO.11 Series Planning and Installing Wireless LANS Install indoor antennas as close as possible to a window (or wall if a window is not accessible) facing the required direction. Avoid metal obstacles such as metal window frames or metal film anti-glare windows in the transmission path. Install outdoor antennas high enough to avoid any obstacles, which may block the signal. 0LQLPDO3DWK/RVV Path loss is determined mainly by several factors: • Distance between sites – Path loss is lower and system performance better when distances between sites are shorter. • Clearance – Path loss is minimized when there exists a clear line of sight. The number, location, size, and makeup of obstacles determine their contribution to path loss. • Antenna height – Path loss is lower when antennas are positioned higher. Antenna height is the distance from the imaginary line connecting the antennas at the two sites to “ground” level. “Ground” level in an open area is the actual ground. In dense urban areas, “ground” level is the average height of the buildings between the antenna sites. 5.3.2 Rooftop Installation Note: Rooftop antenna installations are extremely dangerous! Incorrect installation may result in death, serious injury and/or damage. Such installations should be performed by professional antenna installers only! Rooftop installations offer several advantages: • Increased antenna range. • Fewer obstacles in path. • Improved performance due to greater height. • Reduced multipath problems. BreezeNET PRO.11 Series 5-17 User’s Guide Planning and Installing Wireless LANS 5.3.3 Antennas for Outdoor Applications The BreezeNET PRO.11 series can be used in point-to-point or point-to-multipoint configurations. 5.3.3.1 Point-to-Point A point-to-point link is based on the use of one Access Point with external antennas (AP-10D or AP-10DE) and one adapter (SA-10/40D, WB-10D or WB-10DE). The AP and the WB must be equipped with one or two directional antennas. The necessary antenna gain depends on the required range and performance. 5.3.3.2 Point-to-Multipoint Setting up a point-to-multipoint link requires the use of an AP-10D equipped with omni-directional antennas and a remote WB-10D (or SA-10/40D) equipped with high-gain directional antennas. 5.3.3.3 Antenna Alignment Low gain antennas do not require alignment due to their very wide radiation pattern. High gain antennas have a narrow beamwidth necessitating an alignment procedure in order to optimize the link. Check antenna alignment by using the LED indicators on the front panel of whichever adapter is used in the link (WB-10D or SA-10/40D). These LED indicators provide indication of reception quality. ⇒ To perform antenna alignment: 1. Assemble antennas according to the assembly instructions included with the antenna set. 2. Mount the antennas as high as possible. 3. Connect the coaxial cable to the AP at the main site. 4. Connect the coaxial cable to the WB (or SA) at the remote site. 5. Power on the AP and the WB (or SA). User’s Guide 5-18 BreezeNET PRO.11 Series Planning and Installing Wireless LANS 6. Synchronize the units by aligning the antennas manually until the WLNK indicator LED on the front panel of the wireless Bridge and/or Station Adapter illuminates. 7. Align antennas at the main and remote sites until maximum signal quality is obtained. (Check QLT LEDs on the front panel of the Station Adapter and the wireless Bridge.) If the received signal quality is lower than expected for this antenna/range combination, change antenna height and verify RF cables connections. 5.3.3.4 Antenna Diversity In applications where no multipath propagation is expected, a single antenna is sufficient to ensure good performance levels. However, in cases where multipath propagation exists, BreezeCOM recommends that two antennas be used. This takes advantage of space diversity capabilities. By using two antennas per unit, the system can select the best antenna on a per-packet basis (every several milliseconds). Multipath propagation is to be expected when there are potential reflectors between the main and remote sites. These reflectors may be buildings or moving objects such as airplanes and motor vehicles. If this is the case, the radio signal does not travel in a straight line, but is reflected or deflected off of the object, creating multiple propagation paths. When installing a single antenna, modify the transmit diversity option to either antenna 1 or antenna 2, according to the antenna being used (refer to Section 3.4.3). 5.3.3.5 Antenna Polarization Antenna polarization must be the same at either end of the link. In most applications, the preferred orientation is vertical polarization. Above-ground propagation of the signal is better when it is polarized vertically. To verify antenna polarization, refer to the assembly instructions supplied with the antenna set. BreezeNET PRO.11 Series 5-19 User’s Guide Planning and Installing Wireless LANS 5.3.4 Antenna Seal When using outdoor antennas, you must seal the antenna connectors against rain. Otherwise the antennas are not suitable for use in outdoor installations. 5.3.5 Cell Size Cell size is determined by the maximum possible distance between the Access Point and the Station Adapter, usually related to point-to-multipoint installations using external antennas. For open outdoor areas with an unobstructed line of sight between the Access Point and the BreezeNET PRO.11 workstation, the suggested maximum distance between Access Point and workstation is: Standard AP-10 PRO.11 700m (2000 ft.) 5.3.6 Link Distance Link distance is the maximum distance between the AP and the station adapter, usually related to point-to-point installations using external antennas. For open outdoor areas with an unobstructed line of sight between the Access Point and the wireless bridge, the suggested maximum distance is: Unit USA Europe AP-10D PRO.11 with external antennas up to 10Km (7 miles) up to 2.5Km in Europe AP-10DE PRO.11 with external antennas − up to 5Km in Europe Note: The maximum distance of 10Km/7 miles is achieved using 24 dBi antennas. The maximum distance of 2.5Km is achieved using 18 dBi antennas. For range tables, refer to Section 5.3.7. User’s Guide 5-20 BreezeNET PRO.11 Series Planning and Installing Wireless LANS 5.3.7 Using Outdoor Range Tables Outdoor installations must have a clear line-of-sight. Solid obstacles such as buildings or hills prevent the establishment of a link. Partial obstacles such as trees or traffic can reduce range. Extending coaxial cables can cause an increase in assembly signal loss and a reduction in range. The ranges in the following tables are attained under good propagating conditions when using the standard cables supplied in the antenna set. Actual ranges may vary due to specific multipath and interference conditions. For specific range guidelines and information about extending cables, consult your local dealer or BreezeCOM central offices. Ranges are subject to change without notice. 5.3.8 FCC Outdoor Range Tables (USA) The following tables are compliant with FCC regulations. Table 5-2. BreezeNET USA/FCC Range Table - 1 Mbps Ant. type Asmb Omni-2 Omni-6 Omni-7 Uni-8.5 Uni-11 Uni-13 Uni-16 Uni-18 Uni24 2 dBi 5 dBi 6 dBi 6.5 dBi 9 dBi 11 dBi 14 dBi 15 dBi 2500 ft 3800 ft 3900 ft 4000 ft 1.0 mi 1.2 mi 1.4 mi 1.5 mi 1.9 mi 3800 ft 4300 ft 4600 ft 4800 ft 1.2 mi 1.5 mi 1.7 mi 1.8 mi 2.2 mi 3900 ft 4600 ft 4800 ft 1.0 mi 1.3 mi 1.6 mi 1.8 mi 1.9 mi 2.3 mi 4000 ft 4800 ft 1.0 mi 1.1 mi 1.4 mi 1.7 mi 1.9 mi 2.0 mi 2.4 mi 1.0 mi 1.2 mi 1.3 mi 1.4 mi 1.7 mi 2.0 mi 2.3 mi 2.5 mi 2.9 mi 1.2 mi 1.5 mi 1.6 mi 1.7 mi 2.0 mi 2.2 mi 2.6 mi 2.8 mi 3.2 mi 1.4 mi 1.7 mi 1.8 mi 1.9 mi 2.3 mi 2.6 mi 3.1 mi 3.4 mi 3.7 mi 1.5 mi 1.8 mi 1.9 mi 2.0 mi 2.5 mi 2.8 mi 3.4 mi 3.5 mi 4.0 mi 19 dBi 1.9 mi 2.2 mi 2.3 mi 2.4 mi 2.9 mi 3.2 mi 3.7 mi 4.0 mi 6.0 mi gain Omni-2 2 dBi Omni-6 5 dBi Omni-7 6 dBi Uni-8.5 6.5 dBi Uni-11 9 dBi Uni-13 11 dBi Uni-16 14 dBi Uni-18 15 dBi Uni-24 19 dBi BreezeNET PRO.11 Series 5-21 User’s Guide Planning and Installing Wireless LANS Table 5-3. BreezeNET USA/FCC Range Table - 2 Mbps Ant. type Asmb Omni-2 Omni-6 Omni-7 Uni-8.5 Uni-11 Uni-13 Uni-16 Uni-18 Uni-24 2 dBi 5 dBi 6 dBi 6.5 dBi 9 dBi 11 dBi 14 dBi 15 dBi 19 dBi 1500 ft 2000 ft 2300 ft 2500 ft 0.6 mi 0.7 mi 0.8 mi 0.9 mi 1.1 mi 2000 ft 2400 ft 2600 ft 2800 ft 0.7 mi 0.9 mi 1.0 mi 1.1 mi 1.3 mi 2300 ft 2600 ft 2900 ft 3000 ft 0.8 mi 1.0 mi 1.2 mi 1.3 mi 1.4 mi 2500 ft 2800 ft 3000 ft 0.6 mi 0.8 mi 1.0 mi 1.3 mi 1.3 mi 1.5 mi 0.6 mi 0.7 mi 0.8 mi 0.8 mi 0.9 mi 1.1 mi 1.4 mi 1.5 mi 1.7 mi 0.7 mi 0.9 mi 1.0 mi 1.0 mi 1.1 mi 1.2 mi 1.5 mi 1.7 mi 2.0 mi 0.8 mi 1.0 mi 1.2 mi 1.3 mi 1.4 mi 1.5 mi 1.8 mi 2.0 mi 2.6 mi 0.9 mi 1.1 mi 1.3 mi 1.3 mi 1.5 mi 1.7 mi 2.0 mi 2.2 mi 2.8 mi 1.1 mi 1.3 mi 1.4 mi 1.5 mi 1.7 mi 2.0 mi 2.6 mi 2.8 mi 3.5 mi gain Omni-2 Omni-6 Omni-7 Uni-8.5 Uni-11 Uni-13 Uni-16 Uni-18 Uni-24 2 dBi 5 dBi 6 dBi 6.5 dBi 9 dBi 11 dBi 14 dBi 15 dBi 19 dBi Table 5-4. BreezeNET USA/FCC Range Table - 3 Mbps Ant. type Asmb Omni-2 Omni-6 Omni-7 Uni-8.5 Uni-11 Uni-13 Uni-16 Uni-18 Uni-24 2 dBi 5 dBi 6 dBi 6.5 dBi 9 dBi 11 dBi 14 dBi 15 dBi 19 dBi 500 ft 750 ft 800 ft 850 ft 1200 ft 1600 ft 0.4 mi 0.5 mi 0.6 mi 750 ft 900 ft 1000 ft 1100 ft 1600 ft 2000 ft 0.5 mi 0.6 mi 0.7 mi 800 ft 1000 ft 1000 ft 1200 ft 1700 ft 2100 ft 0.6 mi 0.7 mi 0.8 mi 850 ft 1100 ft 1200 ft 1400 ft 2200 ft 0.5 mi 0.7 mi 0.7 mi 0.9 mi 1200 ft 1600 ft 1700 ft 2200 ft 0.5 mi 0.6 mi 0.8 mi 0.9 mi 1.0 mi 1600 ft 2000 ft 2100 ft 0.5 mi 0.6 mi 0.7 mi 0.9 mi 1.0 mi 1.2 mi 0.4 mi 0.5 mi 0.6 mi 0.7 mi 0.8 mi 0.9 mi 1 mi 1.1 mi 1.4 mi 0.5 mi 0.6 mi 0.7 mi 0.7 mi 0.9 mi 1.0 mi 1.1 mi 1.2 mi 1.5 mi 0.6 mi 0.7 mi 0.8 mi 0.9 mi 1.0 mi 1.2 mi 1.4 mi 1.5 mi 2 mi gain Omni-2 Omni-6 Omni-7 Uni-8.5 Uni-11 Uni-13 Uni-16 Uni-18 Uni-24 2 dBi 5 dBi 6 dBi 6.5 dBi 9 dBi 11 dBi 14 dBi 15 dBi 19 dBi Note: User’s Guide The use of an LNA can improve the range by 30%-40%. To achieve this it is necessary to install an LNA on both sides of the link (in each site). An LNA will NOT enlarge the link if it is installed only on one side of the link. When using an LNA you must use two antennas - one for TX and one for RX. 5-22 BreezeNET PRO.11 Series Planning and Installing Wireless LANS 5.3.9 ETSI Outdoor Range Tables (Europe and Rest-of-World) – D Models, DL Models In order to comply with ETSI regulations, 20dBm (100mW) EIRP units using antenna kits indicated as low must be configured to the low power setting (4 dBm). Using BreezeNET PRO.11 DL model with an 18dbi antenna and lowering the output power of the unit complies with ETSI regulations and improves reception. Installing this antenna at both ends of the link increases the total range. Installing this antenna at one end of the link does not increase the range, but it does increase the throughput of traffic received at the end with the 18 dBi antenna. The following tables are compliant with ETSI regulations. Table 5-5. BreezeNET Europe and ROW Range Table – D Models, DL Models Data Rate = 1Mbps, Sen=-81dBm Antenna Kit Omni-2 Omni-2 Omni-6 Uni-8.5 Uni-18/20 (DL model) 710m 790m 750m 670m Uni-18/15 (DL model) 730m Uni-18/10 (DL model) 790m Omni-6 790m 820m 890m Uni-8.5 890m 840m 750m 750m 840m 790m 710m 770m 840m Uni-18/20 (low) 670m 750m 710m 1,910m 2,020m 2,130m Uni-18/15 (low) 730m 820m 770m 2,020m 2,130m 2,250m Uni-18/10 (low) 790m 890m 840m 2,130m 2,250m 2,370m Table 5-6. BreezeNET Europe and ROW Range Table – D Models Data Rate = 2Mbps, Sen=-75dBm Antenna Kit Omni-2 Omni-2 Omni-6 Uni-8.5 Uni-18/20 (DL model) 350m 400m 380m 330m Uni-18/15 (DL model) 370m Uni-18/10 (DL model) 400m Omni-6 400m 450m 420m 380m 410m 450m Uni-8.5 380m 420m 400m 350m 390m 420m Uni-18/20 (low) 330m 380m 350m 1,240m 1,310m 1,380m Uni-18/15 (low) 370m 410m 390m 1,310m 1,380m 1,460m Uni-18/10 (low) 400m 450m 420m 1,380m 1,460m 1,540m BreezeNET PRO.11 Series 5-23 User’s Guide Planning and Installing Wireless LANS Table 5-7. BreezeNET Europe and ROW Range Table – D Models, DL Models Data Rate = 3Mbps, Sen=-67dBm Antenna Kit Omni-2 Note: Omni-2 Omni-6 Uni-8.5 Uni-18/20 Uni-18/15 Uni-18/10 (DL models) (DL models) (DL models) 140m 160m 150m 130m 150m 160m Omni-6 160m 180m 170m 150m 160m 180m Uni-8.5 150m 170m 160m 140m 150m 170m Uni-18/20 (low) 130m 150m 140m 560m 610m 670m Uni-18/15 (low) 150m 160m 150m 610m 670m 730m Uni-18/10 (low) 160m 180m 170m 670m 730m 790m All antennas above 8.5 (i.e. 12, 18, and 24), require a filter to be ETSIcompliant. 5.3.10 ETSI Outdoor Range Tables (Europe and Rest-of-World) – DE Models The following tables are compliant with ETSI regulations. Table 5-8. BreezeNET Europe and ROW Range Table – DE Models Data Rate = 1Mbps, Sen=-85dBm Antenna Kit Uni-24/20 Uni-24/15 Uni-24/10 Uni-24/20 3,920m 4,140m 4,370m Uni-24/15 4,140m 4,370m 4,610m Uni-24/10 4,370m 4,610m 4,870m Table 5-9. BreezeNET Europe and ROW Range Table – DE Models Data Rate = 2Mbps, Sen=-79dBm User’s Guide Antenna Kit Uni-24/20 Uni-24/15 Uni-24/10 Uni-24/20 2,550m 2,690m 2,840m Uni-24/15 2,690m 2,840m 3,000m Uni-24/10 2,840m 3,000m 3,160m 5-24 BreezeNET PRO.11 Series Planning and Installing Wireless LANS Table 5-10. BreezeNET Europe and ROW Range Table – DE Models Data Rate = 3Mbps, Sen=-71dBm Note: Antenna Kit Uni-24/20 Uni-24/15 Uni-24/10 Uni-24/20 1,430m 1,510m 1,600m Uni-24/15 1,510m 1,600m 1,680m Uni-24/10 1,600m 1,680m 1,780m All antennas above 8.5 (i.e. 12, 18, and 24), require a filter to be ETSIcompliant. The use of an LNA can improve the range by 30%-40%. To achieve this it is necessary to install an LNA on both sides of the link (in each site). An LNA will NOT enlarge the link if it is installed only on one side of the link. When using an LNA you must use two antennas - one for TX and one for RX. 5.3.11 Non-Regulated Outdoor Range Tables – D Models Table 5-11. BreezeNET Non-Regulation Range Table – D Models Data Rate = 1Mbps, Sen=-81dBm Antenna Kits Omni-2 Omni-6 Uni-8.5 Uni18/20 Omni-2 710m 790m 750m 1,980m Uni18/15 2,090m Uni18/10 2,210m Uni24/20 3,050m Uni24/15 3,220m Uni-24/10 3,400m Omni-6 790m 890m 840m 2,130m 2,250m 2,370m 3,280m 3,460m 3,650m Uni-8.5 750m 840m 790m 2,050m 2,170m 2,290m 3,160m 3,340m 3,520m Uni-18/20 1,980m 2,130m 2,050m 4,870m 5,140m 5,420m 7,500m 7,910m 8,350m Uni-18/15 2,090m 2,250m 2,170m 5,140m 5,420m 5,730m 7,910m 8,350m 8,820m Uni-18/10 2,210m 2,370m 2,290m 5,420m 5,730m 6,040m 8,350m 8,820m 9,310m Uni-24/20 3,050m 3,280m 3,160m 7,500m 7,910m 8,350m 11,550m 12,190m 12,860m Uni-24/15 3,220m 3,460m 3,340m 7,910m 8,350m 8,820m 12,190m 12,860m 13,580m Uni-24/10 3,400m 3,650m 3,520m 8,350m 8,820m 9,310m 12,860m 13,580m 14,330m BreezeNET PRO.11 Series 5-25 User’s Guide Planning and Installing Wireless LANS Table 5-12. BreezeNET Non-Regulation Range Table – D Models Data Rate = 2Mbps, Sen=-75dBm Antenna Kits Omni-2 Omni-6 Uni-8.5 Uni18/20 Omni-2 350m 400m 380m 1,290m Uni18/15 1,360m Uni18/10 1,430m Uni24/20 1,980m Uni24/15 2,090m Uni-24/10 2,210m Omni-6 400m 450m 420m 1,380m 1,460m 1,540m 2,130m 2,250m 2,370m Uni-8.5 380m 420m 400m 1,330m 1,410m 1,490m 2,050m 2,170m 2,290m Uni-18/20 1,290m 1,380m 1,330m 3,160m 3,340m 3,520m 4,870m 5,140m 5,420m Uni-18/15 1,360m 1,460m 1,410m 3,340m 3,520m 3,720m 5,140m 5,420m 5,730m Uni-18/10 1,430m 1,540m 1,490m 3,520m 3,720m 3,920m 5,420m 5,730m 6,040m Uni-24/20 1,980m 2,130m 2,050m 4,870m 5,140m 5,420m 7,500m 7,910m 8,350m Uni-24/15 2,090m 2,250m 2,170m 5,140m 5,420m 5,730m 7,910m 8,350m 8,820m Uni-24/10 2,210m 2,370m 2,290m 5,420m 5,730m 6,040m 8,350m 8,820m 9,310m Table 5-13. BreezeNET Non-Regulation Range Table – D Models Data Rate = 3Mbps, Sen=-67dBm Antenna Kits Omni-2 Omni-6 Uni-8.5 Uni18/20 Omni-2 140m 160m 150m 600m Uni18/15 650m Uni18/10 710m Uni24/20 1,110m Uni24/15 1,180m Omni-6 160m 180m 170m 670m 730m 790m 1,200m 1,260m 1,330m Uni-8.5 150m 170m 160m 630m 690m 750m 1,150m 1,220m 1,290m Uni-18/20 600m 670m 630m 1,780m 1,880m 1,980m 2,740m 2,890m 3,050m Uni-18/15 650m 730m 690m 1,880m 1,980m 2,090m 2,890m 3,050m 3,220m Uni-18/10 710m 790m 750m 1,980m 2,090m 2,210m 3,050m 3,220m 3,400m Uni-24/20 1,110m 1,200m 1,150m 2,740m 2,890m 3,050m 4,220m 4,450m 4,700m Uni-24/15 1,180m 1,260m 1,220m 2,890m 3,050m 3,220m 4,450m 4,700m 4,960m Uni-24/10 1,240m 1,330m 1,290m 3,050m 3,220m 3,400m 4,700m 4,960m 5,230m User’s Guide 5-26 Uni-24/10 1,240m BreezeNET PRO.11 Series Planning and Installing Wireless LANS 5.3.12 Extending the range using the TPA-24 and LNA-10 The following tables show examples of how outdoor ranges of D-model units can be extended using the TPA-24 and LNA-10 devices. In the range tables below, the note LNA means that the LNA 10 Low Noise Receive Amplifier is used (see Section 6.2). The note TPA means that the TPA 24 Transmit Power Amplifier is used (see Section 6-1). When the LNA or TPA are used, one of the unit’s antennas should be permanently set to transmit and the other to receive. In this case, Antenna Diversity is not applicable. The use of an LNA or a Booster (TPA 24) will only enlarge the range if they are installed on both sides of the link. The identification of “TX kit” and “RX kit” is for reference purposes only. They do not have any other meaning than for arranging the table to show the effects of the LNA and Booster (TPA 24). For ranges over 30 km, it is recommended to consult BreezeCOM technical support or your local dealer. Note: In the following tables, “Omni-6/10” refers to an Omni 6dbi antenna with a 10 Meter Heliax cable. BreezeNET PRO.11 Series 5-27 User’s Guide Planning and Installing Wireless LANS Table 5-14. TPA-24 and LNA-10 Extension Range Table. Data Rate = 1Mbps, Sen=81dBm Transmit and Receive TX kit Omni-6/10 Omni-6/10 Antenna Kits Omni-6 Omni-6 (TPA) (TPA) 30 30 Uni-18/10 Uni-18/10 Uni-18/10 Uni-18/10 Uni-24/10 (TPA) (TPA) 42 42 Uni-24/10 Uni-24/10 Uni-24/10 (TPA) (TPA) 48 for Side A Transmit and Receive Antenna Kits for Side B TX EIRP 21 RX kit Omni-6/10 Omni-6 21 RX Gain 4 8.35 4 8.35 16 20.35 16 20.35 22 26.35 22 26.35 Omni-6/10 Omni-6 (LNA 10) 33 33 39 48 Uni-18/10 Uni-18/10- Uni-18/10 Uni-18/10 Uni-24/10 Uni-24/10 Uni-24/10 Uni-24/10 (LNA) (LNA) (LNA) 39 (LNA) (LNA) TX kit EIRP RX kit RX Omni-6/10 21 Omni-6/10 4 1,070m 1,070m 1,070m 1,470m 2,550m 2,550m 2,550m 3,480m 3,920m 3,920m 3,920m 5,370m Omni-6/10 21 Omni-6 (LNA) 8.35 1,070m 1,470m 1,070m 1,470m 2,550m 3,480m 2,550m 3,480m 3,920m 5,370m 3,920m 5,370m Omni-6 (TPA) 30 Omni-6/10 4 1,070m 1,070m 2,050m 2,050m 2,550m 2,550m 4,870m 4,870m 3,920m 3,920m 7,500m 7,500m Omni-6 (TPA) 30 Omni-6 (LNA) 8.35 1,470m 1,470m 2,050m 2,810m 3,480m 3,480m 4,870m 6,660m 5,370m 5,370m 7,500m 10,260m Uni-18/10 33 Uni-18/10 16 2,550m 2,550m 2,550m 3,480m 6,040m 6,040m 6,040m 8,260m 9,310m 9,310m 9,310m 12,730m Uni-18/10 33 Uni-18/10 (LNA) 20.35 2,550m 3,480m 2,550m 3,480m 6,040m 8,260m 6,040m 8,260m 9,310m 12,730m 9,310m 12,730m Uni-18/10 (TPA) 42 Uni-18/10 2,550m 2,550m 4,870m 4,870m 6,040m 6,040m 11,550m 11,550m 9,310m 9,310m 17,780m 17,780m Uni-18/10 (TPA) 42 Uni-18/10 (LNA) 20.35 3,480m 3,480m 4,870m 6,660m 8,260m 8,260m 11,550m 15,790m 12,730m 12,730m 17,780m 24,320m Uni-24/10 39 Uni-24/10 3,920m 3,920m 3,920m 5,370m 9,310m 9,310m 9,310m 12,730m 14,330m 14,330m 14,330m 19,600m Uni-24/10 39 Gain 16 22 Uni-24/10 (LNA) 26.35 3,920m 5,370m 3,920m 5,370m 9,310m 12,730m 9,310m 12,730m 14,330m 19,600m 14,330m 19,600m Uni-24/10 (TPA) 48 Uni-24/10 3,920m 3,920m 7,500m 7,500m 9,310m 9,310m 17,780m 17,780m 14,330m 14,330m 27,380m 27,380m Uni-24/10 (TPA) 48 Uni-24/10 (LNA) 26.35 5,370m 5,370m 7,500m 10,260 12,730m 12,730m 17,780m 24,320m 19,600m 19,600m 27,380m 37,450m User’s Guide 22 5-28 BreezeNET PRO.11 Series Planning and Installing Wireless LANS Table 5-15. TPA-24 and LNA-10 Extension Range Table. Data Rate = 2Mbps, Sen=-75dBm Transmit and Receive TX kit Antenna Kits Omni- Omni- Omni-6 Omni-6 6/10 6/10 (TPA) (TPA) 30 Uni-18/10 Uni-18/10 Uni-18/10 Uni-18/10 Uni-24/10 Uni(TPA) (TPA) 42 42 Uni-24/10 Uni-24/10 24/10 (TPA) (TPA) 39 48 48 for Side A Transmit and Receive Antenna Kits for Side B TX EIRP 21 21 30 RX kit Omni- Omni-6 Omni-6/10 Omni-6 6/10 (LNA 10) 33 33 39 Uni-18/10 Uni-18/10 Uni-18/10 Uni-18/10 Uni-24/10 Uni- (LNA) (LNA) (LNA) Uni-24/10 Uni-24/10 24/10 (LNA) (LNA) 4 8.35 4 8.35 16 20.35 16 20.35 22 26.35 22 26.35 4 560m 560m 560m 930m 1,650m 1,650m 1,650m 2,260m 2,550m 2,550m 2,550m 3,480m 8.35 560m 930m 560m 930m 1,650m 2,260m 1,650m 2,260m 2,550m 3,480m 2,550m 3,480m Omni-6/10 4 560m 560m 1,330m 1,330m 1,650m 1,650m 3,160m 3,160m 2,550m 2,550m 4,870m 4,870m 30 Omni-6 (LNA) 8.35 930m 930m 1,330m 1,820m 2,260m 2,260m 3,160m 4,320m 3,480m 3,480m 4,870m 6,660m 33 Uni-18/10 16 1,650m 1,650m 1,650m 2,260m 3,920m 3,920m 3,920m 5,370m 6,040m 6,040m 6,040m 8,260m 33 RX Gain TX kit EIRP RX kit Omni-6/10 21 Omni-6/10 Omni-6/10 21 Omni-6 (LNA) Omni-6 (TPA) 30 Omni-6 (TPA) Uni-18/10 Uni-18/10 RX Gain Uni-18/10 (LNA) 20.35 1,650m 2,260m 1,650m 2,260m 3,920m 5,370m 3,920m 5,370m 6,040m 8,260m 6,040m 8,260m Uni-18/10 (TPA) 42 Uni-18/10 1,650m 1,650m 3,160m 3,160m 3,920m 3,920m 7,500m 7,500m 6,040m 6,040m 11,550m 11,550m Uni-18/10 (TPA) 42 Uni-18/10 (LNA) 20.35 2,260m 2,260m 3,160m 4,320m 5,370m 5,370m 7,500m 10,260m 8,260m 8,260m 11,550m 15,790m Uni-24/10 39 Uni-24/10 2,550m 2,550m 2,550m 3,480m 6,040m 6,040m 6,040m 8,260m 9,310m 9,310m 9,310m 12,730m Uni-24/10 39 Uni-24/10 (LNA) 26.35 2,550m 3,480m 2,550m 3,480m 6,040m 8,260m 6,040m 8,260m 9,310m 12,730m 9,310m 12,730m Uni-24/10 (TPA) 48 Uni-24/10 2,550m 2,550m 4,870m 4,870m 6,040m 6,040m 11,550m 11,550m 9,310m 9,310m 17,780m 17,780m Uni-24/10 (TPA) 48 Uni-24/10 (LNA) 26.35 3,480m 3,480m 4,870m 6,660m 8,260m 8,260m 11,550m 15,790m 12,730m 12,730m 17,780m 24,320m BreezeNET PRO.11 Series 16 22 22 5-29 User’s Guide Planning and Installing Wireless LANS Table 5-16. TPA-24 and LNA-10 Extension Range Table. Data Rate = 3Mbps, Sen=-67dBm Transmit and Receive TX kit Omni- Omni-6/10 Omni-6 Omni-6 6/10 Antenna Kits (TPA) Uni-18/10 Uni-18/10 Uni-18/10 Uni-18/10 Uni- (TPA) (TPA) (TPA) 24/10 Uni- Uni- Uni-24/10 24/10 24/10 (TPA) (TPA) for Side A Transmit and Receive Antenna Kits for Side B TX EIRP 21 21 30 30 33 RX kit Omni- Omni-6 Omni- Omni-6 Uni-18/10 Uni-18/10 Uni-18/10 Uni-18/10 Uni- 6/10 (LNA 10) 6/10 (LNA) 33 42 (LNA) 42 (LNA) 39 24/10 39 48 48 Uni- Uni- Uni-24/10 24/10 24/10 (LNA) 22 26.35 (LNA) 4 8.35 4 8.35 16 20.35 4 220m 220m 220m 370m 890m 890m 890m 1,270m 1,430m 1,430m 1,430m 1,960m 8.35 220m 370m 220m 370m 890m 1,270m 890m 1,270m 1,430m 1,960m 1,430m 1,960m 4 220m 220m 630m 630m 890m 890m 1,780m 1,780m 1,430m 1,430m 2,740m 2,740m 8.35 370m 370m 630m 1,030m 1,270m 1,270m 1,780m 2,430m 1,960m 1,960m 2,740m 3,740m 16 890m 890m 890m 1,270m 2,210m 2,210m 2,210m 3,020m 3,400m 3,400m 3,400m 4,650m 20.35 890m 1,270m 890m 1,270m 2,210m 3,020m 2,210m 3,020m 3,400m 4,650m 3,400m 4,650m RX Gain 16 20.35 22 26.35 TX kit EIRP RX kit RX Omni-6/10 21 Omni-6/10 Omni-6/10 21 Omni-6 Omni-6 (TPA) 30 Omni-6/10 Omni-6 (TPA) 30 Omni-6 Uni-18/10 33 Uni-18/10 Uni-18/10 33 Uni-18/10 Uni-18/10 (TPA) 42 Uni-18/10 16 890m 890m 1,780m 1,780m 2,210m 2,210m 4,220m 4,220m 3,400m 3,400m 6,490m 6,490m Uni-18/10 (TPA) 42 Uni-18/10 20.35 1,270m 1,270m 1,780m 2,430m 3,020m 3,020m 4,220m 5,770m 4,650m 4,650m 6,490m 8,880m Gain (LNA) (LNA) (LNA) (LNA) Uni-24/10 39 Uni-24/10 22 1,430m 1,430m 1,430m 1,960m 3,400m 3,400m 3,400m 4,650m 5,230m 5,230m 5,230m 7,160m Uni-24/10 39 Uni-24/10 26.35 1,430m 1,960m 1,430m 1,960m 3,400m 4,650m 3,400m 4,650m 5,230m 7,160m 5,230m 7,160m (LNA) Uni-24/10 (TPA) 48 Uni-24/10 22 1,430m 1,430m 2,740m 2,740m 3,400m 3,400m 6,490m 6,490m 5,230m 5,230m 10,000 10,000m Uni-24/10 (TPA) 48 Uni-24/10 26.35 1,960m 1,960m 2,740m 3,740m 4,650m 4,650m 6,490m 8,880m 7,160m 7,160m 10,000 13,680m m (LNA) User’s Guide m 5-30 BreezeNET PRO.11 Series Planning and Installing Wireless LANS 5.4 Available Antennas and Antenna Kits This following table describes several transmit/receive antennas that work well with BreezeNET PRO.11 units. Table 5-17. FCC Available Antennas (USA) Model Ant. Gain Cable Len OMNI-2 2 dBi N/A OMNI-6 6 dBi 4-ft OMNI-7.2 7.2 dBi 20-ft UNI-8.5 8.5 dBi 8-ft UNI8.5Ext 8.5 dBi 8-ft UNI-11P75 11 dBi 30-ft UNI-13P 13 dBi 20-ft UNI-16P 16 dBi 30-ft BreezeNET PRO.11 Series Kit Contains: 2 OMNI-2 Antennas Proprietary SMA OMNI-6 Antenna Mounting Hardware 4-ft Cable Assembly OMNI-7.2 Antenna Mounting Hardware 20-ft Cable Assembly UNI-8.5 Antenna Mounting Hardware 8-ft Cable UNI-8.5 Antenna Mounting Hardware 8-ft Cable Assembly UNI-11P-75 Antenna Mounting Hardware 30-ft Cable Assembly UNI-13P Antenna Mounting Hardware 20-ft Cable Assembly UNI-16P Antenna Mounting Hardware 30-ft Cable Assembly Ideal for: Dispersion Dimensions HxWxD Converting “D” Models for use indoors Extending indoor range of access points and station adapters Establishing 360° coverage for outdoor multipoint links Extending indoor range of access points and/or station adapters Short range outdoor multipoint links 360°H/ 60° V 3"x.5" Tubular 360°H/ 26° V 13"x0.75" Tubular 360°H/ 22° V 16"x0.75" Tubular 75°H/ 60° V 4"x3.7"x1.2" 75°H/ 60° V 4"x3.7"x1.2" ISPs, school districts, and campus area networks requiring wide dispersion patterns Medium range outdoor multipoint links 75°H/ 28° V 11"x7.5"x3.5" 46°H/ 28° V 11"x7.5"x3.5" Medium to long range outdoor multipoint links requiring compact form factors 28°H/ 28° V 11"x11"x3.5" 5-31 User’s Guide Planning and Installing Wireless LANS Model Ant. Gain Cable Len UNI-18 18 dBi 30-ft UNI-24 24 dBi 50-ft Kit Contains: UNI-18 Antenna Mounting Hardware 30-ft Cable Assembly UNI-24 Antenna Mounting Hardware 50-ft Cable Assembly Ideal for: Long range outdoor point-topoint and multipoint links Long range outdoor point-topoint links Dispersion Dimensions HxWxD 12°H/ 14° V 16"x20"X15" 6°H/ 10° V 24"x36"x15" Table 5-18. ETSI Available Antennas (Europe and Rest-of-World) Model Ant. Gain Cable Len Kit Contains: OMNI-2 2 dBi N/A OMNI-6 6 dBi 3m UNI-8.5 8.5 dBi 6m UNI-18/10 UNI-18/15 UNI-18/20 18 dBi 10m 15m 20m 2 OMNI-2 Antennas Proprietary SMA OMNI-6 Antenna 90° Mount Bracket 3m RG58 Cable UNI-8.5 Antenna Wall Mounting HW 6m RG-58 Cable UNI-18 Antenna U-bolt for pole Heliax Cable UNI-24/10 UNI-24/15 UNI-24 /20 24 dBi 10m 15m 20m UNI-24 Antenna U-bolt for pole Heliax Cable User’s Guide Ideal for: Converting “D” Models for use indoors Extending indoor range of access points and station adapters Extending indoor range of access points and/or station adapters Long range outdoor point-topoint and multipoint links Long range outdoor point-topoint links 5-32 Dispersion Dimensions HxWxD 360°H/ 60° V 3"x.5" Tubular 360°H/ 26° V 13"x0.75" Tubular 75°H/ 60° V 4"x3.7"x1.2" 12°H/ 14° V 16"x20"X15" 6°H/ 10° V 24"x36"x15" BreezeNET PRO.11 Series Planning and Installing Wireless LANS 5.5 Precautions Note: Detached antennas, whether installed indoors or out, should be installed ONLY by experienced antenna installation professionals who are familiar with local building and safety codes and, wherever applicable, are licensed by the appropriate government regulatory authorities. Failure to do so may void the BreezeNET Product Warranty and may expose the end user to legal and financial liabilities. BreezeCOM and its resellers or distributors are not liable for injury, damage or violation of government regulations associated with the installation of detached antennas. 5.5.1 Transmit Antenna Regulations regarding maximum antenna gains vary from country to country. It is the responsibility of the end user to operate within the limits of these regulations and to ensure that the professional installer is aware of these regulations, as well. The FCC in the United States and ETSI in Europe limit effective transit power to 36dBm (USA) and 20dBm (Europe). The maximum total assembly gain of antennas and cables in this case equals 19dBi (USA) and 3dBi (Europe). Violation of government regulations exposes the end user to legal and financial liabilities. BreezeCOM and its resellers and distributors shall not be liable for expense or damage incurred as a result of installations which exceed local transmit gain limitations. 5.5.2 Spurious Radio Frequency Emissions The regulations referred to in the previous section also specify maximum “out-ofband” radio frequency emissions. Install a filter as close as possible to the BreezeNET PRO.11 “D” model unit connector. BreezeNET PRO.11 Series 5-33 User’s Guide Planning and Installing Wireless LANS 5.5.3 Lightning Protection Lightning protection is designed to protect people, property and equipment by providing a path to ground for the lightning’s energy. The lightning arrestor diverts the strike energy to ground through a deliberate and controlled path instead of allowing it to choose a random path. Lightning protection for a building is more forgiving than protection of electronic devices. A building can withstand up to 100,000 volts, but electronic equipment may be damaged by just a few volts. Lightning protection entails connecting an antenna discharge unit (also called an arrestor) to each cable as close as possible to the point where it enters the building. It also entails proper grounding of the arrestors and of the antenna mast (if the antenna is connected to one). The lightning arrestor should be installed and grounded at the point where the cable enters the building. The arrestor is connected to the unit at one end and to the antenna at the other end. The professional installer you choose must be knowledgeable about lightning protection. The installer must install the lightning protector in a way that maximizes lightning protection. BreezeCOM offers the following high-quality lightning arrestor assembly: BreezeNET AL 1 Lightning Arrestor - Part No. 872905 5 ft (1.5m), “N” Male to “N” Female. 5.5.4 Rain Proofing 12, 18, and 24 dBi antennas must be sealed against rain at the point the cable enters the pole before they are suitable for external use. User’s Guide 5-34 BreezeNET PRO.11 Series Accessory Installation 6. ACCESSORY INSTALLATION This chapter introduces some of the accessories available for specific installations, and describes how to install them. 6.1 TPA 24 Transmit Power Amplifier (Booster) The TPA 24 Transmit Power Amplifier is used to amplify the transmit power to a fixed output of 24 dBm (250 mW). The TPA 24 is especially useful when long RF cable runs are required. In addition, the TPA 24 simplifies antenna alignment by enabling the use of wider dispersion transmit antennas. The TPA 24 is internally protected against lightning and voltage surge protection. There are two models: • The TPA 24 NL receives input power in the range of -10dBm to 0dBm. • The TPA 24 NH receives an input power of 0dBm to +10dBm. Both models amplify the input power to a fixed output level of 24dBm (250mW). The TPA is powered by 12VDC carried from the power inserter by the RF cable. Note: The TPA 24 is not available in the USA due to FCC regulations. When used in compliance with ETSI regulations, the TPA 24 can be connected to cables and antennas resulting in a total transmitted power of 20dBm (100 mW) EIRP. For technical specifications, refer to the Appendix. BreezeNET PRO.11 Series 6-1 User’s Guide Accessory Installation 6.1.1 Installing the TPA 24 1. Choose one of the TPA 24 models according to the power level at the input of the booster. In general the NH model is used. For installations with long cables (high attenuation), the NL model should be used. 2. Choose one of the antenna connectors to be used for transmission. This connector is called the transmit antenna of the unit. 3. Configure the BreezeNET PRO.11 unit via a local terminal to transmit through the transmit antenna using the Transmit Diversity parameter (see Section 3.4.3). Figure 6-1. TPA 24 Installation 4. Connect the TPA 24 RF output directly to the transmit antenna. 5. Attach the TPA 24 RF input to the Power Inserter with the RF cable. The Power Inserter must be installed indoors. 6. Connect the RF cable leading from the Power Inserter to the transmit antenna on the BreezeNET PRO.11 unit. 7. Plug the power cable leading from the Power Inserter into any available 110/220V outlet. The power supply must be installed indoors. User’s Guide 6-2 BreezeNET PRO.11 Series Accessory Installation 8. For reception, use a separate antenna connected to the other antenna connector of the BreezeNET unit. Note: Installations exceeding regulations set by local authorities expose the installer and the user to potential legal and financial liabilities. 6.2 LNA 10 Low Noise Receive Amplifier The LNA 10 is a high-performance, low-noise preamplifier designed to enhance fringe area reception and provide additional gain on the receive antenna. Its exceptionally small size and light weight enables it to be directly mounted on the antenna by means of the female RF IN connector. Power is obtained through an RG-59 coaxial cable connected to the power supply. The LNA 10 is internally protected against lightning and voltage surge protection. The Power Supply (PS) and Power Inserter are supplied with the LNA 10. The RG59 coaxial cable with F-type connector is not supplied and must be purchased separately. For technical specifications, refer to the appendixes. 6.2.1 Installing the LNA 10 Before installing the LNA 10, the following steps must be taken: 1. Choose one of the antenna connectors to be used for reception. This connector is called the receive antenna of the unit. The other connector is called the transmit antenna of the unit. 2. Configure the BreezeNET PRO.11 unit via the Monitor to transmit through the transmit antenna only using the Transmit Diversity parameter (see Section 3.4.3). This prevents transmission from going through the LNA 10. 3. Connect the LNA 10 RF input directly to the receive antenna, as close as possible. BreezeNET PRO.11 Series 6-3 User’s Guide Accessory Installation 4. Attach the LNA 10 RF output directly to the RF cable going down to the receive antenna connector on the BreezeNET PRO.11 unit. 5. Connect the RG-59 coaxial cable which leads down to the Power Inserter to the “Signal and Power out” connector on the LNA 10. 6. Connect the Power Inserter to the power supply (both are indoor units). 7. For transmission, use a separate antenna connected to the other antenna connector (transmit antenna) of the BreezeNET unit. Figure 6-2. LNA 10 Connections Diagram 6.3 RFS 122 Radio Frequency Splitter The RFS 122 Radio Frequency Splitter is used to split the RF signal generated by a transmitter into two signals. These signals are then sent to two different and independent antennas. The RFS 122 enables radio transmission using two directional antennas connected to the same port of the BreezeNET PRO.11 unit. User’s Guide 6-4 BreezeNET PRO.11 Series Accessory Installation Similarly, the splitter is used to combine two receiving antennas to one antenna connector. Before installing the RFS 122, configure the BreezeNET PRO.11 unit via the Monitor to transmit through Antenna 2 only using the Transmit Diversity parameter (see Section 3.4.3), and connect the RFS 122 to antenna connector 2. For technical specifications, refer to Section 9.2. 6.3.1 Installing the RFS 122 The following diagram illustrates RFS-122 installation. Figure 6-3. RFS-122 Connection Diagram 6.4 AL 1 Lightning Arrestor The AL 1 Lightning Arrestor is used to protect transmitters and receivers from transients originating from lightning or EMP. The AL 1 is gas tube-based and is not radioactive. The gas discharge tube can sustain several transients if the time period between transients is sufficient to allow the tube to cool down. For technical specifications, refer to Section 9.2. BreezeNET PRO.11 Series 6-5 User’s Guide Accessory Installation Figure 6-4. AL-1 Connection Block Diagram One of the female-type N connectors is mounted directly through a hole in the shelter wall and held in place with a lockwasher and nut. 6.5 AMP 2440 Bi-Directional Amplifier The AMP 2440 is a bi-directional amplifier designed for extending the range of BreezeNET wireless LAN radios. The unit operates automatically, therefore there is no need for manual adjustments. The units receive signal gain and also provide transmit power amplification. Tx Power Sense Tx Amp Tx RF Tx Out In Rx 12 V DC Rx Amp Bandpass Filter Rx DC Power Supply Figure 6-5. AMP 2440 Functional Block Diagram User’s Guide 6-6 BreezeNET PRO.11 Series Accessory Installation The amplifier is installed directly at the antenna’s feed point, providing maximum effectiveness of transmit power which compensates for signal loss in the transmitter cable to the antenna. Likewise, the Low Noise Amplifier (LNA) in the AMP 2440 boosts the receive signal right at the antenna prior to experiencing the loss in the transmission cable to the radio. This gain also overcomes the losses in the transmission cable between the amplifier and the radio. In fact, use of the AMP 2440 bi-directional amplifier will actually increase the receiver sensitivity of the radio by 4dB. The ultimate result is the best possible noise figure and maximum receiver sensitivity. System gains of up to 30 dB are typical when amplifiers are used at each end of a link. The AMP 2440 bi-directional amplifier is completely weatherproof and can be bolted to the antenna mast or tower leg using the U-bolt included. The connectors face down so that gravity will drain all water away from the amplifier enclosure. This will prevent water from settling on the face of the unit. Likewise, since the LEDs are also facing downward they can be checked for operation from the bottom of the mast. DC Power to the amplifier is supplied through the transmission cable, using an indoor power supply and DC Injector. The amplifier unit also contains its own integral lightning protection and DC surge protection to ensure years of continuous outdoor operation. BreezeCOM provides the user with two models of the AMP 2440 bi-directional amplifier: • AMP 2440-500. Provides 500 mW (+27dBm) maximum output • AMP 2440-250. Provides 250 mW (+24dBm) maximum output The transmit gain for both models is 12 - 15dB. Full output power of approximately 500 mW is achieved with 30 mW (+15 dBm) input to the amplifier; 8 mW (+9dBm) for the AMP 2440-250 model. The amplifier goes into limiting at this point and higher input power results in only slight increases in the output power. Up to 100 mW of power may be safely applied directly to the amplifier input without any damage on either model. The AMP 2440 bi-directional amplifier comes with power supplies that have standard 2.1 mm barrel plugs (which are configured as positive (+) tip and negative (-) outer conductor). Although normally supplied with a power supply, any regulated 12 Volt DC 1 amp supply can be used. The power supply can be used with 110 or 240 VAC power. BreezeNET PRO.11 Series 6-7 User’s Guide Accessory Installation 6.5.1 Installing the AMP 2440 bi-directional amplifier The AMP 2440 bi-directional amplifier is designated for installation by professional radio installers. Several key factors unique to the particular installation determine the power level at the input of the amplifier. The most important consideration is the cable loss in the transmission cable between the radio and the pole mounted amp. The installer should understand these and other factors when computing the input power to the amplifier. The AMP 2440 bi-directional amplifier can be mast mounted using the steel U-bolt included with the unit (refer to Figure 6-6). The AMP 2440 bi-directional amplifier should be installed with the connectors facing downward. After placing the assembly on the mast, use an open-end wrench to carefully tighten the nuts. Take care not to over-tighten the nuts or you may inadvertently strip the threads. Figure 6-6. AMP 2440 Installation and Mounting WARNING! It is very important to waterproof the RF connectors on the AMP 2440 bidirectional amplifier. However, it is recommended that you do not seal the connectors until after all system tests have been performed. Be sure to use the high quality weather resistant vapor wrap included with you amplifier kit to seal all the outside connections. User’s Guide 6-8 BreezeNET PRO.11 Series Accessory Installation The DC Power Injector is not in a waterproof enclosure and must be protected from the weather. It can be permanently mounted to a surface using the mounting flanges. For more information on amplifier installation, refer to Figure 6-7. Note: When using the 24dB gain dish antenna in the United States, the external filter (P/N: SPF-1) must be installed to comply with FCC emission requirements. ANTENNA Omni-directional (shown), or Grid or Panel Antennas (not shown) AMP2440 (mounted to mast with U-Bolt) Drip Loop N-Male connector Filter * (P/N: )SPF-1 Transmission Line Low loss cable to radio room Mast Coax Cable to Pole Mounted Amplifier 110/220 VAC AC Main Power 110/220 VAC AC Main Power Barrel Plug RF + DC N-Male to N-Male adapter to attach to the N-Female on cable DC POWER INJECTOR 5ft. LMR-400 N-Male to N-Male adapter to attach to the N-Female on cable BreezeNet Radio UTP Cable To Ethernet Hub Special SMA Right angle Male connector is required in the United States when the 24dB grid dish * Filter antenna is used in order to comply with FCC emission requirements. Figure 6-7. AMP 2440 Installation Details For technical specifications, refer to Section 9.2. BreezeNET PRO.11 Series 6-9 User’s Guide Upgrade Procedure 7. UPGRADE PROCEDURE Firmware upgrades to the unit's flash memory is done by a simple download procedure using a TFTP application. Before beginning an upgrade, be sure you have the correct files and latest instructions. Upgrade packages can be obtained at the BreezeCOM web site: http://www.breezecom.com/TechSupport/techsupp.html. In general terms, upgrading includes the following steps: 1. Set up an IP connection to the device. You can verify working connection using the Ping command. 2. Run TFTP software and connect to the device. 3. Use TFTP to download the Flash erase file to the device. Use the tables below to determine the specific file to use, according to the unit’s current version. This causes the flash memory to be cleared. Do not reset the device during the download procedure in any case. 4. Use TFTP to download the software file to the device. Use the tables below to determine the specific file to use, according to the unit’s current version. 5. The unit resets itself and comes up with the new upgraded version. Table 7-1. Upgrade Files Current Version of Unit 3.2, 3.38, 3.42, 3.50 3.52, 4.204 3.62, 4.210, 4.211, 4.310 Flash Erase File Name download erase erase -fw Software Download File Name AP-10 eanaf eanafb ap_fw SA-10, SA-40, WB-10 eansf eansfb sawb_fw The current version and type of the unit determine the files used for upgrade. For example, when upgrading an AP-10 from version 3.52 to version 4.4.1, use the erase and eanafb files. When upgrading a SA-10 from version 3.62 to version 4.4.1, use the fw-erase and sawb_fw files. BreezeNET PRO.11 Series 7-1 User’s Guide System Troubleshooting 8. SYSTEM TROUBLESHOOTING The following troubleshooting guide provides answers to some of the more common problems which may occur when installing and using BreezeNET PRO.11 series products. If problems not mentioned in this guide should arise, checking the Ethernet and WLAN counters may help (see Section 8.2). If the problem persists, please feel free to contact your local distributor or the BreezeCOM Technical Support Department. 8.1 Troubleshooting Guide Problem and Indication Possible Cause Corrective Action No Power to Unit. PWR LED is off. 1. Power cord is not properly connected. 2. Power supply is defective. Failure to establish wireless link. WLNK LED is off and unit resets every few minutes. 1. Power supply to units may be faulty 2. The units may not have the same ESSID as the AP-10. 1. Verify power cord is properly connected to the BreezeNET unit and to the power outlet. 2. If this is not the cause, replace the power supply. 1. Verify power to units (AP and SA/ WB). 2. Verify that all units in the network have the same ESSID as the AP (ESSID must be identical in all units in the network): 3. Verify wireless link: • Set AP and unit (SA or WB) side by side. • Power on each unit and see if a wireless link is established (even “D” models without their external antennas should establish a link if placed side by side with the AP). • If the units fail to associate, reset units to factory default values reset unit (see Section 3.4.5). The units should now establish a wireless link. BreezeNET PRO.11 8-1 User’s Guide System Troubleshooting Problem and Indication Possible Cause Corrective Action Failure to establish wireless link (D models/external antennas) 1. Power supply to units may be faulty. 2. Cables may be improperly connected 3. There may be some problem with antenna installation. Wireless link established, but there is no Ethernet activity (AP and WB units). 1. Ethernet hub port or UTP cable is faulty. 2. Ethernet port in unit is faulty. 1. Verify power to units. 2. Verify that all cables are connected securely. 3. Refer to previous Section and verify wireless link between the units. 4. Verify that the antenna(s) are properly installed (see relevant Section in this manual): • Check antenna alignment. • Verify that antenna polarization is the same at both ends. • Verify that the range matches specifications. • Verify line-of-sight/antenna alignment/antenna height. 1. Check that the LINK LED is on and solid at the hub port. If this is not the case, the port is inactive. Try another port on the hub or another UTP cable. 2. Verify that Ethernet port in unit is working. Ping unit to verify Ethernet connection. 3. Verify that you are using a crossover UTP cable (pins 1 & 3, 2 & 6) if connected directly to workstation, or a straight-through cable if connected to a hub. Wireless link established, but there is no Ethernet activity (SA-10 and SA-40 units). User’s Guide 1. Ethernet port on Network Interface card is faulty. 2. Ethernet port of unit is faulty. 3. UTP cable is faulty. 8-2 4. Check ETHR LED indicator in unit and Ethernet counters in Monitor to verify Ethernet activity (see Section 3.6.1). 1. Verify that the LINK LED is lit and solid at the NIC port. If this is not the case, the port is inactive. Try using another UTP cable or another workstation. 2. Ping the unit to check the Ethernet port. If you cannot ping the unit, this may indicate failure of cable, Ethernet port of unit or Ethernet port of workstation’s NIC. Change UTP cable and retry. If you still cannot ping the unit, exchange units and try to ping the new unit using the same NIC and cable. BreezeNET PRO.11 Series System Troubleshooting Problem and Indication Possible Cause Corrective Action No network detected at Station Adapter (SA-10, SA40) workstation. 1. Workstation networking is improperly configured. 2. UTP cable connection is faulty. 3. Failure to pass Ethernet packets. High quality signal but throughput is poor. 1. Too much interference or multipath propagation. 2. Ethernet port of the unit may be faulty. Link signal quality low or not as good as expected (indoor installation). 1. Possible multipath or structural interference. 1. Reset both Access Point and Station Adapter. • Re-establish network connection. • Verify proper workstation network configuration. 2. Try to ping the remote network. Failure to detect the network may indicate a failure to pass Ethernet packets. 3. Verify UTP cable connection. Solid LINK LED in workstation NIC indicates proper Ethernet connection. 4. Check monitor messages for errors or other indications of problems. 5. Check station counters to verify increase in Ethernet counters which indicates Ethernet activity (see Section 3.6.1). 1. Move the unit or the antennas out of the range of interference. • Check counters to see if more than 10% of total transmitted frames are retransmitted fragments (see Section 3.6.1). • Check if more than 10% of total received data frames are bad fragments. 2. Verify Ethernet port activity by checking Ethernet counters (see Section 3.6.1). Reposition the unit outside range of possible interference. • Check for heavy metal structures (e.g. elevators, racks, file cabinets) near unit. • Check counters for excessive retransmissions or received bad fragments. • Site may require higher gain antennas. • site may require a multicell structure (multiple AP units) due to multipath/structural interference. BreezeNET PRO.11 8-3 User’s Guide System Troubleshooting Problem and Indication Possible Cause Corrective Action Link signal quality low or not as good as expected (outdoor installation). There may be a problem with certain aspects of outdoor installation considerations (see relevant section in this manual). Unit associates with the wrong Access Point. In a multicell structure with overlapping cells, the units may not associate with the closest Access Point. Reduced performance in a multi-AP configuration. The APs in the same coverage area have not been assigned unique hopping sequences. Auto Calibration is enabled for a “DE” unit. Refer to Section 5.3: • Verify that there is a clear line-of-site. • Verify antenna height. • Verify antenna polarization. • Verify antenna alignment. • Check length of cable between antenna and unit (an overly long extension cable may adversely affect performance). For a unit to associate with a specific Access Point, assign a unique ESSID to the Access Point and to all the units you want to include in that wireless network. Assign a unique hopping sequence to each AP in the coverage area. Each AP must have a unique hopping sequence regardless of ESSID. Disable Auto Calibration for the unit. Rx / Tx calibration error messages. User’s Guide 8-4 BreezeNET PRO.11 Series System Troubleshooting 8.2 Checking Counters Checking counters is also a good way to pinpoint any problems that may occur in the BreezeNET wireless LAN. Counters can be checked from the monitor. See Section 3.6.1. 8.2.1 WLAN Counters When checking WLAN counters, total retransmitted fragments should be below 10% of total transmitted (bridge) frames. If total retransmitted fragments are above 10%, this indicates errors in data transmission. Too many retransmissions may be an indication of interference between the transmitting and receiving units. Also, the ratio between Frames Dropped (too many retries) and Total Transmitted Frames (Bridge) should not exceed 1:40 (2.5%) Received bad fragments should be no more than 10% of the total received data frames. If more than 10% of the total received data frames are bad fragments, this may indicate that there is a problem with the wireless link. Refer to the Troubleshooting guide (Section 8.1) above for possible corrective action. 8.2.2 Ethernet Counters When checking the Ethernet counters, received bad frames should be zero (0). If this is not the case, this may indicate a problem with the Ethernet connection. Verify Ethernet port link at hub, workstation, and unit. Assign a unique IP address to the unit and ping. BreezeNET PRO.11 8-5 User’s Guide Appendix 9. APPENDIX This appendix includes the following sections: • Supported MIBs and Traps – Lists MIBs and traps supported by BreezeNET PRO.11 series products. • Technical Specifications – Lists product and attachment specifications. • Wireless LAN Concepts – Provides an overview of the concepts related to wireless LANs. • Radio Signal Propagation – Discusses the concepts and applications of radio signal propagation relevant to wireless LANs. • IEEE 802.11 Technical Tutorial – Introduces the new IEEE 802.11 standard. 9.1 Supported MIBs and Traps This chapter lists MIBs and traps supported by BreezeNET PRO.11 series products. 9.1.1 Supported MIBs All products in the BreezeNET PRO.11 series as well as the Extended Range Access Point (AP-10 DE) and Workgroup Bridge (WB-10 DE) contain an embedded SNMP (Simple Network Management Protocol) agent. All functions can be accessed from the Management Information Base (MIB) using an SNMP application. IP host software BreezeNET PRO.11 series agents support the following MIBs: • MIB-II (RFC1213) • BRIDGE-MIB (RFC1286) • BreezeCOM Private MIB The BreezeCOM Private MIB can be viewed by opening the MIB file on the provided diskette. BreezeNET PRO.11 9-1 User’s Guide Appendix 9.1.2 Supported Traps The following traps are implemented by BreezeNET PRO.11 units. All BreezeNET PRO.11 units that have the SNMP Traps parameter enabled will send traps to the network’s designated managers. The traps can be viewed and filtered using SNMPc. To enable/disable trap sending for a device, use the IP and SNMP Parameters menu (see Section 3.4.2). The following table lists the traps implemented by BreezeCOM PRO.11 units: Trap Variables Description brzAProamingIn brzTrapSTAMacAddr BrzAPassociated brzTrapSTAMacAddr BrzAPdisassociated brzTrapSTAMacAddr BrzAPaging brzTrapSTAMacAddr BrzAProamedout brzTrapSTAMacAddr BrzSTAassociated brzLastAPMacAddr brzTrapAPMac brzTrapLastRssiQual itybrzTrapRssiQualit y BrzWlanStatus brzTrapToggle brzTrapMacAddress A station has roamed into this AP coverage area. The trap contains the MAC address of the associated station. A new station is associated with this AP. The trap contains the MAC address of the associated station. A station has disassociated itself from this AP. The trap contains the MAC address of the associated station. A station association was aged out and removed from this AP. The trap contains the MAC address of the aged-out station. A station has roamed out of this AP’s range. The trap contains the MAC address of the station that roamed out. A station has become associated with, or roamed to, a new AP. The trap contains the MAC address and average RSSI level of the new AP (TrapAPMac and TrapRssiQuality variables). If the station has been roaming, the MAC address of the old AP and the RSSI level prior to roaming are also provided (LastAPMacAddr and LastRssiQuality variables). For an association, the second address appears as all zeros. The wireless media condition has changed. An ON value is sent when the wireless LAN quality for a station or AP drops below the WLAN trap threshold. An OFF value is sent if the quality improves beyond the threshold. The current value of wireless LAN quality is also sent. User’s Guide 9-2 BreezeNET PRO.11 Series Appendix Trap Variables Description BrzWlanStatusOfStati on brzTrapToggle brzTrapMacAddress BrzGeneral brzTrapIndex brzTrapText The quality of the wireless connection to the AP has changed. An ON value is sent when the connection goes lower than the predetermined threshold. An OFF value is sent when the quality improves above the threshold. The brzTrapMacAddress variable contains the MAC address of the applicable station. For future use. 9.2 Technical Specifications 9.2.1 Specifications for BreezeNET PRO.11 Units The following table provides the technical specifications for all products in the BreezeNET PRO.11 series. Technical Specifications AP-10 PRO. 11, SA-10/40 PRO. 11, WB-10 PRO. 11 SA-PCR PRO.11 SA-PCD PRO.11 Wired LAN interface Compliant with Ethernet / IEEE 802.3 CSMA/CD standard N/A Physical Interface 10BaseT PC card type II / PCMCIA 2.1 Network Operating Systems supported All Windows 95, 98, NT4 Network protocols supported NDIS All Wireless LAN interface Compliant with IEEE 802.11 CSMA / CA Wireless LAN standard Physical interface – two antennas Integrated or External Radio Specifications Type Frequency Hopping Spread Spectrum (FHSS) Frequency range 2.4 GHz – 2.4835 GHz (ISM band) (different ranges available for countries using other bands) Dwell time 32, 64, 128 ms Transmitted power - integrated antennas Up to 100 mW (20dBm) EIRP BreezeNET PRO.11 9-3 User’s Guide Appendix Technical Specifications AP-10 PRO. 11, SA-10/40 PRO. 11, WB-10 PRO. 11 SA-PCR PRO.11 SA-PCD PRO.11 Transmitted power - external antennas D models: - High Power (at the connector): 17dBm (50mW) - Low Power (at the connector): 4dBm (2.5 mW) DE models: At the connector: -2dBm (0.01mW) N/A DL models: At the connector: 4dBm (2.5mW) Sensitivity: @ 1 Mbps −81dBm @ 2 Mbps −75dBm @ 3 Mbps −67dBm Modulation Multilevel GFSK Demodulation Technology DSP-based with adaptive equalization Antenna Diversity Two antennas, selected for use on a packet basis Frequency Accuracy +/- 10 PPM Approvals of Compliance FCC part 15, ETS 300-328, UL, UL/C, TUV/GS, CE Configuration and Management Configuration and Setup SNMP management SNMP agents Via Local Monitor port (serial RS-232) Via Application N/A MIB II, Bridge MIB, WLAN MIB, and private MIB Access via Wired LAN, Wireless LAN Site Survey Via Local Monitor port (serial RS-232) Via SNMP Via Application Front Panel Display LED indicators - Power on - Wired LAN activity - Wireless LAN synchronization - Wireless LAN signal quality/Load - Link Status - Data Traffic S/W upgradeable Through TFTP download via PC System Considerations Range (Access Point to Station) User’s Guide Depends on rate and antenna cable length/quality. (Accurate values must be calculated for specific installations). Refer to Section 5.3.7. 9-4 BreezeNET PRO.11 Series Appendix Technical Specifications AP-10 PRO. 11, SA-10/40 PRO. 11, WB-10 PRO. 11 SA-PCR PRO.11 SA-PCD PRO.11 Range - unobstructed with integrated antennas 2000 ft. (600m) 1500 ft. (450m) Range - unobstructed with external antennas (models D, DE and DL) USA FCC - up to 6 miles Europe ETSI (DL model only) - up to 2.5 km Europe ETSI (DE model only) - up to 5 km Non-Regulated - 30 km and above N/A Range - Office Environment Up to 500 ft. (150m) Maximum no. of APs per wired LAN Unlimited Maximum no. of co-located (overlapping) cells (Access Points) 15 Data Rate: 1, 2, or 3 Mbps Up to 2 Mbps Over 5 Mbps with overlapped cells over the air nominal net aggregate High Speed roaming up to 60 mph (90 kph) Load sharing support yes (with WIX) Dynamic rate selection based Yes on radio medium quality Electrical External Power Supply 100V - 250V, 50-60Hz, 0.5A via network PC Input Voltage 5Vdc 5Vdc Power Consumption 1.5A (peak) 1.2A (average) - XMT 365mA (peak) - RCV 280mA (peak) Dimensions (without antennas and power supply) 5.1” x 3.4” x 1.35” (13cm x 8.6cm x 3cm) standard PCMCIA Type II Weight (without antennas and power supply) 0.9 lb. (0.4 kg.) 1.1 oz (32 gr.) Environmental Operating Temperature 32° F - 105° F (0° C - 40° C) Operating Humidity 5% - 95% non-condensing Note: All specifications are subject to change without notice. BreezeNET PRO.11 9-5 User’s Guide Appendix 9.2.2 Specifications for TPA 24 Transmit Power Amplifier Models used with the BreezeNET PRO.11 Series • TPA 24 NL • TPA 24 NH Input Power • TPA 24 NL: -10dBm - 0dBm (Low input) • TPA 24 NH: 0dBm - +10dBm (High input) Output Power 24 dBm (250mW) (fixed output level) Input Impedance 50W Output Impedance 50W (DC short) Operating Temperature -20° to 50°C Power Requirements 12V; 420 mA (Power Supply and Power Inserter are supplied with models TPA-24 NL and TPA-24 NH) Connectors • TPA 24: IN - N-type Male; OUT - N-type Female • Power Inserter: RF - N-type Male; RF&DC - N-type Female Dimensions 70mm x 150mm x 25mm (2.8”x 6”x 1”) Operating Environment • TPA 24 - For outdoor/indoor use • Power Supply - For indoor use • Power Inserter - For indoor use Note: All specifications are subject to change without notice. User’s Guide 9-6 BreezeNET PRO.11 Series Appendix 9.2.3 Specifications for LNA 10 Low Noise Receive Amplifier Gain 10dB Noise Figure 1.5dB Typ, 2dB Max. Response Flatness ± 1.5dB Max. RF Input Level -15dBm Input Impedance 50W Output Impedance 50W Connectors • LNA-10: Power Supply: Required Voltage Required Current +12V to +28Vdc 20mA Operating Temperature -20° C to +50° C Dimensions 60mm x 35mm x 25mm (2.3”x 1.3”x 1”) Operating Environment LNA 10 - outdoor/indoor Power Supply - indoor Power inserter - indoor RF IN: N-type, female RF OUT: N-type, male Signal and Power IN: not in use Signal and Power OUT: F-type, female • Power Inserter: To CONV - F-type, female To TV - F-type, female Note: All specifications are subject to change without notice. BreezeNET PRO.11 9-7 User’s Guide Appendix 9.2.4 Specifications for RFS 122 Radio Frequency Splitter Insertion Loss 3.8dB max. Isolation 19dB min. Power Rating 10 W max. Internal Load Dissipation 125 mW max. Input Impedance 50W Output Impedance 50W Connectors • SUM: N-type, Male • PORTS: N-type, Female (on each port) Operating Temperature -20° C to +85° C Dimensions 51mm x 51mm x 19mm (2” x 2” x 0.75”) Operating Environment Outdoor/Indoor 9.2.5 Specifications for AL 1 Lightning Arrestor Turn on voltage 75V Insertion loss 0.3dB typical DC path from input to output existing Operating Temperature -55° C to +70° C Dimensions 67.5mm x 25mm x 25mm (2.7” x 1” x 1”) Connectors • Antenna Port: N-type, Female • Equipment Port: N-type, Female Operating Environment Indoor/Outdoor Grounding One of the female-type N connectors is mounted directly through a hole in the shelter wall and held in place with a lockwasher and nut. Note: All specifications are subject to change without notice. User’s Guide 9-8 BreezeNET PRO.11 Series Appendix 9.2.6 Specifications for AMP 2440 Bi-Directional Power Amplifier General Specifications Operating Range 2400-2483 MHz Operating Mode Bi-directional, half-duplex.Senses RF carrier from transmitter and automatically switches from receive to transmit mode. Connectors N-female Indicators TX and RX LEDs on both the amplifier and the DC bias injector Lightning Protection Direct DC ground at antenna connector DC Surge Protection 600 Watt TVS at 12 VDC input from transmission cable Transmitter Amplifier Transmit Gain Up to 15 dB Frequency Response +/-1 dB over operating range Transmit Output Power • AMP 2440-500 model: 500 mW * • AMP 2440-250 model: 250 mW. Transmit Input Power 3 mW minimum, 100mW maximum (+3dBm required to cause TX mode) Receiver Low Noise Amplifier (LNA) Receive Gain 18 dB typical Frequency Response +/-1 dB over operating range Noise Figure 3.5 dB approximately Third Order Intercept 20 dBm BreezeNET PRO.11 9-9 User’s Guide Appendix Mechanical and Environmental Operating Temperature -20°C to +60°C Power 12VDC @ 650mA or 105-240 VAC from power supply provided with kit Dimensions Amplifier: 3.85” x 2.52” x 1.46” DC Power injector: 4.42” x 2.40” x 1.22” Mounting Bracket for amplifier Accommodates pole/mast diameters from 3/4” to 3” Kit Weight Approx. 1.5 lb. with U-bolts 9.3 Wireless LAN Concepts Wireless LAN technology is becoming increasingly popular in large-scale and complex wireless networks, as more and more users are discovering its reliability and high performance. Originally designed for indoor office applications, today’s wireless LANs can be used for both indoor client-server and peer-to-peer networks as well as for outdoor point-to-point and point-to-multipoint remote bridging applications. Wireless LANs are designed to be modular and very flexible. They can also be optimized for different environments. For example, point-to-point outdoor links are less susceptible to interference and can have higher performance if designers increase the Dwell Time and disable the Collision Avoidance and Fragmentation mechanisms described later in this section. 7RSRORJ\ Wired LAN Topology Traditional LANs (Local Area Networks) link PCs and other computers to one another and to file servers, printers and other network equipment using cables or optic fibers as the transmission medium. User’s Guide 9-10 BreezeNET PRO.11 Series Appendix Figure 9-1. Wired LAN Topology Wireless LAN Topology Wireless LANs allow workstations to communicate and to access the network using radio propagation as the transmission medium. Wireless LANs can be connected to existing wired LANs as an extension, or can form the basis of a new network. While adaptable to both indoor and outdoor environments, wireless LANs are especially suited to indoor locations such as office buildings, manufacturing floors, hospitals and universities. The basic building block of the wireless LAN is the Cell. This is the area in which wireless communication takes place. The coverage area of a cell depends on the strength of the propagated radio signal and the type and construction of walls, partitions and other physical characteristics of the indoor environment. PC-based workstations, notebook and pen-based computers can move freely in the cell. BreezeNET PRO.11 9-11 User’s Guide Appendix Figure 9-2. The Basic Wireless LAN Cell Each wireless LAN cell requires some communications and traffic management. This is coordinated by an Access Point (AP) which communicates with each wireless station in its coverage area. Stations also communicate with each other via the AP, so communicating stations can be hidden from one another. In this way, the AP functions as a relay, extending the range of the system. The AP also functions as a bridge between the wireless stations and the wired network and the other wireless cells. Connecting the AP to the backbone or other wireless cells can be done by wire or by a separate wireless link, using wireless bridges. The range of the system can be extended by cascading several wireless links one after the other. User’s Guide 9-12 BreezeNET PRO.11 Series Appendix Figure 9-3. Wireless LAN Connectivity 5RDPLQJ When any area in the building is within reception range of more than one Access Point, the cells’ coverage is said to overlap. Each wireless station automatically establishes the best possible connection with one of the Access Points. Overlapping coverage areas are an important attribute of the wireless LAN setup, because this enables seamless roaming between overlapping cells. BreezeNET PRO.11 9-13 User’s Guide Appendix Figure 9-4. Roaming Through Overlapping Cells Roaming allows mobile users with portable stations to move freely between overlapping cells, constantly maintaining their network connection. Roaming is seamless: a work session can be maintained while moving from one cell to another. Multiple Access Points can provide wireless coverage for an entire building or campus. When the coverage area of two or more APs overlap, the stations in the overlapping area can establish the best possible connection with one of the APs, continuously searching for the best AP. In order to minimize packet loss during switch-over, the “old” and “new” APs communicate to coordinate the process. /RDG6KDULQJ Congested areas with many users and heavy traffic load per unit may require a multi-cell structure. In a multi-cell structure, several co-located APs “illuminate” the same area creating a common coverage area which increases aggregate throughput. Stations inside the common coverage area automatically associate with the AP that is less loaded and provides the best signal quality. The stations are equally divided between the APs in order to equally share the load between all APs. Efficiency is maximized because all APs are working at the same low level load. Load balancing is also known as load sharing. User’s Guide 9-14 BreezeNET PRO.11 Series Appendix Figure 9-5. The Common Coverage Area of a Multi-cell Structure '\QDPLF5DWH6ZLWFKLQJ The data rate of each station is automatically adjusted according to the received signal quality. Performance (throughput) is maximized by increasing the data rate and decreasing retransmissions. This is very important for mobile applications where the signal quality fluctuates rapidly, but less important for fixed outdoor installations where signal quality is stable. 0HGLD$FFHVV When many users are located in the same area, performance becomes an issue. To address this issue, wireless LANs use the Carrier Sense Multiple Access (CSMA) algorithm with a Collision Avoidance (CA) mechanism in which each unit senses the medium before it starts to transmit. If the medium is free for several microseconds, the unit can transmit for a limited time. If the medium is busy, the unit will back off for a random time before it senses again. Since transmitting units compete for air time, the protocol should ensure equal fairness between the stations. BreezeNET PRO.11 9-15 User’s Guide Appendix )UDJPHQWDWLRQ Fragmentation of packets into shorter fragments adds protocol overhead and reduces protocol efficiency when no errors are expected, but reduces the time spent on retransmissions if errors are likely to occur. No fragmentation or longer fragment length adds overhead and reduces efficiency in case of errors and retransmissions (multi-path). &ROOLVLRQ$YRLGDQFH To avoid collisions with other incoming calls, each station transmits a short RTS (Request To Send) frame before the data frame. The Access Point sends back a CTS (Clear To Send) frame with permission to start the data transmission. This frame includes the time that this station is going to transmit. This frame is received by all the stations in the cell, notifying them that another unit will transmit during the following Xmsec, so they can not transmit even if the medium seems to be free (the transmitting unit is out of range). &KDQQHOL]DWLRQ Using Frequency Hopping Spread Spectrum (FHSS), different hopping sequences are assigned to different co-located cells. Hopping sequences are designed so different cells can work simultaneously using different channels. Since hopping sequences and hopping timing of different cells cannot be synchronized (according to FCC regulations), different cells might try to use the same channel occasionally. Then, one cell uses the channel while the other cell backs off and waits for the next hop. In the case of a very noisy environment (multiples and interference), the system must hop quickly. If the link is quiet and clean, it is better to hop slowly, reducing overhead and increasing efficiency. User’s Guide 9-16 BreezeNET PRO.11 Series Appendix 9.4 Radio Signal Propagation 9.4.1 Introduction This section explains and simplifies many of the terms relating to antennas and RF (Radio Frequency) used when dealing with an RF installation system. The following diagram depicts a typical radio system: Figure 9-6. Typical Radio System A radio system transmits information to the transmitter. The information is transmitted through an antenna which converts the RF signal into an electromagnetic wave. The transmission medium for electromagnetic wave propagation is free space. The electromagnetic wave is intercepted by the receiving antenna which converts it back to an RF signal. Ideally, this RF signal is the same as that originally generated by the transmitter. The original information is then demodulated back to its original form. BreezeNET PRO.11 9-17 User’s Guide Appendix 9.4.2 RF Terms and Definitions G% The dB convention is an abbreviation for decibels. It shows the relationship between two values. 5)3RZHU/HYHO RF power level at either the transmitter output or the receiver input is expressed in Watts. It can also be expressed in dBm. The relation between dBm and Watts can be expressed as follows: PdBm = 10 x Log Pmw For example: 1 Watt = 1000 mW; PdBm = 10 x Log 1000 = 30 dBm 100 mW; PdBm = 10 x Log 100 = 20 dBm For link budget calculations, the dBm convention is more convenient than the Watts convention. $WWHQXDWLRQ Attenuation (fading) of an RF signal is defined as follows: Figure 9-7. Attenuation of an RF signal Pin is the incident power level at the attenuated input Pout is the output power level at the attenuated output Attenuation is expressed in dB as follows: PdB = -10 x Log (Pout/Pin) For example: If, due to attenuation, half the power is lost (Pout/Pin = 1/2), attenuation in dB is -10 x Log (1/2) = 3dB User’s Guide 9-18 BreezeNET PRO.11 Series Appendix 3DWK/RVV Loss of power of an RF signal traveling (propagating) through space. It is expressed in dB. Path loss depends on: • The distance between transmitting and receiving antennas • Line of sight clearance between the receiving and transmitting antennas • Antenna height )UHH6SDFH/RVV Attenuation of the electromagnetic wave while propagating through space. This attenuation is calculated using the following formula: Free space loss = 32.4 + 20xLog(FMhz) + 20xLog(RKm) F is the RF frequency expressed in Mhz. R is the distance between the transmitting and receiving antennas. At 2.4 Ghz, this formula is: 100+20xLog(RKm) $QWHQQD&KDUDFWHULVWLFV Isotropic Antenna A hypothetical antenna having equal radiation intensity in all directions. Used as a zero dB gain reference in directivity calculation (gain). Antenna Gain A measure of directivity. It is defined as the ratio of the radiation intensity in a given direction to the radiation intensity that would be obtained if the power accepted by the antenna was radiated equally in all directions (isotropically). Antenna gain is expressed in dBi. BreezeNET PRO.11 9-19 User’s Guide Appendix Radiation Pattern A graphical representation in either polar or rectangular coordinates of the spatial energy distribution of an antenna. Side Lobes The radiation lobes in any direction other than that of the main lobe. Omni-directional Antenna Radiates and receives equally in all directions in azimuth. The following diagram shows the radiation pattern of an omni-directional antenna with its side lobes in polar form. Figure 9-8. Side View Figure 9-9. Top View Directional Antenna Radiates and receives most of the signal power in one direction. The following diagram shows the radiation pattern of a directional antenna with its side lobes in polar form: User’s Guide 9-20 BreezeNET PRO.11 Series Appendix Figure 9-10. Radiation Pattern of Directional Antenna Antenna Beamwidth The directiveness of a directional antenna. Defined as the angle between two halfpower (-3 dB) points on either side of the main lobe of radiation. 6\VWHP&KDUDFWHULVWLFV Receiver Sensitivity The minimum RF signal power level required at the input of a receiver for certain performance (e.g. BER). EIRP (Effective Isotropic Radiated Power) The antenna transmitted power. Equal to the transmitted output power minus cable loss plus the transmitting antenna gain. Pout Output power of transmitted in dBm Ct Transmitter cable attenuation in dB Gt Transmitting antenna gain in dBi Gr Receiving antenna gain in dBi Pl Path loss in dB Cr Receiver cable attenuation is dB Si Received power level at receiver input in dBm Ps Receiver sensitivity is dBm Si = Pout - Ct + Gt - Pl + Gr - Cr EIRP = Pout - Ct + Gt BreezeNET PRO.11 9-21 User’s Guide Appendix Example: Link Parameters: Frequency: 2.4 Ghz Pout = 4 dBm (2.5 mW) Tx and Rx cable length (Ct and Cr) = 10 m. cable type RG214 (0.6 dB/meter) Tx and Rx antenna gain (Gt and Gr) = 18 dBi Distance between sites = 3 Km Receiver sensitivity (Ps) = -84 dBm Link Budget Calculation EIRP = Pout - Ct + Gt = 16 dBm Pl = 32.4 + 20xLog(FMhz) + 20xLog(RKm) ≅ 110 dB Si = EIRP - Pl + Gr - Cr = -82 dBm In conclusion, the received signal power is above the sensitivity threshold, so the link should work. The problem is that there is only a 2 dB difference between received signal power and sensitivity. Normally, a higher margin is desirable due to fluctuation in received power as a result of signal fading. User’s Guide 9-22 BreezeNET PRO.11 Series Appendix 6LJQDO)DGLQJ Fading of the RF signal is caused by several factors: • Multipath The transmitted signal arrives at the receiver from different directions, with different path lengths, attenuation and delays. The summed signal at the receiver may result in an attenuated signal. Figure 9-11. Multipath Reception • Bad Line of Sight An optical line of sight exists if an imaginary straight line can connect the antennas on either side of the link. Radio wave clear line of sight exists if a certain area around the optical line of sight (Fresnel zone) is clear of obstacles. A bad line of sight exists if the first Fresnel zone is obscured. • Link Budget Calculations • Weather conditions (Rain, wind, etc.) At high rain intensity (150 mm/hr), the fading of an RF signal at 2.4 GHz may reach a maximum of 0.02 dB/Km Wind may cause fading due to antenna motion. BreezeNET PRO.11 9-23 User’s Guide Appendix • Interference Interference may be caused by another system on the same frequency range, external noise, or some other co-located system. 7KH/LQHRI6LJKW&RQFHSW An optical line of sight exists if an imaginary straight line can be drawn connecting the antennas on either side of the link. Clear Line of Sight A clear line of sight exists when no physical objects obstruct viewing one antenna from the location of the other antenna. A radio wave clear line of sight exists if a defined area around the optical line of sight (Fresnel Zone) is clear of obstacles. Fresnel Zone The Fresnel zone is the area of a circle around the line of sight. The Fresnel Zone is defined as follows: Figure 9-12. Fresnel Zone R = ½ √ (λxD) R: radius of the first Fresnel zone λ: wavelength D: distance between sites User’s Guide 9-24 BreezeNET PRO.11 Series Appendix Figure 9-13. Fresnel Zone Clear of Obstacles When at least 80% of the first Fresnel Zone is clear of obstacles, propagation loss is equivalent to that of free space. 9.5 IEEE 802.11 Technical Tutorial The purpose of this chapter is to give technical readers a basic overview of the new IEEE 802.11 Standard, enabling them to understand the basic concepts, principles of operation, and the reasons behind some of the features and/or components of the Standard. The document does not cover the entire Standard and does not provide enough information for the reader to implement an 802.11-compliant device (for this purpose the reader should refer to the standard). 9.5.1 Architecture Components An 802.11 LAN is based on a cellular architecture where the system is subdivided into cells. Each cell (called Basic Service Set, or BSS, in the 802.11 nomenclature) is controlled by a Base Station (called Access Point or, in short, AP). Although a wireless LAN may be formed by a single cell, with a single Access Point, (and as will be described later, it can also work without an Access Point), most installations will be formed by several cells, where the Access Points are BreezeNET PRO.11 9-25 User’s Guide Appendix connected through some kind of backbone (called Distribution System or DS). This backbone is typically Ethernet but, in some cases, might be wireless itself. The whole interconnected wireless LAN, including the different cells, their respective Access Points and the Distribution System, is seen as a single 802 network to the upper layers of the OSI model and is known in the Standard as the Extended Service Set (ESS). The following diagram shows a typical 802.11 LAN including the components described above: Figure 9-14. Typical 802.11 LAN The standard also defines the concept of a Portal. A portal is a device that interconnects between an 802.11 and another 802 LAN. This concept is an abstract description of part of the functionality of a “translation bridge”. Even though the standard does not necessarily require it, typical installations will have the AP and the Portal on a single physical entity. This is also the case with BreezeCOM’s AP which provides both functions. User’s Guide 9-26 BreezeNET PRO.11 Series Appendix 9.5.2 IEEE 802.11 Layers Description As in any 802.x protocol, the IEEE 802.11 protocol covers the Media Access Control Layer (MAC) and Physical Layer (PHY). The Standard currently defines a single MAC which interacts with three PHYs (all of them running at 1 or 2 Mbit/s) as follows: • Frequency Hopping Spread Spectrum (FHSS) in the 2.4 GHz Band • Direct Sequence Spread Spectrum (DSSS) in the 2.4 GHz Band, and • InfraRed 802.2 802.11 MAC FH Data Link Layer DS IR PHY Layer Beyond the standard functionality usually performed by MAC Layers, the 802.11 MAC performs other functions that are typically related to upper layer protocols, such as Fragmentation, Packet Retransmissions, and Acknowledges. 9.5.3 The MAC Layer The MAC Layer defines two different access methods, the Distributed Coordination Function and the Point Coordination Function: 9.5.3.1 The Basic Access Method: CSMA/CA The basic access mechanism, called the Distributed Coordination Function, is basically a Carrier Sense Multiple Access with Collision Avoidance mechanism (known as CSMA/CA). CSMA protocols are well-known in the industry, the most popular being Ethernet, which is a CSMA/ CD protocol (CD standing for Collision Detection). A CSMA protocol works as follows: A station desiring to transmit senses the medium. If the medium is busy (i.e. some other station is transmitting) then the station defers its transmission to a later time. If the medium seems free then the station is allowed to transmit. BreezeNET PRO.11 9-27 User’s Guide Appendix These kinds of protocols are very effective when the medium is not heavily loaded since it allows stations to transmit with minimum delay. But there is always a chance of two or more stations simultaneously sensing the medium as being free and transmitting at the same time, causing a collision. These collision situations must be identified so the MAC layer can retransmit the packet itself, not by the upper layers, to avoid significant delay. In the Ethernet case, a collision is recognized by the transmitting stations which listen while transmitting and go into a retransmission phase based on an exponential random back-off algorithm. While these Collision Detection Mechanisms are a good idea on a wired LAN, they cannot be used on a wireless LAN environment for two main reasons: • Implementing a Collision Detection Mechanism would require the implementation of a Full-Duplex radio capable of transmitting and receiving at the same time, an approach that would increase the price significantly. • In a wireless environment we cannot assume that all stations can hear each other (a basic assumption of the Collision Detection scheme), and the fact that a station wants to transmit and senses the medium as free doesn’t necessarily mean that the medium is free around the receiver’s area. In order to overcome these problems, 802.11 uses a Collision Avoidance (CA) mechanism together with a Positive Acknowledge scheme, as follows: 1. A station wanting to transmit senses the medium. If the medium is busy then it delays. If the medium is free for a specified time (called Distributed Inter Frame Space (DIFS) in the standard), then the station is allowed to transmit. 2. The receiving station checks the CRC of the received packet and sends an acknowledgment packet (ACK). Receipt of the acknowledgment indicates to the transmitter that no collision occurred. If the sender does not receive the acknowledgment, then it retransmits the fragment until it either receives acknowledgment or is thrown away after a given number of retransmissions. User’s Guide 9-28 BreezeNET PRO.11 Series Appendix 9.5.3.2 Virtual Carrier Sense In order to reduce the probability of two stations colliding because they cannot hear each other, the standard defines a Virtual Carrier Sense mechanism: A station wanting to transmit a packet first transmits a short control packet called RTS (Request To Send), which includes the source, destination, and the duration of the following transaction (i.e. the packet and the respective ACK), the destination station responds (if the medium is free) with a response control Packet called CTS (Clear to Send), which includes the same duration information. All stations receiving either the RTS or the CTS, set their Virtual Carrier Sense indicator (called NAV, for Network Allocation Vector), for the given duration, and use this information together with the Physical Carrier Sense when sensing the medium. This mechanism reduces the probability of a collision on the receiver area by a station that is “hidden” from the transmitter to the short duration of the RTS transmission because the station hears the CTS and “reserves” the medium as busy until the end of the transmission. The duration information on the RTS also protects the transmitter area from collisions during the ACK (from stations that are out of range of the acknowledging station). It should also be noted that, due to the fact that the RTS and CTS are short frames, the mechanism also reduces the overhead of collisions, since these are recognized faster than if the whole packet was to be transmitted. (This is true if the packet is significantly bigger than the RTS, so the standard allows for short packets to be transmitted without the RTS/CTS transmission. This is controlled per station by a parameter called RTS Threshold). The following diagrams show an exchange between stations A and B, and the NAV setting of their neighbors: BreezeNET PRO.11 9-29 User’s Guide Appendix Figure 9-15. Transaction Between Stations A and B The NAV State is combined with the physical carrier sense to indicate the busy state of the medium. 9.5.3.3 MAC Level Acknowledgments As mentioned earlier in this document, the MAC layer performs Collision Detection by expecting the reception of an acknowledge to any transmitted fragment (Packets that have more than one destination, such as Multicasts, are not acknowledged.) 9.5.3.4 Fragmentation and Reassembly Typical LAN protocols use packets several hundred bytes long (the longest Ethernet packet could be up to 1518 bytes long). There are several reasons why it is preferable to use smaller packets in a wireless LAN environment: User’s Guide • Due to the higher Bit Error Rate of a radio link, the probability of a packet getting corrupted increases with the packet size. • In case of packet corruption (either due to collision or noise), the smaller the packet, the less overhead it causes to retransmit it. • On a Frequency Hopping system, the medium is interrupted periodically for hopping (in our case every 20 milliseconds), so, the smaller the packet, the smaller the chance that the transmission will be postponed after dwell time. 9-30 BreezeNET PRO.11 Series Appendix However, it doesn’t make sense to introduce a new LAN protocol that cannot deal with packets 1518 bytes long which are used on Ethernet, so the committee decided to solve the problem by adding a simple fragmentation/ re-assembly mechanism at the MAC Layer. The mechanism is a simple Send-and-Wait algorithm, where the transmitting station is not allowed to transmit a new fragment until one of the following happens: 1. Receives an ACK for the said fragment, or 2. Decides that the fragment was retransmitted too many times and drops the whole frame. It should be noted that the standard does allow the station to transmit to a different address between retransmissions of a given fragment. This is particularly useful when an AP has several outstanding packets to different destinations and one of them does not respond. The following diagram shows a frame (MSDU) being divided to several fragments (MPDUs): Figure 9-16. Frame Fragmentation BreezeNET PRO.11 9-31 User’s Guide Appendix 9.5.3.5 Inter-Frame Spaces The Standard defines 4 types of Inter Frame Spaces, which are use to provide different priorities: • SIFS – Short Inter Frame Space, separates transmissions belonging to a single dialog (e.g. Fragment-Ack), and is the minimum Inter Frame Space. There is always at most one single station to transmit at any given time, therefore giving it priority over all other stations. This value is a fixed value per PHY and is calculated in such a way that the transmitting station will be able to switch back to receive mode and be capable of decoding the incoming packet. On the 802.11 FH PHY this value is set to 28 microseconds • PIFS – Point Coordination IFS, is used by the Access Point (or Point Coordinator, as called in this case), to gain access to the medium before any other station. This value is SIFS plus a Slot Time (defined in the following paragraph), i.e. 78 microseconds. • DIFS – Distributed IFS, is the Inter Frame Space used for a station willing to start a new transmission, which is calculated as PIFS plus one slot time, i.e. 128 microseconds. • EIFS – Extended IFS, which is a longer IFS used by a station that has received a packet that it could not understand. This is needed to prevent the station (which could not understand the duration information for the Virtual Carrier Sense) from colliding with a future packet belonging to the current dialog. 9.5.3.6 Exponential Back-off Algorithm Back-off is a well known method used to resolve contention between different stations wanting to access the medium. The method requires each station to choose a Random Number (n) between 0 and a given number, and wait for this number of Slots before accessing the medium, always checking if a different station has accessed the medium before. The Slot Time is defined in such a way that a station will always be capable of determining if another station has accessed the medium at the beginning of the previous slot. This reduces collision probability by half. User’s Guide 9-32 BreezeNET PRO.11 Series Appendix Exponential Back-off means that each time the station chooses a slot and happens to collide, it will increase the maximum number for the random selection exponentially. The 802.11 standard defines an Exponential Back-off Algorithm, that must be executed in the following cases: • When the station senses the medium before the first transmission of a packet, and the medium is busy • After each retransmission, and • After a successful transmission The only case when this mechanism is not used is when the station decides to transmit a new packet and the medium has been free for more than DIFS. The following figure shows a schematic of the access mechanism: Figure 9-17. Access Mechanism 9.5.4 How Does a Station Join an Existing Cell When a station wants to access an existing BSS (either after power-up, sleep mode, or just entering the BSS area), the station needs to get synchronization information from the Access Point (or from the other stations when in ad-hoc mode, which will be discussed later). The station can get this information by one of two means: BreezeNET PRO.11 9-33 User’s Guide Appendix • Passive Scanning: In this case the station just waits to receive a Beacon Frame from the AP, (the beacon frame is a frame sent out periodically by the AP containing synchronization information), or • Active Scanning: In this case the station tries to locate an Access Point by transmitting Probe Request Frames, and waits for Probe Response from the AP. Both methods are valid. A method is chosen according to the power consumption/performance trade-off. 9.5.4.1 The Authentication Process Once the station has located an Access Point, and decides to join its BSS, it goes through the Authentication Process. This is the interchange of information between the AP and the station, where each side proves the knowledge of a given password. 9.5.4.2 The Association Process Once the station is authenticated, it then starts the Association Process, which is the exchange of information about the station and BSS capabilities, and which allows the DSS (the set of APs) to know about the current position of the station). A station is capable of transmitting and receiving data frames only after the association process is completed. 9.5.5 Roaming Roaming is the process of moving from one cell (or BSS) to another without losing connection. This function is similar to the cellular phones’ handover, with two main differences: 1. On a packet-based LAN system, the transition from cell to cell may be performed between packet transmissions, as opposed to telephony where the transition may occur during a phone conversation, this makes the LAN roaming a little easier, but 2. On a voice system, a temporary disconnection may not affect the conversation, while in a packet-based environment it significantly reduces performance because retransmission is then performed by the upper layer protocols. User’s Guide 9-34 BreezeNET PRO.11 Series Appendix The 802.11 standard does not define how roaming should be performed, but defines the basic tools. These include active/passive scanning, and a re-association process, where a station which is roaming from one Access Point to another becomes associated with the new one1. 9.5.6 Keeping Synchronization Stations need to keep synchronization, which is necessary for keeping hopping synchronized, and other functions like Power Saving. On an infrastructure BSS, this is achieved by all the stations updating their clocks according to the AP’s clock, using the following mechanism: The AP periodically transmits frames called Beacon Frames. These frames contain the value of the AP’s clock at the moment of transmission (note that this is the moment when transmission actually occurs, and not when it is put in the queue for transmission. Since the Beacon Frame is transmitted using CSMA rules, transmission may be delayed significantly). The receiving stations check the value of their clocks at the moment the signal is received, and correct it to keep in synchronization with the AP’s clock. This prevents clock drifting which could cause loss of synch after a few hours of operation. 9.5.7 Security Security is one of the first concerns that people have when deploying a wireless LAN. The 802.11 committee has addressed the issue by providing what is referred to as WEP (Wired Equivalent Privacy). Users are primarily concerned that an intruder should not be able to: 1 • Access the Network resources by using similar wireless LAN equipment • Capture wireless LAN traffic (eavesdropping) The BreezeNET product line provides a patented enhanced roaming mechanism which allows stations to roam at speeds of 60 Km/h without losing or duplicating packets. BreezeNET PRO.11 9-35 User’s Guide Appendix 9.5.7.1 Preventing Access to Network Resources This is done by the use of an Authentication mechanism where a station needs to prove knowledge of the current key. This is very similar to Wired LAN privacy, in the sense that an intruder needs to enter the premises (by using a physical key) in order to connect his workstation to the wired LAN. 9.5.7.2 Eavesdropping Eavesdropping is prevented by using the WEP algorithm which is a pseudo-random number generator initialized by a shared secret key. This PRNG outputs a key sequence of pseudo-random bits equal in length to the largest possible packet which is combined with the outgoing/incoming packet producing the packet transmitted in the air. The WEP is a simple algorithm based on RSA’s RC4 which has the following properties: • Reasonably strong: Brute-force attack to this algorithm is difficult because every frame is sent with an Initialization Vector which restarts the PRNG for each frame. • Self Synchronizing: The algorithm re-synchronizes for each message. This is necessary in order to work in a connection-less environment, where packets may get lost (as any LAN). 9.5.7.3 Power Saving Wireless LANs are typically related to mobile applications. In this type of application, battery power is a scare resource. This is the reason why the 802.11 standard directly addresses the issue of Power Saving and defines an entire mechanism which enables stations to go into sleep mode for long periods of time without losing information. The main idea behind the Power Saving Mechanism is that the AP maintains a continually updated record of the stations currently working in Power Saving mode, and buffers the packets addressed to these stations until either the stations specifically request the packets by sending a polling request, or until they change their operation mode. User’s Guide 9-36 BreezeNET PRO.11 Series Appendix As part of its Beacon Frames, the AP also periodically transmits information about which Power Saving Stations have frames buffered at the AP, so these stations wake up in order to receive the Beacon Frame. If there is an indication that there is a frame stored at the AP waiting for delivery, then the station stays awake and sends a Polling message to the AP to get these frames. Multicasts and Broadcasts are stored by the AP, and transmitted by the AP at predefined intervals (called DTIM), all stations - both stations working in Power Saving mode and stations working in Normal mode, will be awake at that period and will receive this kind of frames. Unicasts are stored by the AP, and transmitted at station-defined intervals (called Listen Intervals), when all stations who wish to receive this kind of frames are awake. Unicast frames are transmitted upon request only, whereas, Multicast frames are transmitted automatically at every DTIM interval. Note: Unicast frames can be also poled by the stations at the DTIM intervals. 9.5.8 Frame Types There are three main types of frames: • Data Frames: which are used for data transmission • Control Frames: which are used to control access to the medium (e.g. RTS, CTS, and ACK), and • Management Frames: which are frames that are transmitted in the same manner as data frames to exchange management information, but are not forwarded to upper layers (e.g. beacon frames). Each frame type is subdivided into different Subtypes, according to its specific function. BreezeNET PRO.11 9-37 User’s Guide Appendix 9.5.9 Frame Formats All 802.11 frames are composed of the following components: Preamble PLCP Header MAC Data CRC 9.5.9.1 Preamble This is PHY dependent, and includes: • Synch: An 80-bit sequence of alternating zeros and ones, which is used by the PHY circuitry to select the appropriate antenna (if diversity is used), and to reach steady-state frequency offset correction and synchronization with the received packet timing. • SFD: A Start Frame delimiter which consists of the 16-bit binary pattern 0000 1100 1011 1101, which is used to define frame timing. 9.5.9.2 PLCP Header The PLCP Header is always transmitted at 1 Mbit/s and contains Logical information used by the PHY Layer to decode the frame. It consists of: User’s Guide • PLCP_PDU Length Word: which represents the number of bytes contained in the packet. This is useful for the PHY to correctly detect the end of packet. • PLCP Signaling Field: which currently contains only the rate information, encoded in 0.5 Mbps increments from 1 Mbit/s to 4.5 Mbit/s. • Header Error Check Field: Which is a 16 Bit CRC error detection field. 9-38 BreezeNET PRO.11 Series Appendix 9.5.9.3 MAC Data The following figure shows the general MAC Frame Format. Part of the fields are only present in part of the frames as described later. Figure 9-18. MAC Frame Format )UDPH&RQWURO)LHOG The Frame Control field contains the following information: Figure 9-19. Frame Control Field Protocol Version This field consists of 2 bits which are invariant in size and placement across following versions of the 802.11 Standard, and will be used to recognize possible future versions. In the current version of the standard the value is fixed as 0. BreezeNET PRO.11 9-39 User’s Guide Appendix Type and Subtype These 6 bits define the Type and SubType of the frame as indicated in the following table: Type Value b3-b2 00 00 00 00 00 00 00 00 00 00 00 00 00 01 01 01 01 01 01 01 10 10 10 10 10 10 10 10 10 10 Type Description Management Management Management Management Management Management Management Management Management Management Management Management Management Control Control Control Control Control Control Control Data Data Data Data Data Data Data Data Data Data Subtype Value b7 b6 b5 b4 0000 0001 0010 0011 0100 0101 0110-0111 1000 1001 1010 1011 1100 1101-1111 0000-0001 1010 1011 1100 1101 1110 1111 0000 0001 0010 0011 0100 0101 0110 0111 1000-1111 0000-1111 Subtype Description Association Request Association Response Association Request Reassociation Response Probe Request Probe Response Reserved Beacon ATIM Disassociation Authentication Deauthentication Reserved Reserved PS-Poll RTS CTS ACK CF End CF End + CF-ACK Data Data + CF-Ack Data + CF-Poll Data + CF-ACK + CF-Poll Null Function (no data) CF-Ack (no data) CF-Poll (no data) CF-Ack + CF-Poll (no data) Reserved Reserved ToDS This bit is set to 1 when the frame is addressed to the AP for forwarding to the Distribution System (including the case where the destination station is in the same BSS, and the AP is to relay the frame). The Bit is set to 0 in all other frames. User’s Guide 9-40 BreezeNET PRO.11 Series Appendix FromDS This bit is set to 1 when the frame is received from the Distribution System. More Fragments This bit is set to 1 when there are more fragments belonging to the same frame following the current fragment. Retry This bit indicates that this fragment is a retransmission of a previously transmitted fragment. This is used by the receiver station to recognize duplicate transmissions of frames that may occur when an Acknowledgment packet is lost. Power Management This bit indicates the Power Management mode that the station will be in after the transmission of this frame. This is used by stations which are changing state either from Power Save to Active or vice versa. More Data This bit is used for Power Management as well as by the AP to indicate that there are more frames buffered for this station. The station may decide to use this information to continue polling or even changing to Active mode. WEP This bit indicates that the frame body is encrypted according to the WEP algorithm Order This bit indicates that this frame is being sent using the Strictly-Ordered service class2. 2 The Strictly-Ordered Service Class is defined for users that cannot accept change of ordering between Unicast Frames and Multicast Frames (ordering of Unicast frames to a specific address is always maintained). The only known protocol that would need this service class is DEC’s LAT. BreezeNET PRO.11 9-41 User’s Guide Appendix 'XUDWLRQ,' This field has two meanings depending on the frame type: • In Power-Save Poll messages this is the Station ID • In all other frames this is the duration value used for the NAV Calculation. $GGUHVV)LHOGV A frame may contain up to 4 Addresses depending on the ToDS and FromDS bits defined in the Control Field, as follows: • Address-1 is always the Recipient Address (i.e. the BSS station that is the immediate recipient of the packet). If ToDS is set, this is the AP Address; if ToDS is not set, then this is the address of the end-station. • Address-2 is always the Transmitter Address (i.e. the station which is physically transmitting the packet). If FromDS is set, this is the AP address; if it is not set, then it is the Station address. • Address-3 is in most cases the remaining, missing address. On a frame with FromDS set to 1, Address-3 is the original Source Address; if the frame has the ToDS set, then Address 3 is the destination Address. • Address-4 is used in special cases where a Wireless Distribution System is used, and the frame is being transmitted from one Access Point to another. In such cases, both the ToDS and FromDS bits are set, so both the original Destination and the original Source Addresses are missing. The following Table summarizes the usage of the different Addresses according to ToDS and FromDS bits setting: To DS 0 0 1 1 User’s Guide From DS 0 1 0 1 Address 1 DA DA BSSID RA Address 2 SA BSSID SA TA 9-42 Address 3 BSSID SA DA DA Address 4 N/A N/A N/A SA BreezeNET PRO.11 Series Appendix 6HTXHQFH&RQWURO The Sequence Control Field is used to represent the order of different fragments belonging to the same frame, and to recognize packet duplications. It consists of two subfields, Fragment Number and Sequence Number, which define the frame and the number of the fragment in the frame. &5& The CRC is a 32-bit field containing a 32-bit Cyclic Redundancy Check (CRC). 9.5.10 Most Common Frame Formats 9.5.10.1 RTS Frame Format The RTS frame looks as follows: Figure 9-20. RTS Frame Format The RA of the RTS frame is the address of the STA on the wireless medium that is the intended immediate recipient of the next Data or Management frame. The TA is the address of the STA transmitting the RTS frame. The Duration value is the time, in microseconds, required to transmit the next Data or Management frame, plus one CTS frame, plus one ACK frame, plus three SIFS intervals. BreezeNET PRO.11 9-43 User’s Guide Appendix 9.5.10.2 CTS Frame Format The CTS frame looks as follows: Figure 9-21. CTS Frame The Receiver Address (RA) of the CTS frame is copied from the Transmitter Address (TA) field of the immediately previous RTS frame to which the CTS is a response. The Duration value is the value obtained from the Duration field of the immediately previous RTS frame, minus the time, in microseconds, required to transmit the CTS frame and its SIFS interval. 9.5.10.3 ACK Frame Format The ACK frame looks as follows: Figure 9-22. ACK Frame Format The Receiver Address of the ACK frame is copied from the Address 2 field of the immediately previous frame. If the More Fragment bit was set to 0 in the Frame Control field of the previous frame, the Duration value is set to 0, otherwise the Duration value is obtained from User’s Guide 9-44 BreezeNET PRO.11 Series Appendix the Duration field of the previous frame, minus the time, in microseconds, required to transmit the ACK frame and its SIFS interval. 9.5.11 Point Coordination Function (PCF) Beyond the basic Distributed Coordination Function, there is an optional Point Coordination Function, which may be used to implement time-bounded services, like voice or video transmission. This Point Coordination Function makes use of the higher priority that the Access Point may gain by the use of a smaller Inter Frame Space (PIFS). By using this higher priority access, the Access Point issues polling requests to the stations for data transmission, hence controlling medium access. To still enable regular stations to access the medium, there is a provision that the Access Point must leave enough time for Distributed Access in between the PCF. 9.5.12 Ad-Hoc Networks In certain circumstances, users may wish to build up wireless LAN networks without an infrastructure (more specifically without an Access Point). This may include file transfer between two notebook users, co-workers meeting outside the office, etc. The 802.11 standard addresses this need by the definition of an “ad-hoc” mode of operation. In this case, there is no Access Point and part of its functionality is performed by the end-user stations (such as Beacon Generation, synchronization, etc.). Other AP functions are not supported (such as frame-relaying between two stations not in range, or Power Saving). BreezeNET PRO.11 9-45 User’s Guide Index 1 10BaseT cable ................................................. 2-4 A Access Control Change Access Rights .............................. 3-29 Change Installer Password ....................... 3-30 Show Current Access Right...................... 3-30 Access Method .............................................. 9-27 Access Point Data Rates Supported ................................. 1-4 Description.................................................. 1-4 Displaying Neighboring APs.................... 3-28 LEDs ........................................................... 2-6 Model types ................................................ 1-5 Positioning .................................................. 2-3 Redundancy Support................................. 3-16 Access Points LEDs ........................................ 2-6 Accessing An Existing BSS ....................................... 9-33 SA-PRC Configuration Utility ................. 4-13 Accessory Installation ..................................... 6-1 Activating the Power Save Feature ............... 4-19 Active Scanning ............................................ 9-34 Address Fields ............................................... 9-42 Ad-Hoc Networks.......................................... 9-45 Advanced Settings AP Redundancy Support .......................... 3-16 Maintenance.............................................. 3-17 Performance.............................................. 3-15 Radio......................................................... 3-16 Translation Mode...................................... 3-14 AL 1 Lightning Arrestor.................................. 6-5 Specifications.............................................. 9-8 Alias Button................................................... 4-29 BreezeNET PRO.11 Series AMP 2440 Bi-Directional Power Amplifier ........6-6 Installation...................................................6-8 Specifications..............................................9-9 Antenna Alignment .................................................5-18 Beamwidth ................................................9-21 Diversity.......................................... 5-13, 5-19 Gain...........................................................9-19 Kits ............................................................5-31 Polarization ..................................... 5-14, 5-19 Seal............................................................5-20 Antennas for Indoor Applications .................5-13 Antennas for Outdoor Applications Point-to-Multipoint ...................................5-18 Point-to-Point............................................5-18 AP Redundancy Support................................3-16 AP-10 Access Point .......................................1-13 Architecture Components ..............................9-25 Association Process .......................................9-34 Attenuation.....................................................9-18 Authentication Process ..................................9-34 B Back-off Method............................................9-32 Booster .............................................................6-1 BreezeNET PRO.11 Functional Description..............................1-13 Series Features ............................................1-2 Series Product Line .....................................1-3 Units Specifications ....................................9-3 BreezeVIEW....................................................1-5 Bridge LEDs ....................................................2-5 Bridging menu ...............................................3-11 Index-1 User’s Guide Index C Card & Socket Services................................. 4-38 Cell Size................................................5-15, 5-20 Cell, Defined.................................................. 9-11 Changing Access Rights ........................................... 3-29 Configuration Access mode ..................... 4-18 Installer Password..................................... 3-30 Password ................................................... 4-18 Channelization............................................... 9-16 Checking Counters .......................................... 8-5 Checking Unit Functionality using LEDs ....... 2-5 Choosing a Hopping Standard....................... 4-24 Clear Line of Sight ........................................ 9-24 Collision Avoidance mechanism..........9-15, 9-28 Collision Detection mechanism .................... 9-28 Communication Parameters, Local Terminal ...... 3-1 Configuration Notes ...................................... 4-39 Configuration utility, SA-PCR, using ........... 4-13 Connecting Remote Offices to Main Office Network ... 5-3 Units to the Ethernet Port ........................... 2-4 Units to the Power Supply .......................... 2-4 Construction Materials .................................. 5-14 Counters Checking ..................................................... 8-5 Display Rate counters............................... 3-22 Ethernet counters ...............................3-18, 8-5 Power Saving counters ............................. 3-24 Resetting ................................................... 3-24 System counters........................................ 3-18 Wireless LAN counters ............................ 3-19 WLA counters............................................. 8-5 CRC Field...................................................... 9-43 CSMA...................................................9-15, 9-35 CSMA/CA ..................................................... 9-27 CSMA/CD ....................................................... 9-3 D dB .................................................................. 9-18 Default button................................................ 4-17 DIFS .............................................................. 9-32 Directional Antenna ...................................... 9-20 Display Neighboring AP's ............................. 3-28 Distributed Coordination Function................ 9-27 User’s Guide Downloading Upgrades from the Web ............7-1 Duplicates and Dwell Timeouts.....................3-21 Duration ID Field...........................................9-42 Dynamic Rate Switching ...............................9-15 E Editing SA-PCR card WLAN parameters .....4-15 EIFS ...............................................................9-32 EIRP...............................................................9-21 Enabling Power Save mode ...........................4-19 Encryption.........................See Security. See Wep ESSID .................................................... 4-11, 8-1 Ethernet Counters ............................................ 3-18, 8-5 Counters, resetting ....................................3-24 Overview...................................................1-13 Verifying the Connection............................2-6 ETSI Outdoor Range Tables DE-models ................................................5-24 D-models...................................................5-23 Event Log, viewing........................................3-28 Exponential Back-Off Algorithm ........ 9-28, 9-32 Exporting configuration files.........................4-17 Extended Range Access Point and Bridge ....1-12 Extended Service Set .......................................1-4 Extending range using the TPA-24 and LNA-10...5-27 F FCC Outdoor Range Tables...........................5-21 Features, BreezeNET PRO.11 series ...............1-2 Firmware/drivers, upgrading in SA-PCR ......4-32 Forwarded to the bridge.................................3-19 Four Port Station Adapter................................1-7 Fragmentation ................................................9-16 Fragmentation and Reassembly.....................9-30 Frame Control Field.......................................9-39 Frame Formats ...............................................9-38 ACK ..........................................................9-44 CTS ...........................................................9-44 RTS ...........................................................9-43 Frame Types ..................................................9-37 Frames dropped .............................................3-20 Free Space Loss .............................................9-19 Freq. Hopping Spread Spectrum ........ 9-3, 9-16, 9-27 Fresnel Zone ..................................................9-24 Index-2 BreezeNET PRO.11 Series Index H Handling 802.3 packets ................................. 4-23 Histogram, Rx Packets per Frequency .......... 3-23 HyperTerminal ................................................ 3-1 I Iconize button ................................................ 4-29 IEEE 802.11 .................................................... 1-2 Layers Description.................................... 9-27 Technical Tutorial..................................... 9-25 Wireless LAN standard .............................. 1-4 Importing configuration files ........................ 4-17 Indoor Installation Considerations ................ 5-11 Installation Checklist....................................... 2-1 Installing SA-PCR card .............................................. 4-2 SA-PRC utilities ....................................... 4-11 Wireless LANs ........................................... 5-1 Installing SA-PCR Drivers under Windows 95...................................... 4-5 under Windows 98...................................... 4-3 under Windows NT .................................... 4-8 in ODI Systems......................................... 4-38 Inter-Frame Spaces........................................ 9-32 Internally discarded ....................................... 3-21 IP and SNMP Parameters ................................ 3-7 IP Host Software.............................................. 3-7 Isotropic Antenna .......................................... 9-19 J Japan Call Sign .............................................. 3-17 Japanese Ministry of Communications ......... 3-17 Joining an existing BSS................................. 9-33 K Keeping Synchronization .............................. 9-35 L Lantastic ........................................................ 4-38 LASTDRIVE= line, in config.sys file........... 4-39 LEDs Access Points .............................................. 2-6 Station and Bridge ...................................... 2-5 SA-PCR card ............................................ 4-10 BreezeNET PRO.11 Lightning Protection ......................................5-34 Line of Sight Concept....................................9-24 Link Distance.................................................5-20 LNA 10 Installation .........................................6-3 LNA 10 Low Noise Receive Amplifier...........6-3 Specifications..............................................9-7 Load Sharing................................... 1-2, 5-9, 9-14 Local Terminal Communication Parameters ........................3-1 Configuration Screens.................................3-2 Getting Started ............................................3-1 Logging in as a User ......................................4-17 M MAC Data......................................................9-39 MAC Layer ....................................................9-27 Main Menu, local terminal ..............................3-5 Maintenance...................................................3-17 Media Access.................................................9-15 MIB, SNMP ............................................. 2-2, 9-1 Missed frames ................................................3-19 Multicell Configuration ...................................5-1 Setting up a multicell ..................................5-8 Multi-Hop Configuration.................................5-1 Setting up a multi-hop cell..........................5-9 N NetWare server ..............................................4-38 NETX clients .................................................4-38 Non-regulated Outdoor Range Tables ...........5-25 Novell TCPIP.................................................4-38 Novell VLM...................................................4-38 O ODI Configuring security parameters...............4-22 Installation troubleshooting ......................4-40 Installing SA-PCR drivers ........................4-38 Upgrading SA-PCR cards .........................4-36 ODINSUP ......................................................4-38 Omni-directional Antenna .............................9-20 Outdoor Installation Considerations..............5-16 Outdoor Range Tables ...................................5-21 Overlapping Cell Configuration ......................5-1 Setting up an overlapping cell ....................5-7 Index-3 User’s Guide Index P Packing List ..................................................... 2-1 Parameters Acknowledge Delay ................................. 3-15 Alias.......................................................... 4-28 AP Address ........................................3-6, 4-28 Associated AP........................................... 4-28 Authentication Algorithm......................... 3-13 Auto Calibration ....................................... 3-17 Broadcast Relaying................................... 3-12 BSS Address ............................................. 4-14 Current Number of Authentications ....3-6, 3-7 Default ...................................................... 4-17 Default Gateway Address........................... 3-7 Default Key ID ................................3-13, 4-22 Default Radio Status................................. 4-25 Disable Appletalk tunneling ..................... 4-23 Display Current Values .....................3-7, 3-10 Display Ethernet and WLAN Counters.... 3-18 Display Event Log .................................... 3-28 Display Rate Counters .............................. 3-18 Display Rx Packets per Frequency........... 3-18 Driver Version .......................................... 4-14 Dwell Time (AP Only) ............................. 3-15 Erase Event Log........................................ 3-28 ESSID ................................................3-9, 4-15 Event Storage Policy ................................ 3-28 Export ....................................................... 4-17 Firmware Version ..................................... 4-14 Forward Unknown.................................... 3-11 Hopping Sequence...................................... 3-7 Hopping Set ................................................ 3-8 Hopping Standard ............................3-16, 4-25 Import ....................................................... 4-17 Intelligent Bridging Period ....................... 3-11 IP Address................................................... 3-7 IP Filtering ................................................ 3-11 IP Stack..................................................... 3-15 Japan Call Sign ......................................... 3-17 LAN to WLAN Bridging Mode ............... 3-11 Load Defaults ........................................... 3-12 Load Sharing....................................3-10, 4-16 MAC Address ........................................... 4-14 MAC Address of the Preferred AP........... 3-10 Max Multicast Rate .................................. 3-15 User’s Guide Maximum Data Rate ......................... 3-9, 4-15 Maximum number of Authentications........3-7 Mobility.......................................................3-9 Multi-Rate Support ...................................3-16 Network Type ...........................................4-14 Open System .............................................4-21 Operation Mode ........................................3-25 P.S. Broadcast Reservation Percentage ....3-16 Power Level .................................... 3-16, 4-25 Power Save Support..................................3-15 Power Saving Counters.............................3-18 Pre-authentication .....................................3-13 Present Mode ............................................4-18 Privacy Option Implemented ....................3-13 Reject Unknown........................................3-11 Reset Counters ..........................................3-18 Reset Unit..................................................3-12 RTS Threshold ..........................................3-15 Set mode....................................................4-18 Shared Key................................................4-21 Show control on taskbar ...........................4-24 Signal Bar..................................................4-28 Signal Strength..........................................4-28 SNMP Traps................................................3-7 Start Statistics............................................3-25 Station Status .................................... 3-6, 4-14 Stop Statistics............................................3-25 Subnet Mask................................................3-7 Total No. of Associations since Last Reset.......3-6 Transmit Antenna.............................. 3-9, 4-16 Tunneling ..................................................3-11 Unicast Relaying.......................................3-12 Unit's HW Address .....................................3-6 Unit's Mode.................................................3-6 Unit's WLAN Address ................................3-6 Version Information..................................4-23 WEP ..........................................................4-15 WEP enabled.............................................4-15 WEP Key...................................................4-22 WEP Keys .................................................3-13 Passive Scanning ...........................................9-34 Path Loss........................................................9-19 PCF ................................................................9-45 PCMCIA Release 2.1 type II slot ..................1-11 Index-4 BreezeNET PRO.11 Series Index Performance................................................... 3-15 Performance tuning......................................... 4-25 PIFS ............................................................... 9-32 Planning Wireless LANs ................................. 5-1 PLCP Header ................................................. 9-38 Point Coordination Function ......................... 9-45 Positioning PRO.11 units ................................ 2-2 Positioning the Access Point ........................... 2-3 Power Save mode .......................................... 4-19 Power Saving................................................. 9-36 Power saving aged......................................... 3-21 Power saving free entries .............................. 3-21 Preamble ........................................................ 9-38 Precautions .................................................... 5-33 Preventing Access to Network Resources..... 9-36 Preventing Eavesdropping............................. 9-36 Privacy........................................................... 3-13 Product line, BreezeNET PRO.11 series......... 1-3 Q QRP file format ............................................. 4-31 R Radiation Pattern ........................................... 9-20 Radio.............................................................. 3-16 Radio Frequency Emissions .......................... 5-33 Radio Signal Propagation.............................. 9-17 Rain Proofing................................................. 5-34 Receive Statistics, viewing............................ 3-27 Received bad frames ..................................... 3-19 Received good frames ................................... 3-19 Receiver Sensitivity....................................... 9-21 Record button ................................................ 4-29 Resetting the SA-PCR card ........................... 4-26 RF Power Level............................................. 9-18 RF Terms and Definitions Attenuation ............................................... 9-18 dB.............................................................. 9-18 Free Space Loss ........................................ 9-19 Line of Sight Concept............................... 9-24 Path Loss................................................... 9-19 RF Power Level ........................................ 9-18 Signal Fading............................................ 9-23 System Characteristics.............................. 9-21 RFC1213.......................................................... 9-1 BreezeNET PRO.11 RFC1286..........................................................9-1 RFS 122 Installation...................................................6-5 Radio Frequency Splitter ............................6-4 Radio Frequency Splitter Specifications .........9-8 Roaming............................................... 9-14, 9-34 Tuning .......................................................4-25 Rooftop Installation .......................................5-17 RTS Threshold...............................................9-29 Running Configuration Utility.......................4-39 Rx Packets per Frequency histogram ............3-23 S SA-10 Station Adapter...................................1-14 SA-40 Station Adapter...................................1-14 SA-PCR card Description ................................................1-11 Initial configuration ..................................4-11 Installation steps..........................................4-2 Installing drivers in Windows 95................4-5 Installing drivers in Windows 98................4-3 Installing drivers in Windows NT ..............4-8 Installing in ODI systems .........................4-38 Installing utilities ......................................4-11 LEDs .........................................................4-10 Models.......................................................1-12 Packing list..................................................4-1 Performing a Site Survey ..........................4-31 Resetting ...................................................4-26 Troubleshooting installation problems .....4-37 Uninstalling drivers in Win 98... 4-4, 4-7, 4-10 Uninstalling utilities..................................4-12 Upgrading the firmware and drivers.........4-32 Using the Configuration utility .................4-13 Using the Site Survey utility.....................4-27 Using the Upgrade kit ...............................4-32 SA-PCR Site Survey Utility Accessing ..................................................4-27 Main window ............................................4-28 Performing ................................................4-31 Printing......................................................4-30 Using .........................................................4-27 SA-PCR Station Adapter ...............................1-15 Index-5 User’s Guide Index SA-PRC Configuration Utility Main Window Configuration Access tab ......................... 4-17 Maintenance tab........................................ 4-23 Performance tab ......................................... 4-25 Power Management tab ............................ 4-19 Radio tab................................................... 4-24 Security tab ............................................... 4-20 Station Control tab.................................... 4-16 Station Status tab ...................................... 4-14 WLAN Parameters tab.............................. 4-15 Scope of User’s Guide..................................... 1-1 Seamless Roaming ...................................1-2, 5-6 Security....................................... 3-13, 4-20, 9-35 Sequence Control Field ................................. 9-43 Setting Power level of the unit.............................. 4-24 Setting up a multicell.................................. 5-8 Setting up a single cell................................ 5-5 Setting up an overlapping cell .................... 5-7 Show Current Access Right .......................... 3-30 Side Lobes ..................................................... 9-20 SIFS ............................................................... 9-32 Signal Fading................................................. 9-23 Signal Loss Chart .......................................... 5-14 Single Cell Configuration................................ 5-1 Mobile Applications ................................... 5-3 Point-to-Multipoint..................................... 5-3 Point-to-Point.............................................. 5-3 setting up a single cell ................................ 5-5 Single Station Adapter..................................... 1-6 Site Selection Factors..............................................5-11, 5-16 For Access Point ....................................... 5-12 Site Survey System Counters ....................................... 3-18 Site Survey utility, SA-PCR card, using ....... 4-27 Site Survey utility, SA-PCR card See SA-PCR Site Survey Utility Site Survey, Monitor Display Neighboring AP's ........................ 3-28 Event Log.................................................. 3-28 Graphs....................................................... 3-28 Survey Software ....................................... 3-25 Slot Time ....................................................... 9-32 SNMP agent............ 1-5, 1-6, 1-8, 1-10, 1-12, 2-1 User’s Guide SNMP, MIB ............................................. 2-2, 9-1 SNMP, traps.....................................................3-7 Station Control...............................................3-12 Station LEDs....................................................2-5 Station Status ...................................................3-6 Survey Log.....................................................4-29 Survey software, monitor...............................3-25 System Characteristics...................................9-21 System Configuration Menu Bridging ....................................................3-11 IP and SNMP Parameters............................3-7 Security .....................................................3-13 Station Control ..........................................3-12 Station Status ..............................................3-6 Wireless LAN Parameters...........................3-7 System Counters ............................................3-18 System problems, troubleshooting ..................8-1 T TCPIP, Novell................................................4-38 Technical Specifications..................................9-3 Terminal Emulation Program ..........................3-1 TFTP protocol. 1-5, 1-6, 1-8, 1-10, 1-12, 3-7, 7-1 Topology........................................................9-10 Torque Key ......................................................2-2 Total received data frames.............................3-21 Total received fragments ...............................3-21 Total received frames ....................................3-21 Total retransmitted fragments........................3-20 Total transmitted fragments...........................3-20 Total transmitted frames ................................3-20 Total transmitted frames (bridge) ..................3-20 Total Tx errors ...............................................3-20 TPA 24 Installation..........................................6-2 TPA 24 Transmit Power Amplifier .................6-1 TPA 24 Transmit Power Amplifier Specifications................................................. Translation Bridging........................................1-2 Translation Mode...........................................3-14 Transmit Antenna ..........................................5-33 Transmit Statistics, viewing...........................3-26 Transmitted to Ethernet .................................3-19 Traps supported ...............................................9-2 9-6 Index-6 BreezeNET PRO.11 Series Index Troubleshooting Card does not function properly ............... 4-37 Conflict with DOS drivers........................ 4-37 ODI Installation ........................................ 4-40 System Problems ........................................ 8-1 U Uninstalling SA-PCR Drivers in Windows 95............................................ 4-7 in Windows 98............................................ 4-4 in Windows NT ........................................ 4-10 Uninstalling SA-PRC Utilities ...................... 4-12 Upgrade Files................................................... 7-1 Upgrade Procedure .......................................... 7-1 Upgrade program........................................... 4-32 Upgrades, downloading from web .................. 7-1 User’s Guide, scope......................................... 1-1 Using the Monitor Site Survey...................... 3-25 V Verifying firmware/driver compatibility....... 4-23 Viewing Card Information ...................................... 4-14 Card WLAN parameters........................... 4-15 Event Log.................................................. 3-28 Receive Statistics...................................... 3-27 Transmit Statistics .................................... 3-26 Virtual Carrier Sense Mechanism ................. 9-29 VLM, Novell ................................................. 4-38 BreezeNET PRO.11 W WB-10 Wireless Bridge.................................1-14 WEP ............................................ 3-13, 4-22, 9-35 Upgrading the card for WEP support .......4-34 Wired Equivalent Privacy..............................3-13 Wireless LAN Concepts Channelization ..........................................9-16 Collision Avoidance..................................9-16 Dynamic Rate Switching ..........................9-15 Fragmentation ...........................................9-16 Load Sharing .............................................9-14 Media Access ............................................9-15 Roaming ....................................................9-13 Topology ...................................................9-10 Wireless LAN Counters.................................3-19 Wireless LAN Parameters menu .....................3-7 Wireless LANs Configurations........................5-1 WLA Counters.................................................8-5 Workgroup Bridge ...........................................1-9 X X-Terminals ...............................1-6, 1-8, 1-9, 5-2 Index-7 User’s Guide