1
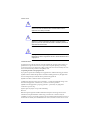
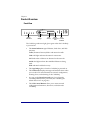
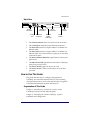
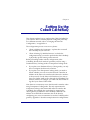
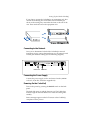
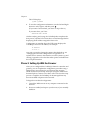
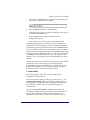
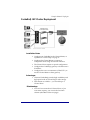
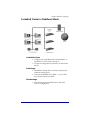
Cobalt CacheRaQ
User Manual
www.cobaltnet.com
©1998 Cobalt Networks, Inc. All rights reserved.
Cobalt Networks and Cobalt CacheRaQ are trademarks of Cobalt Networks, Inc. All other
company, brand, and product names may be registered trademarks or trademarks of their
respective companies and are hereby recognized.
This publication and the information herein is furnished AS IS, subject to change without
notice, and should not be construed as a commitment by Cobalt Networks, Inc.
Furthermore, Cobalt Networks, Inc., assumes no responsibility or liability for any errors or
inaccuracies, makes no warranty of any kind (express, implied, or statutory) with respect to
this publication, and expressly disclaims any and all warranties of merchantability, fitness
for particular purposes and noninfringement of third-party right.
The majority of the software used within the Cobalt CacheRaQ can be freely distributed
under the terms of the BSD copyright or the GNU General Public License. However, some
applications remain the property of their owners, and require their permission to
redistribute. For a complete listing of the software used within the Cobalt CacheRaQ, and
the terms under which it can be distributed, refer to the Cobalt web site at
www.cobaltnet.com. For reference, the BSD copyright and the GNU General Public License
are reproduced at the back of this manual.
Cobalt Networks, Inc.
440 Clyde Ave., Bldg. B
Mountain View, CA 94043
www.cobaltnet.com
In the U.S.A.:
Phone
Fax
(888) 70-COBALT
(650) 930-2500
(650) 930-2501
Outside the U.S.A.:
Phone
Fax
+1 650 930 2500
+1 650 930 2501
Important Safeguards
For your protection, please read all these instructions regarding your CacheRaQ™ and
retain for future reference.
1. Read Instructions
All the safety and operating instructions should be read and understood before the
appliance is operated.
2. Ventilation
The Cobalt CacheRaQ ‘s vents (on the front) and the fan opening (on the back panel) are
provided for ventilation and reliable operation of the product and to protect it from
overheating. These openings must not be blocked or covered. This product should not be
placed in a built-in installation unless proper ventilation is provided.
3. Lithium Battery
The lithium battery on the system board provides power for the real-time clock and CMOS
RAM. The battery has an estimated useful life expectancy of 5 to 10 years. If your system no
longer keeps accurate time and date settings, it may be time to change the battery. Contact
Cobalt for service information. No operator serviceable parts inside.
Warning: There is a danger of explosion if the battery is incorrectly
replaced or replaced with the wrong type of battery. Replace only with
the same or equivalent type recommended by the equipment
manufacturer. Dispose of used batteries according to manufacturer’s
instructions.
Attention: Il y a danger d’explosion s’il a remplacement incorrect de la
batterie. Remplacer uniquement avec une batterie du même type ou
d’un type equivalent recommandé par le constructeur. Mettre au rebut
les batteries usagées conformement aux instructions du fabricant.
Achtung: Explosionsgefahr wenn die Battery in umgekehrter Polarität
eingesetzt wird. Nur mit einem gleichen oder ähnlichen, vom Hersteller
empfohlenen Typ, ersetzen. Verbrauchte Batterien müssen per den
Instructionen des Herstellers verwertet werden.
i
4. Power Cord
!
Caution: The power supply cord is used as the main disconnect
device. Ensure that the socket-outlet is located/installed near the
equipment and is easily accessible.
!
Attention: Le cordon d’alimentation est utilisé comme interrupteur
général. La prise de courant doit être située or installée a proximité du
matérial et être facile d’accés.
!
Achtung: Zur sicheren Trennung des Gerätes vom Netz ist der
Netzstecker zu ziehen. Vergewissern Sie sich, daß die Steckdose leicht
zugänglich ist.
5. Electrical Shock
To reduce the risk of electrical shock, do not disassemble this product. Instead, take it to a
qualified service person when service or repair work is required. Opening or removing
covers may expose you to dangerous voltage or other risks. Incorrect reassembly can cause
electric shock when this product is subsequently used.
6. Operating the unit in an equipment rack
If you plan to operate the CacheRaQ in an equipment rack, take the following precautions:
(a) Make sure the ambient temperature around the CacheRaQ (which may be higher than
the room temperature) is within the limits specified in Appendix B.
(b) Make sure there is sufficient air flow around the unit.
(c) Make sure electrical circuits aren’t overloaded — consider the nameplate ratings of all
the connected equipment, and make sure you have overcurrent protection.
(d) Make sure the equipment is properly grounded — particularly any equipment
connected to a power strip.
(e) Don’t place any objects on top of the CacheRaQ.
Browsers
Both Netscape Navigator® and Microsoft® Internet Explorer have bugs that can cause
intermittent, unexplained failures. When using a web browser to interact with your
CacheRaQ, you may occasionally experience a browser failure. Released product versions of
the browsers are usually more reliable than beta versions, and later versions seem to work
ii
the most reliably. A browser program failure, although annoying, will not adversely affect
your CacheRaQ’s data. The CacheRaQ has been tested with both Netscape Navigator and
Microsoft Internet Explorer, versions 4.
Regulations and Information
NOTE: This equipment has been tested and found to comply with the limits for a Class A
digital device, pursuant to Part 15 of the FCC Rules. These limits are designed to provide
reasonable protection against harmful interference in a commercial environment. This
equipment generates, uses and can radiate radio frequency energy and, if not installed and
used in accordance with the instructions, may cause harmful interference to radio
communications. Operation of this equipment in a residential area is likely to cause harmful
interference, in which case the user will be required to correct the interference at his/her
expense.
This equipment is in compliance with Underwriters Laboratories (UL) and is UL listed.
iii
iv
Contents
1 Introduction
Product Overview
1
2
Front View
2
Back View
3
How to Use This Guide
3
Organization of This Guide
3
Requirements
4
Other Information
4
2 Setting Up the Cobalt CacheRaQ
7
Phase 1: Making the Connection
8
Installing the Cobalt CacheRaQ
8
Connecting to the Network
9
Connecting the Power Supply
9
Powering On the CacheRaQ
9
Using the LCD Console During Setup
10
Configuring Network Settings
11
Phase 2: Setting Up With the Browser
3 Cobalt CacheRaQ Administration
12
17
Cache Setup
17
Filter Setup
19
Report Setup
19
Cache Logs
20
Cache Statistics
21
Network Usage
23
CPU Usage
24
Maintenance
24
Appendix A: Using the LCD Console
27
Changing the Network Configuration
27
Rebooting
28
Powering Down
29
Resetting the Network Configuration
29
Resetting the Admin Password
30
v
Appendix B: Product Specifications
33
Appendix C: Example Network Topologies
37
vi
Chapter 1
Introduction
The Cobalt CacheRaQ is a dedicated World Wide Web caching
device — it stores documents that have been retrieved from the
Web. Once a document has been retrieved from the Web, users
can obtain it from the CacheRaQ without having to access the
Web again. This reduces the communication load on the Wide
Area Network (WAN) and helps users obtain Web documents
much more quickly.
The Cobalt CacheRaQ can operate in several modes:
•
Traditional Proxy Caching mode. Client Web browsers are
configured explicitly to request documents from the
CacheRaQ. The browsers can be configured to do this by
either individual users or a central manager of browser
configuration files. The CacheRaQ also supports the use of a
Proxy Auto-Configuration (PAC) file for browser
configuration.
•
Transparent Caching mode. All client network traffic is
automatically routed through the CacheRaQ. The CacheRaQ
detects users’ requests for Web documents (HTTP requests),
which are then handled by the CacheRaQ’s software. No
browser configuration is necessary.
•
Clustering. Several CacheRaQs are configured in a cluster.
Clustering can be done in either Traditional Proxy Caching
Mode or Transparent Caching mode. In a Cluster
configuration, the Cluster Master receives clients' HTTP
requests by either of the two methods described above. Each
request is forwarded dynamically to one of several Cluster
Slaves. The Cluster Slave retrieves the document, either from
its cache or from the document's original server. The Cluster
Slave returns the document to the Cluster Master, which
forwards it on to the requestor. Because the work of
managing cached documents is divided evenly among
Cluster Slaves, clustering allows for a greater volume of
HTTP traffic.
1
Chapter 1
Product Overview
Front View
Status
Indicators
Logo
Badge
LCD
Screen
Reset
LCD
Password Control
Port
Buttons
The Cobalt logo indicator light glows green when the CacheRaQ
is powered on.
•
The Status Indicators signal Ethernet, hard drive, and Web
activities:
Tx/Rx (Transmit/Receive) blinks with network traffic.
Link solid light indicates the network connection.
Col blinks when collisions are detected on the network.
100 M solid light indicate that 100 Mbit Ethernet is being
used.
Disk indicates hard disk activity.
2
•
The Logo Badge glows when the CacheRaQ is powered on.
•
The LCD Screen displays messages and entered values when
you use the LCD control buttons for network configuration,
shutting down, and rebooting of the CacheRaQ.
•
You can use the Reset Password port if you forget the
CacheRaQ administrator password. (See “Resetting the
Admin Password” on page 30.)
•
The LCD Control Buttons allow you to enter network
configuration information, shut down, and reboot the
CacheRaQ.
Introduction
Back View
Network 2
Network 1
Cobalt Networks and Cobalt CacheRaQ
are trademarks of Cobalt Networks, Inc.
OK to
Power Off
Serial
Col
Link
Tx/Rx
100 M
PPPPPMYWWSSSS
R15 664 NCU
CacheRaQ
Col
Link
Tx/Rx
100 M
S/N
100 - 240 VAC 50/60 Hz
1.0 A
40W max
www.cobaltnet.com
Serial
Connector
Cooling
Fan
Network 1
Connector
Network 2
Connector
OK to
Power Off
Network
Status
Indicators
Power
Socket
Power
Switch
•
The Serial Connector allows for serial console connection.
•
The Cooling Fan maintains proper thermal parameters.
•
The Network 1 interface accepts a 10Base-T or 100Base-TX
Ethernet cable.
•
The Network 2 interface accepts a 10Base-T or 100Base-TX
Ethernet cable. Use of this interface is optional, as described
in the next chapter.
•
The Network Status Indicators signal network activity and
information.
•
The OK to Power Off light indicates when the CacheRaQ is
ready to be powered down.
•
The Power Switch toggles the power on or off.
•
The Power Socket is where you attach the AC cord that’s
provided.
How to Use This Guide
This guide describes how to configure and operate the
CacheRaQ. You should be familiar with TCP/IP networking
concepts and know how to use either the Netscape Navigator®
or the Microsoft® Internet Explorer Web browser.
Organization of This Guide
Chapter 1, “Introduction,” includes an overview of the
CacheRaQ’s features and describes this guide.
Chapter 2, “Setting Up the Cobalt CacheRaQ,” explains
installation and configuration.
3
Chapter 1
Chapter 3, “Cobalt CacheRaQ Administration,” describes how to
configure various features of the CacheRaQ and how to view the
statistics and log files.
Appendix A, “Using the LCD Console,” describes how to use the
CacheRaQ’s LCD console functions — configuring (and
resetting) the CacheRaQ’s network settings, rebooting, and
powering down.
Appendix B, “Product Specifications,” contains the product
specifications and functional information.
Appendix C, “Example Network Topologies,” shows examples of
how the CacheRaQ can be used within a network.
Requirements
•
The CacheRaQ operates in a TCP/IP network on 10Base-T or
100Base-T Ethernet.
•
The CacheRaQ’s administrative interface requires a Web
browser that supports frames and JavaScript™; Netscape
Navigator or Microsoft Internet Explorer, versions 3.0 or
later, will work.
•
You need to assign or obtain an IP address and netmask for
each configured Ethernet interface. You also need to have a
gateway IP address and the IP address of a DNS server. To
use Transparent Caching, you should either be, or work
closely with, your network administrator to perform the
appropriate setup procedure, as described in Chapter 2,
“Setting Up the Cobalt CacheRaQ.”
Other Information
For the latest information, or if you have any unanswered
questions, visit the support section of the Cobalt Web site at
http://www.cobaltnet.com/support/. There, you can view a list
of FAQs (Frequently Asked Questions).
For General Cobalt Information
In the U.S.A., call (888) 70-COBALT or (888) 702-6225, or send email to [email protected].
Outside the U.S.A., call +1 650 930-2500, or send e-mail to
[email protected].
In Europe, call +31 70 517 6375, or send e-mail to
[email protected].
4
Introduction
In Japan, send e-mail to [email protected].
For Cobalt Technical Support and Service
Cobalt Networks, Inc., provides telephone technical support at
no charge for the first 30 days.
In the U.S.A., call (888) 70-COBALT or (888) 702-6225, or send email to [email protected].
Outside the U.S.A., call +1 650 930-2500, or send e-mail to
[email protected].
In Europe, send e-mail to [email protected].
In Japan, send e-mail to [email protected].
5
Chapter 1
6
Chapter 2
Setting Up the
Cobalt CacheRaQ
This chapter explains how to configure the Cobalt CacheRaQ for
your network. If the CacheRaQ has been configured previously
for a different network, refer to “Changing the Network
Configuration,” in Appendix A.
The configuration process occurs in two phases.
•
“Phase 1: Making the Connection,” explains how to install
the CacheRaQ on your network.
•
“Phase 2: Setting Up With the Browser,” includes the
configuration steps you need to perform after the CacheRaQ
is physically up and running on the network.
Before proceeding further with the configuration of the
CacheRaQ, decide which mode of operation you’ll be using —
Traditional Proxy Caching mode or Transparent Caching mode.
•
If you plan to use Traditional Proxy Caching mode, you only
have to configure the Network 1 interface.
•
If you plan to use Transparent Caching mode, you need to
decide whether you want to use the Network 2 interface in
addition to the Network 1 interface (the Network 1 interface
is always used). Use the Network 2 interface if you want to
force your clients’ traffic to flow through the CacheRaQ. This
mode is useful if, for example, you want to be able to filter or
log all of your clients’ HTTP traffic.
Note that it is not necessary to use the Network 2 interface when
using Transparent Caching mode. The only requirement for
transparent caching is that client traffic must be routed to the
CacheRaQ. For example, this can be done by assigning the
clients’ gateway IP address to the CacheRaQ’s Network 1 IP
address. In an ISP POP environment, this can be done by
configuring your access concentrators to use the CacheRaQ as the
gateway. Appendix C describes example network configurations.
7
Chapter 2
If you use Traditional Proxy mode, the HTTP and FTP proxy port
numbers for browser configuration are both 3128 by default (they
can be changed as described later in this chapter). Alternatively,
you can configure the browsers to use the CacheRaQ’s Proxy
Auto-Configuration (PAC) file; the URL for this file is http://
cacheraq-name/proxy.pac.
Example network configurations appear in Appendix C,
"Example Network Topologies," and detailed information is
available at the Cobalt Networks Web page
(www.cobaltnet.com).
Phase 1: Making the Connection
Installing the Cobalt CacheRaQ
The CacheRaQ can either be placed on a flat surface — for
example, a desk, shelf, or table top — or it can be connected to an
equipment rack.
!
Caution: If you operate the CacheRaQ in an equipment rack,
see the precautions described in “Operating the unit in an
equipment rack,” on page ii.
If you plan to use the CacheRaQ on a flat surface, attach the
rubber feet to the five indentations on the bottom of the case (as
shown in the following figure).
Rubber feet
8
Setting Up the Cobalt CacheRaQ
If you plan to operate the CacheRaQ in an equipment rack, first
connect the mounting ears to the sides of the CacheRaQ (as
shown in the next figure), near either the front or the rear of the
case. Then attach the ears to the equipment rack.
Connecting to the Network
Once you’ve determined which of the CacheRaQ's network
interface(s) to use, connect the interface(s) to your network with
twisted-pair Ethernet cabling (see the following diagram).
Network 2
Network 1
Cobalt Networks and Cobalt CacheRaQ
are trademarks of Cobalt Networks, Inc.
www.cobaltnet.com
Network 2
Network 1
OK to
Power Off
Serial
Col
Link
Tx/Rx
100 M
PPPPPMYWWSSSS
R15 664 NCU
CacheRaQ
Col
Link
Tx/Rx
100 M
S/N
100 - 240 VAC 50/60 Hz
1.0 A
40W max
Power
Connecting the Power Supply
Connect the power supply cord to an electrical outlet (100-240
volts AC, 50/60 Hz, as listed in Appendix B).
Powering On the CacheRaQ
Turn on the power by pressing the On/Off switch on the back
panel.
The hard disk spins up and the fan turns on. The Cobalt logo
indicator light on the front blinks a few times and then glows
steadily.
Status messages appear on the LCD screen as the CacheRaQ
completes its boot process.
9
Chapter 2
!
Caution: It is important to follow the proper power-down
procedure before turning off the CacheRaQ. Refer to “Powering
Down” in Appendix A.
Using the LCD Console During Setup
During startup, the LCD console displays status information
relating to the boot process itself. During setup, the console
buttons are used to enter network configuration information for
the CacheRaQ. After setup, the LCD console is used to change
network configuration information, to reboot, and to power
down the system.
LCD Screen
Control Buttons
The LCD screen displays two lines. The top line of the LCD
presents instructions regarding data to enter, and the bottom line
displays the data already entered. You use the control buttons to
the right of the LCD screen to enter the required network
information manually.
Here’s how the control buttons work:
The Left button moves the cursor left.
The Right button moves the cursor right.
The Up button increments the digit located at the cursor
position.
The Down button decrements the digit located at the
cursor position.
S
10
The S button (“select”) selects the next option.
Setting Up the Cobalt CacheRaQ
E
The E button (“enter”) accepts the information entered.
Refer to Appendix A, “Using the LCD Console,” for more
information.
Configuring Network Settings
Now that you’ve made the network and power connections,
you’re ready to configure the network settings. The settings that
are configured through the LCD console are the Network 1 IP
address, the Network 1 netmask, and the Gateway address.
Other network settings are configured through the web interface
(described in the next section).
Follow these steps to configure Network 1 manually:
1.
When you see the prompt
NET1 IP ADDR:
000.000.000.000
enter the IP address for Network 1, using the control buttons
on the LCD console.
2.
Press
E
.
If the IP address is valid, the next prompt appears:
NET1 NETMASK:
255.000.000.000
3.
Enter the netmask of Network 1, if the number shown is not
correct.
4.
Press
E
.
The LCD displays:
[S]AVE [C]ANCEL
5.
Use the Left and Right buttons to select [S]ave or [C}ancel,
and then press E .
If you select Cancel, you return to step 1, above. If you select
Save, the following prompt appears:
ENTER GATEWAY:
000.000.000.000
6.
Enter the IP address of the gateway for your network.
7.
Press
E
.
11
Chapter 2
The LCD displays:
[S]AVE [C]ANCEL
8.
To save the configuration information, use the Left and Right
buttons to select [S]ave, and then press E .
(If you enter Cancel instead, you return to step 6 above.)
If you enter Save, you’ll see:
VERIFYING AND SAVING
12After verifying and saving, the CacheRaQ then completes the
boot process, and the LCD screen shows several messages before
displaying the IP address assigned to Network 1.
Configuration is complete when the LCD screen displays the
CacheRaQ’s Network 1 IP address, for example:
IP Address:
10.9.25.77
Any time you need to change the settings described above, see
“Changing the Network Configuration” in Appendix A. It
explains how to return to this interface once the system is up and
running. Appendix A also describes other options available from
the LCD panel interface.
Phase 2: Setting Up With the Browser
After you've configured the CacheRaQ's Network 1 interface and
gateway, you can complete the configuration procedure using a
Web browser. You will need to use a browser that supports
HTML frames and JavaScript. Netscape Navigator or Microsoft
Internet Explorer, versions 3.0 or later, will work. Once the setup
process is complete, the CacheRaQ can be managed from any
browser-enabled computer on the network.
To begin browser-based configuration:
12
1.
Launch the Web browser on any computer connected to the
network.
2.
Be sure to enable JavaScript in your browser, if you normally
disable it.
Setting Up the Cobalt CacheRaQ
3.
To access the CacheRaQ, enter its Network 1 IP address into
the browser’s URL field. For example:
4.
Press the Return or Enter on your keyboard.
A Welcome page appears, with the Cobalt logo at the top and
a Start button at the bottom.
5.
Click the Start button to begin the Setup Wizard
configuration process.
A second browser window opens to the Setup Wizard.
The Setup Wizard guides you through several configuration
screens, each of which requires you to enter some information.
After entering the requested information, click the NEXT button
to move to the next screen in the Setup Wizard. You can return to
earlier screens by clicking the Setup Wizard's BACK button. All of
the Setup Wizard configuration options can be accessed from the
CacheRaQ's normal Web interface, so you can come back and
change or view any setting at any time after finishing the Setup
Wizard.
The Setup Wizard presents the following four steps, each with its
individual screen: Cache Settings, Network Integration,
Administrator Setup, and Time Setup. It’s a good idea to read
through the descriptions of these screens before you begin, to
make sure you have all the required information.
1. Cache Settings
The Cache Settings screen allows you to configure the
CacheRaQ's caching software.
The most important setting on this page is the first one — the
Caching Mode Setting. Select from among Traditional Proxy
Caching mode, Transparent mode, and Transparent mode with
dual interfaces. These modes are described in Chapter 1,
“Introduction.”
The next setting, Refresh Ratio, determines how often the
CacheRaQ's caching software will refresh cached Web pages. A
refresh occurs when the caching software decides that a
requested document (that’s in the cache) should be checked
13
Chapter 2
against its original server to ensure that the cached copy of the
document is up to date. The method used to determine when to
refresh a document is described in the next paragraph.
Cached documents are refreshed after they expire. Documents
expire after they have been in the cache for a certain amount of
time. This amount of time is set for each document according to
the document’s Last-Modified timestamp. When a document
enters the cache, the CacheRaQ software calculates the difference
between the current time and the document’s Last-Modified
time. It multiplies this quantity by the Refresh Ratio; the result is
the amount of time that the document will exist in the cache
before being expired. Consequently, smaller values of Refresh
Ratio cause documents to expire sooner. This reduces the
likelihood that out-of-date documents will be served from the
cache, but it also increases the amount of HTTP traffic between
the CacheRaQ and the Web. With a Refresh Ratio of 10%, the
likelihood that any particular document will be out of date when
retrieved from the cache is under 1% (this is true in most
environments). In practice, users’ browser caches are much more
likely than the CacheRaQ to return out-of-date documents.
The third setting, Maximum Time Before Expiration, is the
upper limit on the amount of time that any document will exist in
the cache before being refreshed. This setting is used in
conjunction with the Refresh Ratio setting above. A cached
document will expire by the earlier of the two methods: Refresh
Ratio or Maximum Time Before Expiration.
The fourth setting, Maximum Size of Cacheable Documents,
specifies the largest possible cached document. This setting can
prevent exceedingly large documents from evicting many small
documents from the cache. A large value (say 20MB) is a good
setting — very large documents (e.g. multimedia files) are often
cacheable at this setting.
The fifth setting, Disk Space for Log Files, controls how much of
the CacheRaQ's disk space is devoted to storing log files. One log
file is generated each day — it’s used to generate the information
in the Cache Statistics section of the Web interface. It’s a good
idea to set a large value for this (several hundred megabytes),
enough for a month or two of log files. You may need to increase
this setting if users at your site generate heavy HTTP traffic.
14
Setting Up the Cobalt CacheRaQ
The sixth setting, Disk Space for Usage Statistics, controls how
much disk space to devote to the per-client and per-server usage
information that’s calculated nightly. (These statistics are
described in more detail in the next chapter.)
Click NEXT to move to the next Setup Wizard screen.
2. Network Integration
The Network Integration screen allows you to configure
network-related settings that aren’t configured via the LCD
interface, including:
•
Hostname
•
Domain name
•
Primary DNS server address
•
Secondary DNS server address
•
Network 2 IP address
•
Network 2 Netmask
The Hostname, Domain name, and Primary DNS Server Address
must be entered. If you are not the network administrator, you
can obtain the correct values for these fields from your network
administrator. You can also configure the Network 2 IP address
and netmask, if your configuration requires the use of this
interface. Finally, you can configure the Gateway address.
An optional CacheRaQ feature is to run a local caching-only DNS
server. If you enter 127.0.0.1 as the IP address of the Primay DNS
Server, the local caching-only DNS server will be enabled. You
may wish to run the local DNS server if, for example, your
normal DNS server is not in close network proximity to your
CacheRaQ.
For informational purposes, the Network Integration page
displays the Ethernet (MAC) addresses of your network
interfaces.
When you’ve entered the required information on the Network
Integration page, click NEXT to move to the next screen.
3. Administrator Setup
The CacheRaQ has an Administrator user for performing normal
administrative and maintenance tasks. These tasks are performed
via the Web interface. You must authenticate yourself as user
admin before you can access the administrative functions.
15
Chapter 2
The Administrator Setup page lets you specify the admin
password, enter a full name for the admin user, and specify an email address that the CacheRaQ can use to notify the
Administrator of any problems that might arise.
The only required field on this screen is the Password for admin.
If you forget or want to reset the admin password, see “Resetting
the Admin Password” in Appendix A, which describes the
procedure for resetting it.
Advanced administration is possible by logging in to the
CacheRaQ via telnet. Login as user root, with the password you
assigned to admin on this setup page.
Click the NEXT button to move to the next screen.
4. Time Setup
The last Setup Wizard screen is Time Setup, where you enter time
and time zone information. It’s important to enter correct values
here to ensure that the nightly log-file rotation and statistics
programs run at the correct times.
When you’re finished, click NEXT. At this point, assuming the
CacheRaQ has been configured with a functional gateway and a
functional DNS server, you can register via e-mail using the form
displayed in the Setup Wizard. Otherwise, use the printed
registration card that came in the CacheRaQ box. It’s a very good
idea to register your CacheRaQ, so that you can be notified of
software updates (including patches for bug fixes), new product
information, special promotions, and so on.
Click FINISH to finish the Setup Wizard configuration. Once this
is complete, your CacheRaQ is ready for operation.
16
Chapter 3
Cobalt CacheRaQ
Administration
This chapter describes the Cobalt CacheRaQ's administrative
functions, which are available through the Web interface. This
interface includes the following items:
•
Network Setup
•
Cache Setup
•
Filter Setup
•
Report Setup
•
Cache Statistics
•
Cache Logs
•
Network Usage
•
CPU Usage
•
Maintenance
The Network Setup screen is exactly as described for step 2 in the
Setup Wizard. For information on this screen, see on page 15.
The rest of the options are described below.
Cache Setup
The first seven options on the Cache Setup screen — Cache
Mode, HTTP Port Number, Refresh Ratio, Maximum Time Before
Expire, Maximum Size of Cacheable Documents, Disk Space for
Log Files, and Disk Space of Usage Statistics — also appear in the
Setup Wizard. These options are describedon page 13.
The Cache Setup screen presents some additional configuration
options that aren’t in the Setup Wizard. This section describes
these additional options.
Empty Cache Now. If, for some reason, you need to empty the
CacheRaQ’s document cache, click this button. In normal usage,
this feature isn’t necessary because the CacheRaQ’s caching
17
Chapter 3
software manages its own disk storage by removing old,
infrequently-requested documents when the available disk space
is low.
Remove Cache Statistics Now. This option removes all log files
and statistics files stored on the CacheRaQ.
Cache Cluster Settings. This option lets you configure the
CacheRaQ as a Cluster Master. To do this, you simply enter the
host names (or IP addresses) of Cluster Slaves in the fields
marked “Cluster Slave 1,” “Cluster Slave 2,” etc. Make sure that
the specified Cluster Slaves are on the network and are up and
running. Also make sure that the admin password on the Cluster
Slaves is the same as the admin password on the Cluster Master.
This is necessary for the Cluster Master to retrieve statistics data
from the Cluster Slaves. For optimal performance, the Cluster
Slaves should be configured for Traditional Proxy Caching only
(that is, do not enable Transparent Caching on the Cluster
Slaves).
The Cluster Master can operate in any caching mode —
Traditional Proxy Caching mode or Transparent mode with 1 or 2
network interfaces. In Transparent mode, all client traffic should
be routed through the Cluster Master, just as if the Cluster Master
were a standalone CacheRaQ operating in Transparent mode.
Inter-Cache Protocol (ICP) Settings. The Inter-Cache Protocol
(ICP) is an Internet protocol used to create cache hierarchies. The
ICP Configuration page allows you to configure ICP peer hosts
for the CacheRaQ. You may wish to configure ICP if, for example,
your Internet Service Provider (ISP) operates an ICP-compliant
cache with which you want to peer. On the IPC Configuration
page, each peer requires you to specify the following
information: the peer host name, an indication of whether the
peer is a “parent” or a “sibling” (in ICP terminology), and HTTP
and ICP port numbers to use for the specified peer. Optionally,
you can configure the peer to be “Proxy-only,” in which case
documents retrieved from this peer will be returned to clients but
will not be stored locally by the Cluster Master. Additionally, you
can configure the peer as “No-query”, in which case cache misses
are automatically forwarded to the configured peer.
Cache Clustering can be used in conjunction with ICP in the
following way: Configure the Cluster Master as described in
“Cache Cluster Settings,” above, but do not configure any ICP
peers for it. On the Cluster Slaves, configure the desired ICP
18
Cobalt CacheRaQ Administration
peers, as described above in “Inter-Cache Protocol (ICP)
Settings.” With this configuration, the Cluster Master will (as
usual) send all requests to the Cluster Slaves, which will then
query the ICP peers that have been configured.
Filter Setup
The CacheRaQ is capable of filtering HTTP traffic that passes
through it. The Filter Setup page allows you to choose among
three options:
•
No Filtering. The CacheRaQ allows all HTTP traffic. This is
the default option.
•
Deny Access. The CacheRaQ will disallow access to
specified sites and URLs.
•
Limit Access. The CacheRaQ will deny access to all sites and
URLs except ones that are explictly specified. This can be
useful in environments (educational environments, for
example) where only specific sites are intended to be
accessed.
If you use the Deny Access or Limit Access modes, enter the list
of relevant sites (server names or IP addresses) and URLs into the
text area shown on this page. Click the “Save Changes” button at
the bottom of the page to activate your filtering configuration.
Report Setup
This page configures optional e-mail reports that will be sent
nightly to the admin user. (E-mail to admin can be forwarded to
an arbitrary e-mail address. See “Maintenance” on page 24 for
information about how to configure the admin e-mail alias.)
Two types of e-mail reports can be optionally enabled:
•
Summary Statistics. This report describes cache
performance in terms of traffic through the cache, documents
through the cache, cache hit and miss response times, and so
on. This information is identical to the Summary Statistics
information available in the Cache Statistics section of the
CacheRaQ Web interface (described in “Summary Statistics”
on page 21). The Summary Statistics output also includes
three graphs. These graphs illustrate the number of requests
as a function of time of day, the number of cache hits vs.
cache misses as a function of time of day, and the average
19
Chapter 3
cache hit latency vs. average cache miss latency as a function
of time of day.
•
Usage Report. This report lists the names of client machines
and server machines that have retrieved (or served, in the
case of servers) more than a specified number of documents
or more than a specified number of total bytes of content.
Four thresholds are configurable: bytes per client,
documents per client, bytes per server, and documents per
server. Entering 0 for these fields will cause the report to list
all clients or servers (or both).
Cache Logs
The CacheRaQ’s caching software logs date to two files in its
normal course of operation — “access.log” and “cache.log.”
•
Access.log contains one line per request served. Among
other things, each line lists the URL of the requested
document, the client’s IP address, the size of the document,
and the time of the request. Access.log files can grow quite
large (up to approximately one hundred megabytes per day).
The amount of disk storage devoted to access.log files can be
set in the Cache Setings page, as described on page 13.
•
Cache.log contains informational messages describing the
state of the cache software. Cache.log also lists error
messages that arise during normal operation. For example, a
message is logged whenever the caching software fails to
connect to a remote HTTP server.
Software on the CacheRaQ rotates access.log and cache.log files
once per day. Log files are saved until they exceed the disk space
allocation for log files. At this point, old log files are deleted until
disk space consumption is within the specified limit.
The Cache Logs page is divided into two sub-pages — one for
viewing the current day’s log files and one for downloading
previous days’ log files.
View Log Files. This page lets you select a log file (access.log or
cache.log) and enter a number of lines (N). It then displays the
most recent N lines of the selected log file. This is useful for
diagnosing any immediate problems (by viewing cache.log) and
for examining current client activity (by viewing access.log).
20
Cobalt CacheRaQ Administration
Download Log Files. This page lets you download entire log
files on a daily basis — it lists all the available access.log and
cache.log files from previous days. To download a log file via
your browser, you shift-click the filename. You can also click a file
to view it; but keep in mind that these files (particularly
access.log) can be quite large and therefore may be cumbersome
to display in a Web browser.
Cache Statistics
The CacheRaQ's caching software records information on all
HTTP requests it receives. Statistics are calculated nightly from
this data and are available on a daily basis for the current month
and the preceding month.
Using the Cache Statistics page is a two-step process. First, you
select the type of statistics you want to display. Then you specify
a time period for which you want to see the statistics. You can
select an arbitrary combination of days from the last two months
for which you want to see statistics. Or you can enter a time value
(in minutes, seconds, or hours) to have statistics calculated for the
immediate past for the amount of time you’ve specified (up to the
start of the current day).
There are two main types of statistics available: summary statistics
and usage statistics. Summary statistics are described
immediately below; usage statistics are described later.
Summary Statistics. This option displays the following
information for the time period you specify:
•
Number of clients. This is the number of unique client IP
addresses that made requests through the CacheRaQ.
•
Number of cache hits. A cache hit is a request in which the
requested document was delivered from the cache — the
document didn’t have to be downloaded from the original
server.
•
Number of cache misses. A cache miss is a request in which
the requested document was not in the cache and had to be
retrieved from the original server.
•
Total number of documents sent to clients
•
Number of bytes sent to clients from cache hits
•
Number of bytes sent to clients from cache misses
•
Total number of bytes sent to clients
21
Chapter 3
•
Cache hit rate. This number refers to the ratio of cache hits to
total cache requests.
•
Average cache hit object size. This is the average (mean)
document size for documents which were delivered from the
cache.
•
Average cache miss object size. This is the average (mean)
document size for documents which had to be retrieved from
their original servers.
•
Bandwidth savings. This number reflects the amount of
client HTTP traffic that did not result in documents being
downloaded from the Internet, which results in saved
bandwidth.
•
Average cache hit latency. This is the average (mean)
amount of time (in seconds) it took the CacheRaQ to deliver a
document from its cache to a client. The time measured is the
difference in time between the time that the CacheRaQ
receives the request initially to the time that the CacheRaQ
has finished sending the complete object to the client.
•
Average cache miss latency. This is the average amount of
time it took the CacheRaQ to deliver a document that had to
be requested from the original server. It is calculated
similarly to the cache hit latency (above), with the exception
that only cache misses are considered.
•
Weighted average request latency. This is the average cache
hit latency multipled by the cache hit rate, plus the average
cache miss latency multiplied by the cache miss rate (cache
miss rate is one minus the cache hit rate).
•
Request speedup. This number quantifies the CacheRaQ's
performance improvement in terms of user-perceived
latency. It is the ratio of cache miss latency to weighted
average request latency.
The Summary Statistics output also includes three graphs. These
graphs illustrate the number of requests as a function of time of
day, the number of cache hits vs. cache misses as a function of
time of day, and the average cache hit latency vs. average cache
miss latency as a function of time of day.
Usage Statistics. Four options let you view HTTP traffic statistics
for individual clients (users) and individual HTTP servers. Each
option returns a list of client or server hostnames, and for each
hostname, a count of documents sent/received and a count of
bytes sent/received:
22
Cobalt CacheRaQ Administration
•
All clients. This option returns a list of clients that requested
documents through the CacheRaQ. The list contains the
number of bytes sent to each client and the number of
documents sent to each client.
•
A specific client. For a specified client host name or IP
address, this option returns a list of servers accessed by this
client.
•
All servers. This option returns a list of all servers that were
accessed by one or more clients through the CacheRaQ.
•
Specific server. For a specified server host name or IP
address, this option returns a list of clients who made
requests for documents from that server.
Each of the above options can be sorted by number of documents
or by number of bytes. Finally, you can specify the number of
sites to be displayed by each of the above options.
Note that the statistics can take some time to calculate. This is
particularly true of statistics for the current day, which must be
calculated from the raw access.log file.
Network Usage
The Network Usage page shows statistics for network packets
sent and received on the CacheRaQ's two Ethernet interfaces. If
an interface is unused, the statistics will all be shown as 0 for that
interface.
Packets are counted in the following categories:
•
Good. A packet was received or sent without error.
•
Error. Some kind of send/receive error occurred that’s not
covered by the categories below.
•
Dropped. A packet was ignored (dropped) by the operating
system because of temporary lack of buffer memory.
•
Collisions. The CacheRaQ attempted to transmit a packet
while another host was in the process of transmitting a
packet. A high rate of collisions relative to packets sent
indicates a potentially overloaded network.
23
Chapter 3
CPU Usage
This page displays a graph of the CacheRaQ’s load average as it
varies over time. The system’s load average is a rough indicator
of overall system activity. Generally speaking, a high load
average indicates a busy system. A CacheRaQ with a load
average that routinely exceeds 1.0 may be overloaded— a Cache
Cluster might be appropriate for the workload in this situation.
Contact Cobalt Support for diagnostic assistance if you believe
your CacheRaQ is overloaded.
Maintenance
This section of the administrative interface combines three
unrelated maintenance features.
Admin Setup. This page lets you configure the Administrator’s
password (which is required) and an external e-mail address that
will receive mail to the admin user (this e-mail address is
optional). Note that email Reports (described in the Report Setup
section above) will be sent to admin, so use the Admin Setup page
to set the real e-mail address to which you want the reports sent.
Time Setup. This page lets you set the time and time zone on the
CacheRaQ. It is important to set the time correctly, because the
CacheRaQ software does log-file rotation and statistics
generation shortly after midnight each day. This time is chosen
because it’s close to the start of the day. This way, each day’s log
files and statistics accurately reflect the actual usage that occurred
on the corresponding calendar day.
Update Software. From time to time, Cobalt Networks, Inc. may
issue updates to critical software that runs on its products.
Updates can be obtained from the Cobalt Web page
(www.cobaltnet.com). Updates come in the form of a “Package”
file with a “.pkg” file name suffix. The Update Software page
allows you to install new packages on the CacheRaQ.
To install a package, first obtain the pkg file from Cobalt
Networks, Inc. Save this file on your local computer (i.e., on the
computer on which you run your Web browser). Then access the
Update Software page on the CacheRaQ administrative interface.
On the Update Software page, enter the filename of the .pkg file
you want to install. The “Browse...” button lets you find the file
on the computer running your Web browser.
24
Cobalt CacheRaQ Administration
Once you've entered the name of the package file you want to
install, enter the admin password and click the “Install a ‘.pkg’
Package” button. (The admin password is required as a security
precaution.) Once the package is installed, you may be prompted
to reboot the CacheRaQ (some packages require reboot to take
effect). Confirm or cancel the reboot as desired; if you cancel the
reboot, remember to reboot manually some time later, so that the
package’s software can come into effect.
25
Chapter 3
26
Appendix A
Using the LCD Console
During startup, the CacheRaQ’s LCD screen displays
status information relating to the boot process itself.
During setup, the LCD console is used to enter network
configuration information.
Once the CacheRaQ is running, the LCD console also
serves multiple purposes:
•
Change network configuration information — useful
if the CacheRaQ’s location is changed.
•
Reboot the system.
•
Power down — necessary if you need to unplug the
CacheRaQ’s power.
•
Reset network — resets all IP addresses, netmasks,
and other network information. This is useful if
incorrect data has been entered and you want to start
again.
IMPORTANT: Follow the proper power-down procedure before
turning off the CacheRaQ (see “Powering Down” on page 29).
You access each of these functions by holding down the
S button (Select) for approximately two seconds. This
causes the LCD screen to enter its function mode. Then,
press the S button until the function you want appears
on the LCD screen. To cancel the LCD’s function mode,
select the EXIT function, press the E button (Enter),
then select [Y]ES.
Changing the Network Configuration
To change Network 1 IP address or netmask, or to change
the CacheRaQ’s gateway, follow these steps:
1.
From the LCD console, hold down the
down for approximately 2 seconds.
S
button
27
Appendix A
The LCD screen displays:
SELECT:
SETUP NETWORK
2.
Press the
3.
Enter the Network 1 IP address, and then press the
E button.
4.
Enter the netmask for Network 1, and then press the
E button.
5.
Toggle the cursor to [S]ave or [C]ancel and press the
E button.
E
button.
If you select Cancel, you see the prompt to enter the
IP address (return to step 3, above). If you select Save
(and the netmask is valid), you see the prompt to
enter the Gateway.
6.
Enter the Gateway, and press the
7.
Toggle the cursor to [S]ave or [C]ancel and press the
E button.
E
button.
When you’re finished, choose EXIT to leave the LCD
menu.
Rebooting
To reboot the CacheRaQ:
1.
From the LCD console, hold down the
approximately 2 seconds.
S
button for
The LCD screen displays:
SELECT:
SETUP NETWORK
2.
Press the S button once until REBOOT appears in the
LCD display:
SELECT:
REBOOT
28
3.
Press the
4.
Using the control keys, toggle the cursor between
[Y]ES and [N]O and select [Y]ES to reboot the
system.
5.
Press
E
E
button.
again to accept [Y]ES.
Using the LCD Console
The CacheRaQ will reboot.
Powering Down
!
Caution: To prevent the potential loss of data, it is important to
follow the proper power-down procedure before turning off the
CacheRaQ.
To select the power-down application:
1.
From the LCD console, hold down the
approximately 2 seconds.
S
button for
The LCD screen displays:
SELECT:
SETUP NETWORK
2.
Press the S button twice until POWER DOWN appears
in the LCD display:
SELECT:
POWER DOWN
3.
4.
Press the E button to choose the power-down
application.
Using the control keys, toggle the cursor between
[Y]ES and [N]O and select [Y]ES to power down
the system.
5.
When the CacheRaQ is ready to be turned off, the
LCD displays:
PLEASE SWITCH
POWER OFF NOW
6.
Press the On/Off button to turn off the CacheRaQ.
Resetting the Network Configuration
The Reset Network function resets the Hostname, IP
Address, Netmask, Gateway, and DNS information to
that of a new, unconfigured system. This function may be
useful if you’re moving the CacheRaQ to a new network.
29
Appendix A
To reset the CacheRaQ to a factory-fresh network state,
perform the following steps:
1.
From the LCD console, hold down the
approximately 2 seconds.
S
button for
The LCD screen will display:
SELECT:
SETUP NETWORK
2.
Press the
S
button three times until
RESET NETWORK appears in the LCD display:
SELECT:
RESET NETWORK
3.
Press the
4.
Using the control keys, toggle the cursor between
[Y]ES and [N]O and select [Y]ES to reset the
network configuration.
5.
Press
E
E
button.
when the cursor highlights [Y]ES.
After resetting, the CacheRaQ powers down and the
LCD displays:
PLEASE SWITCH
POWER OFF NOW
Resetting the Admin Password
If you forget the Administrator password, here’s how to
reset it:
1.
Push a paper clip into the Reset Admin Password
port (to the right of the LCD screen on the front
panel) and hold for approximately 2 seconds. The
LCD screen displays RESETTING ADMIN PASSWORD.
!
Caution: After you’ve cleared the password, be sure to set
a new one as soon as possible (as described below) to prevent unauthorized access to the Administrator functions.
2.
In your Web browser, enter the URL
http://IP address/
30
Using the LCD Console
IP address is the CacheRaQ’s assigned IP address.
3.
Go to the Administrator Setup screen.
If you’re prompted for a username or password,
enter admin as the username, and enter any name or
word for the password.
4.
Enter a new password in the Password field on the
Administrator Setup screen.
5.
Click Save Changes to save the new password.
31
Appendix A
32
Appendix B
Product Specifications
Caching Features
Caches HTTP and FTP traffic (only HTTP traffic is cached
in transparent mode)
Configurable for both Transparent Caching and
Traditional Proxy Caching mode
Supports HTTP/1.1 persistent connections (keep-alives)
DNS caching (optional DNS server in caching-only
mode)
ICP Support
Supports SSL tunneling and cookies
Persistent cache across reboots
Log files compatible with Harvest, Squid, and CERN
Proxy standards (log files downloadable via web
interface)
Performance
Supports 1 to 2 T1 or E1 lines
Supports 200 simultaneous requests
Scalability through Cobalt InstaCache Clustering
Built-in support for Level 4 switching for scalability and
failover protection
Stores meta-data and hot objects in RAM for fast cache
lookups
System Management
Browser-based Management Interface
Compatible with Netscape Navigator or Microsoft
Internet Explorer, versions 3.0 or later
33
Appendix B
Setup Wizard guides administrator through initial setup
Password protection for browser-based management
interface
Online Active Assist real-time help
Advanced management via telnet
Performance and Usage Reporting and Logging
Detailed event logging and Web-based statistical
reporting (see “Cache Statistics” on page 21)
Optional nightly e-mail reports
Complete log files available for download
Automatic log file rotation
SNMP agent
Active Monitor
Real-time pro-active system maintenance daemons
E-mail alerts
Cache Configuration Settings
User-definable content refresh parameters
User-definable maximum cacheable object size
Miscellaneous
Automatic system restart (after power outage and
restore)
Browser-based software upgrade
Year 2000 compliant
34
Product Specifications
Hardware
Superscalar RISC microprocessor
6.4 GB or 12.7 GB hard disk drive
128 MB or 256 MB 5-Volt EDO 60-ns DRAM, packaged in
72-pin Single In-Line Memory Modules (SIMMs)
Dual 10/100 Mbps Ethernet network interfaces, autosensing
LCD console
Serial console interface
Power consumption: 25 W typical, 35 W peak
Physical Specifications
Dimensions: 17.00 in. x 12.50 in. x 1.75 in. (43.2 cm x
31.8cm x 4.5cm - fits in standard 19” rack)
Weight: 9 lbs. 3 oz. (4.2 kg)
Power requirements: Input rating 100-240 V, 50/60 Hz
Operating enviroment: 32° to 108° F (0° to 40° C), 10% to
90% humidity (non-condensing)
Non-operating enviroment: 14° to 122° F (-10° to 50° C),
5% to 93% humidity (non-condensing)
LEDs: Power, Transmit/Receive, Link, Collision, 100Mbit
Operation, Disk Activity, Web Activity, OK to Power Off
Regulatory approval: FCC Class A, VCCI-A, UL, C-UL,
TUV, CE
35
Appendix B
36
Appendix C
Example Network Topologies
This appendix shows how the Cobalt CacheRaQ can be
used in a variety of ways in different network
environments. It illustrates the connections among the
network components and gives configuration details for
each setup.
37
Appendix C
CacheRaQ in Traditional Mode
Installation Notes
•
•
Configure the CacheRaQ for Traditional Proxy mode.
Configure clients’ browsers to use the CacheRaQ as
the HTTP Proxy.
Instructions for Internet Explorer Version 4
1.
Choose Internet Options from the View menu.
2.
Click the Connection tab.
3.
Check “Access the Internet using a proxy server.”
4.
Under Automatic Configuration, click Configure.
5.
In the URL field, enter http://cacheraq-name/proxy.pac .
Instructions for Netscape Navigator Version 4
1.
Choose Preferences from the Edit menu.
2.
In the Category list, click Advanced and Proxies.
3.
Choose Automatic Proxy Configuration.
4.
In the URL field, enter http://cacheraq-name/proxy.pac .
Advantage
If the CacheRaQ fails, the outside network is still
accessible (contrast with Transparent mode, on the next
two pages).
Disadvantage
Requires changes to the clients’ browser configuration.
38
Example Network Topologies
Transparent Mode Using One Network Interface
Installation Notes
•
•
•
To avoid changes to the clients’ configuration, assign
the existing gateway address used by the clients to
the CacheRaQ’s Network 1 interface.
Assign a new IP address to the Router/Firewall.
Use the router/firewall’s new IP address as the
gateway setting on the CacheRaQ.
Advantage
No special configuration for the client machines is
necessary.
Disadvantage
If the CacheRaQ fails, the clients cannot access the
outside network until the CacheRaQ comes back on-line.
However, if the clients can be configured with multiple
gateway addresses, you can configure them with the new
IP address for the router/firewall. The clients can then
use this address if the CacheRaQ fails.
39
Appendix C
Transparent Mode Using Two Network Interfaces
Installation Notes
•
•
To avoid changes to the clients’ configuration, assign
the existing gateway address used by the clients to
the CacheRaQ’s Network 2 interface.
Create a new subnet containing two hosts: the router
(assign it a new address) and the CacheRaQ’s
Network 1 interface. Make sure that the IP addresses
you assign to Network 1 and the router are on a
subnet different from the clients’ network. This is
necessary for the CacheRaQ to pass traffic through
from the clients to the router.
Advantages
•
•
No special configuration for the client machines is
necessary.
All traffic is forced through the CacheRaQ, so precise
logs and statistics can be generated.
Disadvantage
If the CacheRaQ fails, the clients cannot access the
outside network until the CacheRaQ comes back on-line.
40
Example Network Topologies
CacheRaQ for Workgroups
Installation Notes
•
•
You can configure the CacheRaQ for either
Transparent mode (using one or two network
interfaces) or Traditional Proxy mode.
To set up the mode you choose, follow the
instructions given on page 38 for Traditional mode,
or pages 39-40 for Transparent mode.
Advantage
You can separate network traffic into workgroups to
divide client load among multiple caching servers. This
increases scalability and allows geographically-separated
networks to be cached.
41
Appendix C
CacheRaQ ISP Deployment
Installation Notes
•
•
•
•
Configure the CacheRaQ for Transparent mode using
one network interface.
Configure access concentrators (“DIAL UP”) to use
the CacheRaQ as their gateway.
Configure the CacheRaQ to use the router as its
gateway.
One CacheRaQ should be able to handle 1-2 Mbps of
WAN traffic. Contact Cobalt Networks, Inc. for more
detailed deployment guidelines.
Advantage
You can keep quick-to-access copies of remote
documents, saving bandwidth and speeding up page
access for users.
Disadvantage
For large POPs, one CacheRaQ may not be enough. (In
this case, Clustered CacheRaQs can be used.)
42
Example Network Topologies
CacheRaQ ISP Cluster Deployment
Installation Notes
•
•
•
•
•
Configure one CacheRaQ as the Cluster Master, as
explained in "Cache Setup" on page 17.
Configure the Cluster Master to operate in
Transparent mode using one network interface.
The Cluster Slaves require no special configuration.
Configure the CacheRaQ’s gateway to be the router’s
IP address.
Configure the access concentrators (“DIAL UP”) to
use the Cluster Master as their gateway.
Advantages
•
•
Clustered CacheRaQs provide high-availability and
high-speed cache access and larger cache storage.
This solution is scalable — you can add up to 5
Cluster Slaves.
Disadvantage
•
You can’t have more than 5 Cluster Slaves; if you
want more capacity, you can use the L4 switch
solution (described on the next page).
43
Appendix C
CacheRaQ ISP Cluster With L4 Switch
Installation Notes
•
•
•
•
Configure the CacheRaQs for Transparent mode
using one network interface.
No Cluster Master is needed (the L4 switch replaces
the Cluster Master).
CacheRaQs can be connected either directly to the L4
switch or via a hub.
Refer to the L4 switch’s manual for instructions on
configuring the cache redirection.
Advantages
•
•
•
No Cluster Master is needed.
This solution is scalable — you can have dozens of
CacheRaQs per switch.
This is the fastest, largest-capacity solution.
Disadvantage
•
44
The cost of the L4 switch.
Example Network Topologies
CacheRaQ Cluster in Traditional Mode
Installation Notes
•
•
Configure one CacheRaQ as the Cluster Master, as
explained in "Cache Setup" on page 17.
No special configuration is necessary for the Cluster
Slaves.
Advantages
•
•
Distributed caching allows for faster response time
and more storage space.
Clustered CacheRaQs are scalable — you can add
more Cluster Slaves as needed.
Disadvantage
•
This solution requires modification to the client
browser configuration.
45
Appendix C
CacheRaQ Cluster in Transparent Mode
Installation Notes
•
•
•
Configure the Cluster Master for Transparent mode.
(The figure above shows a two-interface
configuration. A one-interface configuration is also
possible.)
Configure the Cluster Slaves for Traditional Proxy
mode.
Enter the Cluster Slave information into the Cluster
Master configuration.
Advantage
No client-side configuration is necessary.
Disadvantage
If the Cluster Master fails, the clients cannot access the
outside network until the Cluster Master comes back online.
46
Example Network Topologies
CacheRaQ Enterprise Cluster With L4 Switch
Installation Notes
•
•
•
•
Configure the CacheRaQs for Transparent mode
using one interface.
CacheRaQs can be connected either directly to the L4
switch or via a hub.
No Cluster Master is necessary (the L4 switch
replaces the Cluster Master).
Refer to the switch’s manual for instructions on
configuring the cache redirection.
Advantages
•
•
•
•
This solution allows for high-speed clustering.
It’s fully scalable — you can add CacheRaQs as
needed. L4 switches typically place few limits on the
maximum number of cache servers.
It provides increased cache storage space.
No Cluster Master is necessary.
Disadvantage
•
The cost of the L4 switch.
47
Appendix C
48
THE BSD COPYRIGHT
Copyright ©1991, 1992, 1993, 1994 The Regents of the University of California. All rights
reserved.
Redistribution and use in source and binary forms, with or without modification, are
permitted provided that the following conditions are met:
1. Redistributions of source code must retain the above copyright notice, this list of
conditions and the following disclaimer.
2. Redistributions in binary form must reproduce the above copyright notice, this list of
conditions and the following disclaimer in the documentation and/or other materials
provided with the distribution.
3. All advertising materials mentioning features or use of this software must display the
following acknowledgment: This product includes software developed by the University of
California, Berkeley and its contributors.
4. Neither the name of the University nor the names of its contributors may be used to
endorse or promote products derived from this software without specific prior written
permission.
THIS SOFTWARE IS PROVIDED BY THE REGENTS AND CONTRIBUTORS “AS IS'” AND
ANY EXPRESS OR IMPLIED WARRANTIES, INCLUDING, BUT NOT LIMITED TO, THE
IMPLIED WARRANTIES OF MERCHANTABILITY AND FITNESS FOR A PARTICULAR
PURPOSE ARE DISCLAIMED. IN NO EVENT SHALL THE REGENTS OR
CONTRIBUTORS BE LIABLE FOR ANY DIRECT, INDIRECT, INCIDENTAL, SPECIAL,
EXEMPLARY, OR CONSEQUENTIAL DAMAGES (INCLUDING, BUT NOT LIMITED TO,
PROCUREMENT OF SUBSTITUTE GOODS OR SERVICES; LOSS OF USE, DATA, OR
PROFITS; OR BUSINESS INTERRUPTION) HOWEVER CAUSED AND ON ANY THEORY
OF LIABILITY, WHETHER IN CONTRACT, STRICT LIABILITY, OR TORT (INCLUDING
NEGLIGENCE OR OTHERWISE) ARISING IN ANY WAY OUT OF THE USE OF THIS
SOFTWARE, EVEN IF ADVISED OF THE POSSIBILITY OF SUCH DAMAGE.
GNU GENERAL PUBLIC LICENSE
Copyright (C) 1989, 1991 Free Software Foundation, Inc.
675 Mass Ave., Cambridge, MA 02139, USA
TERMS AND CONDITIONS FOR COPYING, DISTRIBUTION AND MODIFICATION
This License applies to any program or other work which contains a notice placed by the
copyright holder saying it may be distributed under the terms of this General Public
License. The “Program,” below, refers to any such program or work, and a “work based on
the Program” means either the Program or any derivative work under copyright law: that is
to say, a work containing the Program or a portion of it, either verbatim or with
modifications and/or translated into another language. (Hereinafter, translation is included
without limitation in the term “modification.”) Each licensee is addressed as “you.”
Activities other than copying, distribution and modification are not covered by this License;
they are outside its scope. The act of running the Program is not restricted, and the output
from the Program is covered only if its contents constitute a work based on the Program
(independent of having been made by running the Program). Whether that is true depends
on what the Program does.
You may copy and distribute verbatim copies of the Program's source code as you receive it,
in any medium, provided that you conspicuously and appropriately publish on each copy
an appropriate copyright notice and disclaimer of warranty; keep intact all the notices that
refer to this License and to the absence of any warranty; and give any other recipients of the
Program a copy of this License along with the Program.
You may charge a fee for the physical act of transferring a copy, and you may at your option
offer warranty protection in exchange for a fee.
You may modify your copy or copies of the Program or any portion of it, thus forming a
work based on the Program, and copy and distribute such modifications or work under the
terms of Section 1 above, provided that you also meet all of these conditions:
1.You must cause the modified files to carry prominent notices stating that you changed the
files and the date of any change.
2.You must cause any work that you distribute or publish, that in whole or in part contains
or is derived from the Program or any part thereof, to be licensed as a whole at no charge to
all third parties under the terms of this License.
3.If the modified program normally reads commands interactively when run, you must
cause it, when started running for such interactive use in the most ordinary way, to print or
display an announcement including an appropriate copyright notice and a notice that there
is no warranty (or else, saying that you provide a warranty) and that users may redistribute
the program under these conditions, and telling the user how to view a copy of this License.
(Exception: if the Program itself is interactive but does not normally print such an
announcement, your work based on the Program is not required to print an announcement.)
These requirements apply to the modified work as a whole. If identifiable sections of that
work are not derived from the Program, and can be reasonably considered independent and
separate works in themselves, then this License, and its terms, do not apply to those sections
when you distribute them as separate works. But when you distribute the same sections as
part of a whole which is a work based on the Program, the distribution of the whole must be
on the terms of this License, whose permissions for other licensees extend to the entire
whole, and thus to each and every part regardless of who wrote it.
Thus, it is not the intent of this section to claim rights or contest your rights to work written
entirely by you; rather, the intent is to exercise the right to control the distribution of
derivative or collective works based on the Program.
In addition, mere aggregation of another work not based on the Program with the Program
(or with a work based on the Program) on a volume of a storage or distribution medium
does not bring the other work under the scope of this License.
You may copy and distribute the Program (or a work based on it, under Section 2) in object
code or executable form under the terms of Sections 1 and 2 above provided that you also
do one of the following:
1.Accompany it with the complete corresponding machine readable source code, which
must be distributed under the terms of Sections 1 and 2 above on a medium customarily
used for software interchange; or,
2.Accompany it with a written offer, valid for at least three years, to give any third party, for
a charge no more than your cost of physically performing source distribution, a complete
machine-readable copy of the corresponding source code, to be distributed under the terms
of Sections 1 and 2 above on a medium customarily used for software interchange; or,
3.Accompany it with the information you received as to the offer to distribute
corresponding source code. (This alternative is allowed only for noncommercial distribution
and only if you received the program in object code or executable form with such an offer, in
accord with Subsection b above.)
The source code for a work means the preferred form of the work for making modifications
to it. For an executable work, complete source code means all the source code for all
modules it contains, plus any associated interface definition files, plus the scripts used to
control compilation and installation of the executable. However, as a special exception, the
source code distributed need not include anything that is normally distributed (in either
source or binary form) with the major components (compiler, kernel, and so on) of the
operating system on which the executable runs, unless that component itself accompanies
the executable.
If distribution of executable or object code is made by offering access to copy from a
designated place, then offering equivalent access to copy the source code from the same
place counts as distribution of the source code, even though third parties are not compelled
to copy the source along with the object code.
You may not copy, modify, sublicense, or distribute the Program except as expressly
provided under this License. Any attempt otherwise to copy, modify, sublicense or
distribute the Program is void, and will automatically terminate your rights under this
License. However, parties who have received copies, or rights, from you under this License
will not have their licenses terminated so long as such parties remain in full compliance.
You are not required to accept this License, since you have not signed it. However, nothing
else grants you permission to modify or distribute the Program or its derivative works.
These actions are prohibited by law if you do not accept this License. Therefore, by
modifying or distributing the Program (or any work based on the Program), you indicate
your acceptance of this License to do so, and all its terms and conditions for copying,
distributing or modifying the Program or works based on it.
Each time you redistribute the Program (or any work based on the Program), the recipient
automatically receives a license from the original licensor to copy, distribute or modify the
Program subject to these terms and conditions. You may not impose any further restrictions
on the recipients' exercise of the rights granted herein. You are not responsible for enforcing
compliance by third parties to this License.
If, as a consequence of a court judgment or allegation of patent infringement or for any other
reason (not limited to patent issues), conditions are imposed on you (whether by court
order, agreement or otherwise) that contradict the conditions of this License, they do not
excuse you from the conditions of this License. If you cannot distribute so as to satisfy
simultaneously your obligations under this License and any other pertinent obligations,
then as a consequence you may not distribute the Program at all. For example, if a patent
license would not permit royalty-free redistribution of the Program by all those who receive
copies directly or indirectly through you, then the only way you could satisfy both it and
this License would be to refrain entirely from distribution of the Program.
If any portion of this section is held invalid or unenforceable under any particular
circumstance, the balance of the section is intended to apply and the section as a whole is
intended to apply in other circumstances.
It is not the purpose of this section to induce you to infringe any patents or other property
right claims or to contest validity of any such claims; this section has the sole purpose of
protecting the integrity of the free software distribution system, which is implemented by
public license practices. Many people have made generous contributions to the wide range
of software distributed through that system in reliance on consistent application of that
system; it is up to the author/donor to decide if he or she is willing to distribute software
through any other system and a licensee cannot impose that choice.
This section is intended to make thoroughly clear what is believed to be a consequence of
the rest of this License.
If the distribution and/or use of the Program is restricted in certain countries either by
patents or by copyrighted interfaces, the original copyright holder who places the Program
under this License may add an explicit geographical distribution limitation excluding those
countries, so that distribution is permitted only in or among countries not thus excluded. In
such case, this License incorporates the limitation as if written in the body of this License.
The Free Software Foundation may publish revised and/or new versions of the General
Public License from time to time. Such new versions will be similar in spirit to the present
version, but may differ in detail to address new problems or concerns.
Each version is given a distinguishing version number. If the Program specifies a version
number of this License which applies to it and “any later version”, you have the option of
following the terms and conditions either of that version or of any later version published
by the Free Software Foundation. If the Program does not specify a version number of this
License, you may choose any version ever published by the Free Software Foundation.
If you wish to incorporate parts of the Program into other free programs whose distribution
conditions are different, write to the author to ask for permission. For software which is
copyrighted by the Free Software Foundation, write to the Free Software Foundation; we
sometimes make exceptions for this. Our decision will be guided by the two goals of
preserving the free status of all derivatives of our free software and of promoting the
sharing and reuse of software generally.
NO WARRANTY
BECAUSE THE PROGRAM IS LICENSED FREE OF CHARGE, THERE IS NO WARRANTY
FOR THE PROGRAM, TO THE EXTENT PERMITTED BY APPLICABLE LAW. EXCEPT
WHEN OTHERWISE STATED IN WRITING THE COPYRIGHT HOLDERS AND/OR
OTHER PARTIES PROVIDE THE PROGRAM “AS IS” WITHOUT WARRANTY OF ANY
KIND, EITHER EXPRESSED OR IMPLIED, INCLUDING, BUT NOT LIMITED TO, THE
IMPLIED WARRANTIES OF MERCHANTABILITY AND FITNESS FOR A PARTICULAR
PURPOSE. THE ENTIRE RISK AS TO THE QUALITY AND PERFORMANCE OF THE
PROGRAM IS WITH YOU. SHOULD THE PROGRAM PROVE DEFECTIVE, YOU
ASSUME THE COST OF ALL NECESSARY SERVICING, REPAIR OR CORRECTION.
IN NO EVENT UNLESS REQUIRED BY APPLICABLE LAW OR AGREED TO IN
WRITING WILL ANY COPYRIGHT HOLDER, OR ANY OTHER PARTY WHO MAY
MODIFY AND/OR REDISTRIBUTE THE PROGRAM AS PERMITTED ABOVE, BE LIABLE
TO YOU FOR DAMAGES, INCLUDING ANY GENERAL, SPECIAL, INCIDENTAL OR
CONSEQUENTIAL DAMAGES ARISING OUT OF THE USE OR INABILITY TO USE THE
PROGRAM (INCLUDING BUT NOT LIMITED TO LOSS OF DATA OR DATA BEING
RENDERED INACCURATE OR LOSSES SUSTAINED BY YOU OR THIRD PARTIES OR A
FAILURE OF THE PROGRAM TO OPERATE WITH ANY OTHER PROGRAMS), EVEN IF
SUCH HOLDER OR OTHER PARTY HAS BEEN ADVISED OF THE POSSIBILITY OF
SUCH DAMAGES.