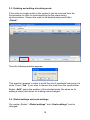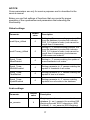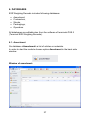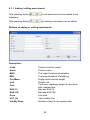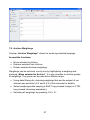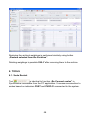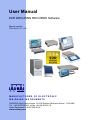
1
User Manual
E2R WEIGHING RECORDS Software
Manual number:
ITKU-56-01-01-11-A
MANUFACTURER OF ELECTRONIC
WEIGHING INSTRUMENTS
RADWAG Wagi Elektroniczne, 26–600 Radom 28 Bracka Street - POLAND
Tel. +48 48 38 48 800, tel/fax. +48 48 385 00 10
Sales Department +48 48 366 80 06
www.radwag.com
TABLE OF CONTENTS
1. GENERAL INFORMATION .................................................................................. 4
1.1. Intended use ................................................................................................. 4
1.2. Database....................................................................................................... 5
1.3. System requirements .................................................................................... 5
1.4. Scales cooperating with the system .............................................................. 6
2. SOFTWARE INSTRUCTION ................................................................................ 7
2.1. Databases..................................................................................................... 7
2.2. Installation of E2R Weighing Records........................................................... 7
3. E2R SYNCHRONIZER ....................................................................................... 10
3.1. RADWAG Synchronizer – Windows Service............................................... 11
3.2. Adding new scales to the Synchronizer...................................................... 13
3.3. Deleting and editing of existing scale .......................................................... 16
3.4. Global settings and scale settings............................................................... 16
4. E2R MANAGER.................................................................................................. 19
4.1. Setting connection to Radwag Synchronizer............................................... 20
4.2. Show / hide the panel of connection with server ......................................... 21
5. E2R WEIGHING RECORDS .............................................................................. 21
5.1. Starting program ......................................................................................... 21
5.2. Main program window ................................................................................. 22
5.3. Program settings......................................................................................... 23
5.3.1. Database............................................................................................. 24
5.3.2. Updating the database ........................................................................ 25
5.3.3. Connection configuration..................................................................... 25
5.3.4. Connection checking ........................................................................... 26
5.3.5. Authorization and groups of users....................................................... 26
5.3.6. Service settings................................................................................... 28
5.4. Other settings.............................................................................................. 29
5.4.1. Changing the active window................................................................ 29
5.4.2. Language change ............................................................................... 29
5.4.3. Program appearance .......................................................................... 29
5.4.4. Logging out ......................................................................................... 30
5.4.5. Closing program.................................................................................. 30
5.5. Working window of the program.................................................................. 31
5.5.1. Sorting information .............................................................................. 31
5.5.2. Additional filtering options ................................................................... 31
5.5.3. Filter creator ........................................................................................ 33
2
6. DATABASES...................................................................................................... 37
6.1. Assortment.................................................................................................. 37
6.1.1. Adding / editing assortments ............................................................... 38
6.1.2. Deleting product .................................................................................. 39
6.1.3. Searching and filtering assortments .................................................... 39
6.1.4. Reports from Products ........................................................................ 40
6.2. Contractors ................................................................................................. 40
6.2.1. Adding / editing contractors................................................................. 41
6.2.2. Deleting contractors ............................................................................ 42
6.2.3. Filtering and searching contractors ..................................................... 42
6.2.4. Reports from Contractors.................................................................... 43
6.3. Stocks ......................................................................................................... 43
6.3.1. Adding / changing stocks .................................................................... 44
6.3.2. Deleting a stock................................................................................... 44
6.3.3. Filtering and searching stocks............................................................. 45
6.4. Packagings ................................................................................................. 45
6.4.1. Adding / changing packagings ............................................................ 46
6.5. Operators .................................................................................................... 47
6.5.1. Adding / changing operators ............................................................... 48
6.5.2. Deleting operators............................................................................... 49
6.5.3. Filtering and searching operators........................................................ 49
6.5.4. Reports from operators ....................................................................... 49
7. MODULE WEIGHING RECORDS – Reports .................................................... 49
7.1. The main window in E2R Weighing Records .............................................. 49
7.2. Raport for the Materials............................................................................... 52
7.3. Report for Operator ..................................................................................... 52
7.4. Report for Cooperants................................................................................. 53
7.5. Report for Batch Number ............................................................................ 54
7.6. Report for the Balance ................................................................................ 55
7.7. Header and Report Title.............................................................................. 56
7.8. Archive Weighings ...................................................................................... 57
8. TOOLS ............................................................................................................... 58
8.1. Scale Restart .............................................................................................. 58
3
1. GENERAL INFORMATION
1.1. Intended use
E2R System is a modular system for complex management of production
processes that are associated in some points with weighing. Owning to the
modular structure the system is versatile and can be easily tailored to the
profile, characteristics and needs of a firm as well as individual customer
requirements.
E2R SYSTEM
Module E2R Weighing Records is intended to recording weight
measurements performed on RADWAG weighing terminals, which work
connected in the Ethernet network, and saving them in the computer
database.
4
The network of scales can be combined with one or more types of scales.
E2R SYSTEM based on Ethernet
The program allows for full supervision and reporting from measurements
collected from scales WPW, TMC, TMX, WLY, WPY.
Notice:
1. Due to continual updates, there is a possibility of minor discrepancies
between the contents of this manual and the program.
2. RADWAG takes no responsibility for the unexpected effects of program
operation, and possible consequences resulting from wrong use of the
program.
1.2. Database
The engine of installed database can be any distribution of MS
SQL Server (MS SQL 2000/2005/2008). Due to the performance,
scalability and reliability of the system it is recommended to use a
commercial platform SQL Server, e.g.: SQL Server 2008.
1.3. System requirements
The minimum requirements for the program:
• Windows 2000/XP/ 2003/Vista/Windows7 operating system,
5
•
•
•
•
processor 2 GHz or faster,
minimum 1 GB RAM (recomended 2 GB),
minimum 5 GB of free space on HD,
monitor and graphic card allowing for resolution at least 1024x768
pixels,
• DVD drive,
• Default system font size (96 dpi)!
Notice:
1. It is advisable not to install other applications on the computer with E2R
system.
2. If the program is to be installed on a computer that is not delivered,
together with installed software, by RADWAG (customer ownership),
take following steps:
• install SQL server on your computer (if it has not been installed
before),
• connect databases (is SQL server is installed).
3. If the program has been installed on a customer’s computer any
resulting hardware and software problems are of the user (computer
owner) concern.
4. RADWAG takes no responsibility for:
• Any influence of E2R system and/or SQL server on operation of
other programs installed on the same computer,
• Any malfunctions of E2R system and/or SQL server cosed by
operation of other programs installed on the computer (system
overload).
1.4. Scales cooperating with the system
Program E2R Weighing Records, considering the communication
protocol, can cooperate only with scales manufactured by RADWAG.
Following series of scales can cooperate with this program: WPW, TMX,
WLY and WPY.
6
Before starting cooperation with the program, each scale requires setting
adequate user parameters for assuring the expected measurement
accuracy and appropriate cooperation with the program. Setting
parameters for each scale is described in user manuals.
2. SOFTWARE INSTRUCTION
2.1. Databases
As a database engine can be used any distribution of MS SQL Server (MS
SQL 2000/2005/2008). The database of E2R System is created during
installation of E2R Weighing Records.
2.2. Installation of E2R Weighing Records
This instruction comprises description of version „System E2R Weighing
Records 11.02.02”.
After running the file the following dialogue window appears with the
possibility of choosing the language to be used during the installation:
Choose the language and press „OK”.
7
In further steps follow the instructions displayed in subsequent windows.
Welcome window:
In order to continue press „Next”.
Window with installation path:
8
Choose a folder for program (it is advisable to keep the default path),then
press „Next”.
Window for selecting components to be installed:
Choose components you want to install (all elements needed for
appropriate operation are ticked), and then press „Next”.
Ready-to-install window:
9
In order to start the installation process press button „Install”.
Completing installation window:
After the installation is completed the computer restart is required and the
option is selected by default.
Press button „Finish” in order to complete the installation.
Together with the program are installed: database of E2R System (SQL
base), „E2R Synchronizer” and „E2R Manager”.
3. E2R SYNCHRONIZER
Program E2R Synchronizer is designed for saving registered weighings in
the MS SQL database and monitoring scales based on terminals other
than PUE5 (e.g. PUE C41, PUE 7).
The program operates as a service – if properly configured it does not
require any user intervention. It is run automatically by starting operating
system (no user logging in is required). After establishing connection with
the indicated database collects data with choosen scales.
10
3.1. RADWAG Synchronizer – Windows Service
In the main window of E2R SYNCHRONIZER (SynchAdmin.exe), a button
for changing the language and configuring the Radwag Synchronizer
sercice is accessible.
Main program window:
In the title bar of the window there is information about of programs that are
parts of „RADWAG Synchronizer”.
Description:
Install Service
Before running RADWAG Synchronizer the
service needs to be installed in MS Windows
operating system.
Uninstall Service
Uninstalling the service RADWAG Synchronizer
from MS Windows
Run Server
Running the service server RADWAG
Synchronizer
11
Stop Server
Stopping the server responsible for communication
with scales.
Language
Language selection window. Accessible languages
Polish, English, German and Spanish. After the
language change program restart is required.
Save
Saving language change. Caution! The language
change will be applied after program restart.
Notice:
In case of any problems with the service it should be stopped and
uninstalled. Meanwhile a test program can be used C:\RADWAG\E2R
SYSTEM\E2R EWIDENCJA\E2R SYNCHRONIZER\SynchServer.exe. It
is also a service. But only one of the programs can opperate.
If the „Windows Firewall” is enabled the program needs to be unlocked
after the first program start.
After starting the program go to overlap „Parameters”.
Connect to the database by pressing button „Connect” to configure
scales.
12
3.2. Adding new scales to the Synchronizer
After connecting to the database adding new scales to the Synchronizer on
overlap „Scales” is possible. Press button „Add” to add a new scale.
Then a scale window appears which needs to be filled in according to the
example below. Adding an new scale is shown on the scale WPW.
Identically can be added other scales that can cooperate with „E2R
System”.
13
Scale settings:
Name
Type
Config
Edit
Ident.
Name
Type
Serial No.
Adress
Platform
Quantity
Any interface name
Field to display interface type (serial, Ethernet)
Field to display interface configuration
Button for interface edition
Scale identification number (numerical field)
Any scale name
Types of conection with scales:
• Radwag.Devices.PUE41.PUE41Encoder – connection
with indicator PUEC41H
• Radwag.Devices.WeightDryer.WeightDryer
Encoder – connection with moisture analyser MAX
• Radwag.Devices.PUE7.PUE7Encoder – connection with
indicator PUE 7
• Radwag.Devices.PUE4L.PUE4LEncoder – connection
with indicator PUE4L
Scale serial number
Scale address (set in the scale)
Platform Number
For scales with WPW indicators „Type” choose an appropriate setting:
Radwag.Devices.PUE41.PUE41Encoder.
Press button „Edit” to see a window for setting parameters of the
communication interface with the scale.
14
Interface settings:
MediumType
ConnectionString
Host
Port
BaudRate
DataBits
Handshake
Parity
PortName
StopBits
Connection type (None – no connection,
Serial – scale connected via RS232,
Ethernet – scale connected via Ethernet)
String of characters with encoded
configuration parameters
Name or IP of remote host (for Ethernet
connections) – scale IP on which the
Synchronizer server runs.
Remote host port (default 4001)
Baud rate of RS232 (default for moisture
analysers 9600 bps, for WPW and PUE7 set
115200 bps)
Number of data bits (default DB_8)
Device presence and transmission
acknowledge (default None)
Parity check (default None)
Communication port number
Number of stop bits (default One)
Notice:
All of the above settings need to be compared with settings in scales and
the system settings of the communication port in MS Windows.
If adding a scale (after pressing „Save” in the window for adding scale)
triggers the message box below it means that the scale identifier already
exists in the database.
Then the Identifier needs to be changed and saved again by pressing
„Save”.
15
3.3. Deleting and editing of existing scale
If the scale no longer works in the system it can be removed from the
Synchronizer in order to avoid searching for the scale during
synchronisation. Choose the scale to be deleted and press button
„Delete”.
Then the following window appears:
This question appears in order to avoid the risk of accidental removing of a
scale. Press „Yes” if you want to remove the scale from the synchronizer.
Button „Edit” opens the window of the selected scale (the same as for
adding a scale) and allows for making some changed.
3.4. Global settings and scale settings
On overlap „Scales” „Global settings” and „Scale settings” can be
changed.
16
NOTICE:
Some parameters are only for service purposes and is described in the
service manual.
Below you can find settings of functions that are crucial for proper
operation of the synchroniser and parameters that extending the
functionality.
Global settings:
Parameter
Default
value
Description
Setting to „1” causes sending operators‘ IDs
from the database to scales with indicator
PUE_C41 instead of code (code cannot be
longer than 6 characters)
Setting to „1” causes sending products’ IDs
from the database to scales with indicator
PUE_C41 instead of code (code cannot be
longer than 6 characters); productname=
Code+name and code=id
pue41Oper_id2kod
0
pue41Towary_id2kod
0
Synch_Towar
MasaEnabled
0
Setting to „1” causes enabling the update of
mass standards in all scales
Synch_Towar
MinMaxEnabled
0
Setting parameter to „1” causes enabling the
update of thresholds in all scales
Synch_Towar
TaraEnabled
0
Setting parameter to „1” causes enabling the
update of tare in all scales
Synch_Towar
UpdateEnabled
0
Setting parameter to „1” causes enabling
updates from all scales to the database
Scale settings:
Parameter
ew_wazenia
Default
value
0
Description
Weighings from the scale are saved in the
database: 0 - ew1_wazenia (for modules E2R
Weighing Records, E2R Transactions i E2R
Formulas); 1 – ew_wazenia (E2R Weighing)
17
Synch_Towar
MasaEnabled
0
Setting parameter to „1” causes enabling the
update of mass standard in the scale
Synch_Towar
MinMaxEnabled
0
Setting parameter to „1” causes enabling the
update of thresholds in the scale
Synch_Towar
TaraEnabled
0
Setting parameter to „1” causes enabling the
update of tare in the scale
Synch_Towar
UpdateEnabled
0
Setting parameter to „1” causes enabling the
update of tare in the scale
ReconnectTimeout
OnNoRespond
0
A parameter for setting the maximum timeout
in seconds (waiting for a scale reply). After the
time elapses the scale is disconnected and
reconnected to Synchronizer.
Parameter values:
0 – no timeout, 1 to 60 – timeout in seconds.
Signalling lamp
0
Setting parameter to „1” sets the
checkweighing mode of a scale based on
indicator PUE4-L
After making changes (adding scales and changing parameters) press
button „Save”.
18
After saving go to overlap „Windows Sevice” and check if „RADWAG
Synchronizer Server” operates.
If the server runs you can see a visualization of operating scales connected
to the system using program E2R Manager.
4. E2R MANAGER
Program „E2R Manager” is designed for displaying the state of
communication with scales and current weighings. Additionally, there
are displayed information about: operator, production order, weitghted
product, batch number, contractor, product tare and working mode.
All messages are of informational character which means that it is not
possible to save or print in program „E2R Manager”. These functionalitied
are present in program „E2R WEIGHING RECORDS”.
After installing „E2R WEIGHING RECORDS”, a shortcut to the program
is created on the desktop.
19
Main window of E2R Manager:
Notice:
In case of lack of communication between „E2R Manager” and service
Radwag Synchronizer or when the service is off no scale window is
displayed.
4.1. Setting connection to Radwag Synchronizer
In window „Radwag Synch Manager” set address IP and a
communication port for a computer with running the service of
connecting with scales.
20
4.2. Show / hide the panel of connection with server
In the menu Program settings of „E2R Manager” users can access the
panel of connection sith service „Radwag Synchronizer”. If the program
runs and no scale is displayed in the window it means the lack of
connection with the service „Radwag Synchronizer”. In such a case
make sure if the service is running in system MS Windows and press
„Connect” in the connection panel.
Window indicating the lack of connection:
Window indicating the establishment of connection:
5. E2R WEIGHING RECORDS
This manual describes version 10.3.10.0 of „E2R Weighing Records” and
may not include descriptions of functionalities and corrections made in
upper versions.
5.1. Starting program
After the program starts running the logging in procedure is initiated.
Enter Login and Password for an operator.
Press OK to confirm, then the program goes to the main window.
21
5.2. Main program window
After an operator has logged in the main window appears:
There are 4 areas in the main window:
•
•
•
•
Top Bar – System,
Side Bar – Work,
Pasek Dolny – Information,
Workspace.
In the top bar there are program settings, appearance options (colours), a
LOGOUT and EXIT buttons.
In the side bare, there are modules and operating functions of the program.
22
The bottom bar displayes information about the program version and
logged in user their authorization.
In the workspace, there are displayed all windows related to the Side Bar,
holding all data and information.
5.3. Program settings
Press button
in the top bar to display settings.
23
5.3.1. Database
In order to display database settings, press button
<Settings>.
in module
Functions of database settings:
•
•
•
Update Database,
Check Connection,
Configure Connection.
In the top part of the window there is displayed the status of connection
with the database.
In the lower part of the window there are displayed parameters of
connection with the database.
In order to cancel introduced changes press button
24
.
5.3.2. Updating the database
After pressing button
updated.
the database version will be
Notice:
1. Updating the database overwrites the existing database. For that the
current database needs to be archived before updating;
2. Users can update the current database after consulting with
RADWAG.
5.3.3. Connection configuration
After pressing button
a window with parameters of
connection with the database is displayed.
Fields:
Server
Database
User
Password
IP or server name on which SQL server runs (if the
database has a declared instance, it also needs to be
given). Format: SERVER\INSTANCE
SQL database name
User name, default sa
User password, default radwag
After pressing button <Test connection> the connection of database will
be checked.
25
Then the window with information given earlier is displayed:
After pressing OK in the window above a message box is displayed with
information about the connection status.
5.3.4. Connection checking
After pressing button
database is checked.
the connection with the
5.3.5. Authorization and groups of users
In order to enable the access of users and groups to different functionalities
press button
in module <Settings>.
In overlap <Groups> groups of users are defined.
26
Buttons’ description:
Add
Delete
Save
Adding the new group of users
Erasing a group of users
Recording changes
In overlap <Access Rights> all codes with names ascribed to them ,which
are used for defining group rights, are accessible.
In overlap <Group Rights> each group of users can have set accessibility
to different program modules.
27
After choosing a group from menu <Group> add or take off authorization
according to the predetermined pattern.
5.3.6. Service settings
In order to get access to the service settings press button
in module Settings.
Notice:
All service settings are accessible only for RADWAG authorized services.
28
5.4. Other settings
5.4.1. Changing the active window
Only one window is to be displayed after choosing it from the list (setting a
.
tick next to it) displayed after pressing button
5.4.2. Language change
Choose the language from the listbox below.
Fields:
PL
EN
DE
ES
Polish
English
German
Spanish
5.4.3. Program appearance
The program outlook can be changed by pressing button
choosing one item from the list.
29
and
Accessible colour schemes:
Caramel
Money Twins
Lilian
The Asphalt World
iMaginary
Black
Blue
Brown
Light-blue
Light-blue
Light-gray
Dark gray
Black
Dark blue
5.4.4. Logging out
After pressing button
, the user is logged out.
Then another operator can be logged in by enaring a Login and the
to log in.
Password. Then press button
5.4.5. Closing program
Press button
and the program will be closed.
30
5.5. Working window of the program
5.5.1. Sorting information
In the working window of all accessible modules all information displayed
can be freely sorted.
In order to group displayed data choose a column header and drag it to the
place indicated in the image below.
The selected header will be displayed as a button with the same caption.
Pressing the button causes sorting the list in an ascending or descending
way.
5.5.2. Additional filtering options
After pressing the right side of a column header additional filtering options
appear to be choosen from the list.
After right-clicking the header a pop-up menu
will be displayed.
31
Fields:
Sort Ascending
Sort Descending
Clear Sorting
Group By This Column
Hide Group By Box
Remove This Column
Column Chooser
Best Fit
Best Fit (all columns)
Filter Editor…
Sorting from A to Z
Sorting from Z to A
Disable sorting filter
Group data according the selected
column
Hides the field of quick grouping
Deletes a selected column from the
window
Starts columns configurator in the
window
Change the column width to get the best
view
Change the width of all columns to get
the best view
Advanced filter
In each window, a navigation bar is available in where we can add, edit,
delete and jump between records.
In the upper part of the bar there is a data filter which allows you to
generate five basic statistics for that column. The selection of statistics is
displayed by pressing the right mouse button in the upper part of the
navigation bar.
Basic statistics:
Sum
Min
Max
Count
Average
None
Displays the sum of all values in the column
Displays the minimum value in the column
Displays the maximum value in the column
Displays the number of rows in the column
Displays the average value of the data in the column
Statistics are off
32
5.5.3. Filter creator
After choosing button „Filter editor…” you start the window of filter creator
where you can freely filter data from the database.
Using the creator you can set one or many filtering conditions, which allows
for detailes filtering and generating reports from the filtered data.
Filtering criteria:
a) Filtering groups (and, or, not and, not or)
33
Definitions:
And
Or
Not And
Not Or
Add Condition
Add Group
Clear All
The condition that endorces fulfilment of all
filtering criteria
The condition that endorces fulfilment of any
filtering criterium
The condition that endorces fulfilment of the
opposites to all the set filtering criteria
The condition that endorces fulfilment of any
opposite to set filtering criteria
Allows for adding another condition of filtering
Allows for adding another group of filtering
(each group can include many conditions of
filtering)
Causes clearing (deleting) of all filtering
conditions
b) Filtering conditions – outlines the data to be filtered and the
methods of filtering:
- choosing a column for filtering
- choosing filtering range and method
34
Designations:
Equals
Does not equal
Is greater than
Is greater than or
equal to
Is less than
Is less than or
equal to
Is between
Is not between
Contains
Does not contain
Displaying only records from the selected column
which are ecactly the same as the entered value
Displaying all records from the selected column
which are different from the entered value (opposite
to filter „Equal”)
Displaying only records from the selected column
which values are greaterer than the entered value,
Displaying only records from the selected column
which values are greaterer or equal to the entered
value,
Displaying only records from the selected column
which values are lower than the entered value,
Displaying only records from the selected column
which values are lower or equal to the entered value,
Displaying only records from the selected column
which values are in the range between two given
values
Displaying only records from the selected column
which values are beyond the range between two
given values
Displaying only records from the selected column
which include the given string of characters
Displaying only records from the selected column
which do not include the given string of characters
35
Begins with
Ends with
Is like
Is not like
Is blank
Is not blank
Is any of
Is none of
Displaying only records from the selected column
which start form the given string of characters
Displaying only records from the selected column
which end with the given string of characters
Displaying only records from the selected column
which has the same beginning and end, the filtering
criterion has the following format „begin%end”
Displaying only records from the selected column
which has not the given beginning and end, the
filtering criterion has the following format
„begin%end”
Displaying only records from the selected column
which are empyt
Displaying only records from the selected column
which are not empyt
Displaying only records from the selected column
which are the same as one of the given patterns
Displaying only records from the selected column
which are different from all of the given patterns –
opposite to „Is any of” filtering
Here you can specify the exact criterion for filtering the selected column,
e.g.: if you want to get a result concerning product „Apple” choose „Name
- Equals – value: Apple”. If additionally you want to filter add another
criterion by pressing „+” next to the filtering critrion.
After completing the configuration of filters confirm the settings by pressing
button
, which causes the filter to run.
At the same time in the bottom bar the filtering method is displayed.
Pressing button „Edit filter” calls for the filter creator window.
36
6. DATABASES
E2R Weighing Records includes following databases:
•
•
•
•
•
Assortment,
Contractors,
Stocks,
Packagings,
Operators.
All databases are editable also from the software of terminals PUE 5
(Terminal E2R Weighing Records).
6.1. Assortment
On database <Assortment> a list of articles or materials.
In order to start the module choose option Assortment in the back side
window.
Window of assortment:
37
6.1.1. Adding / editing assortments
After pressing button
database.
a new assortment can be added to the
After pressing button
an existing assortment can be edited.
Window of adding or editing assortments:
Description:
Code
Name
MAX
MIN
Pcs Mass
Unit
Tare
EAN 13
EAN 128
Price
VAT [%]
Validity Days
Product code for scales
Product name
The upper threshold of weighing
The lower threshold of weighing
Single piece nominal weight
Weight unit
Tare value (package weight) for producte
with constant tare
Barcode EAN 13
Barcode EAN 128
Unit price
Value Added Tax
Number of days to the expiery date
38
After editing all required data save settings by pressing button <Save> and
then <Close>.
6.1.2. Deleting product
After pressing button
the assortment can be deleted from the
database.
Records are protected from accidental erasing and a confirmation is
required for such action.
If the database holds weighings related to the product it cannot be erased,
but is attributed as an archive record.
6.1.3. Searching and filtering assortments
Each product entered to the system can be found by inscribing an
appropriate string of characters in the column.
After typing the characters in the column a list of products with the same
string of characters is displayed.
In order to delete a displaying filter from the window of products press
.
39
Notice:
In the working window of <Assortment> displayed information can be
sorted and use additional options of filtering. See details in section 5.5.2
and 5.5.3 of this manual.
6.1.4. Reports from Products
In order to print a report from the list of products press button
in
the main window. Then a window called <Preview> with the generated
report appears. Press <Print> in this window to send the report to the
printer.
6.2. Contractors
In the database of <Contractors> the included list of contractors can be
supervised.
To run the module choose Contractors in the side menu.
Window of contractors:
40
In this window you can add, erase or modify contractors that are attributed
to products to be weighed.
6.2.1. Adding / editing contractors
After pressing button
database.
you can add a new contractor to the
After pressing button
choosen contractor.
you can edit and change data for a
A window for adding or editing contractors:
Fields:
Weighing code
Name
Address
City
Post code
Tax ID
Discount [%]
Label file name
Contractor code for scales
Contractor name
Contractor address
City or town
Post code
Tax Identification Number
Discount in % for the contractor
A label file name in format of *.lb file,
which is situated in the program folder
All changes in the contractor’s data can be recorded by pressing <Save>
and then the window can be closed by pressing <Close>.
41
6.2.2. Deleting contractors
After pressing button
you can delete the selected contractor from
the database. Records are protected from accidental erasing and a
confirmation is required for such action.
If the database holds weighings that are attributed to the selected
contractor it will not be deleted.
6.2.3. Filtering and searching contractors
Each contractor introduced to the system can be found by inscribing an
appropriate string of characters in the column.
Postcode
After typing the characters in the column a list of contractors with the same
string of characters is displayed.
In order to delete a displaying filter from the window of products press
.
Notice:
In the working window of <Contractors> displayed information can be
sorted and use additional options of filtering. See details in section 5.5.2
and 5.5.3 of this manual.
42
6.2.4. Reports from Contractors
In order to print a report from the list of contractors press button
in
the main window. Then a window called <Preview> with the generated
report appears. Press <Print> in this window to send the report to the
printer.
6.3. Stocks
In database <Stocks> the included list of different storage areas can be
supervised.
To run the module choose Stocks in the side menu.
Window of stocks:
In this window you can add, erase or modify stocks that have been added
to the database.
43
6.3.1. Adding / changing stocks
After pressing button
database.
you can add a new stock to the
After pressing button
stock.
you can change any data in the selected
A window for adding or editing a stock:
Fields:
Code
Name
Long name
Data Name
Stock code for a scale
Stock name
Full stock name
Database name to which a stock is attributed
All changes in the stock’s data can be recorded by pressing <Save> and
then the window can be closed by pressing <Close>.
6.3.2. Deleting a stock
After pressing button
you can delete the selected stock from the
database. Records are protected from accidental erasing and a
confirmation is required for such action.
44
If the database holds weighings that are attributed to the selected stock it
will not be deleted.
6.3.3. Filtering and searching stocks
Each warehouse introduced to the system can be found by inscribing an
appropriate string of characters in the column.
After typing the characters in the column a list of warehouses with the
same string of characters is displayed.
In order to delete a displaying filter from the window of products press
.
Notice:
In the working window of <Stocks> displayed information can be sorted
and use additional options of filtering. See details in section 5.5.2 and 5.5.3
of this manual.
6.4. Packagings
In database Packaging the included list of different storage areas can be
supervised.
To run the module choose <Packagings> in the side menu.
45
Window of packagings:
In this window you can add, erase or modify warehouses that have been
added to the database.
6.4.1. Adding / changing packagings
After pressing button
database.
you can add a new package to the
After pressing button
package.
you can change any data in the selected
A window for adding or editing a package:
46
Fields:
Code
Name
Mass
Barcode
Package code for scales
Package name
Nominal package weight – tare
Package Barcode
All changes in the package’s data can be recorded by pressing <Save>
and then the window can be closed by pressing <Close>.
6.5. Operators
In database <Operators> the included list of different storage areas can be
supervised.
To run the module choose Operators in the side menu.
Window of operators:
In this window you can add, delete or modify operators and attribute them
an authorization level. Operators can be logged in both on
„E2R Weighing Records” and „Terminal E2R Weighing Records”.
47
6.5.1. Adding / changing operators
After pressing button
database.
you can add a new operator to the
After pressing button
operator.
you can change any data in the selected
A window for adding or editing an operator:
Fields:
Code
Name
Password
Group
Card number
Archive
Operator code for scales
Operator name
Operator’s password
Ascribing to an authorization level group. There are
four groups with different access levels:
administrator, advanced, standard and basic. The
general settings of accessability of different program
modules within the group can be found in Program
Settings.
Work card number
Giving the “archive” attribute to the operator. Notice:
having this attribute set you cannot log in the
operator.
All changes in the operator’s data can be recorded by pressing <Save>
and then the window can be closed by pressing <Close>.
48
6.5.2. Deleting operators
After pressing button
you can delete the selected operator from
the database. Records are protected from accidental erasing and a
confirmation is required for such action:
6.5.3. Filtering and searching operators
Notice:
In the working window of <Operators> displayed information can be
sorted and use additional options of filtering. See details in section 5.5.2
and 5.5.3 of this manual.
6.5.4. Reports from operators
In order to print a report from the list of operators press button
in
the main window. Then a window called <Preview> with the generated
report appears. Press <Print> in this window to send the report to the
printer.
7. MODULE WEIGHING RECORDS – Reports
7.1. The main window in E2R Weighing Records
The main window of Weighing Records is displayed after pressing button
in the side panel.
49
It allows to display all weighings collected in the SQL database. Generation
of simple reports from weighings is also possible.
In the main window of Measurements you can freely set columns in any
report using the tool „Choose column”.
50
The tool can be started by choosing it from the pop-up menu called by
right-clicking on the bar with column names.
Two additional windows are displayed:
¾
¾
Edit Kolumn Properties
Customization.
Window „Edit Column Properties” allows for modification of appearance
of the selected column as well as window and printing properties.
Window „Customization” allows to add or remove of the selected column
from the view of the selected report. Columns are added or removed by the
„drag and drop” method.
Description:
- enables or disables quick data sorting
- enables or disables of the value filter
in columns
- enables or disables displaying a filter that allows for
generating 5 basic statistics for the column.
51
7.2. Raport for the Materials
Overlap „Material Report” allows for sorting weighings according to the
product name. Different sorting criteria can be applied e.g: weighing date,
product name. Grouping sorting conditions depends on the sequence of
adding them. The time interval for the report is set in the upper part of the
window.
After outlining all required conditions of grouping and pressing button
, a report in PDF file will be generated. It can be
saved or printed on a local printer connected to the computer with
application „E2R Weighing Records”.
An example of grouping a report for a product is shown in figure below.
7.3. Report for Operator
Overlap „Report for Operator” allows for sorting weighings according to
the Operator that have performed them. Different criteria can be applied for
sorting data e.g.: date of weighing, operator.
52
Grouping sorting conditions depends on the sequence of adding them. The
time interval for the report is set in the upper part of the window.
After outlining all required conditions of grouping and pressing button
, a report in PDF file will be generated. It can be
saved or printed on a local printer connected to the computer with
application „E2R Weighing Records”.
7.4. Report for Cooperants
Overlap „ Report for Cooperants” allows for sorting weighings according to
the contractor for whom/which weighings have beem performed. Different
criteria can be applied for sorting data e.g.: date of weighing, contractor.
53
Grouping sorting conditions depends on the sequence of adding them. The
time interval for the report is set in the upper part of the window.
After outlining all required conditions of grouping and pressing button
, a report in PDF file will be generated. It can be
saved or printed on a local printer connected to the computer with
application „E2R Weighing Records”.
7.5. Report for Batch Number
Overlap „Report for batch number” allows for sorting weighings
according to the one batch number they belong to. Different criteria
can be applied for sorting data e.g.: date of weighing, batch number.
54
Grouping sorting conditions depends on the sequence of adding them. The
time interval for the report is set in the upper part of the window.
After outlining all required conditions of grouping and pressing button
, a report in PDF file will be generated. It can be
saved or printed on a local printer connected to the computer with
application „E2R Weighing Records”.
7.6. Report for the Balance
Overlap „Report for the Balance” allows for sorting weighings according
to the scale on which they have been performed on. Different criteria can
be applied for sorting data e.g.: date of weighing, scale.
55
Grouping sorting conditions depends on the sequence of adding them.
The time interval for the report is set in the upper part of the window.
After outlining all required conditions of grouping and pressing button
, a report in PDF file will be generated. It can
be saved or printed on a local printer connected to the computer with
application „E2R Weighing Records”.
Additionally, in each report window an advanced sorting can be applied
with the use of filter editor (described in details in section 5.5.3 of this
manual).
7.7. Header and Report Title
Overlap „ Header and Report Title” allows for setting any name in the
report header. Such a header can be placed in any of five kinds of reports.
After applying any change in the header the new title will appear in the
choosen kind of report after pressing
56
.
7.8. Archive Weighings
Overlap „Archive Weighings” allows for archiving selected weigings.
Accessible functions:
• Move selected to Archive
• Restore selected from Archive
• Delete selected Archival weighings
Weighings can be archived one by one by highlighting a weighing and
pressing „Move selected to Archive”. It is also possible to archive groups
of weighings. The group can be selected in different ways:
• Using data filtering for choosing weighings that are the subject of our
interest (see sections 5.5.2 and 5.5.3 of this manuals for details),
• Select weighings while keeping a SHIFT key pressed (range) or CTRL
key pressed (choosing separately),
• Selecting all weighings by pressing „Ctrl + A”.
57
Restoring the archival weighings is performed similarly using button
„Restore selected from the Archives”.
Deleting weighings is possible ONLY after removing them to the archive.
8. TOOLS
8.1. Scale Restart
is identical to function „Re-Connect scales” in
Tool
Synchronizer accessible from the PC application. It causes reconnection to
scales based on indicators PUE7 and PUEC41 conncected to the system.
58
MANUFACTURER
OF ELECTRONIC WEIGHING
INSTRUMENTS
RADWAG WAGI ELEKTRONICZNE
26 – 600 Radom, 28 Bracka Street
POLAND
Tel. +48 48 38 48 800, tel./fax. + 48 48 385 00 10
Sales department + 48 48 366 80 06
www.radwag.com
59