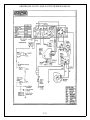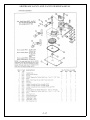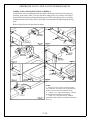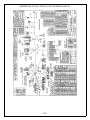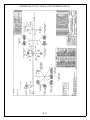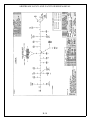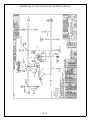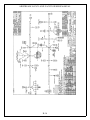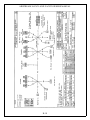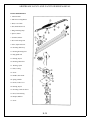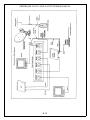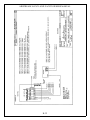
1
AIRSTREAM 360 XC LAND YACHT OWNERS MANUAL
INTRODUCTION
The Owners Manual for your new Airstream Motorhome is designed to respond to the most frequent
inquiries regarding the operation, function and care of the many systems that make modern motor homing a
joy.
Airstream realizes our customers possess varying degrees of expertise in the area of repairing and
maintaining the appliances in their motorhome. For this reason, the service and trouble-shooting
information found in this manual is directed toward those with average mechanical skills. We also realize
you may be more familiar in one area than you are in another. Only you know your capabilities and
limitations.
We want you to use this manual, and hope you will find the information contained in it useful, however,
should you ever feel you may be "getting in over your head" please see your dealer to have the repairs
made.
The operation and care of component parts such as chassis, refrigerator, furnace, water heater and others
are explained in this manual. However, you will also find the manufacturer's information supplied in a
packet included with this manual.
All information, illustrations and specifications contained in the literature are based on the latest product
information available at the time of publication approval.
Throughout this manual CAUTION and WARNING notations are used. Failure to observe "caution" can
damage equipment. "Warning" notes the possibility of personal injury if not observed.
Note: If and when new materials and production techniques are developed which can improve the quality
of its product, or material substitutions are necessary due to availability, Airstream reserves the right to
make such changes.
The next page of this manual is a table of contents. Point your cursor to the subject, colored blue, you
would like to research. Right click your mouse while it is on the subject title and you will be taken to that
area of the manual.
To get back to table of contents, click on the back arrow in the tool bar at the top of the document. The
arrow will be lighted.
The next two pages contain an index of subject material in alphabetical order.
© Airstream, Inc. 2000
AIRSTREAM 360 XC LAND YACHT OWNERS MANUAL
A.
WARRANTY AND SERVICE
F.
Warranty
Warranty Explanation
Service
Reporting Safety Defects
Maintenance Schedule
Lounges & Tables
Fabric Care
Features & Fixtures
G.
B.
LP (Liquid Petroleum) Gas
Water System
Water Pump
City Water Hookup
Storage and Winterizing
Faucets
Drainage System
Toilet
CHASSIS
Chassis -Body Product Definition
Engine
Air Brake System Drainage
Tire/Wheels
Air Conditioner/Heater
Electric Step
D.
H.
ELECTRICAL
12-volt system
Inverter
Monitor Panel
Fuses
TV Antenna
Satellite and CB Hookups
Solar Panel
110-Volt Power
Generator
CAMPING
Camping Safety
Smoke Alarm
Carbon Monoxide Alarm
LP Gas Detector
Overnight Stop
Winter Traveling
Condensation
Extended Stay
Slide-out Room
Campground Setup
E.
PLUMBING
DRIVING
Wide Body Limitations
Loading
Safety, Pre-Travel Check List
Dash controls & Instruments
Trailer Towing & Driving Tips
C.
INTERIOR FURNISHINGS AND
ACCESSORIES
I.
APPLIANCES
Air Conditioner
Furnace
Refrigerator
Range/Oven
Microwave Oven
Water Heater
Power Roof Vent
EXTERIOR
Cleaning
Body Armor
Roof Storage, Ladder
Main Door Locks
Keyless Entry
SPECIFICATIONS
Coach Dimensions
Tank Capacities
Chassis Components
AIRSTREAM 360 XC LAND YACHT OWNERS MANUAL
INDEX
Air Brake System Drainage .................... C-1
Air Conditioner .........................................I-1
Air Dump Switch ................................... B-5
Air Supply Line .......................................E-2
Antenna ...................................... H-26, H-29
Appliances ................................................I-1
Automotive Fuses ...................H-2, H-5, H-6
Auxiliary Start Switch ............................ B-4
Battery Disconnect Switch...................... H-1
Electrical System .................................... H-1
Electric Cord ......................................... D-10
Electric Step ............................................ C-7
Engine Access......................................... C-1
Engine Block Heater ............................... C-4
Escape Window ...................................... D-1
Extended Stay ....................................... D-10
Exterior .................................................. E-1
Bathroom ................................................F-3
Batteries .................................................. H-1
Bed, Rear ................................................. F 1
Bottled Gas ............................................. G-1
Body Armor .............................................E-1
By-Pass Valves ............................. G-5, G-19
Faucets ........................................G-5, G-12
Fabrics, Cleaning ....................................F-1
Filter, Water (Faucet)........G-12, G-14, G-17
Fire Extinguisher..................................... D-1
Floor Tile .................................................F-1
Furnace ....................................................I-2
Fuses ..................................H-2, H-5, H-6
Cab Seats ................................................ B-5
Cabinets ...................................................F-3
Capacities................................................. J-1
Camping........................................ D-1, D-10
Carbon Monoxide Alarm. ....................... D-5
Carpet ...................................................F-2
Caution .....................................Introduction
Chairs (Recliners) ....................................F-1
Chassis ............................................C-1, J-1
CB antenna............................................ H-29
Check Valve, water pump....................... G-8
Child Restraint Device............................ B-3
Circuit Breakers ..................H-2, H-31, H-32
City Water Hookup ............................... G-11
Cleaning Codes ........................................F-2
Cleaning, Exterior ....................................E-1
Condensation .......................................... D-9
Counter Areas ..........................................F-3
Dash Air Conditioner.............................. C-4
Dash Switches......................................... B-4
Dimensions .............................................. J-1
Dinette ...................................................F-1
Door Lock........................................B-4, E-3
Drain Hose ............................................ G-21
Drain Lines ................................. G-18, G-21
Drain System ........................................ G-21
Drain Valves ............................... G-19, G-21
Drawers ...................................................F-3
Drawings, water system ........................ G-24
Driving .................................................. B-1
Gas Lines, LP.......................................... G-4
Gas, LP ..........................................D-6, G-1
Gauges .................................................. B-4
Generator ............................B-4, D-10, H-31
Ground Fault Interrupter ....................... H-31
GVWR .................................................. B-1
GCWR ........................................... B-1, J-1
Hitch Load ............................... B-1, B-5, J-1
Holding Tanks....................................... G-21
Humidity ................................................. D-9
Interior ...................................................F-1
Inverter/Charger ...................................... H-1
Keyless Door Lock ................................. E-3
Lavatory, Cleaning...................................F-3
Leveling ..............................D-8, D-10, H-20
Leveling Jacks.....................D-8, D-10, H-20
Lights .................................................. H-2
Loading .......................................... B-1, H-2
Locks .................................................. E-3
Lounge ...................................................F-1
LPG System ............................................ G-1
LP Leak Detector .................................... D-7
Maintenance Schedule ............................ A-7
Microwave Oven.......................................I-4
Monitor Panel..............................G-21, H-22
Mirrors, Remote Control......................... B-5
AIRSTREAM 360 XC LAND YACHT OWNERS MANUAL
Overnight Stop........................................ D-8
Plumbing................................................. G-1
Power Cord ........................................... D-10
Power Seats............................................. B-5
Protective Film, Front End.......................E-1
Range/Oven ..............................................I-4
Range Exhaust ..........................................I-4
Reporting Safety Defects ........................ A-6
Refrigerator...............................................I-3
Roof Vent..................................................I-6
Roof Storage, Ladder ...............................E-2
Safety Defects, Reporting ....................... A-6
Safety ................... B-2, D-1, G-1, G-2, I-5
Satellite antenna.......................... H-29, H-30
Seat Belts ................................................ B-3
Service .................................................. A-5
Sewer Hose ................................. D-10, G-21
Shades ...................................................F-2
Shower Stall.............................................F-3
Sinks
...................................................F-3
Slide-out................................................ D-10
Smoke Alarm .......................................... D-2
Sofa
...................................................F-1
Solar Power........................................... H-31
Specifications........................................... J-1
Step, Electric........................................... C-7
Step Cover .............................................. C-7
Storage ................................................ G-18
Switches, Armrest-Dash ......................... B-4
Table ...................................................F-1
Tank Capacities........................................ J-1
Tank Drain ....................................D-8, G-21
Tank, Sewage........................................ G-21
Tank, Water............................................. G-5
Tank, LPG............................................... G-1
Tires, Support.......................................... C-2
Toilet ................................................ G-23
Towing .................................................. B-5
TV Antenna........................................... H-26
Upholstery................................................F-1
Ventilation .............................................. D-9
Walls ...................................................F-3
Washing/Waxing..................................... E-1
Warning .....................................Introduction
Warranty ......................................... A-1, A-4
Warranty Transfer ................................... A-3
Warranty Exclusions ............................... A-4
Waste System........................................ G-21
Water Filter, Faucet .............................. G-12
Water Heater .............................................I-5
Water Hookup.............................D-10, G-11
Water Pump ............................G-6, G-7, G-9
Water System ................................G-5, G-20
Water Tank Fill ....................................... G-5
Water Tank Cleaning ....................G-6, G-22
Wide Body Limitations........................... B-1
Windshield Wiper ................................... E-2
Winterizing ........................................... G-18
Winter Traveling ..................................... D-8
Wiring, 12 Volt ....................................... H-3
Wiring Diagrams, 12 Volt....................... H-4
Wiring, 110 Volt System ...................... H-31
Wiring Diagram, 110 Volt ..........H-32, H-34
AIRSTREAM 360 XC LAND YACHT OWNERS MANUAL
AIRSTREAM INC.
LIMITED WARRANTY
AIRSTREAM LAND YACHT MOTORHOME
WARRANTY COVERAGE
When you buy a new Airstream Motorhome from an authorized Airstream dealer, Airstream, Inc., warrants
the motorhome from defects in material and workmanship as follows:
BASIC WARRANTY PERIOD
This warranty is for 30,000 miles (40,000 Kilometers) or two years, whichever comes first, beginning when
the vehicle is delivered to the first retail customer or first placed into demonstrator service. This warranty
must have started prior to the accumulation of 4,000 miles in order to be valid.
ITEMS COVERED
Any part of the motorhome or any component equipment installed by the factory is covered by the basic
warranty except the following items, which are not covered:
•
•
•
House Batteries
Automotive Chassis
Generator
The above items will be handled by their respective service points and according to their written policy.
This limited warranty does not include failure caused by accident, abuse, normal wears, overload or any
cause not attributable to a defect in original material or workmanship of the motorhome or component
equipment as installed by the factory.
LIMITATION OF IMPLIED WARRANTIES
All warranties of merchantability and fitness for a particular purpose, whether written or oral, express or
implied, shall extend only for a period of two years from the date of original purchase, or 30,000 miles,
whichever comes first. There are no other warranties, which extend beyond those described on the face
hereof and which expressly excludes conditions resulting, from normal wear, accident, abuse, exposure or
overload. Some states do not allow limitation on how long an implied warranty lasts, so the above
limitations may not apply to you.
AIRSTREAM'S RESPONSIBILITY
The basic Airstream Limited Warranty applies for a period of two years from the date of original
purchase or 30,000 miles, whichever comes first, and the application date of all warranties is that indicated
on the owner's identification card. Defects in items covered under this Warranty will be corrected without
cost upon the return, at the owner's expense, of the motorhome or defective part to an authorized Airstream
dealer.
A-1
AIRSTREAM 360 XC LAND YACHT OWNERS MANUAL
CARE AND MAINTENANCE
This warranty covers only defective material and/or workmanship; adjustments are made at the factory
prior to shipment, and rechecked by the dealer prior to delivery to the customer. Adjustments thereafter
become a customer responsibility.
The owner is also responsible for following all recommendations, instructions and precautions contained in
the Airstream Motorhome Owner's Manual and the individual manuals furnished by the chassis, appliance
and other manufacturers.
INSTALLATIONS NOT COVERED
Airstream, Inc., does not accept any responsibility in connection with any of its motorhomes for additional
equipment or accessories installed at any dealership or other place of business, or by any other party. Such
installation of equipment or accessories by any other party will not be covered by the terms of this
warranty.
IF REPAIRS ARE NEEDED
If your motorhome needs repairs under the terms of the basic Airstream Limited Warranty, you should:
1.
Take your motorhome to your selling dealer or other Authorized Airstream Dealer.
2.
If the dealer is incapable of making the repair, request that he contact the Service Administration
Department at Airstream, Inc., for technical assistance.
3.
If repairs are still not made, the customer should contact:
AIRSTREAM, INC.
419 W. Pike Street - P.O. Box 629
Jackson Center, Ohio 45334-0629
Attention: Owner Relations Department
Furnish the following information:
• The complete serial number of the motorhome
• Mileage
• Date of original purchase
• Selling dealer
• Nature of service problem and steps or service, which have been performed. (The owner
may be directed to another dealer at the owner's expense.)
4.
If, after taking the above steps, repairs are still not complete, the Airstream owner may request the
motorhome be allowed to be brought to the Factory Service Center at the owner's expense.
DEALER REPRESENTATION EXCLUDED
The full extent of the basic Airstream Limited Warranty is set forth in detail in the folder, and in the
explanation of the basic Airstream Limited Warranty covered in the Airstream Motorhome Owner's
Manual. Airstream Inc. will not be responsible for additional representations or implied warranties made by
any of its dealers to the extent those representations are not a part of, or are contrary to, the terms and
conditions of the basic Airstream Limited Warranty.
A-2
AIRSTREAM 360 XC LAND YACHT OWNERS MANUAL
CONSEQUENTIAL AND INCIDENTAL DAMAGES
Airstream, Inc., will not be responsible for any consequential or incidental expenses or damages
resulting from a defect. Incidental expenses include, but are not limited to: travel expenses, gasoline,
oil, lodging, meals, telephone tolls, and loss of work and loss of use of the motorhome. Some examples
of consequential damages would be: stained curtains due to rain leaks or delaminated floor caused by
a plumbing leak. Some states do not allow the exclusion or limitation of incidental or consequential
damages, so the above limitation or exclusion may not apply to you.
WARRANTY TRANSFER
The basic Airstream Limited Warranty is transferable to subsequent owners for the duration of the
warranty period. Warranty transfer application forms are available from your dealer or the Airstream Inc.
Service Administration Department.
CHANGES IN DESIGN
Airstream Inc. reserves the right to make changes in design and improvements upon its product without
imposing my obligation upon itself to install the same upon its products theretofore manufactured.
This warranty gives you specific legal rights, and you may also have other rights, which vary from
state to state.
Thor Industries
Airstream Inc.
419 West Pike Street
Jackson Center, Ohio 45334
937-596-6111
A-3
AIRSTREAM 360 XC LAND YACHT OWNERS MANUAL
WARRANTY EXPLANATION
Along with your new Airstream motorhome you have purchased the Airstream Limited Warranty. Read
your Limited Warranty carefully. It contains the entire agreement with respect to Airstream's obligation on
the Limited Warranty on your new vehicle. The terms of the Limited Warranty, and only those terms, will
define Airstream's responsibility. When you receive your Limited Warranty file it for safekeeping.
Upon proof of purchase date to any Airstream Dealer Service Center, defects in materials or workmanship
will be repaired or replaced without cost to the owner for a period of twenty four (24) months from the
original purchase date, or 30,000 miles, whichever occurs first. Written warranties of some manufacturers
of components of the motorhome will be honored by Airstream for the duration on that manufacturer's
warranty.
Items such as motorhome chassis, engine, tires, batteries and generator are serviced by their respective
manufacturers and will be handled by their service centers according to the terms of their written policy.
Any warranty forms from these manufacturers should be completed promptly, preferably at time of
purchase.
Your motorhome chassis is pre-checked by its manufacturer before delivery to Airstream. All service to the
chassis must be performed by the manufacturer according to the manufacturer's warranty and service
policies. Literature is supplied with each Airstream motorhome, which gives important information
concerning its warranty coverage; however, the Airstream Limited Warranty covers the chassis heater,
defrosters, windshield wiper blade, motor, washer, LP gas bottle and gas regulator.
Paint and appearance items, which show imperfections, should be brought to the attention of your dealer at
the time of delivery and during pre-delivery inspection. Normal deterioration by use and exposure is not
covered by the Airstream Limited Warranty.
Damage to enameled or porcelain surfaces resulting from abrasion, collision or impact, and broken window
glass are not covered by the Airstream Limited Warranty.
The Airstream Limited Warranty Excludes:
Normal Wear:
Items such as water purifier packs, curtains, upholstery, floor coverings, window, door and vent seals may
show wear within the one year Limited Warranty period depending upon the amount of usage, weather and
atmospheric conditions.
Accident
Damage caused by accident is usually visible, and we strongly urge our dealers and customers to inspect
the motorhome upon delivery for any damage caused by accident while being delivered to the dealer, or
while it is on the dealer's lot. Damage of this nature becomes the dealer's or your responsibility upon
acceptance of the motorhome. GLASS BREAKAGE, whether obviously struck or mysterious, is always
accidental and covered by most insurance policies.
A-4
AIRSTREAM 360 XC LAND YACHT OWNERS MANUAL
Abuse
Lack of customer care and/or improper maintenance, including failure to comply with the terms of the
Owner’s Manual, or failure to heed proper vehicle operation shown by the dash instruments is not covered
by warranty.
Exposure
Deterioration by sunlight is possible to such items as tires, curtains or upholstery. Steel or metal surfaces
are subject to the elements, causing rust and corrosion, which is normal, and beyond the control and
responsibility of Airstream.
Overload
Overload Damage due to loading beyond capacity or to cause improper balance is not covered by the
Airstream Limited Warranty. The Airstream motorhome body is engineered to properly handle any normal
load. There are limits to the amount of load that can be safely transported depending upon speed and road
conditions. If these limits have been exceeded the Airstream Limited Warranty will not cover resulting
damage. For additional information on the load capacity of your motorhome consult your Owner's Manual
or gross vehicle weight rating plate. Each motorhome is aligned during the last quality inspection. These
tolerances will only change if the motorhome is subjected to abuse, such as dropping off a sharp berm,
striking a curb, or hitting a deep hole in the road. Such damage would be considered as resulting from an
accident which risks are not covered under the warranty. Abnormal tire wear and/or wheel alignment
resulting from such damage is not covered under the terms of the warranty.
SERVICE
The Airstream Silver Key Delivery Program is an exclusive Airstream program. Before leaving the factory
each and every vital part of the motorhome is tested for performance. Each test is signed and certified by an
inspector. After the motorhome arrives on your dealer's lot all of these vital parts and systems are again
tested. When you take delivery of your new motorhome you will receive a complete checkout.
Please contact your dealer if you need service. Major service under your Airstream Limited Warranty is
available through our nationwide network of Airstream Dealer Service Centers. An up-to-date list of Dealer
Service Centers has been provided with your new motorhome. This list is current as of the date of
publication.
Occasionally dealerships change, or new dealers are added who may not appear on this list. For this reason,
it is suggested that you contact your local dealer from time to time and bring your list up to date. He can
also provide you with additional copies if you need them.
ALL CENTERS OPERATE ON AN APPOINTMENT BASIS FOR THE UTMOST EFFICIENCY.
When you require service from the Airstream Factory Service Center, or a Certified Dealer Service Center,
please contact the service manager for an appointment, and kindly inform him if you are unable to keep the
appointment date or wish to change it.
Service may be arranged at the Factory Service Center by contacting the Service Coordinator at
Airstream Factory
Service Center
419 W. Pike Street P.O. Box 629
Jackson Center, Ohio 45334-0629
Phone: 937-596-6111
Fax: 937-596-6802
A-5
AIRSTREAM 360 XC LAND YACHT OWNERS MANUAL
You Should Also be Aware of the Following:
Airstream is not responsible for any consequential or incidental damages incurred as a result of any defect.
Consequential damages include, but are not limited to, travel expenses, gasoline, oil, lodging, meals,
telephone tolls, loss of work and loss of use of the motorhome.
In the event of a defect, the owner must take all reasonable corrective action to lessen the damages, which
might result from such defect. Airstream will not be responsible for damages, which could have been
avoided.
Airstream's responsibility is defined solely by the Airstream Limited Warranty and Airstream is not
responsible for or bound by representations or warranties made by any of its dealers.
Your Airstream Limited Warranty is transferable to subsequent owners of the motorhome, but only for the
duration of the warranty period. Warranty transfer application forms are available from your dealer or the
Airstream factory.
REPORTING SAFETY DEFECTS
If you believe that your vehicle has a defect, which could cause a crash or could cause injury or death, you
should immediately inform the National Highway Traffic Safety Administration (NHTSA) in addition to
notifying Airstream, Inc.
If NHTSA receives similar complaints, it may open an investigation, and if it finds that a safety defect
exists in a group of vehicles, it may order a recall and remedy campaign. However, NHTSA cannot become
involved in individual problems between you, your dealer, or Airstream, Inc.
To contact NHTSA you may either call the Auto Safety Hotline toll-free at 1-800-424-9393 (or 366-0123
in Washington, D.C. area) or write to: NHTSA, U.S. Department of Transportation, Washington, D.C.
20590. You can also obtain other information about motor vehicle safety from the Hotline.
A-6
AIRSTREAM 360 XC LAND YACHT OWNERS MANUAL
MAINTENANCE SCHEDULE
WARNING: FAILURE TO MAINTAIN YOUR COACH CAN CAUSE PREMATURE AND
UNEXPECTED PARTS BREAKAGE AND/OR ERRATIC OPERATION THAT MAY BE
HAZARDOUS.
Note: See Freightliner and appliance manufacturer's literature for further information.
EVERY 1,000 MILES OR 60 DAYS
Escape Window
Check operation of latches and upper hinge.
Smoke Alarm
Test and replace battery as required.
CO, LPG and Smoke Alarm
Test and replace battery as required.
GFI Circuit Breaker
Test and record.
EVERY 5,000 MILES OR 90 DAYS
Exterior Door locks
Lubricate with dry graphite
Exterior Hinges
Lubricate with light household oil
LPG Regulator
Check bottom vent for obstructions
Main Door Striker Pocket
Coat with paraffin.
Wheel Lug Bolts
Torque to 450-500 ft. lbs.
Range Exhaust Hood
Clean fan blades and wash filter.
Roof Vent Elevator Screws
Lubricate with light household oil
Main Door Step
Check and lubricate moving parts.
EVERY 10, 000 MILES OR 6 MONTHS
Exterior
Clean and wax.
Hitch
Check bolts and welds
EVERY YEAR or 12,000 miles
Battery
Clean, neutralize and coat terminals with petroleum jelly.
LP Tank
Clean, neutralize and coat terminals with petroleum jelly.
Seams
Check and reseal exterior seams, windows, lights and vents if
necessary. Reseal with Bostik urethane sealant or equivalent
as needed.
A-7
AIRSTREAM 360 XC LAND YACHT OWNERS MANUAL
MAINTENANCE RECORDS
DATE
DEALER
SERVICE PERFORMED
A-8
AIRSTREAM 360 XC LAND YACHT OWNERS MANUAL
DRIVING
WIDE BODY LIMITATIONS
Vehicles with overall body width greater than 96" are known as "wide bodies. Wide body vehicles are
restricted to use on main highways in certain states. A vast majority of states allow 102" body width on all
highways, but wide body width is not allowed on all federal highways in the United States. Your dealer
may be able to furnish more specific information. If you are concerned about vehicle width, we invite you
to consider other fine Thor vehicles offered in the standard 96" width.
LOADING
Below is a sample of the weight information chart provided in all Airstream vehicles. This information can
be found in your vehicle on the back of the first wardrobe door on the curbside of the vehicle about 60" up
from the floor or in one of the galley overhead lockers.
The GROSS COMBINATION WEIGHT RATING on the 360XC motorhome is 31,350 pounds.
*WARNING - Do not exceed the hitch capacity of 500 lb. load and 5000 lb. tow.
The motorhomes have large fluid tanks and lots of storage areas. It gives you great flexibility in loading.
With flexibility comes responsibility. If you want to load down all the storage compartments the amount of
fluids will have to be reduced. Distribute your additional cargo as evenly as possible with the heaviest
objects located as low as possible.
Do you really want to carry 750 pounds of water to a RV park 1,000 miles away and then hook up to a city
water supply? Even if you're going to the "boondocks" you can usually fill your water tank shortly before
entering the area. Just reducing your load by 10 gallons of water lets you carry an awful lot of fishing and
camping gear.
B-1
AIRSTREAM 360 XC LAND YACHT OWNERS MANUAL
WEIGHING
The UVW, unloading vehicle weight, given in the chart above is the weight of the motorhome with the
options as ordered, and installed at the factory. To determine the actual weight of your vehicle with
personal cargo, water and LP, it must be weighed on scales. The most common are those used by states to
weigh trucks used along the highway. In rural areas grain elevators are a good source and another would be
a gravel pit. If you have trouble locating scales, a call to your State Highway Patrol will usually find them
very cooperative in assisting you.
WARNING: Do not exceed the Gross Axle Weight Ratings or the Gross Vehicle Weight Rating when
loading your vehicle.
SAFETY CHECK LIST
Your Airstream motorhome should be given a thorough safety check before a trip. Regular use of the
following list will provide safe operation of your motorhome and will help you spot any malfunctioning
equipment and correct the problem as soon as possible. The list is to help you and may not be all-inclusive.
Failure to heed many of the following items may cause damage to the vehicle or personal injury.
EXTERIOR CHECK LIST (BEFORE ENTERING VEHICLE)
1.
2.
3.
4.
5.
6.
Check condition of tires for proper inflation.
Turn off LPG valve on LPG tank.
Check that sewer connection, all external compartments and filler openings are properly stowed or
closed and/or locked.
Check that items stored on exterior of vehicle are securely tied down.
Would any items stored on exterior of vehicle present a clearance problem?
Lower and secure awnings/TV antenna.
INTERIOR CHECK LIST (BEFORE DRIVING OFF)
1.
2.
3.
4.
5.
6.
7.
8.
9.
10.
11.
12.
13.
14.
It is important that the main door and cab door be completely closed and locked during travel. As
an added precaution we recommend the dead bolt also be locked on the main door.
Turn off living area water pump.
Check that refrigerator door is fastened.
Check that nothing heavy is stored in overhead or high cabinets that could fall out and cause
injury. Heavy items should be stored in low cabinets.
Stow folding and pedestal tables.
Check that counter tops, range top, credenza tops and shelves are clear of even small items that
could become projectiles in an accident.
Do not cook while under way. Hot food or liquid could scald due to a sudden stop or accident.
Check that any internal stowage is securely held in place
Check that lights and switches are set in positions safe for travel.
Adjust the driver's seat so that you can easily reach and operate all controls. Make sure seat is
locked in position. Do not adjust driver's seat swivel or fore and aft mechanism while vehicle is
moving. The seat could move unexpectedly causing loss of control.
Check that front passenger's seat is locked in position - both fore and aft adjustment and swivel
mechanism.
Check rear view mirror adjustment.
Fasten lap belts.
Check that step light goes out and that electric step has retracted
B-2
AIRSTREAM 360 XC LAND YACHT OWNERS MANUAL
SAFETY SEAT BELTS
In the forward driver's area of the motorhome, safety seat belts are provided for the use of the driver and the
right front passenger. Safety belts are available for other seats. It is strongly recommended that all
occupants remain seated with their safety belts firmly attached while the motorhome is in motion. The
driver should adjust his seat so that he is able to reach all controls easily with the belt on, especially able to
use all the travel on the foot brake. The belt should be placed as low as possible around the hips to prevent
sliding out from under them in case of accident. This places the load of the body on the strong hipbone
structure instead of around the soft abdominal area. Two people should never try to use the same seat belt.
WARNING:
Children must be secured in a Federally Approved Child Restraint Device. Failure
to use proper restraints can result in severe or fatal injuries in case of accidents.
Child restraint devices are designed to be secured with lap or lap/shoulder belts. All instructions supplied
by the restraint manufacturer must be followed. Statistics have shown children are safer when properly
restrained in a rear seating position than in a front seating position.
Often the children traveling in motorhomes are grandchildren. There are times when our love for
grandchildren makes us hesitate to properly supervise their actions. Don't hesitate when it comes to their
safety. Make sure they are properly restrained.
CHILDREN HAVE LOVED ONES TOO.
IF YOU WON'T BUCKLE UP FOR YOURSELF, BUCKLE UP FOR THEM.
B-3
AIRSTREAM 360 XC LAND YACHT OWNERS MANUAL
NOTE: Switches will vary according to options on vehicle.
AIRSTREAM DASH CONTROLS
Most automotive gauges and controls are standard instruments provided by the chassis manufacturer. Their
function and use is described in your Drivers Manual. The exception on automotive controls is the
heater/air conditioner. Operating- instructions on these components can be found in the chassis section of
this manual.
DASH SWITCHES:
•
Aisle Lights - The low aisle lights will allow passengers to converse without using overhead
lights that could be bothersome to a driver at night.
•
Docking Lights RS - The docking lights illuminate the area at the side of the motorhome and
are intended for use when parking in a campground at night.
•
Air Dump Switch – Down on the side of the armrest is a switch (valve) that is part of the
Freightliner air suspension. There are two advantages to dumping the air, first it lowers the
vehicle and makes the first step height easier to use, and second, without air in the suspension
you may find it unnecessary to deploy the stabilizing/leveling jacks.
Armrest Switches
• ICC Blink - With this switch it is possible to blink the clearance lights on the motorhome. Ifs most
commonly used as a way of indicating your thanks for a courtesy shown to you by another driver.
• Rear Camera - The rear view-monitoring camera has two positions. One will show the rear
bumper and operating the switch tilts the camera to view further back.
• Driving Lights - To operate the driving lights the regular headlights must be turned on first.
• Defrost Fans - In cool, damp weather these fans really help to clear the large windshields. This
switch turns them on and off and each fan has it's own switch to operate the oscillating feature.
• Door Lock - The main door deadbolt can be locked or unlocked electronically from the drivers seat.
Remember to hide an extra door key on the exterior in case of unexpected battery failure. The
manual knob is located by the passenger seat and is for interior use only.
• Auxiliary Start - The auxiliary start switch is intended to be used if the engine battery becomes too
discharged to turn the engine over. To operate, hold the switch in the start position, and then use
the ignition switch in a normal fashion. Operating the auxiliary start switch closes the points on a
large solenoid, tying all three-vehicle batteries together for increased starting power.
B-4
AIRSTREAM 360 XC LAND YACHT OWNERS MANUAL
• Generator Switch - The remote generator switch on the dash allows the driver to start or stop the
Generator without leaving the driver's seat. It should be noted a built-in time delay allows the
generator to reach full operating speed before 120 volt current is provided to the coach.
•
Mirror - Move center switch to R or L. The four perimeter switches will then move the right or
left mirror in the direction indicated. The paddle type switch marked heat is for defrosting the
mirrors. (Hopefully you won't need this unless you're a skier).
•
Map Lights – Lights mounted above both cab seats to aid in reading. Switches are mounted
in both armrests.
POWER SEAT CONTROLS
Besides the normal power seat switch there are two additional finger levers. One allows the seat to recline
and the other will allow the seat to rotate.
WARNING: Never adjust drivers seat while vehicle is in motion.
CAUTION: Revolving the power seat completely around will pull the wiring apart. The seats should
only be swiveled toward the center of the vehicle. If the wires are loosened they can be reconnected
by following the color code: Red to red, green to green, etc. On some models the wires will be on a
plug that can be reattached.
TRAILER TOWING AND DRIVING TIPS
Since this vehicle is designed and intended to be used primarily as a load carrying vehicle, towing a trailer
will affect handling, durability and economy. Maximum safety and satisfaction depends upon proper use of
correct equipment and avoiding overloads and other abusive operation.
CAUTION: The maximum loaded trailer weight that you can pull with your vehicle is 5,000 lbs.
Vehicles should be properly equipped for towing trailers. Information on trailer hauling capabilities
and special equipment required may be obtained from your Airstream dealer.
CAUTION: The Gross Combination Weight Rating is the total allowable weight of the motorhome
combined with the weight of the vehicle or trailer being towed. Do not exceed this weight whenever
you are towing behind your motorhome. 31,350 lbs. is the GCWR.
To assist in attaining good handling of the vehicle/trailer combination it is important that the trailer tongue
load be maintained at approximately 10% of the loaded trailer weight, but not to exceed 500 lbs. Tongue
loads can be adjusted by proper distribution of the load in the trailer, and can be checked by weighing
separately the loaded trailer and then the tongue.
When towing trailers, tires should be inflated to the highest pressures shown on the information plate
attached to the driver’s doorjamb or dash of your motorhome. The allowable passenger and cargo load
(GVW) of this vehicle is reduced by an amount equal to the trailer tongue load on the trailer bitch.
Trailer brakes are required on axles of trailers over 1,000 lbs. loaded weight,
CAUTION:
If your Freightliner chassis requires towing please refer to their manual for directions. They may be
called at 1-864-487-1700.
B-5
AIRSTREAM 360 XC LAND YACHT OWNERS MANUAL
NOTES
B-6
AIRSTREAM 360 XC LAND YACHT OWNERS MANUAL
CHASSIS
The Airstream motorhome is built on a Freightliner chassis. Operation of the engine and other related
components are discussed in the Freightliner Owners and Drivers Manual supplied with each coach.
If repairs are needed it can be difficult to determine which parts of the chassis are warranted by
Freightliner, and which are Airstream's responsibility. The following list shows the major components of
the chassis and the company responsible for their servicing.
FREIGHTLINER X LINE CHASSIS
Engine
Transmission
Brakes
Steering Assembly
Front Spindle, Bearings
Alternator
Turn Signals
Drive Axle and Hubs
Air Conditioner Compressor
Shocks
Automotive Fuse Panels
Parking Brake
Fuel Tank
Cruise Control
Wheels
AIRSTREAM
Auxiliary Heater
Dash Air Conditioner/Heater
Windshield Wipers
Isolator
The above list covers almost all of the chassis components. If you need further clarification or information
your dealer should be contacted with the details.
ENGINE ACCESS
Although most engine functions and maintenance can be preformed from outside the coach, occasionally
"top" engine service will be required.
To make this servicing easier the bed top can be raised with the assistance of gas props. Once the bed top is
raised the engine cover can be unlatched and raised to expose the engine.
WARNING - The lifting and supporting strength of the gas props vary according to temperature.
Props that support the bed top when hot may let the bed close rapidly when cold.
AIR BRAKE SYSTEM DRAINAGE
Your motorhome is equipped with an air brake system. When air is compressed some liquid is forced out
and collects in the bottom of the air ranks and must be drained.
Three drain valves are on your brake system. The valves can be opened for drainage by pulling on the
looped cables in your front wheel wells on each side. See your Freightliner operator’s manual under Pretrip Inspection for directions.
C-1
AIRSTREAM 360 XC LAND YACHT OWNERS MANUAL
TIRE SUPPORT
Since motorhomes may sit for long periods of time it is important to properly support the tires if blocks are
used for leveling.
The Michelin Technical Group provides the following information.
Extreme caution must be taken to ensure that the tires are fully supported when using blocks to level
motorhomes and/or RV's. The load on the tire should be evenly distributed on the block and in the case of
duals, evenly distributed on blocks for both tires. If not property done, the steel cables in the sidewall of the
tires may be damaged and could lead to premature fatigue of the sidewall.
The CORRECT methods are shown in Figure 1. Please note that the blocks are wider than the tread and
longer than the tire's footprint. This provides maximum support to the tires and assures that the load is
evenly distributed throughout the tire's footprint area.
FIGURE I
CORRECT
C-2
AIRSTREAM 360 XC LAND YACHT OWNERS MANUAL
INCORRECT
One tire or a portion of one
tire is supporting the full
load.
Portion of two tires are
supporting the full load.
CAUTION: Tires incorrectly supported, as shown above, may be damaged which could lead to
casing failure resulting in serious injury or property damage. If, on previous occasions, the tires
have been incorrectly supported, a hidden damage may be present. Please contact your local
Michelin dealer and request an inspection and a determination of possible damage.
C-3
AIRSTREAM 360 XC LAND YACHT OWNERS MANUAL
Engine Block Heater
A switch is located in the bedroom for the engine block heater. It is inside the roadsidehanging wardrobe above the lower shelf, accessed from the side.
DASH AIR CONDITIONER/HEATER
Acme Radiator Air Conditioning, Inc.
17103 St. Rd. 4E
Goshen, Indiana 46526
800-552-2263
OPERATION
The dash heater control is very similar to many automobiles
The center rotary switch marked "cold-hot" controls the amount of hot water flowing through the
heater core. When the maximum air conditioner is engaged, inside air is circulated through the
evaporator to obtain the utmost in cooling. The two positions marked vent and norm draw outside
air through the evaporator.
SERVICE
Acme has requested you to call them on the 800 number listed above should you experience any
service problems. They are usually able to help get any repairs needed at an air conditioner repair
facility close to your location.
The following pages include wiring diagrams and vacuum line diagrams.
C-4
AIRSTREAM 360 XC LAND YACHT OWNERS MANUAL
C-5
AIRSTREAM 360 XC LAND YACHT OWNERS MANUAL
C-6
AIRSTREAM 360 XC LAND YACHT OWNERS MANUAL
ELECTRIC STEP
Manufacturer:
Kwikee Products Company
Division of Ashton Corporation
P.O. Box 638
Drain, Oregon 97435
Phone: 503-836-2126
The step is easy and convenient to operate. Just inside the main door is a wall switch for the step.
When traveling, leave the switch in the "ON" position - the step will lower when the door is
opened and retract when the door is closed.
When parked, open the door so the step is lowered, then shut the switch off. The step will remain
in the lowered position and the "step" light on the dash will be extinguished. If left on it will run
your engine battery down in about a week.
If you forget and leave the switch off as you leave - No Problem! When the ignition is "ON" the
wall switch is by-passed and the step will retract when the door is closed.
WARNING: If the wall switch is turned off, and the step is in the retracted position when
the ignition is turned off, the step will not lower when the door is opened. Keep your
passengers informed.
STEP WELL COVER
Your motorhome is equipped with a pneumatically powered step well cover.
The switch (valve) is a black lever located in the front of the passenger right hand arm rest. The
air pressure is supplied by the chassis air ride system. It is normal for the air system to leak down
so you may find the cover to be inoperable if the engine has been shut off for a period of time.
The intent of the step cover is to provide the passenger with a "floor" while traveling and then be
retracted so the steps can be used when stopped. With this in mind you can see where the loss of
air after the motorhome has been shut off for a time is not a problem. When you park the
motorhome you'll normally retract the step cover so you can at least get out and stretch your legs.
If you happen to lose air pressure before retracting the step cover just starting the engine for a few
minutes will replenish the air supply.
WARNING: Do not operate the pneumatic cover while standing in the step well.
C-7
AIRSTREAM 360 XC LAND YACHT OWNERS MANUAL
C-8
AIRSTREAM 360 XC LAND YACHT OWNERS MANUAL
OPERATING INSTRUCTIONS
For control units #9514 and #9591
1. After the installation is complete and with the entrance door open, turn the power switch on.
2. Close the door. The step should retract and lock in the up position.
3. Open the door. The step should extend and lock in the down position with the understep light
on. NOTE - The under step light is not available on all step models.
4. Turn the power switch off. The step should remain in the extended position with the understep
light off when the door is closed. The procedure can also hold the step in the retracted position.
5. With the power switch off, the step extended, and the entrance door closed, turn on the vehicle
ignition. The ignition safety system will go into effect and the step will automatically retract.
NOTE - If the yellow wire was not connected in Step #11 of the HOOKUP PROCEDURE the
ignition safety system is inoperative and the step will remain in the extended position. If the
vehicle is driven with the step in the extended position there is the possibility of causing major
damage to both the step and the vehicle. The power switch must be turned on for the step to
retract.
WARNING: When the ignition safety system goes into effect and the step automatically retracts,
DO NOT OPEN THE DOOR until the step completely retracts. If the door is opened before the
step completely retracts and locks in the up position, the step will stop moving. The step may only
be partially extended. Stepping on a partially extended step may cause damage to the step frame
and/or motor assembly. When the door is closed the step will finish retracting.
WARNING: If the entrance door is opened before the vehicle ignition is turned off, the step will
extend as soon as the ignition is turned off, even if the power switch is off. If the step is not
allowed to extend fully and lock out before the door is closed, the step will stop moving. The step
may only be partially extended. Stepping on a partially extended step may cause damage to the
step frame and/or motor assembly. If the door remains closed, the step will retract if either the
ignition or power switch is turned on. If the door is reopened the power switch must be turned on
for the step to finish extending.
WARNING: If your step does not have the 'Last out" feature, it will not extend once the ignition
has been turned off and the door is opened. The power switch must be turned on in order to
operate the step. To determine if your unit has the "Last out" feature follow these procedures:
With the ignition switch on, the door closed, the power switch off, and the step retracted, turn off
the ignition. Open the door. If the step extends, your unit is equipped with the "last out "feature.
Be Safe - Look Before You Leap!
C-9
AIRSTREAM 360 XC LAND YACHT OWNERS MANUAL
General Service Notes
If the power wire to the step is disconnected from its source and reconnected, a spark is common. This is
caused by the momentary charging of the control unit and does not necessarily indicate the system is
staying on, causing a drain on the battery.
If battery drain is suspected, observe the understep light (if so equipped) while the step is extending. The
power switch must be on for the understep light to operate. When the step locks into the down position, the
understep light should become noticeably brighter. If it does not, the control may not be shutting off. Turn
the power switch off and unplug the four way plug between the control unit and the vehicle to prevent
overheating the motor.
To further determine that the control is not shutting off, remove the two (2) screws from the connector on
the motor leads between the motor and control unit. Remove the seal assembly. (See Figure 2 on page #8)
Place a voltmeter between the red and yellow motor leads than reconnect the four way plug. Turn the
power switch on. If any voltage is read, the control is not shutting off and may be defective. When doing
this test, switch the voltmeter leads back and forth between the red and yellow motor leads to be sure no
voltage shows. If any voltage shows, disconnect the four way plug to keep the motor from overheating. If
zero voltage is present, the control has shut off and is normal.
If the step does not work or operates erratically, such as extending part way and shutting off, the first item
that should be checked is the vehicle battery. The voltage across the battery terminals should be at least
12.7 volts DC to insure a well charmed battery. A battery that reads below 12.7 volts DC may drop as low
as 8 volts DC when a load is drawn, such as the engaging of the step motor. The control unit will shut off if
the loaded voltage falls below 9 volts DC. The control unit will remember which function it was
performing. It will wait between two and five seconds (time depends upon temperature) and will try again
to complete the original function. If the supply voltage is still below 9 volts, the control will go into another
delay state. If the supply voltage remains above 9 volts DC, the original function will be completed. Should
the supply voltage again fall below 9 volts the system will go into another delay state. It many take a couple
of minutes to complete the original function. Low supply voltage may cause erratic operation of the step.
Intermittent ground may also cause erratic operation of the step.
The step may also operate erratically if the step is being operated directly from a converter and the output
from the converter is not adequate or properly filtered for clean DC voltage. The converter must be capable
of producing a minimum of 30 amps for proper step operation.
If the control unit is hooked up electrically backwards, the step will not operate. If ground to the control
unit is lost, either between the step control unit and the vehicle chassis (the 31 " long 10 gauge green
ground wire), or between the vehicle battery and ground (negative battery cable) the step will not function.
Make sure the battery terminals and all wire connections are clean and tight.
Be sure all wires are of proper gauges or heavier as specified in the wiring diagram.
WARNING: IMPORTANT: No other devices (hearers, fans, burglar alarms, lights, etc.) can be
incorporated in the same circuit as the control unit or step. This may cause the step or control unit to
malfunction and may void the warranty.
Check the step for physical damage. If the step has been struck by some kind of road hazard, the step
mechanism may be bent, causing the step to bind. Check the tread, sliding rails, and extending arms for
physical damage. Also check the pivot points for rusting. (See the LUBRICATION AND
MAINTENANCE SCHEDULE).
If the power switch is on and the step will not extend when the door is opened and/or retract when the door
is closed, but there is a clicking noise coming from the control unit (the engaging and disengaging of the
relays in the control unit) the first item that should be checked is the motor.
C-10
AIRSTREAM 360 XC LAND YACHT OWNERS MANUAL
See the MOTOR TEST PROCEDURE. The relays will engage and disengage (the clicking noise) when the
door switch is cycled if the motor is malfunctioning.
These general service notes and the following test procedures cover the most common problems associated
with Kwikee electric steps. Due to the number of variable conditions available, you may experience
symptoms other than those covered. Please feel free to contact the customer service department at 1-800736-9961 for further information or assistance.
TEST PROCEDURE - VEHICLE
WIRING:
Read the General Service Notes before
starting any test procedure.
1. Unplug the four way plug between the
control unit and the vehicle wiring. (See Figure
2)
2. TO CHECK THE MAIN POWER
SOURCE: Connect a voltmeter between the
RED wire from the vehicle half of the four way
plug and the ring terminal on the end of the 10
ga. green ground wire from the control unit to
the vehicle chassis (See Figure 3). NOTE Steps manufactured before August 26, 1991
used a braided ground cable to ground the step
to the vehicle chassis. The control unit on steps
manufactured after that date are grounded
directly to the vehicle chassis by the 10 ga.
green ground wire as shown in Figure 2. If the
step is equipped with a braided ground cable,
substitute the braided ground cable in place of
the green ground wire in these test procedures.
The reading should be about 12 volts DC. If
the voltage is low there may be a loose or
corroded connection, or low battery charge. If
the voltage reading is zero, check the 25 or 30
amp fuse/circuit breaker and all connections.
Be sure there is a good -round connection
between the step frame and the vehicle chassis.
See Step #2 of the HOOKUP PROCEDURE.
A good ground connection is a must. If the
reading is approximately 12 volts DC proceed
with the next test.
3. TO CHECK THE POWER SWITCH:
Connect the voltmeter between the WHITE
wire from the vehicle half of the four way plug
and the ring terminal on the green ground wire.
(See Figure 4) The reading should be about 12
volts DC with the power switch on and zero
when the switch is off. If the voltmeter reads
zero with the power switch on, the first item to
check is the inline fuse or circuit breaker in the wire between the power switch and the power lead (red
wire). If the fuse/circuit breaker is all right, connect the voltmeter between the terminals on the power
switch with the wire leading to the power wire (red wire) and the ground. (See Figure 5)
C-11
AIRSTREAM 360 XC LAND YACHT OWNERS MANUAL
If the reading is still zero check the wire
leading to the power lead for a loose
connection or cut wire. If the reading is about
12 volts DC, turn on the power switch and
check the other power switch terminal in the
same manner, by connecting the voltmeter
between the terminal and ground. If the
reading is zero, replace the power switch. If
the reading was about 12 volts DC, there
may be a loose connection or cut wire
between the power switch and the vehicle
half of the four way plug.
4. TO CHECK THE DOOR SWITCH:
Connect the voltmeter between the RED wire
from the vehicle half of the four-way plug
and the BROWN wire in the same plug (See
Figure 6). The reading should be about 12
volts DC when the door is open and zero
when the door is closed. If the reading is zero
with the door open, check the ground
connection from the door switch. This
connection should be clean and tight. See
Step #8 of the HOOKUP PROCEDURE. An
improper ground can cause intermittent or
erratic operation of the step. If the step will
not retract after being extended or extends
with the door closed, the BROWN wire to
the door switch may be touching a grounded
surface inside the wall behind the doorjamb,
or the door switch terminals may be touching
a grounded surface or each other. If the step
extends and retracts by its self while
traveling, check the conditions previously
described. With plunger door switches, be
sure that the door switch plunger is depressed
at least two thirds of its travel when the door
is closed. If the switch is not depressed at
least two thirds of its travel, it is possible for
the switch to make intermittent contact as the
vehicle frame shifts slightly while traveling
alone, the roadway. With magnetic door
switches, be sure the magnet is in place and
proper clearance is maintained between the
switch and magnet. If all the previous
conditions check okay, the door switch may
be faulty.
5. TO CHECK THE IGNITION SAFETY SYSTEM: Connect the voltmeter between the YELLOW wire
from the vehicle half of the four way plug and the ring terminal on the green ground wire (See Figure 7).
The reading should be about 12 volts DC when
C-12
AIRSTREAM 360 XC LAND YACHT OWNERS MANUAL
the ignition is on and zero when the ignition is off. If the reading is zero when the ignition is on,
check the connection of the yellow wire at the vehicle's fuse panel. If connected at a fuse, check
for a blown fuse. NOTE - On some installations there may be an inline fuse or circuit
breaker in the YELLOW wire that should be checked Kwikee Products Company, Inc.
recommends that this fuse circuit breaker be installed at this time if the Yellow wire is not
already fused. If the reading was about 12 volts DC when the ignition was off, the YELLOW
wire is connected to a constant live source. On control units #9513 and #9590, if the YELLOW
wire is connected to a constant live source, the step will always activate with the door movement,
even if the power switch and ignition are off.
NOTE - On some travel trailer and fifth wheel applications, the ignition safety system may
not be connected and the voltmeter reading will be zero between the YELLOW wire and
the ground wire.
TEST PROCEDURE - MOTOR TEST:
6. When checking the motor, remove the two (2) screws from the connector on the motor leads
between the motor and control unit. Separate the seal assembly exposing the connectors on the
red and yellow motor wires. CAUTION: Make note of how the wires and connectors assembled
for reassembly later. The wire connectors may be led wrong even though the colors match
Disconnect the motor leads.
WARNING: Under no condition should power be applied to the motor leads while the
motor is still connected to the control unit or damage to the control unit will result voiding
the warranty. Connect a 10 gauge jumper wire to the RED wire in the vehicle half of the four
way plug. This wire must have power. See Step #2 of the VEHICLE WIRING TEST
PROCEDURE: Connect another 10 gauge wire to the ring terminal on the end of the 31" long 10
ga. green ground wire (See Figure 8).
TO RETRACT STEP: Connect the ground jumper wire (Jumper from the green ground wire) to
the RED motor lead. Touch the power jumper wire (Jumper from four way plug) to the
YELLOW motor lead.
TO EXTEND STEP: Connect the ground jumper wire (Jumper from the green ground wire) to
the YELLOW motor lead. Touch the power jumper wire (Jumper from four way plug) to the
RED motor lead.
CAUTION: Do not leave the jumper wire connected to the motor for more than it takes to
extend or retract the step or damage to the motor may result.
If the motor fails to move, the motor may be defective. If the step has been struck by some kind
of road hazard, the step mechanism may be bent and causing the step to bind. The control unit
would then shut off power to the step as described in the BASIC SUMMARY OF OPERATION.
Check for physical damage to the tread, sliding rails, extending arms, etc. Also check all pivot
points for rusting. (See the LUBRICATION AND MAINTENANCE SCHEDULE)
If the step doesn't move when power is applied to the motor terminals, but a dim spark is
noticeable, there may be damage to the windings inside the motor, requiring replacement of the
motor. A dim spark may also indicate a shorted or burned out motor requiring replacement.
C-13
AIRSTREAM 360 XC LAND YACHT OWNERS MANUAL
TEST PROCEDURE - CONTROL UNIT TEST:
7. The motor must be operational to test the control unit using this procedure. See MOTOR
TEST PROCEDURE.
a. Ground the negative (-) post of a well charged 12 volt DC battery to the ring terminal on the
end of the 31 " long 10 ga. green ground wire.
NOTE: A well charged battery will read at least 12 volts DC when a voltmeter is connected
between the battery posts.
b. The motor leads must be connected to the control unit.
c. The four way plug between the control unit and the vehicle should be disconnected. Install
pigtail (four way plug - vehicle half - Part *9336 - same plug as supplied with the step for
connection to the vehicle) into the control unit half of the four way plug.
d. Touch the RED and WHITE wires of the pigtail to the positive (+) post of the battery. At the
same time, touching the BROWN wire to around (10 ga. green wire) will cause the step to extend.
CAUTION: Keep hands clear of the step mechanism.
e. When the BROWN wire is removed from the green ground wire the step should retract.
f. Extend the step again by applying power to the RED and WHITE wires and grounding the
BROWN wire to the green ground wire. Remove the RED and WHITE wires from the battery
before removing the BROWN wire from ground. This will cause the step to remain in the
extended position.
g. To test the ignition safety system circuit, apply power to both the RED and YELLOW wires of
the four-wire pigtail and the step should retract.
h. On control units #9513 and #9590: To test the "last out feature", remove the YELLOW wire
from the battery without removing the RED wire. Ground the BROWN wire to the green ground
wire and the step should extend. If the RED wire is removed from the battery before grounding
the BROWN wire, Step *7f and #7g must be repeated before testing the last out feature. This test
will only work if performed immediately after the ignition safety system test.
i. If the control unit tests okay, then recheck all wire and ground connections. If the source of the
trouble cannot be found, feel free to contact the customer service department for further
information or assistance.
j. If the above tests do not check out, the control unit may be defective and should be returned to
the factory for evaluation.
In most cases the control unit does not fail and problems can be traced to vehicle wiring or
voltage problems.
C-14
AIRSTREAM 360 XC LAND YACHT OWNERS MANUAL
Instructions for removing the motor assembly (part #9501) from the step frame and
disassembly:
Read all instructions before starting any procedure.
Refer to the motor assembly exploded view drawing, on the page C-17 for the item numbers
referred to in these instructions.
1. Unplug the control unit from the vehicle (four way plug). Do not cut any wiling.
2. Remove the two (2) screws (Item #12) from the connector (Item #18 and #19) on the motor
leads between the motor and the control unit. Remove the seal assembly (Item #20). CAUTION:
Make note of how the wires and connectors are assembled for reassembly later. The wire
connectors may be assembled wrong even though the colors match.
3. It is easiest to remove the motor assembly from the step frame if the step tread(s) are in a
partially extended position. Try to extend the step by following the procedure outlined in Step #6
under the TEST PROCEDURE - MOTOR TEST. If the step is locked in the up position and will
not move, read Steps #4 and #5 below before preceding.
4. Remove the hair pin (Item #6) from the clevis pin (Item #7).
5. Remove the clevis pin (Item #7) from the cast block in the end of the linkage assembly (Item
#8, #9 or #10). Note which direction the clevis pin goes into the cast block. If the step is in its
locked position, the clevis pin may have to be pried or driven out of the block. If the step is in the
locked position, loosening the motor assembly mounting bolts may allow the clevis pin to be
removed easier. The step tread(s) should swing freely when the clevis pin is removed. If the tread
does not move freely, check for a bent step frame and for rusting, at the pivot points.
6. MOTOR REMOVAL - The motor (Item #5 or #5A) may be removed without removing the
gear box or linkage assembly simply by removing the three (3) screws (Item #4) along with the
bearing bracket (Item #2).
7. GEAR BOX REMOVAL- Unbolt the gear box mounting plate (Item #16) from the step frame.
8. Remove the beating (Item #3) and the linkage assembly (Item #8, #9, or #10) from the gear
case (Item #11) along with the adapter gear (Item #1) and shaft (Item #17).
9. Turn the gear box assembly over and remove the four (4) 1-1/4" long #10 self tapping screws
(Item #13) from the gear case. Lift off the mounting plate (Item #16).
10. Remove the bearing (Item #3). Lift off the gear case cover (Item #15) and lift out the gear
(Item #14). Note which side of the gear goes up.
C-15
AIRSTREAM 360 XC LAND YACHT OWNERS MANUAL
Reassembly and installation of the motor assembly (part #9501) on the step frame:
Read all instructions before starting any procedures.
Refer to the motor assembly exploded view drawing on the opposite page from the item numbers
inferred to in these instructions.
1. Note: In the following assembly be sure all bearing pockets and surfaces, gear teeth and the
gear hub socket that is in the gear case are well lubricated with a good grade of lithium based
grease.
2. Install the gear (Item #14) in the gear case (Item #11). Be sure the gear is reinstalled the same
way it was removed (With the penny sized depressions down).
3. Place the gear case cover (Item#15) on the gear case. Set the hearing (Item #3) in the center
hole of the gear case cover (the flange of the bearing should be up) and align the square hole in
the bearing with the square hole of the gear.
4. Place the mounting plate (Item #16) on the gear case cover (the square holes in the mounting
plate should be away from the motor) and install and tighten the four (4) 1¼” long #10 self
tapping screws (Item #13).
5. Turn the motor assembly over and set it on the flat mounting plate. Install the linkage
assembly (Item #8, #9, or #10) into the gear case. Be sure the linkage assembly seats all the way
into the gear and bearing or the bearing bracket (Item #2) will not set properly. The swivel ball
and cast block should face the front of the motor assembly.
6. Place the bearing (Item #3) on the linkage assembly shaft. Place the flange of the bearing
down.
7. Lubricate and set the adapter gear (Item #1) and adapter gear shaft (Item #17) in place and
mesh with the main gear (Item #14).
8. Replace the motor (Item #5 or #5A) by carefully aligning the motor and adapter gear (Item #1)
so they slide together. Align the holes and push the motor into the screw hole alignment pockets
in the gear case.
9. Place the bearing bracket (Item #2) on the motor assembly and install and tighten the motor
screws (Item #4). These screws must be very secure.
10. Reinstall the motor assembly on the step frame and tighten all mounting bolts.
NOTE-Be sure the motor assembly is positioned the same way the old one was prior to
removal.
11. Install the clevis pin (Item #7) through the drive arms attached to the step frame and the cast
block in the linkage assembly (Item #8, #9, or #10). Be sure to reinstall the clevis pin in the same
direction it was removed. Install the hair pin (Item #6) in the clevis pin.
12. Reassemble the motor to control unit leads. See step two in column 1 under disassemble on
this page.
13. Connect the control unit to the vehicle (Four way square plug).
14. Test step function.
C-16
AIRSTREAM 360 XC LAND YACHT OWNERS MANUAL
C-17
AIRSTREAM 360 XC LAND YACHT OWNERS MANUAL
LUBRICATION AND MAINTENANCE SCHEDULE
Clean all mud, salt, and road grime from step before lubricating. Lubricate all moving parts
(bearings, pivot points, slides, clevis pin, and drive linkage ball) every 30 days with a good
quality moisture and heat resistant penetrating grease. Kwik-Lube Spray Grease is specially
formulated to lubricate Kwikee electric steps and is recommended for lubricating all moving
parts.
Refer to figures below for lubrication locations:
NOTE 1. Figures are to be used as a general reference
only. Some may not pertain to your particular step
model. Views are typical to both ends of step.
2. Figures 1 & 3 - square shaft bearing - lubricate
around outside and under head of bearing.
3. Figure 4 - I" O.D. tube bearing - lubricate
around drive tube and between head of bearing and
drive leg.
C-18
AIRSTREAM 360 XC LAND YACHT OWNERS MANUAL
CAMPING
SAFETY
As always, safety should be one of your top priorities. Make sure you, and everyone traveling with you, can
operate the main door and exit window rapidly without light.
WARNING:
The roadside rear window is designed as an escape window. To escape, pull in on the
two red latches at the bottom. The complete window sash will swing out to allow easy
exit. The pleated shade is opened by sliding straight up. The window operation should
be checked each trip and explained to all traveling companions.
WARNING:
At each campsite make sure you have not parked in such a manner as to block the
operation of the escape window by being too close to trees, fences or other
impediments. Scenic views are one reason for traveling, but don't park so the beautiful
lake or steep cliff is just outside your escape window.
WARNING:
Read the directions carefully on the fire extinguisher. If there is ally doubt on the
operation, you and your family should practice, then replace or recharge the
extinguisher. You will find your local fire department will be happy to assist you and
answer any questions.
WARNING:
DON'T SMOKE IN BED!
KEEP MATCHES OUT OF REACH OF SMALL CHILDREN!
DON'T CLEAN WITH FLAMMABLE MATERIAL!
KEEP FLAMMABLE MATERIAL AWAY FROM OPEN FLAME!
We have all heard these warnings many times, but they are still among the leading causes of fires.
Other safety information on the LPG system of your motorhome is located in the Plumbing Section of this
manual.
D-1
AIRSTREAM 360 XC LAND YACHT OWNERS MANUAL
SMOKE ALARM - FIREX MODEL B
IMPORTANT INFORMATION
SMOKE ALARM SAFETY CHECKLIST
Before installing, using and maintaining your smoke alarm read the entire owners manual and warranty.
Keep it in a convenient place for reference.
1. Test your smoke alarm every week. To test the electronics, firmly depress the button. To test that smoke
reaches the sensor, blow smoke in a careful fire-safe manner into your smoke alarm.
2. Your smoke alarm will not work without power. Never shut off its power or remove the battery to quiet
the alarm.
FOR BATTERY-POWERED UNITS: When your smoke alarm "beeps" about once a minute, the battery is
weak. Immediately install a new battery correctly. Be sure to use only batteries specified in Owner's
Manual or on unit. Test unit after installing a new battery.
3. Clean and vacuum the openings on your smoke alarm once a month.
4. Do not open the smoke alarm or try to repair it. For replacement information see the WARRANTY in the
Owner's Manual.
5. Verify you have the proper number of smoke alarms in your home and the correct location for each one.
A smoke alarm will not respond well in an incorrect location.
6. If your smoke alarm has one or more of these special features, please note:
•
FALSE ALARM CONTROL (Model C): Pushing test/hush button reduces sensitivity for up to 15
minutes, minimizing nuisance alarms,
•
FLASHING LIGHT (Model E): Pushing test button turns flashing safety light on. Very thick
smoke may obscure light.
7. Smoke alarms have technical limitations and may not respond in all situations. FIRE PREVENTION is
your best safeguard.
8. For a replacement Owner's Manual or Safety Checklist, please indicate your unit model, include a selfaddressed stamped envelope and send to:
Maple Chase Company
2820 Thatcher Road
Downers Grove, Illinois 60515-4040
D-2
AIRSTREAM 360 XC LAND YACHT OWNERS MANUAL
WEEKLY TESTING OF YOUR SMOKE ALARM
1. FOR A COMPLETE WEEKLY TEST OF THE ELECTRONICS AND THE SENSOR OPERATION,
FIRMLY DEPRESS THE TEST BUTTON ON THE COVER OF THE SMOKE ALARM FOR A FEW
SECONDS. The smoke LED (light emitting diode), which is the indicator light under the clear Push-toTest button, will blink once per second while the button is being pushed and the alarm is sounding. The
smoke alarm will stop sounding when you release the button.
2. If your smoke alarm has the False Alarm Control or Safety Light feature see "SPECIAL SMOKE
ALARM FEATURES" for further testing information.
3. IMPORTANT: Always test your smoke alarm upon returning from vacation, or any other time when no
one has been in your household or residence for several days.
4. If a smoke alarm is installed in a mobile home, test the smoke alarm after you remove the vehicle from
storage and before each trip.
! WARNING: If your smoke alarm does not respond as described in any of the above tests, check
that a good battery is properly installed. If a good battery is properly installed, promptly remove the
unit, repack it and return it for repair or replacement.
TAKING CARE OF YOUR SMOKE ALARM
Your smoke alarm has been designed and manufactured to be as maintenance-free as possible. Here are a
few simple steps you must perform, in addition to the weekly tests described in the section "WEEKLY
TESTING OF YOUR SMOKE ALARM," to keep your unit in good working order.
•
The smoke alarm should be vacuumed monthly or more often if there is dust, dirt or kitchen
grease that can accumulate. Use a soft brush or wand attachment and vacuum all slots in the cover
and side. FOR YOUR SAFETY, you must properly clean and maintain your smoke alarm, since a
dirty or malfunctioning unit may fail to alarm or cause unwanted nuisance alarms.
•
If the unit is damaged or fails to operate properly, and you have checked that a good battery is
installed correctly, follow the directions in the section "WHERE TO SEND YOUR SMOKE
ALARM IF IT NEEDS SERVICE" for return. FOR YOUR SAFETY, DO NOT OPEN THE
SMOKE ALARM AND TRY TO REPAIR IT YOURSELF. While smoke alarms are economical
devices, they contain precision electronic components that are precisely calibrated. The
manufacturer must do repairs.
REPLACING THE BATTERY
The smoke alarm will "beep" once a minute for at least 30 days when the battery is weak. The battery must
immediately be replaced with a fresh one.
The battery should also be changed if it does not sound an alarm when tested. TO REPLACE THE
BATTERY:
1.
Check if the tamper resist locking pin is installed in the smoke alarm (see "USING THE TAMPER
RESIST LOCKING MECHANISM" section). If so, pull the pin completely out of the smoke
alarm using long-nose pliers.
2.
Remove the smoke alarm from the mounting bracket by twisting counterclockwise
3.
Replace old battery with a fresh one. If your smoke alarm has a safety light, the miniature lamp
operates on two AA batteries. (See recommended batteries below.)
D-3
AIRSTREAM 360 XC LAND YACHT OWNERS MANUAL
4.
Check that battery connections are secure and the battery is secured in its compartment
5.
Test smoke alarm for proper operation (see "WEEKLY TESTING OF YOUR SMOKE ALARM"
section). The smoke alarm operates on a 9-volt battery. The normal battery operating life will be
one (1) year. The life of some batteries may be less.
Firex smoke alarms sold with Ultralife long-life lithium batteries require replacement
approximately every ten (10) years or when the low battery signal sounds.
6.
! CAUTION: You should only use the batteries specified here or on the label of the unit.
For Models A, B, C, E and PB use: Eveready 216, 522 or 1222; Mallory MN1604; Duracell MN1604;
or Ultralife U9VL-J.
For Model E also use AA Heavy Duty for light power. The miniature lamp operates on two (2) AA
batteries. For replacement, use heavy-duty or alkaline AA batteries: Eveready 1215, E91, or Duracell
M15HD, MN1500.
! CAUTION: Do not use any type of rechargeable batteries.
USING THE TAMPER RESIST LOCKING MECHANISM
To make the smoke alarm somewhat tamper resistant, a "locking pin" has been provided in the base of the
unit. It will help deter a child or other individual from removing the smoke alarm from the bracket. See
Figure 7. The following directions can install this.
1. Remove the break- away locking pin
from the unit by rocking pin back and
forth.
2. Put the smoke alarm back on the
mounting bracket. (See section "HOW TO
INSTALL YOUR SMOKE ALARM.")
3. Using long-nose pliers grab the head of the locking pin and insert into hole located on the side of the
smoke alarm. See Figure 8.
4. The Tamper Resist feature is now installed and complete.
To Remove:
5. Using long-nose pliers grasp the head of the locking pin and pull the pin completely out of the smoke
alarm.
6. The smoke alarm can now be removed from the mounting bracket with a counterclockwise twist.
SPECIAL SMOKE ALARM FEATURES
If your smoke alarm has one or more of these special features, read the following:
• BLINKING LED LIGHT (Models B, C, E and PB): The indicator light under the Push-to Test
button blinks about once per minute to indicate the smoke alarm is receiving power.
! WARNING: Very thick smoke may obscure the light.
D-4
AIRSTREAM 360 XC LAND YACHT OWNERS MANUAL
CARBON MONOXIDE ALARM
The following information is highlights from the folder provided by the alarm manufacturer. The folder,
with more detailed information, is contained in your Owners' Packet.
Test detector immediately following installation and weekly for proper operation by pushing the test
button until the YELLOW L.E.D. lights and a short beep is heard (approximately three seconds). Release
the button. The detector will then test itself for proper operation. At completion of the self-test, the alarm
will sound and both L.E.D.s will light for 3/4 of a second. The detector then resumes normal operation.
NORMAL OPERATION
In normal operation the detector will flash the RED L.E.D. once every 30 seconds.
WARNING CONDITION
If the COSTAR senses a low level of CO The YELLOW L.E.D. will light and the detector will beep every
three seconds warning that CO is present. The area should immediately be ventilated. A concentration of 60
PPM within 67 minutes will cause the warning condition. Pushing the test button will silence the warning
signal but the YELLOW L.E.D. will stay on. After two hours the warning signal will sound again if the CO
source has not been eliminated. If the condition persists there is a possibility that it may cause the unit to
enter alarm condition (below). If this occurs pushing the reset button will silence the alarm for 30 minutes.
ALARM CONDITION
If the COSTAR senses unsafe levels of CO, the RED L.E.D. will light up and the alarm will sound. The
alarm condition will be signified by a repetitive alarm-sounding pattern of approximately 4.5 seconds on
1.5 second off. Immediate evacuation is required. Pushing the test button will silence the alarm once for
approximately 4 minutes.
After approximately 4 minutes the alarm will once again sound until the unsafe CO concentration is
removed.
FAULT CONDITION
Periodically the detector's measurement circuit is tested. If an error is detected, the detector will sound
twice and the YELLOW L.E.D. will flash twice every 30 seconds. This is an indication of circuit
malfunction and that the detector requires immediate servicing.
MAINTENANCE
Battery Replacement:
If tamper resistant pin has been used, refer to "tamper resistant locking pin" for removal
instructions.
To replace the battery remove the detector from the mounting plate by rotating the detector in the direction
of the "OFF" arrow on the cover.
D-5
AIRSTREAM 360 XC LAND YACHT OWNERS MANUAL
The Model 9L-i CO Detector uses one (1) 9-volt battery. The CO DETECTOR is powered by a 9V
alkaline battery. A fresh battery should last for one year under normal operating conditions. This detector
has a low battery monitor circuit which will cause the detector to "chirp" and the red LED to flash
approximately every 30-40 seconds for a minimum of seven (7) days when the battery gets low. Replace
the battery when this condition occurs. USE ONLY THE FOLLOWING 9 VOLT BATTERIES FOR
CO DETECTOR REPLACEMENT.
Alkaline type: EVEREADY522; DURACELL MN1604; GOLD PEAK 1604A
Lithium type: ULTRALIFE U9VL
NOTE: REGULAR TESTING IS RECOMMENDED.
WARNING!! USE ONLY THE BATTERIES SPECIFIED. USE OF DIFFERENT BATTERIES
MAY HAVE A DETRIMENTAL EFFECT ON THE CO DETECTOR.
CLEANING YOUR DETECTOR:
To clean your detector remove it from the mounting bracket as outlined in the beginning of this section.
You can clean the interior of your detector by using your vacuum cleaner hose and vacuuming through the
openings around the perimeter of the detector. The outside can be wiped with a damp cloth.
AFTER CLEANING, REINSTALL YOUR DETECTOR. TEST YOUR DETECTOR BY USING
THE TEST BUTTON.
Test detector weekly for proper operation by pushing the test button until the YELLOW L.E.D. lights and a
short beep is heard (approximately three seconds). Release the button. The detector will then test itself for
proper operation. At completion of the self-test, the alarm will sound and both L.E.D.s will light for 3/4 of
a second. The detector then resumes normal operation.
SERVICE AND WARRANTY
If after reviewing this manual you feel that your CO Detector is defective in any way, do not tamper with
the unit. Return it for servicing to: Quantum Group, Inc., 11211 Sorrento Valley Road, Suite Valley
Road, Suite V. San Diego, CA 92121.
Or call us toll free (800) 432-5599
E-mail address: [email protected]
D-6
AIRSTREAM 360 XC LAND YACHT OWNERS MANUAL
LP GAS DETECTOR
In the kitchen area of your unit, approximately six inches above the floor, is the LP gas detector. LP gas is a
mixture of gases produced and sold commercially as a fuel for heating and cooking appliances. LP gas is
highly flammable and, as a result, can be explosive if ignited under certain circumstances. LP gas is heavier
than air and, if confined in a closed space, will accumulate close to the floor. When the LP gas
concentration in your unit exceeds 2000 PPM the detector will provide a visual and audible alarm by
sounding a buzzer and flashing the red LED two times per second.
WARNING:
Activation of this detector indicates the presence of LP gas, which can cause an explosion and/or fire.
This normally indicates a leak in the LP gas installation or a LP gas appliance. Extinguish all open
flames, open your windows and door and evacuate the unit immediately. Do not activate any
electrical switch. Turn off the LP at your gas bottle(s). DO NOT RE-ENTER YOUR UNIT UNTIL A
QUALIFIED REPAIR TECHNICIAN HAS CORRECTED THE PROBLEM.
OPERATION
Your LP gas detector is wired directly to your vehicle battery and incorporates a 1-amp in-line fuse. When
the device is operating normally the green LED will be lit.
WARNING:
It is not recommended that the detector be disconnected from the battery during periods of storage.
There is a small heater on the sensor of the device, which "burns" away impurities in the air during
periods of normal use. During periods when power is interrupted, impurities can build up on the
sensor. When power is returned to the detector the detector alarm may activate until the impurities
are "burned" off. This could take a number of hours, during which time the alarm will be constantly
"on".
DETECTOR TEST
Press the test button for 5 to 6 seconds until the alarm sounds then release the test button. The red LED
should flash and the alarm sound for approximately 4 minutes. This test should be performed at least once a
week during normal vehicle operation, and after periods of storage, and before each trip.
LOW VOLTAGE
Below 10 VDC the detector will continue to operate but will blink alternately green and orange. Below 8
VDC the unit will behave erratically and will eventually shut off. To ensure proper operation, do not
operate the unit below 10 VDC.
COMPONENT FAILURE
The failure of any circuit component will cause the detector to display a continuous orange LED fault light
and a short beep indicating failure. If this occurs, immediately contact your dealer or Airstream Customer
Service for the name of the nearest detector service center.
Please read the operating instructions for your detector, which have been supplied with the paper work of
your unit.
WARNING: Have a professional check your system if you have any doubts.
D-7
AIRSTREAM 360 XC LAND YACHT OWNERS MANUAL
OVERNIGHT STOP
In time you will develop a knack for spotting wonderful little roadside locations by turning off the main
highway and exploring. There are many modern recreational vehicle parks, including State, County and
Federal parks with good facilities, where you may obtain hookups of electrical, water and sewer
connections. Directories are published which describe in detail these parks and tell what is available in the
way of services and hookups.
Overnight or Weekend Trips
On overnight or weekend trips, chances are you will not use up the capacity of the sewage holding tank,
deplete the water supply, or run down the batteries which supply the living area 12 volt current.
All you need to enjoy the self-contained luxury is to:
1.
2.
3.
Turn on the LP gas supply and light the appliance pilots if required.
Turn on the water pump and open the faucets until air is expelled from the system.
Deploy the slide-out if so equipped and you desire the extra space.
Before moving on, turn off the LP gas and the water pump, check you campsite, both for cleanliness and
also to be sure you haven’t left anything behind. Make sure everything is properly stowed.
Longer Trip
On a longer trip, when you have stayed where sewer connections and utility hookups were not available, it
will be necessary for you to stop from time to time to dispose of the waste in the holding tank and replenish
the water supply. Many gas stations (chain and individually owned) have installed sanitary dumping
stations for just this purpose. Booklets are available which list these dumping stations.
When you stop for the night, your Airstream motorhome is built to be safely parked in any spot that is
relatively level and where the ground is firm. Your facilities are with you. You are self- contained. Try to
pick as level a parking spot as possible.
Hydraulic Leveling Jacks
Manufacturer:
Power Gear
1-800-334-4712
The 360 XC is equipped with semi-automatic hydraulic leveling jacks that can be deployed. Complete
instructions are included with the Owners Packet. Be sure to read the directions completely prior to
operating the jacks. The jacks will be able to level your unit in most modern campgrounds. However, their
capabilities are limited, and in some situations you will have to use planks to level the coach. See page H20 for instructions on resetting the automatic level system.
WINTER TRAVELING
Traveling in your motorhome during the cold winter months can be a most exhilarating experience. There
are, of course, certain precautions that must be taken as you would in your home in low temperatures.
WARNING: Always shut off the LP gas when gasoline is added to the fuel tank.
Some states do not allow LPG to be turned on while moving. While traveling in these states you must use
your common sense. How cold is it? How long will it be before you can turn the heat back on? Is the
temperature dropping or rising? Remember, the wind chill factor when driving 50 MPH will cause the
interior of the motorhome to cool much faster than when it is parked.
D-8
AIRSTREAM 360 XC LAND YACHT OWNERS MANUAL
1. You must have a plentiful supply of propane gas.
2. If your stay is longer than overnight, you should endeavor to have 120-volt electricity available. The
batteries, fully charged, will not last more than about 15 hours in freezing weather. Of course, you can run
your generator to recharge the batteries, or even use the generator continually. Since the generator starts off
the same battery as the engine, it is recommended to start the generator prior to shutting off the engine. This
will prevent running the engine battery down should there be a difficulty in starting the generator in the
cold temperatures.
3. Minimize use of electricity if 120 volt power source is not available.
4. Leave cabinet doors, bed doors and wardrobe doors slightly open at flight to allow circulation of air in
and around all furniture components
5. Use propylene glycol type antifreeze in waste and drain water tanks to prevent freezing. Quantity of
antifreeze needed will vary with ambient temperature and the amount of liquids in tank.
6. For extended stays in cold weather, insulate the water line outside the motorhome. You should remember
that low temperatures in combination with high winds cause an equivalent chill temperature much below
what your thermometer is reading. For instance, with an outside temperature of zero degrees, and the wind
velocity of 10 miles per hour, the equivalent chill temperature is minus 20' F. The exterior water faucet has
an in-line valve inside the motorhome. In below freezing temperatures, shut off the valve inside and open
the exterior brass valve so it will drain.
Condensation
It is also important to guard against excessive humidity inside your motorhome during winter campouts.
When windows and window frames fog up or "sweat," it means that there is too much moisture in the air.
Moisture comes from water vapor and water vapor is the direct result of water evaporating.
Many things such as baths and showers, boiling foods, washing dishes, washing clothes, even breathing,
contribute to evaporation. The inside air can only absorb so much of this moisture before it becomes
saturated. At this point it can hold no more, and any additional water vapor condenses back to liquid water
in the form of droplets on any available cool, solid surface. Temperature has a direct effect on the airs
saturation point. Cold air holds less moisture than warm air. For this reason, the air immediately adjacent to
cold outside walls and windows cools down and causes water vapor to condense and form moisture
droplets, even though warmer inside surfaces are still dry.
The best way to keep condensation under control is to reduce moisture producing activities. It is important
to provide adequate ventilation and keep the air circulating as much as possible.
Use your exhaust fans to remove moisture before water vapor mixes with the air. Open windows slightly
once in a while, while operating fans, to bring in drier outside air and aid in overall air circulation. In
extremely cold weather, when outside ventilation is not practical, it may be necessary .to use a small
dehumidifier to aid in reducing condensation.
There is no substitute for common sense in cold weather.
Note: The Airstream motorhome is built as a recreational vehicle and is not intended as a permanent
dwelling or for more than temporary use in sub-freezing temperatures.
D-9
AIRSTREAM 360 XC LAND YACHT OWNERS MANUAL
EXTENDED STAY
Making a long trip is not very different from making a weekend excursion. Since everything you need is
right at hand, you are at home wherever you go. When packing for an extended trip, take everything you
need, but only what you need. Some models are equipped with Hydraulic Leveling Jacks that can be
deployed. Complete instructions are included with the Owners Packet. Be sure to read the directions
completely prior to operating the jacks.
When you plan to stay in the same place for several days, weeks or months, you will want your motorhome
to be as level as possible. Check the attitude with a small spirit level set on the inside work counter. If a
correction is necessary, then you must first level from side to side. This can be done most easily by driving
up a small ramp consisting of 2" x 6" boards tapered at both ends. WE DO NOT RECOMMEND
PLACING TIRES IN A HOLE FOR LEVELING.
CAUTION: Read and follow all warning labels in the coach and safety instructions in the Power
Gear owner manual. To operate the SLIDE-OUT room you MUST first remove the interior travel locks.
These are located on the top of the room on the interior of the coach and are out of your normal sight. There
are two and they provide pressure between the exterior wall of the coach and the top facer board on the
room. They have caming action and the tension is adjustable. The first time you remove them you'll
probably need to stand on a stable step stool to see how the cam is released. After seeing their simple
operation you may able to operate them from the floor according to your height and strength. Also make
sure the driver’s seat is forward enough to clear the room. Push and hold the rocker switch located at the
top of the control panel in the hallway. You'll easily be able to tell by the sound of the mechanism when the
room is fully extended or retracted. Instructions for manual retraction and extension of the room during a
power failure are in the Power gear owner’s manual.
NOTE: Before the optional slide-out room can be deployed the ignition switch must be off. We also
recommend leveling the coach prior to deploying the slide-out.
CAMPGROUND SETUP
Hook Up to Water by attaching a ½” minimum high-pressure water hose to the city water service, or the
hose from the water reel if so equipped.
Plug the Electrical Cable into the City Power Service. Be sure you have the wire grounded and have the
proper polarity. See Electrical Section for technical details.
A Cable TV and Telephone Hookups are located on the roadside rear corner of the motorhome. It is
already wired into the existing system, so the exterior connection is all that is required
To use the Generator you simply start it. All switching is done automatically. The generator can be started
either from your interior monitor panel, dash switch or the switch on the generator itself. It is easier on your
generator and appliances if you'll allow the generator to reach its normal operating speed (about a minute)
prior to applying heavy current loads.
Hook your Waste Drain Hose into the Sewer Disposal Facility and attach to the drain outlet in your
motorhome. For details on this procedure see Drain and Waste System Section.
Turn on the gas supply and light the oven pilot. Lighting a top range burner to bleed any air from the
system will make it easier to start other appliances.
When you stay for extended periods where electric or water hookups are not available, you must make
regular checks on the condition of your 12-volt battery and the contents of your water tank. Carry drinking
water in a clean bucket to refill your tank. When your waste tank nears capacity, move your motorhome to
a dumping location.
D-10
AIRSTREAM 360 XC LAND YACHT OWNERS MANUAL
EXTERIOR
The roof of your Airstream Land Yacht motorhome is a fiberglass compound. If it is damaged contact the
Airstream customer service department and ask for the Service Bulletin on roof repairs.
The walls, front, and rear end are fiberglass that is custom painted by Carrera Designs with an automotive
finish. As a general rule of thumb, we recommend the motorhome be washed about every four weeks and
waxed in the spring and fall.
ALWAYS CLEAN YOUR MOTORHOME IN THE SHADE OR ON A CLOUDY DAY WHEN THE
SKIN IS COOL. Oil, grease, dust and dirt may be removed by washing with any mild non- abrasive soap or
detergent. Do not use hot water. Cleaning should be followed by a thorough clean water rinse. Drying the
unit with a chamois or a soft cloth can prevent spots and streaks.
After cleaning and drying, a good grade of nonabrasive automotive paste or liquid wax will increase the life
of the finish, especially in coastal areas where the finish is exposed to salt air, or in polluted industrial
areas. It will also protect the shell from minor scratches and make subsequent cleaning easier.
If your vehicle is exposed to pollen, bird droppings, tree sap, or the like, especially in hot and sunny
weather, wash it as often as necessary to keep it clean. If you do not, your paint will be damaged. Take
similar precautions if you vehicle is exposed to chemical industrial fallout. If asphalt remains on the
motorhome after washing, use a small amount of 100% mineral spirits on a rag and wipe the spots
individually, being careful not to scratch the finish.
It is recommended that the caulking and sealant used in external seams and joints such as window frames,
light bezels, beltline and rub-rail molding, etc., be checked regularly. If this material has dried out and
becomes cracked or checked, or if a portion has fallen out, it should be replaced with fresh material to
prevent possible rain leaks. Caulking and sealing material is available from your motorhome dealer.
Caution: Do not use high-pressure vehicle washes with harsh detergents or automatic truck washes.
FRONT END PROTECTIVE FILM
Your vehicle has a 3M protective film on the front end. Wash this with mild soap. Do not use
abrasive cleaners or damage may occur. For any questions please call Coach Guard at 1-800-2624100.
BODY ARMOR (NOSESHIELD, optional)
Cleaning Instructions
1. Clean the Body Armor with warm soapy water. Never use solvents such as gasoline, straight alcohol, or
ammonia. To remove tar, crease, or paint, use a 10-15% diluted isopropyl alcohol solution.
2. Use a soft cotton cloth to clean the plastic (polycarbonate) shield. Do not use paper towels: Paper towels
will scratch the plastic.
3. Once the Body Armor is clean, seal and protect the plastic with a plastic cleaner such as Plexus. Plastic
cleaners can be purchased from plastic retailers or automotive stores.
4. Small scratches can be removed or reduced by carefully polishing the area with a plastic scratch
remover compound such as Novus 2. Novus 2 can usually be purchased from a plastic retailer.
5. A light-buffing compound as used on automotive paint can also be used on the Body Armor shield. Use
light pressure and a slow speed when buffing out scratches.
If you have any questions regarding your Body Armor shield, please call Summit Products, Inc. at (515)
778-8958.
E-1
AIRSTREAM 360 XC LAND YACHT OWNERS MANUAL
Roof Ladder and Storage
For traveling, the lower section of the ladder should be removed and stored in one of your lower
compartments. To remove, pull out the cross pins in the lower sockets then pull the bottom of the ladder out
of the sockets. This will allow the top of the ladder to be unhooked freeing it for storage.
CAUTION. Roof storage is limited to 250 pounds evenly distributed.
Wheels
Use same instructions for the wheels as the exterior walls for cleaning.
Windshield Wiper
The wiper system is a made by Trico and uses a 28” blade. The washer bottle and motor is located in the
roadside front compartment.
Air Supply
There is an air supply chuck located in the roadside front compartment. A hose and fitting is included with
the tool kit for your convenience. The air is supplied by the chassis compressor and will be replenished
only with the ignition on.
E-2
AIRSTREAM 360 XC LAND YACHT OWNERS MANUAL
MAIN DOOR LOCK
LOCK ASSEMBLY, MAIN DOOR
1. Outside housing assembly
2. Inside plate
3. Striker bolt
4. Caged nut
5. Rotary latch
KEYLESS DOOR LOCK
Operation
The dead bolt portion of your motorhome may be controlled by radio signals produced by the key fob
shown below. One characteristic of this system is the one second delay after a pad has been depressed.
NOTE: When you use the keypad to turn the patio lights ON you must also use the keypad to turn
them OFF. The same goes for the switch inside the door ... if you turn the lights on with this switch,
you must use the same switch to turn them off. You cannot turn the lights on with the keypad and
off with the switch.
SERVICE
There are four major components operating the door locks; control module/receiver, dash switch, relay, and
drive motors. The control module is mounted on the inside wall just behind the main door. The relay
operates in conjunction with the dash switch and is located up under the left hand side of the dash. The
drive motors, located at each lock, are polarity sensitive. When testing you'll find the wires at the drive
motors will switch from positive to negative and vice versus as the key fob or dash switch is being
operated. When using the dash switch the relay under the dash performs the polarity switching functions
and the control module/receiver serves the same function when the key fob is used.
A detailed wire layout is provided in the electrical section of this manual.
E-3
AIRSTREAM 360 XC LAND YACHT OWNERS MANUAL
INTERIOR
The luxurious interior of your Airstream motorhome has been designed for comfort, convenience,
durability and appearance. An understanding of the operational procedures and maintenance techniques of
the interior appointments will add to your pleasures, as well as to the long life of your motorhome.
Lounges
To convert the Deluxe Sofa into a bed, pull the armrest straight up and out of their bracket, grasp the front
edge of the seat, raise and pull it toward the aisle of the motorhome. The backrest will slide down into place
automatically.
Rear Bed
On diesel models the bed top raises to reveal the engine cover for access to top of the engine. Gas rod props
assist the bed top raising. The engine cover latches to the bottom of the bed top.
WARNING - The lifting and supporting strength of the gas props vary according to temperature.
Props that support the bed top when hot may let the bed close rapidly when cold.
Dinette
The standard dinette will make into a bed. Swing the table leg up against the bottom of the table, lift up on
the front of the table and it will unhook from the wall. Now pull out and the swinging hinge will let the
back edge of the table down level with the supports attached to the front of the seat bases. Use backrest to
fill in over the table.
Recliners
The recliners supplied with the motorhome have side levers that can swivel, lock, or recline the chair
according to which chair was ordered with your coach.
CAUTION: Rotating the chair when it's slid back against the wall can damage the upholstery.
Position the chair so it isn't chafing when in transit.
Fabric Cleaning
All material should be professionally dry cleaned to remove any overall soiled condition. These materials
may be spot cleaned, however, using the cleanability code instructions as listed. Sample swatches are
furnished to our dealers. The dealer will be able to give you the cleaning code and part number for the
fabrics used in your particular motorhome.
Floor Tile
The tile is standard ceramic tile and grout and should be cleaned and cared for with products designed for
tile floors.
F-1
AIRSTREAM 360 XC LAND YACHT OWNERS MANUAL
The following are the cleanability code instructions for the various fabrics used in the Airstream
motorhomes:
Cleanability Codes
CODE W-S
Fabric care. Spot clean this fabric either with a mild solvent or a water-based cleaning agent. When using a
solvent or dry cleaning product, follow instructions carefully and clean only in a well-ventilated room.
Avoid any product that contains highly toxic carbon tetrachloride. You may also use an upholstery
shampoo product or the foam from a mild detergent. With either method, pretest a small area before
proceeding. Use professional furniture cleaner when an overall soiled condition is reached.
CODE S
Fabric care. Spot clean, using a mild, water-free solvent or dry-cleaning product. Carefully follow
instructions on such product. Clean only in a well-ventilated room. Avoid any product containing carbon
tetrachloride, which is highly toxic. Pretest small area before proceeding. Use professional furniture cleaner
when an overall soiled condition is reached.
CODE W
Fabric care. Spot clean, using the foam only from a water-based cleaning agent, such as mild detergent or
non-solvent upholstery shampoo product. Apply foam with a soft brush in a circular motion. Vacuum when
dry. Pretest small area before proceeding. Use professional furniture cleaner when an overall soiled
condition is reached. The manufacturer of the fabric designed the above code.
CAUTION:
Never remove cushion cover for separate cleaning or washing. Any tumble cleaning method can
destroy the backing, shrink or otherwise damage upholstery.
SMOKING WARNING
Keep your furniture and family safe from fires caused by careless smoking. Do not smoke when
drowsy. Remove immediately any flowing ash or a lighted cigarette that falls on furniture.
Smoldering smoking material can cause upholstered furniture fires.
Shades
The day/night shades are opened and closed by grasping both knobs and sliding the shade straight up and
down. Your choice of blind density is instantly available by using the appropriate set of knobs.
Carpet
The carpet can be cleaned with any good commercial carpet cleaner, or with a detergent and water.
HOWEVER, BE CAREFUL NOT TO SOAK THE CARPET WITH WATER.
F-2
AIRSTREAM 360 XC LAND YACHT OWNERS MANUAL
Galley Counter
The galley counter around the sink is Corian and can be cleaned with soap and water, or you can use a
common solvent on tough spots. Be sure no abrasive cleaner is used, as there is the possibility it could
scratch the surface. A protective pad should always be placed under hot utensils.
Sanding minor damaged areas can repair Corian counters. The color of the material is constant and not just
a surface coat.
The lavatory sink is a very dense material called KARRAN. In the unlikely event of it ever being stained
powdered cleansers such as Ajax/Comet may be used or even Scotch-Brite® pads. The color is constant
through the thickness of the material.
Walls/Cabinets
The vinyl walls of the motorhome can be wiped with any mild household cleaner. The wood grain panel
also has a vinyl covering for easy care. The cabinet doors and framework are hardwood, so any good
furniture polish can be used.
Drawers
Drawer removal - pull drawer out to stop then raise front of drawer to clear rollers
CAUTION: Do not use any abrasive material on the vinyl-covered walls.
Bathroom
CAUTION-. The lavatory bowl and countertop in your bathroom should be cleaned with soap or
detergent. NEVER USE SCOURING POWDER.
Shower Stall
To clean your ULTRA/GLAS shower stall unit, use warm water and one of the stronger liquid detergents.
Do not use abrasive cleaners; they may scratch and dull the surface of your ULTRA/GLAS unit. Stubborn
stains can be removed with solvents such as turpentine, paint thinner or acetone. Restore dulled areas by
rubbing with an automotive-type liquid cleaner, and then put the soft glow back into your ULTRA/GLAS
unit with a light application of liquid wax.
WARNING: Do not wax the floor of the stall without using a bath mat afterward to prevent a
dangerous slippery floor condition.
F-3
AIRSTREAM 360 XC LAND YACHT OWNERS MANUAL
NOTES
F-4
AIRSTREAM 360 XC LAND YACHT OWNERS MANUAL
PLUMBING
LPG SYSTEM
Your motorhome is equipped with a permanently mounted tank for LPG (Liquid Petroleum Gas). LPG
burns with a clean blue flame. There are two basic types of LPG in common usage: Butane and Propane.
Butane is widely used where temperatures are normally above freezing the year round, and Propane is used
where subfreezing temperatures are common, since Butane freezes at 32°F as compared to -40°F for
Propane. ALL OF THE ORIFICES IN THE LPG APPLIANCES ARE OF THE UNIVERSAL TYPE
THAT WILL BURN EITHER FUEL. How long a full tank of gas will last is dependent on usage. In cold
weather, when you are using the furnace, large amounts of hot water, and cooking extensively, you will
naturally use more than you will in warm weather, when you may do limited cooking. On the average, with
normal cooking and other appliance use, you can probably count on one month of usage from the tank.
If you have allowed the tank to run out, air may have gotten into the lines. In this event the air must be
forced out through the lines by gas pressure before you can light the pilots. Hold a match to the pilot of the
appliance closest to the tanks until it lights and stays lit. Then move to the next closest, etc.
WARNING:
All pilot lights and appliances must be turned off during refueling of motorhome fuel tank and
permanently mounted LPG tank. Gas lines should be checked periodically for leaks with ammonia
free soapy water. Do not use open flame.
CAUTION:
Moisture in the LPG tank will cause a malfunction of the regulator in controlling proper pressure.
This may result in the flame lifting off the burner, or the flame may go out frequently. Many
refueling stations will add approximately 1/4 to 1/2 gallon of alcohol to lower the moisture
temperature. Moisture will then pass through the regulator without the formation of ice crystals.
WARNING:
If gas can be smelled, appliance pilots fail to stay on, or any other abnormal situation occurs, shut off
tank valve immediately and call on a qualified LPG service center or Airstream Service Center.
LPG Regulator
The LPG regulators used on Airstream motorhomes are designed for low-pressure service, with a normal
outlet pressure setting of 11.5 water column. Only personnel trained in the proper procedures, codes,
standards, etc., should service regulators.
Have the regulator inspected each time the tank is refilled. Make sure the regulator vent opening on both
first and second stage regulators does not become plugged by mud, insects, snow, ice, paint, etc. Vents
must remain open.
Replace any regulator that has had water in the spring case, or shows evidence of external corrosion, or
corrosion inside the spring case. Closely examine regulators directly connected to the container valve by
means of a solid POL adapter (horizontal mounting) for signs of corrosion. (An Airstream Service Center is
recommended for this service.)
G-1
AIRSTREAM 360 XC LAND YACHT OWNERS MANUAL
BASIC RULES FOR SAFETY
WARNING: DO NOT store LP containers within vehicle. LP containers are equipped with safety
devices that vent gas should the pressure become excessive.
WARNING: DO NOT use cooking appliances for comfort heating. Cooking appliances need fresh air
for safe operation. Before operation open overhead vent or turn on exhaust fan and open window.
A warning label has been located in the cooking area to remind you to provide an adequate supply of
fresh air for combustion. Unlike homes, the amount of oxygen supply is limited due to the size of the
recreational vehicle, and proper ventilation when using the cooking appliances will avoid dangers of
asphyxiation. It is especially important that cooking appliances not be used for comfort heating as
the danger of asphyxiation is greater when the appliance is used for long periods of time.
WARNING: Portable fuel burning equipment, including wood and charcoal grills and stoves, shall
not be used inside the recreational vehicle. The use of this equipment inside the recreational vehicle
may cause fires or asphyxiation.
WARNING: A Warning Label has been located near the LP gas container. This label reads: DO
NOT FILL CONTAINER (S) TO MORE THAN 80% PERCENT OF CAPACITY. Overfilling the
LP gas container can result in uncontrolled gas flow that can cause fire or explosion. A properly
filled container will contain approximately 80 percent of its volume as liquid LP gas.
WARNING: Do not bring or store LP gas containers, gasoline or other flammable liquids inside the
vehicle because a fire or explosion may result.
WARNING:
If you smell gas:
1. Extinguish any open flames, pilot lights and all smoking materials.
2. Do not touch electrical switches.
3. Shut off the gas supply at the tank valve(s) or gas supply connection.
4. Open doors and other ventilating openings.
5. Leave the area until odor clears.
6. Have the gas system checked and leakage source corrected before using again.
WARNING:
LP gas regulators must always be installed with the diaphragm vent facing downward. Regulators
that are not in compartments have been equipped with a protective cover. Make sure that regulator
vent faces downward and that cover is kept in place to minimize vent blockage that could result in
excessive gas pressure causing fire or explosion.
G-2
AIRSTREAM 360 XC LAND YACHT OWNERS MANUAL
LP TANK INSTALLATION
The regulator at the L.P. tank
is under a black plastic cover.
The protective cover certainly
helps to keep the vent on the
regulator from getting
clogged by wasps or ice, but
should still be checked
regularly to make sure the
vent remains clear.
WARNING: Do not
attempt to seal regulator
cover.
WARNING:
Check vent each time tank is filled to make sure it is clear of obstructions.
Gas Regulator Removal/Replacement
1. Shut off main gas supply at the tank.
2. Remove the plastic protective cover from the regulator assembly
3. Using two wrenches, one to hold the line fitting and one to turn the flare nut, disconnect
the regulator from the flexible rubber line.
4. Disconnect the regulator from the tank fitting. Remove regulator.
5. To replace, reverse the removal procedures.
G-3
AIRSTREAM 360 XC LAND YACHT OWNERS MANUAL
G-4
AIRSTREAM 360 XC LAND YACHT OWNERS MANUAL
WATER SYSTEM - SELF-CONTAINED
Most plumbing functions are accomplished in the plumbing utility compartment on the roadside of your
motorhome. To fill your water tank, hook up a garden hose to the city water inlet then open the water tank
fill valve. The water level can be monitored on your control panel above the range or the tank can be filled
until water is expelled out of the tank overflow and is seen running on the ground under the vehicle.
NOTE: Once the water level has reached the height of the overflow, water will continue to be
expelled for a few minutes after the fill valve is closed.
If it is more convenient for you, a water fill is also located on the side in the utility compartment. As noted
above, water will be expelled from an overflow valve for a short time once the tank is full and the fill hose
has been removed.
Turn water heater by-pass valves to normal flow. Access to the single lever valve is from inside, opening
the cabinet door directly below the kitchen sink and lowering the hinged access door on the back wall of
the cabinet. If the valve handle is horizontal it is in the normal flow position.
Open the hot side of the galley or lavatory faucet and turn on the water pump switch located on the monitor
panel. For some time the open faucet will only sputter. This is because the water heater is being filled and
air is being pushed out through the lines. Once the water heater is full a steady stream of water will come
from the faucet. Now open a cold faucet. It will sputter for a short time, but will soon expel a steady stream.
All other faucets can now be opened until all air is expelled.
Once the system is filled with water and the faucets closed, the water pump will shut off. When a faucet is
opened the pump will come back on automatically. If the faucet is just barely open it is normal for the
pump to cycle on and off rapidly.
CAUTION: The water pump must be turned off when hooked up to city water supply and when you
leave your Airstream unattended.
G-5
AIRSTREAM 360 XC LAND YACHT OWNERS MANUAL
WATER PUMP AND STRAINER
The water pump and strainer are located behind the exterior water service in the roadside exterior
compartment.
To clean strainer screen, first remove inlet
connection from pump side of strainer. This
will allow the intake side of the strainer to
be rotated about 1/8 turn counter clockwise
and removed. The screen part of the strainer
will now be accessible for cleaning.
When reassembling, only rotate the inlet
side of the strainer until the stops are felt.
The “O” ring preforms sealing and too much
pressure will only break the strainer.
Cleaning Water Storage Tank
1. Prepare sodium hypochlorite solution using potable water and household bleach (5 1/4 to 6%) in the ratio
of 1/4-cup bleach to 1 gallon of water. (Common household bleaches are Purex and Chlorox.)
2. Pour 1 gallon of hypochlorite solution for each 15 gallons of capacity into the empty water tank.
3. Add enough potable water to completely fill the water system.
4. Allow closed system to stand for three hours.
5. Drain the hypochlorite solution from the system and refill with potable water.
6. Excessive hypochlorite taste or odor remaining in the water system is removed by rinsing the system
with a vinegar solution mixed in the ratio of 1 quart of vinegar to 5 gallons of water.
7. Drain the system and flush with potable water.
G-6
AIRSTREAM 360 XC LAND YACHT OWNERS MANUAL
WATER PUMP
Manufacturer:
Shur-Flo
1740 Markle Street
Elkhart, Indiana 46514
Phone: 219-294-7581
088-404-144 PUMP REPAIR KITS
1. Switch/check valve and upper housing kit (replaces all previous switch designs)
2. Valve plate assembly
3. Diaphragm/drive assembly
4. Motor
5. Complete Pump Head assembly (includes 1,2,3) (replaces all previous switch designs)
G-7
AIRSTREAM 360 XC LAND YACHT OWNERS MANUAL
Switch and Check Valve Repair
The check valve, hydraulic switch mechanism and micro switch are accessible by removing the switch
cover.
CAUTION: Care should be taken in removing the switch cover screws. Within the mechanism is a
spring under compression.
Replacement of Micro Switch
Occasionally the micro switch fails or an electrode is broken off. Proceed as follows: Remove the two
screws holding the cap to the main body. Remember, this cap retains a spring under compression. With
both screws out, allow the spring to extend fully. Then carefully lift off cap and spring. If only the micro
switch is at fault, avoid disturbing the hydraulic elements remaining in the head. If examination of the
hydraulic parts is required, remove them carefully by pulling. Be sure to note the order of removal.
To replace the micro switch, remove the spring and pull out the black retaining ring. This will allow the
micro switch to fall free. Replace parts in the reverse sequence: Micro switch, black retainer, and the
spring.
Reassemble cover to the main body. Switch cap may be pointed up or down as desired, providing wire has
not been shorted.
After replacing the micro switch, carefully rewire correctly.
Note: If the positive wire from the battery is connected to the "B" terminal, the switch is bypassed and the
pump cannot shut off, Pressure will build up until the motor stalls. If the proper fuse has been used, it will
blow. If a larger fuse than recommended has been used the motor will stall and may burn out.
Check Valve Problems
Due to contamination from debris or lime build-up, the check valve may fail to properly seat. To correct,
clean out the area and replace the check valve element. If checking the check valve with air, be certain to
moisten the check valve to get an accurate check. The rubber seals more effectively when wet.
Properly installed, the Pump will:
PRIME: The pump will automatically prime itself.
AIR-LOCK- Pump will not airlock, as the compression stroke is powerful enough to pressurize the
entrapped air and force the check valve open.
RUN DRY: Pump will run dry for extended periods without damage.
BATTERY DRAIN: At free flow, the pump draws a mere 7 to 7 1/2 amps.
CHECK VALVE: Built-in check valve prevents back flow and can protect the pump from the dangers of
high city water pressure (up to 200 PSI).
FULLY AUTOMATIC: The pump will automatically come on when the faucet or valve is opened. It
delivers a smooth, steady flow of water and shuts off automatically when the faucet is closed.
G-8
AIRSTREAM 360 XC LAND YACHT OWNERS MANUAL
Trouble Shooting
MOTOR DOES NOT OPERATE.
- Is battery discharged?
- Are any wires disconnected?
- Are terminals corroded'?
- Is switch in "ON" position?
- Is fuse good?
- Is water frozen in pump head?
MOTOR RUNS BUT NO WATER FLOWS.
-
Is water tank empty?
Are there kinks in the inlet hose?
Is air leaking into inlet hose fittings?
Is inlet line or iii-line filter plugged?
If using a filter, check the line just before the filter.
Is outlet hose kinked?
MOTOR RUNS BUT WATER "SPUTTERS"
Check to be certain that air has been bled off the lines and water heater. Also check for air leaks in the input
side of the pump.
PUMP CYCLES ON AND OFF WHEN ALL OUTLETS ARE CLOSED.
The pump will normally cycle (go on and off) when a faucet is partially opened. If, however, it cycles when
all valves are closed, check for a leak in the lines. It may be a leaky toilet valve or a dripping faucet. Do not
forget to check the outside city water entry valve. It may be leaking.
If no leak can be detected, shut pump off. Remove the output hose where it joins the system (not at the
pump). Insert a plug in the hose and clamp it. (You can make a perfect plug from a barb fitting: ½ " size
with a cap tightly screwed on the threads.) Turn the pump switch on. The pump should come on, run a few
seconds, and then shut off. If it remains off, the problem is NOT the pump. The problem is in the system.
If, however, the pump goes on and off, there may be a problem in the pump.
There may be an internal leak in the pump that allows water to escape from the high-pressure area back into
the low-pressure area. Look for a pump valve held open or a crack in the plastic parts.
PUMP DOES NOT ACHIEVE SHUT OFF
The wall switch may be used for temporary control of the pump. A low battery charge may be the cause. Or
the pump switch mechanism may be stuck. Try tapping the switch cap on the end of the pump with the
handle of a screwdriver. If the pump appears in all other respects to run normally, but fails to shut off, you
may have to replace the switch mechanism.
PUMP HEAD LEAKS
If the pump head leaks, first try to tighten the screws in the pump head assembly until they are snug.
CAUTION:
then replace.
Do not over tighten. The leak may be from a crack in the pump head assembly. If so,
One cause of the pump head cracking may be water freezing inside the pump head. If the leaking water is
escaping back near the motor, check for a leaking or broken piston.
G-9
AIRSTREAM 360 XC LAND YACHT OWNERS MANUAL
Pump Repair
•
•
•
•
•
•
Screws (A) hold the entire pump head assembly to the
motor.
Screws (B) hold the pump head face to the pump head
main body.
Screws (C) hold the switch assembly to the front of the
pump head.
Screws (A) would be removed to correct a problem in
the "drive train" between the motor and pump head.
Screws (A) and (B) would be removed to correct a problem in the pump head valves or pumping
chambers.
Screws (C) would be removed to correct a problem in the automatic switch or check valve.
PUMP HEAD REPAIR
Motor and drive train.
Rarely does a problem occur in this area of the pump head. If a part does fail, it is quite easily replaced. Just
be certain to follow closely the sequence of parts as shown in the figure. Also be careful to align the flat
surface in the drive adapter with the flat surface on the motor shaft.
LUBRICATION
If the lubricant appears dried out it should be wiped off the bearing assemblies. A small amount of
automotive wheel bearing grease should be applied to both sides of each bearing.
FAILURE TO PRIME
Failure to prime can be caused by the presence of some foreign matter lodged in the valve preventing it
from seating. To correct, remove any such foreign bodies.
CAUTION: Do not remove the stainless steel screens. These filter screens should be cleaned without
removing them from the plastic housing.
PUMP CHAMBER REPAIR
Replacement of broken piston.
To remove a piston, back out the screw holding the defective piston.
Now lift the corner of the diaphragm and remove the broken piston. Insert the new piston through the
diaphragm and slide the retaining ring on. Rotate the piston until it drops into place in the drive plate.
Replace the screw and tighten until snug.
CAUTION: Do not attempt to re-use a piston once it has been removed. The plastic stem, if used a
second time, may not hold securely. The second thread path removes additional material and there is
then no real bite.
REPLACE A DIAPHRAGM
To replace a diaphragm follow the procedure used in removing the pistons. After removing the three
pistons the diaphragm is loose and easily removed.
Screws (A) hold the piston.
Screws (B) hold the drive mechanism and should not be removed when replacing piston.
G-10
AIRSTREAM 360 XC LAND YACHT OWNERS MANUAL
CITY WATER HOOKUP
In your utility compartment on the roadside of the motorhome is the city water hose connection and various
other valves. They are clearly marked and your dealer should have explained the functions of each at time
of purchase.
NOTE: When you use the "fresh water tank fill" valve and fill the tank it will expel any overflow
under the coach. When you turn the rill valve off, the overflow will not cease immediately, but will
slowly taper off.
Use a high-pressure hose of at least ½” diameter. It should be one that is tasteless, odorless and non-toxic
designed for RV use. The city water inlet is a standard garden hose thread. We suggest you carry two
lengths of hose. This way you have the ability to reach hookups further away than normal, plus you have a
spare hose should one fail or become damaged unexpectedly. Turn the water heater bypass to the normal
flow position as described under self-contained.
After hooking up the hose and turning on the city water valve provided in the park, slowly open a faucet.
There will be a lot of spurts and sputtering until all the air is expelled from the motorhome system. If the
water heater is empty it will take some time before all the air is expelled and you get a steady flow of water
at the faucet. Once a steady flow is achieved at one faucet the others should be opened long enough to
expel the air in the lines going to them.
During city water operation the water pump switch should be in the off position. A check valve built into
the pump protects it from city water pressure.
Your plumbing system has a built in pressure regulator to protect your lines and faucets from extremely
high pressures on some city water systems.
Information on dump valve and black tank flush use can be found under DRAIN AND WASTE SYSTEM
further back in this section.
G-11
AIRSTREAM 360 XC LAND YACHT OWNERS MANUAL
GALLEY FAUCET, MOEN PURETOUCH CLASSIC
1-800-374-6542
WATER FILTRATION SAFEGUARDS
Your Moen PureTouch® Classic Filtering Faucet System integrates carbon block filtration technology
designed by Culligan International into a faucet spout. This technology is fast and effective at reducing
contaminants commonly found in water and is certified by NSF® International. The PureTouch Filtering
Faucet System and installation must comply with State and Local laws and regulations. To ensure optimal
operation of your new Moen faucet, please read the following safeguards carefully.
MicroTech™ Filter Cartridges
• MicroTech filter cartridges will reduce:
Chlorine, Taste and Odor (MicroTech 400, 600)
Lead (MicroTech 400,600)
Cysts (Cryptosporidium, Giardia) (MicroTech 600)*
*The contaminants removed or reduced by this filter are not necessarily in your water.
• Do not use with water that is microbiologically unsafe or of unknown quality without adequate
disinfections before or after the system. Systems certified for cyst reduction may be used on
disinfected waters that may contain filterable cysts.
•
MicroTech filter cartridges are designed for replacement after dispensing 200 gallons of filtered
water. Water conditions and usage may affect filter life and water taste.
•
The electronic indicator will signal when filter replacement is necessary
•
Use only MicroTech 400 or 600 filter cartridges with the PureTouch Classic Filtering Faucet
System.
•
Filter flow rate = .4-.5 gpm at rated pressure (20 psi min. – 125 psi max.).
Water Temperature
• Minimum/Maximum faucet operating temperature = 40 degrees – 150 degrees F
• CAUTION: Do not filter water above 100degrees F.
MicroTech Filter Flushing Instructions
•
New MicroTech Filter Cartridge: Allow cold water to run through a new filter for 5 minutes to
flush out any loose carbon particles. Once these small black specks are washed out the filter is
ready for use.
•
Daily Use: Allow cold water to run through the filter for 10-15 seconds prior to first use. If the
filter has not been used for two days, run cold water through the filter for 60 seconds prior to use.
Questions
• If you have any questions please call our toll-free help lines:
1-877-374-6542
Saturday
8:00 a.m. to 6:30 p.m.
1-877-DRINK-H20
Monday through Friday
8:00 a.m. to 8:00 P.M.
G-12
AIRSTREAM 360 XC LAND YACHT OWNERS MANUAL
PARTS DESCRIPTION
1. Solid Handle Body
2. Set Screw
3. Plug Button
4. Dome & Pivot Retainer Assembly
5. Cartridge Screw
6.Handle Adapter & Connector Assembly
7. Pivot Stop
8. Spout Retaining Nut
9. Bearing Washer
10. "D" Washer
11. Retainer Clip
12. 1225 Cartridge
13. Filter Cartridge
14. Filtering Appliance
15. Lower Spout Assembly
16. Threaded Shank
17. Supply Tubes (2)
18. Bottom Bearing Washer
19. 1/2" Threaded Fitting
20. Deck Ring with Gasket
21. Deck Plate
22. Mounting Bracket
23. Mounting Nut
24. Designer Spray Head (Spray Models)
25. Hose Guide with Gasket (Side Spray
Models)
26. Spray Hose
27. Extended Locknut (Side Spray Models)
28. Swivel Nut (Spray Models)
29. Mounting Tool
30. Deck Plate (Spray in Deck Models)
31. Support Plate with Gasket
G-13
AIRSTREAM 360 XC LAND YACHT OWNERS MANUAL
MICROTECH™ FILTER
INSTALLATION/REPLACEMENT
1. Install a new filter by wetting the outlet ports with
water and then inserting into the round filter ports on
the faucet head and pushing the filter and head
together. Both outlet ports must be fully inserted into
the filter ports.
2. Install the filter and faucet head assembly on to the
spout by wetting the faucet head o-ring seal and then
carefully sliding the free end of the filter into the spout.
The head will need to be initially turned approximately
1/2 turn counter clockwise from its normal position to
slip past the safety catch. Lock the head into place by
simultaneously pushing and twisting the head
clockwise. When properly installed the head will feel
secure, and will be correctly oriented on the spout.
3. Reset the filter life indicator by pushing the filter
button 3 times. Wait 10 seconds. You should not be
running water while resetting the filter life indicator
because the filter button will remain depressed, with
the first push as it switches to filter mode. The filter life
indicator has been correctly reset if a short series of
rapidly flashing green light occurs, indicating that the
new filter-flushing period has begun.
4. Flush the filter for 5 minutes before initial use.
Your new Moen faucet is now ready for normal use.
To replace filter:
1. Turn off the faucet. Remove the faucet head by
twisting it approximately 1/4 turn counter clockwise to
unlock it. Gently pull the faucet head away from the
spout and twist it approximately another 1/4 turn to get
the faucet head past the safety catch. The faucet head
and depleted filter (if one is installed) can now be
pulled completely out of the spout.
2. The filter is held to the faucet head by two outlet
ports, which connect into the head. Remove the old
filter by simply pulling it straight off. Discard the old
filter and install a new MicroTech 400 or 600 filters.
Note: The faucet will function correctly in unfiltered
stream mode with or without a filter installed. The
faucet will not function correctly in filter mode without a filter. If a filter is not installed and the filter
button in depressed, unfiltered water will flow from both the filtered water outlet and the stream outlet
aerator, and the filter button will not automatically stay depressed.
Use only Microtech 400 or 600 filter cartridges with the PureTouch Classic Filtering Faucet system. The
Microtech filters are high performance carbon block filters developed specifically for the PureTouch
system.
G-14
AIRSTREAM 360 XC LAND YACHT OWNERS MANUAL
OPERATING INSTRUCTIONS
Controlling The Water
The PureTouch system has two options for water delivery, unfiltered stream and filtered water.
STREAM MODE: Unfiltered water in regular stream flow
When the water is turned on at the faucet, the spout will always begin operating in the regular stream mode.
FILTERED WATER MODE: Filtered water dispensed though the separate filtered water outlet.
Pressing the front filtered water button will divert water through the filter and dispense filtered water from
a separate outlet. To exit the filter mode, shut off the faucet.
CAUTION: Only filter cold water. Do not filter water above 100 degrees F.
Electronic Indicator
The flashing light on the electronic filter life indicator provides information regarding the performance of
the filter. The indicator provides you with information throughout the life of the filter to help communicate
the level at which it is performing.
Indicate Color
Performance
Amber & Green
A new filter must be flushed with cold water for 5 minutes after it is installed.
This procedure helps clean the filter of loose carbon particles.
Filter performing at optimum efficiency.
Green
Amber
Red
Warning: Filter is ready for replacement.
(Approximately 16 gallons left.)
Warning: Filter life is deleted, discard old filter and replace with a new Microtech
400 or 600 filter.
*If fast red doesn't change to slow amber/green after memory has been reset, reset was not complete and
needs to be redone. Follow step 3 on the previous page.
A standard replaceable 3V lithium watch battery (2032) designed to last several years powers the electronic
indicator.
Battery Replacement
Follow filter replacement instructions to remove
filter appliance. Locate battery compartment drawer,
pull out and replace battery, positive side up.
G-15
AIRSTREAM 360 XC LAND YACHT OWNERS MANUAL
TROUBLESHOOTING
PROBLEM: Water flows from both outlets, filter and unfiltered, when the filter button is pushed.
SOLUTION: No filter is installed. Install a filter.
PROBLEM: After installing a new filter, the filter life indicator still flashes red.
SOLUTION: Filter life indicator was not reset, or the attempt to reset the indicator did not work. Perform
reset sequence.
PROBLEM: Reversed Hot & Cold positions,
SOLUTION: HELPFUL HINTS: IT IS NOT NECESSARY TO SHUT OFF WATER SUPPLIES.
HANDLE SCREW REQUIRES A 7/64" HEX KEY WRENCH.
1. Remove plug button (3) from the handle by prying the button upwards from
the bottom center. If a tool is required, use something, which will not scratch
the handle. Remove setscrew (2), handle body (1), dome and pivot retainer
assembly (4), cartridge screw (5), handle adapter and handle connector
assembly (6).
2. Turn cartridge stem around so that the notch is turned one half turn or 180
degrees.
3. Reinstall as follows: Be sure retainer clip (11) is present on cartridge stem
and raised edge of pivot stop (7) faces front. Note orientation of handle
adapter & connector assembly (6) in the exploded view. Completely tighten
cartridge screw (5) to prevent unwanted closure of faucet. Thread on dome
clockwise until hand tight. Reinstall handle body (1), set screw (2), and plug
button (3).
PROBLEM: Faucet head is loose and water flows freely from between the head and spout.
SOLUTION: The head was not locked in place correctly. Reinstall the head and filter assembly.
PROBLEM: Slow or uneven water flow in filtered mode.
SOLUTION Filter outlet may be clogged.
1. Remove filter outlet nut, flush out carbon particles.
2.
Filter cartridge may be clogged with captured contaminants. Replace filter cartridge.
If problem persists call Moen Help line at:
1-877-DRINK-H20 (1-877-374-6542)
PROBLEM: Electronic display doesn't function
SOLUTION: Replace battery.
CARE AND MAINTENANCE
All that is needed to clean your faucet is a soft damp cloth. Moen does not recommend the use of scour
pads, cleansers or chemicals. The abrasive nature of these substances could damage the faucet's finish. A
non-abrasive car wax will help to protect the finish. DO NOT SUBMERGE OR PLACE FAUCET HEAD
IN DISHWASHER.
G-16
AIRSTREAM 360 XC LAND YACHT OWNERS MANUAL
MOEN LAVATORY FAUCET
1. Handle
2. Lever mechanism
3. Retainer clip
4. Transition collar
5. Cartridge
6. Flo-control aerator
MOEN SHOWER
MIXING VALVE ASSEMBLY
1. Handle Cover
2. Handle
3. Cartridge
4. Handle Screw
5. Valve Body
6. Stop Tube
7. Retainer Clip
NOTE: See end of faucet section for removal of
cartridge.
LAVATORY FAUCET AND SHOWER MIXING VALVE CARTRIDGE REMOVAL
Shut off water pressure for entire system.
Disassemble: Remove handle cover. Take out handle screw and remove handle and stop tube, Lift out
retaining clip and pull the cartridge out of the body by the stem.
CAUTION: Reinsert cartridge by pushing it all the way into the body and until the front of the ears
on the cartridge shell are flush and aligned with the body. Replace the retainer clip so that the legs
straddle the cartridge ears and slide down into the bottom slot in the body. This prevents the
cartridge from rotating and locks it in the body. Reinstall stop tube and handle. Tighten handle
screw securely, and replace the handle cover. The red flat on the stem must point UP when mounting
the knob handle (down for lever handle).
If cold water is on left side and hot water is on right side (red flat pointed down), remove cartridge and
reinstall 180 degrees.
G-17
AIRSTREAM 360 XC LAND YACHT OWNERS MANUAL
STORAGE
When storing your motorhome for a short or long period, use the same precautions as you would in your
own home in regard to perishables, ventilation and rain protection. In addition, for a prolonged storage
period, flush out all the drain lines and the holding tanks. Also, drain the entire water system, including the
water heater and the water storage tank. Instructions for draining the water system are explained in the
following paragraphs on winterizing.
Twice a year, or after a long storage period, we suggest you take your unit into your Airstream dealer for a
check-up and cleaning of the gas operated appliances
G-18
AIRSTREAM 360 XC LAND YACHT OWNERS MANUAL
WINTERIZING
1.
2.
3.
Turn the water pump switch to the OFF position.
Level the motorhome from side to side and front to rear. Open all faucets.
Open the two lines drain valves in your utility compartment as well as the exterior water service
faucet. Open either water tank drain valve also located in the utility compartment. Remove plug or
open petcock on exterior face of water heater.
4.
After water has stopped running from drain lines, close the valves.
5.
Turn by-pass valve on back of water heater to by-pass position. Access is inside, open door under
sink and through access hole. Swing the single lever valve from horizontal to vertical to by-pass
the water heater.
6. Connect rubber hose from dropout on tank drain "A" and place the other end of hose into a
container of non-toxic RV anti-freeze.
7. Turn on water pump and open each faucet, shower head, hand spray, toilet and drain valve until a
flow of anti-freeze is expelled than turn off that faucet or valve and proceed to the next.
8. Pour a cup of non-toxic antifreeze into the lavatory, sink, and tub drains to prevent freezing water
in traps.
9. Be sure to open the waste holding tank drain valves, and drain and flush the tanks thoroughly.
(This is very important, as the sewage in the tank, if frozen, could seriously damage the tank.)
10. Remove the batteries from your motorhome and store in a cool dry place where there is no danger
of freezing. It is very important for optimum life of your battery to check it periodically and to
keep it fully charged. This is especially true in winter months, when the temperature may drop
below freezing. Please refer to the battery section for more information on battery maintenance.
11. Remove any items (food, cosmetics, etc.) from the interior that might be damaged by freezing, or
might damage the motorhome if containers break.
WINTERIZING YOUR OPTIONAL SPLENDIDE WASHER/DRYER
1.
2.
3.
4.
5.
Turn off the hot and cold-water source to machine.
Set machine to fill with warm water in regular wash cycle, turn machine on for a few minutes so
machine can take on any water left in inlet hoses. Make sure no water is left in inlet hoses.
Turn unit off and advance the wash timer to spin cycle and turn on. This will activate the water
pump and will evacuate as much water as possible.
Turn unit off and remove wash filter. This will drain any water left in the bottom of unit. Make
sure you get the drain filter put back in correctly or it may allow water to leak.
Turn valves to washer off and proceed with winterizing instructions on previous page.
Winterize Your Optional Icemaker
1.
2.
Remove the Airstream installed supply hose and the small clear Dometic supply water line
from the solenoid located in the exterior refrigerated compartment. The solenoid is mounted
to back of the refrigerator.
Drain the small clear hose and blow out and drain the solenoid and large water supply line.
G-19
AIRSTREAM 360 XC LAND YACHT OWNERS MANUAL
G-20
AIRSTREAM 360 XC LAND YACHT OWNERS MANUAL
DRAIN AND WASTE SYSTEM
The drain and waste system of your motorhome includes waste holding tanks made from molded plastic.
The MAIN (BLACK) HOLDING TANK enables you to use the toilet for several days away from disposal
facilities. The wastewater from the sink, shower, and bath and lavatory drain into the AUXILIARY
(GRAY) HOLDING TANK. Each tank has its own dump valve LOCATED IN THE DRIVER SIDE
COMPARTMENT IN FRONT OF THE REAR WHEELS; however, both tanks drain through a common
outlet. Therefore, you need to make only one connection when hooking up in a trailer park with sewer
facilities. Remove the cover in the bottom of the compartment and run your sewer hose connector up
through the access hole and connect the hose to the drain connector.
Monitor Panel
Check your monitor panel frequently by pressing the labeled button on the panel. When the MAIN
(BLACK) HOLDING TANK is completely full, sewage cannot be emptied from the toilet bowl. If the
AUXILIARY (GRAY) HOLDING TANK is overfilled, drain water will "backup" into the tub and cause an
unpleasant cleaning job. Never drain the tanks at any place other than an approved dumping station.
To empty both tanks, attach the sewer hose by pressing the bayonet fitting onto the outlet adapter and rotate
clockwise until it feels solid and secure. Attach the outlet end of the hose to the sewage outlet; making sure
that the hose is placed so that it will drain completely. The dump valves are located in the utility
compartment on the roadside. Pull the dump valve handle out as far as it will go and wait until the tank is
drained. If the auxiliary tank is drained after the waste tank, the soapy water will help keep the sewer hose
and outlet clean.
The main holding tank must be flushed out until all paper and waste material is removed. Close the dump
valve and refill the tank with 5 to 10 gallons of clean water and repeat until clean. Always travel with
valves closed and the sewer cap firmly in place.
When Parked and Connected to Sewer Outlet
When you are in a park and connected to a sewer outlet, keep the main holding tank dump valve closed and
empty the tank every few days or whenever it becomes almost full. ONLY BY SENDING A LARGE
VOLUME OF LIQUID THROUGH THE MAIN HOLDING TANK AT A TIME WILL TOILET PAPER
AND OTHER SOLIDS COMPLETELY WASH AWAY.
This practice will avoid the accumulation of solids in the main holding tank, which could lead to an
unpleasant cleaning job. Should solids accumulate, close the dump valve, fill the tank about half full with
water, then drive the motorhome for a few miles. The turbulence and surging of the water will usually
dissolve the solids into suspension so the tank can be drained. Keep the auxiliary tank valve open when
connected to a sewer outlet.
The furnace in your motor home supplies heat to the tanks. In sub-freezing weather, we still recommend
using a winterizing solution designed for RVs in the tanks. Follow the directions on the container. During
storage draining the tanks as described above will protect them from freezing.
CAUTION: Never put wet strength paper towels or tissues in your holding tank, since they won't
dissolve and can "catch" in the mechanism of the dump valve. Colored toilet tissue is slower to
dissolve than white. Most RV accessory stores offer tissue, designed for RVs that will completely
dissolve.
G-21
AIRSTREAM 360 XC LAND YACHT OWNERS MANUAL
BLACK TANK FLUSH
The main holding tank must be flushed out until
all paper and waste material is removed. Close
the dump valve and refill the tank with 5 to 10
gallons of clean water and repeat until clean.
In the utility compartment on the left side is a
water hose connector marked "black tank flush."
To use, hook-up hose and turn on full force.
Within the tank a spray head with a multipleholed head will spray the interior surface of the
tank.
The gate valve should be closed for the first
couple of minutes, and then opened to let the
water out in a rush. Repeat as needed.
Drain Systems Cleaning
There are many deodorizers on the market in tablet, liquid, and powder form. These not only combat odor,
but also, stimulate the bacteria that works to dissolve the solids in your tank. Picking a deodorizer with
lubricating qualities will ease slide valve operation.
The only cleaning agents that can be used without causing harm to the system are household ammonia and
tri-sodium phosphate in small quantities. Do not use any product that contains any portion of petroleum
distillates. This attacks the rubber seals of your toilet and dump valve. Also, do not use any dish detergent
or abrasive cleaners. All products should be marked approved for ABS drainage systems.
When winterizing drains use only recreational vehicle plumbing type antifreeze. These are sold through
your dealer.
G-22
AIRSTREAM 360 XC LAND YACHT OWNERS MANUAL
TOILET
Manufacturer:
Thetford Corporation
7101 Jackson Road
Ann Arbor, MI 48103
313-769-6000
The RV toilet in your Airstream is a design that has been used for many years. There are two pedals. The
large pedal opens and closes the slide mechanism, and the smaller pedal opens and closes a water valve.
In normal use, when you are hooked up to city water, both pedals are depressed together. This dumps the
sewage and fresh water and flushes down the side of the bowl. Water will continue to run into the bowl for
a short time after the pedals are released.
When you wish to conserve water hold the hand-spray head over the bowl and hold down the thumboperated lever. Now when you depress the pedal all the water is routed through the hand-spray.
CAUTION: When you dump the bowl of the toilet make sure all paper and solids have cleared the
slide mechanism before you allow it to close. Failure to do so can cause the groove for the slide to
become jammed and the slide will no longer close completely.
If the problem should occur a small nail or bent clothes hanger can be used to "pick" the material out of the
groove.
G-23
AIRSTREAM 360 XC LAND YACHT OWNERS MANUAL
G-24
AIRSTREAM 360 XC LAND YACHT OWNERS MANUAL
G-25
AIRSTREAM 360 XC LAND YACHT OWNERS MANUAL
NOTES
G-26
AIRSTREAM 360 XC LAND YACHT OWNERS MANUAL
ELECTRICAL SYSTEM
BATTERY CONTROL CENTER
The Intellitec Battery Control Center is a centralized power switching, fusing, and distribution center.
Power from both the chassis and the coach batteries are feed into the control center box. All servicing
with-in this box should be done only by a qualified Service Technician.
Your motorhome is equipped with six batteries. Two batteries will be for the engine and the other four
batteries (coach) for the interior 12-volt circuits. All batteries are located in lower compartments.
The engine batteries are used for starting the engine and operating the headlights, taillights, running lights,
instrument panel lighting, automotive air conditioning and other accessories. The alternator charges all the
batteries while the engine is running. The inverter/converter charges all the batteries when the unit is
plugged into shoreline.
The coach batteries are used for interior lighting; exhaust fans, generator, water pump, central control
panel, entertainment center, optional 12-volt convenience outlets, and the refrigerator when it is switched to
12-volt power. The generator also charges all batteries when it is running, through the 120-volt city power
system that powers the inverter/converter. The Intellitec Battery Control Center manual is also in your
packet. It has trouble-shooting and wiring information.
BATTERY DISCONNECT SWITCH (CHASSIS –COACH)
The BATTERY DISCONNECT switch on the panel just inside the main door acts as a master switch.
When the coach switch is turned to use it opens the circuit between the coach batteries and the twelve-volt
distribution panel. The chassis disconnect switch does not disconnect the chassis battery from the chassis
systems. It only cuts off power from the inverter/charger charging system to the chassis battery. You must
have the chassis battery disconnect switch on (use) for the inverter/converter to charge the engine batteries.
The coach batteries are charged by the inverter/converter whether the coach battery disconnect switch is in
the use or store position.
The coach switch is not intended for everyday use. But if you're going to be away from your coach for
more than 3 or 4 days and it's not plugged into 110-volt current just flip the switch off on the way out and
you’re assured of fresh batteries when you return.
Inverter/Charger
With the inverter is the standard package of four batteries for the interior coach circuits. The inverter is
located in the second lower compartment back of the main door. An inverter uses 12-volt battery power
and changes it to 120 volt AC current. More information on the 120-volt operation is in the 110-volt
section of this manual.
What is important on the 12-volt side is the amount of power required from the batteries for the inverter.
This is probably best shown by a little ninth grade science.
120 Volt (Plugged in)
1500 Watt = 12.5 amp
120 Volt
12 Volt (Battery power)
1500 Watt = 125 amp
12 Volt
Pulling 125 amps from your batteries is a tremendous load. Luckily there would probably be few times
where you need this kind of power. If you do need 1500 watts for an extended period of time start your
Generator --- 1500 watts would be a light load for it. A little common sense will make the inverter system
useful. But, if you try to overdo it you'll have dead batteries. Each inverter comes with its' own operator's
manual and is contained in the notebook with this owners manual. Look for the section titled "operating the
Inverter" to acquaint yourself with the many features of this appliance.
H-1
AIRSTREAM 360 XC LAND YACHT OWNERS MANUAL
12-Volt Operation
Many interior lights and 12-volt features have been included in your motorhome to give you almost infinite
variable light intensity and convenience.
The lounge and galley area has several features. Just inside the main door are switches for the step, patio
light, battery disconnect, and ceiling lights. The ceiling lights must have their individual switches on before
the remote switches, one on the panel by the door and one above the galley, will control them. The dimmer
switch on roof locker end panel operates the dinette light.
NOTE: When you use the keypad to turn the patio lights ON you must also use the keypad to turn them
OFF. The same goes for the switch inside the door ... if you turn the lights on with this switch, you must
use the same switch to turn them off. You cannot turn the lights on with the keypad and off with the switch.
In the bathroom, the water heater switch supplies power to the igniter and gas valve. When turned on, it
will flash red until flame is sensed, then the red light will be extinguished. The ceiling light operates the
two center roof lights. The light switch by the water pump switch operates the bathroom light. The Power
Dome switch activates the bath fan with its power lift cover.
The bedroom has a ceiling switch below the TV for the light above the bed. The wall lights are operated by
their own switches. Don’t forget the telephone hook-up under the roadside-hanging wardrobe.
Exterior compartments and interior wardrobes have lights for your convenience.
The bulbs in the light fixtures are all easily replaced if they burn out. Round, exposed bulbs, such as those
around the bathroom mirror and reading lights, are replaced by depressing them into their base, then
turning to the left about 1/4 turn. This will allow them to "POP” out part way, so they can be removed.
WARNING: If they are difficult to turn, use a folded rag to protect your hand when grasping the
bulb in case it should unexpectedly shatter.
The only thing you have to do is make sure the coach batteries don't run down. In normal usage there isn’t
any problem, since you would normally drive part of the day and be plugged into a campground at night.
The alternator charges the all batteries when you drive. When you're plugged into city power or run the
generator, the inverter/converter charges the batteries and carries much of the load.
Some nights you may not find a place to plug into city power. No problem; the standard four battery system
gives you about 400 amp-hours so you can comfortably run your lights and vents in a normal fashion
without depleting the batteries.
If you are not plugged into city power and you're not driving, you'll want to conserve your batteries by
using as few lights and appliances as possible. If you notice the lights becoming dim, its much easier on the
batteries if you go ahead and start the engine or generator before the batteries run down.
Your motorhome is equipped with a 10-watt solar panel. There is an indicator light to the left of the
microwave oven that is on when there is enough sunlight to charge batteries. It will go dim and then off as
the batteries reach a full charge.
There are two sets of 12-volt fuses and breakers in your motorhome. The main interior circuit fuses are in
the black box in the curbside rear compartment. The chassis fuses are located in the black box in the
roadside front compartment. The brightly colored fuses pull straight out from the face of the panel. On the
panel covering the fuses is a diagram showing the function of each fuse or circuit breaker. See the primary
and secondary battery control centers on the drawing on page H-2 and circuit identification drawings in
section H.
Three in-line fuses are also used.
H-2
AIRSTREAM 360 XC LAND YACHT OWNERS MANUAL
•
•
One is by the battery disconnect solenoid.
The other two are close to the engine battery - one providing power to the taillights and the other
powers the trailer plug.
Basic 12V Wiring
On the following pages are 12-volt wiring diagrams. The first drawing simply labeled "12V Wiring" will
probably be the most useful. It shows how the power from the batteries reaches the main components.
12V WIRING DIAGRAMS
•
•
•
•
•
•
•
•
•
•
•
•
•
•
•
•
•
•
12-volt wiring main chassis
12-volt fuse panel, primary, Airstream
12-volt fuse panel, Secondary
Harness, headlight
Harness, firewall
Harness, switch, arm rest, part A
Harness, switch, arm rest, part B
Harness, body, chassis
Harness, body, chassis, part A
H-3
Harness, body, chassis, part B
Harness, body, ceiling
Harness, body, interior
Harness, body, interior
Harness, extension, taillight
Harness, taillights
Harness, mirrors
Leveling Jack Sensor Reset
Layout, keyless entry
AIRSTREAM 360 XC LAND YACHT OWNERS MANUAL
H-4
AIRSTREAM 360 XC LAND YACHT OWNERS MANUAL
LOCATED IN THE CURBSIDE INVERTER COMPARTMENT
H-5
AIRSTREAM 360 XC LAND YACHT OWNERS MANUAL
LOCATED IN THE ROADSIDE FRONT COMPARTMENT
H-6
AIRSTREAM 360 XC LAND YACHT OWNERS MANUAL
H-7
AIRSTREAM 360 XC LAND YACHT OWNERS MANUAL
H-8
AIRSTREAM 360 XC LAND YACHT OWNERS MANUAL
H-9
AIRSTREAM 360 XC LAND YACHT OWNERS MANUAL
H-10
AIRSTREAM 360 XC LAND YACHT OWNERS MANUAL
H-11
AIRSTREAM 360 XC LAND YACHT OWNERS MANUAL
H-12
AIRSTREAM 360 XC LAND YACHT OWNERS MANUAL
H-13
AIRSTREAM 360 XC LAND YACHT OWNERS MANUAL
H-14
AIRSTREAM 360 XC LAND YACHT OWNERS MANUAL
H-15
AIRSTREAM 360 XC LAND YACHT OWNERS MANUAL
H-16
AIRSTREAM 360 XC LAND YACHT OWNERS MANUAL
H-17
AIRSTREAM 360 XC LAND YACHT OWNERS MANUAL
H-18
AIRSTREAM 360 XC LAND YACHT OWNERS MANUAL
H-19
AIRSTREAM 360 XC LAND YACHT OWNERS MANUAL
TO RESET START WITH THE THIRD BOX
H-20
AIRSTREAM 360 XC LAND YACHT OWNERS MANUAL
H-21
AIRSTREAM 360 XC LAND YACHT OWNERS MANUAL
MONITOR PANEL
Ventline
P.O. Box 629
Bristol, Indiana 46507
Phone: 219-848-4491
Operation
To check tank capacities or battery condition, depress the corresponding button on the panel. In order to
obtain a true reading on the batteries, you must be unplugged from city power and disconnected from your
tow vehicle. Black is sewer and Gray is lavatory sink and kitchen water.
The range exhaust fan has an exterior door that must be unlatched to be effective. You'll see the two small
twist latches if you look at the fan from outside the motorhome. In most circumstances you can leave the
door unlatched. During storage or adverse weather conditions, latching the door is recommended.
Trouble Shooting Guide
Be sure the wiring to the panel is correct and that the house battery is well charged. All electrical
connections must be correct.
NOTE: RV's are subjected to a lot of vibration from traveling on the highways, so always look for broken
wires and loose or broken connections.
NOTE: If a RV has exposed holding tanks under the vehicle and the vehicle is operated in the rain, sleet or
snow, the panel may show incorrect tank levels due to electrical conductivity on the outside of the tanks.
Washing the tanks and sealing the connections on the outside of the well nuts with silicon sealer should
correct this condition.
When troubleshooting a problem with a Ventline monitor system, always remember that there are four
basic system components to consider.
1) The monitor panel assembly, which includes the circuit board, lights, and switching.
2) The wiring harness, which includes the wires and connectors that connect the monitor panel to 12-volt
DC power, ground, tank resistor harnesses, LP sensors and switching.
3) The tank resistor harness, which includes the wires, connectors, and encapsulated electronic components.
4) The holding tank sensors and fresh water probes.
In many cases a malfunction of one of the above components will be reflected in another, which can result
in misdiagnosis of the actual problem. Ventline recommends a consistent, methodical approach to
troubleshooting in order to diagnose and correct the problem with the minimum investment in time and
resources.
COMMON FIELD PROBLEMS
- Inaccurate Holding Tank Level Readings
- Some Or All Holding Tank Level Lights Not Coming On
- Some Or All Holding Tank Level Lights Continuously On - LP Gas Levels Not Reading Properly
INACCURATE HOLDING TANK LEVEL READINGS
The accuracy of two wire holding tank monitoring systems can be adversely affected by dirty tanks,
unusual mineral content in the water, or improper holding tank probe location. These conditions can cause
the monitoring system to have oversensitive (reads higher than actual level) or under sensitive (reads lower
than actual level) readings.
H-22
AIRSTREAM 360 XC LAND YACHT OWNERS MANUAL
Oversensitive readings: Oversensitive readings can occur as a result of scum buildup on the tank walls,
abnormally high mineral content in the water, or incorrectly located holding tank probes. In these
situations, the monitoring system indicates higher levels than are actually present in the holding tank.
Certain cleaning products and food by-products can build up on the inside walls of the holding tanks
producing a layer of scum that can cause the monitoring system to read higher than the actual level. To
correct this problem, the holding tanks should be cleaned periodically (consult dealer or tank manufacturer
for cleaning instructions). If the problem persists after cleaning the holding tank, the ground probe can be
moved farther away from the other tank probes. The increased distance between the ground probe and the
other probes will decrease the sensitivity of the monitoring system.
Under sensitive readings: Under sensitive readings can occur if the mineral content of the water is
abnormally low or if the holding tank probes are located incorrectly. In this case, the monitoring system
indicates lower levels than are actually present in the holding tank. This problem can be corrected by
moving the ground probe closer to the other probes. Moving the ground probe closer increases the
sensitivity of the monitoring system.
The Ventline Adjustaboard™: In response to requests from the field for a means to adjust monitor
sensitivity without relocating holding tank probes, Ventline has developed the Ventline Adjustaboard™
(patent pending). This adjustable circuit board allows for field adjustments to monitor sensitivity. As tank
conditions or water mineral content changes, the monitor circuitry may be made more or less sensitive as
required. Pleas see Appendix A for adjustment instructions.
SOME OR ALL HOLDING TANK LEVEL LIGHTS NOT COMING ON
Possible Cause
Corrective Action
No power
Verify 12 volt DC power is available from the
battery or from the filtered side of the power
converter. Verify 12 volt DC power is present at
the circuit board.
Verify ground at panel and ground probe with a
continuity tester.
Poor ground at monitor panel or at holding tank
ground probe.
Wire to tank resistor harness disconnected or
damaged.
Verify wire is connected and free of damage.
Replace if necessary. With the tank resistor
harness correctly installed and free from damage,
a jumper wire containing a 47Kohm resistor
placed between the holding tank ground probe
and any tank level probe should cause the
respective tank level lights to illuminate,
Short circuit on circuit board
If the above test fails to illuminate the level
lights, repeat the test at the monitor panel. Refer
to the wiring diagram for the correct wires to
jump together. If lights illuminate, replace the
wiring between the panel and the tank resistor
harness. If lights do not illuminate, replace the
circuit board.
H-23
AIRSTREAM 360 XC LAND YACHT OWNERS MANUAL
SOME OR ALL HOLDING TANK LEVEL LIGHTS ON CONTINUOUSLY
Possible Cause
Corrective Action
Foreign substances on interior of holding tank
causing false readings
See inaccurate holding tank readings above.
Clean holding tanks per manufacturers
recommendations.
Tank sensor wire from panel to tank resistor
harness shorted to ground.
Disconnect wire from panel and tank resistor
harness. Verify wire is not shorted to ground
with a continuity tester. Replace wire if shorted.
Tank resistor harness shorted internally
Disconnect the tank resistor harness from the
tank sensors and from the wire connected to the
monitor panel. Check resistance between tank
sensor wires with an OHMmeter. Typical
resistance will be 68k ohm between Full and 2/3
levels, 68k ohm between 2/3 and 1/3 levels, and
136 k ohm between Full and 1/3 levels. Specific
resistance will vary based on resistor harness
model, but at no time should you detect a dead
short or an open circuit. For resistor values
specific to your application, please determine the
model number of the resistor harness in question
and contact Ventline for assistance. If a short or
an open is detected, replace the tank resistor
harness.
Short circuit on circuit board
If the above steps fail to pinpoint the specific
problem, replace circuit board and re-test.
Possible Cause
LP GAS LEVELS NOT READING ACCURATELY
Corrective Action
Open circuit between panel and LP sensor causes
tank to incorrectly read full. Short circuit
between panel and LP sensor causes tank to
incorrectly read empty.
Consult the RV manufacturer for information on
troubleshooting the LP sensor. Replace the LP
sensor and re-test.
If the above steps fail to pinpoint the specific
problem, replace circuit board and re-test.
Defective LP sensor provides incorrect signal to
monitor panel causing incorrect readings.
Short circuit in circuit board.
Disconnect the wire running from the monitor
panel to the LP sensor. Check the wire for
damage and with continuity tester to verify the
wire is OK. If OK, reconnect and check
operation, if circuit is open or shorted replace the
wire and re-test.
H-24
AIRSTREAM 360 XC LAND YACHT OWNERS MANUAL
H-25
AIRSTREAM 360 XC LAND YACHT OWNERS MANUAL
TV ANTENNA
Manufacturer:
Winegard Company
3000 Kirkwood Street
Burlington, Iowa 52601
Phone: 800-843-4741
Raising Antenna to Operating Position
Turn elevating crank in "UP" direction until some resistance to
turning is noted. Antenna is now in operating position. Check to
make sure switch on front TV jack is on.
Rotating Antenna
Make sure antenna is in "UP" position. Pull down on directional
handle with both hands until it disengages ceiling plate and rotate
for best picture and sound on television set.
Lowering Antenna to Travel Position
Rotate antenna until pointer on directional handle aligns with
pointer on ceiling plate.
WARNING: Antenna must be in "down" position while
traveling to prevent damage.
Turn elevating crank in the "Down" direction until resistance is
noted. Antenna is now locked in travel position.
Checking Operation
1. Tune TV receiver to nearest station and rotate antenna for best
picture and sound.
2. Turn off switch on power supply. Picture on TV receiver should
be considerably degraded with the power off.
DO'S
1. Do check parking location for obstructions before raising
antenna.
2. Do carefully raise, lower and rotate - if difficult, check for cause.
3. Do rotate slowly when selecting station and check fine-tuning on
TV set to make sure it is properly adjusted.
4. Do lower antenna before moving vehicle.
DON'TS
1. Don't force elevating crank up or down. Check for cause of trouble.
2. Don't rotate directional handle hard against stops.
3. Don't travel with lift in up position.
4. Don't leave lift part way up or down.
5. Don't apply sealing compound or paint over top of base plate or anywhere on lift.
H-26
AIRSTREAM 360 XC LAND YACHT OWNERS MANUAL
Maintenance
Lubrication
To lubricate the elevating gear apply a
liberal amount of silicone spray
lubricant to the elevating gear with the
lift in the down position, then run the
lift up and down a few times to
distribute lubricant over gears.
Lubricating Rotating Gear Housing
In the event that rotating the antenna becomes difficult, lubricating
the bearing surface between the rotating gear housing and the base
plate can restore normal operation. Any spray type silicone lubricant
may be used.
Elevate antenna and remove setscrew from rotating gear housing as
shown. Spray lubricant into hole and around edges of gear housing.
Rotate gear housing until lubricant coats bearing surfaces and
antenna rotates freely.
Elevating Shaft Worm Gear Assembly Replacement Procedure
NOTE: It is not necessary to remove the rotating gear housing (11)
from the base plate (14) or remove the antenna from the roof to
replace the shaft and gear assembly.
STEP 1: Lower antenna to travel position. Loosen set -screw on
elevating crank (23); remove crank, spring (20), and directional
handle (19).
STEP 2: Remove top retaining ring (5) from top pin (4) holding top
elevating tube in rotating gear housing and remove pin.
STEP 3: Remove plug from top of rotating gear housing elevating
gear (8) and remove elevating shaft assembly (10).
STEP 4: Cut new shaft to same length as one removed.
STEP 5: Lubricate worm gear on new elevating shaft assembly with
spray silicone lubricant, make sure wave washer, flat washer and
quad ring are on lower bearing and insert assembly in housing.
STEP 6: Install plastic plug in top of housing, re-engage elevating
gear in worm gear, replace pin and retaining ring.
STEP 7: Replace directional handle, spring and elevating crank. Make sure setscrew contacts flat on shaft
before tightening.
H-27
AIRSTREAM 360 XC LAND YACHT OWNERS MANUAL
PARTS DESCRIPTION
1. Antenna Head
2. LM-300 Leveling Mount
3. Boot, Coax Cable
4. Pin, Headed/Grooved
5. Ring, Retaining Snap
6. Spacer, Plastic
7. Grommet, Plastic
8. EG-87 Elevating Gear
9. Tube, Square Elevator
10. Elevating Shaft Assy
11. Housing, Rotating Gear
12. Ring Quad Seal
13. Bearing, Nylon
14. Housing, Base Plate
15. Bearing, Nylon
17. Plate, Ceiling
18. Screw
19. Handle, Directional
20. Spring, Handle
21. Decal, Crank Cover
22. Bearing, Nylon
23. Elevating Crank/Set Screw
27. Boot, Gear Housing
30. Bumper, Rubber
31. Screw
H-28
AIRSTREAM 360 XC LAND YACHT OWNERS MANUAL
TV, RADIO, AND CB ANTENNA
Not including the TV antenna, your motorhome may have as many as two other antennas.
The AM/FM radio antenna is a solid whip type with a flexible coil base. The coil base certainly helps extend
the life of the antenna but hitting low branches and other objects at high speed can lead to severe damage.
The CB antenna lead-in wire is located up under the dash left of the steering column. It will be coiled along
with ground and 12-volt positive wires for CB radio hook-up.
SATELLITE ANTENNA PREP
In order to facilitate the installation of either roof mount or portable satellite dish antennas Airstream has prewired your motorhome. On the drawing on the following page please note the two coaxial cables drawn with
heavy double lines. One is labeled PREP WIRE, CEILING and the other is PREP WIRE, PORTABLE.
PREP WIRE, CEILING is used for roof mounted antenna. The end of the cable for the antenna is located in the
roof, centered side to side and about four inches behind the front roof cross member. Under the outer roof sheet,
in this same area, is a stiffener plate about a foot square to help support the antenna and it's attachments.
The other end of the cable is located in the roof locker next to the television and is labeled.
PREP WIRE, PORTABLE is used for the satellite dish antenna that is portable and set next to your vehicle
when you pack. The end of the cable for the antenna connection is under the front hood on the curbside. You'll
need to bend down and look up to see the coiled coax cable.
The other end of the cable is located in the roof locker next to the television and is labeled.
H-29
AIRSTREAM 360 XC LAND YACHT OWNERS MANUAL
H-30
AIRSTREAM 360 XC LAND YACHT OWNERS MANUAL
SOLAR POWER
The 10-watt solar power system primarily functions as a battery maintainer. Memory functions in radios, locks
and many circuit boards each draw power in the milliamp range. If a charge source is not available, even these
miniscule power drains will run batteries down in seven to twelve days unless the "kill" switch is turned off.
Barring an unusual number of cloudy days the 10-watt system will prevent battery discharge even with the kill
switch on. A small red light below the monitor panel shows the solar panel is charging when lit. It goes dim and
eventually completely dark as the batteries reach full charge capacity.
Detailed information provided by the solar panel manufacturer can be found in this notebook.
110-VOLT POWER
The 110-volt system works very much like your home. The circuit breakers, located behind access door in the
foot of the rear bed, supply the power to the receptacles and appliances.
If a circuit is over loaded or a short circuit occurs, the breakers will "kick" out. To reactivate the circuits, turn
the breaker to off, reduce the load or correct the short, and tam the breaker back to on.
One of the breakers is a GFI (Ground Fault Interrupter) breaker. The intent of this breaker is to sense any loss of
ground before a harmful shock could occur, and kick the breaker out. These sensitive breakers are installed in
the circuit feeding the bathroom, outside receptacle, and galley area. These are the areas where the use of water
or the wet ground could put a person in danger of shock. Since the GFI breaker is so sensitive, it is not unusual
to have it kick out for no apparent reason.
GENERATOR
Using the generator is very much like plugging into an external power source. The generator has start switches
located on the driver side armrest, monitor control panel, under the roadside bed wardrobe, and on the generator
located in the front nose slide-out compartment. When you start the generator there is a built in delay of about
20-30 seconds before the circuits are switched and the generator is providing all the 110-volt power to your
coach.
The electrical device that has the delay and switching feature is called the generator switch over relay. The time
delay feature allows the generator to reach full operating speed before it takes the "load". The switching device
has two sets of points. It is normally closed so city power coming in goes through the switch and on to the main
circuit breakers. When the generator is started and the delay feature is satisfied the switching device goes to the
second set of points. This cuts the contact between the city power and the breaker box and makes the contact
between the generator and the breaker box.
NOTE: The generator manufacturer provides an operators manual that should be reviewed prior to use.
H-31
AIRSTREAM 360 XC LAND YACHT OWNERS MANUAL
H-32
AIRSTREAM 360 XC LAND YACHT OWNERS MANUAL
Locating Shorts and Opens
The key in locating shorts and opens is isolation. The first step is to isolate the circuit with the short or open.
The second step is to then isolate the section of the circuit with the fault. Once the section is identified, the
specific problem can be located. The cause may be a loose or corroded connection, cut wire, worn insulation, or
defective component. The following procedure is one method for isolating shorts and opens.
SHORTS
1. Isolate the circuit that has the short by noting which circuit has tripped.
2 Disconnect the power inlet cord from the power source.
3. Using the 120V schematic as a reference, disconnect outlet boxes one it a time starting at the box furthest
from the distribution panel. After disconnecting each box, check for continuity between the black wire and
ground or common (white) wire on the distribution panel side of the circuit. When a continuity light or
ohmmeter indicates no continuity, the short is either in the receptacle just removed or the section of Romex wire
between this receptacle and the previous receptacle removed.
4. Examples of a short are:
A) The black wire of the 120V system contacting the white wire, bare wire, or grounded surface.
B) B) An internal short in a 120V appliance.
Any damaged wire must be replaced. The National Electric Code does not permit splicing 120V wiring outside
an outlet box or junction box. Also, the wire must not be exposed to an area such as a sharp metal edge that may
damage the wire.
OPENS
1. Check all receptacles and components for voltage on the circuit that has the open.
2. If all receptacles and components of the circuit are without power, begin to look for the open in the
distribution panel.
3. Inspect for loose or corroded connections and a faulty circuit breaker,
4. Check for power on both ends of circuit breaker. If there is no power on the inlet side of the circuit breaker,
the open is between the power cord's male connector and the distribution panel.
5. Isolate the open by noting the outlets that do not have power. Example: If the bath outlet in the rear bath
model has power and the converter has no power, the open is between the bath outlet and converter outlet.
6. Examples of an open are:
A)
B)
C)
D)
Loose or corroded connections.
A wire disconnected from a terminal.
Contacts in the circuit breaker that do not like contact.
A broken wire.
H-33
AIRSTREAM 360 XC LAND YACHT OWNERS MANUAL
H-34
AIRSTREAM 360 XC LAND YACHT OWNERS MANUAL
APPLIANCES
AIR CONDITIONER
Manufacturer:
Dometic Sales Corporation
2320 Industrial Parkway
P.O. Box 490
Elkhart, IN 46515
Phone: 219-295-5228
Note: Review the air conditioning literature supplied in your Owner's Packet before proceeding.
The roof air conditioner used on Airstream motorhomes is one of the most popular on the market today. In
your Owner's Packet is a set of literature covering all operating and maintenance instructions. If the
literature is misplaced, please contact the air conditioner manufacturer or your Airstream dealer for
replacement. A detailed service guide may be ordered from the manufacturer.
The voltage to the air conditioner is critical. We commonly refer to 110 or 120 volts, but a check with a
voltmeter may find voltage much lower. Your air conditioner will probably not function if the current drops
below 105 volts. Low voltage is usually associated with older or poorly maintained trailer parks, but many
people have found their homes, built only twenty or thirty years ago, may not be capable of operating the
air conditioner on some receptacles. Parking your motorhome so the power cord can be plunged into a
receptacle close to the fuse or circuit breaker box can alleviate the problem. Avoid extension cords and
adapters whenever possible. If an extension cord must be used, it should be as short and heavy as possible
to provide the most current to the air conditioner.
If high temperatures are expected, you should make an effort to park in a shaded area. Starting the air
conditioner early in the morning also helps. It is much easier to hold a comfortable temperature than it is to
lower the temperature after the interior of the motorhome is already hot.
I-1
AIRSTREAM 360 XC LAND YACHT OWNERS MANUAL
FURNACE
Manufacturer:
Hydro Flame Corporation
1874 South Pioneer Road
Salt Lake City, UT 84104
Phone: 801-972-4621
The manufacturer of the furnace in your motorhome has been well known in the RV industry for many
years. The furnace burns LP gas, and is powered by 12-volt current from the battery or power converter
when plugged into city power. Operating instructions are located in your Owners Packet. If they should
become misplaced new literature can be ordered direct from the manufacturer or your Airstream dealer.
The manufacturer also offers a detailed service guide for your furnace.
WARNING:
Carefully read all the manufacturer's instructions prior to operating. NEVER store
flammable material next to the furnace.
If warranty service is required use only a service location recommended by the furnace
manufacturer or your Airstream dealer.
The furnace is located under the refrigerator. Remove the louvered panel by pulling it off the cabinet to
access it and the furnace ducts. It held on by four pressure catches. The furnace is removed from the
exterior, but you must remove all heat ducts and wiring from the inside before pulling the furnace.
I-2
AIRSTREAM 360 XC LAND YACHT OWNERS MANUAL
REFRIGERATOR
Manufacturer:
Dometic Sales Corporation 2320
Industrial Parkway P.O. Box 490
Elkhart, Indiana 46514
Phone: 219-295-5228
Review all Dometic Literature supplied in your Owner's Packet or stored in the refrigerator prior to
operating.
In the absorption refrigerant system, ammonia is liquefied in the finned condenser coil at the top rear of the
refrigerator. The liquid ammonia then flows into the evaporator (inside the freezer section) and is exposed
to a circulating flow of hydrogen gas, which causes the ammonia to evaporate, creating a cold condition in
the freezer.
The tubing in the evaporator section is specifically sloped to provide a continuous movement of liquid
ammonia, flowing downward by gravity, through this section. If the refrigerator is operated out-of-level
when the vehicle is not moving, liquid ammonia will accumulate in portions of the evaporator tubing. This
will slow the circulation of hydrogen and ammonia gas, or in severe cases, completely block it, resulting in
a loss of cooling.
Any time the vehicle is parked for several hours with the refrigerator operating the vehicle should be
leveled to prevent this loss of cooling. The vehicle needs to be leveled only so it is comfortable to live in
(no noticeable sloping of floor or walls).
When the vehicle is moving the leveling is not critical, as the rolling and pitching movement of the vehicle
will pass to either side of level, keeping the liquid ammonia from accumulating in the evaporator tubing.
OPERATION
The refrigerator requires 12-volt current to operate even if running on LP or 110 volt modes. The 12-volt is
used to power the circuit board that directs the refrigerator functions. When running in a mode such as LP,
it means the heat source, by far the largest power requirement; to evaporate the ammonia is being provided
by an LP Gas burner.
WARNING: Most LP gas appliances used in recreational vehicles are vented to the outside of the
vehicle. When parked close to a gasoline pump, it is possible that gasoline fumes could enter this type
of appliance and ignite the burner flame, CAUSING A FIRE OR AN EXPLOSION.
I-3
AIRSTREAM 360 XC LAND YACHT OWNERS MANUAL
RANGE
Manufacturer:
Magic Chef
28812 Phillips Street
Elkhart, Indiana 46514
219-264-9578
People using gas ranges in their home will find little difference in the operation of the range in the
motorhome. Other customers, used to electric ranges may be a little apprehensive at first; but will quickly
gain confidence. The basic operation of the gas ranges have been the same for many years, but please be
sure to read all the directions furnished by the manufacturer and located in the Owner' s Packet. Excellent
service and parts manuals are available from the manufacturer.
WARNING: The operation manual for the range is titled "Maytag RV Cooking Appliances". If this
has not been provided with your trailer, contact the manufacturer listed at the top of the page to
obtain. Their manual contains specialized warnings and cautions that should be reviewed prior to
operating the appliance.
MICROWAVE OVENS
Only federally certified technicians are permitted to service microwave ovens. For this reason the only
service instructions contained in this manual are for removal of the complete oven. If you have a
microwave problem please contact the appropriate manufacturer.
Dometic Sales Corporation
2320 Industrial Parkway
P.O. Box 490
Elkhart, IN 46515
219-295-5228
Sharp Electronics Corporation
10 Sharp Plaza
Paramus, New Jersey 07652
201-5112-0055
The following steps will remove the microwave:
1.
Remove the long crown-molding running along the top of the rooflocker assembly. This will
expose the screws holding the panel above the microwave.
2.
Remove the panel above the microwave by taking out these screws plus one on each side that
are accessible by opening the cabinet doors on each side of the microwave.
3.
Removing the wood panel exposes two screws holding the top of the microwave. There are
also two brackets on the bottom of the microwave that are accessible by removing the two
lower panels. Removing the screws and loosening the brackets will allow the microwave to be
removed.
Range Exhaust
The range exhaust is incorporated into the microwave oven and the switch is located on the front. The
exhaust fan has an exterior door that must be unlatched for the fan to be effective. You will see two small
twist latches on the vent door on the outside of the motorhome. In most circumstance you can leave the
door unlatched. During storage or adverse weather conditions, latching the door is recommended.
I-4
AIRSTREAM 360 XC LAND YACHT OWNERS MANUAL
WATER HEATER
Manufacturer:
Atwood Mobile Products 4750
Hiawatha Drive P.O. Box 1205
Rockford, Illinois 61105
Phone: 815-877-7461
Note: Review the water heater literature supplied in your Owner's Packet before proceeding,
CAUTION: Hydrogen gas can be produced in a hot water system served by this heater that has not
been used for a long period of time (generally two weeks or more). Hydrogen gas is extremely
flammable. To reduce the risk of injury under these conditions, it is recommended that the hot water
faucet he opened for several minutes at the kitchen sink before using any electrical appliance
connected to the hot water system. If hydrogen is present there will probably be an unusual sound
such as air escaping through the pipe as the water begins to flow. There should be no smoking or
open flame near the faucet at the time it is open.
Electronic Ignition
The switch used to light your electronic ignition water heater is located in the bathroom above the lavatory
top. When the switch is turned on, the red light will come on indicating the "try" mode is in effect.
Normally the burner will ignite in just a few seconds, and the light will go out. If your LP system hasn't
been used for some time, the system may go into safety lockout (about 20 seconds) before the air is all
expelled from the lines. Turning the switch off for 30 seconds, then back on, reinstates the "try" mode.
110-Volt Operation
In the bathroom you'll see a 110-volt switch for the water heater. This provides power to the heating
element. DO NOT use unless you are sure the water heater is full. (Open a faucet and see if there is a full
stream of water on the hot side)
The 110-volt element may be operated at the same time as the gas burner. To operate the 110-volt by itself
simply turn the electronic gas igniter switch off.
The heating element is 1500 watts so if breakers start to kick out when the air conditioner cycles you may
want to turn the switch off to the heating element.
SAFETY
If your water system is full and cold and the water heater is ignited the system can see pressures as high as
120 psi before the relief valve starts to open. Since the water system normally operates in the 40-psi range
the water expanding does put unusual stress on the system. This normally does not cause any problems, but
the stress is easily alleviated. As the water is heating just open any faucet and run as little as a cup of water.
Just removing this small amount of water reduces the pressure build up significantly.
For fun, watch the sequence of events your family goes through when you park the trailer and ignite the
water heater. More than likely someone will run water and relieve the pressure without even
realizing it.
I-5
AIRSTREAM 360 XC LAND YACHT OWNERS MANUAL
HIGH VOLUME ROOF VENT (OPTIONAL)
Manufacturer:
FAN-TASTIC VENT CORP.
4349 S. Dort Hwy.
Burton, MI 48529
1-313-742-0330
1-800-521-0298
The optional high-volume roof vent system is designed to quickly exhaust stale, hot air and draw in fresh
air. It's great to use when the outside temperature really doesn't call for air conditioning, but heat has built
up in your coach.
OPERATING INSTRUCTIONS:
1. Rotate 3-speed switch to desired position, 0-off, 1, 2, and 3. The 3-speed switch must be set at 1, 2 or 3
to activate appliance.
2. Rotate thermostat knob toward 40° (cooler) until dome begins operating.
3. When equipped with reverse switch, there is a neutral (off) position. Fan motor will not operate when
in/out switch is in its center "off' position. The dome will, however, operate up and down automatically as
long as the 3-speed switch remains on.
4. To determine desired temperature setting:
a. Use the wall thermometer on furnace thermostat, or any interior temperature indicator.
b. Operate fan until interior comfort level is achieved. Rotate thermostat knob toward 110' symbol
on label until dome begins closing. You now have the location for normal setting.
The thermostat sensor is calibrated approximately 4°. This minimizes rapid recycling of the unit, once
desired temperature level is achieved.
5. The rain sensor built into your fan will prevent excessive rain from entering coach through the open
dome. Maintain a setting above (to the right of) "rain override" zone and the dome will close when the
sensor becomes wet.
WARNING: Do not leave coach unattended with thermostat knob set in the "rain override" zone.
6. A rain sensor override is built into this system so you can operate your fan during light to moderate rains.
When sensor is wet, rotate fan thermostat knob to coolest position to override sensor. Dome will open and
fan motor will start. When sensor has completely dried, rotate thermostat knob back to desired setting for
automatic operation.
7. To close dome in extremely hot conditions, rotate thermostat knob right, past 110' symbol to off. Dome
will come down.
8. Always allow dome to completely cycle up and down. If dome "hangs up" in partially open/close
position, rotate thermostat knob to extreme right and then left position allowing complete cycles down and
up. Now reset to original comfort level.
9. When vehicle is in storage, rotate thermostat knob to right (off), after dome closes, turn 3 speed switch
to "O" (off).
CLEANING INSTRUCTIONS:
1) Turn fan motor OFF.
2) Remove 8 painted flathead Philips screws around perimeter of screen insert only.
3) Clean screen with soap & water solution and reinstall.
I-6
AIRSTREAM 360 XC LAND YACHT OWNERS MANUAL
SPECIFICATIONS
Airstream constantly strives to improve its product. All specifications are subject to change without notice.
Note: all weights and measurements were made on prototype vehicles. Your production motorhome may
vary slightly.
DIMENSIONS
36 Ft. W/Slide-out
Exterior Height with Air Conditioner
Interior Head Room
Interior Width
Exterior Length
Exterior Width
11’ 8”
78 ½”
95”
36' 4”
101”
CAPACITIES
LPG Tank
Fresh Water Tank
Grey Water Holding Tank
Black Water Holding Tank
Fuel Tank, Freightliner
182 Lbs,
70 Gal.
52 Gal.
52 Gal.
90 Gal.
CHASSIS COMPONENTS
Trailer hitch
*GCWR
5,000 lb. tow - 500 lb. tongue weight
31,350 lbs.
*GROSS COMBINATION WEIGHT RATING means the value specified by the motorhome
manufacturer as the maximum allowable loaded weight of this motorhome with its towed trailer or towed
vehicles.