1
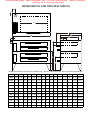
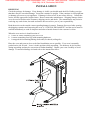
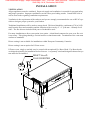
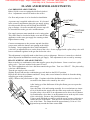
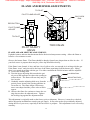
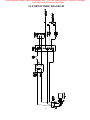
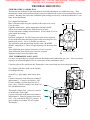
Total Restaurant Supply - https://totalsupply1.com - Toll Free 1-800-944-9304 - Local 507-288-9454
2940 Hwy 14 W, Rochester, MN 55901
TECHNICAL SERVICE MANUAL
FLOOR MODEL GAS DECK OVENS:
SERIES 100, 200, 300, 400, 600, 800, 125, 805, 516, 616, 816
INTENDED FOR OTHER THAN HOUSEHOLD USE
OVEN MUST BE KEPT CLEAR OF COMBUSTIBLES AT ALL TIMES
After the gas supply has been connected to your appliance, it is extremely important to
check piping for possible leaks. To do this, use soap and water solution or solutions
which are expressly made for this purpose. DO NOT USE matches, candles, flames
or other sources of ignition since these methods are extremely dangerous. Post in a
prominent location instructions to be followed in the event you smell gas. Obtain
these instructions from your local gas supplier.
For Your Safety: Do not store or use flammable liquids or vapors in the vicinity
of this or any other appliance.
Warning: Improper installation, adjustment, alteration, service or maintenance can
cause property damage, injury or death. Read the Installation, Operating and
Maintenance instructions thoroughly before installing or servicing this equipment.
Initial heating of this oven may generate smoke or fumes and must be done in a well
ventilated area. Overexposure to smoke or fumes may cause nausea or dizziness.
NOTE: Only Pizza or Bread can have direct contact with ceramic decks. All other food products
must be placed in a pan or container to avoid direct contact with ceramic decks.
This equipment has been engineered to provide you with year round dependable service when
used according to the manufacturer’s instructions and standard commercial kitchen practices.
BAKERS PRIDE OVEN CO., INC.
P/N U4154A 06/09
30 Pine Street
New Rochelle, NY 10801
(800) 431-2745 US & Canada
www.bakerspride.com Web Address
[email protected]
+1 (914) 576-0200 Phone
+1 (914) 576-0605 Fax
© COPYRITE 2009 BAKERS PRIDE OVEN CO., INC
1
Total Restaurant Supply - https://totalsupply1.com - Toll Free 1-800-944-9304 - Local 507-288-9454
2940 Hwy 14 W, Rochester, MN 55901
Continuous improvement is a Bakers Pride tradition. All efforts have been taken to insure this booklet
is up to date as of the day it is printed. In case of discrepancies or uncertainties, please consult with
your Technical Service Technician.
2
Total Restaurant Supply - https://totalsupply1.com - Toll Free 1-800-944-9304 - Local 507-288-9454
2940 Hwy 14 W, Rochester, MN 55901
TABLE OF CONTENTS
Table of Contents ....................................................................................................
Dimensions and Specifications ...............................................................................
Gas Ratings .............................................................................................................
Installation ..............................................................................................................
Receiving ......................................................................................................
Mount The Legs ............................................................................................
Optional Casters ...........................................................................................
Deck Installation ...........................................................................................
Ceiling Tiles ..................................................................................................
Gas Connections ...........................................................................................
Ventillation ....................................................................................................
Flame and Burner Adjustments ..............................................................................
Gas Pressure Adjustments ............................................................................
Pilot Lighting and Adjustments ....................................................................
Flame and Air Mixture Adjustments ............................................................
By-Pass Flame Adjustments ........................................................................
Automatic Timer .........................................................................................
Il Forno Booster Burner ........................................................................................
Il Forno Wire Diagram ..........................................................................................
Gas Conversion .....................................................................................................
Troubleshooting ....................................................................................................
Temperature Calibration .............................................................................
Test Thermopile and Gas Valve ..................................................................
Warranty ................................................................................................................
3
3
4
8
9
9
10
10
10
11
12
13
14
14
14
15
16
16
17
18
19
20
22
22
23
Total Restaurant Supply - https://totalsupply1.com - Toll Free 1-800-944-9304 - Local 507-288-9454
2940 Hwy 14 W, Rochester, MN 55901
DIMENSIONS AND SPECIFICATIONS
Nominal dimensions in inches on standard legs. Refer to individual spec sheets for latest information.
Model
A
B
C
D
E
F
G
H
I
J
K
L
M
N
Y600
6 1/2
6 1/2
60
78
1 5/8
1 3/4
25
30
51
43
36
11 1/2
8
43
Y800
6 1/2
6 1/2
66
84
1 5/8
1 3/4
25
30
59
51
44
11 1/2
8
43
D125
6 3/8
8 3/8
48
65
1 5/8
2 3/4
29
30
54
43
36
11 1/2
10
44
DS805
6 1/2
8 1/4
48
55
1 5/8
2 3/4
25
30
49
43
36
11 1/2
6 3/4
45
GS805
6 1/2
8 1/4
36
53
1 5/8
2 3/4
25
30
49
43
36
11 1/2
6 3/4
45
151
4 3/4
8
36
48
1 1/8
1 3/4
24
30
51
33
34 1/2 11 1/4
8
43
251
4 3/4
8
36
48
1 1/8
1 3/4
24
30
51
43
34 1/2 11 1/4
8
43
351
4 3/4
8
45
57
1 1/8
1 3/4
24
30
51
43
34 1/2 11 1/4
8
43
451
4 3/4
8
45
66
1 1/8
1 3/4
24
30
51
43
34 1/2 11 1/4
8
43
3151
4 3/4
8
54
57
1 1/8
1 3/4
24
30
51
33
34 1/2 11 1/4
8
43
4151
4 3/4
8
54
66
1 1/8
1 3/4
24
30
51
33
34 1/2 11 1/4
8
43
4
Total Restaurant Supply - https://totalsupply1.com - Toll Free 1-800-944-9304 - Local 507-288-9454
2940 Hwy 14 W, Rochester, MN 55901
DIMENSIONS AND SPECIFICATIONS
E
Nominal dimensions in inches on standard legs. Refer to individual spec sheets for latest information.
Model
A
B
C
D
E
F
G
H
I
J
K
L
M
N
O
Y602
6 1/2 6 1/2
60
78
1 5/8
1 3/4
25
16
51
43
36
11 1/2
8
54 1/2
29 1/4
Y802
6 1/2 6 1/2
66
84
1 5/8
1 3/4
25
16
59
51
44
11 1/2
8
54 1/2
29 1/4
D250
6 3/8 8 3/8
48
65
1 5/8
2 3/4
29
12
54
43
36
11 1/2
10
55
26 1/4
DS990 6 1/2 8 1/4
48
55
1 5/8
2 3/4
25
16
49
43
36
11 1/2
6 3/4
54 3/4
30
GS990 6 1/2 8 1/4
36
53
1 5/8
2 3/4
25
16
49
43
36
11 1/2
6 3/4
54 3/4
30
152
4 3/4
8
36
48
1 1/8
1 3/4
24
16
51
33
34 1/2 11 1/4
8
52 3/4
28 3/4
252
4 3/4
8
36
48
1 1/8
1 3/4
24
16
51
43
34 1/2 11 1/4
8
52 3/4
28 3/4
352
4 3/4
8
45
57
1 1/8
1 3/4
24
16
51
43
34 1/2 11 1/4
8
52 3/4
28 3/4
452
4 3/4
8
45
66
1 1/8
1 3/4
24
16
51
43
34 1/2 11 1/4
8
52 3/4
28 3/4
3152
4 3/4
8
54
57
1 1/8
1 3/4
24
16
51
33
34 1/2 11 1/4
8
52 3/4
28 3/4
4152
4 3/4
8
54
66
1 1/8
1 3/4
24
16
51
33
34 1/2 11 1/4
8
52 3/4
28 3/4
5
Total Restaurant Supply - https://totalsupply1.com - Toll Free 1-800-944-9304 - Local 507-288-9454
2940 Hwy 14 W, Rochester, MN 55901
DIMENSIONS AND SPECIFICATIONS
Nominal dimensions in inches on standard legs. Refer to individual spec sheets for latest information.
Model
A
B
C
D
E
F
G
H
I
J
K
L
FC516
6 3/8
8 3/8
48
65
1 5/8
1 3/4
10
36
52
43
36
49 1/4
FC616
6 1/2
6 1/2
60
78
1 5/8
1 3/4
10
36
52
43
36
49 1/4
FC816
6 1/2
6 1/2
66
84
1 5/8
2 3/4
10
36
60
51
44
49 1/4
6
Total Restaurant Supply - https://totalsupply1.com - Toll Free 1-800-944-9304 - Local 507-288-9454
2940 Hwy 14 W, Rochester, MN 55901
DIMENSIONS AND SPECIFICATIONS
Nominal dimensions in inches on standard legs. Refer to individual spec sheets for latest information.
Model
A
B
C
D
FD516 6 3/8 8 3/8
48
65
FY616 6 1/2 6 1/2
60
FY816 6 1/2 6 1/2
66
E
F
G
H
I
J
K
L
M
N
O
P
1 5/8 1 3/4
10
33
29
12
54
43
36
11 1/2
28 5/8
26 1/8
78
1 5/8 1 3/4
10
33
25
16
51
43
36
11 1/2
25
29 3/4
84
1 5/8 2 3/4
10
33
25
16
59
51
44
11 1/2
25
29 3/4
7
Total Restaurant Supply - https://totalsupply1.com - Toll Free 1-800-944-9304 - Local 507-288-9454
2940 Hwy 14 W, Rochester, MN 55901
GAS RATINGS
NORTH AMERICAN GAS RATINGS
NATURAL
PROPANE
BTU
KW
PRESSURE
BTU
KW
PRESSURE
Y600
120,000
35.15
3.5 wc
120,000
35.15
10 wc
Y800
120,000
35.15
3.5 wc
120,000
35.15
10 wc
D125
125,000
36.6
3.5 wc
105,000
30.7
10 wc
DS805
70,000
21
3.5 wc
70,000
21
10 wc
GS805
60,000
18
3.5 wc
60,000
18
10 wc
151
48,000
14
3.5 wc
48,000
14
10 wc
251
60,000
18
3.5 wc
60,000
18
10 wc
351
70,000
21
3.5 wc
70,000
21
10 wc
451
80,000
24
3.5 wc
80,000
24
10 wc
3151
70,000
21
3.5 wc
70,000
21
10 wc
4151
70,000
21
3.5 wc
70,000
21
10 wc
FC516
140,000
41
3.5 wc
140,000
41
10 wc
FC616
140,000
41
3.5 wc
140,000
41
10 wc
FC816
140,000
41
3.5 wc
140,000
41
10 wc
EUROPEAN GAS RATINGS
EN 437
GAS AND
PRESSSURE
DESIGNATED COUNTRY
AT BE DK FI FR DE IE IT LU NL PT ES SE GB
I2H
G20@20 mbar
I2L
G25@25 mbar
I2E
G20@20mbar
I2E+
G20/25@20/25mbar
♦
♦
♦
♦
♦
♦
♦
♦
♦
♦
8
♦
♦
♦
♦
Total Restaurant Supply - https://totalsupply1.com - Toll Free 1-800-944-9304 - Local 507-288-9454
2940 Hwy 14 W, Rochester, MN 55901
INSTALLATION
RECEIVING
Check the package for damage. If any damage is visible you should mark the bill of lading you sign
that there may be concealed damage. Insure the container is upright. If the container is not upright major damage can occur to your appliance. If damage is discovered, do not refuse delivery. Contact the
carrier and file appropriate freight claims. Do not contact the manufacturer. Shipping damage claims
are to be resolved between the customer, shipping carrier and dealer. The manufacturer may assist in
resolving any such claims, but such assistance does not relieve you of your responsibility.
Read the notice on the outside carton regarding damage in transit. Damage discovered after opening
the shipping container and inspecting the oven is “CONCEALED DAMAGE” and the carrier must be
notified immediately to send an inspector and also to furnish forms for the customer’s claim.
When the oven arrives it should consist of:
a. A crate or carton containing your new oven
b. A carton containing four legs with mounting hardware
c. A strapped skid containing baking decks and (if ordered) ceiling tiles
Place the oven and parts as close to the final installation area as possible. Your oven is normally
packed on its side or back. Leave it in this position while unpacking. The skid may be left in place
during unpacking and may be convenient in further handling. Unpack your oven carefully to avoid
damage. If concealed damage is found refer to the instructions above.
9
Total Restaurant Supply - https://totalsupply1.com - Toll Free 1-800-944-9304 - Local 507-288-9454
2940 Hwy 14 W, Rochester, MN 55901
INSTALLATION
MOUNT THE LEGS
Use proper lifting equipment. Due to the oven’s size and weight a rolling lift jack, air sled or pallette
jack may be required.
Legs are shipped in a separate container with mounting hardware.
Bolt two legs to the upper corners of the oven. Tighten in place.
Use proper lifting equipment. Lower the oven down so that the two bolted legs rest on the floor.
Use proper lifting equipment. Raise the second end of the oven slightly higher than the height of the
legs. Remove the skid and support the frame of the oven.
Mount the remaining two legs and bolt in place.
Use proper lifting equipment. Lift oven and remove all supports. Move oven into its final location.
OPTIONAL CASTERS
When optional casters are ordered there will be two with locks and two without locks.
Locking casters to be mounted at the two front corners of the oven.
Appliances mounted on casters must be connected to the building framing to prevent stress on electrical and gas connections.
NOTE: Installation should be made with a connector that complies with the latest edition of the Standard for Connectors for Movable Gas Appliances ANSI Z21.69 in the USA and CAN CGA-6.16 in
Canada and a quick disconnect device that complies with the latest edition of the Standard for Quick
Disconnect Devices for use with gas fuel ANSI Z21.41 in the USA and CAN CGA 1-6.9 in Canada an
adequate means must be provided to limit the movement of the appliance without depending on the
connector and any quick disconnect device or its associated piping. The restraint should be attached to
the rear legs of the oven on which casters are mounted. If disconnection of the restraint is required for
service the restraint must be reconnected after the appliance is returned to its normally installed position.
Minimum Clearances:
Left Side from Combustible construction: 3” [75 mm] from Non-Combustible construction: 0
Right Side from Combustible construction: 1” [25 mm] from Non-Combustible construction: 0
Rear from Combustible construction: 3” [75 mm] from Non-Combustible construction: 2” [50 mm]
DECK INSTALLATION
Remove all packing material, samples, shims, etc. from the baking chamber leaving the metal hearth
sheets on the baking chamber floor. Make sure the sheets are arranged to cover the whole bottom of
the chamber.
Depending on the model, two, three, or four baking hearth stones are required for the cooking deck.
The hearth stones are heavy and fragile. Careful handling is required for personal safety and to insure
proper performance.
Slide the first stone into the baking chamber. Push it as far back as possible. Push it to one side as far
as possible.
Slide additional stones into the baking chamber similarly. If more than two stones are required for the
oven cavity install the side stones first to insure they are properly positioned into the cavity corners behind the door frame as required.
Seams should be closed tightly by moving hearth stones against each other.
Use of metal shims may be required to level the stones.
The use of steel wedges between the hearth stones and cavity sides may be required. Care must be exercised if wedges are installed along side walls of the cavity to insure the operation of the vent slides is
not adversely affected by too much side pressure causing them to bind.
10
Total Restaurant Supply - https://totalsupply1.com - Toll Free 1-800-944-9304 - Local 507-288-9454
2940 Hwy 14 W, Rochester, MN 55901
INSTALLATION
On models that include them install the hearth trim strip between the front of the baking hearth stones
and the door frame.
After curing and use, new stones may require re-leveling. This is the responsibility of the owner and
not the manufacturer.
WEDGE
BUTT TIGHT
IN-BETWEEN
SEAMS
CEILING TILES
Some models have the option of having a hearth lined ceiling. These tiles will be packed separately
from the oven, may be in the same container as the baking deck tiles.
For Il Forno models there are multiple square tiles that get installed into the top supports by tipping at
an angle, inserting the edge above the support rail toward the center, setting one edge along the support
rail along the side of the cavity and letting the tipped up edge come down to rest on the center support
rail. Center tiles are installed the same way.
For deck ovens a long narrow ceiling stone will be inserted at a cut-out in the front edge along the door
opening. Set the rear end up over the ledge along the back of the cavity. Swing the front edge up
through the cut-out and slide it to the left or right for positioning.
11
Total Restaurant Supply - https://totalsupply1.com - Toll Free 1-800-944-9304 - Local 507-288-9454
2940 Hwy 14 W, Rochester, MN 55901
INSTALLATION
GAS CONNECTIONS
Your oven installation must conform to local codes. In the absence of local codes it must comply with
National Codes.
The type of gas the oven is equipped for is stamped on the rating plate. Connect ovens marked “NAT”
only to natural gas supplies. Connect ovens marked “LP” only to propane gas supplies.
Before connecting oven the gas supply should be inspected by your gas supplier or local authorities to
insure sufficient gas flow, pressure and meter size.
If the gas supply line is greater than 1/2 PSI [3.45 kPa] a step-down regulator is required.
The gas inlet connection for all ovens is 3/4” NPT.
Each oven deck requires its own gas shut-off that is end-user supplied.
All pipe joints must be sealed with pipe thread sealant rated for use with LP gas supplies.
Before use all pipe joints must be inspected for leaks. Use a soap and water solution or a product expressly made for this purpose. Do NOT use matches, candles or flames to check for leaks as these
methods are extremely dangerous.
The oven and its shut-off valve must be disconnected from the gas supply piping during any pressure
testing in excess of 1/2 PSI [3.45 kPa].
The oven must be isolated from the gas supply by manual shut-off valve during any pressure testing at
levels equal or less than 1/2 PSI [3.45 kPa].
Only Natural Gas equipped models are available in European Community Countries
In MASSECHUSETTS all gas products must be installed by a Massachusetts licensed plumber or gas
fitter. Ventilation hoods must be installed in accordance with NFPA-96, current edition, with interlocks as described in that standard.
WARNING: Installation must conform with local codes and/or with the latest edition
of the National Fuel Code ANSI Z223.1 Natural Gas Installation code in the USA or
CAN/CGA-B149.1 or the Propane Installation code, CAN/CGA-B 149.2 in Canada.
WARNING: This appliance must be installed by a competent person in accordance
with rules in force. In the U.K. Corgi registered installers (including the regions of
British Gas) undertake to work to safe and satisfactory standards. This appliance must
be installed in accordance with the current Gas Safety (Installation and Use) Regulations and the relevant Building Regulations/IEE Regulations. Detailed recommendations are contained in the British Standard Codes of Practice BS 6172, BS 5440: Part
2 and BS 6891.
12
Total Restaurant Supply - https://totalsupply1.com - Toll Free 1-800-944-9304 - Local 507-288-9454
2940 Hwy 14 W, Rochester, MN 55901
INSTALLATION
VENTILLATION
All gas appliances must be ventilated. Proper air supply and ventilation is essential for personal safety
and proper operation. Improper ventillation can also cause poor baking results. Consult NPFA 96 as
well as local codes regarding ventilation requirements.
Ventilation is the requirement of the end user and you are strongly recommended to use an HVAC specialist to design a proper system for your kitchen.
Traditional installations will be under a canopy hood. This hood should be a minimum of 78 in [1950
mm] from the floor and extend beyond the footprint of the oven by 4” - 6” [100 mm - 150mm] on all
sides. The flue diverter included with your oven should be used.
For many installations a direct vent option is an option. A draft hood connected to your oven flue exit
is necessary. This piping should go vertical and never slant downwards. Termination of the vent must
conform to standards.
Direct venting is not available for installations within European Community Countries.
Direct venting is not an option for Il Forno ovens.
Il Forno ovens, singly or stacked, may be vented with an optional Eye Brow Hood. Eye Brow hoods
are shipped separately for installation before first use. A separately sized and designed exhaust fan system must also be installed.
DRAFT HOOD
FLUE DIVERTER
13
Total Restaurant Supply - https://totalsupply1.com - Toll Free 1-800-944-9304 - Local 507-288-9454
2940 Hwy 14 W, Rochester, MN 55901
FLAME AND BURNER ADJUSTMENTS
GAS PRESSURE ADJUSTMENTS
Baker’s Pride ovens are equipped with fixed sized orifices. Adjustments can not be made to the orifice.
Gas flow and pressure is to be checked at installation.
A pressure tap is supplied with each oven. It is located
in the control compartment along the gas supply piping.
On older models this tap will be along the manifold
pipe or fittings. On newer models the pressure tap will
be located between the gas valve and thermostat.
Gas supply pressure must match the oven’s rating plate.
This value must be checked with the oven and all other
appliances on the same gas supply line running at their
highest burner setting.
ADJUSTMENT
SCREW
NEWER
LOCATION
TRADITIONAL
LOCATION
Connect a manometer to the pressure tap and check the
gas pressure while the burners are running at their highest setting. Ovens equipped with a 7000 combination
valve have an adjustment screw on the front of the valve. Ovens equipped with a pilot safety valve will
have a traditional regulator in the gas line before the valve.
This adjustment is originally made at the factory prior to shipment. However, it must be re-checked
and/or adjusted at installation to match your gas supply. This adjustment is not covered by warranty.
PILOT LIGHTING AND ADJUSTMENTS
Most ovens have a combination valve that supplies gas to the pilot burner. Some ovens have a pilot
safety valve. The basic method is the same for each.
The 7000 combination valve has a dial that controls the gas flow. Turn it to “PILOT”. The pilot safety
valve has a RED button.
Turn the gas supply to the oven ON.
Slightly depress and turn the combination gas cock knob to the PILOT position.
Depress the dial or the red button and hold. It may take several minutes to bleed air from the tubing
supplying gas to the pilot burner.
Apply a flame to the pilot burner to light. Continue to hold the dial/button depressed for at least 30
seconds for the flame to be sensed by the valve.
After letting go of the dial/button if the pilot flame goes out repeat the
above steps.
Once the flame is lit and burning normally for several minutes to insure
all air is bled from the supply tube the flame may need to be adjusted.
On pilot safety valves there is an adjustment screw above the red button.
On combination valves there is an adjustment screw at the top left corner
of the valve body. Remove the pilot adjustment cap.
Using a small flat blade screwdriver turn the screw counter-clockwise to
reduce the size of the flame. Turn the screw clockwise to increase the
size of the flame. The flame should be approximately 3/8 in to 1/2 in
high and wrap around the flame sensor bulb.
14
Total Restaurant Supply - https://totalsupply1.com - Toll Free 1-800-944-9304 - Local 507-288-9454
2940 Hwy 14 W, Rochester, MN 55901
FLAME AND BURNER ADJUSTMENTS
TO PILOT
PILOT FLAME ADJUST
GAS COCK
DIAL
RED BUTTON
PILOT FLAME
ADJUST
TO PILOT
7000 VALVE
PILOT SAFETY
VALVE
FLAME AND AIR MIXTURE ADJUSTMENTS
Light the burners and turn the thermostat dial to the desired temperature setting. Allow the flame to
burn for a few minutes to settle.
Observe the burner flame. The flame should be sharply formed cone shapes that are blue in color . If
your fuel source is propane there may be yellow tips that flicker briefly.
If the flame is not formed, is lazy, and has a lot of yellow color, not enough air is mixing with the gas.
If the flame “roars” and you can see the base of the flame separating from the burner pipe– lifting,
there is too much air mixing with the gas. For either condition the air/fuel mixture must be adjusted.
A. Loosen the locking disk.
LOCKING DISC
B. Turn the larger adjusting disk towards the gas/
air port of the inspirator to reduce the opening to
ADJUSTING DISC
reduce the air. The flame will turn lazy and yellow in color.
C. Gradually turn the adjusting disk away from the
gas/air port to increase the opening and thus increase the air. The flame shape will become
more cone shaped and the yellow color will disappear.
D. Observe the flame for a minute to insure the setting does not have be adjusted more. Tighten
the locking ring against the adjustment disk.
This adjustment is originally made at the factory prior to shipment. However, it must be re-checked
and/or adjusted at installation to match your gas supply. It may also need to be periodically adjusted
during the life of your oven, especially if the fuel source is propane. This adjustment is not covered by
warranty.
15
Total Restaurant Supply - https://totalsupply1.com - Toll Free 1-800-944-9304 - Local 507-288-9454
2940 Hwy 14 W, Rochester, MN 55901
FLAME AND BURNER ADJUSTMENTS
BY-PASS FLAME ADJUSTMENT
Your oven is equipped with a throttle back thermostat that continually maintains a small flame to help
reduce temperature swings as the burners cycle on and off. When the oven reaches set temperature the
thermostat main valve closes and only gas from the by-pass valve flows to the burners.
BYPASS ADJUST
Turn the temperature dial to 300 º.
After the oven temperature rises and remains constant turn the dial back down
to the lowest setting.
This closes the main valve.
Remove the knob by pulling straight from the thermostat body.
Refer to the figure showing a thermostat with knob removed.
There are two adjustment screws on the left side of the thermostat body. The
upper screw has a “B” marking along side. Using a small flat blade screwdriver turn the screw to adjust the by-pass flame.
Turn the screw counter-clockwise to increase the flame height. Turn the screw
clockwise to reduce the flame height.
When properly set there should be a minimal height flame that maintains itself
along the burners.
Replace the dial. Turn the temperature up and down several times to insure the
by-pass flame maintains at a minimal setting.
This adjustment is made at the factory prior to shipment. However, it must be re-checked and/or adjusted at installation. This adjustment is not covered by warranty.
AUTOMATIC TIMER
When ordered the automatic oven start timer will turn the main burner on at the set time of your choosing.
The thermostat jumper between the TH-TP and TH contacts on the 7000 combination gas valve are replaced by wire leads to the switch contacts of the timer. The red and white leads from the Thermopile
must be connected. The main burner will not turn on unless the pilot is lit.
NO VOLTAGE IS TO BE CONNECTED TO THESE CONTACTS. This connection is an extension of the jumper which tells the valve open the main gas valve. At the appointed time the clock
closes the switch terminals and completes the circuit. The valve interprets this as a call for heat and
opens the main gas valve.
The main burner may be lit manually by opening the switch box and turning the timer switch to the
“ON” position.
TIMER
CONNECTIONS
LINE
CORD
7000 VALVE
TH
TP
TH
16
Total Restaurant Supply - https://totalsupply1.com - Toll Free 1-800-944-9304 - Local 507-288-9454
2940 Hwy 14 W, Rochester, MN 55901
IL FORNO BOOSTER BURNER
ON-OFF
TRANSFORMER
IGNITION
MODULE
FUSE
TERMINAL
BLOCK
The Il Forno booster burner is located in the center rear of the oven cavity visible through the front
opening as an added visual effect. It also provides 20 KBTU additional heat to the oven.
Controls for this feature are in the left side compartment behind the typical gas control stack. The
booster burner is plumbed and controlled separately from the main burner. There is an ON-OFF switch
just inside the control compartment door. There is an ON-OFF switch on the gas valve.
When turned on the ignition module energizes the hot surface ignitor. When the hot surface ignitor
reaches current a signal opens the gas valve for the burner. The flame sensor completes the circuit
when it signals the ignition module it is sensing flame. This burner has its own inspirator and it typically adjusted to provide a YELLOW flame to simulate wood burning at the back of the cavity.
NEWER
MOUNTING
OLDER
MOUNTING
17
Total Restaurant Supply - https://totalsupply1.com - Toll Free 1-800-944-9304 - Local 507-288-9454
2940 Hwy 14 W, Rochester, MN 55901
IL FORNO WIRE DIAGRAM
18
Total Restaurant Supply - https://totalsupply1.com - Toll Free 1-800-944-9304 - Local 507-288-9454
2940 Hwy 14 W, Rochester, MN 55901
GAS CONVERSION
WARNING
Conversion kits shall be installed by a qualified service agency in accordance with the
manufacturer's instructions and all applicable
codes and requirements of the authority having jurisdiction. If the information in these
instructions is not followed exactly, a fire, an
explosion or production of carbon monoxide
may result causing property damage, personal
injury or loss of life. The qualified service
agency is responsible for the proper installation of this kit. The installation is not proper
and complete until the operation of the converted appliance is checked as specified in the
manufacturer’s instructions.
There are times it is required to do a field conversion from one gas type to another.
Consult with your Technical Service Representative to order the correct parts for the oven model you
will be converting.
♦
♦
♦
♦
♦
♦
Shut off the gas to the oven.
Remove the two screws that hold the regulator in place on the combination valve. Remove the gasket. Install a new gasket and the new regulator. Insure the regulator gasket is in place with two
circular cut-outs over small posts in the valve body casting. Evenly tighten the two screws holding
the regulator in place. The conversion kit includes a label to be placed on the side of the valve
body to inform others that the conversion has taken place.
Remove the orifices from the inspirators. Depending on the oven model there will be one, two or
three that need to be changed.
Change the orifice in the pilot.
Refer to other sections of this manual. Test for gas leaks.
Follow normal start-up procedures for lighting and adjusting the pilot and insuring the gas-air mixture to the burners is correct.
ORIFICE
REGULATOR
REGULATOR
GASKET
NOTIFICATION
LABEL
19
Total Restaurant Supply - https://totalsupply1.com - Toll Free 1-800-944-9304 - Local 507-288-9454
2940 Hwy 14 W, Rochester, MN 55901
TROUBLESHOOTING
All technical problems should only be investigated by qualified gas fitters or service technicians. Improper adjustment, alteration or service can cause property damage, injury or death. For problems with
your gas supply or oven operation contact your gas supplier or contact a Bakers Pride Authorized Service Agency.
PROBLEM
No Pilot
POSSIBLE
No Gas
REMEDY
Gas supply shut-off.
Shut-off valve in “OFF” position.
Kink in supply tube from valve. Inspect entire length
Blocked supply line
Faulty valve
Pilot won’t stay lit
Dirty Orifice
Make sure pilot orifice is clean and not blocked. Care must be taken
to clean but not enlarge orifice hole.
Not Enough Gas
Gas flow too low. Check gas pressure
Incorrect orifice. LP orifice in place of Natural.
Blocked Orifice in pilot. Check and clean as required.
Flame too small
Adjust pilot flame
Dirty Contact
Jumper wire at thermostat posts on combination valve must be clean
and tight.
Thermopile must be clean and fastening nut tight to pilot bracket.
Faulty Component
Faulty thermopile or thermocouple. See Thermopile Test Procedure.
Faulty valve. Test for functioning Thermocouple or Thermopile.
Change Valve
Main Burner won’t light
No Gas
No pilot
Valve Shut-off
Blocked supply line
Faulty Valve. Test gas flow before changing.
Faulty Thermostat. Test gas flow before changing.
Not enough gas
Not enough supply. Test gas flow.
Not enough air
Adjust air mixture at inspirator
Not enough gas
Test gas pressure/flow
Flame lifting
Too much air
Adjust air mixture at inspirator
Flame flashes back
High gas pressure
Test gas pressure/flow
Flame POPS when turned
off
Wrong orifice
Verify and change as needed
Flame too large
Over gassed
Test gas pressure/flow
Wrong orifice
Verify and change as needed
Plugged burner
Clean
Ventilation
Consult HVAC professional to verify air mixture
Not enough gas
Test gas supply.
Yellow or lazy flame
Delayed ignition
Oven takes too long to heat
20
Total Restaurant Supply - https://totalsupply1.com - Toll Free 1-800-944-9304 - Local 507-288-9454
2940 Hwy 14 W, Rochester, MN 55901
TROUBLESHOOTING
PROBLEM
Oven temperature Too
High/Too Low
Booster burner won’t light
POSSIBLE
CAUSE
REMEDY
Thermostat setting
Calibrate thermostat
Ventilation
Incorrect air flow can affect oven performance. Have checked by a
No gas
Gas valve for booster burner shut-off
Blocked supply line
No electric
No electric to oven
Unplugged
Switch shut-off
No 24V to ignition module. Change transformer
Ignitor failure
Ignitor doesn’t light. Check voltage, change ignitor
Soot in ignitor. Clean.
Ignitor lights but doesn’t pass enough current to module. Change
ignitor
Module failure
Module receives voltage but doesn't light ignitor. Change module.
Module lights ignitor but doesn’t sense its current. Change module.
Module receives current from ignitor but fails to open gas valve.
Change module.
Booster burner won’t stay
lit
No flame sense
Sense rod missing ground connection. Clean and tighten.
Soot on sense rod. Clean.
Sense rod fails. Change sense rod.
21
Total Restaurant Supply - https://totalsupply1.com - Toll Free 1-800-944-9304 - Local 507-288-9454
2940 Hwy 14 W, Rochester, MN 55901
TROUBLE SHOOTING
TEMPERATURE CALIBRATION
Thermostats are calibrated at the manufacturer and field adjustments are seldom necessary. They
should not be made unless actual cooking experience indicates the control is not maintaining set temperature. Breaking the seal on the calibration plate locking screws may void the manufacturer’s warranty for the thermostat.
Use a digital thermometer.
Place a thermocouple along the capillary bulb in the oven cavity.
Close the door.
Light the main burner. Adjust temperature setting to 400ºF.
Allow oven to heat until burner flame drops to by-pass.
Check temperature reading at thermometer. If not within 25º of set
point adjust dial setting.
To adjust:
Pull knob straight off. Do NOT turn stem while removing knob.
Grasp calibration plate and hold in place while loosening two calibration lock screws. Use a #1 Phillips screwdriver.
The calibration plate has markings and the name “ROBERT
SHAW” stamped in it. There are approximately 50º between each
letter.
Turn calibration plate counter-clockwise to lower set point.
Turn calibration plate clockwise to increase set point.
Tighten locking screws and replace dial.
INDICATOR MARK
LOCK
SCREWS
CALIBRATION PLATE
TEST THERMOPILE AND VALVE
Use these test procedures to trouble shoot the thermopile and combination gas valve. Prior to performing any tests clean and tighten all wire connections at the combination valve.
Clean the pilot orifice and insure the Thermopile is not coated with soot from a high pilot flame.
Use a digital volt meter with a scale capable
of reading millivolts.
System Test - pilot lights, main burner does
not.
Connect volt meter leads between terminal 2
and terminal 3. Turn gas cock dial to “ON”.
If meter reading is greater than 100 mV replace valve. If meter reading is less than 100 1
mV run additional tests.
Thermopile Output Test - pilot won’t stay lit 2
or main burner won’t light.
Connect volt meter leads between terminal 1
and terminal 2. Remove jumper from termi- 3
nal 3. Gas cock dial in “PILOT” position. If
meter reading is less than 325 mV replace
Thermopile.
22
Total Restaurant Supply - https://totalsupply1.com - Toll Free 1-800-944-9304 - Local 507-288-9454
2940 Hwy 14 W, Rochester, MN 55901
WARRANTY
WHAT IS COVERED: This warranty covers defects in material and workmanship under normal use, and applies only to the
original purchaser providing that:
♦ The equipment has not been accidentally or intentionally damaged, altered or misused;
♦ The equipment is properly installed, adjusted, operated and maintained in accordance with National and local
codes, and in accordance with the installation instruction provided with the product;
♦ The serial number rating plate affixed to the equipment has not been defaced or removed.
WHO IS COVERED: This warranty is extended to the original purchaser and applies only to equipment purchased for use in the
U.S.A.
COVERAGE PERIOD: Full size gas and electric deck ovens: Two (2) year limited parts and labor. Cyclone Convection Ovens:
♦ BCO Models: One (1) Year limited parts and labor; (1) Year limited door warranty.
♦ GDCO Models: Two (2) Year limited parts and labor.
♦ CO11 Models: Two (2) Year limited parts and labor; (5) Year limited door warranty.
♦ All Other Products: One (1) Year limited parts and labor.
♦ Warranty period begins the date of dealer invoice to customer or ninety (90) days after shipment date from
BAKERS PRIDE - whichever comes first.
WARRANTY
COVERAGE:
This warranty covers on-site labor, parts and reasonable travel time and travel expenses of the authorized service
representative up to (100) miles, round trip, and (2) hours travel time. The purchaser, however, shall be responsible
for all expenses related to travel, including time, mileage and shipping expenses on smaller counter models that may
be carried into a Factory Authorized Service Center, including the following models: PX-14, PX-16, P18 and BK-18.
EXCEPTIONS:
All removable parts in BAKERS PRIDE Char-broilers, including but not limited to: Burners, Grates,
Radiants, Stones and Valves, are covered for a period of SIX MONTHS.
All Ceramic Baking Decks are covered for a period of THREE MONTHS. The installation of these
replacement decks is the responsibility of the purchaser.
The extended Cyclone door warranty years 3 through 5 is a parts only warranty and does not include labor,
travel, mileage or any other charges
EXCLUSIONS:
♦
♦
♦
♦
♦
♦
♦
♦
♦
♦
♦
♦
Negligence or acts of God,
Thermostat calibrations after (30) days from equipment
installation date,
Air and Gas adjustments,
Light bulbs,
Glass doors and door adjustments,
Fuses,
Char-broiler work decks and cutting boards,
Tightening of conveyor chains,
Adjustments to burner flames and cleaning of pilot burners,
Tightening of screws or fasteners.
♦
♦
♦
♦
♦
♦
Failures caused by erratic voltages or gas supplies,
Unauthorized repair by anyone other than a BAKERS
PRIDE Factory Authorized Service Center,
Damage in shipment,
Alteration, misuse or improper installation,
Thermostats and safety valves with broken capillary
tubes,
Accessories - spatulas, forks, steak turners, grate lifters,
oven brushes, scrapers, peels, etc.,
Freight - other than normal UPS charges,
Ordinary wear and tear
INSTALLATION: Leveling and installation of decks, as well as proper installation and check out of all new equipment — per appropriate installation and use materials – is the responsibility of the dealer or installer, not the manufacturer.
REPLACEMENT BAKERS PRIDE genuine Factory OEM parts receive a (90) day materials warranty effective from the date of
PARTS:
installation by a BAKERS PRIDE Factory Authorized Service Center.
This Warranty is in lieu of all other warranties, expressed or implied, and all other obligations or liabilities on the manufacturers part.
BAKERS PRIDE shall in no event be liable for any special, indirect or consequential damages, or in any event for damages in excess of
the purchase price of the unit. The repair or replacement of proven defective parts shall constitute a fulfillment of all obligations under the
terms of this warranty.
23
Total Restaurant Supply - https://totalsupply1.com - Toll Free 1-800-944-9304 - Local 507-288-9454
2940 Hwy 14 W, Rochester, MN 55901
BAKERS PRIDE OVEN CO., INC.
30 Pine Street
New Rochelle, NY 10801
(800) 431-2745 US & Canada
www.bakerspride.com Web Address
[email protected]
+1 (914) 576-0200 Phone
+1 (914) 576-0605 Fax
24