1
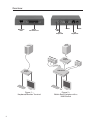
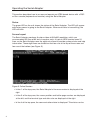
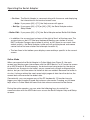
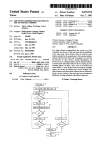
Serial Adapter
User Manual
F1DE084Eea
Table of Contents
Overview.........................................................................................................................1
• Introduction and Package Contents...................................................................... 1
• Feature Overview.................................................................................................... 1
• Specifications......................................................................................................... 1
Installation. ........................................................................................................................... 3
• Device Setup.......................................................................................................... 3
• Installing the Serial Adapter with a KVM Switch.................................................... 3
Operating the Serial Adapter................................................................................................ 4
• Screen Layout......................................................................................................... 4
• Online Mode........................................................................................................... 5
• Buffer Edit Mode.................................................................................................... 7
• Setup Operation..................................................................................................... 8
FAQs .............................................................................................................................. 10
Information................................................................................................................... 11
Overview
Introduction
The Belkin Serial Adapter is designed to emulate an “ASCII terminal,” converting RS232
serial ASCII terminal data to “PS/2 keyboard and VGA video” or “Sun keyboard and Sun
video”. This conversion allows any devices that can be accessed by an ASCII terminal to
be operated using a PC or Sun™ console.
Package Contents
• Serial Adapter
• DB25 Cable
• Power Supply
• CD
Feature Overview
The Serial Adapter is designed with the following features:
• Maintains 8 pages of data in a circular buffer
• Buffer Edit Mode—edit, copy (mark), and resend to computer functions
• Online Mode—operate an ASCII device as if attached to a text terminal
• 12 programmable keys for frequently performed character string commands
• U
se PS/2 console-PS/2 keyboard and VGA monitor (see Figure 1, on next page) or
Sun console-Sun keyboard and composite sync Sun monitor (auto-sensing)
• U
se with a Belkin KVM Switch for convenient access to multiple ASCII devices and
LAN/WAN components
Specifications
Part Number: F1D084Eea
Power Adapter: 6V 1.4A
Input Port: D25 (F)
Output Port: DB9 (M)
Maximum Baud Rate: 19,200
Dimensions: 4.3” (W) x 3.6” (D) x 1.0” (H) (108 x 91 x 23mm)
Weight: 0.7 lbs. (0.3kg.)
Operating Temp: 32° F to 104° F (0° C to 40° C)
Storage Temp: 32° F to 122° F (0° C to 50° C)
Humidity: 20%–80%
Warranty: 1 year
1
Overview
Diagnose
Port
ASCII
Terminal Port
3ERVER
3ERIAL
$EVICE
3ERVER
0#
3ERIAL
3ERIAL
!DAPTER !DAPTER
Figure 1 –
Keyboard/Monitor Terminal
2
Video
Status
LED
PS/2
Keyboard
0#
0#
0#
0#
0#
Power
Sun
Keyboard
3ERIAL
$EVICE
3ERIAL
3ERIAL
!DAPTER !DAPTER
0#
0#
0#
+6- 3WITCH
+6- 3WITCH
Figure 2 –
Belkin Serial Adapter with a
KVM Switch
0#
Installation
Device Setup
Follow these steps to install the Serial Adapter:
1. If necessary, boot your ASCII device and configure a serial port to be VT100,
9600-baud rate, no parity, 8-bit data, 1 stop bit.
2. Using the DB25 cable included, connect the ASCII device serial port to the
DB25 connector on the Serial Adapter.
3. Plug the 6VDC power supply into the Serial Adapter.
4. Plug a PS/2 monitor into the miniDIN6 connector and a VGA monitor to the
HD15 connector on the Serial Adapter.
OR
lug a Sun keyboard into the miniDIN8 connector and a composite sync Sun
P
monitor into the HD15 connector on the Serial Adapter. You may need to use a
VGA-to-13W3 adapter to convert HD15 (M) to 13W3 (F).
5. You will see a login prompt on the monitor.
Installing the Serial Adapter with a KVM Switch
1.Connect the KVM cables to the serial device’s keyboard, monitor, and mouse
ports.
2.Connect the serial cable included from the Serial Adapter’s serial port to the
ASCII device.
3.Select the channel where the Serial Adapter is connected to access the ASCII
device via the KVM switch.
Note: When powering up the Serial Adapter with a KVM, the KVM switch must be
powered up first, then the Adapter, and finally the serial device.
4.You will see a login prompt on the monitor.
Important: After initial installation, if you must first power OFF the Serial Adapter
when switching keyboards on the Serial Adapter, switch keyboards and then power
ON the Serial Adapter.
3
Operating the Serial Adapter
This section describes how to access and operate an ACSII-based device with a PS/2
or Sun console (keyboard and monitor) using the Serial Adapter.
Status
The green LED on the unit shows the status of the Serial Adapter. The LED will appear
solid when power is going to the Serial Adapter. When serial data is transmitting, the
LED will blink.
Screen Layout
The Serial Adapter produces 8-colour video at 800x600 resolution, which can
accommodate 32 lines of 80 text characters each. A typical ASCII terminal uses 24
lines, so the Serial Adapter uses the eight extra lines to provide system-status and help
information. These eight lines are divided so that four are at the top of the screen and
four are at the bottom (see Figure 3).
Figure 3 Online Session
• In line 1 of the top pane, the Serial Adapter’s firmware version is displayed at the
right.
• In line 3 of the top pane, the cursor position and buffer-page number are displayed
at the left, and the terminal type and data rate are displayed at the right.
• In line 4 of the top pane, the communication status is displayed. This status can be:
4
Operating the Serial Adapter
− On Line: The Serial Adapter is communicating with the server and displaying
the interactions in its terminal-screen area
− Help: If you press [Alt] + [F1], the Help screen will appear
− Set Up: If you press [Alt] + [F2] or [Alt] + [F3], the Serial Adapter enters
Setup Mode
− Buffer Edit: If you press [Alt] + [F4], the Serial Adapter enters Buffer Edit Mode
• In addition, the access type is shown at the right of line 4 of the top pane. The
access type can be LOC (the local keyboard/monitor user station is active),
RMT (a remote Paragon user station is active), or NO (there is no current userstation activity—the Serial Adapter is idle and will grant keyboard and mouse
control to the first user station that attempts to assert it).
• The four lines in the bottom pane display command keys specific to the current
screen.
Online Mode
When you operate the Serial Adapter in Online Mode (see Figure 3), the main
screen area displays your interactions with the ASCII device, as if it were the screen
of an ASCII terminal. Simultaneously, the data stream being output by the device
is stored in an 8-page circular buffer, so you cannot only access and operate the
device, but you can also review its historical data as needed. Because the buffer is
circular, it always retains the most recent eight pages of data from the device; the
newest data will overwrite the oldest data.
Conveniently, you can program any of the PC keyboard’s 12 function keys to
trigger your most frequently used data-stream commands. Pressing any of these
keys when in Online Mode will send that data-stream command to the device.
During the online session, you can enter the following keys to control the
communication with the ASCII device or access the Serial Adapter Help and Setup
screens.
5
Operating the Serial Adapter
• <Ctrl-Break>: Reset the serial communication with the computer and reset the
Serial Adapter
• <Ctrl-S>: Stop computer from sending any data—all output data will be
queued in the computer
• <Ctrl-Q>: Resume computer to send data
• <Alt-F1>: Display Help Menu screen (see Figure 4)
• <Alt-F3>: Set up programmable keys
• <Alt-F4>: Review/edit buffer
Figure 4 Help Menu Screen
6
Operating the Serial Adapter
Buffer Edit Mode
The Serial Adapter stores the most recent eight pages of data from the attached
ASCII device in a circular buffer. You can edit the data in the buffer (see Figure 5).
Figure 5 Buffer Edit Mode
After you switch the Serial Adapter from Online Mode to Buffer Edit Mode by
pressing [Alt] + [F4], you can review the contents of the buffer by moving the cursor
with the arrow keys—[PageUp], [PageDown], [Home], and [End]. You can also edit
the data in the buffer with [Insert], [Delete], [Backspace], and the other keys listed
in the Help screen.
7
Operating the Serial Adapter
Setup Operation
Pressing the [Alt-F2] key will enable you to set up the serial-communication
parameters and the selection of video output (see Figure 6). You can change the
serial-communication baud rate and transmission format to meet your device
needs.
Figure 6 Set Up Communication
Also, this function allows you to optionally use a VGA monitor in conjunction with
a Sun keyboard, which typically requires a Sun composite sync monitor.
To select a VGA video output with a Sun keyboard, you should use a PS/2
keyboard and a VGA monitor to access the Serial Adapter. Press [Alt-A2] to get
into the Setup screen and change the video option for Sun keyboard to VGA.
Then, you can replace the PS/2 keyboard with a Sun keyboard.
8
Operating the Serial Adapter
Pressing [Alt-F3] will enable you to program the 12 function keys (see Figure 7). Programmable keys allow you to store frequently used data streams or commands, and send
them to the devices during Online Mode by simply pressing a preprogrammed function key.
Figure 7 Set Up Programmable Keys
Note: At this time, the port labeled “Diagnose” does not have a function. This port will be used
for compatibility with future Belkin parts.
9
FAQs
1. If you do not get a device prompt:
- If the Serial Adapter’s screen is displayed on your monitor with the top and
bottom Help windows, make sure that it indicates online status. If not, press
[Esc] to return to Online Mode.
- Make sure that the Serial Adapter and the attached device are both receiving
power. The Serial Adapter’s power supply should be securely connected to
both the Serial Adapter and a working outlet. Its LED (next to the 6-pin miniDIN
PS/2 mouse connector) should flicker quickly if data is being transmitted or
blink once per second at other times.
- Make sure that the cable between the Serial Adapter and the device is securely
attached at both ends. This must be the null-modem cable included with the
Serial Adapter or one just like it.
- Make sure that the serial-communication settings of the Serial Adapter match
those of the device. Press [Alt] + [F2] to check the Serial Adapter’s settings in
its Setup screen.
2. If you do not get any video or the video is degraded or distorted:
- Make sure that all of your cables are connected securely.
- Make sure that your monitor can handle 800x600 video resolutions at a refresh
rate of 60Hz.
- If you are using a Sun keyboard at the local user station, the Serial Adapter will,
by default, try to output legacy Sun-compatible composite video on its HD15
connector. You must temporarily attach a PS/2 keyboard, press [Alt] + [F2]
to activate the Setup screen, and change the video setting so that the Serial
Adapter outputs VGA video even when a Sun keyboard is attached.
3. If the keyboard connected to the Serial Adapter does not work:
- If you have changed keyboards, you may not have powered OFF the Serial
Adapter before doing so. Power off the Serial Adapter, reconnect the
keyboard, and then power ON the Serial Adapter.
10
Information
FCC Statement
DECLARATION OF CONFORMITY WITH FCC RULES FOR
ELECTROMAGNETIC COMPATIBILITY
We, Belkin International, Inc., of 501 West Walnut Street, Compton CA 90220,
declare under our sole responsibility that the product:
F1D084E, to which this declaration relates:
Complies with Part 15 of the FCC Rules. Operation is subject to the following
two conditions:
(1) this device may not cause harmful interference, and (2) this device must
accept any interference received, including interference that may cause
undesired operation.
This equipment has been tested and found to comply with the limits for a
Class A digital device, pursuant to Part 15 of the FCC Rules. These limits are
designed to provide reasonable protection against harmful interference when the
equipment is operated in a commercial environment. This equipment generates,
uses, and can radiate radio frequency energy and, if not installed and used in
accordance with the instruction manual, may cause harmful interference to radio
communications. Operation of this equipment in a residential area is likely to
cause harmful interference, in which case the user will be required to correct the
interference at his or her own expense.
CE Declaration of Conformity
We, Belkin International, Inc., declare under our sole responsibility that the
product F1D084E, to which this declaration relates, is in conformity with
Emissions Standard EN55022 Class A and with Immunity Standard EN55024,
LVP EN61000-3-2, and EN61000-3-3.
11
Information
Belkin International, Inc., Limited 1-Year Product Warranty
What this warranty covers.
Belkin International, Inc. (“Belkin”) warrants to the original purchaser of this
Belkin product that the product shall be free of defects in design, assembly,
material, or workmanship.
What the period of coverage is.
Belkin warrants the Belkin product for one year.
What will we do to correct problems?
Product Warranty.
Belkin will repair or replace, at its option, any defective product free of charge
(except for shipping charges for the product). Belkin reserves the right to
discontinue any of its products without notice, and disclaims any limited warranty
to repair or replace any such discontinued products. In the event that Belkin
is unable to repair or replace the product (for example, because it has been
discontinued), Belkin will offer either a refund or a credit toward the purchase of
another product from Belkin.com in an amount equal to the purchase price of the
product as evidenced on the original purchase receipt as discounted by its natural
use.
What is not covered by this warranty?
All above warranties are null and void if the Belkin product is not provided to
Belkin for inspection upon Belkin’s request at the sole expense of the purchaser,
or if Belkin determines that the Belkin product has been improperly installed,
altered in any way, or tampered with. The Belkin Product Warranty does not
protect against acts of God such as flood, lightning, earthquake, war, vandalism,
theft, normal-use wear and tear, erosion, depletion, obsolescence, abuse, damage
due to low voltage disturbances (i.e. brownouts or sags),
non-authorized program, or system equipment modification or alteration.
How to get service.
To get service for your Belkin product you must take the following steps:
1. Contact Belkin International, Inc., at 501 W. Walnut St., Compton, CA
90220, Attn: Customer Service, or call (800)-223-5546, within 15 days of the
Occurrence. Be prepared to provide the following information:
a. The part number of the Belkin product.
b. Where you purchased the product.
c. When you purchased the product.
d. Copy of original receipt.
2. Your Belkin Customer Service Representative will then instruct you
on how to forward your receipt and Belkin product and how to proceed
with your claim.
12
Information
Belkin reserves the right to review the damaged Belkin product. All costs of
shipping the Belkin product to Belkin for inspection shall be borne solely by the
purchaser. If Belkin determines, in its sole discretion, that it is impractical to ship
the damaged equipment to Belkin, Belkin may designate, in its sole discretion, an
equipment repair facility to inspect and estimate the cost to repair such equipment.
The cost, if any, of shipping the equipment to and from such repair facility and of
such estimate shall be borne solely by the purchaser. Damaged equipment must
remain available for inspection until the claim is finalized
Whenever claims are settled, Belkin reserves the right to be subrogated under any
existing insurance policies the purchaser may have.
How state law relates to the warranty.
THIS WARRANTY CONTAINS THE SOLE WARRANTY OF BELKIN. THERE ARE
NO OTHER WARRANTIES, EXPRESSED OR, EXCEPT AS REQUIRED BY LAW,
IMPLIED, INCLUDING THE IMPLIED WARRANTY OR CONDITION OF QUALITY,
MERCHANTABILITY OR FITNESS FOR A PARTICULAR PURPOSE, AND SUCH
IMPLIED WARRANTIES, IF ANY, ARE LIMITED IN DURATION TO THE TERM OF
THIS WARRANTY.
Some states do not allow limitations on how long an implied warranty lasts, so the
above limitations may not apply to you.
IN NO EVENT SHALL BELKIN BE LIABLE FOR INCIDENTAL, SPECIAL, DIRECT,
INDIRECT, CONSEQUENTIAL OR MULTIPLE DAMAGES SUCH AS, BUT NOT
LIMITED TO, LOST BUSINESS OR PROFITS ARISING OUT OF THE SALE OR USE
OF ANY BELKIN PRODUCT, EVEN IF ADVISED OF THE POSSIBILITY OF SUCH
DAMAGES.
This warranty gives you specific legal rights, and you may also have other rights,
which may vary from state to state. Some states do not allow the exclusion or
limitation of incidental, consequential, or other damages, so the above limitations
may not apply to you.
13
Serial Adapter
Belkin Tech Support
UK: 0845 607 77 87
Europe: www.belkin.com/support
Belkin Ltd.
Express Business Park
Shipton Way, Rushden
NN10 6GL, United Kingdom
+44 (0) 1933 35 2000
+44 (0) 1933 31 2000 fax
Belkin B.V.
Boeing Avenue 333
1119 PH Schiphol-Rijk
Netherlands
+31 (0) 20 654 73 00
+31 (0) 20 654 73 49 fax
Belkin GmbH
Hanebergstrasse 2
80637 Munich
Germany
+49 (0) 89 14 34 05 0
+49 (0) 89 14 34 05 100 fax
Belkin SAS
130 rue de Silly
92100 Boulogne-Billancourt
France
+33 (0) 1 41 03 14 40
+33 (0) 1 41 31 01 72 fax
Belkin Iberia
Avda. Cerro del Aguila 3
28700 San Sebastián de los Reyes
Spain
+34 91 625 80 00
+34 902 02 00 34 fax
Belkin Sweden
Knarrarnäsgatan 7
164 40 Kista
Sweden
+46 (0) 8 5229 1870
+46 (0) 8 5229 1874 fax
© 2008 Belkin International, Inc. All rights reserved. All trade names are registered trademarks of respective manufacturers listed.
P75588ea-A