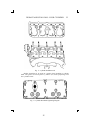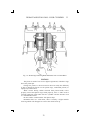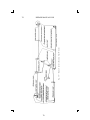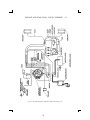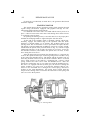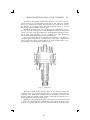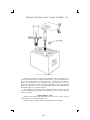
1
Repair Manual
Showing Short Cuts
and Methods for
Repairing and Upkeep
Durant and Star Cars
FOUR CYLINDER MODELS
JANUARY, 1929
DURANT MOTORS, Inc.
BROADWAY AT 57th STREET
NEW YORK CITY
DURANT MOTOR CO. of NEW JERSEY
Elizabeth, N. J.
DURANT MOTOR CO. of CALIFORNIA
Oakland, Cal.
DURANT MOTOR CO. of MICHIGAN
Lansing, Michigan
DURANT MOTOR CO. of CANADA, LTD.
Toronto (Leaside), Ontario
1
Blank page
2
WARRANTY
W
E warrant each new DURANT and STAR motor
vehicle so by us to be free from defects in material
under normal use and service, our obligation under
this warranty being limited to making good at our factory
any part or parts thereof which shall with ninety (90) days
after delivery of such vehicle to the original purchaser be
returned to us, transportation charges prepaid, and which our
examination shall disclose to our satisfaction to have been
thus defective, this warranty being expressly in lieu of all
other warranties expressed or implied and of all other obligations or liabilities on our part.
This warranty shall not apply to any vehicle which shall
have been repaired or altered outside of our factory in any
way, so as in our judgment, to affect its stability or reliability,
nor which has been subject to misuse, negligence or accident.
We make no warranty whatever in respect to tires, rims,
ignition apparatus, horns or other signaling devices, starting
devices, generators, batteries, speedometers or other trade
accessories, inasmuch as they are usually warranted separately
by their respective manufacturers.
We do not make any guarantee against, and we assume no
responsibility for, any defect in metal or other material, or
in any part, device, or trade accessory that cannot be discovered by ordinary factory inspection.
It is understood and agreed that our Standard Warranty
as shown above is null and void on any DURANT or STAR
model where parts not sold by us are used in replacements
or otherwise.
3
3
The following is a list of unit manufactures supplying Durant and Star
units who have established many service stations throughout the United States:
Ammeter
W. G. Nagel Electric Co., Toledo, Ohio
Battery
U. S. Light & Heat Corporation, Niagara Falls, N.Y.
Carburetor
Tillotson Manufacturing Co., Toledo, Ohio
Circuit Breaker
Electric Auto-Lite Co., Toledo, Ohio
Coil
Electric Auto-Lite Co., Toledo, Ohio
Generator
Electric Auto-Lite Co., Toledo, Ohio
Horn
Schwarze Electric Co., Adrian, Mich.
E. & A. Laboratories, Inc., Brooklyn, N. Y.
Distributor
Electric Auto-Lite Co., Toledo, Ohio
Lighting and Ignition Switch
Briggs & Stratton Co., Milwaukee, Wis.
Clum Mfg. Co., Milwaukee, Wis.
Oil Pressure Guage
W. G. Nagel Electric Co., Toledo, Ohio
Rims
Hayes Wheel Co., Jackson, Mich.
Bimel Spoke and Auto Wheel Co., Portland, Ind.
Speedometer
Stuart-Warner Speedometer Corp., Chicago, Ill.
Starting Motor
Electric Auto-Lite Co., Toledo, Ohio
Starting Switch
Electric Auto-Lite Co., Toledo, Ohio
Tires
Fisk Rubber Co., Chicopee Falls, Mass.
4
4
PREFACE
We have attempted in this Repair Manual to deliver a clear and concise message, which will enable any mechanic to make the necessary
repairs and adjustments on DURANT and STAR cars.
With a thorough understanding of the working parts, and their relation one to the other, this service can be delivered with a minimum of
delay.
For a mechanic to perform carefully and intelligently the duties required in a Service Station, it is necessary the he understand the construction and the various functions which component parts perform, in
order to deliver to the owner the satisfactory “service” to which he is
entitled.
In trying to diagnose the various ailments common to an automobile,
we have illustrated different parts of the car and have described the
easiest and simplest methods to be used in the making repairs, adjustments
or tests. The various operations performed in disassembling or assembling a car are graphically illustrated.
It has been made simple, with technical terms explained, for the
benefit of the mechanics who are without previous experience.
We are providing service facilities in every part of the world.
At our Factories we maintain a service organization which is at your
disposal at all times, and on which we will be glad to give you any
information you may desire.
5
6
REPAIR MANUAL FOR
Figure 1 shows the controls of the DURANT and STAR car.
The throttle and spark levers (cars equipped with full automatic spark
control are without hand spark hand lever) are located on the steering
column
In addition to the throttle lever at steering wheel a foot accelerator is
located on the toe board just to the right of the brake pedal.
Fig. 1—Front Compartment and Controls
The lighting and ignition switch, oil gauge, speedometer and ammeter
are located on the instrument board, where the oil gauge and ammeter can
be watched by the driver to see that the oil and electric current are
working satisfactorily.
The carburetor choke control is located at the left side of steering
column on instrument board.
The horn button is located at the center of steering wheel.
The starting switch is located on the toe board, at the right of accelerator
pedal and foot brake.
The gear shift is what is known as a standard shift; that is, three speeds
forward and one reverse.
The emergency or hand brake lever is located at right of the gear shift lever.
The clutch and brake pedals are located below the steering column,
the brake being on the right side and the clutch on the left.
6
DURANT AND STAR CARS – FOUR CYLINDER
7
COOLING SYSTEM
The cooling system used is a large cellular type radiator, and a water
pump of the centrifugal type which is attached to right side of motor
directly behind the generator, and is driven by the generator, which
is connected to the water pump shaft by a rubber hose which is securely
clamped to the shafts by two screws, one through each shaft.
As the circulating pump is connected to the lower radiator outlet, the
water drawn through the radiator before being delivered to the water
jacket surrounding the cylinder walls, which insures a proper circulation of cool water at all times regardless of engine speed. See Fig. 2.
Fig. 2—Cooling System
Should water leak through the stuffing box on the end of the pump,
tighten the nut. If this does not stop the leak, unscrew the stuffing box
nut, install new packing or wrap around the shaft ordinary candle wicking that has been saturated with tallow or graphite grease and tighten
the nut again.
Keep the cellular openings clean. Never allow mud to remain in
them as it cuts down the radiation and prevents proper cooling. The
entire circulating system should be thoroughly flushed out occasionally.
This can be done in ordinary cases by disconnecting both the upper and
lower hose connections and allowing fresh water to enter the enter the filler neck
and flow down through the radiator and out the lower hose. The motor
water jackets can be flushed out in the same way.
7
8
REPAIR MANUAL FOR
When hard water has been used, a scale or deposit will be formed which
unless removed, will obstruct the circulation, causing unnecessary heating
and frequent refilling. In this case a good way to clean out the scale is to
dissolve a half pound of lye in about five gallons of water. Strain the liquid
through a cloth and pour in the radiator. Run the motor for about five
minutes, then draw off the solution through the radiator drain cock.
Fill the radiator with fresh water and run the motor again for several
minutes; then drain off and refill with fresh water.
Never Use A More Powerful Chemical
Once a week it is a good plan to open the radiator drain cock and let
all the water and accumulated dirt run out. If the water is very dirty, flush
the radiator with fresh water.
Never—and be sure about this—put cold water into the radiator while
the motor is hot. By “hot” we mean any temperature which is uncomfortable to the hand when held against the cylinder head.
When a motor gets “hot”, the cylinder walls and especially the cylinder head around the exhaust ports are thoroughly heated up. The
danger of cracking these parts cannot be overestimated; so make it a
point, should you stop for water after the motor has been running for
some time, to test the temperature of the motor by raising the heed and
placing your hand on the cylinder head. If you can hold it there with
comfort, water can be placed in the radiator; if not, wait until you can.
It will only take a few minutes for the motor to cool off, and the repair
bill saved will more than offset the slight loss of time and inconvenience.
Leaks in any system subject to vibration are likely to occur. It is
not a good plan to put corn meal, bran or other substances in a radiator
to stop a leak. It clogs up the tubes, thereby decreasing the cooling
efficiency. Make a permanent repair with solder.
Winter Driving
As soon as the temperature begins to approach the freezing point, an
anti-freezing solution should be placed in the radiator. Wood alcohol
of denatured alcohol is best for that purpose.
The following table may be used in estimating the quantity of comercial alcohol required for different temperatures.
30° F. Above………………..½ qts.
Zero………………………….2¾ qts.
20° F. Above………………1½ qts.
10° F. Below…………….......4 qts.
10° F. Above……………….2 qts.
20° F. Below………………...4½ qts.
50° F. Below………………...5¼ qts.
Capacity cooling system—8 quarts.
Since alcohol evaporates more quickly than water, it is well when
filling the radiator to make up the loss by adding a s solution of equal
parts of alcohol and water.
8
DURANT AND STAR CARS – FOUR CYLINDER
9
The use of powerful chemicals, while sometimes cheaper in first
cost, is very likely to cause damage later, costing more in repair bills that
the amount saved, as they attack the metal and rubber hose connections.
If the radiator should freeze, do not try to thaw it by starting the
motor, but thaw it by placing in a warm place.
It is a good plan, when making a stop in cold weather, to cover the
radiator and hood with a blanket or other covering. This helps hold the
heat, and in the way gives considerable protection for the prob-ability of
freezing, besides making the motor start easier.
9
Blank page
10
CHAPTER I
A DETAILED DESCRIPTION OF THE THINGS MOST
LIKELY TO CAUSE DIFFICULTY AND
HOW TO DIAGNOSE THEM
11
12
REPAIR MANUAL FOR
HOW THE MOTOR OPERATES
The DURANT and START motors are of the “L” head, poppet valve
type. All models have four cylinders on which the firing sequence is
1-3-4-2.
All DURANT and STAR motors are “four cycle,” which means there
are four complete strokes of the piston or two complete revolutions of
the flywheel to one complete firing sequence.
1. As the piston starts downward in the first stroke of the cycle,
the intake valve is opened. The motion of the piston creates a vacuum
in the cylinder and draws a charge of gas from the carburetor through
the valve opening.
2. When the piston reaches the bottom of its stroke and starts
upward on the second stroke of the cycle, the intake valve closes and the
piston compresses the gas that is drawn into the space at the top of the
cylinder.
3. As the piston reaches the end of its upward stroke, the compressed
gas is ignited by an electric spark which occurs at the points of the
spark plug and the resulting explosion pushes the piston downward,
turning the crankshaft on the third cycle or power stroke.
4. On the upward stroke of the piston, the exhaust valve is opened
and the piston forces the burned gas out through the exhaust pipe,
leaving the cylinder empty and ready for the beginning of a new intake
stroke.
MOTOR FAILS TO START
If for any reason the motor does not start immediately under its own
power, remove your foot from the starting button at once. One of the
following things may be causing the trouble:
Ignition switch may not be turned on.
The storage battery may be partially discharged and when the starting
motor is in operation, not enough electric current is flowing to the coil to
produce a spark sufficient to ignite the gas. (See Pages 102 to 105.)
The coil may be burned out. (See Page 90.)
The contact points in the distributor may not be opening or the points
may be burned so badly as to form a poor contact.
The primary wire from coil to distributor, coil to switch or to battery,
may be loose or broken, making poor contact.
Spark plugs points fouled with oil or carbon.
Secondary wire from coil to distributor cover disconnected at coil or
distributor.
Gasoline supply exhausted.
Shut-off cock in gasoline feed line may be closed.
Filter screen in bottom of carburetor may be clogged with sediment
so that gasoline cannot enter float chamber.
Filter screen at top of vacuum tank may be clogged with sediment to
stop flow of gasoline.
Gasoline line may be clogged with dirt; or if is cold weather, an
accumulation of water n the line may have frozen.
12
DURANT AND STAR CARS – FOUR CYLINDER
13
The carburetor choke wire may not be pulled up far enough, providing
the motor is cold, to make the mixture rich enough to ignite, or the
choke valve may have been closed too tight, causing the mixture to be
so rich with gasoline that it will not ignite.
WATER IN GASOLINE SYSTEM
If there is water in the gasoline, it will not mix; but being heavier
than gasoline, will find its way to the bottom or lowest point in the carburetor.
In cold weather it may freeze. By pouring hot water or applying hot
cloths to the supply pipe and carburetor this can be loosened up. If
poured on, be careful that none enters the carburetor.
MOTOR MISSES AT HIGH SPEED ONLY
There is insufficient gasoline flowing to carburetor, due to obstruction
in gasoline line or filter screen, or the shut-off cock may be only partly
open.
A valve may be sticking slightly and does not seat properly.
There may be a loose electrical connection.
The spark plug points do not have the proper gap. The point should
be separated .025 of an inch
MOTOR MISSES AT ALL SPEEDS
First determine which of the cylinders are not firing. This can be
accomplished by placing a screw driver (with wood or rubber handle)
from the terminal end of the spark plug to the cylinder head. (See Fig.
73.) If a change in the running of the motor is noticed, it is not the
correct cylinder. Test each cylinder separately until one is found that
by “short-circuiting” the spark plug with the screwdriver makes no
difference in the running of the motor. The following reasons may be
causing the motor to misfire:
Spark plugs may be fouled or may have broken porcelain. If the
plugs are fouled, wash with gasoline. If the plugs have a broken porcelain, a new plug is the only remedy.
One or more valves are sticking. In this event, with an oil can
filled with equal portions of cylinder oil and kerosene, squirt around the
valve stem of valves that are sticking. In some instances it will be
necessary to remove the valve and polish stem. (See Page 31, Fig. 13.)
Valves may need grinding. (See Page 30, Fig. 12.)
One of the ignition wires may be loose. Examine and make sure that
all electrical connections are tight.
The contact points in the breaker box may be badly worn or need
cleaning. (See Page 101 Fig. 75.)
Valve spring may be weak and not allowing the valve to properly close.
(See Page 29, Fig. 11.)
The valve tappet may be adjusted too tight not allowing the valve
to close, or the valve adjustment may be loose, not allowing the valve
to open.
A valve spring may be broken.
13
14
REPAIR MANUAL FOR
Filter screen in carburetor clogged and gasoline not flowing to carburetor properly. (See Page 85.)
The spark plug gaps are not adjusted properly. The gaps should be
about .025 of an inch.
The carburetor may be flooding, causing the mixture to be too rich.
The is usually caused by the needle valve not seating properly. To
correct, remove float chamber cover, rotate valve slowly with fingers and
tap lightly on top of valve. This will cause a new seat to be formed and
will also remove any obstruction or roughness that there may be on the
needle valve seat.
MOTOR MISSES AT LOW SPEED ONLY
Compression is weak due to leaky piston rings or valves not seating.
There may be a leaky gasket where the carburetor is attached to the
intake manifold or where the manifold attaches to the cylinder block,
permitting air to enter, weakening the mixture. To detect the leak, take
an oil can filled with gasoline and squirt around where the connections
are made. If any gasoline enters the opening, the speed of the motor will
immediately increase, thereby indicating a leak.
The regulator screw which regulates the flow of gasoline at low
speed only may not be adjusted properly. Set the throttle for low speed running and turn the screw in and out to obtain the best low speed running
adjustment.
The spark lever (cars equipped with manual control may be advanced
too far. When running at low motor speeds, the spark lever should be
retarded.
When running at low motor speed the generator does not deliver electric current to the storage battery, as the circuit breaker makes an “open”
circuit in the line and ignition current is then supplied from the storage
battery. If the battery is in a badly discharged condition, it ofttimes
happens that insufficient current is being supplied for ignition purposes.
There may be one or more weak exhaust springs and, with the throttle
practically closed, the vacuum created the cylinders by the piston on
the suction stroke will open the exhaust valve, drawing in burned gases
and weakening the mixture so it will not burn.
MOTOR STOPS SUDDENLY
If the motor stops suddenly, without any further explosions:
Examine gasoline supply.
Examine carburetor to see if gasoline is running into the float chamber.
If motor has been running along evenly and begins to miss with
considerable backfiring through the carburetor and finally stop, it is
usually an indication the gasoline supply is exhausted. When the
gasoline gets below a certain point in the carburetor, an insufficient
supply is furnished to the cylinders, which produces a slow-burning
mixture with the resultant backfiring.
Examine the switch, and, at any point on the reverse side of the instrument board where wires are attached, at the storage batter, igniter and on
the coil, for loose connection, as a wire may have become detached.
14
DURANT AND STAR CARS – FOUR CYLINDER
15
The switch may be burned out, or the key does not produce a contact.
Test the coil (See Page 90) to determine whether it is burned out, and,
in fact, make a thorough examination of the entire ignition system.
Test the wires at the distributor (See Page 100) to determine whether
electricity is getting through the ignition switch.
If it is found that the electrical connections are all tight and that there
is electricity in the wires, examine the distributor, as the cam which
operates the distributor may have become loosened and the contact points
are not opening. If this is found to be the case (See Pages 96 to 98) for
retiming distributor.
MOTOR SPITS AND BACKFIRES
This is usually an indication of carburetion faults, although the backfiring through the exhaust pipe or muffler may be due to defective ignition. If for any reason the igniter or ignition apparatus fails to operate
for a few revolutions of the motor, there is a considerable amount of
unburned gas forced from the cylinders into the exhaust pipe and muffler; the when the gas is ignited in the cylinders the flame which is
emitted through the exhaust valve ignites the gas in the muffler, causing
an explosion.
Backfiring and spitting through the carburetor is often due to a weakened mixture, which is slow-burning, and as there is still a certain
amount of flame in the cylinder when the intake valve opens to receive
the new charge of gas, the result is that the gas in the intake pipe is
ignited. The cause is usually a low gasoline supply or a clogged gasoline
system, or there may be small air leaks in the intake manifold or at the
connections which allow air to enter, making the mixture too lean.
Carbon Deposits on top of the piston or on the sides of the combustion
chamber becoming heated to a degree of incandescence will sometimes
ignite the incoming charge of gas, causing a backfire through the carburetor.
On of the intake valves may be sticking and not getting to its seat in
time. It should be removed and the stem polished. (See Page 31.)
STARTING MOTOR DOES NOT OPERATE
This is not an infrequent source of difficulty and may be caused by
any one of the following:
Exhausted storage battery, due to excessive use of the starting motor
or lights and is the direct result of failure of the part of the owner in not
observing the rules set forth for the care of his battery. (See Page 103.)
Broken or loose wires either at the battery, starting switch or starting
motor. Examine all connections and wires carefully.
Starter cables may be loose at the battery posts or have become corroded and are not making a good contact. Remove and thoroughly clean,
then cover with vaseline or petroleum jelly.
The cable leading from the negative post of the battery to the starting
switch or from the starting switch to the starting motor may be loose at
the terminal post.
15
16
REPAIR MANUAL FOR
Starting switch making poor contact, having broken blades or sticking. Remove the switch and make necessary repairs.
Starting motor may be “short-circuited” or may have shifted out of
line. (See Page 95.)
MOTOR OVERHEATS
The following causes will usually lead to a hot motor:
Low water supply in the radiator. It is necessary to have full tank of
water as it to have plenty of gasoline or oil. Make it a rule to regularly
inspect and fill the radiator.
Radiator tubes stopped with lime deposits. The radiator should be
thoroughly cleaned. (See Page 7.)
Fan belt too loose, or broken, causing fan to stop rotating. (See Page
46 on adjustment and replacement.)
Oil not circulating through the motor properly, or it may be diluted
with gasoline to such an extent that the friction-reducing qualities are
affected.
Late or retarded spark. This is usually apparent by a marked loss
in power. A late spark produces a slow-burning charge which causes
an increased amount of heat due to the piston having started downward
on the power stroke, reducing the density of the compressed gas before
it is ignited. (See Pages 96 to 98 covering retiming distributor.)
Gasoline mixture too rich.
MOTOR LACKS POWER AND IS SLUGGISH
This is very apparent when ascending a slight grade or in attempting
to accelerate the motor suddenly, and ay be caused by the following:
Carbonized Valves
As the motive power is obtained by burning or exploding a highly
compressed gas mixture, it follows that a certain amount of carbon will
be deposited on the valve seats, piston head and combustion chamber.
Small particles of burnt carbon will lodge under a valve, especially the
exhaust, holding it open. As this exposes the valve seats to the heat
generated b the explosion, small pits or burnt spots will in time cause
the surface to be so roughened as to prevent tile proper seating of the
valves. This will cause a leakage of gases, resulting in loss of power
and uneven running of the motor. When this occurs, grinding the
valves is the only remedy.
To determine which valve needs attention, turn the motor over slowly
by hand and note whether the same degree of resistance is met with in
each cylinder. The ones offering the least resistance are those whose
valves leak. Grinding the valves is the only remedy. (See Page 30,
Fig. 12.)
Worn or Broken Piston Rings
It is always advisable to grind the valves first and in that way remove
the most likely cause of trouble. With the cylinder head off an approximate examination of the rings be made. as follows: Turn the motor
16
DURANT AND STAR CARS – FOUR CYLINDER
17
over by hand so as to bring successive pistons to the top of their strokes.
Then rock the fly wheel back and forth, holding your fingers on the top
of the piston. If the rings are worn in the grooves, you can feel them
move.
Piston rings seldom wear enough on their outside diameters to require
replacement. However, they will wear on the sides where they fit into
the grooves, therefore when they become loose enough to feel the movement
as described above they should be replaced. (See Page 37.)
Replacing the piston rings will not always overcome the "blowing by"
of gases if the cylinder walls are worn out of round. An examination
should be made to determine whether this condition exists, as the new
piston rings will only touch the high spots in the cylinder, leaving a
space between the rings and the cylinder walls. In this event, the only
remedy is to hone or regrind the cylinders or replace the cylinder block.
Valves Adjusted Too Close
Valve tappets set up too tight, causing the valves to hold open.
With the motor hot, test the tappet clearance (Pages 26-27) and adjust
accordingly.
Late Ignition
If the piston starts downward on the power stroke before the spark
crosses the gap of the spark plug, the compression is reduced and a
portion of the effect of the expansion or explosion of the gases on top
of the piston is lost. The ignition timing should be checked very carefully to see that the electric current is being delivered to the spark plug
at the proper time. (See Pages 96 to 98.)
Badly burned spark plug electrodes, which increase the resistance of
the plugs, resulting in a weak spark. Replacing the plug is the only
remedy.
MOTOR POUNDS OR KNOCKS
When a peculiar pound or knock, unusual to the regular motor sounds,
is heard, it should be investigated to determine as nearly as possible its
location and seriousness.
Go about the task of locating the source of trouble carefully—don’t
jump at conclusions, and, above all, do not operate the car until you
are satisfied that no harm will result pending later repairs.
Nearly all motor noises can be definitely located. Some, however, can
only be Approximated. These noises are usually the result of :
An Accumulation of Carbon Deposits on Piston Heads, Valves
and Combustion Chamber
A motor which is badly carbonized will pound when the power is
applied suddenly or when ascending a slight grade. Retarding the spark
will reduce the noise; however, the motor will be sluggish, heat readily
and labor on the slightest pull.
Carbon will deposit in the combustion chamber of any internal combustion engine, so do not be alarmed. However, at the first opportunity
the cylinder head should be taken off (Fig. 5), the carbon removed, and
the valves reground (Fig. 12).
17
18
REPAIR MANUAL FOR
Loose or Worn Bearings
A bearing knock or thump can be detected in two ways: First, by
accelerating the motor quickly , at which time a rattling and clashing
sound will be produced; and, second, by starting the car with the brakes
set, which will cause the motor to pull against resistance. By holding
one end of a screwdriver or rod to the ear and placing the other end at
different points on the motor. the particular spot where the noise is loudest can be determined (Fig. 3).
If the sound is loudest at the top of the motor, short circuit the plug.
(Fig. 73) on that cylinder. If the noise disappears you have located the
cylinder in which the trouble lies.
Fig. 3—Locating Motor Knock
The next step is to determine: First, whether it is due to a worn piston pin;
second, to a worn or loose piston.
Worn piston pins cannot always be located by short-circuiting the spark
plug, but by holding open an exhaust valve, thereby reducing the vacuum in the
combustion clamber on the suction stroke of the piston, the knock will usually
disappear, indicating the cylinder in which the trouble lies.
If the motor is cold, run enough to thoroughly heat up the pistons and
cylinder walls-as a cold motor will always be noisy and is likely to deceive
the inexperienced mechanic.
If the noise is produced by a loose piston, retarding the spark will lessen
it; however, the best test is to operate the car at a speed of ten to twelve miles
per hour, either on a slight grade or by having the brakes partly set. Under these
conditions a knock produced by a loose piston usually develops, and by shortcircuiting the spark plugs, the cylinders containing worn or loose pistons can
usually be located.
18
DURANT AND STAR CARS – FOUR CYLINDER
19
To replace piston or piston pins, remove the oil pan (Fig. 16) and
proceed as instructed on Pages 35 to 43.
If the noise appears to come from the lower part of the motor, determine whether it is in the main crankshaft bearings or connecting rod
bearings. By holding the screwdriver or rod opposite the main bearings
and putting the motor on a "pull," the location can usually be determined
with accuracy.
Remove the lower crankcase and tighten the bearings as instructed
on Pages 43 to 44.
Worn or improperly adjusted valve tappets.
This is easily detected and adjustment or replacement made as per
instruction (pages 27 to 29).
Loose flywheel bolts. This sometimes is a very difficult noise to locate,
as the sound is transmitted to all parts of the motor and gives the impression of loose main bearings. If tightening the bearings does not
remove the noise, examine the flywheel bolts.
Worn camshaft bearings or loose timing sprocket keys.
Lack of Oil or Water
Insufficient oil circ ul ating through the motor or a low supply of
water will cause the motor to over h eat and knock. Examine the oil
pump and circulating pipes.
CLUTCH
The releasing and engaging of the clutch will in time produce the
following conditions:
Clutch Grabs
If the clutch takes hold too quickly, causing the car to start with a
jerk, (when the clutch is engaged slowly), the adjusting fingers should be
adjusted evenly so that same pressure is on each one, or the disc which
holds the friction plates may be sprung. Remove and straighten.
Clutch Slips
If clutch slips the adjusting fingers may not be adjusted property to
give enough pressure on the single plate disc. To increase pressure,
loosen the three castled nuts on the clutch fingers; or, perhaps, the clutch
pedal is striking the toe board.
Weak Clutch Springs
This seldom occurs, as the action of the springs is very light. However,
if none of the above conditions are the source of trouble, renewing the
springs will usually correct the difficulty.
TRANSMISSION
The transmission is of the selective type, having three (3) speeds
forward and one reverse. It is composed of a countershaft on which
are keyed three gears and a main or splined shaft, on which two gears
slide, which, by a lengthwise movement, can be made to engage
the gears on the countershaft.
19
20
REPAIR MANUAL FOR
The most frequent source of annoyance is having the gears jump out
of engagement. This is usually produced by one or more of the following
causes:
First: Gears not meshed deep enough, causing the load to be carried
on a part of the teeth only. In making the gear shifts always be sure,
before engaging the clutch, that the gearshift lever has been moved as
far forward or backward as it will go without straining. If this is not
done, the edges of the teeth will become beveled, and in time it will be
possible to keep the, gears- engaged.
Second: Bent gearshift forks. (See Pages 56 to 57.)
Third: Loose or worm sliding gears.
Fourth: Loose main drive gear bearing or worn, main drive gear
bushing.
If transmission becomes noisy or grinds when the motor is running
idle with the clutch engaged, it may be due to the transmission being
out of alignment with the motor.
REAR AXLE NOISES
These can be subdivided into two classes:
First: A normal and natural steady hum which is always present when
gears are used, whether in an axle or otherwise. This should not be
confused, neither should the motorist become alarmed, if the noise continues steady and uniform.
Second: Lumpy, jerky noises usually produced by wear. Although
occasionally one or more teeth may become broken. There is no absolute
method of diagnosis except to disassemble the axle and examine and try
the fit of each working part,
A rear axle is divided into three component parts:
(a) A propeller shaft, which is the connecting shaft between the
transmission and the axle proper (Fig 51).
(b) A differential, whose function is to permit one wheel to travel.
faster than the other, or independent of the other, such as turning corners, etc.
(c) The main or driving shafts to which the rear wheels are attached.
Each of the above are properly supported on bearings mounted in suitable housings. By following the description covering the disassembly and
assembly of the different units on Pages 63 to 67 the proper repair of the
axle should not be a difficult task.
The following will give a general idea of the probable source of
difficulty.
REAR WHEELS WILL NOT ROTATE
(a) Remove the, hub caps and note if axle shafts revolve. Occasionally the key holding the wheel hub to the axle shaft shears off.
(b) Remove the cover on the transmission and note if the spline shaft
revolves; if it does, the trouble may be looked for at the following
places:
20
DURANT AND STAR CARS – FOUR CYLINDER
21
First—Universal joint, key sheared on drive pinion.
Second—Broken axle shafts.
Third—Rivets sheared holding ring gear to differential case.
Fourth—Broken universal joint or propeller shaft.
Grinding Noises When Turning Corners
This is an indication that the differential thrust bearings are out of
adjustment. Replacement or proper fitting is the only remedy.
AXLE “BUCKS" OR "CLASHES" WHEN COASTING
May be due to one or all of the following:
First: Worn or improperly adjusted pinion shaft thrust bearing.
Second: Worn drive gear or pinion.
Third: Worn universal joint. (See Page 63.)
Fourth: Loose rear axle shaft wheel key.
Fifth: Worn bushing in the transmission drive gear.
Sixth: Loose rivets holding drive gear to differential gear case.
Seventh: Worn differential spider pins.
BRAKES
Brakes are the "safety factors" of an automobile, and, yet is safe
to say that the average motorist seldom give them any thought until they
have become so worn as to be ineffective.
Brakes "Howl" or "Squeak" When Applied
This is due to the brake linings becoming worn so that the heads of
thee rivets holding the linings to the bands or shoes strike the drum, or
the surface of the lining has become glazed. If the rivets protrude,
remove the bands or shoes and sink the rivet heads below the lining.
If the linings are too thin, renew them.
Car Skids, or One Wheel Locks When Applying Brakes
The brakes are not adjusted evenly; that is, those on one wheel grip
before those on another. For proper adjustments, see Pages 67 to 74.
Brakes Will Not Hold on a Hill
This indicates that the lining is not bearing evenly and is gripping
on portion of the lining only. (See Pages 67 to 74.)
CAR STEERS HARD
This is usually caused by any one of the following:
Steering gear needs lubrication.
Steering knuckle king pins need lubrication. This is one of the
most common causes.
21
22
REPAIR MANUAL FOR
Front tires not properly inflated.
Wheels not in proper alignment. To properly grip the road, the
wheels, should "toe in" at the front that is the distance between the center
of the tires should be not greater than ⅛” shorter at the front than at the
rear of the wheels, when measured at the height of the hubs. (See Page
59, Fig. 46.)
The bolts holding the steering gear to the frame may have become
loose.
FRONT TIRES WEAR UNEVENLY
This is due entirely to the front wheels not being properly lined up.
(See Page 59 for front wheel alignment.)
22
CHAPTER II
PRACTICAL METHODS FOR THE REPAIR AND
MAINTENANCE OF DURANT AND STAR CARS
23
24
REPAIR MANUAL FOR
TO REMOVE MOTOR FROM CAR
Disconnect all parts which connect the motor to the body, frame or
radiator.
Remove universal joint between clutch and transmission.
By installing a motor hook, as shown in Fig. 4, fastened in No. 3
spark plug hole, and with the aid of a chain hoist, it can be removed
very easily.
Fig. 4—Removing Motor from Car
CYLINDER HEAD
The cylinder head, a separate casting, can be removed by
disconnecting radiator hose, spark plug wires, and fifteen (15) 7/16'
hexagon nuts. (See Fig. No. 5.)
The old cylinder head gasket may be considered in good condition,
and may be reinstalled if the copper lining 'is free from marks of
depressions, and the surface is smooth and unbroken.
24
DURANT AND STAR CARS – FOUR CYLINDER
25
Fig. 5—Cylinder Head Removed
Shellac should never be used on a gasket when installing a cylinder
head. The gasket is held in place by fifteen (15) studs projecting from
the cylinder block.
Fig. 6—Cylinder Head Bolt Tightening Diagram
25
26
REPAIR MANUAL FOR
When the gasket is in position on the cylinder block, put the head
in place; then the upper water connections Screw each of the fifteen
7/16" hexagon nuts until they just touch the cylinder head. Then tighten
each one evenly, a little at a time, until all are tight.
The best results may be obtained by tightening the bolts in the order
specified on the cylinder head bolt tightening diagram, as shown in Fig,
6.
After the motor been warmed up under its own power, tighten
each nut again.
VALVE TAPPETS
Four valve tappets are installed in each of two guide gates and are
held in position by pin and spring plungers between each tappet.
These can be removed as an assembly, as shown in Fig. 7 by
removing two (2) 3/8”-16 x 1-9/16” hexagon head cap screws which
screw into bosses on cylinder.
Fig. 7—Removing Valve Tappet Guide
Caution:—Do not use longer cap screw than specified above, as a
longer screw will extend into the cylinder and cause damage to the piston.
Adjusting Valve Tappets
To adjust valve tappet, crank the motor by hand until the valve tappet
being tested has reached its lowest point of travel, then measure the
26
DURANT AND STAR CARS – FOUR CYLINDER
27
space between the tappet adjusting screw and the valve stem; there
should be .008 of an inch clearance or back lash with hot motor.
Fig. 8—Determining Proper Valve Clearance
Clearance can be determined by feeler stock or thickness gauge, as
shown in Figure 8; but if same is not available, an ordinary sheet of
writing paper can be used which will measure approximately .005 of an
inch. If adjustment is required, loosen the lock nut with a 9/16" flat
wrench, and turn adjusting screw with an 11/16" flat wrench until proper
adjustment is made, after which the lock nut should be tightened.
Fig. 9—Standard Thickness Gauge
27
28
REPAIR MANUAL FOR
Fig. 10—Adjusting Valve Tappet
NOTE: By welding an eight or nine-inch handle on standard 11/16”
and 9/16” flat wrenches, it will allow you to make adjustments more
easily as shown in Fig. 10.
REMOVING VALVE SPRINGS
After the cylinder head and valve tappet assemblies have been
removed, compress valve springs, and remove lock pin.
TESTING TENSION OF VALVE SPRINGS
Insert a screwdriver or some other suitable tool between the coiIs of
the valve spring while the motor is running.
Twist or turn the screwdriver, thus increasing the spring's tension, as
shown in Fig. 11.
If the motor picks up and runs properly, replace the spring with a
new one.
28
DURANT AND STAR CARS – FOUR CYLINDER
29
Fig. 11—Testing Tension of Valve Spring
The spring's tension can be increased for a short time by removing
the spring and stretching.
GRINDING VALVES
Place a light coil spring, 1¾” long, around the valve stem.
Smear a thin coat of grinding compound on the bevel edge of the
valve head, insert the valve in its original position and with a brace and
screwdriver bit or with a vacuum cap valve grinding tool, rotate the
valve back and forth a quarter of a turn, using enough pressure to
overcome the resistance of the small spring. (NOTE: When a vacuum
cup valve grinding tool is used, no spring is necessary around the valve
stern.)
Do not turn the valve through a complete circle, as it will cause the
compound to cut ridges on the surfaces.
Quite often valve seats are badly burnt or pitted and should be reseated
by a special resealing tool before attempting to grind in valve.
29
30
REPAIR MANUAL FOR
Fig. 12—Grinding Valves
After rotating the valve a few moments, release the pressure on the
brace. This will cause the coil spring to act, lifting the valve slightly
before again resealing. For further grinding turn valve one-quarter
revolution, and repeat operation until the valve seats in block are polished, and show no dark spots. To test for perfect contact, mark lines
with a lead pencil, about ¼" apart on the bevel edge of the valve and
reseat the valve. Give the valve one-half turn to the right and one-half
turn to the left using a little extra pressure on the brace.
If all marks are removed, the grinding is perfect. If one line or part
of one line remains untouched, this indicates an uneven spot, and the
valve must be reground until it seats properly,
POLISHING VALVE STEMS
Remove all particles of carbon and grit.
Hold the valve head in wooden blocks clamped in the jaws of a vise
as shown in Fig. 13. Wrap a narrow emery cloth around the valve
stem and pull the ends back and forth, at the same time causing it to slide
up and down the stem.
30
DURANT AND STAR CARS – FOUR CYLINDER
31
Fig. 13—Polishing Valve Stem
After the grinding or polishing operation, be sure all compounds are
thoroughly washed out with gasoline.
Fig. 14—Side View of Motor
31
32
REPAIR MANUAL FOR
Fig. 15—Front View of Motor
REMOVING CONNECTING RODS AND PISTONS
(3c” Bore Motor)
After oil pan is removed, the connecting rod bearing caps can be
removed, disconnecting the connecting rod from the crankshaft.
Turn motor over by hand with starting crank until connecting rod
journal is horizontal, which will allow the connecting rod and piston to
be pulled out.
If the cylinder head is off, the connecting rod and piston can be
removed from the top.
Figure 16 shows connecting rod and piston being removed from bottom of cylinder.
To remove connecting rods and pistons from the 3d” bore motor it is
necessary to remove cylinder head and oil pan and take rods and pistons
out from
32
DURANT AND STAR CARS – FOUR CYLINDER
33
Fig. 16—Removing Connecting Rods and Pistons from 3⅛" Bore Motor
PISTONS
The piston is made of cast iron or light weight metal, with three rings
above the piston pin.
Fitting new pistons is often resorted to when in reality the difficulty
is due to improperly fitted or worn piston rings, carbonized pistons, or
improperly seated valves.
With a motor having carbon removed from piston heads, valves
properly seated and piston rings fitted properly, there is little need to
consider replacing piston until after the cylinder wall has become worn
to a considerable extent.
Do not confuse carbon knocks with piston slaps.
Remember that in a cold motor, there is usually a slight metallic
click-ing which will disappear as soon as the motor heats up.
33
34
REPAIR MANUAL FOR
There is always a slight shoulder above and below the piston ring, travel
in a worn cylinder bore. These shoulders must be removed before a new
piston can be properly fitted.
Fig. 17—Fitting Piston
Where motors have been in service an unusually long time, the cylinder bores will wear unevenly: that is. will be out of round and somewhat tapered.
To determine the condition of the cylinder, as to size and taper use a
piston and feeler stock of sufficient thickness to fill up the space between
the cylinder wall and the piston.
Insert the piston and feeler at the top of the cylinder, as shown in
Fig. 17. If the piston binds at the bottom of the cylinder, and is free at
the top, you will know that the cylinder is tapered. It should be honed or
reground.
To determine if the cylinder walls are out of round, insert piston with
feeler gauge into cylinder bore, noting the clearance.
Remove piston and turn one-quarter turn with the feeler gauge in
same position of the piston and again insert in the cylinder.
If the clearance is not the same, the cylinder is out of round, and
should be reground or honed.
After honing or regrinding a cylinder bore, oversized pistons must be
used. We stock at our factories, .003, .005, .010, .015, and .020 oversized
cast iron, and lightweight, solid skirt pistons. We can also furnish
oversized lightweight, pistons .023, .025, .030, and .035 oversize.
34
DURANT AND STAR CARS – FOUR CYLINDER
3.124
35
A standard cast iron piston measures 3.122 and is stamped on the top
of3.123the piston, 3.122, A standard lightweight, solid skirt piston measures
and is stamped on the top of piston 3.121.
A standard lightweight
3.121
3.375
piston for the 3d" bore motor measures 3.373 The letter "S" is also
painted on the top.
Oversized pistons are stamped with the full decimal measurements of
the piston. To determine the amount of oversize, deduct the known
standard given above from the stenciled figures.
On new pistons the amount of oversize is also painted on the piston,
thus: 3+, 5+, etc.
Pistons—both cast iron and lightweight—for the 3c” bore motor
should be fitted loose on a .003” feeler and tight on a .004” feeler and
tight on a .015” feeler for the 3d” bore motor.
To determine the correct clearance between piston and cylinder wall,
secure three narrow strips of feeler stock, .0015”, .003” and .004” thick and
½" wide, and long enough to reach the full length of the bore.
First insert the feeler stock of the proper thickness between piston and
cylinder wall, make sure the feeler lays at side of piston between the
piston pin bosses. Piston should be pushed well into the cylinder bore
and considerable resistance should be felt in removing the feeler stock.
Pistons with slot in skirt must be installed with slot side of piston
toward the valve side.
Fig. 18—Cylinder Hone
35
36
REPAIR MANUAL FOR
Next insert piston in cylinder bore using the low limit thickness of
feeler for the type piston being fitted and with piston pushed well into
bore, it should be a free fit, or to remove feeler, only a slight drag should
be felt.
By using the two thickness of feelers, it gives for the proper fit, a
loose and tight piston, which is correct.
Pistons should not be fitted to closer limits than specified, as some
room for expansion must be provided.
Caution: Powdered emery, glass or other abrasive should never be
used to grind in an oversized piston, as the compound works into the
pores of the cylinder wall, and no amount of washing or brushing will
remove it. Therefore, it is an active abrasive, making an early renewal of
the piston and cylinder necessary.
If a hone is not available, there are machine shops in almost every
locality that are equipped to regrind or rebore cylinders.
Figure 18 shows the hone which is recommended for refinishing
bores in DURANT and STAR motor blocks.
The operation of the hone is as follows:
The hone is placed in the cylinder and adjusting screw tightened until
the stones are up against the cylinder wall. The driving handle is put into
the drill chuck and ball end of driver in end of hone; then, with an oil can
see that plenty of kerosene is put on the honing stones and cylinder wall.
Drill is started and, as hone revolves it is moved slowly up and down far
enough to let the ends of the stones protrude about half an inch through
block. As soon as the hone begins to free itself, the driver handle is
removed and adjusting screw tightened, it being necessary to keep hone
adjusted tightly and working until the finish; then move up and down
very slowly f or about five times and stop at top of stroke. Loosen
adjusting screw one-half a turn and remove hone.
PISTON RINGS
The purpose of the piston ring is to fill up the space between the
cylinder wall and the piston, so as to prevent leakage of gases.
As these gases are under pressure, it is necessary that the rings not
only fit snugly around the cylinder wall, but in the grooves of the pistons
as well; otherwise the gas and oil work behind the rings.
Remove the piston rings over the top of the piston. It will be found
easier to remove the top ring first, then the center, and lastly the bottom.
A piston vise as shown in Fig. 20, the jaws of which are lined with
babbitt, will not mar or distort the finest piston. Indispensable in ring or
piston-pin fitting operations.
Caution: Be careful in handling a piston with light walls as they, may
be easily sprung, causing the piston to be out of round.
36
DURANT AND STAR CARS – FOUR CYLINDER
37
Fig. 19—Removing Piston Rings
Fig. 20—Piston Vise
Removing Piston Rings
To remove the piston ring use piston ring expander (See Fig. 19). If
this tool is not available, then raise one end of ring and insert a knife
blade or hacksaw blade back of it and guide it around the piston with one
hand using the other hand to help force it out of groove.
Fitting Piston Rings
To properly fit new piston rings, proceed as follows:
Slide the piston into the cylinder bore (top up). Insert the ring into
the bore and press it down until it rests snugly against the piston at all
points, It may be necessary to file the beveled edges of the ring to do
this, as all rings when new are oversize; however, use care not to remove
more metal than is necessary to make the ring rest squarely on the piston
head. (See Fig. 21.)
With the aid of a narrow strip of feeler stock, .003' thick, slip it
between the two edges of the split in the ring. If the space between the
37
38
REPAIR MANUAL FOR
split is less than this, remove the ring and with a very fine file dress the
edge until the proper clearance is obtained.
Fig. 21—Testing Split in Piston Ring for Clearance
Care should be exercised not to round the edges of the rings. Fit each
ring separately.
Figure 22 shows a piston ring filing gauge. By inserting the piston
ring in the recessed groove, the beveled edges can be filed without
danger of rounding the edges.
Fig. 22—Piston Ring Filing Gauge
With a scraping tool, carefully remove all particles of carbon from
the faces of the ring grooves in the piston.
Slip the back side of the ring into the groove, and roll it entirely
around the groove. If the ring is the proper thickness, you should feel it
drag slightly in the groove. The ring clearance in groove should be from
.001”' to .0015”. If it is too loose, try another ring.
If too thick, fasten the ring to a flat board; then lay a sheet of very
fine emery cloth on a flat surface. Lay the board,, ring down, on the
emery cloth, and with the hand resting lightly on the board, slide it
across the emery. Be careful to put pressure on the board evenly, so as to
remove an equal amount of metal from the entire surface of the ring. (See
Fig. 23.)
38
DURANT AND STAR CARS – FOUR CYLINDER
39
Remove the ring from the board and try the fit, repeating the
grinding operation if necessary.
In fitting rings back in the grooves again, use piston ring expander so
as not to break or distort also be very careful not to injure the edges of
the-ring, as these must not be broken in any way; otherwise trouble will
result.
Fig. 23—Grinding Piston Rings
In slipping the pistons and connecting rods back into the cylinders,
use extreme care. Take your time and do not force the rings into the bore.
The splits in the three rings should not be in a vertical line, as the
gases could leak by more easily. Therefore stagger the splits so that they
will be equally distant around the circumference of the piston.
FITTING PISTON PINS
3c" Bore Motor
Fitting piston pins is a very important operation, both because the
holes through each boss must be exactly parallel and smooth, and also
because it is difficult to hold a piston firmly without distorting it.
The best method we know of is to clamp the piston in a special vise
(See Fig. 20) which has the babbitt-lined jaws.
If no fixture of this kind is available, the piston can be clamped
between wooden blocks or copper jaws in an ordinary vise. Place the
open end of the piston against one jaw and the head against the other.
Use just enough pressure to hold the piston firmly.
We have designed for the DURANT and STAR motors an adjustable,
piloted reamer for the reaming operation. Figure 24 shows this reamer
just finishing one side and entering the other. Two taper plugs pilots hold
the reamer bar firmly and in proper line.
Do not crowd the reamer, either in cutting speed or depth of cut. It is
very important that the holes be perfectly smooth and polished.
39
40
REPAIR MANUAL FOR
Fig. 24—Piston Pin Hole Reamer
In fitting the pin it should slide through both. bosses with slight drag,
equal approximately to thumb pressure,
We carry in stock .003", .005", .010”, .015" and .020” oversized pins
for the 3d" bore motor,
3d" Bore Motor
The assembly of the lightweight piston in the 3d" bore motor is
different from the ordinary type and construction. The piston pin holes in
piston bosses are burnished to a polished bearing surface and finished
three ten thousands smaller than the finished piston pin. The dif-ference
in size allows a shrink fit of pin in the piston. Connecting rod is bronze
bushed and the finish size in the bushing is held to a regular running fit
of from .0002" and .0005" clearance.
Piston pins are retained from moving endwise in piston by a
retaining or lock ring.
Piston is heated in hot oil or boiling water to expand piston pin hole
and allow pin to enter. As soon as the motor warms up, the piston will
expand and the pin will be free to rotate both in the piston and connecting rod, thus doubling the bearing area.
After the motor has been in service for some time, the pin will seat
itself in the piston bosses and be free to rotate when cold.
This is a highly satisfactory development, and pins should not be
exchanged for this reason. The following instructions are intended only
for the fitting of new pins:
First Operation
In removing piston pin from piston, take out the small wire retaining
ring from groove in piston pin hole at end of piston pin. Use the point of
a small screw driver or knife blade, insert under end of ring, lifting it
from the small groove. Make sure ring is replaced in groove when piston
pin is again replaced in piston.
Second Operation
Immerse piston and pin in heated oil or boiling water for approximately one minute.
40
DURANT AND STAR CARS – FOUR CYLINDER
41
Third Operation
After piston with pin has been heated to the correct temperature, hold
piston in hand with glove or cloth and with finger or some small blunt
tool, push pin out of piston pin boss. Do not attempt to drive pin out. If it
cannot be removed easily, reheat piston. In replacing piston pin, the same
heating process is necessary to expand piston pin hole so pin can easily
be fitted into place. Pin must also be heated otherwise a cool pin would
cause hole in piston to contract before the installation was made. Pin
must be removed or replaced quickly after parts have been heated.
We furnish piston pins. 003" and .005” oversize for the 3d" bore
motor.
CONNECTING ROD BEARINGS
rod.
The connecting rod babbitt bearings are die cast into the connecting
When a bearing is scored or burnt, either from lack of lubrication or
from having them set up too tight and not properly worked in, refitting
the bearing is the only remedy.
A scored bearing is one having the surface slightly roughened, but
where the babbitt metal has not been burnt or run. A bearing of this kind
can usually be refitted.
A burnt bearing is one having the surface badly roughened or where
the babbitt has melted and started to run. This bearing cannot be used and
a new rod with bearing should be fitted.
Connecting rods which are not otherwise damaged, can be exchanged
at factory for rebabbitted rods for the cost of the babbitting only.
Fitting of Connecting Rod Bearings
The fitting of the connecting rod bearings is one of the most
important repair operations that can be performed on a motor.
Misalignment produces knocks, causes vibration and excessive wear
of cylinder walls.
Fig. 25—Scraping Bearing
41
42
REPAIR MANUAL FOR
Connecting rods come with the crank pin bearings finished to size so
reaming is unnecessary and they only require a little sizing or hand fit
ting for a perfect surface bearing-. This being accomplished by spreading
a very thin coat of Prussian blue on the crankshaft to which rod is to be
fitted.
Install the connecting rod on the crankshaft or arbor of the same
diameter with the piston end hanging downward, as shown in Figure 26.
Draw the nuts tight so that the bearing is snug on the shaft. Swing
the rod back and forth several times and then examine the bearing for
blue spots.
Fig. 26—Fitting Connecting Rod to an Arbor
The blue spots, or as they are termed high spots, indicate that the
bearing and the crankshaft rub at these points only.
It is then necessary to remove the high spots on the bearing with a
scraper, as shown in Fig. 25.
Repeat operation until all high spots are removed, and the bearing
surface is smooth, and touches the crankshaft at all points.
The tension of the rod on the shaft should be snug enough so that
when the piston and rod are moved to a horizontal position they will of
their own weight move to a vertical position with a slight drag.
All burrs and other obstructions must be removed from the oil holes.
When the bearing has been fitted to the shaft, lubricate it thoroughly.
After the bearing has been properly fitted, the connecting rod must
be tested for alignment, which can be done in the connecting rod aligning
fixture, as shown in Fig. 27.
Fasten the piston pin in the upper end of the rod and slip the 1½"
bushing in the lower bearing. Pass the plug through the holes in the
Fixture and through the 1½" bushing.
42
DURANT AND STAR CARS – FOUR CYLINDER
43
Fig. 27—Connecting Rod Aligning Fixture
Let the piston pin rest on the squared portion of test slide and test
from both surfaces, using paper shims as "feelers" or a feeler gauge.
Bend the rod until piston pin bears equally in both planes.
With the piston assembled, test the straightness by placing the piston
against the straightedge, using feelers as before.
CRANKSHAFT AND MAIN BEARING
Tightening Loose Main Bearings
To tighten the main bearings, care should be exercised in removing
an equal number of metal shims from each side of the bearing cap.
The number and thickness of shims to be removed will depend upon
how loose the bearings are.
If it is found there are no shims between the main bearing caps and
the crankcase, the bearing cap should be removed, locked in a vise and
with a mill file remove enough metal from the face of the bearing cap to
allow the proper tension. (See Fig. 28.)
Considerable care should be exercised not to get the bearings too
tight, as there is danger of scoring or burning them.
Fig. 28—Filing Bearing Caps
43
44
REPAIR MANUAL FOR
If more than one bearing is loose, each bearing should be tightened
separately, and when the proper adjustment has been secured, loosen the
nuts sufficient to take the pressure of the bearing from the crankshaft.
Then proceed to the next bearing in the same manner.
After bearings have been properly fitted, the motor should be
allowed to run idle under its own power for some time, which will have a
tendency to work in the bearings properly.
Use plenty of lubrication during this process, as bearings which are
set up too snug will heat readily at first. Therefore, the danger of scoring
or burning is very great until the bearings have time to work in.
Care must be exercised in driving car for approximately one hundred
miles after bearings have been tightened.
Fitting Crankshaft Main Bearing.
The upper half of the crankshaft bearings are loose in the crank-case.
The lower half being die-cast in bearing caps.
If line reaming fixture is not available, the bearings can be scraped.
This can be accomplished by putting a thin coat of Prussian blue on
the bearing surface of the crankshaft.
Place the crankshaft in 'its normal position in the case, and rock back
and forth. Remove crankshaft and scrape the blue spots from the
bearings. (See Fig. 29.)
It is necessary to repeat this operation several times to obtain the
desired results.
The upper bearings must be scraped in first. After the desired
bearing is obtained, the bearing caps can then be fitted. The bearing caps
must be fitted to the crankshaft in the same manner as the upper bearings,
After the bearing surfaces form to those of the crankshaft, lubricate
the bearings well and adjust each separately to get the proper tension.
Fig. 29—Fitting Main Bearings
44
DURANT AND STAR CARS – FOUR CYLINDER
45
End Play In Crankshaft
The end play in a crankshaft 'is governed by the front crankshaft
bearing.
A clearance of .006' should be allowed between the crankshaft and
the bearing.
Too much end play will often cause a pound or knock when the
motor is running idle.
To remove end play it is only necessary to take out shims back of
crankshaft sprocket and pressing sprocket farther back on shaft until
proper clearance is obtained between crankshaft and front main bearing,
Sprung Crankshaft
A sprung crankshaft will cause the bearings to loosen quickly and if
the motor has been run for some time with loosened bearings, the shaft
should be tested to see if it 'I true before attempting to refit the bearings.
A test can be made by placing the crankshaft in the case as shown in
Fig. 29 by first smearing the babbitt bearings with a thin coat of Prussian
blue; then revolve the crankshaft and note whether the blue shows
completely around all the main bearings.
If it is sprung to any extent, it will also pivot on the center main
bearing in a certain position.
Another method of testing a crankshaft is to place it between centers
in a lathe or straightening press as shown in Fig. 30, and by using a dial
indicator, the exact amount it is out of true can be determined.
Fig. 30—Straightening Arbor Press
45
46
REPAIR MANUAL FOR
A crankshaft can be straightened in an arbor or straightening press by
supporting the two end bearings with blocks and applying the pressure on
the center main bearings.
Out-of-round Crankshaft Bearings
To determine whether main or connecting rod bearings are out of
round, tighten each bearing cap separately and give the crankshaft a
complete turn. If the bearing is out of round, the shaft will invariably
turn free at one point and bind at another. Or measurements can be taken
of the shaft bearings with a pair of outside micrometers.
If bearings are out of round, they should be reground or turned in a
lathe and polished, unless badly worn then the best remedy would be a
new shaft.
FAN
The fan is 16" in diameter and has four blades. It is adjustable for
belt wear or stretch, being mounted to a slotted bracket and held in place
to bracket with a Y8" nut and a lock washer which is fastened to the
forward end of cylinder casting. Fan is driven by a 1" woven belt from
pulley on end of crankshaft. It is very easily adjusted and right tension
can be secured on the fan belt by either moving the fan assembly up or
down. (See Fig. 31.)
Fig. 31—Fan Adjustment
To Install Fan Belt
Pass belt between radiator and over the fan blades.
Loosen the jam nut, which will allow the fan assembly to be lowered.
Loop belt over fan pulley, which is driven by the crankshaft.
Insert the starting crank and turn motor over -while holding loose
end of fan belt tightly against the fan pulley until is completely in the
groove.
Adjust fan belt to right tension by moving fan assembly upward and
tighten jam nut
46
DURANT AND STAR CARS – FOUR CYLINDER
47
Removing Fan Drive Pulley
Figure 32 shows the method of removing fan drive pulley. The shaft
passes through the starting crank hole and the pins on the shaft engage in
starting jaws,
Fig. 32—Removing Fan Drive Pulley
If this puller is not available a starting crank can be used by
engaging same in the starting jaws and tapping the handle of starting
crank firmly with a hammer.
This pulley can be removed without removing radiator.
CHAIN CASE
The chain case is bolted to the front of the crank case and houses the
timing chain also supports the generator.
TIMING CHAIN
The timing chain in the front end of the motor runs over three
sprockets, viz, crankshaft sprocket, camshaft sprocket and Generator
shaft sprocket. (See Fig. 33.) It is properly adjusted when the car is
shipped from the factory. However, owing to slight wear or "running
47
48
REPAIR MANUAL FOR
in" of the three sprockets and the natural stretch which will develop in
any silent chain, it is necessary to again adjust this chain to the proper
tension after it has seen approximately 800 to 1,000 miles of service.
Fig. 33—Timing Sprockets and Chain
Adjusting Chain
We have provided for the adjustment of this chain by the simple
method of either shifting the generator in towards the motor, or out from
the motor. It is unnecessary to remove the timing chain case cover.
Moving generator outward tightens the chain.
The generator housing is assembled to the crankcase with two cap
screws; one at the bottom, which might be termed a pivot screw, and one
at the top. By loosening both cap screws the generator can be rotated in
or out. (See Fig. 66.)
The proper adjustment of the timing chain may be made as follows:
With the motor not running, loosen the two nuts and shift the position of
the generator out from the motor to a point where the chain is drawn up
snug, tighten securely; then start the motor. The timing chain will give
off a slight hum, indicating that the chain is too tight, Again loosen the
nuts and shift the position of the generator towards ' the motor 4 t where
the timing chain hum disappears, to a poin t Again tighten securely and
you will then have the correct adjustment on the timing chain. Unless
some abnormal condition in the motor or front end develops, no further
adjustment should be required for 2,000 to 3,000 miles.
48
DURANT AND STAR CARS – FOUR CYLINDER
49
The necessity for adjusting the chain will occur when there is a slight
tapping or rattle in the front end.
Caution: In any case when it becomes necessary for you to install a
timing chain, be sure that it is assembled so that the chain will run in the
direction of the arrows stamped on the chain.
Do not let the chain too tight when adjusted, for if you do it is more
than likely that immediately upon starting the motor the chain will break.
Do not use a crow-bar or pry in b hind the generator to throw it out from
the motor. This is an abnormal way of making this adjustment and is not
necessary.
When it is impossible to make further adjustment on the chain by
shifting the position of the generator, then the chain should be shortened
Fig. 34—Chain Showing Hunting Link
by removing the "hunting link." (See Fig. 34.) After removing the
"hunting link" the chain may be reassembled on the sprockets and
adjustments made as before.
How to Determine the Condition of a Chain
The condition of a Morse chain is best determined when on the
sprockets. That is, if the looseness of a chain can be taken up by the
adjustment or by removing a link and adjusting. it is still in service-able
condition, Testing for slackness (or come and go) of a chain by removing
pins at some point and laying chain out flat is the wrong method of
determining the true condition of a Morse chain.
Morse chain has a two-part joint consisting of a rocker pin which
rolls or rocks on a seat pin. To permit this rocking action, clearance of
about .010 of an 'Inch is allowed at each point, (See Fig. 35.). Therefore
in a new chain having 63 links, there would be 63 times .010 of an inch,
equaling .630 of an inch or approximately e of an inch slackness (come
and go). If a worn chain shows a total come and go of 1 e” when laid
Fig. 35—Rocker Pin and Seat Pin of Chain
49
50
REPAIR MANUAL FOR
out flat, it is obvious that the additional slackness over what is built into
a new chain is 1". Only half of this increased slackness (½") represents
the lengthening of the chain due to wear. The other ½” of slack-ness will
be apparent when it is seen that the worn chain will compress ½” shorter
than it is possible with a new chain. Remember that the chain runs under
tension when on the sprockets and not compressed. Comparing a new and
worn chain when both are fully extended will clearly show that the added
length due to wear 'is only a small portion of the total slackness.
How to Shorten
In practically all chains a row of thin "hunting links" (sometimes
called half, offset or master links) will be found, which can b removed by
taking out pins A and B. (See Fig. 36.) The ends can then be dove-tailed
together and repinned. Always use the old rocker pins and new seat pins,
Fig. 36—To Remove Hunting Link
Inserting Pins Into Links
The seat and rocker pins must be inserted as shown. The pointed 'de
of the rocker pin bears on the flat side of the seat pin. The pointed side of
the rocker pin and the ribbed side of the seat pin are placed toward the
direction in which the arrows fly, which is the direction the chain travels.
(See Figs. No. 37-38.) Do not place the rocker pin in backward; that is,
with the flat side against the seat pin. This will result 'in noise and
possible destruction of the chain.
Fig. 37—Rocker Pin and Seat Pin Removed
Fig. 38—To Install Rocker Pin and Seat Pin
50
DURANT AND STAR CARS – FOUR CYLINDER
51
REMOVING CAMSHAFT SPROCKET
Remove acorn nut, which also acts as an oil relief body and thrust
nut for camshaft.
Remove the spring and check ball on end of camshaft. Camshaft
sprocket can then be pulled off.
REMOVING CRANKSHAFT SPROCKET
Remove lock nut and oil ring. Sprocket can then be pulled off by
hand.
REMOVING GENERATOR SPROCKET
Remove lock nut and sprocket can be pulled off by hand.
The timing sprockets mentioned above are lip-fitted to their
respective shafts and should not cause any difficulty in removing by
hand.
TIMING MOTOR
Should the camshaft be removed, or if when the chain is removed,
the position of the camshaft is changed, retime the motor as follows: (See
Fig. 39.)
With the chain off, rotate the motor until No. 1 piston is at its highest
point, that is, top dead - center.
Rotate the camshaft until the No. 1 exhaust valve (the one next to the
radiator) closes.
The valve must be closed, but the valve lifter should still be in
contact with the valve stem.
Fig. 39—Valve Timing Diagram
51
52
REPAIR MANUAL FOR
The motor is then timed and the chain can be installed.
Use care in placing the chain on the sprockets so as not to change the
position of these sprockets. In line with the chain travel and between the
generator sprocket and camshaft sprocket, and between the crank-shaft
sprocket and the camshaft sprocket, the number of chain links is plainly
marked on the chain case casting.
On the generator sprocket-at the proper position from the keyway
and at the base of the teeth-the figure "O" is stamped. Counting from this
point to a similar mark on the crankshaft sprocket the number of links
should correspond to the number of links as marked on the timing chain
case. Also as between the crankshaft sprocket and the camshaft sprocket
there should be a definite number of links as marked on the timing gear'
case, these counts being taken from similar marks on the two gears.
The crankshaft gear has two naughts stamped on it. The count is
always taken from the naught nearest to the gear for which the count is
being taken.
it is very important that these counts be correct; otherwise there is
danger of mis-timing and crowding the chain, causing breakage and
serious damage.
OIL PUMP
The oil pump is located at the rear end of motor block, and is driven
direct by the camshaft.
It is a gear type and should not cause the slightest trouble. -However,
as a safeguard and to avoid accidents, a registering dial is mounted on
the instrument board so that the action of the pump may be observed.
Should this dial for any reason show that the pump has stopped working,
the car should be stopped at once, and the source of trouble located and
remedied. The pressure of this pump works direct against the spring and ball
check located in the front end of camshaft. To increase pressure on
gauge, it is necessary to increase spring tension.
After the car has been in service for a long time, the small gears may
be worn to a point where they will not function, in which case
replacement of gears is the only remedy. Also the drive bar which drives
the gears may become worn and also need replacement. When repairs
have been made on the motor and necessitates the removal of the ol 'I
pump or oil pump feed lines, it is well to prime the pump with cylinder
oil by priming into the line which runs from the motor to the oil gauge on
the dash.
Get into the habit of noting the action of the registering dial
regularly —not in the expectation of trouble, but to avoid its possibility.
The oil suction line leading from the oil pump to the oil pan is surrounded at its lower end b a fine-meshed screen strainer. Occasionally
lint and dirt may clog the screen and interfere with proper suction.
Therefore - it is very important when working o -n the motor, to make
sure that no lint is allowed to collect either on the inside of the motor or
'in the oil an.
52
DURANT AND STAR CARS – FOUR CYLINDER
53
Caution: Whenever the motor is drained of oil and fresh oil is installed
and the motor started,, always see that the oil gauge on the instrument
board is working. If no pressure is registered, it will be necessary to
prime the oil pump, which can be accomplished by removing the oil
pressure line at the point where it enters the motor and put in sufficient
oil to start pump working.
THE CLUTCH
The clutch is of special design, known as single plate dry disc type.
A large steel disc is riveted to a splined clutch shaft. The outer edge
of the disc is deflected 'into equal spaces in both directions and segments
of hard asbestos fibre are riveted to each side.
The clutch disc fits into the recessed portion of the flywheel and one
side of the fibre discs rests against the face of the flywheel.
Fig. 40—Clutch
A clutch friction plate rests against the outer segments, to which is
attached three studs, One end of each stud is securely fastened to the
friction plate, the other ends pass through the clutch cover plate.
Each stud is centered between two heavy coil springs, interposed
between the friction and cover plate the tension of which is controlled by
castled nuts on the free-ends of each stud.
53
54
REPAIR MANUAL FOR
Mounted on the clutch cover plate are three levers, hinged at their
upper ends to brackets attached to the cover plate.
These levers, called clutch lifting levers, are forked at one end so as
to engage under the heads of the castled nuts on the studs. The free end
rests in slots on the clutch throwout collar.
The clutch throwout collar consists of a hollow pressed steel bowl in
the end of which is mounted a ball thrust bearing. The hollow collar is
provided with a screw plug which can be removed and the cavity filled
with lubricating oil.
Two pressure fingers mounted on a transverse tube, to which is
attached the clutch foot pedal, press against the clutch thrust bearing.
The clutch cover plate is bolted directly to the flywheel, becoming
a p ar t of it and carr ying w ith it th e clu tch fr iction p late and
lifting levers.
The clutch springs cause the friction plate to bear heavily against
the clutch disc, which in turn is forced against the face of the flywheel,
thus holding the clutch disc firmly between.
Pressing down on the clutch pedal causes the pressure fingers to move
the clutch collar in the direction of the flywheel. This movement operates the three lifting levers, causing them to lift the studs; and as the
Fig. 41—Clutch Throwout Control and Universal joint
54
DURANT AND STAR CARS – FOUR CYLINDER
55
clutch cover plate is bolted to the flywheel in a fixed position, this action
is carried through to the friction plate, causing it to move away from
the clutch disc, releasing the pressure and disengaging the clutch.
As the leverage ratios are high the actual pressure on the clutch pedal
is very slight, making the act of disengaging the clutch both easy and
comfortable.
The Clutch Throwout Bearing
The clutch throwout bearing is housed in the rear end of the oil
chamber, and should not cause any trouble if properly lubricated: The
pipe plug located in the oil chamber should be removed and lubricating
oil inserted once a week.
Removing Clutch
Remove the universal joint which connects the clutch and the
transmission; then drop one end of the throwout shaft to allow the
throwout fork to clear the thrust bearing. Then remove the three bolts
which hold the clutch to flywheel and the entire assembly can be easily
removed.
The Clutch Grabs
If he clutch takes hold too quickly, causing the car to start with a
jerk when the clutch is engaged slowly, the lifting levers should be
equalized.
To Adjust Lifting Levers
When the clutch is in neutral position the distance between the throwout collar and the clutch cover should be 1c”. To equalize lifting levers,
either tighten or loosen the castle nut holding the levers so each has
equal pressure on the throwout collar.
When Clutch Slips
It is necessary to increase the clutch spring tension on the friction
plate by backing off the three (3) castle nuts on the ends of the studs.
These should be backed off an equal amount on each nut so as to retain an
even pressure.
Weak Clutch Springs
This seldom occurs, as the action on the springs is very light. However, if adjustments cannot be made as stated above, renewal of clutch
springs will usually remedy the difficulties encountered.
We carry in stock clutch discs and shafts completely assembled; also
friction segments. Neither of these will need replacement for several
thousand miles.
REMOVING FLYWHEEL
To remove the flywheel, it is necessary first to remove the clutch
assembly complete, as described on this page.
Then remove the six (6) nuts holding the flywheel to the crankshaft.
The flywheel can then be removed by applying a few light blows with
soft hammer, either babbitt or rawhide.
The holes for the flywheel bolts are staggered so that the flywheel
can only be installed in the same position as when removed
TRANSMISSION
The transmission is of the selective type, having three speeds
forward and one reverse.
55
56
REPAIR MANUAL FOR
The gear speed ratios are as follows:
Reverse:
4.3 to 1
Low:
3.32 to I
Intermediate:
1.77 to 1
High:
Direct
The gear shift is standard.
The transmission assembly is attached to the frame cross member
by two d” cap screws. The rear end is hung on the two (2) brake
cross rods by a bracket and ½” cap screws, making a secure mounting
and one very accessible.
The transmission control lever is the usual type, operating on a universal ball joint in transmission cover.
The most frequent difficulty encountered in a transmission is having
the gears jump out of mesh. This is usually produced by one or more
of the following causes.
Fig. 42—Transmission
First: Gears Not Meshed Properly
Gears not meshed deep enough, causing a load to be carried on a
part of the teeth only. In making the gear shifts, always be sure before
engaging the clutch that the gear shift lever has been moved as far
forward or backward as it will go without straining. If this is not done,
the edges of the teeth will become beveled, and in time it will be impossible to keep the gears engaged:
Second: Bent Gear Shift Forks
The shifting forks may be bent which does not allow the gear to come
fully in mesh with the companion gear. To determine this, place the
shifting lever in the position of the speed desired; then remove the cap
screws which hold transmission cover in place and raise the cover. You
56
DURANT AND STAR CARS – FOUR CYLINDER
57
can then readily determine from the position of the sliding gears, its
relation to the companion gear. (See Fig. No. 43.) (Shows Fork location.)
Fig. 43—Location of Shifter Forks
Third: Loose or Worn Sliding Gears
Occasionally the sliding gear will become loose on the spline shaft,
allowing the gears to canter or cock on the shaft. This condition is
brought about by excessive wear produced by lack of proper lubrication,
and is best detected by having the gears jump out of mesh when passing
over rough spots or when coasting. Loose main bearings and end play in
spline shaft will also cause this condition.
A drain plug is provided in the bottom of the case for cleaning, and
we recommend that the old oil be drained, and transmission cleaned, and
refilled with new oil every three months.
The oil capacity of the transmission is one quart.
Misalignment of Transmission
To determine if the transmission is out of alignment, remove the
universal joint between the clutch and the transmission.
For a perfect alignment, the transmission shaft and the clutch shaft
should be in line with each other. If they are not, remove the two rear
motor support bolts and raise or lower the motor to bring these two shafts
in alignment. (See Fig. 44.)
All bolts which hold the transmission and motor in place must be
kept tight at all times to prevent disalignment.
Fig. 44—Alignment of Motor and Transmission
57
58
REPAIR MANUAL FOR
To Remove Transmission Assembly
Remove gear shift lever by removing two (2) machine screws holding
gear shift lever to transmission cover.
The universal joint and propeller shaft at the transmission end should
then be removed.
Remove three (3) bolts holding forward end of transmission to frame
cross member.
Remove bolt at rear end of transmission which holds transmission to
the cross brake rods.
The transmission can then be removed, in an assembly.
FRONT WHEEL ADJUSTMENT
The front wheels are equipped with inner and outer tapered roller
bearings, adjustable by castled nut on end of steering knuckle. Care
Fig. 45—Front Wheel Bearings
should be exercised when tightening this nut, to see that the proper
adjustment is made that will allow the wheel to turn very freely and yet
eliminate any loose play.
Three Things Are Absolutely Necessary to the Proper
Working of Wheel Bearings:
First: Regular and careful lubrication.
Second: Removal of wheels and thorough cleaning of all working
parts every three months.
Third: Inspection and adjustment to compensate for wear when needed.
Front Wheel Alignment
The front wheels should “toe in” slightly, as this will make driving
easier and eliminate excessive wear on tires.
58
DURANT AND STAR CARS – FOUR CYLINDER
59
To get proper alignment, measure the distance between the felloe
bands (at the height of the hub) at the front of wheels, and the distance
between the felloe bands at the rear of wheels. (See Fig. 46.)
Fig. 46—Front W heel Aligning Gauge
For proper alignment, the rear distance should read not to exceed c”
greater than the front distance.
If adjustment is required, remove the tie rod bolt on left side,
lengthen or shorten the tie rod by turning on or off the adjusting yoke
bolt and measure.
Continue until dimension of not greater than c” is obtained.
Tighten clamp screw.
Fig. 47—Taking Lost Motion from Steering Connecting Rod (Cross Rod Type)
59
60
REPAIR MANUAL FOR
TAKING LOST MOTION FROM STEERING CONNECTING ROD
Figures 47 and 49 shows the adjustment of the drag link after the lost
motion is removed, be sure to lock the plug with a cotter pin.
ADJUSTMENT OF STEERING GEAR (Cross Rod Type)
Raise the front end of the car until the front wheels clear the ground. You
can then determine by taking hold of the wheel which part of the steering
mechanism needs adjustment.
If there is lost motion within the steering gear, first loosen the clamp bolt on
top of gear case; next release the locking plate and then tighten the adjusting nut
until all looseness disappears.
Fig. 48—Steering Gear (Cross Rod Type)
ADJUSTMENT OF STEERING GEAR (Fore and Aft Type)
Adjustment for End Play in Thrust Bearings
This is controlled by the steering gear worm adjusting nut, (See Fig. 50)
located at the upper end of the steering gear housing. Tightening this nut eliminates
end play in the thrust hearings, but in tightening care must be taken not to exert any
undue pressure on the thrust bearings.
60
DURANT AND STAR CARS – FOUR CYLINDER
61
Fig. 49—Taking Lost Motion from Steering Connecting Rod (Fore and Aft Type)
This can be checked by the ease with which the steering wheel can be
turned.
Adjustment for End Play in the Pitman Arm
This is controlled by the worm gear thrust screw (See Fig. 50) and
locking nut located on the inner side of the steering gear housing next to
the cylinder block. The tightening of this thrust screw removes end play
from the Pitman arm. Care must also be exercised in tightening this
thrust screw so as to avoid a binding action in the main tube, which will
occur if the adjustment is made too tight.
Adjustment for Wear or Looseness Between Worm and Worm
Wheel
This is controlled by the steering gear worm wheel adjusting screw.
(See Fig. 50.) This adjusting screw is located on the lower portion of the
housing, and a hole is cut in the engine underpan to make Ibis adjusting
screw accessible from underneath the car. This screw fits into a shoulderon the inner portion of the housing around the worm, and tightening the
screw presses the housing upwards, thus bringing the worm into closer
mesh with the worm wheel. Before making this adjustment it is necessary
to slacken off the tour nuts on the car) screws holding the cover to the
housing.
61
62
REPAIR MANUAL FOR
Fig. 50—Steering Gear
SPRING BREAKAGE
Nearly all spring plate breakage is caused by loose clips or bolts, or
to a bind or twist in the spring caused by misalignment or improperly
applied bolts.
If the car is used every day the clips holding the spring to the axle
should be tightened once a month.
The spring leaves should be lubricated regularly, using cylinder oil
mixed with graphite or with one of several graphite solutions on the
market.
Spring shackle bolts should be drawn up tight until all side play is
removed; then the nut should be backed off one-quarter turn.
All shackle bolts are supplied with lubricators. Caution your customers to lubricate these parts regularly.
PROPELLER SHAFT AND UNIVERSAL JOINTS
The propeller shaft and universal joints connect the rear end of the
transmission and the drive pinion shaft of the rear axle. The function of
this is to transmit power from the transmission to the rear axle, in
addition to allowing the rear axle to rise and fall with the road irregularities.
62
DURANT AND STAR CARS – FOUR CYLINDER
63
The universal joints are completely enclosed and dust-proof, and are
provided with a pipe plug for lubrication, and should be filled with
Spicer Universal Joint Grease or No. 672 Dixon’s graphite every thirty
(30) days.
Fig. 51—Propeller Shaft and Universal Joints
To Remove Front Universal Joint and Propeller Shaft
To remove the front universal joint, unscrew dust cap, allowing same
to slide down propeller shaft towards rear axle.
Then remove the locking spring and the six (6) bolts holding the
universal joint housing to the flange, and allow same to slip down on
propeller shaft towards rear axle.
Grease should then be removed, and the universal joint pin bushings
removed, which will allow the universal joint cross to be released from
the flange.
To Remove Upper Universal Joint flange
First, remove the tapered pin which holds to the transmission splint
shaft. With the aid of a puller or a few slight blows of soft hammer this
can be very easily removed.
To Remove the, Rear Universal Joint
Unscrew the dust cap, and remove locking spring and the universal
joint housing from the universal joint flange, allowing these parts to slip
upward on the propeller shaft.
Remove grease and the universal joint cross pin bushings, allowing
the propeller shaft to be removed from the flange.
To Remove Lower Universal Joint Flange
Remove cotter pin, and the drive pinion shaft lock nut, and with the
aid of a gear puller the flange can be removed. This flange is keyed to
the drive pinion shaft. Never drive off as this may ruin bearings on
pinion shaft.
63
64
REPAIR MANUAL FOR
To Install Propeller Shaft
The flange of the rear universal joint is key-wayed on the tapered end
of the drive pinion shaft, and is held in position by the drive pinion shaft
castled nut, locked with cotter pin.
One-half of the universal joint cross can then be attached to the flange
by the installation of the universal joint cross bushings.
The universal joint housing can then be attached to the flange by
six (6) bolts, nuts and lock washers.
The lock spring and dust cap can then be installed.
The front universal joint flange is placed on the spline shaft of the
transmission and is held in place by a tapered pin.
The front end of the propeller shaft is equipped with a longer yoke
than the rear end. Into this spline yoke slides the splined end of the
propeller shaft be sure that the “arrow marks” on spline shaft and
yokes are assembled in straight line. This end is also provided with a
pipe plug for lubrication, and should be filled with Spicer Universal
Joint Grease or No. 672 Dixon’s graphite every thirty (30) days.
REAR AXLE
The rear axles used on DURANT and STAR Cars are known as the
semi-floating type, in which the revolving parts are mounted on heavyduty tapered roller and ball bearings.
The driving gears are spiral bevel of heavy tooth section capable of
withstanding any reasonable load. The drive pinion gear and shaft are
forged integral of special alloy steel.
Adjustment of Bearings
The gears and shafts of an axle seldom wear out under thousands of
miles of use if they are kept in proper alignment and mesh.
Most rear axle troubles come from failure to keep these parts in
proper adjustment.
As the loads carried by the bearings are both radial and thrust, they
are subjected to continual changes in stresses; therefore, it is to be
expected that some wear will take place and that from time to time they
must be adjusted to eliminate play.
Fig. 52—Rear Axle (Solid Type Housing)
64
DURANT AND STAR CARS – FOUR CYLINDER
65
Every axle should be examined at the end of each 2500 miles and
bearings adjusted. In a rear axle the change in direction of thrust is
very rapid, due to side sway of the car and contour of road surfaces;
therefore, if the bearings become loosened, there is a constant hammer-
Fig 52A—Rear Axle (Split Type Housing
ing action set up in the bearing which will crack the races or split the
rollers or balls.
The axle having the solid type housing has a large cover plate which
when removed allows adjustment of differential bearings and ring gear.
Adjusting Drive Gears (Split Type- Housing)
The axle having a split type housing carries the entire differential
thrust on tapered roller bearings at the outer ends of axle housing.
To remove the axle shaft end play, or to adjust ring gear into pinion,
remove, wheels and tighten up bearing adjusting nuts.
To adjust for proper back lash of ring gear in pinion, which should
be .008” to .012”, wheels must be removed first. Next, back off the right
hand adjusting nut enough so that the left hand nut can be turned up far
enough to force the ring gear in the pinion tight. Next screw up the right
hand adjusting nut until it is tight, then back off the left hand nut three
notches and again bring up the right hand nut until it is tight. Then lock
both adjusting nuts in place.
The adjusting nut has sixteen threads per inch. One complete turn of
the nut would be 1/16” or .0625”. Adjusting nut has fifteen notches or
approximately .004” adjustment per notch. By backing off the nut as
advised two notches, it gives .008 back lash which is required.
Removing Pinion (Split Typo Housing)
To remove the pinion gear it is necessary to disconnect the propeller
shaft lower universal joint and then the pinion shaft housing assembly.
65
66
REPAIR MANUAL FOR
Remove nut on end of pinion, joint flange and pull pinion out through
the large end of housing.
In reassembling pull joint flange up snug. The bearings should be
just loose enough to turn freely.
Adjusting Drive Gears (Solid Type Housing)
The tooth bearing of drive gears is very important and extreme care
should be taken whenever adjustment is made.
First, make sure that the pinion bearings are properly adjusted.
Second, spread a thin coat of flat paint on both the working and back
faces of the ring gear teeth.
Third, move the differential assembly over until the back lash between
pinion and ring gear is between .008” and .012”. Lock the differential
adjusting bearings securely.
Fig. 53—Proper Tooth Bearing
Fig. 54—Improper Tooth Bearing
Fourth, set the brakes and revolve the gears—first in a forward direction; then in a reverse direction.
Fig. 53 shows the proper tooth bearing under load.
Never allow gears to run as shown in Fig. 54.
The moment the load comes onto the gear, a pinching action is set
up which will break the ends of the teeth. Fig. 54 shows pinion raised
out of ring gear too far; or the kind of tooth bearing when the bearing
gives out back of pinion.
Fig. 55—Not Meshed Deep Enough
Figure 53 shows a gear where the entire load is carried on a part of
the teeth. Usually the gear soon wears out. The effect is the same as
upsetting pinion bearing spacer, causing pinion to float endwise.
66
DURANT AND STAR CARS – FOUR CYLINDER
67
For a properly set gear the marks on the reverse side should be approximately the same as on the drive side with a toe bearing back approximately e” starting from small end of tooth.
Removing Pinion (Solid Type Housing)
To remove the pinion gear it is necessary to disconnect the propeller
shaft lower universal joint and remove the pinion shaft housing assembly.
Remove the joint flange, pinion bearing lock nut, lock washer and adjusting nut.
In reassembly of pinion be sure to draw the adjusting nut up snug.
The bearings should be just loose enough to turn freely.
The outer wheel bearings can be adjusted by removing the rear wheels
and the wheel bearing cap.
Between the wheel bearing cap and the axle flange are shims which
can be changed to suit.
We carry .010” shims in stock.
BRAKES
The brakes on a motor car are very important. Extreme care should
be used to keep them in good condition and properly adjusted.
Nearly every fatality or smash-up is caused by inability to stop
quickly, so every service station should make it their business to see that
customer’s brakes are in good repair.
In some cities brake inspections are being made by the police and
heavy penalties are imposed for bad brakes.
Fig. 56—Two Wheel Band Type Brake (Solid Type Housing—l0” Brakes)
67
68
REPAIR MANUAL FOR
Fig. 56A—Two Wheel Band Type Brake (Split Type Housing—10” Brakes)
Two Wheel Band Type Brakes
The two wheel band type brakes are the conventional external contract-ing and internal expanding, against a heavy brake drum mounted on the
rear wheels.
They are lined with a good quality brake lining and under normal
conditions will not require replacement for several thousand miles.
Equalized Brakes (Two Wheel Band Type Brake)
Both brakes when applied should have the same pressure on the brake
Fig. 56B—Two Wheel Band Type Brakes (Split Type Housing—11” Brakes).
68
DURANT AND STAR CARS – FOUR CYLINDER
69
drums. If one band grips tighter than the other, a bad skid is sure to
result, particularly if the road surface is wet or slippery.
After the brakes have been adjusted for clearance, have some one
apply the brakes separately; grasp the rear wheels and see if one wheel
turns more freely than the other. Be sure that the one applying the
brakes holds the pressure on the pedal or lever at the same point for
both wheels.
The car should be jacked up for all brake adjustments.
If one brake is looser than the other, shorten the rod on that brake,
which runs from the brake operating lever to the rocker shaft amidship
of the car, by screwing up on the yoke ends.
The point to bear in mind in any brake adjustment is that the bands
must not touch the brake drum when released and at the same time be
close enough so that when fully applied they will stop the rotation of
the wheels.
Occasionally a band gets out of round; that is, it touches the drum
at one spot only. When this occurs, remove the band and form it to the
brake drum.
In applying new linings, be sure to set the rivet heads up snug and
see that they are well below the surface of the lining.
Fig. 57—Brake Controls (Two Wheel Band Type Brakes)
69
F i g . 5 8 —B r a k e C o n t r o l ( B e n d i x F o u r W h e e l )
70
REPAIR MANUAL FOR
70
DURANT AND STAR CARS – FOUR CYLINDER
71
Squeaking brakes are caused by rivet heads rubbing on the brake
drum.
The foot brake pedal is connected to the rocker shaft by a rod in
which is placed a turn buckle. By screwing up on the turn buckle
(which can be reached by lifting tile floor board) the foot brake can be
tightened; however, be sure to equalize both brakes afterwards.
The real purpose of the turn buckle is that the foot brake pedal may
be adjusted for height in relation to the position of the operating levers
on the rocker shaft and axle.
When the foot brake is fully released, these levers should incline backwards from a vertical position about one-half inch. If they incline forward, it is likely .that part of the foot pressure ~viil be absorbed in an
attempt to straighten the levers, as the arc of travel will be in a straight
line with the pull rods.
With the brakes fully released and operating levers inclined properly,
the service or foot brake bands can be adjusted for clearance by screwing
in or out on the adjusting nut attached to each brake band.
Be sure to equalize the brakes afterward and adjust foot pedal for
height.
If the brake band linings have worn to such an extent that tins cannot
be done and at the same time keep all the conditions mentioned above
normal—replace the linings.
BRAKES
Four Wheel Mechanical Brakes
The DURANT car is equipped with the Bendix Mechanical Four Wheel
Brakes which are accepted as the safest and simplest braking system of
present day engineering. All working parts at the four wheels are
mounted on a heavy steel plate that fits over the 11” brake drum, thus
protecting these parts from water, dirt and slush which insures peak
efficiency of operation when the brakes are most needed.
Pressing down on the foot brake pedal or pulling back on the hand
brake lever (See Fig. 58) operates in unison all four brakes.
Both the foot brake pedal and hand brake lever are connected by
separate pull rods, to the cross-shaft located just back of the center crossmember of the frame. Mounted on both outer ends of cross-shaft are
double levers, known as over-running links to which are attached two
pull rods that operate the shoe controls of the front and rear brakes.
(See Fig. 58)
All four brakes must be adjusted exactly alike to insure efficient operation and should be adjusted as follows:
FOUR WHEEL BRAKE ADJUSTMENT FOR WEAR FRONT
WHEELS
A. Turn square ball nuts until center line of ball on lever is ¼” to
5/16” back of center line of steering king pin with brakes released.
71
72
REPAIR MANUAL FOR
B. Loosen lock nut on worm screw adjustment (1) and turn slot to
right until brake shoes are free.
C. Loosen eccentric lock nut (3) at front wheels, and turn eccentric
in same direction in which wheel revolves when car moves forward, until
brake is tight against drum, then back off gradually until wheel is just
free. Hold eccentric and tighten lock nut.
D. Turn worm screw (1) to left until brake binds, then back off until
wheel is just free. Tighten lock nut.
FOUR WHEEL BRAKE ADJUSTMENT FOR WEAR, REAR
WHEELS
A. Loosen eccentric lock nut (3) at rear wheels, and turn eccentric
in same direction in which wheel revolves when car moves forward, until
brake is tight against drum, then back off gradually until wheel is just
free. Hold eccentric and tighten lock nut.
Fig. 59—Brake Shoe Assembly
B. Angle of control levers with brake rods should be 70 degrees with
the brakes released, otherwise reset as follows: Loosen pinch bolt and
slide lever off serrations. Slack off square ball nut (2) to end of thread
on rod. Apply brake with Stillson wrench on camshaft and slip control
lever on serrations. If brake is too tight move lever back one serration.
72
DURANT AND STAR CARS – FOUR CYLINDER
73
Tighten pinch bolt. Control levers should have approximately the same
angle with the rod on both brakes. (Fig 58)
EQUALIZING FOUR WHEEL BRAKES
D. Equalize all four wheels as follows: Push pedal down with block
or jack within 3” of floor board or until the tightest wheel can just
be turned by hand. Slack off tight wheels a turn at a time at the square
ball nut (2) on all four wheels, until all four are the same, remembering
that a change in the rear brake mar affect the front brake on the same
side and vice versa. (See Fig. 58).
E. Remove block from pedal and try all four wheels for drag. There
should be no drag if previous operations were properly done. If necessary, slack off the same number of turns on all four wheels.
MAJOR ADJUSTMENTS FOUR WHEEL BRAKES
Anchor pins should he adjusted only, (a) When fitting newly lined
Fig. 60—Lever Control Assembly
shoes,. (b) When anchor pin nuts are found loose, (c) When other
adjustments fail to give satisfactory results. (See Fig. 58.)
To adjust anchors: Jack up all four wheels. Turn eccentric adjustment (3) away from articulating pin and leave loose. Slacken tight
anchor pin nuts free of lock washers. Tap both anchors out against
drum. Hold brake on tight by 100 pound load on the end of an 8-in.
Stillson wrench on control shaft, or equivalent monkey wrench on con-
73
74
REPAIR MANUAL FOR
trol lever. Tap anchor pins on end and try to turn wheel forward with
brake applied. Still holding brake on, tighten both nuts as tight as
possible. with a 16-in, wrench. Release brake, then adjust eccentric
and make other adjustments as in Adjustment for wear.”
Where the brake drums are slotted so that feeler gauges may be
inserted between the shoe lining and the brake drums the adjustments
may be checked as follows
Remove covers on slots. Check toe and heel of auxiliary shoe and
toe and heel of secondary shoe with feelers. Both ends of the shoe
should be alike within 0.002-in. If not to these limits repeat anchor
adjustment or loosen improperly set anchor one turn and tap until correct clearance is obtained. Then tighten firmly. Replace covers on slots.
REMOVING THE FOUR WHEEL BRAKE SHOES
To remove Bendix Brake shoes, detach the return springs, indicated
in Fig. 59. Take off the nut or cotter pin from the secondary shoe
anchor pin. Spread the primary and auxiliary shoes to clear the cam,
drop shoes sufficiently to allow disengagement of articulating pin and
eccentric and slip all three shoes off tog-ether.
It will be noted that the auxiliary shoe anchor pin has no nut and is
the same diameter as the hole in the shoe. This enables the shoe to be
slid off the end of the pin.
In removing the shoe it is not necessary to detach the anchor pin
assembly.
Fig. 61—Cam Wormscrew Adjustment
74
CHAPTER III
CARBURETION AND ELECTRICAL SYSTEM
75
76
REPAIR MANUAL FOR
VACUUM TANK (Lever Type)
As the gasoline tank is mounted on the rear of the car, some distance
from the carburetor, it is necessary to provide a means of drawing the
fuel from the tank into the carburetor.
Fig. 62—Vacuum Tank (Lever Type)
This is accomplished by the use of a vacuum tank mounted under the
hood, the construction of which is illustrated in Figs 62 and 63.
Every motor draws its supply of gasoline through the carburetor by
reason of the pumping action of the pistons which, on their downward
or suction stroke, create a partial vacuum in the intake pipe. It is this
76
DURANT AND STAR CARS – FOUR CYLINDER
77
same pumping action which draws gasoline from the main supply tank
into the vacuum tank.
The vacuum tank is composed of two chambers. The upper or smaller
one is the filling chamber, and the lower one the emptying chamber. To
the upper chamber is connected a copper pipe, 3, which is attached to the
intake pipe at the center of the two branches. Gasoline enters this
chamber from the main supply tank through the connection 4, at the
base of which a small wire strainer, 5, is placed to catch any dirt or lint
which may have gotten into the main tank. At the base of this chamber
is placed a flapper valve, 6, which, when closed, prevents the gasoline
from running into the lower chamber.
The suction of the pistons on the intake stroke exhausts the air in the
upper chamber, creating a vacuum, and this vacuum closes the valve, 6.
As the main supply tank is open to atmospheric pressure (through the
vent hole in the filler cap), the vacuum created in the upper chamber
will cause the gasoline to flow from the main tank through the supply
line and into the chamber through the connection, 4. Mounted inside of ft
this chamber is a metal float, 7, and as the gasoline rises in the chamber
the lever, 8, moves upward until when the proper quantity has been
obtained the direction of pull on the springs, 9, is reversed, which causes
the lever, 13, to move upward. This action closes the valve, 1, thus
shutting off the suction from the motor, and opens the valve, 2, which
allows air to flow into the chamber through the vent pipe, 12.
The admission of outside air destroys the vacuum in the chamber,
which automatically releases the suction on the valve, 6, and at the same
time stops the flow of gasoline through the pipe, 4. The weight of the
gasoline in the upper chamber then causes the valve, 6, to open, allowing
the gasoline to flow into the lower chamber, from whence it flows by
gravity to the carburetor through the connection, 13.
As the level of the gasoline in the upper chamber drops, the float, 7,
moves downward, causing the lever, 8, to move at its free end in the same
direction. The levers 8 and 10 are pivoted on the pin, 11, and connected
together at their free ends by springs, 9; therefore, when the free end of
lever, 8, has dropped below the center line of the pivot, 11, the direction of
pull on the springs, 9, will reverse, and the lever, 10, will move downward
at its free end. This action opens the valve, 1, thus permitting the motor
suction to create a vacuum in the upper chamber and start the flow of
gasoline, through the connection, 4, and at the same time closes the valve,
2, shutting off the admission of outside air. The process of filling the
upper chamber is then repeated.
As all lint and dirt cannot be kept out of the system, it is necessary
to drain the lower chamber every three months, and to do this a drain
plug, 14, is placed at the lowest point in the tank.
The manufacturers of the vacuum tank maintain a complete service
repair organization in all principal cities, and we recommend that should
trouble be encountered with this system you consult one of their experts
or write the factory direct. .
Should this be impossible, the following instructions supplied by the
manufacturers, if carefully followed, should give relief:
77
78
REPAIR MANUAL FOR
Care and Repair of Vacuum System
Before proceeding to repair the vacuum tank, make absolutely sure
that the trouble is not due to some other cause.
Vent Tube Overflows (Lever Type)
The air vent, 12, allows an atmospheric condition to be maintained in
the lower chamber, and also serves to prevent an overflow of gasoline
in descending steep grades. If once in a long while a small amount of
gasoline escapes no harm will be done, and no adjustment is needed.
However, if the vent tube regularly overflows, the air hole in main
gasoline tank filler cap may be too small, or may be stopped up. Tithe
hole is too small, or if there is no hole at all, the system will not work.
Enlarge hole to c” diameter, or clean it out.
Failure to Feed Gasoline to Carburetor (Lever Type)
Remember that this condition may be due to other causes than the
vacuum system. Do not blame the vacuum system until you are sure
that the fault does not lie elsewhere. After flooding the carburetor, or
“tickling the carburetor,” as it is commonly called, if gasoline runs out
of the carburetor float chamber you may be sure that the vacuum is
performing its work of feeding the gasoline to carburetor.
Another test is to take out the inner vacuum tank, leaving only the
outer shell. If you fill this shell with gasoline and the motor still refuses
to run properly, then the fault clearly lies elsewhere, and not with the
vacuum system—because you must certainly get gasoline feed from this
open, elevated tank of gasoline, unless there is stoppage in the connection
line to carburetor.
To Remove Top (Lever Type)
In removing top of tank, after taking out screws, run the blade of a
knife carefully around top, between cover and body of tank, so as to
separate gasket without damaging it. Gasket is shellaced to make an
air-tight joint.
If Faulty Feed Is Traced to Vacuum System,
One of the following Conditions May Be the Cause: (Lever Type)
(A.) The float, which should he air-tight, may have developed a
leak, thus filling up float with gasoline and making it too heavy to rise
sufficiently to close vacuum valve. This allows gasoline to he drawn
into manifold, which in turn will choke down the motor.
Proper operation depends upon the float being air-tight.
To Repair Float (Lever Type)
Remove top of tank (to which float is attached) as above directed.
Dip the float into a pan of hot water, in order to find out definitely where
the leak is. Bubbles will be seen at point where leak occurs. Mark this
spot.
Next, punch two holes, one in the top and the other in the bottom of
the float, to permit discharge of the gasoline. Then solder up these holes
and the leak. Test the float by dipping in hot water. if no bubbles are
seen, the float is air-tight.
78
DURANT AND STAR CARS – FOUR CYLINDER
79
In soldering float, be careful not to use more solder than required.
Any unnecessary amount of solder will make the float too heavy.
In taking out float and repairing it, take care not to bend the float
guide rod. If you bend the rod, it will strike against guide and retard
float, producing the same effect as a leaky float, and allowing gasoline to
enter manifold. Also note whether surface of rod is perfectly smooth,
so that it cannot be retarded by guide.
To overcome the condition of a leaky float temporarily until you can
reach a garage, remove plug 15 at the top. In some cases the suction ii..
of the motor is sufficient to draw gasoline into tank even with this plug
open, but not enough to continue to be drawn into manifold. If,
however, you are not able to do this, close up plug, 15, with engine running. This will fill tank. After running engine until tank is full, remove
plug, 15, until gasoline gives out. Repeat the same operations until a
repair station or garage is reached, where the leaky float can be remedied.
(B.) The flapper valve, 6, may be out of commission.
A small particle of dirt getting under the flapper valve might prevent
it from seating absolutely air-tight, and. thereby render the tank inoperative.
In order to determine whether or not the flapper valve is not function-ing, first plug up air vent; then detach tubing from bottom of tank to carburetor. Start motor and apply finger to this opening. If suction is
felt continuously, then it is evident that there is a leak in the connection
between the tank and the main gasoline supply, or else the flapper valve
is being held off its seat and is letting air into the tank instead of drawing gasoline.
In many cases this troublesome condition of the flapper valve can be
remedied by merely tapping the side of the tank, thus shaking loose the
particle of dirt or lint which has clogged the valve. If this does not
prove effective, remove tank cover, as described on previous page. Then
lift out the inner tank. The flapper valve will be found screwed into
the bottom of this inner tank.
(C.) Manifold connection, 3, may be loose, allowing air to be drawn
into manifold.
(D.) Tubing may have become stopped up in lengths 4 or 3.
(E.) Gasoline strainer, 5, is a screen located in the line from gasoline
tank. This screen collects all foreign substances that might get in the
rear tank and he carried through to the carburetor, and clog it. If tank
fails to ‘work it may be that this screen is clogged, preventing gasoline
from getting into tank. Screen may be easily cleaned by unfastening
connection at elbow. This cleaning should be done every three weeks.
If tank should ever fail to operate, examine strainer first.
VACUUM TANK (Leverless Type)
GENERAL DESCRIPTION
The Stewart-Warner Tank has two separate chambers—the inner or
vacuum chamber M and the outer or reserve chamber N (see Figure 62).
The inner chamber has four openings:
79
80
REPAIR MANUAL FOR
1. The fuel inlet A, which is connected to the main supply tank.
(The fuel passes through the screen S.)
2. The vacuum opening F, which is connected to the intake manifold.
3. The atmospheric opening C.
4. The flapper valve G.
The outer or reserve chamber has two openings:
1 At the top the opening to the atmosphere at all times through vent
tube K.
2. Outlet E, which is connected to the carburetor float bowl.
Fig. 63—Vacuum Tank (Leverless Type)
Except the inner shell bottom, which is brass, the outer and inner shell
and top are made of terne plate, which is sheet steel coated with lead by
a special process. All rear gasoline tanks are also made of this.
The float F is made of brass and nickel-plated. The float stem is
made of bronze. The stem extends to the bottom of the float to which
it is attached. This prevents the float from being bent in at the top
from jars and putting the stem out of line with the vertical axis of the
float.
The bends in the float stem cause the valves to be opened and closed
as the float reaches the bottom or top of its travel. The valve stern
eyes cannot pass these bends, except when the float is held far to one
side. This cannot occur after it is assembled in the tank. The float
stem, between these bends, moves freely through the valve stem eyes.
The valve stems are spring steel, brass plated, but the valves are
brass.
80
DURANT AND STAR CARS – FOUR CYLINDER
81
The “flapper” valve is flat glazed bakelite. This seats against a ring
embossed in the brass bottom of the inner shell. This ring-shaped valve
seat is lapped to form an air-tight seat for the bakelite valve.
How It Operates
The pumping action of the pistons in the motor creates a suction or
vacuum in the intake manifold. By connecting the Stewart-Warner
Tank to the intake manifold, air is withdrawn from the inner chamber
thus reducing the pressure below that of the atmosphere. The fuel in
the main supply tank being under atmospheric pressure is forced into
the inner chamber (this action is commonly called suction) from where
it flows to the outer chamber, as explained later. As the StewartWarner Tank is always installed at a point higher than the carburetor
the fuel flow3 by gravity to the carburetor.
As float F raises the lower bend its stem lifts and closes the vacuum
valve B. When the float starts to go down Valve B is held closed by
vacuum in the manifold. For this reason the manifold vacuum must
be great enough under all conditions to operate this tank properly.
When the vacuum chamber M is nearly or entirely empty, the float is
down, the atmospheric valve C is closed and the vacuum valve B is
open. The suction of the intake manifold is applied to the inner
chamber M through the open vacuum valve B. This reduces the pressure in the inner chamber M below that of the atmosphere. This closes
flapper valve C, as outer chamber N is at atmospheric pressure. Fuel
from the main supply tank which is at atmospheric pressure is therefore
forced into inner chamber M through fuel inlet and screen S.
As inner chamber M fills with fuel float F rises. As float reaches the
top of its stroke it closes vacuum valve B and opens atmospheric valve
C, allowing atmospheric pressure to he established in chamber M.
As the pressure in both chambers is now equal the fuel flows by
gravity through flapper valve C into outer or reserve chamber N, allowing the float F to drop gradually.
As the float F reaches the bottom of its stroke it opens vacuum valve
B and closes atmospheric valve C. The intake manifold vacuum again
lowers the pressure in inner chamber M, fuel is forced into inner
chamber and the operation is repeated.
This operation is continued at a rapid rate until the fuel level in
chamber N comes to a balance with the fuel level in chamber M and
operated thereafter as the carburetor demands the fuel.
As the gravity chamber N is always open through vent tube K, a
perfect, even flow of fuel to the carburetor is maintained by gravity.
Instructions For Disassembling
It is not necessary to remove the tank from the car to repair it.
1. Disconnect the fuel line U and vacuum line J connections.
2. Remove the four screws from the top.
3. Lift the cover with the float attached.
4. Lift out the inner shell, if required.
81
82
REPAIR MANUAL FOR
Trouble Indications
Except in one respect, that of a check valve not seating properly on
back pressure from the manifold, the various possible troubles in this
tank will be indicated in the same way as similar troubles are indicated
with the lever type tank.
Failure to Draw Fuel
1. Air leak in vacuum line or fittings. Air leak in the supply line
or fittings from the supply tank to the vacuum tank. This may be
caused by loose or broken fittings at the vacuum tank, supply tank or
manifold or by split, broken or worn tube. It will be most likely to
prevent operation on open throttle, but will not cause total failure unless
the leak is very had. To repair, replace broken tube or fittings or tighten
loose fittings.
2. Plugging of supply tank vent (usually in the filler cap). This may
also cause some gasoline to he forced out of the vacuum tank, due to
expansion of the gas in the supply tank creating a pressure.
3. Restriction in supply tube U. Any restriction will limit the flow
of fuel. Restriction may be caused by dirt clogging the screen 5, at the
vacuum tank or the entrance to the tube at the supply tank, especially
when a valve or screen of any kind is used. It may also he caused by a
sharp bend in the tube or dirt clogged in the tube at bends, etc.
Over-rich Mixture or “flooding” Engine
1. Float leak. A leak in the float will cause it to fill partly, fail to
open promptly, or at all, the atmospheric valve and close the vacuum
valve. This will cause gasoline to fill the inner chamber and he drawn
through the vacuum valve into the manifold, resulting in an over-rich H
mixture or flooding the engine, especially on idling. To repair, see
“Instructions for Disassembling.” Punch a very small pin hole in the
float and empty it of fuel. Solder the leak and the pin hole, then test by
immersing it in a pan of hot water. If no bubbles are seen, the float is
air tight.
2. The vent tube K may have become clogged. This can easily he
determined by tile use of a test tool which can he purchased of StewartWarner Speedometer Corporation which they list under No. T-46026.
3. The atmospheric valve C may not seat properly because of some
foreign matter having lodged on the seat. If this leaks much air a sufficient degree of vacuum cannot he built up in the inner chamber to draw H
gasoline to it. To test the seating of this valve, the test tool T-46026
should he used placing it over the lower part of the intake manifold
and then hold entire assembly with the upper half of the intake mani-fold pointing upward, and in this position seal the vacuum connection
with the finger and then suck on the stem of the test tool. If air can be
drawn through, invert the entire assembly and endeavor to blow out
the matter preventing the valve from seating properly. In this position
(upside down) the vacuum valve will he closed so any air going through
must go through the atmospheric valve and out the vent at the side.
Also by turning the valve stem while pulling it against its seat try to
grind off the dirt or whatever is preventing it from seating.
82
DURANT AND STAR CARS – FOUR CYLINDER
83
If the valve cannot he made to seat properly, replace the defective top
assembly with a good one. If these are in such condition as to be
reusable as new after being repaired they should be returned to the factory or your distributor for repair and base your charges on the cost for
repairs.
4. Vacuum valve dirty or will not seat properly. When the vacuum
valve B does not seat properly there will be a continuous flow of air
coming through the atmospheric valve and out the vacuum valve into
the manifold. After the inner chamber is filled gasoline will be drawn
into the manifold through valve B and cause the engine to be flooded
and finally stop.
This valve can easily be tested by holding the entire cover assembly
in a vertical position and pull out the valve stem and blow into the
vacuum nipple. Push the valve stern in and suck. A properly seated
valve will not allow air to be drawn through it thus into the mouth.
Pull out the stem and continue to suck. Air should pass through the
valve when the valve stern is pulled outward. When you find the valve
defective and cannot make it scat properly by pushing it upward and
turning it, replace the defective assembly.
Fuel Won’t flow to Carburetor or Only Slowly
1. Clogged vent to inner shell in center top nipple or clogged vent
tube K. Under such directions fuel could flow only as air comes up
through the carburetor line to replace it.
2. Sticking Flapper valve. This is sometimes due to an insoluable
gum getting on the valve seat. At other times a green paste, formed
by the action of acid on the brass bottom, may get on the valve seat
and cause it to stick closed. The source of this gum is not known and
it has been found in quantities too small for analysis. This and the
paste may be tl1e result of some soldering flux not removed from the
supply tank or vacuum tank before use.
We have occasionally seen tanks having in them a substance like
varnish, hut in too small a quantity for analysis. The source of this has
not been determined.
Check this valve in the following manner: Remove the inner shell,
and place open end over your mouth and attempt to breathe through
it. A defective flapper will allow air to leak into the shell. Clean the
valve seat and flapper, but if this does not help, replace the inner shell
and flapper assembly with a new one. This must not be construed as
authorizing a charge for a new shell.
It will he found more difficult than is apparent to remove the old
flapper without damaging the shell bottom beyond repair or to put on a
new flapper so it will not leak around the rivet or the seat. For this
reason no tools are supplied for this repair and the complete inner shell
and flapper valve should be returned to the factory for repair if the
shell is not rusty and it can• be repaired for resale as new by merely
putting on a new flapper and relapping the seat
CARBURETOR
The Tillotson Carburetor is especially designed for the DURANT
and STAR engine. It is a plain tube carburetor with air-feed main
nozzle, accelerating well, and a by-pass for idling.
83
84
REPAIR MANUAL FOR
The upper cross-holes in main nozzle feed air above the level of
gasoline and thin out the mixture at ordinary speeds to give maximum
economy. The lower cross holes fill the accelerating well, and empty
it when throttle is opened quickly.
The needle valve regulates the flow of fuel to main nozzle. The
approximate setting is two and one-fourth turns open. To adjust, open
throttle one-third, retard spark, adjust needle valve until engine runs
smoothly, then cut off one-eighth to one-fourth turn, which should give
you best performance.
The by-pass needle regulates the air for idling; the approximate setting is one-fourth to one-half turn open. The position of butterfly to
give required speed is determined by a stop screw, which should be
adjusted at the same time as the by-pass needle. When desired speed is
secured, lock the screw by binder screw.
Fig. 64—Carburetor
Before adjusting carburetor, spark plugs, ignition system and valves
should be in good order; gasoline line and strainers free and clean, and
engine well warmed up.
A large proportion of carburetor trouble is due to water or dirt in
gasoline stopping up the screen and nozzles.
This instrument has been designed and adjusted for use with gasoline
fuel; when using other fuels, secure instructions from Tillotson Mfg.
Co., or authorized service stations.
84
DURANT AND STAR CARS – FOUR CYLINDER
85
The carburetor has been carefully tested and properly adjusted with
the motor at the factory, and no further adjustments should be necessary.
Too often attempts are made to adjust the carburetor when something
else is causing the motor to run unevenly.
The carburetor is equipped with a filtering screen or strainer at the
point where the gasoline enters the carburetor. Dirt or water may be
causing the motor to misfire and sputter; and in this event, the bowl
to which the gasoline line is connected should be removed and thoroughly
cleaned.
If dirt should pass the screen or strainer, it may lodge so that the
needle valve will not have a good seating. In this event, it would cause
a leaky carburetor, and the needle valve should be reseated.
Remove the cover over the float chamber bowl and with a light hammer or other suitable tool, tap lightly on the end of the needle valve.
The needle valve seat is made of brass and this action will cause a new
seat to be formed.
A slight drip from the carburetor is sometimes due to the gasoline
level being too high. The lever for this carburetor is 13/16” from the
top of the float chamber to the surface of the gasoline. The level can
be changed by bending the float lever arms.
In nearly every case of difficulties encountered with a carburetor, you
will find that dirt in the carburetor or passages between the gasoline
tank and carburetor, is a contributing cause.
To Clean Carburetor
Disassemble the carburetor completely and examine each part.
Clean all parts thoroughly in gasoline using a stiff brush to remove
caked dirt and blow out the small drilled passages which may become
clogged with chips or dirt.
Inspect carefully for defects in fibre washers or leaks due to sand
holes in body castings.
If due care is exercised, further difficulties can generally he traced to
insufficient fuel feed, faulty ignition or poor compression.
ELECTRICAL SYSTEM
The system used is known as the two-unit system; that is, with a
separate generator and starting motor, each performing its function
independently of the other.
The system, as a whole, comprises three principal units:
The generator, which produces an electric current and delivers it to
the storage battery.
The storage battery, which receives and accumulates the current thus
generated, and delivers it to the distributor, lighting system or the starting motor when needed.
The starting motor receives the current from the storage battery and
cranks the automobile motor whenever it is to be set in motion.
In addition, there are four auxiliary systems for the regulation and
control of the different units, as follows:
A circuit breaker, whose function is to “break” the charging circuit
when the automobile engine is standing still or when the speed drops
below the point where the generator will produce a charging voltage.
85
86
REPAIR MANUAL FOR
Fig. 65—Right-hand Side of Motor
An ammeter, which registers on a dial the charging or discharging
rate of current floating through the system. When the car is at rest and
no lights burning, the indicating needle or pointer should stand at “zero.”
When the lights are turned “on” the pointer will move to the right,
and indicate the amount of discharge or current flowing from the storage
battery. With the automobile motor running at a fair speed, and no
lights burning, the pointer will move to the left of zero, and indicate the
amount of current flowing into the storage battery, or “charging rate.”
Should the pointer indicate “discharge” when the car is at rest and no
lights burning, the system is not working properly and should be investigated to determine the cause of the trouble as quickly as possible.
A starting switch, the function of which is to make the necessary electrical connection from the storage battery to the starting motor when
the automobile motor is to be set in motion. This switch is self-contained in an insulated steel box and requires no attention.
An ignition and lighting switch, by which the ignition and lighting
systems are controlled.
Figure 65 illustrates the relative position of the generator and igniter
sets for the DURANT and STAR cars. The units are mounted on the
86
DURANT AND STAR CARS – FOUR CYLINDER
87
right side of the motor. The generator is driven by a chain connecting
with the crankshaft and camshaft gears housed in the chain case at the
forward part of the motor. The ignition coil is mounted on the side of
the generator and the distributor is driven by the generator armature
shaft.
THE GENERATOR
The construction of the generator is of the utmost simplicity, and
beyond a few drops of oil every week, requires no attention. The machine
is enclosed in a dust and moisture proof shell which effectually protects
it from oil and dirt.
The voltage output is controlled by a third brush, which increases or
decreases the field strength in proportion to the motor speed, thus doing
away with mechanical governors and clutches, which are liable to get
out of adjustment.
The generator begins to produce a charging current of sufficient voltage at a car speed of about ten miles per hour. At twenty-five miles per
hour the generator is producing nearly its maximum output, or about
fifteen amperes.
Care of the Generator
The generator should be examined occasionally to see that all connections are tight and that there is no undue wear on the moving parts.
The commutator end of the generator can be reached by removing the
steel band around the commutator head.
If the commutator should be found blackened or rough, it may be
smoothed down with No. 00 sandpaper, while the generator is running.
Never use emery cloth for this purpose.
After smoothing down the commutator, examine it carefully and
remove all particles of metal which may bridge across from one copper
segment to another. Blow out every particle of carbon dust which may
be accumulated in the generator case.
See that there is just enough spring tension on the carbon brushes to
insure good contact on the commutator. Too much tension will cause
heating and unnecessary wear to brushes and commutator segments.
See that the brushes are making even contact with the commutator.
When they become worn to such an extent as to need replacement, new
ones should be installed.
Locating Generator Troubles
The Generator is provided with a field fuse to protect it from serious
damage should a loose connection or broken wire occur in the charging circuit. This is located in the right hand tipper quarter of the commutator end plate looking at the unit from the commutator end and is
easily accessible by removing the head band assembly. The fuse is of
a 5 ampere capacity and should never be replaced by a fuse substitute
or one of higher rating.
After checking all the connections in Fig 67, examine the field fuse
for being “Blown” or “Open”. A blown fuse will show no wire in the
glass which will also have a smoky appearance, while an open fuse
will generally have loose metal end ferrules.
87
88
REPAIR MANUAL FOR
If the ammeter shows no charge at fair motor speed, go carefully over
each connection. Make sure that every wire is intact and is securely
fastened to its respective terminal. In nearly every case of suspected
generator trouble, it will be found outside of the generator itself.
If trouble is traced directly to the generator do not remove it immediately, but by removing the flat band around the rear end examine the
brushes, brush connections and commutator segments. There are a
number of insulating discs on the brush rigging; also on terminal posts.
Make sure that none of these are broken or misplaced and that whenever
used the terminals or screws are not touching some grounded portion
of the generator housing.
If you are sure these are in good condition, first mark the exact position of the brush holder plate; then remove the generator, then the armature.
The brushes are set at the exact neutral point of the magnetic field.
This varies on each generator, so it is very important not to change this
in any way.
Testing Field Coils
Disconnect the coil leads; attach one end to the positive battery terminal. Connect a six-volt lamp in series with a wire attached to the
negative battery terminal. Make and break the connection by touching
the other coil lead. If the coil circuit is intact, the lamp will light. If
it is open (broken) the lamp will not burn.
Sometimes the insulation on one of the coil wires breaks, causing the
bare wire to come in contact with the field pieces, causing a ground. To
determine this, attach the negative battery wire (still in series with the
lamp) directly to the generator case; then bring the free end of the
coil wire into contact with the generator case. Make and break the
contact. If a ground exists, the lamp will light.
Do not attempt to repair a broken or grounded coil, as it will be much
cheaper to install a new one.
Before removing the pole pieces to take off the coils, mark each one
plainly so they can be put back in exactly the same condition and position. The polarity will be changed unless this is done.
Note which direction the coil is wound; that is, right or left handed.
In putting on new coils, be sure to have the winding run in the same
direction.
If the coils are on backwards, it will change the polarity and the
machine will not generate.
Testing Armature
The armature is more difficult to test, requiring special test
apparatus, such as a Growler, or bar-to-bar test.
There are three conditions that would cause an armature to fail.
First: Shorted commutator segment.
Second: Broken armature coil.
Third: Shorted armature coil.
The first case can be determined by a careful examination of the slots
between each segment. Each segment is separated from its neighbor by a
thin mica insulating strip.
88
DURANT AND STAR CARS – FOUR CYLINDER
89
With a tool the exact width of the space between the segments, scrape
the mica down so that it is somewhat below the top of each segment.
Examine the connections of each coil wire to its respective segment
to make sure that no solder is shorting one coil with another.
If there is no short circuit between segments or coils at commutator,
then either one of the second or third causes mentioned above is the
reason for the failure.
It is much cheaper to replace the armature with a new one than it is
to attempt to repair it.
It is essential for the proper working of a generator that the bearings
supporting the armature be tight; therefore, when they become loosened
from wear, replace them.
Adjusting Generator Third Brush
When DURANT and STAR cars leave the factory, the third brush is
set for average driving needs. In congested centers where the driving
speeds is continually low, it may he necessary to increase the voltage
output at comparatively low speeds. To do this, remove the flat band
which surrounds the generator at the rear end. The tower brush (when
facing the motor) is the third brush. By loosening the lock nut, this
brush may be moved up or down slightly. Moving the brush upwards
increases the voltage.
It is best not to change the regular setting unless you are sure that it
is necessary for that particular car and its operating conditions.
To Remove Generator
Remove the generator sprocket plate from the chain case cover which
will allow the cotter pin and castled nut to be removed which holds the
sprocket to the generator shaft.
Next remove the two cap screws holding generator to chain case:
disconnect water pump held by three (3) bolts.
Fig. 66—Adjustment of Chain by Moving Generator
89
90
REPAIR MANUAL FOR
Due to the boss on generator where Slot for adjusting is located, it
may strike the motor block if pulled straight back; but when taken off
in an assembly unit, and by moving the generator slightly at the same
time pulling off the generator gear, which is a slip fit on generator shaft,
it can be easily removed.
Ignition Coil
In order to determine if the coil is operating properly, secure a piece
of wire, and, holding one end to the frame of the car, motor casting, or
other metallic “ground,” bring the other end to within one-quarter inch
from the point where the high tension wire (running from the coil to the
central terminal of the igniter) leads from the coil.
Turn the engine over by hand with the switch turned on.
If a spark occurs at this point and not at the distributor, the trouble
is in the high-tension wire which leads from the coil to the igniter.
If no spark occurs at either point, the distributor in proper shape and
the primary circuit intact, it is evident that the coil should be replaced.
Primary Circuit
When testing the primary circuit, there are practically only two things
to be taken into consideration; namely, the condition of the contact
points in the breaker box and the wiring.
When tracing the primary circuit, first see if the fuse on the back of
the instrument board has “blown”; then trace all wiring, following the
diagram shown in this book. (Figs. 67 and 68.)
Lighting and Ignition Switch
In order to test switch and determine if current flows through it:
Remove the white wire from the terminal on coil. (Figs. 67 and 68)
Attach a wire to the negative terminal on the storage battery and
bring its free end around so that it can be brought in contact with the
free end of the wire which was removed from the coil.
Then turn on the ignition switch and make and break the circuit with
the two wires by touching their free ends together.
If no spark occurs, bring the free end of the wire attached to the
negative terminal of the battery up to the switch and make and break
the circuit by touching the screw on the back of the switch marked “Bat.”
If a spark is given off, then the wire from the switch to the coil is
broken or faulty and should be replaced. If no spark is given off, there
is doubtless an open circuit in the interior.
WIRING DIAGRAMS
Wiring diagrams for DURANT and STAR models are shown in
Figures 67 and 68
90
DURANT AND STAR CARS – FOUR CYLINDER
Fig. 67—Wiring Diagram—Durant and Star Passenger Car
91
91
92
REPAIR MANUAL FOR
Fig. 68—Wiring Diagram (Durant and Star Commercial)
92
DURANT AND STAR CARS – FOUR CYLINDER
93
CIRCUIT BREAKER
The circuit breaker is entirely automatic and requires no lubrication
or attention. If the circuit breaker is removed, the car must not be
operated until a short piece of copper wire is connected between the two
terminal posts on the generator.
Figure 69 illustrates the circuit breaker.
Fig. 69—Circuit Breaker
Minor repairs, such as removing the burrs and pits from the contact
points, which have become burned through constant use, may be done by
securing a nail file. This file, being perfectly flat, may, without any
injurious effect be placed between the contact points, and, with the movable points held lightly against the file, pull the file out. It may be
necessary to repeat this operation several times in order to secure a
perfectly flat and clean contact surface.
Do not move the file back and forth between the points, as this
motion has a tendency to round off the edges, causing them to have a
convex surface rather than a flat surface. If the points burn off entirely or
if the contact spring breaks, reinstalling new parts is the only remedy. If
the coil burns out on account of the excessive flow of current through it,
the only remedy is to install a new circuit breaker.
It is seldom that the coil in a circuit breaker burns out. Usually a
loose outside connection is the real reason why the contact points will
not closest proper car speeds..
Do not condemn the circuit breaker until you are sure all outside
connections are tight and that the generator is actually functioning.
The generator should cut in or start showing a charge on the ammeter
between 8 and 10 miles per hour, (car speed), 15 miles per hour should
show from 8 to 10 amperes, from 15 to 20 miles per hour 14 to 15
amperes, and generator should start cutting back approximately 30 miles
per hour.
Due to the very resistant condition that comes through the wiring
harness, circuit breaker and other parts of electrical equipment, the
factory endeavors to adjust and set the generator so it will show a consistent output on every car as noted above.
93
94
REPAIR MANUAL FOR
If results are not obtained, as noted above, the generator third brush
should be adjusted.
STARTING MOTOR
The starting motor like the generator requires little attention beyond
regular oiling. (Generators equipped with graphite bearings are selflubricating and should not he lubricated.)
It is attached to the motor base in a saddle which securely locks it in
place. A dowel between the motor base and starting motor frame locates
it in relation to the flywheel.
In replacing the starting motor, be sure this dowel is in its proper place
and that the clamping bands are tight and square with the motor.
To the end of the armature shaft is mounted a pinion which automatically engages the toothed edge of the flywheel when the motor
armature is rotated rapidly, as in starting. The armature shaft of the
starting motor has an extension or sleeve provided with square threads.
The pinion is also threaded and, in addition, carries an eccentric weight,
which holds the pinion in the position shown in Fig. 70, with the weight
underneath. Because of the weight, the pinion is too heavy to turn on
the threaded extension, and because the pinion does not turn, it must
move along the screw sleeve.
After the pinion has moved along the threaded sleeve, it engages the
teeth on the flywheel and keeps on moving along until it reaches a stop
at the end of the threaded sleeve. The pinion and the flywheel gear are
then fully meshed. Fitted over the end of the armature shaft is a second
sleeve, held securely to the shaft by a clamping bolt. A heavy coiled
spring connects the outer sleeve with the threaded sleeve. After the
pinion has reached the stop, it now must turn with the threaded sleeve;
but since it is engaged with the flywheel gear, the shock of starting the
engine would be very great were it not that the armature shaft is connected to the threaded sleeve through the coiled spring. Instead of
picking up the load immediately, this spring keeps coiling until the
torque of the starting motor overcomes the resistance of the spring and
starts to revolve the flywheel.
Fig. 70—Starting Motor
94
DURANT AND STAR CARS – FOUR CYLINDER
95
As soon as the gasoline engine starts under its own power, the flywheel revolves at a much higher speed than it did when the starting
motor was cranking the engine. This increases the speed of the pinion,
but because it is running faster than the threaded sleeve, it will be
thrown out of mesh with the flywheel gear.
Should the operator of the car, through error, not immediately remove
his foot from the starting butt on, the unbalanced weight of the pinion
causes it to twist on the threaded sleeve and clutch the threads, preventing it from again meshing with the flywheel gear. This demeshing
movement and clutching action is entirely automatic.
The coiled spring should be examined occasionally to see that it is
clamped tightly and that no distortion has taken place. Should this
occur, replace the spring, as this must he in good working order to prevent damage to the teeth on the flywheel gear.
Fig. 71—Distributor
While the coiled spring absorbs much of the starting torque, the
vibration of the car, coupled with the shock of starting, may cause the
clamping bolts, holding the starting motor to the motor, to loosen and
possibly shift the starting motor slightly, throwing the pinion out of
proper alignment with the flywheel gear.
Whenever, when starting the engine, the pinion goes into mesh with
a “bang,” accompanied with considerable noise while cranking, take
your car to a garage and have the bolts examined and the starting motor
95
96
REPAIR MANUAL FOR
lined up properly. By turning the threaded sleeve with the fingers, the
pinion can be moved into mesh with the flywheel gear, and any disalignment observed and corrected.
When resetting the motor, be sure there is between .017” and .020”
clearance or back lash between the pinion and flywheel teeth.
In general, the instructions given for the care of the generator will
apply as well to the starting motor. The brushes and commutator are
easily accessible for examination by removing the sheet metal cover on
the commutator end of the machine.
Removing Distributor
Should it become necessary to remove the distributor assembly, loosen
the lock screw on the side of the distributor shaft housing, and same can
be easily removed.
In replacing, care should be taken to see that the shoulder on the
machine end of the distributor comes in contact with the generator support, and the lock screw fits firmly into the slot in the distributor shaft.
Retiming Distributor (Full Manual Spark Control)
Remove the valve cover and with the starting crank turn the motor
over by hand until the intake valve on No. 1 cylinder begins •to open.
This is the second valve from the radiator.
Continue to turn until the valve is entirely closed and there is clearance
between the valve stem and valve lifter. On the rim of the flywheel is
a heavy stamped line. Continue to turn the motor slowly until this line
is exactly on top and in a direct line with the center of the crank shaft.
This is called the top dead center position of the compression stroke.
Fig. 72—Timing of Distributor (Full Manual Spark Control)
96
DURANT AND STAR CARS – FOUR CYLINDER
97
Remove the distributor cap (do not remove the disc) and set the distributor assembly into the generator housing so that the metal contact on
the top of the disc inclines forward 45°, as shown in Fig 72.
Before installing the distributor, see that the spark lever on the distributor housing is moved forward as far as it will go. That is, the
distributor must be in a retarded position.
Should any of the wires be removed from the distributor, their proper
position can be determined by reference to the wiring diagram on Pages
91 and 92.
Retiming Distributor (Full Automatic Control)
This distributor is equipped with a full automatic spark control
device which automatically times the ignition according to the speed
of the engine. This renders a hand spark advance unnecessary. The
initial setting at the factory is correct and should not be altered unless
these parts have been removed or disturbed.
To check the timing when necessary, proceed as follows: First, remove the spark plugs from all cylinders except No. 1 cylinder (No. 1
cylinder is the one nearest the radiator) crank the engine by hand until
the piston in No. 1 cylinder starts up on the compression stroke which
will be when resistance is offered, then remove the spark plug in No.
1 cylinder and continue to crank the engine slowly until the fourth
tooth on the flywheel ahead of the top dead center markings on the
rim of the flywheel is exactly at the top and in the center of the cylinder
bore or in a direct line with the center of the crankshaft.
Next, loosen the distributor cap nut before entirely removing make
sure the position of the distributor arm is pointing directly to the spark
plug wire leading from the top of the distributor cap to the spark plug
of No. 1 cylinder. If it is not in this position, loosen vertical clamp bolt
on the retainer bracket and lift the entire distributor tip Just far enough
so the gears at the lower end of distributor shaft are out of mesh and
then turn the distributor arm only, until it is pointing directly to the
No. 1 spark plug wire. In this position the distributor cam should be
just touching the breaker arm to cause the contact points to start separating or opening. To adjust if necessary loosen the clamp screw
on the outside of the distributor just beneath the housing and turn the
entire distributor slightly in the proper direction. Turning the distributor to the right or clock—wise retards the ignition: turning to the
left or anti-clockwise advances the ignition.
After the proper adjustment is made, tighten the clamp screw, replace
the distributor cap, spark plugs, etc., and the ignition timing should be
correct.
IGNITION TIMING
SEMI-MANUAL SPARK CONTROL
The distributor is equipped with a semi-automatic spark control device
which mechanically controls the advancing and retarding of the spark.
The initial setting at die factory is correct and should not he altered
unless the parts have been removed or disturbed.
97
98
REPAIR MANUAL FOR
To check the timing when necessary. proceed as follows: first, remove
the spark plugs from all the cylinders except No. 1 cylinder (No. 1
cylinder is the one nearest to the radiator). Crank the engine by hand
until the piston in No. 1 cylinder starts up on the compression stroke,
which will be when resistance is offered; then remove the spark plug
in No. 1 cylinder and continue to crank the engine slowly until the
fourth tooth ahead of the dead center line on the flywheel lines up with
the pointer located on the right hand side of the bell housing, which
encloses the flywheel.
Next, advance the spark lever on the steering wheel to its full limit
(See Fig. 1) then loosen the springs holding the distributor cap in place
but before entirely removing the cap, make sure the position of the
distributor arm is pointing directly to the spark plug wire leading from
the top of the distributor cap to the spark plug in No. 1 cylinder. If
it is not in this position, loosen vertical clamp bolt on the retainer
bracket and lift the entire distributor up just far enough so the gears
at the lower end of distributor shaft are out of mesh and then turn the
distributor arm only, until it is pointing directly to the No. 1 spark plug
wire. In this position the distributor cam should be just touching the
breaker arm to cause the contact points to start separating or opening.
To adjust, if necessary, loosen the clamp screw on the outside of the
distributor just beneath the housing and turn the entire distributor
slightly in the proper direction. Turning the distributor to the right or
clockwise retards the ignition; turning to the left or anti-clockwise advances the ignition.
After the proper adjustment is made, tighten the clamp screw, replace
the distributor cap. spark plugs, etc., and the ignition timing should be
correct.
LOCATING ELECTRICAL TROUBLES
When the electric system gives trouble, do not jump at conclusions.
Only when you have made sure that the wiring is in perfect condition,
all terminals tight and connected up according to the wiring diagrams
(Figs. 67-68), should trouble be looked for in the electrical instrument
themselves.
A short circuit occurs when any two wires of opposite polarity come
in contact at exposed places or with any metallic conductor. This will
discharge the storage battery in a very short time; therefore, the greatest care should be taken to see that all connections remain tight and that
the insulation of all wires is not broken or cut.
To prevent a short circuit from damaging the lights, a fuse is inserted
on back of the instrument board. When this “blows,” it can be easily
replaced; however, before doing so, be sure everything else in the wiring
system is in good order. If the ammeter hand shows a discharge when
the lights are turned off and engine idle, disconnect the positive (+)
wire from the battery, and if the hand goes back to zero it shows that
there is a leak or short circuit, which should be remedied at once. If
the hand does not go back to zero, the needle is bent.
After satisfying yourself that the wiring is in good working order,
test each of the electrical instruments.
98
DURANT AND STAR CARS – FOUR CYLINDER
99
Examine the generator brushes; see that they work freely and that
the commutator is clean. Examine the circuit breaker; see that the
points make contact; if not, close them with your fingers. If the ammeter
registers “charge” with the engine running at fair speed, remove the
circuit breaker and repair as instructed.
Examine the ammeter. With the lights turned on and engine idle,
the ammeter hand should register “discharge.” If it stands at zero,
remove the ammeter and return to the manufactures for repair.
Examine the storage battery. See that the solution in each cell covers
the plates, and add distilled water if it does not. See that the top of the
battery is clean and terminals tight. In case of leakage of the electrolyte
in one or more cells, take your battery to the nearest battery service
station for examination and replacements.
It should be remembered that the efficiency of any storage battery
decreases with a drop in temperature, and for that reason the starting
motor and lights should be used sparingly in cold weather and the engine
run for several minutes at good speed after each start.
Misfiring
Figure 73 shows the proper method to locate the particular cylinder
which misfires.
Fig. 73—Short-Circuiting Spark Plug
With the motor running, hold a wooden-handled screwdriver so that
the metal edge touches the spark plug terminal and then comes in contact with the cylinder head.
If a change in the running of the motor is noticed, that particular
cylinder is running properly. If no change, however, is noticed, either
the spark plug or the spark plug wire is at fault.
99
100
REPAIR MANUAL FOR
Remove the spark plug, and, if it is fouled with carbon, clean with
gasoline and a brush.
If the porcelain insulation of the spark plug is broken, a complete new
plug must be installed.
Trouble may also be caused by the spark plug points being too far
apart. The proper spark gap is .027”, or slightly less than 1/32”.
The spark gap may be changed by exerting a slight pressure upon
the two points and carefully forcing them closer together; or may be
increased by inserting the blade of a knife, which will separate the points
the desired distance.
The sparking points or electrodes may have become burned to such
an extent as to increase the resistance of the electric current. If this
is true, the best remedy is to renew the plug.
Another method of determining the working qualities of the spark
plug is to interchange the plugs which you know are good with those
which appear to be poor, and by the process of elimination weed out the
inferior plugs.
The trouble may be with the spark plug wire. Disconnect it from the
spark plug and hold the end about 34” from the plug. If no spark jumps
across the gap with the motor running, examine the terminals and insulation. Frequently the stranded copper wires break, which will cause
an open circuit and which is very difficult to discover.
If no exterior damage can be found, procure another piece of wire,
fasten one end to the igniter cap and hold the other end near the spark
plug. With the motor running, if a spark jumps across the gap, a new
spark plug wire should be installed.
Distributor
If trouble is suspected with the distributor, see if a spark is delivered
to the plugs. Failing to get a spark at the plugs, disconnect the high tension wire (running from the central terminal of the distributor to the
coil) from the coil (Fig. 74), and hold it within 54” from the point from
which it was removed.
Turn the motor over by hand with the ignition switch “turned on.”
If no spark occurs at this point, first examine the wire to see that it is
in good condition and that it is properly secured to the distributor cap.
Fig. 74—Testing Distributor
100
DURANT AND STAR CARS – FOUR CYLINDER
101
Fig. 75—Distributor, Showing Head Removed; How to File and
Adjust Contact Points
After satisfying yourself that this is the proper shape, take the distributor cap off the distributor and examine the small spring on the distributor disc (Fig. 75). See that this is not broken and that it is making
good contact with the high-tension terminal. If this part of the assembly
is in good condition, some ground exists in the breaker box.
Examine the primary wire; see that the insulation is good and that it
is properly fastened to the distributor. Occasionally oil or grease will
101
102
REPAIR MANUAL FOR
get into the breaker box and form a connection between the case and the
insulated contact point. Wipe out thoroughly.
Contact Points
The contact points will require little attention or refiling, even though
they may be very rough and irregular. When they become so badly
burned as to cause missing, they should be “trued” so that their contact
surfaces are exactly parallel. The best way to do this is to secure a
thin Swiss jewelers, or nail file, insert the blade between the contact
points, then press them together firmly with the fingers (Fig. 75), at the
same time withdrawing the file. Repeat this operation two or three
times, then adjust the contact points so that when the cam holds them
open the space between is .020”.
Caution: The contact points are made from thin discs of tungsten
welded to alloy buttons, so care must be taken to remove only enough
metal (when trueing points) to get parallel surfaces. When the tungsten
has been removed by reason of frequent refiling, a new adjustable screw
and contact arm should be secured.
STORAGE BATTERY
The storage battery is the heart of the electric system. It is a reservoir
into which the electrical energy made by the generator is stored for
ignition, lighting and cranking the motor.
A storage battery is an electro-chemical device entirely different from
the mechanical parts of the car. Its life depends on the care which it
receives and the kind of service demanded from it.
A battery possesses three compartments or cells. Within each cell
are two elements, one positive (+), and the other negative (-). Each
element consists of a number of plates called “grids,” the openings of
which are filled with a lead paste. Each group of plates is connected
together and separated from the opposite group by wooden separators
between each plate.
The liquid in which these plates are immersed is called electrolyte,
and is composed of diluted sulphuric acid.
The passage of current from the generator through the positive and
negative elements of the battery arouses a definite chemical action,
separating the lead paste into its several component parts. When the
battery is fully charged, this composition is soft or spongy.
The chemical action of a battery while undergoing a charge emits
a fine spray, called “gassing,” composed principally of water. Therefore
it is absolutely essential that distilled water he added every two weeks.
At the top of each cell is a vent hole or opening accessible by unscrewing the vent cover. These vents are for the purpose of inspection, adding water, and reading the specific gravity of the electrolyte.
Immediately upon receipt of a battery or a new automobile the battery
should he inspected. This requires but a few minutes, and may prevent
trouble. All vent covers should be removed, and the level of the solution
in each cell ascertained.
The battery plates should he well covered with solution; if not, add
distilled water.
102
DURANT AND STAR CARS – FOUR CYLINDER
103
Fig.76—Storage Battery
Filling one cell does not fill all, so examine each one and fill as required. If inconvenient to obtain distilled water, use melted artificial
ice or rain water that has been caught in a wooden tub (not metal).
Under no circumstances use ordinary water. Do not store water for
batteries in metallic vessels—use glass. Remember that if the battery
plates are exposed (not covered by the liquid), they become hardened and
the battery capacity is greatly reduced.
Never add acid, except to replace spilled solution. In that case, one
part of chemically pure sulphuric acid and three parts of pure distilled
water by volume.
Proper Battery Care
Keep all cells filled with disti1led water to a level ½” above the top
of the plates. Never fill above this level.
Keep the battery and the battery compartment clean and dry.
103
104
REPAIR MANUAL FOR
Keep the terminals clean and tight and well covered with vaseline to
prevent corrosion.
Never allow the battery to become heated in service above 100° F.
Watch the battery for heating one or more times every day in warm
weather. If the top connectors feel more than blood-warm to the touch,
burn all the lamps while driving, until you can consult a U. S. L. Service
Station, which will prescribe what is necessary. If the temperature
reaches 120°’ F., the battery may be ruined.
In order to prevent freezing in cold weather, test the battery frequently and see that the gravity is kept up to at least 1.275. A discharged battery will freeze at a little below the freezing point.
When filling, if one cell takes considerably more water than the
others, this indicates a leaky jar and the battery should be taken or sent to
a U. S. L. Service Station. Unless repaired immediately, the battery may
be ruined.
If you lay up your car, the battery should be removed and placed in
storage with a U. S. L. Service Station, who will issue a receipt for it.
A battery will slowly discharge when standing idle. Serious injury
will result if it is not kept charged, and it is not practical to do this by
running the engine when the car is not in use.
U. S. L. SERVICE POLICY
U. S. Light & Heat Corporation guarantees batteries of its manufacture to be free from defects in material or workmanship and insures
the service of such batteries under the following service and adjustment
policies:
Initial Test
The purchaser of a new car should immediately drive his car to the
nearest U. S. L. Service Station for initial test. This test, which covers
complete inspection of the battery and its relation to the electrical system,
will be made without cost to the owner.
90-Day Free Service Period
During the first ninety days of service, if repairs to the battery are
necessary, such repairs till be made by any U. S. L. Service Station
without cost to the owner, unless it is apparent that such repairs are
made necessary by neglect or abuse. It is, of course, understood that
the owner will be expected to pay for any necessary recharging.
The battery should be inspected and distilled water added, if required,
at least twice monthly in summer and monthly in winter. The owner
may inspect and fill his battery, if desired, in accordance with the instructions in his car instruction book or the U. S. L. battery instruction book,
or this service may be performed by the U. S. L. Service Station.
Fifteen Months’ Guaranteed Adjustment Plan
After the expiration of the ninety-day free service period, but within
fifteen months of the date indicated in code on the number plate of the
104
DURANT AND STAR CARS – FOUR CYLINDER
105
battery, the owner will, in case of battery failure, have the option
of paying for necessary repairs or of obtaining at any U. S. L. Service
Station a new U. S. L. battery in exchange at a price, f. o. b. factory,
equal to one-fifteenth of the list price for every month of the fifteen
months guaranteed adjustment period which has elapsed.
U. S. Light & Heat Corporation,
Niagara Falls, N. Y.
105
CHAPTER IV
GENERAL LUBRICATION
106
DURANT AND STAR CARS – FOUR CYLINDER
107
MOTOR LUBRICATION
The purpose of lubrication is to prevent any two pieces of metal that
are working against the other from touching. This is accomplished by
having a film of oil between these two metals. Upon this film of oil
depends entirely the life of the bearings, cylinder walls, pistons, and, in
fact, all working parts of the car. Care of the lubricating system will
often eliminate a great many repairs.
Fig. 77—Motor Oiling System
The oil system used in the DURANT and STAR motor is known as
the forced feed system. The oil is carried in the reservoir, or oil basin,
located at the bottom of the motor, and the oil drawn from this reservoir
by a pump located at the rear end of the camshaft. It is then forced
through the camshaft, which is hollow, to the three camshaft. hearings.
An oil regulator is located at front end of camshaft.
To increase oil pressure, it will be necessary to remove the oil pressure
nut, spring, and ball, and by either stretching the spring or putting a
shim in the oil pressure nut, which is a dome-shaped nut, more tension
can be given the spring, which will increase the oil pressure.
Oil is forced from the camshaft hearings to the crankshaft bearings
and to connecting rod bearings through a drilled crankshaft.
107
F i g . 7 8 —Lubrication Chart ( T w o W h e e l B r a k e s )
M—Lubricate every 500 miles with Motor Oil
T—Lubricate every 2500 miles with 600-W Steam Cylinder Oil
S—Lubricate every 500 miles with 600-W Steam Cylinder Oil
U—Lubricate every 2500 miles with Spicer Universal Joint Grease
G—Lubricate every 1000 miles with Grease
or Dixon’s No. 672 Graphite Grease
108
REPAIR MANUAL FOR
108
109
F i g . 7 8 —Lubrication Chart
(Four Wheel Brakes)
M—Lubricate every 500 miles with Motor Oil
S—Lubricate every 500 miles with 600-W Steam Cylinder Oil
G—Lubricate every 1000 miles with Grease
T—Lubricate every 2500 miles with 600-W Steam Cylinder Oil
U—Lubricate every 2500 miles with Spicer Universal Joint Grease or Dixon’s No. 672 Graphite Grease
DURANT AND STAR CARS – FOUR CYLINDER
109
110
REPAIR MANUAL FOR
The capacity of the oil reservoir is four quarts.
Midway of the cylinder block in a recessed place you will find a small
rod or plunger. This is the motor oil gauge, and when the proper amount
of oil is in the motor, the rod will extend to the high step cast in the
recess.
When oil in motor is drained, and fresh oil installed, always see that
oil pressure is shown on the oil gauge mounted on the instrument board.
If no pressure is shown, it is necessary to prime the oil pump by disconnecting the oil pressure pipe at the motor end and injecting sufficient
oil to start the pump working.
The old motor oil should be removed at the end of each 500 miles
and fresh oil put in. It is impossible to prevent oil dilution and the above
is the only way to insure proper lubrication.
Transmission Lubrication
The transmission should be inspected for oil at least once every month.
Hard grease or cup grease should not be used either in the transmission
or rear axle, as gears will have a tendency to cut a channel or path
through grease of this nature, and lubrication will not be provided for
the working parts.
An oil of the consistency of the 600-W should be used.
On the right side of the transmission is a pipe plug which can be removed to allow filling of transmission. This also acts as an oil level, and
oil should be supplied to bring same up to this point.
Every 2500 miles the oil in the transmission should be drained by
removing plug provided for this purpose, and the housing cleaned with
gasoline, and new oil provided.
In the winter months an equal amount of motor oil should be mixed
with 600-W oil. Heavy oils become stiff from cold and it is necessary to
thin them to secure proper lubrication.
Clutch Release Bearing Lubrication
The clutch release bearing is mounted in an oil chamber, which operates the three (3) clutch throw-out arms. Chamber is provided with a pipe
plug which can be removed and oil injected.
This should be lubricated every 500 miles.
6007W oil is recommended for summer use and a lighter oil for the
winter. Chamber holds 11/2 ounces of oil to the shaft hole level.
Rear Axle
The rear axle is equipped with a pipe plug installed in the rear axle
housing, which also acts as an oil level.
Hard grease or cup grease should not be used in the rear axle as the
gears will have a tendency to cut a channel or path in the grease, and
the working parts will not receive sufficient lubrication.
600-W oil is recommended for the rear axle.
110
DURANT AND STAR CARS – FOUR CYLINDER
111
In the winter mouths an equal amount of motor oil should he mixed
with 600-W oil. Heavy oils become stiff from cold and it is necessary
to thin them to secure proper lubrication.
Every 2500 miles the oil in the rear axle should be drained and fresh
oil put in.
Rear Wheel Bearings
The rear wheel bearings are lubricated by Alemite fittings located at
lower rear side of rear axle housing into which cup grease should be
installed every 1000 miles.
Universal Joint
The universal joints at the transmission and rear axle end are equipped
with pipe plugs which can he removed, and the universal joints lubricated.
The lubrication of these two joints should he done every 2500 miles.
Spicer Universal Joint Grease or Dixon’s Na. 672 Graphite Grease is
recommended for these universal joints.
The front universal, between the clutch and transmission, on the
Model “M”, “M-2” and M-4” requires no lubrication.
Front Wheel Bearing Lubrication
The front wheel bearings can he lubricated by filling the huh caps
with cup grease and replacing.
The front wheels should he lubricated once every month.
Oil connections are on all spring shackles, steering cross rod bolts, tie
rod bolts and should be oiled weekly.
Figures 78 and 79 show DURANT and STAR car lubrication charts.
111
Blank page
112
DURANT AND STAR CARS – FOUR CYLINDER
113
TABLE OF CONTENTS
Page
Front Compartment and Controls ----------------------------------------- 6
Cooling System -------------------------------------------------------- 7-8-9
CHAPTER I
A Detailed Description Of The Things Most Likely To Cause
Difficulty And How To Diagnose Them
Page
Brakes --------------------------------------- 21
Howl and Squeak ---------------------- 21
Will Not Hold ------------------------- 21
Bearings—Loose or Worn ------------ 18-19
Carbon Deposits --------------------------- 17
Carbonized Valves ------------------------ 16
Car Skids -------------------------------------21
Car Steers Hard------------------------- 21-22
Clutch --------------------------------------- 19
Grabs ------------------------------------ 19
Slips ------------------------------------- 19
Spring------------------------------------ 19
Ignition Late -------------------------------- 17
Motor—Fails to Start ----------------- 12-13
How Operated ------------------------- 12
Lacks Power and is sluggish --------- 16
Misses at High Speed ----------------- 13
Misses at All Speeds -------------- 13-14
Motor (Continued)
Page
Misses at Low Speed ------------ 14
Overheats -------------------------- 16
Pounds and Knocks -------------- 17
Spits and Backfires -------------- 15
Stops Suddenly -------------- 14-15
Oil—Lack of -------------------------- 19
Rear Axle ------------------------------ 20
Rear Axle Noises ----------------- 20
Rear Axle Bucks or Clashes ---- 21
Grinding Noises When Turning
Corners ------------------------- 21
Rear Wheels Will Not Rotate --- 20-21
Starter Motor Does Not Operate 15-16
Tires Wear Unevenly -----------------22
Transmission ---------------------- 19-20
Water—Lack of ---------------------- 19
Water in Gasoline -------------------- 13
Worn or Broken Piston Rings -- 16-17
CHAPTER II
Practical Methods For The Repair And Maintenance Of Star Cars
Page
Brakes --------------------------------------- 67
Brakes Equalized ------------------ 67-74
Camshaft Sprocket Removing------------ 51
Crankshaft—Fitting Bearings -------- 43-44
Bearings—Out of Round ------------- 46
End Play in------------------------------ 45
Sprocket Removing ------------------- 51
Sprung ------------------------------- 45-46
Chain Case --------------------------------- 47
Timing------------------------------- 47-48
Adjusting --------------------------- 48-49
Condition---------------------------- 49-50
How to Shorten ------------------------ 50
Clutch ------------------------------- 53-54-55
Lifting Levers—Adjusting ---------- 55
Grabs ------------------------------------ 55
Removing ------------------------------ 55
113
Clutch (Continued)
Page
Slips Speed ------------------------ 55
Springs Weak --------------------- 55
Throwout Bearing ---------------- 55
Connecting Rod—Removal --------- 32
Connecting Rod Bearings------------ 41
Connecting Rod Bearing
Fitting-------------------- 41-42-43
Cylinder Head ----------------- 24-25-26
Fan -------------------------------------- 46
Belt—To Install ------------------- 46
Drive Pulley ----------------------- 47
Flywheel—Removing --------------- 55
Generator Sprocket Removing ----- 51
Main Bearings -------------------- 43-44
Main Bearings Out of Round ------- 46
Motor—Removing ------------------- 24
Timing ------------------------- 51-52
114
REPAIR MANUAL
CHAPTER II (Continued)
Page
Page
Oil Pump ------------------------------- 52-53
Piston—Removing ------------------------ 32
Pistons -------------------------- 33-34-35-36
Piston Rings -------------------------------- 36
Piston Rings—Removing ---------------- 37
Piston Rings Fitting --------------- 37-38-39
Pins ------------------------------ 39-40-41
Propeller Shaft ----------------------------- 62
Installing ------------------------------- 64
Rear Axle ----------------------------------- 64
Bearing Adjustment --------------- 64-65
Drive Gear Adjustment ----------- 65-66
Pinion Removing ------------------ 65-67
Spring Breakage --------------------------- 62
Steering Connecting Rod Adjustment --------------------------------- 60-61
Steering Gear Adjustment ------------ 60-61
Transmission ---------------------- 55-56
Misalignment --------------------- 57
Gears Not Meshed --------------- 56
Gear Fork Bent ------------------- 56-57
Removing ------------------------- 58
Sliding Gear Worn --------------- 57
Universal Joint—Front—Removing 61
Flange—Upper—Removing 63-64
Flange—Rear—Removing ----- 63
Flange—Lower—Removing --- 63
Valve Tappets ------------------------- 26
Adjusting------------------- 26-27-28
Grinding ----------------------- 29-30
Stem Polishing ---------------- 30-31
Springs—Removing ------------- 28
Springs—Testing Tension -- 28-29
Wheel Front—Adjustment ---------- 58
Bearings—Proper Working ---- 58
Alignment ------------------------- 58-59
CHAPTER III
Carburetion And Electrical System
Page
Page
Carburetor ------------------------------ 83-85
Cleaning -------------------------------- 84
Circuit Breaker ------------------------ 93-94
Coil—Ignition ----------------------------- 90
Contact Points ---------------------- 101-102
Distributor—Removing ------------------ 96
Retiming ---------------------------- 96-97
Electrical Troubles—Locating ---------- 98
Electrical System ------------------ 85-86-87
Generator ----------------------------------- 87
Armature Testing ---------------------- 88
Care of----------------------------------- 77
Locating Trouble ------------------ 87-88
Removing -------------------------- 79-80
Field Coils Testing -------------------- 88
Third Brush Adjustment ------------- 89
Distributor ------------------ 96-97-100
Misfiring ------------------------------- 99
Primary Circuit ----------------------- 90
Starting Motor ---------------- 94-95-96
Storage Battery ---------- 102-103-104
Care -------------------------- 103-104
Service Policy ------------- 104-105
Switch—Lighting -------------------- 90
Wiring Diagrams ----------------- 91-92
Vacuum Tank --------------------- 76-82
Faulty Feed ------------------------ 78
Float Repair ----------------------- 78
Top Removing -------------------- 78
Vent Tube Overflows -------------78
CHAPTER IV
General Lubrication
Page
Page
Clutch Release Bearing Lubrication -- 110
Front Wheel Bearing Lubrication ----- 111
Motor Lubrication ---------------------- 107
Oiling Chart ------------------------- 108-109
Rear Axle Lubrication ------ 110-111
Rear Wheel Bearing Lubrication --- 98
Transmission Lubrication --------- 110
Universal Joints --------------------- 111
114