1
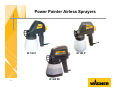
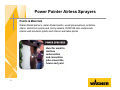
Wagner Product Training
Safety Considerations and
Recommendations
As with any power tool, you need to exercise a level of care to ensure user
safety.
Wagner products used correctly are very safe, and meet all of the necessary
safety requirements.
There has not been a reported case of skin injection injury in over 10 years,
but safety should always be high priority
2
Safety Considerations and
Recommendations – cont.
1. Before using the equipment, read and observe the safety instructions detailed
in the Users Manual.
2. Make sure the electrical lead is in good working condition.
3. Spray materials emerge from the nozzle tip under high pressure. Never point
the spray stream towards human beings or animals. In the event of injury to
the skin by paint or solvents, quick expert treatment by a physician is
essential. The physician should be informed of the type of paint or solvent
involved.
4. To avoid the hazard of explosion when spraying, provide for effective natural
or artificial ventilation.
3
Safety Considerations and
Recommendations – cont.
5. No sources of ignition are to be in the immediate area when spraying eg.
open flame, cigarettes, sparks, glowing wires and hot surfaces.
6. The spray gun is not a toy. Keep out of reach of children.
7. Before carrying out any type of work on the spray gun, unplug the lead from
the power socket.
8. Do not use spray guns to spray flammable liquids.
9. Do not spray any liquid of unknown hazard potential.
10. Wear a breathing mask or ear protection as required.
4
Power Painter Airless Sprayers
W 140 P
5
W 180 P
W 400 SE
Power Painter Airless Sprayers
Paints & Materials
Water diluted primers, water diluted paints, wood preservatives, polishes,
stains, aluminium paints and cavity sealers. W400 SE also undercoats,
interior wall emulsion paints and interior wall latex paints.
Ideal for small to
medium
redecoration
and renovation
jobs around the
house and yard
6
Air Spray
Process
Paint is drawn into the gun by venturi
and is a atomized by injected air. The
fan can be manipulated by air
introduced around the fan. Because
the paint is both picked up and
atomized by air the paint leaves the
nozzle in form of a fine mist. The paint
droplets are suspended in the air and
tend to float, causing overspray. The
transfer efficiency is very low, only 2545% of the coating reaches the job
Advantages
• Adjustable air control
• Adjustable fluid control
• Fan width adjustment
Disadvantages
• Poor transfer efficiency
• Overspray
7
Airless Spray
Process
Paint is drawn into the gun by
vacuum and is pressurised. It is
forced trough a small orifice causing
it to atomise. The paint is delivered
to the job by pressure only, therefore
there is little overspray although you
do get fallout. Due to fixed tips a
percentage of the paint can be
sprayed past the job. The transfer
efficiency of an airless gun is 6580%
Advantages
• Fast coating time
• Good transfer efficiency
• Low overspray
Disadvantages
• Fixed tips
• Not adjustable
8
Functional Principle of Electric Hand
Spray Guns
The heart of the airless unit is the
piston which causes atomisation
by high pressure.
The oscillator pushes the piston
forwards. As soon as the piston
spring moves the piston backwards,
a vacuum is set up in the pump
cylinder and this sucks in the
spraying material. In the next
forward movement of the piston, the
suction aperture is closed and the
spray material is pressed outwards
under high pressure through the
valve system – with no air.
The spray flow rate and the
spraying pressure can be
smoothly adjusted with the
regulating screw
9
Power Painter Introduction
Power Painters let you paint quickly and smoothly. The drawing below shows
the set of typical components. Refer to the selection chart for model specific
components.
Optional accessories may include a backpack container, additional spray tips, or
a packet of Cleaner/Lubrication depending on model.
10
How it works
•
•
•
•
11
Power Painters
utilise an airless piston pump in the head of the unit to spray paint. Airless
refers to a method of spraying paint utilising high pressure to atomise paint by
forcing it through a small tip (orifice) opening.
Container
holds the material to be sprayed. 600ml and 800ml containers are available
depending on the model.
Suction Set
channels the paint to the pump from the integral container. Paint can also be
drawn from a paint can when using the suction extension supplied with each
model.
Valves
During the backward stroke of the piston a vacuum is created in the
pump by the seal from the swirl valve to the housing. On the forward stroke
the piston forces paint past the sealing block, swirled through the head and
finally atomised within the spray tip to spray paint.
Definitions
•
•
•
•
•
•
12
Speed
some models have more than one speed which allows the user to adjust the
width of the spray.
Tip (Orifice)
size depends on the material being applied. The shape of the tip determines
the shape of the spray pattern. Standard pattern is round unless equipped
with the optional “Wide Angle” tip.
Atomisation
the process in which the paint is broken up into microscopic droplets.
Pump
a mechanical device that moves fluid by pressure or suction.
Pressure (PSI)
Pounds per square inch
Viscosity
resistance of a liquid to sheer forces and hence to flow.
When to use Power Sprayers
Power Sprayers are classified as painting tools. They are designed to cut
labor time, minimise waste, and improve the surface quality.
Power Sprayer Applications include:
•
•
•
•
•
•
•
•
13
Roofing
Timber Fence
Casual Doors
Pergola / Gazebo
Lattice
Boat Anti Fouling
Broad Walls
Sheds
Getting started
Prepare the spraying surface area and surrounding areas. The spray result
depends heavily on the smoothness and cleanliness of the surface to be sprayed.
The surface should be carefully prepared and kept free of dust. Ensure that you
cover all areas that are not to be sprayed. Keep in mind that when working with
wind, paint mist can be transported over great distances.
Remove the Paint Power Sprayer from the box. Check to ensure that all parts and
accessories have been provided (refer to users manual for more information). If
the gun has been used previously, make sure all parts are clean and assembled
correctly.
14
Prepare the spray material
Paints are usually sold in a spreadable, undiluted state.
The paint usually needs to be diluted for use with the
spray gun. To thin the material you are using, try Paint
Easy™ Paint Conditioner for water based paints. It
thins the paint by adding a specially formulated
material for a finer spray. Water will also work but it will
dilute the material. For oil-based materials, use the
thinning agent recommended on the material container.
To achieve the correct dilution you have to use the
viscosity test cup supplied with the unit (viscosity =
consistency of the paint). Dip the viscosity test cup
completely into the spray material Hold the test cup up
and measure the time (in seconds) until the liquid
completely empties out. Compare the measured “runout” time with the viscosity table detailed on the
following slide. If the actual run-out time is greater than
the recommended run-out time, additional thinning of
the spray material will be required.
15
Handling table for viscosity
16
Swirl Valves
Head
17
Spring
Sealing Block
Using the Container
1. Fill container with the material to be sprayed.
2. Place a few drops of household oil down the intake (center) and return (back)
openings in the pump housing.
3. Push the suction set securely into the intake (center) opening on the bottom
of the pump housing. Make certain that the intake filter is in place on the
suction set.
4. Thread the container securely to the sprayer.
18
Selecting the proper tip
Your sprayer comes with a variety of spray tips depending on the model:
a wide angle tip, a round tip, and a stain tip (optional).
Wide angle tip
The wide angle tip produces a wide pattern that can be adjusted horizontally or
vertically.
To adjust:
1.
Make sure the sprayer is unplugged.
2.
Loosen the wide angle tip by turning the tip counterclockwise 1/4 turn.
3.
Turn the adjusting arm so that it is pointing down for a horizontal pattern. Turn the
adjusting arm so that it is pointing to the side for a vertical pattern.
4.
Tighten the tip firmly by hand.
Use the wide angle tip for covering a large, flat surface. It works well with most waterbased paints and stains. The wide angle tip is not recommended for use with oilbased paints.
19
Selecting the proper tip – cont.
Round tips
The round tip produces a round pattern. Use a round tip if the surface you are
spraying is too small for use with the wide angle tip.
The round tip comes in 3 sizes. Use the size that works best for the type of
material you are spraying.
1. Light materials - .023 inch (0.6mm) opening. This size works best for
oil-based materials.
2. Medium materials - .031 inch (0.8mm) opening. This all-purpose size
works best for most materials.
3. Heavy materials - .039 inch (1.0mm) opening. This size works best
for hard to spray, coarse materials.
20
Selecting the proper tip – cont.
Stain tip
The stain tip is an option included with some models. It has a specially designed
opening for use with thin materials such as thin stains, sealers and waterproofers,
and can be adjusted to reduce overspray. If you did not receive a stain tip and
will be spraying one of these materials, the tip can be purchased at your local
retailer.
The stain tip pattern is round with a fine spray. To adjust the spray pattern size
and coarseness, turn the tip slightly counterclockwise to narrow the pattern and
make the spray more coarse. Turn the tip slightly clockwise to widen the pattern
and make the spray more fine.
21
Adjusting the spray tip
1. Make sure the spray gun is unplugged.
2. Loosen the tip by turning the tip counter clockwise.
3. Turn the adjusting arm so that it is pointing down for a horizontal
pattern.
4. Turn the adjusting arm so that it is pointing to the side for a vertical
pattern.
5. Tighten the tip firmly by hand.
22
Regulating the spray amount
The spray pattern is controlled by the flow knob on the back of the sprayer and by
the thickness of the material being sprayed.
Turning the flow knob counterclockwise increases the amount of material flow.
Turning the flow knob clockwise decreases the amount of material flow. To adjust
the pattern:
1.
2.
3.
Turn the flow knob fully
counterclockwise to
maximum.
Squeeze the trigger and
test the pattern on a piece
of scrap wood or
cardboard.
Turn the flow knob
clockwise until you have
a good pattern.
If you adjust the flow knob and power level and still cannot get a good pattern,
you may need to thin the material you are using.
23
Adjusting the spray pattern
A bad spray pattern will concentrate the paint in the center of the spray and go on
blotchy. A good spray pattern has an even amount of material throughout the
pattern in a fine spray and will go on smoothly.
Always practice spraying on a piece of scrap wood or cardboard to test your
spray pattern. Use the coverage rate recommended by the material manufacturer
on the container.
24
How to spray - Distance
Once you have achieved a good spray pattern on your test piece of wood or
cardboard, it is time to begin spraying your work. The key to a good job is an
even coating over the entire surface. This is done by using even strokes. Always
begin spraying outside of the spray area to avoid interruptions inside the spraying
area. Approach difficult or hard to reach areas first. This includes corners and
angles.
Keep your arm moving at a constant speed and keep the sprayer at a constant
distance from the surface. The best spraying distance is 25 to 30 cm between
the spray tip and the surface. The distance from the nozzle to the object to be
sprayed depends on the delivery rate. With a low delivery rate it is possible to go
very close to the object and reduce further the amount of spray mist.
25
How to spray – Technique
The sprayer should be triggered by turning it on and off with each stroke. This
will save paint and avoid paint buildup at the end of the stroke. Do not trigger the
sprayer continuously or during the middle of a stroke. This will result in an
uneven spray and splotchy coverage. Do not apply too much paint during one
spraying operation. First apply a thin layer and allow to dry briefly before applying
a covering layer. This is especially important with vertical surfaces to avoid paint
sags.
Overlap each stroke by about 50%. This will ensure an even coating.
26
How to spray – Technique cont.
The spray gun should be worked as evenly as possible during the spray
operation. Accelerating or slowing down during the spray operation can cause an
uneven spray pattern, spattering or dripping. Keep the sprayer perpendicular to
the surface, otherwise one end of the pattern will be thicker than the other. Keep
the sprayer at right angles to the surface. This means moving your entire arm
back and forth rather than just flexing your wrist.
To achieve optimal spray results, spray back and forth over the surface.
Always hold the spray gun in a horizontal position. If you need to spray upwards
(ie. for ceilings) or downwards (ie. for an unhinged door laid on the table) use the
flexible nozzle extension accessory.
27
Short term clean up
Dried paints and stains act like glue and cause moving pieces to stick. Taking the
time to properly clean and maintain your sprayer helps it last longer and work
right every time.
Short-term cleanup
If you are leaving a project for a few hours or overnight:
Wipe the spray tip carefully before storing for a few hours and again before
returning to spray.
Spray Tip
If you are using the suction extension, you will also need to cover the material you
are using to avoid it from drying and forming a skin on top. For water-based
paints only, pour 1/2 cup of water slowly on the top of the material and let stand.
For other materials, seal the container with a piece of plastic with the suction
extension still in the container.
28
Long term clean up
Long-term cleanup
Cleaning the container: If you used the 940ml container:
1. Unplug the sprayer.
2. Pour the remaining material back into the original container.
3. Fill the 800 ml container half full of solvent appropriate to the type of material
sprayed.
Tip: For water-based paints, use warm, soapy water, or 30ml of
Cleaner/Lubricant (P/N 0154570) mixed with water. For any other
material, use the type of solvent recommended by the material
manufacturer on the original container.
4. Plug in the sprayer.
5. Squeeze the trigger until the solvent comes through the sprayer for several
seconds.
6. Unplug the sprayer.
7. Remove the container and properly dispose of the remaining solvent.
29
Long term clean up - cont.
Long-term cleanup
If you used the suction extension:
1. Unplug the sprayer.
2. Remove the suction set from the material container and submerge into a container
of the solvent appropriate to the type of material sprayed.
3. Squeeze the trigger and spray into a second container until the solvent coming
through the sprayer is free of material.
4. Unplug the sprayer.
5. Remove the suction set from the solvent.
6. Unlock the pump housing locking collar by turning it counterclockwise.
7. Pull the dual hose fitting out of the pump housing.
30
Long term clean up - cont.
Long-term cleanup
Cleaning the pump housing:
1. Make certain the sprayer is unplugged.
2. Turn the spray tip counterclockwise until it is removed. Be careful not to lose
the swirl valve.
3. Pull out the swirl valve.
4. Turn the locking nut counterclockwise until it is removed.
5. Slide the pump housing assembly off of the sprayer.
6. Pull the piston and spring off of the pump housing.
7. Pull the spring off of the piston.
8. Clean all parts thoroughly with the brush provided using a solvent
appropriate to the type of material you sprayed.
31
Storage
Assembling the sprayer
1. Slide the spring onto the front end of the piston.
2. Insert the piston into the back end of the pump housing.
3. Insert the pump housing assembly into the front of the sprayer.
4. Place the locking nut onto the motor housing.
5. Press in while turning the locking nut clockwise and tighten firmly by hand.
6. Insert the swirl valve into the front end of the pump housing.
7. Place the spray tip onto the pump housing and turn it clockwise until it is
tightened securely.
32
Storage - cont.
Lubricating the sprayer
1. Turn the sprayer upside down while the container is off.
2. Pour a small amount of standard household oil into both the intake and
return openings on the pump housing.
3. Plug in the sprayer.
4. Squeeze the trigger of the sprayer for 2 to 3 seconds. This works the
household oil onto the piston and swirl valve. The oil protects the sprayer by
keeping any extra material from drying and seizing the piston.
5. Insert the suction set into the intake (center) opening of the pump housing.
6. Thread the container onto the sprayer.
33
Maintenance
Parts of your sprayer wear out with use and require regular replacement. They
include the swirl valve, piston and spring. These parts are not covered by your
sprayer warranty. More abrasive materials such as acrylic paints and stains
cause these parts to wear out faster than less abrasive materials such as oilbased paints and stains, thin stains and sealers.
Replacing the swirl valve
The swirl valve is shaped to cause the material to spin as it comes out of the
sprayer. The spinning breaks the material up into a fine spray. As more material
goes through the swirl valve, it wears out the valve and the shape of the valve
changes. When it changes too much to produce a good spray pattern, the valve
needs to be replaced.
To replace the swirl valve:
1. Make certain that the sprayer is unplugged.
2. Turn the spray tip counterclockwise and remove.
3. Pull the old swirl valve out of the pump housing and insert a new one.
4. Place the spray tip over the new swirl valve and tighten it securely by hand.
34
Maintenance – cont.
Replacing the piston and spring
The average life of a piston and spring will vary depending on the types of material
being sprayed. Replace the piston if the sprayer takes longer than 2 minutes to prime
when well lubricated, or if there is an excess amount of material leaking and you have
tried all of the troubleshooting suggestions listed in this manual. Replace the spring if
you notice that it is broken when you clean the sprayer.
To replace the piston:
1. Make certain the sprayer
Swirl Valve
is unplugged.
2. Turn the spray tip
counterclockwise until it is
removed. Be careful not to
lose the swirl valve.
3. Pull out the swirl valve.
4. Turn the locking nut
counterclockwise until it is removed.
5. Slide the pump housing assembly off of the sprayer.
6. Pull the piston and spring off of the pump housing.
7. Pull the spring off of the piston and throw away the old piston.
35
Maintenance – cont.
Replacing the piston and spring
8. Slide the spring onto the front end of the new piston.
9. Insert the piston into the back end of the pump housing.
10. Insert the pump housing assembly into the front of the sprayer.
11.
12.
13.
14.
36
Place the locking nut onto the motor housing.
Press in while turning the locking nut clockwise and tighten firmly by hand.
Insert the swirl valve into the front end of the pump housing.
Place the spray tip onto the pump housing and turn it clockwise until it is
tightened securely.
Frequently asked questions
37
•
What Kind of Paint Can I Use?
– The Wagner Power Painters are designed to spray a wide variety of
materials. All of the Power Painters will spray semi-transparent stains,
clear sealers, oil paints, many acrylic paints and other thin-bodied
materials. Units with higher PSI ratings will do a better job spraying
many of the thicker, 100% acrylic paints. As a general rule, only the
thickest acrylic paints require thinning. Always start without thinning.
•
What Are The Differences Between Models?
– The models differ on both ability to spray certain materials and the
features included. Refer to the selection chart of this presentation for
direct comparisons of each model.
•
Is It Hard To Control The Spray Pattern?
– One of the biggest concerns most people have is whether there will be a
lot of overspray. Since the Power Painters are airless, “bounce back” or
overspray is minimized. You will find that by masking off areas or
utilizing a spray shield to protect areas you don’t want painted will work to
achieve professional results and save time when compared to painting
with a brush.
Frequently asked questions – cont.
38
•
How Do I Spray with a Power Painter?
– We recommend that you practice on a piece of scrap wood or cardboard.
The key to a good job is an even coating over the entire surface. This is
done by using even strokes at a constant speed keeping the gun at right
angles to the surface and at a distance of 25 to 30 cm. Move your entire
arm back and forth rather than flexing your wrist.
•
What Are The Electronic Settings (Speeds)?
– Models with electronic speed control have the ability to change the motor
speed and vary the width for the spray pattern. The slower the speed the
narrower the spray pattern providing you with the ability to move in real
close for cut-in work around windows and doors. The faster the speed
the larger the pattern for large surfaces.
•
Are The Power Painters Easy To Clean?
– YES! It will only take about the same amount of time it takes to
thoroughly clean a brush and think about how much time you will save by
painting with a Power Painter. No tools are required for cleaning. All
parts fit together by hand. Refer to the cleaning portion of this
presentation.
Troubleshooting
Problem
Cause
Correction
Spray gun buzzes and does not work
Piston stuck
Disassemble pump and clean with thinner
Defective drive
Send spray gun to Approved Service Agent
No valve in pump
Insert valve
Suction tube loose in the conical bore
Adjust suction tube
Venting hole in pump housing clogged
Clean
Intake hole (fitting) in pump housing clogged
Clean
Viscosity of spray material too high
Thin accordingly
Nozzle clogged
Clean
Ducts and holes in atomiser clogged
Clean
Spray material in container running out
Refill
Spray gun not held straight, causing air to
be sucked in
Use flexible extension nozzle
Viscosity of spray material too high (too
thick)
Thin accordingly
Fine adjustment button not set correctly
Reset according to spray material
Wrong size nozzle
Change nozzle
Nozzle or Valve worn out
Replace
Wrong valve inserted
Use correct valve
Spray gun does not suck in
Spray gun sucks in but does not spray
Spray gun works but sprays unevenly
39
Handy Hints
Clean the spray gun after every use. Proper cleaning and maintenance
ensures the sprayer will continue to operate correctly every time.
When the job is finished empty any unused paint from the container and clean it
with the appropriate thinner. For water based paints warm soapy water is best.
Fill the container with appropriate thinner and spray through the gun for 20
seconds.
• Disconnect the sprayer for the power supply.
• Remove the paint container and pull out the suction tube.
• Unscrew the spray tip with guard and remove the swirl valve.
• Unscrew the locking nut and pull the complete pump housing forward until it is
free of the drive housing. Remove the piston and spring from the housing
and separate them. Clean all parts thoroughly with the appropriate thinner.
Never immerse electrical parts of the sprayer in water or any other liquid.
40
Handy Hints – cont.
Replace the spring on the piston, slide the piston back into the housing and
ensure the spring fits onto the housing. Slide the complete housing assembly
back into the drive housing. Turn the control knob all the way anti-clockwise to
relieve some of the spring tension, then screw on the locking nut being careful
not to damage the thread. Check the swirl valve for wear, if it is in good
condition slide into the housing, or fit a new one if it is worn. Screw on the spray
tip.
Plug in the sprayer, tip it upside down, and put a small amount of oil in the
suction hole (front hole) and trigger the sprayer briefly. This will coat the piston
and cylinder with oil and protect it from corrosion.
Refit the suction tube to the front port of the housing. Ensure the container is
clean and dry, screw it to the sprayer. The sprayer is ready for storage until the
next spray painting job.
If the sprayer is not cleaned properly and oiled after use, it may seize with paint
residue and corrosion. The warranty does not cover damage caused by improper
cleaning or corrosion.
41
Handy Hints – cont.
To assure trouble free service from the sprayer, always remember these
simple steps.
Strain old paint before using.
Be sure paint suction tube is tightly inserted.
Thin paint properly
Use the correct swirl valve and spray tip for the paint.
Watch for wear of the swirl valve and spray tip.
Some paints are much more abrasive than others and will cause quicker wear of
parts. Spray tips, swirl valves and pistons are wearing parts.
Spray tips - Water based paints are especially abrasive. If you notice that the
paint is not atomising as well as it should and the sprayer starts spitting, the
spray tip orifice has become too large and the spray tip should be replaced.
Swirl valve - After paint has been sprayed, the swirl valve may become worn.
The paint may not atomise as well as it should and the sprayer may start spitting.
When the valve is worn, the holes will be larger and the sealing block will be
‘furred’ or scratched. If the spray tip has been over-tightened the swirl valve
head may be damaged.
42
Handy Hints – cont.
Piston - The piston should be checked regularly for wear marks. Improper
cleaning may cause scoring marks on the piston.
Improper cleaning and poor paint preparation can cause the piston to seize. Do
not continue to press the trigger of the gun when a low humming is heard, as this
will burn out the motor.
Dismantle the pump housing and carefully remove the piston. Soak the housing
in solvent if the piston cannot be removed from the housing without force.
Clean all parts and reassemble, condition the paint if necessary.
43
Application
44
Power Sprayer Accessories
Flexible Extension
Jet Nozzle
Suction Set
Swirl Valves
45
Swirl Valve
Swirl valves are a critical part of your spray gun and are subject to the most
wear. Water based paints are abrasive and can wear a swirl valve very quickly.
To tell if your swirl valve is worn, look at the sealing block – it should be clean
and the edges not rounded or ‘furred’.
A worn swirl valve can give the following problems:
• Poor atomisation
• Spitting
• Irregular Spray
Spring Sealing Block
Head
A badly worn swirl valve will stop the gun from picking up paint. Swirl
valves cannot be claimed under warranty. Ensure that you use the correct
swirl valve for the type of paint you are spraying
Swirl valves are color coded for different uses and different model spray guns.
White Swirl Valves are for water based paints and black ones for oil based paints
46
Flexible Extension Nozzle
The flexible nozzle extension flexes to all sides. It is ideal for overhead work and
horizontal surfaces. It should only to be used with the guard assembly and
should not to be used with flat jet nozzles.
47
Suction Set
A Suction System Extension is used for drawing paint directly from the paint
containers. This allows a greater volume of paint to be sprayed without refill.
Suction height is about 1.8m. The suction system container should not be used
with paints containing solvents. There are two versions, one for the W
140P/W180P (Pin 0413910) and one for the W400 SE and older models (Pin
0272910).
48
Using the suction extension
The suction extension includes a hose set, dual hose fitting, pump housing
locking collar, suction set hose adapter, and a container clip.
It allows you to attach the sprayer to a larger container such as 4 or 20 litres
paint can or an optional backpack.
1. Place a few drops of household oil down the intake (center) and return (back)
openings in the pump housing.
2. Push the dual hose fitting into the intake and return openings on the bottom of
the housing. The fitting with the ridge goes into the return opening.
3. Place the pump housing locking collar over the dual hose fitting and turn the
locking collar clockwise until it locks securely.
4. Push the suction hose set onto the intake and return ports of the dual hose
fitting. The hose with the writing on it goes to the intake (center) port.
49
Using the suction extension – cont.
5. Slide the intake hose (the hose with the writing on it) through the container
clip. You may need to pull the hoses slightly apart.
6. Press the suction set hose adapter onto the suction set.
7. Push the intake hose onto the suction set assembly. Make certain that the
intake filter is in place on the suction set.
8. Submerge the suction set assembly into the material container and attach the
container clip to the side to hold it securely. Make certain that the return line
is inside the container.
50
Cleaner Lubricant
Wagner’s cleaner lubricant is recommended for use when changing colors of
paint, overnight cleaning and long term storage.
For Cleaning when changing paint colors or storing overnight:
Empty paint container and clean thoroughly with warm soapy water. Fill container
with 1 litre of clear warm water. Add 30ml of cleaner lubricant to water. Mix
thoroughly. If changing colors, spray about half through the sprayer. Spray into
open space to avoid mixture bouncing back. To resume painting, briefly spray
paint on newspaper or scrap material to clear cleaner lubricant from sprayer. If
storing overnight, spray one half through sprayer and store. Save remainder for
later use.
For long term cleaning and storage:
Disassemble according to instructions in owner’s manual. Mix as described in
step before . Dip brush in mixture and use to clean parts. To clean inside pump
housing, push brush completely through cylinder opening. If paint does not come
off easily, put parts in a separate container, add cleaner lubricant and let soak.
Reassemble sprayer. To lubricate, spray cleaner lubricant through sprayer. If
parts have been soaked, remix a new supply. Do not spray water through the
sprayer after spraying cleaner lubricant through it. Further lubrication is not
necessary. Wipe off any excess moisture from the sprayer and store.
51
Jet Nozzle (Engine Nozzle)
The jet nozzle produces a sharp concentrated jet and is best for high pressure
removal of stubborn dirt, e.g. in cleaning engines, machinery or vehicles etc.
52