1
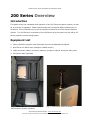
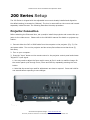
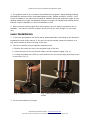
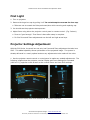
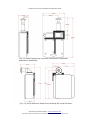
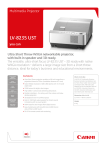
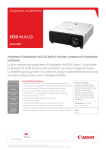
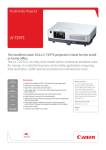
www.elumenati.com
[email protected]
Elumenati OmniFocus 200 Series
Installation and Operation Guide
Last updated: November 2012
This document applies to the OmniFocus 3020 and 30210 sold after January 2013.
For all previous 200 Series products please refer to the “OmniFocus 200 Series
pre2013” manual.
For brevity, we refer to the 200 Series throughout. Differences are noted where applicable.
Elumenati OmniFocus 200 Series .................................................................................1
Installation and Operation Guide..................................................................................1
200 Series Overview...................................................................................................2
Introduction...........................................................................................................2
Equipment List.......................................................................................................2
200 Series Setup........................................................................................................3
Projector Connection...............................................................................................3
Lens Installation.....................................................................................................4
First Light..............................................................................................................5
Projector Settings Adjustment..................................................................................5
Stand Assembly (Optional)......................................................................................7
200 Series Information...............................................................................................8
Maintenance..........................................................................................................8
Troubleshooting......................................................................................................8
Product Support.....................................................................................................8
200 Series Product Specifications.................................................................................9
Immersive Projection Design - www.elumenati.com
Elumenati, GeoDome OmniFocus and OmniMap are all trademarks of The Elumenati LLC.
OmniFocus 200 Series Installation and Operation Guide
200 Series Overview
Introduction
This guide covers the installation and operation of the 200 Series projection system, as well
as an overview of operation. Please read through this entire guide before following the instructions. This will familiarize you with the process of setup for the 200 Series Projection
System. The 200 Series is a variation of the 200 Series using the same lens but with a different projector and mounting system.
Equipment List
1. Canon WUX4000 projector with Elumenati lens mount attached and aligned
2. OmniFocus 200 Series lens (straight or folded version)
3. Video and power cables, remote w/ batteries, projector manual, and quick start guide
4. 200 Series stand (optional)
(Fig. 1) Case has two layers: Stand (top)
and Projection System (bottom)
(Fig. 2) Assembled 30200 on stand
Immersive Projection Design - www.elumenati.com
Elumenati, GeoDome OmniFocus and OmniMap are all trademarks of The Elumenati LLC.
OmniFocus 200 Series Installation and Operation Guide
200 Series Setup
The 200 Series is shipped with the adjustable lens mount already installed and aligned to
the default setting (truncated or fulldome). The lens is removed from the mount and housed
separately inside the case. The following describes the setup procedure.
Projector Connection
Before attaching the Elumenati lens, set up and/or install the projector and connect the projector to the video source. Please refer to the WUX4000 manual for details on projector operation.
1. Connect either the DVI or HDMI cable from the computer to the projector (Fig. 3). Connect power cable. Turn on the projector and aim at any flat surface more than three (3)
feet away.
2. Turn on your computer.
3. Press the “input” button on the remote control or the projector control panel and choose
“Digital PC” input signal.
● You may need to adjust the focus and/or zoom at first in order to read the image. On
the control panel cycle through Focus, Zoom and Shift by repeatedly pressing the Lens
button.
● Note that the arrow keys used for adjustment are slow to respond. Press and hold for
one second before expecting to see changes.
(Fig. 3) Control Panel of the WUX4000
Immersive Projection Design - www.elumenati.com
Elumenati, GeoDome OmniFocus and OmniMap are all trademarks of The Elumenati LLC.
OmniFocus 200 Series Installation and Operation Guide
4. The graphics card of your computer should detect the projector. Adjust desktop settings
to enable the second monitor (extended displays mode). Default resolution is 1920 x 1200.
It may be helpful to use either the truncated or fulldome Elumenati alignment image as your
desktop background. Again use desktop settings to change your background making certain
that the image is displayed 1:1 and not stretched or tiled.
5. Once you have a proper signal from the projector, you are ready to proceed to lens installation. You may turn off the projector at this point if you wish, though it is not necessary.
Lens Installation
1. If you have purchased a 200 Series stand, please assemble it according to the directions
located at the end of this manual. If you are not using the stand, place the projector on a
flat, sturdy surface to allow mounting of the lens.
2. The lens is secured using a magnetic bayonet mount.
● Remove the small lens cap on the projector side of the lens.
● Insert the lens into the mount and rotate until the magnets engage (Fig. 4).
● If using the folded lens (30210) ensure that the pins on the lens align with the grooves
in the mount (Fig. 5).
(Fig. 4) Magnetic mount
(Fig. 5) Note groove for folded lense at top of
mount
3. You are now ready for first light.
Immersive Projection Design - www.elumenati.com
Elumenati, GeoDome OmniFocus and OmniMap are all trademarks of The Elumenati LLC.
OmniFocus 200 Series Installation and Operation Guide
First Light
1. Turn on projector.
2. Remove the large lens cap by pulling it off. Do not attempt to unscrew the lens cap.
● Take care not to scratch the fisheye element/lens while removing and replacing cap.
3. You should see the projector startup screen.
4. Adjust focus using either the projector control panel or remote control. (Fig. 3 above)
● Focus to “good enough”. Final focus is done after setup is complete.
● For fine Focus and Zoom adjustments use the left and right arrow keys.
Projector Settings Adjustment
With the 200 Series, the stock lens not only has Focus and Zoom adjustment but also Lens
Shift. This added capability allows optimization of the projected image. The system is
already delivered in a nearly optimal state so any adjustments to be made will be minor.
1. Use the projector remote control or control panel to make any needed adjustments. The
following images show the projector nominal Display and Focus settings for truncated
(180°x112°) projection mode as well as the nominal Zoom and Lens Shift settings.
(Fig. 6) Nominal Display and Focus settings for truncated projection.
Immersive Projection Design - www.elumenati.com
Elumenati, GeoDome OmniFocus and OmniMap are all trademarks of The Elumenati LLC.
OmniFocus 200 Series Installation and Operation Guide
(Fig. 7) Nominal Zoom and Lens Shift settings for truncated projection.
2. Zoom and Lens Shift are interdependent, they must be adjusted together. It is best to
use the Elumenati supplied alignment pattern described above during these adjustments.
● For Truncated projection
• Adjust Zoom to its narrowest setting (Fig. 7).
• Then adjust the physical height of the projector so that the outer circle of the alignment pattern (Fig. 8) runs the extent of and is parrallel to the screen edge.
(Fig. 8) Truncated (left) and Fulldome alignment patterns. Outer circle aligns with
dome edge (springline) and center cross projects through the lens optical axis.
● For Fulldome projection
• Adjust Zoom to the desired setting. The fulldome projection angle is continuously
variable from 112° to 165°.
• Adjust vertical Lens Shift so that the cross at the center of the concentric circles is
projected directly out of the optical axis.
• Then adjust the physical height of the projector so that the outer circle of the alignment pattern (Fig. 8) runs the extent of and is parrallel to the screen edge.
● Use Lens Shift to make final minor adjustments to the alignment.
Immersive Projection Design - www.elumenati.com
Elumenati, GeoDome OmniFocus and OmniMap are all trademarks of The Elumenati LLC.
OmniFocus 200 Series Installation and Operation Guide
Stand Assembly (Optional)
The stand is shipped collapsed flat.
1. Loosen the tilt knobs and raise the vertical section to 90°. Tighten the knobs.
2. Loosen the 6 bolts that join the vertical section to the base (3 on either side) and slide
the vertical section in about 1/3 of the base length. Tighten the bolts. Your stand should
resemble the image in Fig. 9.
3. The extruded aluminum framing on the 200 Series project allows for multiple mounting
options. 1/4”-20 bolts and t-nuts are provided for mounting using the 90° brackets as
desired.
● Option 1: Use the mounting plate and carriage bolt arrangement for maximum height
adjustment (up to 9”).
● Option 2: With no mounting plate there is still about 3” of height adjustment.
● Option 3: The easiest to assemble but with a fixed height setting.
(Fig. 9) Fully Assembled Stand
(Option 2) 3" height adjustment
(Option 1) 9” height adjustment
(Option 3) Easiest mounting
Immersive Projection Design - www.elumenati.com
Elumenati, GeoDome OmniFocus and OmniMap are all trademarks of The Elumenati LLC.
OmniFocus 200 Series Installation and Operation Guide
200 Series Information
This section contains product specifications, troubleshooting tips, and support information.
Maintenance
Lens Care
The bright light of the projector exaggerates the amount of dust on the lens surface. Dust
has very little effect on picture quality and can be blown off or wiped away with a cloth. We
recommend cleaning the lens ONLY if there are fingerprints or similar on the lens.
To clean:
1. Use a soft lint-free lens tissue or cotton cloth.
2. The Elumenati recommend PUROSOL™ Optical Cleaner from Edmund Optics; however,
any high-quality camera optics cleaning fluid will work. Do not use acetone-based
solvents.
● Tip: In an emergency, Windex™ and a soft cotton t-shirt will work, but be careful!
3. Apply the cleaning fluid directly onto the tissue until moistened. Wipe gently until the lens
is clean. To avoid scratching the lens, make sure that the tissue is always moist and do not
scrub with excessive force.
4. When the lens is clean, finish with a light-pressure, single sweep across the surface of the
lens using a drier portion of the tissue. Discard the tissue after every use.
Troubleshooting
Product Support
Please contact us with your questions via email at [email protected] or phone at 1888-384-3826, extension 2.
Immersive Projection Design - www.elumenati.com
Elumenati, GeoDome OmniFocus and OmniMap are all trademarks of The Elumenati LLC.
OmniFocus 200 Series Installation and Operation Guide
200 Series Product
Specifications
OMNIFOCUS PROJECTION
DIMENSIONS
• Infinite depth of focus
• Weight: 22.0 lbs / 10.0 kg
• Optimized pixel placement
• Size: 680 mm L x 392 mm W x 184 mm H
• Zoom adjustable from 180° x 112° to 165° fulldome
projection
LAMP
• 300W NSHA lamp
IMAGE
• Lamp life: 1500 hours (normal); 2000 hours (quiet)
• 4000 ANSI lumens
• 88% brightness uniformity across the screen
• Contrast ratio: variable, 1000:1
POWER REQUIREMENTS
• Line voltage 100-240 VAC ± 10% @ 50/60 HZ
DISPLAY TECHNOLOGY AND RESOLUTION
• Power consumption: 410W / 365W / 1.7W
(normal / quiet / standby)
• 0.7” reflective LCD panels (LCoS) x 3
• 1920 x 1200 pixels
STANDARD ACCESSORIES
• Pixel fill factor >90%, significantly improving “screen
door” effect over DLP
• Shipping case
• Line cord
INPUT SIGNAL COMPATIBILITY
• Wireless remote unit
• Analog PC: VGA through WUXGA (1920 x 1200)
• Computer cable
• Digital PC:
◦ DVI through WUXGA (1920 x 1200)
◦ HDMI through WUXGA (1920 x 1200)
INPUTS, CONTROL, & NETWORKING
• User manual
• Omnimap Software API
OPTIONAL ACCESSORIES
• Projector stand
• Folded lens ccnfiguration
• DVI-D (24 pin): Digital PC / Analog PC / Digital Video
• HDMI
• Mini D-Sub 15 pin: Analog PC / Component / SCART
OPERATING ENVIRONMENT
• Stereo mini jack: Stereo audio input
• Operating temp: 41˚ to 95˚ F (5˚ to 35˚ C)
• Wireless IR remote control and built-in keypad
• Storage temp: -22˚ to 140˚ F (-30˚ to 60˚ C)
• Mouse Control Receiver (USB)
• Storage humidity: 5% - 90%
• RS-232C Control Terminal
• Audible noise: 39/36dB (normal/quiet mode)
• Optional LAN Adaptor
LIMITED WARRANTY
• 1 year parts and labor
• Lamp: 120 days or 500 hrs, whichever comes first
Immersive Projection Design - www.elumenati.com
Elumenati, GeoDome OmniFocus and OmniMap are all trademarks of The Elumenati LLC.
OmniFocus 200 Series Installation and Operation Guide
(Fig. 11) 30200 straight lens minimizes interference in traditional
planetarium installations.
(Fig. 12) 30210 features a folded lens minimizing the overall fm factor.
Immersive Projection Design - www.elumenati.com
Elumenati, GeoDome OmniFocus and OmniMap are all trademarks of The Elumenati LLC.