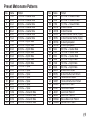
1
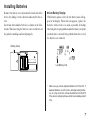
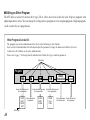
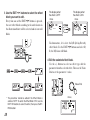
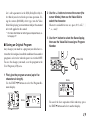
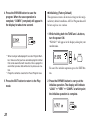
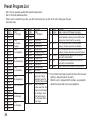
YAMAHA
Silent Brass ST5
Personal Studio
1
Precautions
2
Precautions
3
Introduction
Thank you for purchasing the Yamaha Silent Brass Personal Studio ST5.
Used in combination with the Yamaha Pickup Mute, the Yamaha Silent Brass
System offers excellent muting capabilities that keeps sound outside of the system to a
minimum while delivering high quality sound to the performer. Along with its sound
monitoring capabilities, the ST5 also provides effects such as reverb, delay, chorus,
equalizer, pitch shifter, etc., that can be used in a wide range of situations such as private
practice, home concerts, recording and more. Also, the ST5 can be matched and used
with the Yamaha Pickup Mic allowing the system to be used in live performance
situations, etc.
To get the most out of the ST5, we urge you to read this Owner’s Manual
thoroughly and keep it in a safe place for future reference.
4
Contents
Introduction ....................................................... 4
Main Features .................................................... 6
Installing Batteries ............................................ 7
● Low Battery Display .............................. 7
Controls and Connections ............................... 8
Display Screen ................................................ 10
Making Connections ....................................... 12
Using the ST5 .................................................. 14
■ Getting Sound .......................................... 14
■ Selecting another Effect Program ............ 15
● Bypass/Mute ....................................... 15
■ Editing an Effect Program ........................ 16
■ Saving an Original Program ..................... 19
● Initializing (Factory Default) ................. 20
■ Assigning functions to the Value Dial
and +/- buttons ..................................... 21
PHRASE TRAINER Mode ................................ 26
■ Recording Procedure ............................... 26
■ Playback ................................................... 27
■ Re-recording ............................................ 28
Editing Effects ................................................. 29
● DYNA (Dynamics) ............................... 29
● EQ (Equalizer) .................................... 29
● MOD (Modulation) ............................... 30
● D/R (Delay and Reverb) ...................... 31
● NR (Noise Reduction) ......................... 32
● LEVEL ................................................. 32
Troubleshooting .............................................. 33
Preset Program List ........................................ 34
Preset Metronome Patterns ........................... 35
Specifications .................................................. 36
TUNER Mode ................................................... 22
METRONOME Mode ........................................ 23
EQUALIZER Mode ........................................... 24
AUX KEY Mode ................................................ 25
5
Main Features
● Silent Brass System expands the sonic
possibilities of brass instruments.
The Silent Brass system consists of a mute, which possesses excellent silencing capabilities, and the ST5 which
allows monitoring of the audio signal that is received from
the pickup mute with a pair of headphones. The ST5’s
ability to add a variety of effects, plus shape the tonal
quality of the sound received via the pickup enables the
ST5 to deliver expanded sonic capabilities that exceed
current musical genres.
● 32 Effect Variations
The ST5 provides a total of 32 different effect types, such
as a 4-band equalizer for precise sound shaping, compressor, limiter, chorus, reverb, delay, pitch shifter which,
allows transposition of the pitch, etc.
● 50 Preset Programs and 50 User Programs
The unit also provides 50 different preset programs that
utilize many combinations of the different effects, plus
50 user programs to which original programs can be
saved. The device is capable of producing a wide variety
of sounds that can be used in a variety of situations such
as, private practice, ensemble, recording, etc.
6
● AUX Key Function
This great practice aid transposes the sound received from
a CD/MD player, etc. connected to the AUX IN jack to a
different key.
● Phrase Trainer Function
This great practice aid allows the repeated playback of a
phrase of up to 16 seconds maximum that has been recorded from a CD/MD player, etc., or even your own
instrument. Playback speed can be slowed down without
affecting the pitch to so you can work on phrases that are
hard to hear.
● Some Other Useful Functions
Some other useful functions the ST5 provides are, an auto
tuner function that lets you select the key for your instrument, a metronome for practicing to a tempo, a back lit
display that makes operating the device easier even on a
dark stage, and a large value dial to allow quick settings,
etc.
Installing Batteries
Remove the battery cover located on the back side of the
device by sliding it in the direction indicated by the arrow.
Insert four AAA alkaline batteries as shown in the illustration. When inserting the batteries, take careful note of
the polarity markings and install properly.
● Low Battery Display
When battery power is low, the low battery icon will appear in the display. When this icon appears, replace the
batteries with a fresh set as soon as possible. A backup
function protects program data and other data (except for
any data that is currently being edited) from loss even if
the batteries are removed.
Battery Cover
Low Battery Icon
* Make sure you remove depleted batteries from the ST5. If
depleted batteries are left in place, damage (leaking batteries, etc.) may result. Also, remove the batteries from the ST5
if the device is not going to be used for an extended period of
time.
7
Controls and Connections
q Power Switch (OFF/ON/
Backlight)
This is the devices power switch.
When set to the “ON” position, the
power is switched ON. When set to
the “LCD” position, the display’s
backlight will light.
Display (→ page ??)
q
w
* When batteries are used, using the
LCD backlight will shorten battery life.
e
u
w Power Adaptor Jack
r
t
!4
y
!3
8
!2 !1
!0 o
i
(DC9V)
Connect the supplied power adaptor
(PA-D09) to this jack.
e Value Dial
This dial is used to adjust the master
level, edit effects, and select programs.
r OUTPUT/PHONES Jack
u +/- Buttons
!1 PHRASE TRAINER [S]
This is the device’s output jack. Connect a pair of earphones or headphones to this jack. This jack can also
be used as an external output jack to
connect the ST5 with an audio cable
to a sound or recording system for
amplification or recording.
This buttons are used to select programs, edit effects, and adjust the
master level.
Button
This button is used to enter the Phrase
Trainer mode (→ page ??). It is also
used to begin recording with the
phrase trainer.
t AUX IN Jack
Connect the output jack of an external device such as a CD/MD player,
to this jack via an audio cable (sold
separately) to play along with the
external audio source.
y INPUT Jack
This is the device’s input jack. Connect a Yamaha Pickup Mute or instrument Pickup Mic, etc. to this jack.
* The INPUT Jack also supplies power
to the pickup device. Never use a
pickup device other than a Yamaha
Pickup Mute or Pickup Mic.
* The Value Dial e and +/- button functions can be switched allowing the
Value Dial to select programs or adjust the master level. (→ page ??)
i Input Level Switch (Lo/Hi)
!2 BYPASS [L] Button
Select the switch position according
to the output requirements of the
pickup mute or pickup mic.
Press this button to turn all effects off.
It also switches effects ON/OFF
when editing and to playback/pause
the Phrase Trainer.
o EDIT Q [E]/ W [HOLD]
!3 TUNE Button
Button
These buttons are used to select the
parameter for editing (→ page ??) or
to operate phrase trainer functions
(→ page ??).
!4 EXIT Button
Press this button to enter the Tuner
mode (→ page ??).
Press this button to return from the
current mode back to the play mode.
!0 METRONOME/AUX KEY
Button
This button is used to enter the Metronome mode (→ page ??) or AUX
Key mode (→ page ??).
9
Display Screen
q Effect Block
Indicates the current ON/OFF status
of individual effect blocks such as
Dynamic, Equalizer, Modulation,
and Delay/Reverb.
w e
q
!2
!1
!0
10
o
i
u
y
w Program Number Display
r
Indicates the information for the current program (preset/user, program
number).
t
e TUNE Icon
This icon will blink when in the
Tuner mode
r Equalizer Display
When in the Equalizer mode, or when
the equalizer is set “ON”, this display will indicate the volume level
for each band (tone frequency). In
other modes it is used to indicate
pitch or beat.
t EQ (equalizer) Icon
!0 Low Battery Icon
This icon will blink when in the
Equalizer mode.
Appears when the battery power
level becomes low (→ page ??).
y Value Display
!1 Program Name/Effect Type
Numerically indicates the master
level or effector’s parameter value.
(When the master level is displayed
will light.)
u Phrase Trainer Mode Icon
Display
Displays the program name or effect
type. It also functions as the tuning
meter when in the Tuner Mode. In
other modes it will indicate the status of the function.
This icon will blink when in the
Phrase Trainer mode.
!2 Edit Mode Icon
i AUX Key Mode Icon
This icon will blink when in the Edit
mode.
This icon will blink when in the AUX
Key mode.
o Metronome Mode Icon
This icon will blink when in the Metronome mode.
11
Making Connections
Make sure the power is switched OFF on the ST5 and all devices before any connections are made.
Earphone/
Headphone *4
Other Connected Devices
Audio Device
Amplifier
AC Adaptor *3
*1
*5
CD Player, etc.*2
Input Level Switch
Pickup Mute (PM1-9)
12
Pickup Mic (MC7)
*1 The OUTPUT/PHONES jack is a stereo output. When it is connected with a monaural cable to
an amplifier, etc., the L (left) channel signal will be reproduced.
*2 When an external device, such as a CD/MD player, etc., is connected to the ST5 with an audio
cable, it is possible to play along with the audio from the external device. Use the volume
control on the external device to control its volume level.
*3 When a power adaptor is used, please make sure only the specified power adaptor (PA-DO9) is
used.
*4 Depending upon the type of headphones/earphones used, sound quality may vary.
CAUTION – When connecting the Pickup Mute/Pickup Mic.
• The ST5 is equipped with an input level switch (*5) which allows matching of the input
level with that from a pickup mute or pickup mic. We recommend that the “Lo” setting
be used in conjunction with a pickup mute, while the “Hi” setting be used with a pickup
mic.
• The INPUT jack also supplies power to the pickup device. Never use a pickup device
other than a Yamaha Pickup Mute or Yamaha Pickup Mic.
13
Using the ST5
After you have finished making connections, set the
power switch to its “ON” position.
The ST5 is capable of adding a wide variety of effects
to the pickup mute/mic signal received via the ST5’s
INPUT jack. The ST5 also provides programs (50
preset, 50 user) that are made up of various effects
combinations so first, try and experiment with these
programs.
■ Getting Sound
1 Set the power switch to its “ON” position.
The current Effect Program Name and Program Number will be appear in the display. (This is referred to as
the Play mode.)
Power
Switch
* Make sure the volume is set to its minimum level before operating the power switch.
Program Number
Effect Program Name
2 Play your instrument.
While playing, use the Value Dial to adjust the output
level (Master Level).
Value Dial
Master Level
* If the sound is distorted, set the Input Level Switch to the
“Hi” position, then try adjusting the Master Level once
again.
14
■ Selecting another Effect Program
The ST5 provides a total of 50 preset programs and 50
user programs. The programs contain a mixed variety of
effect combinations that cover a wide variety of musical
genres or situations. First, play and try out some of the
ST5’s sounds.
1 Use the +/- buttons to select a program.
Please refer to page ?? for more information on program numbers and names, along with a description of
each of the programs.
The currently selected program group (PRESET/USER) will
appear in the display above the program number.
The +/- buttons can be assigned to adjust the Master Level
also. (→ page ??)
* When the ST5 is shipped from the factory, User Program
Numbers 1-50 contain the same data as Preset Program
Numbers 1-50.
● Bypass/Mute
Pressing the BYPASS button bypasses the effect’s circuit (no effects will be applied to the sound). The effect
chain will blink in the display and “PASS” will appear in
the display. This is a convenient way to compare the difference between the effect sound and the straight sound.
Blinks
USER
In the case of a User Program
* Programs cannot be selected while editing an effect or in
the Tuner Mode.
* When the Master Level icon is lit, the Value Dial can be
used to adjust the Master Level.
If you press and hold the BYPASS button for more than one
second, the output signal will be muted (no sound will be
produced). The effect chain will blink rapidly in the display
and “MUTE” will appear in the display. This is a convenient
way to momentarily silence the amplified sound.
To exit the BYPASS/MUTE function, press the BYPASS button once again or press the EXIT button.
15
■ Editing an Effect Program
The ST5 offers a total of 32 internal effect types. These effects have been used in the units 50 preset programs with
adjusted parameter values. You can change the settings in these programs to create original programs. Original programs
can be saved in the user program area.
What Programs Consist Of.
The programs use various combinations of the effects in the following six effect blocks.
Select an effect from individual effect blocks and adjust the parameters to shape the manner in which the effect acts.
A total of six effect blocks can be active simultaneously.
Please refer to page ?? for descriptions of individual effect block effect types and their parameters.
Effect Block
Program
Noise
Reduction
Assign the effect type and
set its parameters.
COMP
LIMIT
OVDRV
DIST
Effect Type
16
Assign the effect type and
set its parameters.
Set the equalizer’s
parameters.
CHORS
VIBRT
FLNGR
•
•
•
Level
Assign the effect type and
set its parameters.
ROOM
HALL
CHRC
•
•
•
Set the parameters Set the volume level
that control noise.
of the program.
DYNA Block
Assign one of the four effect types (Compressor, Limiter, Overdrive and Distortion). Edit the parameters of the assigned effect and adjust the amount of effect that is applied to the sound.
D/R Block
Assign one of the nine delay and reverb effect types (Room,
Hall, Church, etc). Edit the parameters of the assigned effect
and adjust the amount of effect that is applied to the sound.
EQ Block
This is a four-band equalizer (LOW, L-MID, H-MID, HIGH
and TRIM). Adjust the level of each band’s parameters to set
the overall tone quality.
Noise Reduction Block
This effect reduces unwanted “noise”. Adjust the parameter
to set the amount of noise reduction applied to the sound.
MOD Block
Assign one of the 12 modulation effect types (Chorus, Vibrato, Flanger, etc.). Edit the parameters of the assigned effect
and adjust the amount of effect that is applied to the sound.
1 In the Play Mode, use the +/- buttons to
select the program you want to edit.
Output Level Block
Adjusts the output level for each program.
2 Press the EDIT W button to enter the Edit
Mode.
* What’s the Play Mode? (→ page ??.)
Blinks
17
3 Use the EDIT Q/W buttons to select the effect
block you want to edit.
Every time one of the EDIT Q/W buttons is pressed,
the next effect block according to the order shown in
the illustration below will be selected and its icon will
blink.
The display when
the effect is OFF.
The display when
the effect is ON.
Blinks
Blinks
To demonstrate, let’s select the D/R (Delay/Reverb)
effect block. Use the EDIT Q/W buttons and select D/
R, the D/R icon will blink.
4 Edit the selected effect block.
Use the +/- buttons to select an effect type edit the
parameter from the selected effect. Then use the Value
Dial to set the parameter’s value.
Value Dial
* The parameter cannot be edited if the Effect Block is
switched “OFF”. To switch the Effect Block “ON”, Use the
EDIT Q/W buttons to select the effect, then press the BYPASS button.
18
Blinks
Let’s edit a parameter in the D/R (Delay/Reverb) effect block you selected in the previous operation. Using the current (ROOM1) effect type, turn the Value
Dial while playing your instrument. Adjust the amount
of reverb applied to the sound.
* For more information on effect types and parameters, refer to page ??.
■ Saving an Original Program
2 Use the +/- buttons to move the cursor (the
cursor blinks), then use the Value Dial to
select the character.
Characters available for use are, space, 0-9, A-Z, ”, ’,
*, +, - and /.
3 Use the W button to select the Save display,
then use the Value Dial to assign a Program
Number.
Any changes you made to a program you edited are returned to their original, unedited condition when another
program is selected or when the power is switched OFF.
To save the changes you made, save the program to the
User Program (1-50) area.
1 First, give the program a name (up to five
characters in length).
Use the EDIT Q/W buttons to select the Program Rename display.
Blinks
Value Dial
Blinks
To cancel the Save operation while underway, press
the EDITQ button and select another display.
19
4 Press the BYPASS button to save the
program. When the save operation is
complete, “COMPL” (complete) will appear in
the display for about one second.
● Initializing (Factory Default)
This operation restores all internal settings to their original factory default conditions. All User Program data will
be lost so please use caution.
1 While holding both the TUNE and + buttons,
turn the power ON.
“PLOAD?” will appear in the display asking for your
confirmation.
* When saving an edited program to a User Program Number, make sure that you have selected a program number
that can be overwritten with new data. Once a program is
overwritten, previous data will be lost so please use caution.
* Programs cannot be saved to the Preset Program area.
5 Press the EXIT button to return to the Play
mode.
20
To cancel the initialize operation, press the EXIT button.
2 Press the BYPASS button to carry out the
initialize operation. The display will indicate
“LOAD” ➔ “VERI” ➔ “COMPL” at which point
the initialize operation is complete.
■ Assigning functions to the Value Dial
and +/- buttons
• Value Dial: Program select
+/- buttons: Master Level setting
The Value Dial and +/- buttons can be assigned to operate in one of the following three different ways.
• Value Dial: Master Level setting
+/- buttons: Program select
Hold down
While holding the EXIT button, press the EDITW button.
“PROG” will appear in the display.
Hold down
• Value Dial: no function
+/- buttons: Program select
While holding the EXIT button, press the EDITQ button.
“M LEV” will appear in the display.
* This setting is always in effect when the power is switched
ON.
Hold down
While holding the EXIT button, press the BYPASS
button to engage the Key Lock. “LOCK” will appear
in the display and button function will be limited to
only the +/- buttons.
21
TUNER Mode
This mode allows the ST5 to be used as an Auto Tuner.
The device detects the pitch received from the instrument connected to the INPUT jack, displays the nearest note name and indicates the difference in that
note’s pitch with the meter.
1 Press the TUNE button to enter the Tuner
mode.
The note name, the instrument’s transposition and the
pitch’s calibration* will appear in the display.
Blinks
3 Play your instrument and tune.
The closest note name to the note that you play will
appear in the display, and the 15-step meter will indicate whether the pitch is high or low. Tune your instrument so that the mark is in the center.
Meter
Blinks
Sharp
Note name
Center mark
Blinks
Transposition
Calibration
2 Use the +/- buttons to select the transposition of the instrument you play.
You can set the transposition to C, Bb, Eb, or F.
22
If the pitch is higher than the standard pitch, the meter
will move to the right, if the pitch is lower than the
standard pitch the meter will move to the left.
Semi-tones are indicated as follows; C#, Eb, F#, Ab, Bb.
*Calibration (frequency of the standard A pitch)
Use the Value Dial to set the calibration to a value within the
range of [A=438Hz to 445Hz]. The changed calibration setting will remain valid even if the power is turned OFF.
METRONOME Mode
The Metronome produces patterns at the set tempo.
1 Press the METRONOME/AUX KEY once to
enter the Metronome mode.
Upon entering this mode, the selected pattern will start
playing and the Metronome icon will blink.
Press the EXIT button to stop the metronome.
• Metronome Pattern:
Selects the pattern that is produced. There are two metronome sounds available, Click and Drums. (→ page
??)
* The Metronome mode cannot be entered when the Mute/
Bypass or Key Lock are active (→ page ??).
Blinks Metronome Pattern
• Tempo:
Set the tempo within the range from q=40-255.
Blinks
2 Use the EDIT Q/W buttons to select Metronome Pattern, Tempo, Level (volume) and
use the Value Dial to set the parameters.
Blinks
Tempo Display
• Level (volume):
Set the metronome’s volume level within a range of
0-30.
Value Dial
Blinks
Level Display
23
EQUALIZER Mode
Use the Equalizer mode to shape the overall sound.
Editing individual EQ (equalizer) bands is simple.
1 While holding the EXIT button, press the
TUNE button to enter the Equalizer mode.
“EQ LO” and the Equalizer icon will both appear in
the display.
Hold
down
Value Dial
Blinks
• Low Frequency (EQ LO): [L] BYPASS button
• Low Mid Frequency (EQ LM): [S] PHRASE TRAINER
button
• High Mid Frequency (EQ HM): [E] EDIT Q button
• High Frequency (EQ HI): METRONOME/AUX KEY button
• Trim (adjusts the overall volume of all frequencies)
(EQ TR): [HOLD] EDITW button
Equalizer
Icon
Blinks
* If this procedure is performed in a program whose equalizer is turned OFF, the equalizer will be forcibly turned
ON.
2 Select the band (frequency) you want to edit
using the following buttons, then use the
Value Dial to adjust the amount of gain
(volume).
24
3 After you have completed Equalizer
settings, press the EXIT button to return to
the Play mode. If it is necessary, use the
Save operation described on page ?? to
save the program.
* Unless data is saved, any changes you made are returned
to their original unedited condition if the power is turned
OFF or another program is selected.
AUX KEY Mode
This mode takes the audio (music from a CD/MD)
from the audio source received via the AUX IN jack
and shifts its pitch using the Key Transpose function.
1 Press the METRONOME/AUX KEY button
twice to enter the AUX KEY mode (press the
METRONOME/AUX KEY button once to enter
from the Metronome mode).
The AUX KEY icon will blink in the display.
2 Use the following buttons to set Key
Transpose settings.
• BYPASS button: Switches the transpose function ON/
OFF.
• Value Dial: Set the amount of transposition.
The Key Transpose setting can be adjusted in the range
of +/- 12 semi-tones (+/- 1 octave).
* The +/- buttons can be used to select Programs even while
in the AUX KEY mode.
* When the Key Transpose function is ON, output is monaural. When OFF, output will be stereo.
* When the AUX KEY mode is entered, the MOD (modulation) and D/R (delay/reverb) effects will be automatically
turned OFF.
3 Press the EXIT button to return to the Play
mode.
Blinks
AUX KEY Icon
25
PHRASE TRAINER Mode
This mode lets you record a phrase from the audio
source (music from a CD/MD) received via the AUX
IN jack, or a phrase that you play into the ST5 via the
INPUT jack, and play it back repeatedly. Playback
speed can be slowed down without changing the pitch.
* When you enter the Phrase Trainer mode, MOD (modulation) and D/R (delay/reverb) effects will be automatically
turned OFF.
■ Recording Procedure
1 Press the PHRASE TRAINER [S] button to
enter the Phrase Trainer mode.
When you enter this mode, the Phrase Trainer mode
icon will blink and the record mode select screen will
appear in the display.
* The Phrase Trainer mode cannot be entered when the
Mute/Bypass or Key Lock are active (→ page ??).
26
Record Mode
Blinks
Phrase Trainer Mode Icon
2 Use the Value Dial to select the recording
mode.
The four of recording mode types are described below.
Value Dial
• AUX S: High quality recording from the AUX IN jack, up
to 8 seconds in length.
• AUX L: Low quality recording from the AUX IN jack, up
to 16 seconds in length.
• INPUT S: High quality recording from the INPUT jack,
up to 8 seconds in length.
• INPUT L: Low quality recording from the INPUT jack, up
to 16 seconds in length.
* Once a phrase has been recorded, it is not possible to
change the record mode. To change the record mode, first
exit to another mode and then re-enter the Phrase Trainer
mode.
3 After you have selected the Recording mode,
press the [S] button to start recording.
Play your instrument or start playback of the CD and
at the point where you wish to begin recording, press
the [S] button. While the ST5 is recording, the recording time will be shown as a numerical value in the
value display.
■ Playback
When recording is complete, repeated playback of the
phrase you just recorded will begin, and the following
controls can be used.
● Adjust Playback Speed
Turn the Value Dial to the left will slow down the speed
without affecting the pitch. The speed can be reduced
within a range of 100-50% in 5% increments such as
100%-95%-90%...
Blinks
Recording Time Display
* Phrases are recorded/played back in monaural.
* If recording is not manually stopped, recording will continue for up to the maximum time that the selected recording mode allows.
4 At the point you wish to stop recording, press
the [S] button or [L] button. Recording will
end and playback will automatically begin.
Playback
Speed (%)
Blinks
● Hold Function
Press the [HOLD] button during playback will sustain
(hold function) the sound produced at that moment.
Press the button again to resume playback from the
same point.
27
● Pause/Playback
Press the [L] button during playback to momentarily
stop playback at that point. Press the [L] button once
again to resume playback from the same point.
● Rewind
Press the [E] button during playback to rewind the
phrase. Pressing the [E] button while playback is
paused will rewind the phrase to its starting point.
● Erase the Phrase
To erase the recorded phrase, press the EXIT button
or the [METRONOME/AUX KEY] button while playback is paused.
● Program Select
During playback, or while playback is paused, the +/buttons can be used to change or select effect programs.
28
■ Re-recording
During playback, press the [L] button at the point from
which you want to record and playback will be paused.
At this time the signal received from the AUX IN or INPUT jacks can be monitored and the phrase can be rewound to its starting point. At the point where you wish
to begin recording, press the [S] button once again to
start recording.
Editing Effects
The ST5 is equipped with the six effect blocks describe
below. In the Edit mode (→ page ??) you can use the
+/- buttons to select an effect type, then use the Value
Dial to adjust the effect’s parameter values.
● DYNA (Dynamics)
These effects alter the sound and change its level by amplifying or compressing the input signal.
You can select one of the four following effect types from
this effect block.
• COMP (Compresser):
The compressor controls the signal’s dynamic range
making loud signals like attacks, etc. quieter and quiet
signals louder. It also adds sustain.
Use the Value Dial to adjust the amount of amplification/compression.
• LIMIT (Limiter):
The limiter controls loud signals, reducing the gain
(volume) of any signal that exceeds the set level.
Use the Value Dial to adjust the level of the limiter.
• OVDRV (Overdrive):
Adds a mild distortion and attack to the sound.
Use the Value Dial to adjust the amount of distortion.
• DIST (Distortion):
Adds hard distortion to the sound.
Use the Value Dial to adjust the amount of distortion.
● EQ (Equalizer)
Equalization changes the character and sound quality of
the signal. The ST5 is equipped with a 4-band equalizer.
When the EQ block is set “ON”, all four bands will be
active simultaneously.
• LOW:
Adjusts the low frequency (around 80Hz) gain.
Use the Value Dial to adjust low frequency gain.
• L-MID:
Adjusts the lower middle frequency (around 320Hz)
gain.
Use the Value Dial to adjust lower middle frequency
gain.
• H-MID:
Adjusts the upper middle frequency (around 1.26kHz)
gain.
Use the Value Dial to adjust upper middle frequency
gain.
29
• HIGH:
• FLNGR (Flanger):
Adjust the high frequency (around 5.00kHz) gain.
Use the Value Dial to adjust high frequency gain.
This effect adds a swooshing sound like a jet taking
off.
Use the Value Dial to adjust the depth of the effect.
• TRIM:
Adjusts the overall level of the equalizer.
Use Value Dial to adjust the overall level of the equalizer.
● MOD (Modulation)
Modulation effects cyclically alter the input signal giving the sound a more spatial feeling or altering its tone or
pitch.
You can select one of the twelve following effect types
from this effect block.
• CHORS (Chorus):
This effect adds a natural feeling of expansiveness or
depth to the sound.
Use the Value Dial to adjust the depth of the effect.
• VIBRT (Vibrato):
This effect adds a vibrating sound like that heard on a
vibraphone.
Use the Value Dial to adjust the depth of the effect.
30
• PHASR (Phaser):
This effect causes the sound to come and go in strong
waves.
Use the Value Dial to adjust the depth of the effect.
• TREM (Tremolo):
This effect causes the sound to move forward and backward.
Use the Value Dial to adjust the depth of the effect.
• PAN (Auto Pan):
This effect causes the sound to move back and forth
between the left and right sides of the stereo field.
Use the Value Dial to adjust the depth of the effect
• AWAH (Auto Wah):
This effect alters the sound from loud to soft and bright
to dark.
Use the Value Dial to adjust the depth of the effect.
• FILT (Filter):
This effect cuts the frequencies at and above the specified frequency.
Use the Value Dial to set the frequency that is cut.
• PIT 1 (Pitch Shifter 1):
Changes the pitch of the signal, which is then mixed
with the original signal for output.
In PIT 1, the original signal’s volume will be louder.
Use the Value Dial to set the pitch shift (in 1/2 step
increments from -24 to +24.d [detune]).
• PIT 2 (Pitch Shifter 2):
Changes the pitch of the signal, which is then mixed
with the original signal for output.
In PIT 2, the original and pitch signals are of the same
volume.
Use the Value Dial to set the pitch shift (in 1/2 step
increments from -24 to +24.d [detune]).
• PIT 3 (Pitch Shifter 3):
Changes the pitch of the signal, which is then mixed
with the original signal for output.
In PIT 3, the pitch signal will be louder.
Use the Value Dial to set the pitch shift (in 1/2 step
increments from -24 to +24.d [detune]).
• PIT 4 (Pitch Shifter 4):
Changes the pitch of the signal, which is then mixed
with the original signal for output.
In PIT 4, the only the pitch signal is produced.
Use the Value Dial to set the pitch shift (in 1/2 step
increments from -24 to +24.d [detune]).
● D/R (Delay and Reverb)
Delay and reverb effects simulate the natural reverberation found in acoustic environments giving the impression that the instrument is being played in a concert hall,
room, etc.
Select from the nine types listed below.
You can select one of the nine following effect types from
this effect block.
• ROOM1
• ROOM2
Adds reverberation to the sound to give the impression of playing in a room. ROOM2 is a larger space
than ROOM1.
Use the Value Dial to adjust the amount of reverb added
to the sound.
• HALL1
• HALL2
Adds reverberation to the sound to give the impression of playing in a concert hall. HALL2 is a larger
space than HALL1.
Use the Value Dial to adjust the amount of reverb added
to the sound.
31
• CHRC1 (Church 1)
• CHRC2 (Church 2)
Adds reverberation to the sound to give the impression of playing in a church. CHRC2 is a larger space
than CHRC1.
Use the Value Dial to adjust the amount of reverb added
to the sound.
• DL40-DL80 (Stereo Delay)
• DL100-DL900 (Stereo Delay)
• DL1000-DL2000 (Stereo Delay)
Adds a delay effect with feedback. The larger the value,
the later the delay.
Use the Value Dial to adjust the volume of the effect.
● NR (Noise Reduction)
This effect reduces noise by cutting the signal when it
reaches a level lower than the specified volume. Convenient to cut unwanted noise produced when you aren’t
playing the instrument.
Use the Value Dial to adjust the level from which noise
will be cut.
32
● LEVEL
Sets the volume for each program.
Use the Value Dial to adjust individual program levels.
Troubleshooting
If the unit does not operate properly, please check the
following points first. If that does not resolve the problem, contact your Yamaha dealer.
■ The power does not turn on.
• Are batteries installed?
• Is the AC adaptor properly connected to an AC outlet
or the unit?
■ No sound.
• Are the pickup mute/pickup mic, amp or headphones
connected properly?
• Is the amplifier turned on?
• Are any of the cables broken?
• Is the Master Level set to “0” or to a low level?
• Is the effect block level set to “0” or to a low level?
• Is the mute active (the effect block blinks rapidly)?
Be aware that if all effect blocks are turned OFF, the
effect blocks will not be displayed.
■ The volume from the device connected to
the AUX IN jack is too loud or too soft or
cannot be heard.
• Adjust the output level of the connected device. The
device should be connected via its headphone jack,
not the line out jack.
• Is the Phrase Trainer mode active?
• Is the cable you are using equipped with a built-in resistor?
■ Effects are not applied.
• Is the effect bypass active (all effect blocks will be
blinking)?
• Are the effects used in the program turned ON? Depending upon the mode, certain effects (MOD, D/R)
may not be available.
■ The effect sound does not stop, or the
sound suddenly gets louder.
• Are you using OVDRV (Overdrive) or DIST (Distortion) effects with a sound system and playing too close
to the speaker?
• Lower the Master Level, or press the Bypass switch.
33
Preset Program List
• Nos. 1-30 are specially equalized for specific pickup mutes.
• Nos. 31-50 utilize individual effects.
• Please select a sound that you like, you don’t necessarily have to stick to the same mute type that your
instrument uses.
No.
1
2
3
4
5
6
7
8
9
10
11
12
13
14
15
16
17
18
19
20
21
22
23
24
25
26
27
34
Name *1
TRP L
TRP M
TRP S
PTP L
PTP M
PTP S
FH L
FH M
FH S
HRN L
HRN M
HRN S
TRB L
TRB M
TRB S
EUP L
EUP M
EUP S
TUB L
TUB M
TUB S
MTP L
MTP M
MTP S
JTP L
JTP M
JTP S
Comment
PM7/
For Trumpet
PM9/
For Piccolo
Trumpet
PM6/
For Flugelhorn
PM3/
For Frenchhorn
PM5/
For Trombone
No.
28
29
30
31
32
33
34
35
36
37
38
39
40
41
42
Name *1
JTB L
JTB M
JTB S
ECHO
DELAY
CHORS
LIMIT
COMP
VIBRT
FLNGR
PHASR
FILTR
TREML
PAN
AWAH
43
HN 8D
PM2/
For Euphonium
PM1/ For Tuba
PM7/
For Trumpet
PM7/
For Trumpet
Comment
PM5/
For Trombone
Echo effect
Delay effect
Chorus effect
Limiter effect
Compressor effect
Vibrato effect
Flanger effect
Phaser effect
Filter effect
Tremolo effect
Pan effect
Wah effect, the sound
quality will change
depending upon the
strength of the sound.
Adds a note one
octave lower than the
original sound. Good
for creating a unison
effect when playing
an instrument with a
high range.
No. Name *1 Comment
44 HN 5U
Adds a note one fifth above the original.
45 HN 8U
Adds a note one octave above the original
sound. Good for creating a unison effect when
playing an instrument with a low range.
46 OCT D
Shifts the original tone one octave lower,
making a trumpet sound like a trombone.
47 OCT U
Shifts the original tone one octave higher,
making a trumpet sound like a piccolo trumpet.
48 OVDRV The overdrive effect sounds like an electric
guitar with mild distortion.
49 DIST
The distortion effect sounds like an electric
guitar with a hard distortion.
50 THRU
Adds a weak reverb. Good for creating effects.
*1 The L, M and S characters used in the chart refer to reverb
length [L= long, M=medium, S=short]
* When the unit is shipped from the factory, user programs
contain the same data as the preset programs.
Preset Metronome Patterns
No.
1
2
3
4
5
6
7
8
9
10
11
12
13
14
15
16
17
18
19
20
21
22
23
24
25
Name
1/4-4
2/4-4
3/4-4
4/4-4
5/4-4
6/4-4
7/4-4
1/4-8
2/4-8
3/4-8
4/4-8
5/4-8
6/4-8
7/4-8
1/4-3
2/4-3
3/4-3
4/4-3
5/4-3
6/4-3
7/4-3
1/416
2/416
3/416
4/416
Pattern
1/4 Time → Quarter Note
2/4 Time → Quarter Note
3/4 Time → Quarter Note
4/4 Time → Quarter Note
5/4 Time → Quarter Note
6/4 Time → Quarter Note
7/4 Time → Quarter Note
1/4 Time → Eighth Note
2/4 Time → Eighth Note
3/4 Time → Eighth Note
4/4 Time → Eighth Note
5/4 Time → Eighth Note
6/4 Time → Eighth Note
7/4 Time → Eighth Note
1/4 Time → Triplet
2/4 Time → Triplet
3/4 Time → Triplet
4/4 Time → Triplet
5/4 Time → Triplet
6/4 Time → Triplet
7/4 Time → Triplet
1/4 Time → Sixteenth Note
2/4 Time → Sixteenth Note
3/4 Time → Sixteenth Note
4/4 Time → Sixteenth Note
No.
26
27
28
29
30
31
32
33
34
35
36
37
38
39
40
41
42
43
44
45
46
47
48
49
50
Name
5/416
5/416
7/416
3DOT8
4DOT8
3SHFL
4SHFL
3SYNC
4SYNC
5/8-4
7/8-4
9/8-4
5/8-8
7/8-8
9/8-8
8BEAT
8SHFL
16BET
16SHF
BLUES
FUNK
JAZZ1
JAZZ2
BOSSA
SAMBA
Pattern
5/4 Time → Sixteenth Note
6/4 Time → Sixteenth Note
7/4 Time → Sixteenth Note
3-Beat Staccato
4-Beat Staccato
3-Beat Staccato Shuffle (Triplet)
4-Beat Staccato Shuffle (Triplet)
3-Beat Syncopation
4-Beat Syncopation
5/8 Time → Quarter Note
7/8 Time → Quarter Note
9/8 Time → Quarter Note
5/8 Time → Eighth Note
7/8 Time → Eighth Note
9/8 Time → Eighth Note
8-Beat Drum Pattern
8-Beat Shuffle Drum Pattern
16-Beat Drum Pattern
16-Beat Shuffle Drum Pattern
Blues Drum Pattern
Funk Drum Pattern
Jazz Drum Pattern 1
Jazz Drum Pattern 2
Bossa Nova Drum Pattern
Samba Drum Pattern
35
Specifications
ST5 Main Unit
● Effects:
32 types (Maximum number of effects available simultaneously: 6 types)
● Programs:
Preset Program=50 types, User Program=50
● Power Supply:
AC Power Adaptor (PA-D09).
Also Four AAA Alkaline Batteries
Battery life is approximately 9 hours of continuous
use (using headphones, backlight OFF).
● Inputs:
Input (standard monaural jack), Input Level Switch
(Lo, Hi), AUX IN (mini stereo jack).
● Dimensions (W x D x H):
119.5mm x 75.7mm x 26.9mm (excluding extrusions)
(4-11/16" x 3" x 1-1/16")
● Output:
Output/Headphone (standard stereo jack)
● Weight:
138g (5 oz.) (without batteries)
● Tuner Section:
Detection Range: 27.5Hz-2.093kHz (A0-C7)
Calibration: A=438Hz-445Hz
● Accessories:
Owner’s Manual, Cable Adapter x1, AC Power Adaptor PA-D09 , Soft Case
● Metronome Section Tempo:
q=40-255bpm
36
* Please understand that the design and specifications of this
product are subject to change without notice for product improvement.