1
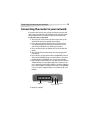
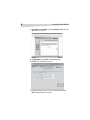
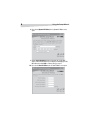
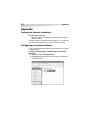
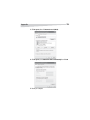
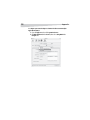
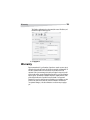
4-Port Cable/DSL Router
Product Name [French]
Product Name [Spanish]
DX-E401
INSTALL ATION GU IDE
G U I DE DE _ _ _ _ _ _ _ _ _ _ • G U Í A DEL _ _ _ _ _ _ _ _ __
2
Contents
Dynex 4-Port Cable/DSL Router
This product can be set up using any current web browser, such as Internet
Explorer 6 or Netscape Navigator 6.2.3.
PACKAGE CONTENTS:
• DX-E401 4-port cable/DSL router
• CD (containing manual and warranty)
• Ethernet straight-through cable
• 5V 2A DC power adapter (Note - Using a power supply with a different
voltage rating will damage and void the warranty of this product.)
If any of the above items are missing, please contact Dynex at (800) 305-2204.
Contents
Installation locations.....................................................................................2
Connecting the router to your network .........................................................3
Connecting additional computers to the router ............................................4
Using the Setup Wizard.................................................................................5
Appendix ....................................................................................................10
Warranty.....................................................................................................13
Technical support........................................................................................14
Installation locations
The router can be positioned at any convenient place in your office or house. No
special wiring or cooling requirements are needed. However, you should comply
with the following guidelines:
• Place the router on a flat horizontal surface.
• Keep away from any heating devices.
• Do not place in a dusty or wet environment.
The recommended operating specifications of the router are:
• Temperature 32° F ~ 131° F
• Humidity 5% ~ 90%
In addition, remember to turn off the power, remove the power cord from the
outlet, and keep your hands dry when you install the hardware.
3
Connecting the router to your network
Connecting the router to your network
If you purchased this router to share your high-speed Internet connection with
other computers, you must have either an Ethernet-based cable or DSL modem
with an established Internet account from an Internet Service Provider (ISP).
To connect the router to your network:
1 Turn off your cable or DSL modem (some devices may not have a power
switch and will require you to unplug the power adapter).
2 Connect the power adapter to the power connector on the back of the
router and then plug the other end of the power adapter into a power
outlet. The Power LED will turn on to indicate proper operation.
3 Connect an Ethernet cable to the Ethernet jack located on the Cable/DSL
modem.
4 Turn on the Cable/DSL modem by turning on the unit or plugging in the
power adapter.
5 Connect the other end of the Ethernet cable to the WAN PORT on the back
of the router. The WAN LED will turn on to indicate that it is connected to a
broadband modem. If the WAN LED is not on, repeat steps 2 through 4.
6 Connect an Ethernet cable to LAN port 1 on the back of the router and to an
available Ethernet port on the network adapter of the computer you will
use to configure the router. The LED for LAN Port 1 will turn on to indicate a
proper connection. Note - The LAN ports on the router are Auto-MDI/MDIX,
so you can use either a straight-through or crossover Ethernet cable to the
LAN ports.
LAN ports
7 Restart your computer.
WAN port
Reset button
Power connector
4
Connecting additional computers to the router
Connecting additional computers to the
router
Using additional Ethernet (CAT-5 UTP) cables, connect your Ethernet-equipped
computers to the remaining Ethernet LAN ports on the back of the router.
The front of your router should indicate the following:
• Power LED—a steady light indicates a good connection to the power
supply.
• WAN LED—a steady light indicates a connection on the WAN port. The LED
blinks during data activity.
• LAN LEDs—a steady light indicates a connection to a computer on ports 1
to 4. The LEDs blink during data activity.
Power LED
WAN LED
LAN LEDs
Using the Setup Wizard
5
Using the Setup Wizard
8 We recommend configuring the router with the same computer that is
connected to your modem. The router acts as a DHCP server and will assign
all the necessary IP address information on your network. See the Appendix
at the end of this Quick Installation Guide or the User Guide on the CD-ROM
for setting each network adapter to automatically obtain an IP address.
Note - This setup should be done on the computer that is registered on the ISP’s
network.
To use the Setup Wizard:
1 Open your Web browser, type http://192.168.0.1 into the URL address box,
then press Enter or Return. The logon window opens.
6
Using the Setup Wizard
2 Type admin for the username, leave the password field blank, then click
OK. The Home screen opens.
3 Click Run Wizard, then click Next. The Setup Wizard opens.
4 Click Next. The Set Password screen opens.
5 Follow the instructions on the screen to set a new password, then click
Next. The Choose Time Zone screen opens.
Using the Setup Wizard
7
6 Select your time zone from the list, then click Next.
The Setup Wizard tries to auto-detect your Internet connection type. If you
have a Dynamic or PPPoE connection, you will be brought to the
corresponding page. If the wizard is unable to detect your Internet
connection type, the Select Internet Connection Type screen opens.
7 Select your type of Internet connection from the list, then click Next.
• If you selected Dynamic IP Address (used primarily for cable Internet
service), go to Step 8.
• If you selected Static IP Address, go to Step 10.
• If you selected PPP over Ethernet (used mainly for DSL Internet service),
go to Step 12.
If you are not sure which type of connection you have, contact your ISP.
8
Using the Setup Wizard
8 If you selected Dynamic IP Address, the Set Dynamic IP Address screen
opens.
9 Click the Clone MAC Address button to automatically copy the MAC
address of the network adapter in your computer, or manually type in the
MAC address, then click Next to continue, then go to step 14.
10 If you selected Static IP Address, the Set Static IP Address screen opens.
Using the Setup Wizard
9
11 Enter the IP address information provided to you by your ISP. Complete all
the required fields, then click Next. Go to step 14.
12 If you selected PPPoE (Point-to-Point Protocol over Ethernet), the Set PPPoE
screen opens.
Remove any existing PPPoE client software installed on your computers.
13 Type the user name and password provided to you by your ISP, then click
Next.
14 Click Restart, then click Close. You will be returned to the Home tab.
15 Click the close button (the red box with the white X in the upper right
corner of the screen) to exit. Your setup is complete.
10
Appendix
Appendix
Testing your Internet connection
To test your Internet connection:
• Relaunch your Web browser, then link to your favorite Web site to test your
Internet connection.
For additional settings or information, refer to the Advanced, Tools, or Status tabs
on the web management interface, or to the User Guide located on the CD.
Configuring your network adapter
To connect to the network, make sure that the network adapter in your computer
is configured properly.
To configure your network adapter to obtain an IP address automatically in
Windows XP:
1 Click Start, then right-click My Network Places.
2 Click Properties, then right-click the network connection associated with
your Ethernet adapter.
11
Appendix
3 Click Properties, then click Internet Protocol (TCP/IP).
4 Click Properties, select Obtain an IP address automatically, then click OK.
5 Restart your computer.
12
Appendix
To configure your network adapter to obtain an IP address automatically in
Apple Macintosh OS X:
1 Go to the Apple menu, then click System Preferences.
2 Click Built-in Ethernet in the Show list, then select Using DHCP in the
Configure list.
13
Warranty
The IP address information, the subnet mask, the router’s IP address, and
the Ethernet adapter address appears.
3 Click Apply Now.
Warranty
Dynex warrants that for 1 year from date of purchase as stated on your receipt, it
will replace this product if found to be defective in materials or workmanship. If
defective, return the item to the store where it was purchased before the
expiration of the 1 year warranty period, with your original receipt, and we will
replace it with a then-current equivalent Dynex product (or a pro-rated refund at
Dynex’s option). This warranty is available only for the original purchaser of this
product. Dynex will not be responsible for any incidental or consequential
damages or for any loss arising in connection with the use or inability to use this
product. Some states do not allow the exclusion or limitation of incidental or
consequential damages, so the above limitation or exclusion may not apply to
you.
14
Technical support
Technical support
Dynex provides free technical support for customers within the United States for
the duration of the warranty period on this product.
Dynex Support via telephone:
Call Toll Free (800) 305-2204
Dynex Support via Internet:
Visit www.dynexproducts.com