1
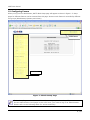
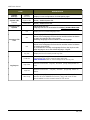
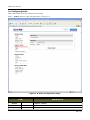
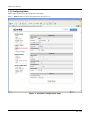
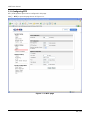
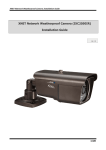
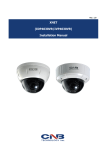
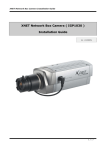
Ver. 1.0
XNET
(IVC5055VR)
User Manual
XNET User Manual
About this Manual
A compatibility and durability test ensures this product’s high performance.
This manual is for XNET Network product users only, and it describes operations related to XNET Network
products.
Please read this manual thoroughly paying attention to cautions and warnings before using the product
even if you have used similar products before.
Important Notices
z The copyright of this manual is owned by CNB Technology Inc.
z It is illegal to copy and distribute this manual without permission.
z Damages caused by misuse and by use of parts not recommended will not be
applicable for support.
z Contact the store or the manufacturer immediately if (you think) there is any
problem with the product.
z Contact the store or the manufacturer before disassembling the product for
alteration or repair.
z XNET is a trademark of CNB Technology Inc.
z This product complies for CE (Europe) and FCC (USA) regulations for
industrial/home-use electrical device.
2 / 45
XNET User Manual
Appendix
[Warning] This symbol provides a caution for handling XNET network
cameras.
[Note] This symbol provides a useful tip for handling XNET network
cameras.
3 / 45
XNET User Manual
Index
1. System Administration .................................................................................................... 5
1.1. Logging On .............................................................................................................................5
1.1.1. Using Internet Explorer ............................................................................................................... 5
1.1.2. ID and Password ......................................................................................................................... 5
1.2. Configuring Camera ...............................................................................................................7
1.3. Web Viewer (Index.html) ........................................................................................................9
1.4. Status Window ...................................................................................................................... 11
1.5. Configuring Users .................................................................................................................12
1.6. Setting Date &Time ..............................................................................................................14
1.7. Maintaining Server Configurations .......................................................................................16
1.8. System / Log ........................................................................................................................18
1.9. Configuring Audio .................................................................................................................20
1.10. Configuring Video ...............................................................................................................21
1.11. Configuring RTP .................................................................................................................23
1.12. Camera Conditions.............................................................................................................25
1.13. Configuring TCP/IP parameters .........................................................................................27
1.14. Configuring IP Filtering .......................................................................................................29
1.15. Configuring HTTP...............................................................................................................31
1.16. Configuring UPnP/DynDNS/Bonjour ..................................................................................33
1.17. Configuring CMS ................................................................................................................35
1.18. Configuring Event Type ......................................................................................................36
1.19. Configuring Motion Detection area .....................................................................................38
1.20. Configuring Sensor/Alarm ..................................................................................................40
1.21. SMTP Setup .......................................................................................................................42
1.22. Configuring FTP .................................................................................................................44
4 / 45
XNET User Manual
1. System Administration
1.1. Logging On
You can log on as an administrator using either Internet browser or ‘CMS’ software. (This manual will describe
about using Internet browser only.)
1.1.1. Using Internet Explorer
Type the IP Address of the XNET product in the address bar and press enter.
e.g.) : http://192.168.123.100
If the HTTP port has been changed from the default value, enter the new port as shown below:
IP Address of the XNET: Port No.
e.g.) : http://192.168.123.100:8080
1.1.2. ID and Password
If you are logging in as an administrator, the Log-In box will appear as shown in figure 1-1. Basic Setup page
will appear when you enter id and password.
Enabling 『Enable anonymous viewing』option at Users setup page allows users to
monitoring Live view without a log-in prompt, however, accessing to other menu
requires a log-in prompt. Please refer to 『1.5. Configuring Users』 for more details.
Once user login to network camera through Internet Explorer, it won’t ask user to login
again until username or password is modified. Thus, please close Network camera’s
Internet Explorer window for security after monitoring live view or modifying its setting
values.
5 / 45
XNET User Manual
Figure 1-1 Log-in window
The default user name and password is “root” and “admin” respectively.
For security purpose, it is recommended to change the administrator’s id and
password from their default values. Please be careful not to forget them or expose
them to others. Please refer to [1.5] for detail.
If you forget the administrator’s password, “Factory Reset” is the only way to regain
access. However, since this will retrieve all default settings, you need to configure the
network settings using IP installer software again.
6 / 45
XNET User Manual
1.2. Configuring Camera
When you log in as an administrator, XNET’s Basic Setup page will appear as shown in Figure 1-2. Setup
pages for different features can be accessed from this page. Access to each feature is controlled by different
user groups (Administrator, Operator, and Viewer.)
Main Menu
Sub Menu
Figure 1-2 Basic Setup Page
Basic Setup Page can be accessed from Operator group level and up. If you want to
access Administrator level page in this user level, you need to log in as Administrator.
Please refer to the following table for access authority:
7 / 45
XNET User Manual
● Accessible
▬ Not Accessible
Function
Index Page
Users
Setup Page
Date&Time
Setup Page
Maintain Server
Setup Page
System / Log
Setup Page
Audio
Setup Page
Video
Setup Page
RTP
Setup Page
Camera Condition
Setup Page
TCP / IP
Setup Page
IP Filtering
Setup Page
HTTP
Setup Page
UPnP / DynDNS / BJR
Setup Page
CMS
Setup Page
Event Type
Setup Page
Motion Detection
Setup Page
Sensor / Alarm
Setup Page
SMTP
Setup Page
FTP
Setup Page
Access
Administrator
Operator
Viewer
●
●
●
●
▬
▬
●
●
▬
●
▬
▬
●
▬
▬
●
●
▬
●
●
▬
●
●
▬
●
●
▬
●
▬
▬
●
▬
▬
●
▬
▬
●
▬
▬
●
▬
▬
●
●
▬
●
●
▬
●
●
▬
●
●
▬
●
●
▬
[Diagram 1-1] User Access Authority
8 / 45
XNET User Manual
1.3. Web Viewer (Index.html)
When you access an XNET product, Web Viewer page will appear automatically. Viewer area displays the
video output from the camera, and menu bar contains taps that lead to each feature setting page.
Figure 1-73 Web Viewer Page
9 / 45
XNET User Manual
ITEM
DESCRIPTION
-
Captures the still image and displays on a pop-up window.
[Save to] c:₩xNetCapture
Setting
-
Opens up Basic Setup Page.
Setup page for each XNET feature can be opened from this Menu
screen.
(Please refer to 1.4 for detail)
Live View
-
Open up Motion Index View page.
Index View Page will display Video as well as setting up Stream
Protocol (TCP / UDP) and Codec (when using Dual Stream).
Stream Protocol
-
A Stream Protocol can be selected when selecting EditBox
(RTP over TCP/RTP over UDP)
Main Stream
When this box is checked, Main Stream Video is displayed.
Sub Stream
When this box is checked, Sub Stream Video is displayed.
(H.264/MJPEG) Dual-Codec needs to be enabled in Video Setup Page
in order for Sub Stream Video to be displayed.
(Please refer to 1.10 for detail)
Capture
Dual Stream
Service
10 / 45
XNET User Manual
1.4. Status Window
Status page displays XNET System’s Version and its Ethernet address.
Click [▷ Status] button to open the page shown in Figure 1-4.
Figure 1-4 Status Page (Internet Explorer 6.0)
11 / 45
XNET User Manual
1.5. Configuring Users
This can give or limit authority to users for controlling Video and other features of XNET system.
Click [▷ Users] button to open the page shown in Figure 1-5.
Figure 1-5 Users Configuration Page
12 / 45
XNET User Manual
ITEM
User List
DESCRIPTION
-
Displays list of registered users.
"root" is the system’s administrator. "root" cannot be added or deleted.
Only the password for “root” can be changed.
This adds a new user.
Select “[Add_User]” tap in User List Box. To add a new user, enter
User name, Password, and User group then click Add button.
Add
-
Updated User list can be viewed in User List Box.
- Up to 10 users can be added.
- Authority of different User Groups
-『User name』must start with alphabet and its length must be
from 1 to 16.
-『Password』length must be from 1 to 14.
Administrator
Full control of the XNET system.
Operator
Refer to [Diagram 1-1]
Viewer
view camera’s video signal only.
Modify
-
Modifies information for each user.
Select a user in User Listbox, enter new Password/ User Group, and
click modify button to save the changes.
Updated detail can be viewed in User List Box.
Remove
-
Removes a user.
Select a user in User Listbox and click remove button to remove.
Updated user list can be viewed in User List Box.
User Settings
Enable
anonymous
viewing
Save
-
Applies and saves the configurations
Reset
-
Recalls previously saved configurations.
Turns Anonymous Viewer mode on or off.
When enabled, Web Viewer can be accessed without a log-in prompt.
Please disable 『Enable anonymous viewing』function if resisted users at 『User List』
only want to monitor network camera’s live view.
13 / 45
XNET User Manual
1.6. Setting Date &Time
This page will change Date and Time of XNET system.
Click [▷ Date & Time] to open the page shown in Figure 1-6.
Figure 1-6 Date and Time Page
14 / 45
XNET User Manual
ITEM
Current Server Time
DESCRIPTION
-
Time Zone
Automatically Adjust
for Daylight Saving
Time Changes
Displays time of XNET system.
Selects Time Zone. <Default : GMT+09>
Enables/ Disables Daylight Saving time.
Sets Date and Time of the Server.
『Synchronize with computer time』
- Synchronizes time and date of Client PC to Server.
『Synchronize with NTP server』
- Synchronizes server’s time and date to NTP Server.
(Enter NTP Server address in Network Setup Page)
- Set NTP Server update period
New Server Time
Time Mode
one
No update periodically
1 day
Once a day
1 week
Once a week
『Set Manually』
- Set date and time of Server manually.
『None』
- Do not modify Server Date and Time
Save
-
Applies and saves the configurations
Reset
-
Recalls previously saved configurations.
15 / 45
XNET User Manual
1.7. Maintaining Server Configurations
This page configures system parameters such as system restart, factory default settings, system upgrade,
saving configurations, saving images, and other additional features.
Click [▷ Maintain Server] to open the page shown in Figure 1-7.
Figure 1-7 Server Maintenance Page
16 / 45
XNET User Manual
ITEM
DESCRIPTION
Restart
Maintain
Server
Light Default
Factory Default
Delete Log
Files
Backup
Delete Logs
Backup
Restarts the system. It takes about 45 seconds.
Resets all parameters except for TCP/IP settings.
This restore will be followed by a 45 seconds system reset.
Resets all parameters to Factory Default setting.
This will be followed by a 45 seconds system restart.
Delete all saved Log Messages.
This saves current camera’s configurations to Client PC as a file
(xnetconfig.dat).
Back up file can be restored to other XNET cameras.
This will be followed by a 45 seconds system reset.
This loads up settings from a saved Backup file.
Click restore button after selecting backup files in Client PC. Optional
check boxes can be used to select settings to be excluded from the
restore process.
『except TCP/IP & HTTP parameters』
Restore
Restore
『except Camera Condition parameters』
『except Users parameters』
『except IP Filter parameters』
『except Motion Detection parameters』
This will be followed by a one-minute system reset.
Use this to update the system.
Select location of Update file in Client PC and click Update button.
System
Update
Update
This will be followed by one-minute system restart.
Upgrade File can be downloaded from http://www.cnbtec.com
Please do not disconnect power and LAN cable
from the XNET while the upgrade is in process. It
might cause a system error.
17 / 45
XNET User Manual
1.8. System / Log
System / Log page provides network camera’s configuration, language, and error information to users.
Click [▷ System / Log] button to open the page shown in Figure 1-8.
Figure 1-8 System / Log Page
18 / 45
XNET User Manual
ITEM
DESCRIPTION
System
Settings
System
Overview
System LED
Control
System LED
Language File
Upload
Event LED
-
Enable / Disable System LED.
Enable / Disable Event LED.
Upload language files.
Language File can be downloaded from http://www.cnbtec.com
List
Display the list of saved language files.
Set
Set a language file to the system.
Please select a language file from the list and then select Set button
to apply the language file to the system.
Web Page language will be modified to the set language.
Del
Delete a language file from the list.
Please select a language file from the list and then select Del button
to remove from the list.
If you delete the currently set language file from the list, then web
page language is set to the default language – English.
Language File
List
Log Report
Displays current configurations for XNet option pages.
Log List
Display the list of currently saved Log files.
Load List
Loads up Log Message file stored in the network camera.
Log Message file can be sorted by date and index.
Click Load List button to view message list in the Log List.
Logs View
Select a file from the『Log List』and click 【Logs View】button to
view.
Logs Del
Select a file from the 『Log List』and click 【Logs Del】button to
delete.
Save Logs
Click [Save Logs] button to save the Log file to PC. The log file is
saved to PC as a TARGZIP file format (*.tgz), and it can be also
downloadable from the network camera’s FTP server.
19 / 45
XNET User Manual
1.9. Configuring Audio
Xnet’s Audio features can be configured in this page.
Click [▷ Audio] button to open the page shown in Figure 1-9.
Figure 1-9 Audio Configuration Page
ITEM
Audio
Enable
Save
Reset
DESCRIPTION
Enable audio
-
Enables or Disables Audio feature
<Default : Disable>
Applies and saves changes.
Recalls previously saved configurations.
20 / 45
XNET User Manual
1.10. Configuring Video
XNET’s Video features can be configured in this page.
Click [▷ Video] button to open the page shown in Figure 1-10.
Figure 1-10 Video Configuration Page
21 / 45
XNET User Manual
ITEM
DESCRIPTION
Resolution
Enable
Dual-Codec
Main Stream
(H.264)
Select a resolution of the video image.
Selectable resolutions differ by models like the following:
CIF | VGA | D1 | 720p | SXGA | 1080p
Turns Sub Stream feature on or off. <Default : Disable>
Sub Stream output is in H.264 & MJPEG Codec.
When configuring, select Main Stream or Sub-Stream in the Live View
page.
“Enable Dual-Codec checkbox” is enabled when Codec is set up as CIF
| VGA | D1 | 720p
Selects Frame rate of Video.
Frame rate
Video Type
Frame rate
NTSC
1, 5, 15, 30
PAL
1, 5, 12.5, 25
Quality
Select MJPEG’s video quality between 10 and 100.
Bit rate
Selects bit rate for MPEG4 or H.264 video signal between 384kbps and
5Mbps.
Selects Video Codec.
Codec
Sub Stream
(H.264 /
MJPEG)
Video Out
Codec
Resolution
H.264
QVGA | CIF
MJPEG
QVGA | CIF | VGA | D1
Resolution
Select resolution of sub stream video among QVGA | CIF | VGA | D1
depending on Main Stream’s resolution and Sub Stream’s codec.
Frame rate
Sub Stream’s frame rate is completely depending on Main Stream’s
Frame rate, so user can not modify sub stream’s frame rate.
Bit rate
(H.264)
Selects bit rate for sub stream.
[CIF]: 64k, 128k, 256k, 386k, 512k
[D1]: 128k, 256k, 384k, 512k, 640k, 768k, 896k, 1M
MJPEG
Quality
(MJPEG)
Select sub stream video quality between 10 and 100.
Enable Video
Out
Video Format
Turns the Video Out feature on or off.
<Note: Video Out is available if Main Stream’s resolution is set to 720p
or less.>
Selects Video format at Video Out terminal between
NTSC and PAL.<Default : Enable>
Save
-
Applies and saves changes.
Reset
-
Recalls previously saved configurations.
22 / 45
XNET User Manual
1.11. Configuring RTP
RTP / RTSP protocol ports can be configured in this page.
Click [▷ RTP] to open the page shown in Figure 1-11.
Figure 1-11 RTP page
23 / 45
XNET User Manual
ITEM
RTSP
Configuration
RTP
Configuration
DESCRIPTION
RTSP Port
Enter RTSP Port of the Main Stream between 1 and 65535.
The default is 554.
RTP Start Port
Enter RTP Start Port between 1024 and 65534.
The default is 2000.
The minimum difference between RTP Start and End Port should be
100.
RTP End Port
Enter RTP End Port between 1124 and 65535.
The default is 3000.
The minimum difference between RTP Start and End Port should be
100.
Maximum
number of
users to
connect
Enter the maximum allowable number of users connected to the
Stream between 1 and 10. However, it can be vary depending on Main
Stream’s Bit Rate.
MAX. number of users to connect = 15Mbps / Main Stream’s Bit Rate
(1<= MAX. number of users to connect <= 10)
Save
-
Applies and saves changes.
Reset
-
Recalls previously saved configurations.
24 / 45
XNET User Manual
1.12. Camera Conditions
This is related to camera features of the XNET products.
Click [▷ Camera Conditions ] button to open the page shown in Figure 1-12
Figure 1-12 Camera Conditions Page
25 / 45
XNET User Manual
ITEM
DESCRIPTION
White Balance
White
Balance
Red Control
Blue Control
Brightness
Contrast
Saturation
Hue
Video
Setting
Select Hue of Video between 0 and 30.
Color/Mono
Selects between Color/Mono of the Video.
Turns Back Light Compensation on or off.
When enabled, the images will not be saturated even when too much
light comes into the Lens.
Selects between Auto/Day/Night for IR LED.
BLC
Day/Night Delay
Exposure
Gain Control
Shutter Min
Speed Control
Shutter Max
Speed Control
Flickerless
Initialization
Select Color Saturation of Video between 0 and 100.
Select Sharpness of Video between contrast 0 and 5.
Day / Night
Sensitivity
Condition
Select Contrast of Video between 0 and 100.
Sharpness
Day/Night
Gain &
Shutter
Condition
Configures Video’s White Balance.
White Balance means balancing color temperature by adjusting Red and
Blue level. Auto mode will adjust White Balance automatically, while
manual mode will adjust white balance level according to manually
configured Red and Blue level.
Select Video’s Red level between brightness of 0 and 255. This can only
be enabled when White Balance is configured as Manual mode.
Select Video’s Blue level between brightness of 0 and 255. This can only
be enabled when White Balance is configured as Manual mode.
Select Brightness of Video between 0 and 100.
Reset Camera
Selects a sensitive degree of a CDS sensor for the automatic switch
between Day and Night mode.
The camera is easy to switch automatically to the Night mode even
though the surroundings are not so dark, as the selected value on
this item is larger.
Select the Delay Time for IR LED operation.
Configures Exposure of Video.
Exposure means to control brightness of video by adjusting Gain value.
In auto mode, Exposure will automatically be adjusted to proper level
according to its selected Indoor or Outdoor type. In Manual mode,
Exposure will be adjusted to the gain value entered.
Select Gain level of Video between 0 – 15 only in Manual Exposure mode.
Configures Camera’s Shutter Speed.
High Shutter Speed can capture a quick movement accurately, but Video
gets noisy while it tries to maintain brightness level properly.
Low Shutter Speed reduces Video Noise, but it will not catch quick
movement very well. In Manual mode, shutter speed will be configured
value. In Auto mode, shutter speed will be changed automatically from
highest value to configured value.
In Auto mode, we recommend configuring the lowest value.
Select the Max Speed of Camera Shutter.
In Auto mode, shutter speed will be changed automatically from highest
value to configured value.
In Auto mode, we recommend configuring the lowest value.
Select On or Off for reducing Camera’s flickering.
Depending on Video Out Format (NTSC/PAL), Shutter Min/Max Speed
value will be modified.
Initializes the Camera’s Condition parameters.
Save
-
Applies and saves changes.
Reset
-
Recalls previously saved configurations.
26 / 45
XNET User Manual
1.13. Configuring TCP/IP parameters
This configures XNET’s network related parameters.
Click [▷ TCP/IP] button to open the page shown in Figure 1-13.
Figure 1-13 Network Setup Page
27 / 45
XNET User Manual
ITEM
DESCRIPTION
Obtain an
IP Address
automatically
(DHCP)
IP Address
Configuration
IP address
Subnet mask
Default gateway
DNS
Configuration
Primary
DNS Server
Secondary DNS
Server
NTP
Configuration
NTP Address
Host name
Configuration
User
the host name
Turns DHCP on or off.
Check DHCP checkbox to get an IP address automatically from the
network using DHCP protocol. Obtained IP address can be viewed by
IP Installer.
If the network does not use DHCP server, the
product will wait for server’s response for two minutes and
restart with its previous IP address(192.168.123.100)
Please modify Camera’s IP address with IP Installer
program.
Enter an IP address.
Configure IP address after checking IP address range configuration of
the router where the XNET product is connected.
Enter Subnet mask.
Use this when you want to access only from the same subnet by
masking out upper portion of the IP address.
Use 255.255.255.255 when you want to connect from one PC only.
Enter the address of Default gateway.
Enter primary DNS address.
Enter secondary DNS address.
Enter address of NTP (Network Time Protocol Server.)
NTP server is used when “Synchronize to NTP Server” is selected in
Date&Time page.
Enter Host name
MAC Clone
Enter Ethernet Address.
Reset MAC
Address
Initializes the Camera’s Ethernet Address.
MAC Address
Save
-
Applies and saves changes.
Reset
-
Recalls previously saved configurations.
28 / 45
XNET User Manual
1.14. Configuring IP Filtering
This configures IP Filters for XNET product.
Click [▷ IP Filtering] button to open the page shown in Figure 1-14.
Figure 1-14 IP Filtering Page
29 / 45
XNET User Manual
ITEM
IP Filter
Address List
Add
DESCRIPTION
-
Displays list of currently established IP Filters.
-
Adds an IP address to filter out.
Enter the IP Address to block and click add button to add it to IP
Filtering listbox.
The updated list can be viewed in IP Address Listbox.
- Up to 20 IP addresses can be added.
- Duplicate IP address, Location, Hostname, IP Address, Default Router,
Subnet Mask, DNS1, and DNS2 can not be inputted.
Removes an IP address from IP Filtering listbox.
Select the IP address to remove and click Remove button to remove it
from the list.
The updated list can be viewed in IP Address Listbox.
Remove
-
IP Filter
Enable
Enable
IP
Filtering
Save
-
Applies and saves changes.
Reset
-
Recalls previously saved configurations.
Turns the IP Filter on or off.
When turned on, XNET product will not be accessed from the IP
addresses in IP Filtering Listbox.
30 / 45
XNET User Manual
1.15. Configuring HTTP
This configures HTTP port to access XNET’s webpage.
Click [▷ HTTP] button to open the page shown in Figure 1-15.
Figure 1-15 HTTP Page
31 / 45
XNET User Manual
ITEM
DESCRIPTION
Enter HTTP Port to access the webpage.
Default port is 80, and any other port number has to be entered at the end
of the IP address when accessing. (e.g. When using HTTP Port 8080, enter
http://192.168.123.100:8080)
HTTP
HTTP port
Save
-
Applies and saves changes.
Reset
-
Recalls previously saved configurations.
32 / 45
XNET User Manual
1.16. Configuring UPnP/DynDNS/Bonjour
UPnP is a protocol for IP installer software. You can enable or disable this UPnP, and you can also use a
Friendly Name.
DynDNS configures XNET’s DDNS server information.
Click [▷ UPnP/DynDNS] to open the page shown in Figure 1-16.
Figure 1-16 UPnP / DynDNS / Bonjour Page
33 / 45
XNET User Manual
ITEM
UPnP
Settings
DynDNS
Settings
DESCRIPTION
Enable UPnP
Friendly Name
Enter UPnP’s Friendly Name.
Enable DynDNS
Enables or disables DynDNS.
When enabled, you can automatically obtain a domain from DDNS
server by simply registering the XNET product.
Enable
Anonymous
Enables or disables DynDNS Anonymous feature. When enabled,
DDNS service is used without going through authentication at
Autoipset.com DDNS server.
If you want to register a hostname with a specific user account at
autoipset.com, please make an account from
http://www.autoipset.com
Alias host name
Bonjour
Settings
Enables or disables UPnP.
When enabled, you can use IP Installer’s XNET Auto Search feature.
Enter a Host Name for the DynDNS server.
Host Name can not be more than 32 characters when you register it
at autoipset.com.
User name
Enter a user Name for the DynDNS server.
Password
Enter a password for the DynDNS server.
Enable Bonjour
Server name
Enables or disables Bonjour.
When enabled, you can use IP Installer’s XNET Auto Search feature.
Enter Bonjour’s Server Name.
Save
-
Applies and saves changes.
Reset
-
Recalls previously saved configurations.
34 / 45
XNET User Manual
1.17. Configuring CMS
This configures XNET’s CMS Server information.
Click [▷ CMS] to open the page shown in Figure 1-17.
Figure 1-17 CMS Page
ITEM
DESCRIPTION
CMS
CMS Port
Save
-
Enter CMS port number for communication with CMS between 1 and
65535. The default is 5000.
Applies and saves changes.
Reset
-
Recalls previously saved configurations.
35 / 45
XNET User Manual
1.18. Configuring Event Type
This is related to XNET’s DDNS Server information.
Click [▷ Event Types] to view page shown in Figure 1-18.
Figure 1-18 Event Types Page
36 / 45
XNET User Manual
ITEM
Event Enable
Event Mode
DESCRIPTION
Enable Event
Enables or disables event processing.
Sensor
Enables or disables the Alarm sensor.
Motion
Detection
Enables or disables Motion Detection.
This displays the capture format of images or video for an event
recording.
Capture Format
Sub Stream Codec
Save as
H.264
Video
MJPEG
Image
When processing an event, this displays the recording frame rate of
image or video.
Event Settings
Event Output
Capture Frame
Sub Stream Codec
Recording Frame Rate
H.264
The same as Sub Stream Frame rate
MJPEG
1 image per second
Pre-Alarm
When processing an event, this establishes saving images or video
before the occurrence of the event.
It can be saved MAX 5 seconds before the event.
Post-Alarm
When processing an event, this establishes saving images after the
occurrence of the event.
It can be saved MAX 8 seconds after the event.
Alarm Output
Port
This sends out Alarm signal to its output port during event processing.
Upload image
to FTP
This allows Alarm images to be uploaded to an FTP server when
processing an event. The client PC has to run FTP server to receive
the images, and the information of the FTP server has to be
accurately entered and saved at the FTP Configuration page.
Send Image to
Email
This allows Alarm images (Not Video) to be sent out by an e-mail
when processing an event. Only one image file at the moment of the
event gets sent out. The e-mail address has to be accurately entered
and saved at SMTP configuration page.
Save
-
Applies and saves changes.
Reset
-
Recalls previously saved configurations.
37 / 45
XNET User Manual
1.19. Configuring Motion Detection area
This defines areas that detect motion, and up to three different areas can be defined in each channel.
Click Motion button in Operator mode to open the page shown in Figure 1-19.
Figure 1-19 Motion Detection Page
38 / 45
XNET User Manual
ITEM
DESCRIPTION
AREA
Displays currently defined Motion Detection area.
When an area is selected from the list, its defined area gets displayed
and highlighted in viewer window. Up to 3 motion detection area can
be defined.
Show Selected Area
When this is checked, only the selected area gets displayed in viewer
window.
Caption
Enter designation for each area.
Sensitivity
Sets sensitivity for detecting motions, “1” being the least sensitive and
“10” being the most sensitive. The user needs to configure this
according to their applications and circumstances.
Defining Motion Detection Area
1. Enter a designation in the caption bar, and set sensitivity.
2. Click “New” button.
3. A square with the designation you’ve just defined will appear in
viewer window.
4. The size of the square can be adjusted by clicking and dragging its
lower right corner, and the position can be adjusted by dragging the
square.
5. Click “Save” button once you are done defining the areas.
39 / 45
XNET User Manual
1.20. Configuring Sensor/Alarm
This is related to XNET’s DDNS server information.
Click [▷ Sensor / Alarm] to open the page shown in Figure 1-20.
Figure 1-20 Sensor / Alarm Page
40 / 45
XNET User Manual
ITEM
DESCRIPTION
Sensor
Setting
Signal Type
Selects the signal type for Alarm Input Port between Normally Close
and Normally Open.
Alarm
Setting
Out Interval
Configures interval between repeating Alarm Out signals between
1 and 120 seconds.
Force
Alarm Control
Alarm Control
Save
-
Reset
-
Select the Alarm Control type either Auto or Manual.
Auto : Rings the alarm automatically during the out interval depending
on the Alarm Input Signal Type.
Manual : User can ring or stop the alarm manually using Index page’s
Alarm button.
Applies and saves changes.
Recalls previously saved configurations.
41 / 45
XNET User Manual
1.21. SMTP Setup
This configures mailing out method of Alarm Images once ‘event’ occurred in the XNET system.
Click [▷ SMTP] button to open the page shown in Figure 1-21.
Figure 1-21 SMTP Page
42 / 45
XNET User Manual
ITEM
Sender :
SMTP
Settings
DESCRIPTION
Enable
Internal SMTP
Server
Turns Internal SMTP Server on or off.
When this box is checked, Alarm Image gets mailed out through an
internal mail server. Mail Authentication cannot be used in this mode.
When this box is unchecked, Alarm Image gets mailed out through an
external mail server. Mail Authentication, port, user, password, mail
address, etc. needs to be configured.
Enable
SMTP
Authorization
Turns External SMTP Server on or off.
When this box is checked, user should choose either Login or Plain
SMTP Authentication Method.
SMTP Server
Name
Enter the name of external mail server.
SMTP Port
Enter the port number for the external mail server.
User name
Enter the user name of the external mail server.
Password
Enter the password of the external mail server user.
Receiver :
E-mail
Address
Setting
Email Address
1-3
Save
-
Applies and saves changes.
Reset
-
Recalls previously saved configurations.
Enter the e-mail address of the external mail server user.
User can input MAX 3 e-mail addresses
43 / 45
XNET User Manual
1.22. Configuring FTP
This configures how the Alarm Images get sent out using FTP once ‘event’ occurred in the XNET system.
Click [▷ FTP] button to open the page shown in Figure 1-22.
Figure 1-22 FTP Page
44 / 45
XNET User Manual
ITEM
FTP
Server
Login
Information
DESCRIPTION
FTP Name
Enter the address of the FTP server to send Alarm Images to in the
event processing.
The client PC at that IP address has to run the FTP server in order to
receive the Alarm Images.
FTP Port
Enter the port number for the FTP server to send Alarm Images to in
the event processing.
User Name
Enter the user name of the FTP server to send Alarm Images to in the
event processing.
Password
Enter the password of the FTP server to send Alarm Images to in the
event processing.
Save
-
Applies and saves changes.
Reset
-
Recalls previously saved configurations.
45 / 45