1
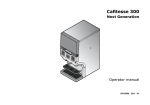
Operator Manual
Cafitesse 700
36172400
02.2010
1
2
01.2006
Contents
CONTENTS
INTRODUCTION ..................................................................................................................................... 4
SAFETY INSTRUCTIONS ...................................................................................................................... 5
HACCP Guidelines .................................................................................................................................. 7
TECHNICAL DATA ................................................................................................................................. 8
DISPENSER COMPONENTS ................................................................................................................. 9
OPERATION .......................................................................................................................................... 10
Putting into Operation ........................................................................................................................... 10
Switching the Dispenser off .................................................................................................................. 10
Delivery of Beverages ........................................................................................................................... 10
Delivery Options .................................................................................................................................... 11
Placing Vessels correctly ...................................................................................................................... 11
Adjusting the Cup Stop ......................................................................................................................... 12
Adjusting the Cup Carrier ..................................................................................................................... 12
Entering and Exiting the Operator Mode ............................................................................................. 13
Possible Settings ................................................................................................................................... 13
Calling up Status and Error Messages ................................................................................................ 13
Deleting the error messages ............................................................................................................... 13
Operating the Touch Screen ................................................................................................................ 14
Functions of the operator main menu ................................................................................................ 14
CLEANING AND MAINTENANCE ....................................................................................................... 15
General Notes ....................................................................................................................................... 15
Maintenance Schedule .......................................................................................................................... 15
When is Cleaning required? ................................................................................................................. 16
Starting the Cleaning Programs without Operator Tag ....................................................................... 17
Cleaning and Flushing .......................................................................................................................... 18
Flushing ................................................................................................................................................. 20
Cleaning Trough and Lid ...................................................................................................................... 21
OPTIONS ............................................................................................................................................... 22
Drainage foot ....................................................................................................................................... 22
Café Cool ............................................................................................................................................... 22
Water Tank ............................................................................................................................................ 22
Magnetic adapters for smaller product packs .................................................................................... 22
Espresso cup carrier ........................................................................................................................... 22
Dispenser feet .................................................................................................................................... 22
Payment systems ................................................................................................................................ 22
02.2010
3
Introduction
INTRODUCTION
• The dispenser has especially been developed
for commercial applications.
The dispenser is excellently suited for the
quick and easy delivery of high quality coffee
and other hot drinks.
• The dispenser is to be used for the delivery
of hot beverages such as coffee, decaf,
espresso, tea, lactiferous or cocoa-containing
beverages and mixed beverages (e.g. café
au lait, cappuccino, Wiener Melange).
• The dispenser is exclusively intended for the
operation with special liquid drink
concentrates (e.g. coffee, decaf, tea,
lactiferous beverages, cocoa-containing
beverages) provided in a disposable pack
BAG IN BOX (BIB).
• Depending on the dispenser model and
equipment the beverages can be delivered
into cups, espresso cups, small pots, pots
and pump-action thermos flasks.
• Beverages can be simultaneously delivered
from two drink outlets.
• For the delivery of e.g. espresso, cappuccino
and cocoa-containing beverages the
dispenser must be equipped with one or
more mixers.
• The dispenser must be placed on a table or
a counter.
• On customer’s demand, different dispenser
functions (e.g. drink recipes) can be
programmed by the service technician.
• Different payment systems or a cup heater
can be connected to the dispenser.
• Several options are available for the
dispenser (see chapter Options).
• The Service Technician can change the
dispenser over, e.g. for the additional
delivery of café cool, iced cappuccino, iced
choco (optional).
The manufacturer can not be held
liable for dispensers, that were used
for purposes other than those
specified in this manual.
Before putting the dispenser into
operation, read the chapter Safety
Instructions.
Symbols
NOTE
Information that requires the operator's particular attention.
WARNING
Vital information that requires recognition in order to prevent injuries or malfunction
of the machine.
4
02.2010
Safety Instructions
SAFETY INSTRUCTIONS
General notes
• Before putting the dispenser into operation, the
operator manual must be carefully read and
fully understood.
• Only authorised and qualified personnel may
clean, fill up and set the dispenser via the touch
screen.
• The dispenser may only be installed,
programmed and repaired by specially trained
service technicians who are familiar with the
safety and hygiene aspects of the dispenser.
• Use only original spare parts.
• The dispenser may not be installed outside.
• The dispenser must be placed where it can be
looked after by trained personnel.
The dispenser may not be cleaned
under a water jet and is not suitable for
installation on surfaces next to which
water jets are being used (e.g. for
cleaning).
• If the dispenser is not to be used for a shorter
period of time (e.g. over the weekend), use the
ON/STANDBY/CLEAR switch to activate the
STANDBY mode.
As a result, the power supply is not completely
interrupted. The product packs continue to be
sufficiently cooled in the ingredient storage unit.
• If the dispenser is not used for a very long time
period (e.g. during works holidays), unplug
the mains plug, close the water tap, remove
the product packs (BIB) and store them in a
refrigerator depending on the 'best before date'.
02.2010
• The dispenser may not be subject to frost during operation, storage and transport:
- In order to prevent damage due to frost, the
service technician must completely drain the
water from the boiler prior to storage and
transport and must also remove any residual
water from hoses and valves.
- It is recommended to store and transport the
dispenser in its original packaging.
- However, if there is the danger of damage
due to frost, the service technician must
check and replace boiler, hoses and valves if
required prior to reconnecting the dispenser
and he should additionally carry out a
functional test.
Health notes
Never touch the power supply plug
with wet hands or plug it in if the plug
itself is wet.
The liquids delivered by the dispenser
are hot!
In order to prevent scalds, keep your
hands and other body parts out of the
delivery area during dispension.
This dispenser is not intended to be
used by persons (including children)
with limited physical, sensory or mental faculties or by persons with insufficient experience and/or insufficient
knowledge unless these persons are
supervised by a person responsible for
their safety or have received instructions from that person on how to use
the dispenser.
Children should be supervised to
ensure that they do not play with the
dispenser.
Safety Instructions
Electrical connection / Water connection
Hygiene
• If the power supply cable of the dispenser is
damaged it may only be replaced by a workshop approved by the manufacturer, as special
tools are needed for the replacement.
• Observe the instructions given on the packs
regarding correct handling and storing of the
product packs (BIB).
If the power supply cord of this dispenser is damaged, it must be replaced by
a service technician.
• The dispenser must be connected to the
drinking water line and to the electric line in
compliance with local regulations.
• The dispenser must be connected to a secured
electric circuit.
We recommend to install a fault current safety
switch. The connection must be made using an
earthed safety plug socket complying with valid
regulations.
After the dispenser has been installed,
the power supply plug must be accessible.
The drinking water quality must be
checked prior to the delivery of cold
beverages. Observe the regulations
specific for the country!
• Regular cleaning of the dispenser is necessary
for functional and hygienic reasons.
When cleaning, take care of sharp
edges. There is danger of injuries!
• To clean the housing only use cleaning agents
approved by the food industry.
• The special cleaning agent must be used for
cleaning.
• Clean the inside and outside of the dispenser
by using a damp cloth and do not splash it.
• Observe the local regulations!
• If the dispenser is operated with a permanently
wired current supply (without mains plug) the
electric circuit must be equipped with a circuit
breaker with a contact opening of at least 3 mm
that controls all poles.
Only hose sets in accordance with
EN 61770 may be used for the connection to the water supply system.
02.2010
Safety Instructions
HACCP Guidelines
1
coffee milk
+6 °C
2
3
4
Guidelines
• For correct operation of the dispenser, at least the guidelines mentioned
below must be observed. The operator is held responsible for the correct
operation.
Storage of the Cafitesse products
• Refer to the Cafitesse pack for storage instructions (fig. 1).
• Store milk in a refrigerator at +6 °C/43 °F (fig. 2).
• Always use the packs according to the 'first-in-first-out' principle (observe
the 'best before date' on the pack).
Handling of the products
• Ensure hygienic handling:
- wash hands (fig. 3),
- keep the working area tidy,
- work hygenically.
• Check the pack for any damage and shake it vigorously (10 times) before
use (fig. 4).
• Observe the user instructions on the pack.
• Mark the actual date on the pack and insert the pack into the dispenser
(fig. 5).
• Dispense a cup and check it.
• Use packs within the recommended time period (see indications on the
pack).
Cleaning of the dispenser
• Observe the cleaning instructions for the dispenser.
• Only use cleaning agents that are approved by the food industry and
recommended by the Cafitesse supplier (fig. 6).
Observe the safety and operating instructions indicated on
the cleaning agent.
Cleaning
Agent
5
500
250
0
6
7
Filing
• File service and maintenance reports of DECS representatives
(fig. 7).
Service of the dispenser
• When the display indicates an error message, follow the corresponding
instructions on the screen.
Training
• Keep the operator manual close to the dispenser.
• Implement the activities on the work schedules.
• Train new staff on HACCP guidelines (fig. 8).
• If there are any further questions please contact your DECS representative.
8
02.2010
Technical Data
TECHNICAL DATA
Dimensions:
Height:
Width:
Depth:
Version
for cup
Version
for pot
Version
for large pot
707 mm/27.8 in
692 mm/27.2 in
450 mm/17.7 in
808 mm/31.8 in
692 mm/27.2 in
450 mm/17.7 in
915 mm/36.0 in
692 mm/27.2 in
450 mm/17.7 in
Weight:
Version for cup: ~ 62.5 kg/137.8 lbs empty, ~ 84.0 kg/185.2 lbs filled
Version for pot: ~ 70.5 kg/155.4 lbs empty, ~ 92.0 kg/202.8 lbs filled
Water connection:
1/2'’ or 3/8'’ supply line with 3/4'’ BSP connecting piece.
Drinking water line with stop valve.
Connection to a hot water supply via copper pipes only.
Supply system requirements:
Water inlet temperature:
max. 75 °C/167 °F
Dynamic pressure:
min. 0.8 bar at 10 l/min.
Static pressure:
max. 10 bar
Cold water connection: Dynamic pressure: min. 0.8 bar at 1.2 l/min.
Water filling volume:
13.5 l/3.6 gal
Beverage capacity:
100 cups at 100 cc (3.3 floz USA) per hour and kW heating capacity
Concentrate capacity:
Packs with a capacity of 2 l/0.53 gal or 1.25 l/0.33 gal (when using
support magnets), containing coffee or milk product, cocoa-containing
beverage and tea product.
Connected load:
For the connected loads refer to the rating plate. Different settings can
be carried out by the service technician.
Maximum loads:
1-phase operation Europe max. 3.2 kW at AC 230V/2.5kW at AC 200V
3-phase operation Europe max. 7.8 kW at 3N AC 400V
1-phase operation USA
max. 1.8 kW at AC 120V
2-phase operation USA
max. 2.4/3.1 kW at AC 208/240 V/2.6/3.5 kW at AC 208/240 V
max. 4.2/5.5 kW at AC 208/240 V/6.4/8.5 kW at AC 208/240 V
Electrical connection:
Only by power cable and plug, otherwise a contact breaking device for
all poles must be installed.
The dispenser must be earthed!
We recommend to install a fault current safety switch.
Length
of the power cable:
1.80 m/70.9 in
Acoustic emission:
The A-weighted sound pressure level of the dispenser is below 70 dB.
Further requirements
for installation:
Options:
The dispenser must be operated at an ambient temperature between
5 °C/41 °F and 32 °C/90 °F.
Adapters for 1.25 l/0.33 gal product packs (BIB), espresso cup carrier,
water tank, café cool, drainage kit, diverse payment systems
The dispenser is marked with the CE label. (Directive about electrical equipment of low voltage,
directive about electromagnetic compatibility, EC machine directive)
Subject to changes!
8
02.2010
Dispenser Components
DISPENSER COMPONENTS FRONT/REAR SIDE
1
2
3
4
-
5 6 -
7 8 -
Housing cover, tiltable
Touch screen
Drink selection buttons
Outlet spout (left-hand side,
middle, right-hand side)
Hot water outlet
Swivelling cup carrier for
positioning espresso cups
(option)
Drip tray with drip grid
Hot water selection button
9 - Stop button
10 - Cup carrier
(Version for pot)
11 - Dispenser foot (Option)
12 - Water connection
13 - Mains cable connection
14 - Water connection for
café cool (option)
15 - Dispenser door
16 - Mechanical lock
17 - Switch ON/STANDBY/CLEAR
1
9
17
15
16
2
8
3
5
7
12
13
14
6
4
Version for cup
(delivery height for cup = 12.5 cm/4.9 in)
11
10
Version for pot
(delivery height for small pot = 22.5 cm/8.8 in)
(delivery height for cups = 9-16 cm/3.5-6.3 in)
02.2010
Version for large pots and/or thermos flasks
(delivery height for large pots = 34 cm/13.4 in)
9
Operation
OPERATION
1
PUTTING INTO OPERATION
• Open the water tap and plug in the mains plug.
• Wait until the correct ingredient storage
temperature is reached. The display indicates a
corresponding message.
Tea
k
Mil
ffee
Co
2
9
• Insert the product packs (1). Please observe the
product stickers (2) when doing so (fig. 9).
Mark the date on the pack.
The stickers at the panel indicate which
product pack (BIB) must be inserted at
which position.
3
A corresponding message is indicated on
the display when the water temperature in
the boiler is not correct if this function has
been programmed. The message is
cleared as soon as the correct temperature
is reached.
10
4
• If the dispenser has been out of operation for a
very long time period (e.g. during works
holidays), put a collecting vessel underneath the
hot water outlet, actuate a hot water delivery
button (3) and let at least 10 l of hot water flow
out before using the dispenser (fig.10).
SWITCHING THE DISPENSER OFF
11
Delivery of beverages
with pre-selection options
• If the dispenser will not be used for a very long
time period (e.g. during works holidays), unplug
the mains plug, close the water tap, remove the
product packs (BIB) and store them in a
refrigerator depending on the 'best before date'.
Please make your selection
small
medium
• If the dispenser is not to be used for a shorter
period of time (e.g. over the weekend), use the
ON/STANDBY/CLEAR switch (4) to activate the
STANDBY mode (fig. 11).
As a result, the power supply is not completely
interrupted. The product packs continue to be
sufficiently cooled in the ingredient storage unit.
large
12
10
02.2010
Operation
DELIVERY OF BEVERAGES
Delivery of beverages by directly
actuating drink selection buttons
• Depending on the dispenser model and
programming, drink delivery is triggered by
Please make your
selection
1
1) - making a corresponding pre-selection (e.g.
portion size or drink strength) on the touch
screen (fig. 12)
and
- actuating the corresponding delivery button
(fig. 13)
If the stop button is pressed after a preselection has been made or if a delivery
button is not pressed within a certain time
period, the dispenser will return to the
standard pre-selection setting.
13
2)
actuating the corresponding drink selection
button directly (fig. 5)
The liquids delivered by the dispenser
are hot!
In order to prevent scalds, keep your
hands and other body parts out of the
delivery area during dispension.
• When pressing the stop button (1, fig. 13) the
delivery of beverages or hot water will be
interrupted at once (fig. 13).
A
DELIVERY OPTIONS
• Depending on how the dispenser has been
adjusted during installation, the mode for the
delivery of beverages and hot water will be one
of the following:
Portioned delivery:
Drinks are delivered in portions, the volume of
which can be set by the service technician.
Continuous delivery:
The delivery is continued as long as the
corresponding delivery button is pressed.
B
Possible portion sizes can be set by the
service technician.
• For further delivery modes, especially for milk
and lactiferous beverages, please ask your
service technician.
PLACING VESSELS CORRECTLY
C
14
02.2010
• Depending on the dispenser model, place cups
or pots on the cup carrier or on the drip tray
underneath the corresponding outlet
(fig. 14A, B, C)
11
Operation
ADJUSTING THE CUP STOP
• Open the dispenser door and use the
ON/STANDBY/CLEAR switch to activate the
STANDBY mode.
1
15
• Insert the stop (1) in the openings of the cup
carrier or the drip grid (fig. 15).
• Adjust the stop (1) according to the size of the
vessel, so that its centre is positioned exactly
underneath the outlet (fig. 15).
Adjust the stop for each product outlet
separately, if vessels of different sizes are
used.
ADJUSTING THE CUP CARRIER
Version for pots
• The cup carrier can be adjusted vertically
according to the following procedure:
2
• Loosen the screws (fig. 16C/D)
B
A
downwards:
press with the thumb in the recess (2) against
the notch locking and push the support
downwards (fig.16A).
upwards:
hold the support on both sides and push it
upwards (fig. 16B).
• When the desired position is reached, fasten the
cup carrier on both sides using a screw driver
(fig. 16C/D).
D
C
16
Do not fasten the screws too tightly.
Espresso cup carrier (option)
• When drinks should be delivered into pots, the
cup carrier can be swivelled to the side (fig. 17).
17
12
02.2010
Operation
OPERATOR MODE (v. 1.2)
FLUSH required
CLEAN&FLUSH required
Tu 11:10
Th 10:30
Mo 10:30
MORE ERROR INFORMATION CONTINUE
18
1
ENTERING AND EXITING THE 'OPERATOR
MODE'
The settings on the dispenser may be
carried out by authorised personnel
only.
CALLING UP STATUS AND ERROR
MESSAGES
• All status and error messages, e.g. empty
indication for product packs, as well as any
corrective measures are clearly indicated on
the screen.
• Press the stop button (1) (fig. 18).
• Hold the operator tag max. 20 mm in front of
the right area of the touch screen in order to
enter the 'Operator Mode' (fig. 18).
• To exit the 'Operator Mode', select the
function EXIT on the display menu (fig. 18).
If the touch screen does not function,
call the service technician.
• After having actuated
status and error
messages will be listed (fig. 19 A, B).
DELETING THE ERROR MESSAGES
POSSIBLE SETTINGS
• On customer’s demand, various functions can
be programmed by the service technician,
e.g.:
- max. 2 different languages for the LCD
display
- acoustic signals when
• the drink delivery is completed
• the touch screen is actuated
• an error message is displayed.
• Error messages can be deleted in the
operator mode by operating the
ON/STANDBY/CLEAR switch.
• The user is prompted through the different
menus by pressing the corresponding fields
on the touch screen.
Cleaning and flushing is required
within 4 h 0 min
Please make your selection
Please make your selection
Douwe Egberts Coffee Systems
small
A
02.2010
medium
small
large
B
medium
large
19
13
Operation
LCD screen
MAIN OPERATOR MENU: select sub menu
CLEANING
DRINK CNTRS
DRNK PRICES
xxxxxxxxx
xxxxxxxxx
xxxxxxxxx
xxxxxxxxx
xxxxxxxxx
xxxxxxxxx
xxxxxxxxx
xxxxxxxxx
xxxxxxxxx
xxxxxxxxx
xxxxxxxxx
xxxxxxxxx
xxxxxxxxx
xxxxxxxxx
xxxxxxxxx
xxxxxxxxx
BLOCK KEYS
STRENGTH
DATE&TIME
HAPPY HOUR
ENERGY SVNG
CLEAN.MMNTS
TEMPERATURS
MESSAGES
WATER FILTR
MACHINE NR
Shifting the displayed
area on the LCD screen
PAYMENT
AUDIT DATA
xxxxxxxxx
xxxxxxxxx
xxxxxxxxx
xxxxxxxxx
xxxxxxxxx
xxxxxxxxx
xxxxxxxxx
xxxxxxxxx
xxxxxxxxx
xxxxxxxxx
xxxxxxxxx
xxxxxxxxx
xxxxxxxxx
xxxxxxxxx
xxxxxxxxx
xxxxxxxxx
EXIT
20
OPERATING THE TOUCH SCREEN (FIG. 20):
Press to display
the previous
menu.
Scroll bar to
shift the
displayed
section of a
menu or list on
the screen.
In some submenus, cursor
arrows are displayed instead
of the scroll bar and must
then be used to select the
adjustment parameters.
FUNCTIONS OF THE MAIN OPERATOR MENU
CLEANING
Calling up the cleaning programmes 'Flushing' and 'Cleaning and Flushing'
DRINK CNTRS Scanning the counter values of individual beverages and the total counter value
DRNK PRICES Setting the beverage prices for sales, and Happy Hour 1, 2, 3
BLOCK KEYS Locking and unlocking the delivery buttons
STRENGTH
Setting the beverage strength for individual beverages
DATE&TIME
Setting the date and time
HAPPY HOUR Setting the day of the week, the starting and ending times for up to 3 HAPPY HOUR intervals
ENERGY SVNG Setting the starting and ending conditions for energy saving intervals
CLEAN.MMNTS Setting the day of the week and the time for the two cleaning programmes
TEMPERATURS Inserting and removing the water temperature and the cooling compartment temperature on the
MESSAGES
screen
Inputting the various individual messages
WATER FILTR Scanning the water filter: water quantity flown through or time period used
MACHINE NR Inputting an operator-internal machine number for the dispenser
AUDIT DATA Function for exchanging data with an accounting system
PAYMENT
EXIT
14
Setting the sale or the free delivery of beverages (in the case of payment systems)
Exiting the operator mode and returning to the delivery mode
02.2010
Cleaning and Maintenance
CLEANING AND MAINTENANCE
GENERAL NOTES
• For hygienic and technical reasons, the
dispenser must be cleaned regularly. The
intervals are defined in the program settings.
•
• A special cleaning agent must be used for
cleaning, which is approved by the food
industry.
There are two different cleaning procedures
(Flushing and Cleaning & Flushing), which
must be carried out in different intervals:
1. Flushing
The procedure must be carried out
once a week
or
for dispensers for additional delivery
of cold drinks (café cool)
once a day
2. Cleaning and Flushing
The procedure Cleaning and Flushing
must be carried out once a week.
• The cleaning times can be set by the
service technician or the operator in
accordance with individual requirements.
Do not use any scouring agents for
cleaning.
Under all circumstances observe the
instructions concerning dosing and
handling given on the packing of the
special cleaning agent.
It is recommended to have a special
container at hand for cleaning.
• All items of the schedule mentioned below must
be carried out in the indicated intervals,
otherwise the guarantee will be null and void.
It is recommended to carry out the
cleaning procedure inbetween, if
required.
• If one of the cleaning procedures has not
been carried out in time, the drink
delivery would automatically be blocked.
Hot or cold (in case of café cool delivery)
water can then be dispensed only.
Maintenance Schedule (
Make sure that all components are
installed correctly after cleaning.
When replacing the product packs (BIB)
pay particular attention to the
instructions on the packing of coffee,
tea, milk, and cocoa containing
beverages.
Danger of injuries because of sharp edges and hot water)
Interval
Type of work
Flushing
once a week
or
once a day for dispensers for
additional delivery of cold
drinks (café cool)
Any parts that come into contact with the product are flushed
with hot or cold (in case of café cool delivery) water.
For dispensers for additional delivery of cold drinks (café cool):
For hygienic reasons small amounts of drink concentrate are
dosed during the flushing procedure. Therefore there will
always be hints of drink concentrate in the water, which is
dosed during flushing.
The display will prompt you step by step through the flushing
procedure.
Flushing takes less than 1 minute.
Any parts that come into contact with the product are removed
from the dispenser. They are cleaned outside the dispenser
with a special cleaning agent or they are replaced by parts
from an exchange kit and are then fitted to the dispenser.
The display will prompt you step by step through the cleaning
procedure.
Cleaning and flushing will take approx. 2.5 minutes.
Cleaning and flushing
once a week
02.2010
15
Cleaning and Maintenance
WHEN IS CLEANING REQUIRED?
Cleaning is due
When 'flushing' or 'cleaning and flushing' is
required, the symbol
will be indicated on the
display (fig. 21).
Please make your selection
small
medium
large
21
• Touch the symbol
on the screen. The time
remaining for the cleaning process will be
indicated (fig. 22).
Cleaning should be carried out within the indicated
time otherwise the drink delivery will be blocked.
Cleaning and flushing is required
within 4 h 0 min
Please make your selection
small
medium
large
22
Cleaning is overdue
When the set time for cleaning is expired, the
drink delivery will be blocked and a corresponding
error message will be indicated on the display
(fig. 23).
Sorry, only hot/cold water is available
Please call the operator.
00: Cleaning & flushing is required
Machine nr: serial nr
Call has been made at Sun 0:00am
23
16
02.2010
Cleaning and Maintenance
STARTING THE CLEANING PROGRAMS
WITHOUT OPERATOR TAG
Start
• Simultaneously touch the upper two corners of
the screen for more than 2 seconds (fig. 24).
Please make your selection
small
large
24
Due or overdue
If 'cleaning' or 'flushing & cleaning' is due or
overdue, the corresponding program will start
automatically (fig. 25).
FLUSHING:
Please place an empty 3 l/0.75 gal bin
under all 3 product outlets and FLUSH.
STATUS: last flushing was successful
FLUSH WATER SIDE
FLUSH PRODUCT SIDE
or
CLEANING&FLUSHING Step 1 of 4
Please remove all product packs
from the ingredient storage.
25
Between two intervals
If 'cleaning' or 'flushing & cleaning' is not due or
overdue, the following message will be displayed
(fig. 26):
• Please select the desired program by touching
the corresponding field.
• Touch
to exit the cleaning program, if
requested.
CLEANING
FLUSHING
CLEANING
&
FLUSHING
26
It is recommended to carry out the cleaning
inbetween too.
02.2010
17
Cleaning and Maintenance
CLEANING & FLUSHING (4 STEPS)
If the 'cleaning & flushing' program is started,
step 1is indicated on the display (fig. 27).
CLEANING&FLUSHING Step 1 of 4
Please remove all product packs
from the ingredient storage.
27
• Open the dispenser door.
• Open the ingredient storage door.
• Remove all product packs and place them in a
clean site (fig. 28).
Tea
Mil
Co
When all product packs are removed, step 2 is
indicated on the display (fig. 29).
k
ffee
28
CLEANING & FLUSHING: Step 2 of 4
Please clean the inside and the 3 doser
holes, replace the product packs and
close the ingredient storage door
29
• Clean the ingredient storage with a clean damp
cloth.
• Clean the doser and outlet holes in the bottom
of the ingredient storage with a damp special
brush (fig. 30).
• Dry the ingredient storage with a clean cloth.
Tea
• Reinsert the product packs into the ingredient
storage.
Mil
k
ffee
• Close the ingredient storage door.
18
Co
30
02.2010
Cleaning and Maintenance
When all product packs are reinserted, step 3 is
indicated on the display (fig. 31).
CLEANING&FLUSHING Step 3 of 4
Please remove trough and lid and
clean them or use an exchange kit.
31
• Remove trough and lid from the dispenser.
Clean the removed parts (see chapter "Cleaning
Trough and Lid") or us an already cleaned
exchange kit (hygiene kit) (fig. 32).
32
When trough and lid are removed from the
dispenser, step 4 is indicated on the display
(fig. 33).
CLEANING&FLUSHING Step 4 of 4
Please place a clean trough & lid and
press it upwards until you hear a click.
Please clean all drip grids and trays
33
• Reinsert trough and lid (fig. 34).
• Close the dispenser door.
• Empty and clean the drip tray (1), all drip grids
(2) and cup carriers (3) if equipped with
(fig. 35).
• Continue with the 'flush' program.
34
2
1
3
02.2010
35
19
Cleaning and Maintenance
FLUSHING
When the 'FLUSHING' program was started
- „FLUSH WATER SIDE“ can be selected to flush
the hot water outlet
or
- „FLUSH PRODUCT SIDE“ can be selected to
flush the product outlets. (Fig. 36)
FLUSHING:
Please place an empty 3 l/0.75 gal bin
under all 3 product outlets and FLUSH.
STATUS: last flushing was successful
FLUSH WATER SIDE
FLUSH PRODUCT SIDE
This function can be skipped which does
not block the drink delivery.
36
• Touch the field „FLUSH WATER SIDE“. (Fig. 36)
On the display a new message will be shown.
(Fig. 38a)
• Please place an empty container (250 ml/9 floz)
underneath the hot water outlet (fig. 37).
37
• Touch the field „FLUSH WATER SIDE“ on the
new display. (Fig. 38a)
Danger of being scalded! Hot liquid is
dispensed for approx. 5 seconds.
FLUSHING:
Please place an empty 250 ml/9 oz cup
under the hot water outlet and FLUSH.
STATUS: last flushing was successful
FLUSH WATER SIDE
38a
Flushing the hot water outlet...
During the flushing process the display indicates
the following message (fig. 38b).
• Touch the arrow soft key (Fig. 38) to go back to the
flushing menu (fig. 36).
CAUTION: HOT LIQUIDS
38b
• Please place an empty container with a capacity
of 3 l/3/4 gal underneath all 3 product outlets
(fig. 39).
• Touch the field 'FLUSH PRODUCT SIDE'.
Danger of being scalded! Hot liquids
are dispensed for approx. 45 seconds.
39
20
02.2010
Cleaning and Maintenance
During the flushing process the display indicates
the following message (fig. 40):
The program automatically returns to the delivery
mode after the flushing process.
Flushing all 3 product outlets....
CAUTION: HOT LIQUIDS
40
• Proceed a test delivery for each hot drink
(fig. 41).
Now the flushing process is completed.
41
CLEANING TROUGH AND LID
• Preferably clean trough and lid in a dishwasher
(fig. 42).
• If a dishwasher is not available, soak trough and
lid for 15 minutes in warm water with cleaning
agent*).
• Flush trough and lid and dry the parts with a
paper cloth.
It is recommended to provide a clean trough and
lid exchange kit (Hygiene kit).
42
*) Only use cleaning agents that are approved by the food industry and recommended by the
Cafitesse supplier.
Observe the safety and operating instructions indicated on the cleaning agent.
02.2010
21
Options
OPTIONS
DRAINAGE FOOT
• The dispenser can be equipped with a
special foot to drain off liquids from the drip
tray.
• For this purpose, the 'drainage for the drip
tray' kit must be installed by a service
technician. This requires the possibility of
connecting to a drain.
MAGNETIC ADAPTERS FOR SMALLER
PRODUCT PACKS
• For the use of 1.25 l/0.33 gal product
packs, special magnetic adapters (1) are
available and are inserted in the
ingredient storage unit and in its door
(fig. 43).
1
CAFÉ COOL
• The dispenser can converted for the
additional delivery of cold beverages (café
cool, iced choco, iced cappuccino).
• Prior to the installation of the café cool kit
by the service technician, the following
information must be taken into account:
Tea
k
Mil
Prior to the delivery of café cool,
check the drinking water quality
first. Observe country-specific
regulations!
• Prior to the delivery of café cool
- and especially whenever the dispenser is not
to be used for a longer period of time (e.g.
overnight, over the weekend)
- rinse the dispenser 1x in order to rinse any
residual water out of the pipelines.
WATER TANK
ffee
Co
Do not place retaining magnets
next to magnetic cards/credit
cards.
ESPRESSO CUP CARRIER
• Up to two swing-out espresso cup
carriers can be installed for more precise
positioning of the espresso cups.
• If a water connection is not available or the
drinking water quality is poor, the dispenser
can be equipped by the service technician
with an additional tank for manual filling with
water.
DISPENSER FEET
• Filling the dispenser:
Plug the power supply plug into the socket.
• This makes it possible to clean
underneath the dispenser.
• While the boiler is being filled with water,
make sure that there is always enough
water in the water tank.
PAYMENT SYSTEMS
If there is not enough water in the
boiler, an error message will appear
in the display.
To fill the tank with water, use
drinking water only. Renew the
water on a daily basis.
22
43
• Special dispenser feet can be used to
position the dispenser 4.5 cm/1.77 in
from the surface of the table or counter.
• The dispenser has been prepared so that
it can be equipped with various types of
payment systems.
• Further information on the possibilities
regarding the use of payment systems
can be obtained from the service
technician.
02.2010