1
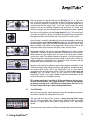
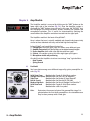
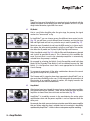
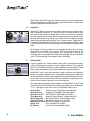
Guitar Amp & FX modeling plug-in
User Manual
4
P LE A S E N OT E :
AMPLITUBE™ IS A TRADEMARK OF IK MULTIMEDIA. ALL OTHER PRODUCT
NAMES AND TRADEMARKS ARE THE PROPERTY OF THEIR RESPECTIVE OWNERS,
WHICH ARE IN NO WAY ASSOCIATED OR AFFILIATED WITH IK MULTIMEDIA.
PRODUCT NAMES ARE USED SOLEY FOR THE PURPOSE OF IDENTIFYING THE
SPECIFIC PRODUCTS THAT WERE STUDIED DURING IK MULTIMEDIA's SOUND
MODEL DEVELOPMENT AND FOR DESCRIBING CERTAIN TYPES OF TONES PRODUCED WITH IK MULTIMEDIA's DIGITAL MODELING TECHNOLOGY. USE OF THESE
NAMES DOES NOT IMPLY ANY CO-OPERATION OR ENDORSEMENT.
5
6
I
Contents
pag. 6
II
Interface
pag. 8
III
License and copyrights
pag. 10
Chapter 1
What is AmpliTube™?
1.1 Description
pag. 12
pag. 12
Chapter 2
Using AmpliTube™
2.1 Connecting your Guitar to your computer
2.2 Input Level – optimal setting
2.3 AmpliTube™ signal path and effects chaining
2.4 Stomp Module
2.5 Amp Module
2.6 Post FX Module
2.7 Presets
pag. 14
pag. 14
pag. 14
pag. 15
pag. 16
pag. 16
pag. 17
pag. 18
Chapter 3
Stomp Module
3.1 Wah-Wah
3.2 Delay
3.3 Chorus
3.4 Flanger
3.5 Overdrive
pag. 20
pag. 20
pag. 20
pag. 21
pag. 21
pag. 21
Chapter 4
Amp Module
4.1 Pre Model
4.2 EQ Model
4.3 Amp Model
4.4 Amp Match
4.5 Cabinet Model
4.6 Cabinet Match
4.7 Microphone Modeling
4.8 Tremolo
4.9 Spring Reverb
pag. 23
pag. 23
pag. 25
pag. 25
pag. 26
pag. 26
pag. 27
pag. 27
pag. 27
pag. 27
I - Contents
I - Contents
Chapter 5
Post FX Module
5.1 Parametric EQ
5.2 Stereo Delay
5.3 Stereo Reverb
pag. 28
pag. 28
pag. 28
pag. 29
Chapter 6
General AmpliTube™ controls/display
6.1 Input Level
6.2 Gate
6.3 Output Level
6.4 Module Bypass
6.5 Presets
pag. 30
pag. 30
pag. 30
pag. 31
pag. 31
pag. 31
Chapter 7
Support
7.1 Support
7.2 User Area
pag. 32
pag. 32
pag. 32
7
Guitar Amp and FX modeling Plug-In
8
5 STOMP effects models:
- Wah-Wah
- Chorus
- Delay
- Flanger
- Overdrive
Stomp Module
3 STEREO POST effects:
- 3 band parametric
stereo EQ
- Stereo Delay
- Stereo Reverb
Post FX module
II - Interface
7 PRE-AMP models:
- solid state clean
- vintage clean
- tube clean
- british crunch
- modern hi-gain
- solid state lead
- fuzz
5 EQ models:
- tube american
- tube american 2
- british class A
- tube british
- tube british 2
Amp Module
4 POWER AMP models:
- solid state 30W
- solid state 100W
- tube 100W
- tube 50W
9 CABINET models:
- small combo
- open back 1x12"
- open back 1x12"II
- vintage open 4x 10"
- modern closed 4x10"
- vintage closed 4x12"
- modern closed 4x12"
- british 2x12"
- no speaker
2 MIC models:
- condenser
- dynamic
2 AMP effects models:
- Tremolo
- Spring Reverb
II - Interface
9
License Agreement
END-USER LICENSE AGREEMENT FOR AmpliTube™ plug-in software
Please read this document carefully before breaking the seal on the media package. This agreement licenses the enclosed software to you and contains
warranty and liability disclaimers.
By breaking the seal on the media envelope, you are confirming to have taken notice of terms and conditions of this agreement and you acknowledge
your acceptance of the software as well as your acceptance of the terms of this agreement. If you do not wish to do so, do not break the seal. Instead,
promptly return the entire package, including the unopened media package, to the dealer from whom you have obtained it, for a full refund.
1) DEFINITIONS
"EULA” means this end user license agreement
"AmpliTube™ plug-in software" means the software program included in the enclosed package, and all related updates supplied by IK Multimedia.
"IK Multimedia Product" means the AmpliTube™ plug-in software and the related documentation and models and multimedia content (such as animation, sound and graphics) and all related updates supplied by IK Multimedia.
"Not for resale (NFR) Version" means a version of IK Multimedia Product, so identified, is intended for review and evaluation purposes, only.
2) LICENSE
The "IK Multimedia Product" is protected by copyright laws and international copyright treaties, as well as other intellectual property laws and treaties.
The "IK Multimedia Product" is licensed, not sold.
This EULA grants you the rights as specified here below. All other actions and means of usage are reserved to the written permission of the right holder
IK Multimedia Production srl:
Applications Software. The "IK Multimedia Product" may be used only by you. You may install and use the "IK Multimedia Product", or any prior version
thereof for the same operating system, on up to three (3) computers, provided that (a) each computer is owed by (or leased to) and under the exclusive
control of the licensee; (b) the program(s) shall NOT be used simultaneously on more than one machine, and (c) any computer(s) with IK Multimedia
software installed shall not be sold, rented, leased, loaned or otherwise be removed from the licensee’s possession without first removing (uninstalling)
the licensed software, except as provided in Paragraph 4 (below) pertaining to “Software Transfer”.
Storage/Network use. You may also store or install a copy of the "IK Multimedia Product" on a storage device, such as a network server, used only to
install or run the "IK Multimedia Product" on your other computers over an internal network; however, you must acquire and dedicate a distinct license
for each user of the "IK Multimedia Product" from the storage device. Any given license for the "IK Multimedia Product" may not be shared or used concurrently or otherwise on different computers or by different developers in a given organization.
3) AUTHORIZATION CODE
The "IK Multimedia Product" only functions when you are in the possession of an authorization code. You will receive an authorization code upon completing the authorization code request procedure. Once your authorization code is activated, you may use the product.
You agree to follow the authorization code request procedure and will provide true, accurate and complete information about yourself. If you provide any
information that is untrue, inaccurate, not correct or incomplete, or IK Multimedia has reasonable grounds to suspect that such information is untrue,
inaccurate, not correct or incomplete, IK Multimedia has the right to suspend or to revoke the license.
The termination of the license shall be without prejudice to any rights, whatsoever, of IK Multimedia.
4) DESCRIPTION OF OTHER RIGHTS AND LIMITATIONS
Limitations on Reverse Engineering, Decompilation, and Disassembly. You may not reverse engineer, decompile, or disassemble the "IK Multimedia
Product", except and only to the extent that such activity is expressly permitted by applicable law notwithstanding this limitation of components. The "IK
Multimedia Product" is licensed as a single product. Its component parts may not be separated for use on more than one computer.
Not for Resale Version. If the "IK Multimedia Product" is labeled "Not for Resale" or "NFR" or "Evaluation Copy", then, notwithstanding other sections
of this EULA, you may not sell, or otherwise transfer the "IK Multimedia Product".
Rental. You may not rent, lease, or lend the "IK Multimedia Product" to any party.
Software Transfer. You may not transfer, license or sublicense your rights as Licensee of the software or any IK Multimedia product, as licensed to you
under this agreement without prior written consent of the rights owner. The carrier on which the IK Multimedia product has been distributed may be
transferred or otherwise made available to any third party only with the prior written consent of the rights owner and provided that (a) the original
media and license(s) accompany the carrier and (b) the party transferring the media does not retain a copy of the media.
10
III License Agreement
5) UPGRADES
If the "IK Multimedia Product" is labeled or otherwise identified by IK Multimedia as an "upgrade", you must be properly licensed to use a product identified by IK Multimedia as being eligible for the upgrade in order to use the "IK Multimedia Product".
An "IK Multimedia Product" labeled or otherwise identified by IK Multimedia as an upgrade replaces and/or supplements the product that formed the
basis for your eligibility for such upgrade. You may use the resulting upgraded product only in accordance with the terms of this EULA. If the "IK
Multimedia Product" is an upgrade of a component of a package of software programs that you licensed as a single product, the "IK Multimedia Product"
may be used and transferred only as part of that single product package and may not be separated for use on more than one computer.
6) DUAL-MEDIA SOFTWARE
You may receive the "IK Multimedia Product" in more than one medium. You may not loan, rent, lease, or otherwise transfer the other medium to another
user, except as part of the permanent transfer (as provided above) of the "IK Multimedia Product".
7) LIMITED WARRANTY
IK Multimedia warrants to the original purchaser of the computer software product, for a period of ninety (90) days following the date of original purchase, that under normal use, the software program and the user documentation are free from defects that will materially interfere with the operation
of the program as described in the enclosed user documentation.
8) WARRANTY CLAIMS
To make a warranty claim under the above limited warranty, please return the product to the point of purchase, accompanied by proof of purchase, your
name, your return address and a statement of the defect, or send the CD(s) to us at the below address within ninety (90) days of purchase. Include a copy
of the dated purchase receipt, your name, your return address and a statement of the defect. IK Multimedia or its authorized dealer will use reasonable
commercial efforts to repair or replace the product and return it to you (postage prepaid) or issue to you a credit equal to the purchase price, at its option.
9) LIMITATIONS ON WARRANTY
IK Multimedia warrants only that the program will perform as described in the user documentation. No other advertising, description or representation,
whether made by a IK Multimedia dealer, distributor, agent or employee, shall be binding upon IK Multimedia or shall change the terms of this warranty.
EXCEPT AS STATED ABOVE, IK MULTIMEDIA MAKES NO OTHER WARRANTY, EXPRESSED OR IMPLIED, REGARDING THIS PRODUCT. IK MULTIMEDIA
DISCLAIMS ANY WARRANTY THAT THE SOFTWARE IS FIT FOR A PARTICULAR PURPOSE, AND ANY IMPLIED WARRANTY OF MERCHANTABILITY SHALL
BE LIMITED TO A NINETY (90) DAY DURATION OF THIS LIMITED EXPRESS WARRANTY AND IS OTHERWISE EXPRESSLY AND SPECIFICALLY DISCLAIMED.
IK MULTIMEDIA SHALL NOT BE LIABLE FOR SPECIAL, INCIDENTAL, CONSEQUENTIAL OR OTHER DAMAGES, EVEN IF IK MULTIMEDIA IS ADVISED OF OR
AWARE OF THE POSSIBILITY OF SUCH DAMAGES. THIS MEANS THAT IK MULTIMEDIA PRODUCTION SRL SHALL NOT BE RESPONSIBLE OR LIABLE FOR
THE LOSS OF PROFITS OR REVENUES, OR FOR DAMAGES OR COSTS AS A RESULT OF LOSS OF TIME, DATA OR USE OF THE SOFTWARE, OR FROM ANY
OTHER CAUSE EXCEPT THE ACTUAL COST OF THE PRODUCT. IN NO EVENT SHALL IK MULTIMEDIA LIABILITY EXCEED THE PURCHASE PRICE OF THIS PRODUCT.
10) CHOICE OF LAW
You agree that any and all claims, suits or other disputes arising from your use of the software shall be determined in accordance with the laws of Itay,
in the event IK Multimedia, is made a party thereto. You agree to submit to the jurisdiction of the court in Modena, Italy for all actions, whether in contract or in tort, arising from your use or purchase of the software.
11) GENERAL
This Agreement contains the complete agreement between the parties with respect to the subject matter hereof, and supersedes all prior or contemporaneous agreements or understandings, whether oral or written. All questions concerning this Agreement shall be directed to:
IK Multimedia Production srl
Via Dell’Industria 46
41100 Modena
Italy
e-mail: [email protected]
© 2003 IK Multimedia. All rights reserved.
AmpliTube™ is a trademark property of IK Multimedia Production.
III License Agreement
11
Chapter 1 What is AmpliTube™
1.1
Description
AmpliTube™ is an amp modelling and effects plug-in. It gives you the ability to model the complete guitar chain - including stomp boxes, amp modelling, mic modelling and post effects. Thanks to its separate pre, eq, amp and
cabinet models, 1,260 amp combinations can be generated to craft your
favourite guitar sound modelled on top vintage and modern gear.
AmpliTube™ is organized into 3 easy to use interfaces: Amp Module, Stomp
Module and Post FX Module.
The Amp Module (fig1) includes:
fig. 1
7 pre-amps models:
- solid state clean
- vintage clean
- tube clean
- british crunch
- modern hi-gain
- solid state lead
- fuzz
5 eqs models:
- tube american
- tube american 2
- british class A
- tube british
- tube british 2
4 power amps models:
- solid state 30W
- solid state 100W
- tube 100W
- tube 50W
9 cabinets models:
- small combo
- open back 1x12"
- open back 1x12"II
- vintage open 4x10"
- modern closed 4x10"
- vintage closed 4x12"
- modern closed 4x12"
- british 2x12"
- no speaker
2 Mic models:
- condenser
- dynamic
12
1 - What is AmpliTube™
2 Amp effects
- Tremolo
- Spring Reverb
The Stomp Module (fig2) includes:
fig. 2
5 Stomp effects models:
- Wah-Wah
- Chorus
- Delay
- Flanger
- Overdrive
The Post FX Module (fig3) includes:
fig. 3
3 Stereo Post effects:
- 3 band parametric stereo EQ
- Stereo Delay
- Stereo Reverb
It's the complete solution for your guitar-powered-studio!
1 - What is AmpliTube™
13
Chapter 2 Using AmpliTube™
2.1
Connect your guitar to your computer
To achieve the best input signal when using AmpliTube™ be sure you have
an "instruments input" on your audio card (or a guitar dedicated input - fig.
6). The “instrument input” needs a gain control and commonly is an high
impedance input, this means that the pickups of your guitar will find an
input that matches that found in guitar amplifiers.
fig. 6
NOTE: Normal +4 dB low impedance line input (i.e. the ones you would
normally use for a synth or a keyboard) are not ideal for directly connecting the guitar because guitar pickups are not designed to deliver such an
high level and on a low impedance load, in these conditions the guitar
sound will be poor.
If your card does not have a high impedance input you will need to use a
small mixer with a good high-Z line input to which the guitar can be connected. The best quality connection is obtained using a very good microphone preamplifier with the addition of a quality D.I. box to which the guitar
will be connected. This setup will deliver the best possible sound because
the signal from the pickups will be treated with extreme care by the D.I. box,
as it is designed expressly for these needs.
2.2
Input Level optimal setting
For an optimal sound quality the signal that’s fed into AmpliTube™ from
your audio system should be within a certain level range. AmpliTube™
shows the input signal level with a very simple three LED meter (fig. 7):
fig. 7
14
- the yellow one
- the green one
- the red one
shows that a too little signal is present
tells that the signal is OK
which should light only occasionally, shows that
the input is close to overload.
2 - Using AmpliTube™
AmpliTube™ does not have an “input level” control, because it’s very important that the level is actually correct at the analog to digital converters of
the audio system.
During normal playing the green LED should be the one that lights more
often. If the yellow one is the one that’s more often lit then increase the gain
of your preamplifier or audiocard break box; if the red one is blinking then
reduce it slightly.
2.3
AmpliTube™ signal path and effect chaining
The signal path within AmpliTube™ is the same as displayed on the interface, from left to right.
The input signal is fed to the stomp boxes section first, then to the Amplifier
and then to the mono to stereo post FX section. The input signal is mono in the situation where AmpliTube™ is inserted on stereo channels or busses
it will sum the left and right input to get the mono input. The output signal
is always stereo, so it is not possible to open AmpliTube™ as a ‘mono to
mono’ plug-in, while it can be opened as a ‘mono to stereo’ or ‘stereo to stereo’.
The very first module that the input signal hits is the Gate, then in order:
Wah > Delay > Chorus > Flanger > Overdrive
for the stomp boxes.
The Gate is the first so that all the Amp and effects tweaks won’t affect the
Gate response, which is very sensitive and fast.
Then there is the entire Amplifier model, from the Tremolo (at the very first
stage) from the output of the microphone model, passing by the Preamp, Eq,
Spring Reverb, Power Amp and Cabinet.
Mic Model > Tremolo > Preamp > Eq > Spring Reverb > Power Amp > Cabinet
After the Amplifier the signal (still in mono) will reach the post stereo FX
section in this order:
Equalizer > Delay > Reverb
After this last stage the signal becomes stereo because of the Reverb and
Delay processing. At the end, after all the processes, there is the Output
Level knob which determines the amount of signal that AmpliTube™ will
output, this is very useful to balance the level of different kind of sounds
and presets.
2 - Using AmpliTube™
15
2.4
Stomp Module
The first module that the signal goes into is the Stomp effects (fig. 8).
The sound of the effects is very different if they are applied before or after
the Amplifier.
In AmpliTube™ you have choice of both the options and the units are specially designed for the “pre” or “post” operation. This “pre” section recreates the sound of some of the classic pedal stomp boxes and it is patched, as
for a real guitar setup, before the amplifier.
fig. 8
It is equipped with 5 pedal processors:
1) Vintage wah pedal, with manual or auto wah options and, thanks to the
modeling technology, a real-wah sound!
2) Analog delay, delivers that typical warm tone of the early stomp delay
units, without the hiss!
3) Analog chorus, modeled after one of the most loved 80’s chorus stomp
boxes.
4) Analog flanger, capable of a wide range of flanging effects - from sub
tle choruses to jet-plane like extreme effects.
5) Analog solid-state overdrive stomp box, this is the perfect unit for “dri
ving” the first stage of all the AmpliTube™ preamps. A warm, rich and
ver
satile overdrive pedal, that can saturate itself and overdrive the
amp as well.
fig. 9
All the connections between the internal stages of AmpliTube™ (and also of
course between these “pedals”) are 32 bit floating point for an unmatched
audio resolution that’s essential for a realistic emulation of what happens
in the analog domain.
fig. 10
2.5
Amp Module
After passing through the stomp boxes section the signal goes into the
heart of AmpliTube™: the amplifier emulation (fig. 9).
Here everything is physically modeled and the signal first hits the optoTremolo (fig. 10) unit than feeds into the gain stage, the Preamp (fig. 11)
that can be either Tube or Solid State. The preamp stage is very important
for getting the guitar tone you’re after. The AmpliTube™ preamps are directly taken from some of the best preamps ever made, and the tonal spectrum
covered by all the AmpliTube™ preamps is exceptionally wide.
fig. 11
16
2 - Using AmpliTube™
After the preamp the signal feeds into the EQ stage (fig. 12) , a “tone control” circuit that recreates the authentic response of the tone shaping section of the best amplifiers. Actually this is not a conventional digital eq.. it
sound exactly like the typical “low”, “mid” and “treble” knobs you would
expect to find on the amplifier faceplate, and, best of all, its “sound” and
character changes very much depending on the Eq type that’s been selected.
fig. 12
Just after the Eq stage we find the Spring Reverb (fig. 13). This reverb really sounds very close to a spring unit, with all the warmth they have but with
that typical metallic and resonant vibe. Of course this reverb is mono.
Once the tone is carefully shaped by the Eq and reverberated by the Spring
the signal feeds into the Power Amplifier stage (fig. 14). Different types of
power amplifiers (both Tube and Solid-State) deliver different sounds. Tube
power amplifier will deliver more compression when driven close to the
maximum, while solid state ones will give a more crunchy sound.
fig. 13
After being amplified, the signal is fed to the Cabinet (fig. 15). Here is where
AmpliTube™ recreates, thanks to meticulous measurements with unprecedented precision, the magical tones of some of the best guitar speaker
system ever made. The speaker frequency response is the most important
stage of the guitar system because every subtle nuance of the cabinet frequency response is responsible for a particular tonal character, and the
AmpliTube™ cabinet emulation is very precise.
fig. 14
Speakers cabs need to be miked to capture their magical sound both in the
studio or onstage. Some miking techniques with different microphones deliver various tonal results, that’s why AmpliTube™ has its own internal
microphone type and placement section. Thanks to different Mic types and
positions (fig. 16), whose results on the sound are finely modeled,
AmpliTube™ sports a very high number of possible combinations of the
sound of the cabinet / microphone system.
fig. 15
This number gets huge if you think of all the combinations that are possible with all the Preamps / EQ / Power amplifiers / Cabs and microphones
positioning (actually up to 1,260 different combinations). And, best of all,
it’s almost impossible to get a bad-sounding combination!
fig. 16
2.6
Post FX Module
Now we have the guitar signal coming out from the microphone, placed in
front of the cabinet with stomp effects inserted.
The next, and final, part of this system is a post processing effects stage
(fig. 17) that’s equipped with a digital three band precision parametric
equalizer, a digital stereo delay and an high quality “hall” type digital
reverb.
fig. 17
2 - Using AmpliTube™
These processors are based on a different concept from the first two modu-
17
les of AmpliTube™, as these are high precision digital processors used to
create exactly the sound the user is searching for, and sometimes this goes
beyond the stomps > amp > cabinet system.
While the first two sections are entirely modeled after real gear which
sound is magical and has to be respected, this last section is extremely precise and you can think of it as a set of studio units, that are usually used on
the sound recorded from the amp, to add a little Eq or a bit of clarity and stereo reverb ‘shine’.
2.7
Presets
AmpliTube™ comes with a very large set of factory presets.
These are divided into two main categories: one is dedicated to the sounds
and the presets are named with a “type of sound” scheme, the other is dedicated to famous guitarists and it’s filled with presets that aims to recreate
their typical tones, whenever this is possible, of course!
AmpliTube™ is able to emulate the amplification/recording chain but not
the guitarist! The two sections are named “Amp” and “VIP”. The first one
also contains some bass-oriented presets.
18
2 - Using AmpliTube™
19
Chapter 3 Stomp Module
The Stomp boxes module is accessed by clicking on the “STOMP” button on
the lower right side of the interface (fig. 18). Once the Stomp section is
displayed the “STOMP” buttons turns red and, in this case, the “BYPASS”
button disengages the entire Stomp section. If, for instance, the Delay and
the Chorus are active both of them will be turned off by selecting “BYPASS”.
This is useful for instantaneously check the sound without all the Stomp
boxes in the signal path.
fig. 18
3.1
Wah-Wah
The first stomp box in AmpliTube™ is the wah pedal (fig. 19).
It carefully recreates that typical mid-rangey funky sweep of the best vintage units.
Click on the “Wah-Wah” big button to engage the effect. The red led shows
that the unit is active.
Mode:
On:
Auto:
Wah:
fig. 19
3.2
used to select the wah type.
manual wah mode. The Wah knob determines the cutoff fre
quency of the wah.
envelope follower mode: the cutoff frequency is controlled by
both the Wah knob and the envelope of the input signal.
sets the cutoff frequency. Then in On mode this is the static cutoff
freq, when in auto mode this is the base frequency, that will be
modulated by the input signal envelope.
Delay
This is a physical model of a high quality analog delay stomp box. Very fine
filters in the delay line and feedback networks provides that warm “full”
sound of old analog delays (fig. 20).
Click on the “Delay” big button to engage the effect. The red led shows that
the unit is active.
Level:
determines the amount of the delay. Fully counterclockwise is
dry, no effect, fully clockwise is only delay.
Delay:
sets the delay time. From 2 mS to one second.
Feedback: determines the number of repetitions. Being an analog delay the
sound bandwidth will decrease on each repetition.
Full clockwise gives a sustaining effect.
fig. 20
20
3 - Stomp Module
3.3
Chorus
After the Delay the signal goes into the analog chorus / vibrato unit. This
recreates the deep and articulated tone that only analog chorus boxes can
deliver (fig. 21).
Click on the “Chorus” big button to engage the effect. The red led shows that
the unit is active.
Level:
Rate:
Depth:
fig. 21
3.4
determines the amount of modulated sound over the direct one.
Fully counterclockwise is dry, no effect, normal chorus is obtai
ned in the center position, while fully clockwise gives
a very nice vibrato tone.
sets the chorus / vibrato modulation frequency. From 0.1 Hz to 6 Hz.
controls the depth of the modulation. When used in vibrato
mode determines the amount pitch deviation.
Flanger
This stomp box creates a wide effects range, from subtle chorusing up to
rich and full jet plane ‘ whoosh’ (fig. 22).
Click on the “Flanger” big button to engage the effect. The red led shows
that the unit is active.
Level:
sets the amount of modulated sound over the direct. Fully coun
terclockwise is dry, no effect, flanging effects are from 25 to 75%
and fully clockwise is useful to get feedback vibrato sounds.
Rate:
controls the modulation frequency. From 0.1 to 6 Hz.
Depth:
determines the depth of the modulation.
Feedback: controls the amount of feedback. When used at low settings the
effect is similar to a rich chorus, when turned up it gives thef ull
flanging character.
fig. 22
3.5
Overdrive
This is modeled after one of the most acclaimed overdrive stomp box ever
made. When used with crunch or lead amps it delivers a very high gain, and
when used with clean amps it can drive them to produce a rich, warm and
thick crunch sound (fig. 23).
Click on the big “Overdrive” big button to engage the effect. The red led
shows that the unit is active.
Distortion: determines the amount of distortion that occurs inside the over
drive pedal. High settings of this control will produce a more
solid-state sounding kind of distortion because the distortion
occurs within the circuitry of the overdrive pedal.
fig. 23
3 - Stomp Module
21
Level:
Tone:
22
sets the output level of the overdrive pedal. By turning this up
the amplifier that follows will be overdriven. To get a more amp
driven sound use low distortion settings with an high output
level.
Controls the timbre of the overdrive pedal. From extra warm at
the full counterclockwise position to extra bright and sharp at
the fully clockwise position.
3 - Stomp Module
Chapter 4 Amp Module
The Amplifier module is accessed by clicking on the “AMP” button on the
lower right side of the interface (fig. 24). Once the Amplifier section is
displayed the “AMP” buttons turns red and, in this case, the “BYPASS” button disengages the whole Amplifier section, including the speaker and
microphone emulation. This is useful for instantaneously checking the
sound without the Amplifier emulation inserted into the signal path.
fig. 24
The Amplifier module is the heart of AmpliTube™.
Here is where the tone is actually modeled and shaped to be impressively
similar to those obtained with very well miked high end amplifiers.
In AmpliTube™ you have different choices for:
1. Preamplifier, the actual gain stage, this offers seven different types
2. Amplifier Tone control, that’s the Eq stage, can be selected among five types
3. Power Amplifier, both solid state and tube with four types
4. Cabinet , the speaker system, this offers eight types plus bypass
5. Microphone model and positioning
Also built into the Amplifier circuit are two vintage “amp” typical effects:
- Opto Tremolo
- Spring Reverb
4.1
Pre Model
You have choice among seven different top quality guitar preamplifier circuits (fig. 25).
Solid State Clean
Vintage Clean (tube)
Tube Clean
British Crunch
Modern High Gain
Solid State Lead
Fuzz
Gain:
Modeled after Fender® Solid State combos.
Modeled after the Vox® AC-30 top boost
Modeled after the Fender® Super Reverb™
Modeled after the Marshall® JCM-800
Modeled after the Mesa® Boogie Dual Rectifier™
Modeled after Fender® Solid State combos.
Modeled after a 60’s fuzz pedal.
Determines the amount of gain of the preamplifier stage. It is
ghosted when the first three preamplifiers are selected because
they’re clean preamps with a fixed gain.
fig. 25
4 - Amp Module
23
Here are some suggestions for making the right choice of preamp type:
Solid State Clean:
This is the most linear preamplifier of AmpliTube™. Very good for jazz sounds,
similar to Fender® combos and the Roland® Jazz Chorus. The frequency
response is only slightly shaped.
Vintage Clean:
This is the Top Boost version of the Vox® AC-30 preamplifier. It has the best
presence and definition in the mids and highs. It is very sensitive to the tone of
the guitar and perfect for all pop/rock electric accompaniments and can be
easily driven with the Overdrive Stomp to produce crunchy and creamy tones.
Tube Clean:
This is the Fender® Super Reverb™ - very clean, hard to overdrive, a high-voltage preamplifier with a lot of punch. The super responsive attack of this
preamp will knock you out! An incredibly precise and clean sound useful for
lighter crunch sounds too and with the overdrive stomp box it can be driven
with not too much gain. Ideal for thick leads too. Great for fat bluesy sounds
with good presence.
British Crunch:
The Marshall® JCM800 super lead preamp. This is a single channel head,
where the GAIN control has a dramatic range of control over the sounds - and
we provide exactly the same control here. It is bright and “lite” at very low gain
settings, with only a little crunch when the input signal is increased; but when
increasing the gain knob the sound becomes more driven AND fatter, up to a
quite high gain- useful for leads too but always warm. The higher the gain the
warmer is the sound. Astonishingly similar to the real thing! Also useful at low
gains for arpeggios in pop music, for slightly crunchy but lite rhythms while at
high gains it becomes the most typical British crunch/lead sound.
Modern High Gain:
This can’t be clean! A lot of gain is provided to deliver all those typical
American extra high gain timbres. The sound is very similar to the Dual
Rectifier™. Even at low gains it crunches but with a lot of highs and attenuated mids. Going higher with the gain it becomes really hard to handle, fitting
perfectly with humbucking pickups for getting those heavy sounds.
It is the most suitable choice for hard rock and heavy sounds. With the Gain at
the max it fires up.. and if you still want more try to engage the Overdrive
Stomp!
Solid State Lead:
This is an alternative to the Modern High Gain for more or less the same kind
of target sound. The difference here is that the tone is more controllable and
precise. It’s also a little darker at the input. It’s very good for really high gain
leads because it is so precise and stable. Furthermore its extra power at the
low end makes it very good for all hard rock sounds. Being a little more flexible than the Modern High Gain it can be usefully played at low gain settings.
24
4 - Amp Module
Fuzz:
Typical fuzz box sound. Actually the fuzz sound can be truly heard only with the
speaker emulation turned off but even with the speakers on this is a quite
rough kind of distortion, typical 60’s fuzz sound.
4.2
EQ Model
Like in a real Guitar Amplifier after the gain stage, the preamp, the signal
reaches the “tone control” or Eq.
In AmpliTube™ you can choose among five different tone control circuits
(fig. 26), you will have a set of different tonal characters and also the Low,
Mid and High knobs will act in a particular way in each Eq model (fig. 27).
Note that some Eq models do not have the MID control, as in those amplifiers where the tone control provided is only Bass and Treble. The controls
that affect the Eq model are: Eq Low, Eq Mid, Eq High and Presence.
fig. 26
If the Amp Match switch (fig. 28) is ON the EQ model Knob becomes ghosted
and it won’t be possible to move it. This is because in this condition the
exact Eq circuit that is used in the selected preamplifier is automatically
selected when the preamp is switched.
For example by selecting the British Crunch Preamplifier model with Amp
Match ON the Eq model Tube British 2 will be selected, because the Tube
British 2 is the Equalizer circuit that’s most appropriate for the British
Crunch Preamp.
fig. 27
Try anyway to experiment all the other combinations because the sounds
you get will always be very interesting.
The Preamp and Eq stage has been kept separated in AmpliTube™ just to
give much more flexibility to the user, it’s like being able to connect part of
the circuitry of an amplifier to part of another, this hugely increases the
number of possible sound combinations.
fig. 28
4.3
Amp Model
After having been tone shaped the sound passes on to the power amplifier,
just before reaching the Speakers. There are four different types of power
amplifiers to choose from, two solid state and two tube (fig. 29).
AmpliTube™ is incredibly accurate in the emulationing the entire guitar
amplification chain and the power amplifier is no less important than the
other parts.
fig. 29
For example, the subtle, warm and unique saturation sound of the power amplifier
that you achieve when the Amp is cranked close to its maximum is beautifully
reproduced by AmpliTube™ - thanks to the accurate power amplifier modeling.
4 - Amp Module
25
Solid State models will, in general, deliver a more clean sound.. becoming a
little saturated when pushed to the max, while Tube models will add some
frequency dependent compression too.
4.4
Amp Match
AmpliTube™ offers the choice of a number of options for the single stages
that an amplifier comprises of, so that you can try to experiment on your
own with a huge number of combinations. Even so you have the capability
of making things much simpler. By activating the Amp match switch (check
the Red led that lights fig. 30) you will notice that the Eq Model and Amp
Model to become ghosted and locked. This is because when “Amp Match” is
activated the configuration that recreates the exact original amplifier setup
is automatically recalled, and everything is controlled by the Preamp model
knob.
fig. 30
By selecting a Preamp model the most appropriate Eq circuit and Power
Amp model are selected. This recreates exactly the original tone of the
amplifier used for the measurements. For example by selecting the
“Vintage Clean” preamplifier with Amp Match engaged the exact top boost
Vox AC-30 from preamp, Eq and power amp is recreated.
4.5
Cabinet Model
A guitar amplifier can sound authentic only with its appropriate speaker
system. The frequency response of guitar speaker systems is very specific
and is far from being flat, because guitar amplifiers use typically full range
large single way speakers that cannot exhibit flat frequency response.
fig. 31
AmpliTube™ uses a very high resolution system to capture and reproduce
the tone of a guitar speaker system, for example the frequency response of
all the AmpliTube™ cabinets are sampled at very high frequency, this delivers an ultra-accurate reproduction of all the small but so important irregularities in the frequency response, even at the high end.
There are eight high quality cabinet models into AmpliTube™ (fig. 31), and
in the 9th position (No Speaker) the Cabinet emulation can be disabled for
a “D.I.”, typically for extra fuzz sounds. The available cabinets are:
Small combo
Fender® small 15W solid state combo (80’s)
Open Back 1x12
Ampeg® AX-30 100W Tube Combo (90’s)
Open Back 1x12 II VHT® Pitbull™ 50W Tube Combo (90’s)
Vint. Open 4x10
Fender® Super Reverb™ vintage Amp (60’s)
Mod. Closed 4x10 Marshall® modern 4x10 closed cab. (80’s)
Vint. 4x12 Closed Marshall® vintage 4x12 cab (70’s)
Modern 4x12 Closed Marshall® modern 4x12 cab (80’s)
British 2x12
Vox® top boost AC-30 (60’s)
No Speaker
D.I. line out (after the power amp)
26
4 - Amp Module
4.6
Cabinet Match
Like with the Eq and Power amp sections also the Cabinet can be Matched
with the preamp model to automatically get the most appropriate cabinet
type for the chosen preamplifier (fig. 32).
For example selecting the Vintage Clean preamplifier with the Cab Math
active the British 2x12 cabinet will automatically be selected, as this is the
real Vox Cabinet.
By activating both the Amp and Cab Match simply selecting the preamp will
select the entire amplifier in a trice, passing from a Super Reverb to a JCM800, for example, with a single knob movement.
fig. 32
4.7
Microphone Modeling
A good cabinet must be very well miked to get the right sound in the studio
or onstage.
AmpliTube™ even provides accurate miking that’s not fixed (fig. 33)- you
can select some different configurations and placement of the microphone
in front of the speakers. You can select between Dynamic and Condenser
microphone types, in-axis, off-axis, close or far placements.
fig. 33
These differences in the sound have also been sampled from the original
speakers with different miking techniques and the result is a very accurate
emulation by AmpliTube™.
4.8
Tremolo
The AmpliTube™ tremolo (fig. 34) is the exact recreation of the OptoTremolo that you find inside the 60’s Fender® amps.
The shape of the waveform is typically “vintage” and it’s so particular
because of the strange interaction that occurs between the lamp and the
opto cell within the tremolo circuit. It is placed before the gain stage, so that
the overdrive tones are modulated by the tremolo too, as required for an
accurate recreation of the majority of classic tremolo sounds.
fig. 34
fig. 35
4 - Amp Module
4.9
Spring Reverb
There are no digital reverbs that can deliver this tone.
For many years the guitar amplifier’s reverb unit was a double metallic spring
to which the sound was applied at one side and picked up at the other. It’s a very
strange kind of reverb, nothing to do with real rooms or digital devices; it’s a
rough resonant sound that is thought to be unbeatable for certain kinds of,
mostly, clean sounds. AmpliTube™ spring reverb (fig. 35) is patched between
the amplifier’s stages, like in the real things and the sound is really close to the
very particular one of the spring, use it specially on clean non sustained sounds.
27
Chapter 5 Post FX Module
5.1
Parametric Eq
This parametric Stereo digital equalizer is the first of the Post FX (fig. 36)
modules encountered by the signal. This is a precision stereo digital equalizer that it’s used to finely tune the modeled sound after all of the Amplifier
simulations.
fig. 36
Treat it as a high end digital Eq you may find on a mixing console, a very
flexible processor that can perform both subtle adjustments on the sound or
completely change it with heavy and drastic equalizations.
The Eq consists of three identical sections that works exactly in the same
way, their frequency range can even overlap, and this allows for really drastic equalizations.
Each section (fig. 37) is a peaking type filter with adjustable bandwidth.
Gain (G):
Frequency (F):
fig. 37
Bandwitdh (Q):
Sets the amount of gain of the selected band, from
–15 to +15 dB.
Sets the center frequency of the selected filter. From
50 Hz to 17 KHz.
Determines the bandwidth of the selected filter, from
very wide (fully counterclockwise) to very narrow
(fully clockwise). Wide settings are less noticeable
and more musical, while narrow settings deliver
weird effects and can be creative as well.
A Level control is also provided in order to compensate for the level change
caused by an heavy equalization curve. This way you are able to switch the
Eq in or out with the automation obtaining the desired level in both the conditions.
Use the big Red button on the right to engage the unit (fig. 38).
fig. 38
5.2
Stereo Delay
A stereo delay effect unit is provided after the parametric equalizer.
This delay delivers a digital crisp and clean delay effect that can add a lot of
space to the sound.
Four types of delay are provided (fig. 39):
fig. 39
28
Mono:
Stereo:
Stereo Multi Tap1:
Stereo Multi Tap2:
normal center delay, with analog emulation filters
alternate Left and Right delays
alternate Left, Center and Right delays
stereo delay with a very little time difference
between L&R.
5 - Post FX Module
These are the controls available for the Stereo Delay (fig. 40):
Mode:
Determines the working mode / algorithm of the
delay, see above.
Delay:
Sets the delay time of the effect. From 2 milliseconds to 1 second.
Feedback: Determines the number of repetitions. Full clockwise gives a
sustaining effect.
Level:
Determines the amount of the delay. Fully counterclockwise is
dry, no effect, fully clockwise is only delay.
fig. 40
Use the big Red button on the right to engage the unit (fig. 41).
fig. 41
5.3
Stereo Reverb
This is a classic high quality hall reverb that can be found in high quality
professional effects units.
fig. 42
Very useful for adding space and dimension to the sound, it’s completely
different in terms of timbre from the Spring emulation in the AmpliTube™
amplifier stage.
The Stereo reverb has these controls (fig. 42):
fig. 43
Rev Time: Controls the length of the reverb tail. From 0.3 to around 10 sec.
,
- depends on the “density” setting too.
Density: Sets the average time between the reflections. Determines how
“thick” is the reverb.
Level:
Determines the amount of the reverb. Fully counter
clockwise is dry, no effect, fully clockwise is only
reverb.
Use the big Red button on the right to engage the unit (fig. 43).
5 - Post FX Module
29
Chapter 6 General AmpliTube™ control/display
6.1
Input Level
The input signal level (fig. 44) is very important in AmpliTube™ because the
preamplifier stages are physically modeled after real circuits, where the
signal level is affecting the timbre that’s produced.
Always check the three LEDS labeled “Input Level” on the right top corner of
the interface.
- the yellow one shows that a too little signal is present, from - the green one tells that the signal is OK
- the red one, that should light only occasionally, shows that the input is
close to overload.
AmpliTube™ does not have an “input level” knob, because it’s very important that the level is actually good at the analog to digital converters in the
audio system.
If the level is too low the input the A/D converters will work with a lower
resolution and the sound will not be as good as it could be, if it is too high
there will be clipping even with AmpliTube™ clean settings.
fig. 44
During normal playing the green LED should be the one that lights most
often.If the yellow one is lighting most often then increase the gain of your
preamplifier or audio card break box; if the red one is blinking reduce it slightly.
6.2
Gate
The very first stage of AmpliTube™ is the noise gate (fig. 45).
fig. 45
It is an ultra fast noise gate that is able to cut the input of AmpliTube™ when
the signal is lower than a certain threshold. This eliminates the noise background typical of the guitar pickups / preamp system when the instrument
is not playing.
Very useful at high gain settings because, being placed before the amplifier,
it can effectively clean up the signal during the silence parts of the performance.
Start by setting the Gate knob fully counterclockwise. This completely
bypasses the Gate, because the threshold is set at the minimum, which is a
very low signal level.
You can check the Gate action by watching the red LED positioned near the
Gate knob. When the Gate closes the LED lights. During normal play the LED
should always be off, and should light only when the strings are not vibrating, showing that the gate is closed.
30
6 - General AmpliTube™ control/display
We suggest leaving the Gate OFF (fully counterclockwise) unless you notice high background noise from the guitar signal. In that case try to slightly
increase the gate knob up to a point where the LED lights and the Gate cuts
the input.
6.3
Output Level
This is the main output level of AmpliTube™ (fig. 46), it has a very wide range
and has to be used to set the output level of the various AmpliTube™ presets.
Depending on how AmpliTube™ is set the level can be quite different at the
Post Effect outputs, that’s why this control is very useful.
Pay particular attention to the driven / distorted sounds - they must absolutely not clip within the sequencer Mixer because the AmpliTube™ distortion
must be followed by an clean audio path, otherwise the digital clipping will
corrupt the AmpliTube™ sound, causing heavy degradation of the overall
quality.
fig. 46
The optimal value for this knob is where the AmpliTube™ output signal (you
can check it on the level meter of the Sequencer mixer) is as close as possible to 0 dB but not clipping, for the setting you’re using.
6.4
Module Bypass
Each AmpliTube™ module (Stomp, Amp, Post FX) can be independently
bypassed (fig. 47).
This can be very useful to only bypass the stomp section, for example, or to
use AmpliTube™ as a multi-effects unit bypassing all the Amplifier stage.
fig. 47
To Bypass a module click on the “BYPASS” button that’s on the left of the
module selection buttons, the module that will be bypassed is the one that’s
currently selected.
6.5
Presets
AmpliTube™ comes with a large collection of ready to use high quality presets. They’re organized into main categories:
- Amp
Brand new sounds created just for AmpliTube™, with references
to the best guitar amplification systems ever made.
- Bass
Presets good for bass too!
- Multi FX Stomp and Multi effects only.
- VIP
This is dedicated to famous guitarists and it’s filled with presets
that aims to recreate their typical tones, whenever this is possible, of course!
6 - General AmpliTube™ control/display
31
Chapter 7 Support
7.1
Support
For any question you may have please refer to the FAQ at:
http://www.AmpliTube.com/FAQ.html
where you'll find answers to the most common questions.
For free support write at:
[email protected]
7.2
User Area
Together with your authorization code you've also have received a user id
and password to access your personal user area on AmpliTube™' website.
The personal user area is an advanced online service provided to you by IK
Multimedia. It allows you to download patches and updates or to generate
new authorization codes in the event that you accidentally lose the previous
ones.
To access your personal user area, simply go here:
https://www.ikstore.com/Login/IKLogin.cgi
32
7 - Support
In the personal user area you can:
1) Request a new authorization code
This is useful for users who need to reinstall their applications with a
new authorization code. The codes are supplied immediately with no
need to wait before receiving them.
2) Submit a support request
Support requests received using this form will follow a preferential line
and will be answered first within our standard 24 hours lead time (busi
ness hours).
3) Edit your personal and product data
Here you can manage all your personal and product data and recall your
serial numbers easily.
4) Download software updates and free contents
According to the products you've registered, here you'll find the latest
patches/updates and free contents to download.
5) Customize your Username/Password
Here you can change your Username/Password in order to remember
them easily.
7 - Support
33
AmpliTube™ is a trademark of IK Multimedia
www.ikmultimedia.com
www.amplitube.com
IK Multimedia Production
Via dell’Industria 46 - 41100 Modena Italy
tel +39 059 285496 fax +39 059 2861671
[email protected]
All specifications are subject to change without further notice.
©2003 IK Multimedia Production
All other trademarks are property
of their respective owners.